When playing Awakening – The Skyward Castle, it is certainly frustrating when you are stuck on a puzzle, perplexed by a mini-game, or if you have lost your way during your quest. This walkthrough of The Awakening – The Skyward Castle will help you uncover the hidden items, games, and winning strategies needed to conquer this highly addictive and fun online puzzle game. Travel through four levels of hidden object games and mini-puzzles, while collecting objects to defeat the magical and ancient evil of Dreadmyre that holds the kingdom hostage from Princess Sophia.
Contents
General Tips & Tricks
Basic Gameplay
The interaction with the game is relatively simple; click on necessary items or key elements in each area until you have reached the ultimate goal of saving Princess Sophia’s kingdom. This is done by solving a series of actions that follow the story line, such as hidden puzzles, multi-puzzles, and item collections. There is a hint icon (represented by the owl) on the screen that you can use throughout the game when you do not know where to go next or simply refer to this easy to follow walkthrough.
General Tips
The following inside list of information will help you to navigate your way through your quest:
- Cursor Status-When the curser icon changes from an arrow to a hand, the object can be interacted with or picked up. When the magnifying glass appears it will aid you in getting a closer look at the area. This is helpful for retrieving items from hidden areas such as the inside of boxes, items in the distance, and items that are covered by other items.
- Player Set-up-When beginning the game, select the appropriate level of experience that best fits your ability.
- Inventory-When an item is collected it is immediately stored in your inventory until needed to clear an area or solve a puzzle.
- Journal-It is wise to rely on the journal to go over the clues that you have collected to help navigate through some areas.
- Hints-Use the hint button to point out which direction to go next or which action is necessary to unlock the area or item.
- Collectables-It is often necessary to collect an item or items during the quest through the area to solve a puzzle or unlock a hidden area.
Playing Tips and Tricks
- Use the map to find your way if you get lost. It is located on the bottom right, next to your inventory bar.
- There are no limit to the number of hints that can be given during play, but you must wait for the hint meter to fill up before using again.
- There is always a solution to every puzzle. Many of these puzzles and mini-games are randomized for optimum entertainment.
Awakening – The Skyward Castle Walkthrough
Part One: Landsong Village
This story begins with Princess Sophia and her unicorn getting caught in a storm and her unicorn has suffered an injured wing. On the opening screen you will need to heal the unicorn by clicking on the Splint. The area near the pile of wood on the right contains a Pocket Dragon for you to collect. It is automatically added to your inventory where you can select it and use it to start the pile of wood on fire.
Next, explore the unicorn itself, to open up a hidden object game. You will finish the puzzle when you find the hidden items that are highlighted in yellow on the list. As you collect items, you will notice that some items will immediately be entered into your inventory and others require additional movements or actions. Add the medical items that you find to the first aid kit.
Clik here to view.
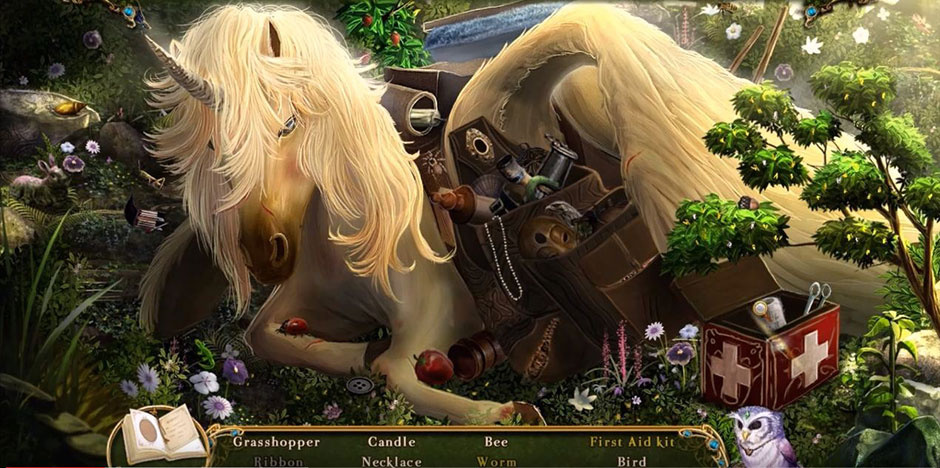
Awakening – The Skyward Castle – Unicorn
Select the splint from your inventory and mend the broken wing. Collect the Sunsky flower and bandages. Click on the pathway to start your journey.
As you enter the next area, you catch the villain in the act of turning a young girl to stone.
Click on her and hand her the flower to break the spell. Break off the Goldleaf Branch and use it to uncover a hidden game on the lower left of the screen. Collect the Jeweled Emblems buried here and uncover a hidden puzzle. Use the curser to select the area in the background where the path leads to the stone walkway to progress.
Find a Corkscrew behind the dead vines by utilizing the Pocket Dragon. Click on the right to reveal a jewel game. Match the jewels from your inventory to the small pattern on the right of the puzzle by moving the pieces around.
Clik here to view.

Awakening – The Skyward Castle – Jeweled Emblems Solution
Solving this puzzle allows entry to two new areas.
In this area you will find a pair of gloves and a slimy pipe. The Goldleaf Branch will be useful in prying this open to reveal Keys. Collect Photos from the stone pillar.
Return to the Crystal Generator area.
Collect the Empty Oil Can and complete the puzzle within the door.
Clik here to view.

Awakening – The Skyward Castle – Portcullis Pieces Solution
Solving this slider puzzle will open the gate and allow you to enter the next area to be conquered.
Collect a Quilt Patch and encounter a Rusty Chain. Enter the area of the Enginarium to find Switches and a Crowbar. Use the Key in the upper right to unlock the panel. Collect the Skirting and use the Crowbar on the lower portion of the doorway. Click on the Treasure Box to reveal a Hammer and Nails to repair the wobbly ladder and break the wall to reveal the final Switch for a Crowbar and access to the next area.
Collect the Shovel. Move the cursor to the Oil Drum and select your Corkscrew to take the cork out of the top of the barrel. Use the Oil Can on the pump to earn you a Filled Oil Can.
Move the loose panel on the box to reveal a key hole. Use your Keys in the keyhole to reveal a hidden puzzle game. Complete this matching hidden item game to earn yourself a Repair Manual.
Return to the courtyard and oil the Rusty Chain. Travel back to the Ancient Goldleaf area. Return to the area where the mini-puzzle is located; under the tree on the right.
Use the Shovel to uncover thorny brambles. Remove the brambles with the Gloves, open the grate using the Crowbar, use the pocket dragon to burn the dead branches. Collect the quilt patch, machine parts, torn up paper, and a mini jigsaw puzzle to earn a Schematics Page. Return to the Enginarium and place it in the Book.
Clik here to view.
Awakening – The Skyward Castle – Jigsaw Puzzle
Use the Manual to repair the broken control panel by following the instructions.
Click on the square fuse area to reveal another hidden puzzle.
Pull the Lever to pull the floating island to your island. Return to the Fairground Entrance area and remove the debris blocking the path.
You will collect Safety Locks and then take the Chain from your inventory and connect it to the Winch to open a slider puzzle.
Clik here to view.
Awakening – The Skyward Castle – Slider Puzzle Solution
Activate the Winch to raise the wood pile. This will uncover a Lever for your inventory.
Move on to the next area to be explored where you will collect such things as a Clippers and a Bamboo Pole.
In the next area you will find a hidden objects game in the scaffolding.
Completing this puzzle will award you the Clippers to take down the bamboo scaffolding to earn you a Bamboo Pole.
The next place that you will visit is the Weaver’s Hut where you will need to activate the Candle with the Pocket Dragon. Select the rattan basket to play the mini game.
Clik here to view.
Awakening – The Skyward Castle – Weave Puzzle Solution
This will award you Rattan Sticks, Dustpan and Broom, and Rags. Exit to the large statue.
Collect the Quilt Patch, use Clippers to cut the rope and travel back to the Squabbit’s den. Clean up with the Dustpan and Broom to reveal a hidden object challenge.
This will award a Bunch of Carrots to give to the Squabbit; return to the stone boy and use the Squabbit to break the spell. Collect the Quilt Patch and proceed to the Weaver’s hut.
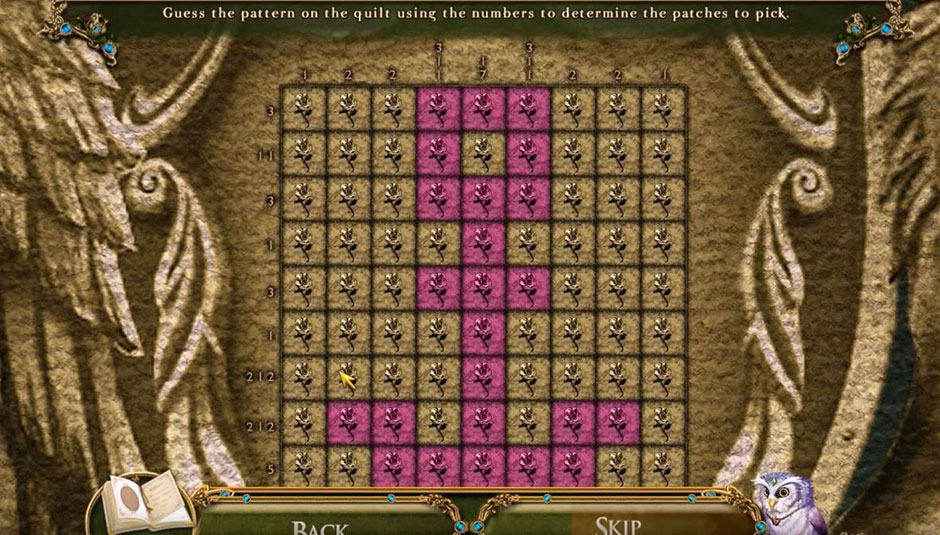
Use the Quilt Patches to complete the mini-game.
Clik here to view.
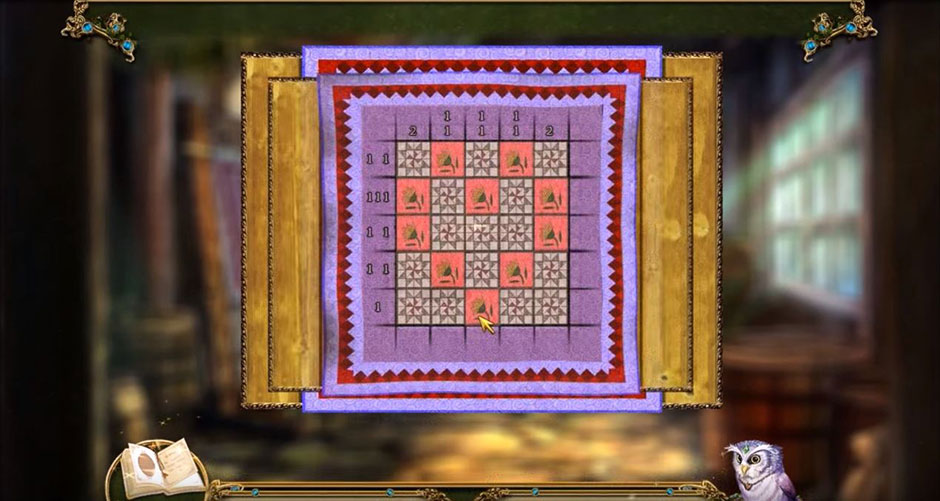
Awakening – The Skyward Castle – Magic Quilt Solution
Collect the Pocket Watch and utilize the map to travel back to the Wingferry area. Use the Pocket Watch on grandpa to receive the Screwdriver. Use the map to travel quickly to the Faire of Stairs.
Use the Screwdriver to get the Lantern Diagram, use the Rags on the cobwebs to create Sticky Rags on a stick. Play the mini game on the statue mechanism.
Clik here to view.

Awakening – The Skyward Castle – Plug Puzzle Solution
Return to the window to collect the Craft Paper. Place the Lantern Diagram, the Craft Paper, and the Rattan Sticks on the worktable. Select one of these items to activate a mini-game.
Clik here to view.
Awakening – The Skyward Castle – Latern Puzzle Solution
Use the Candle to light the Lantern. Go back to the statue and place the Star Lantern in the forehead area and take the crystals back to the Crystal Generator by utilizing the map feature.
Actions in this area include: put Sky Crystal into holder, use Oil Can on three drums, useBamboo Stick on winch, use rope on left winch, collect the Pumice, place Sky Crystal in holder, use Pumice on reflector to reveal a hidden object game.
Select the Crystal for another mini-game.
Return to the Enginarium to complete the Wingferry.
Complete the Wingferry with the Lever and launch into the next area to be conquered.
Part 2: Cloud Court
As you enter this area, take note of the unicorn and the gate on your way up the path.
In the barracks entry area go to the Castle bridge and engage the mini-game while noting the barracks gate and the Stone Chest.
Click on the gate to activate the mini-game where you have to match the symbols to the pattern provided.
Clik here to view.
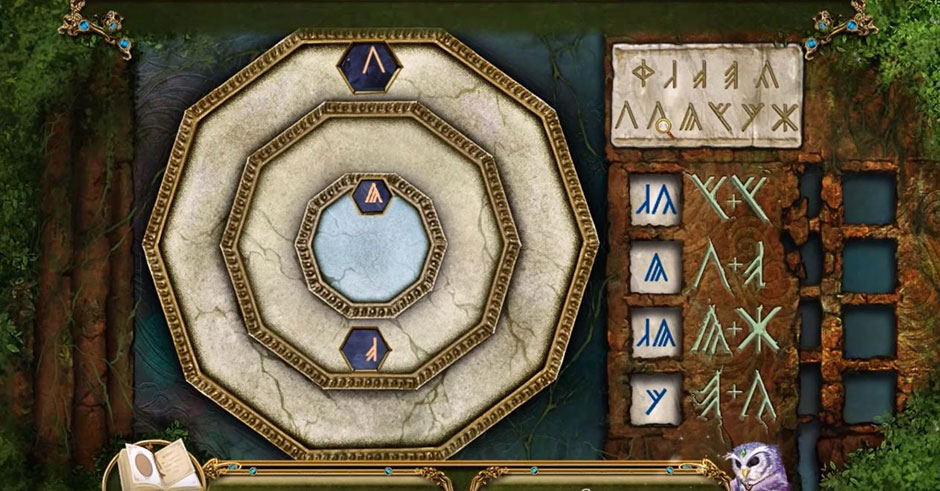
Awakening – The Skyward Castle – Symbols Solution
Proceed forward and use the Pocket Dragon on the vines to the right to collect the Old Key and use it on the cabinet to collect the Oak Ring.
Return to the Castle landing and the Briar gate. Place the Oak Ring on the door to trigger the mini-game to open the next area.
Clik here to view.

Awakening – The Skyward Castle – Discs Solution
Enter the High gardens and take notice of the items in the area such as the greenhouse, the Crystal Lattice, and the Petrified Faun that is located by the Giant Goldleaf Oak.
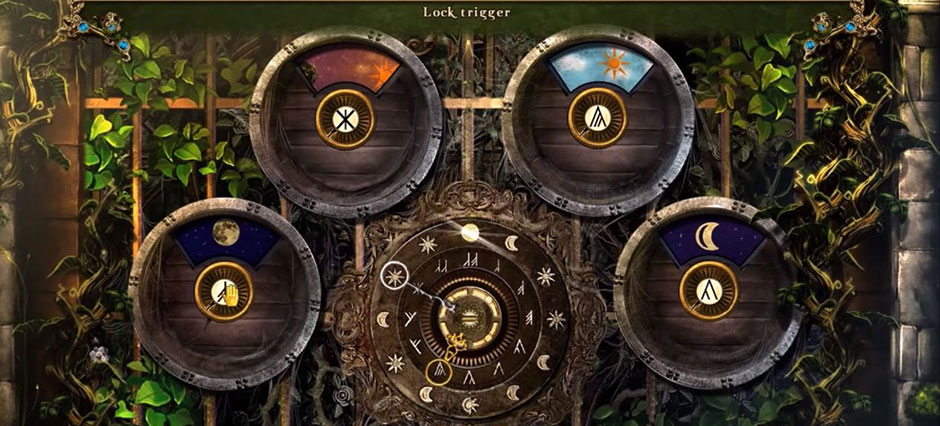
Collect Gemstones, Stone Tablet Piece, Greenhouse Key, and Quilt Patch. Use the Greenhouse Key to activate a mini-puzzle.
Clik here to view.

Awakening – The Skyward Castle – Lock Trigger Solution
After conquering that mini-game, continue up the path to solve a hidden object game on the garden shed.
Flip the switches to activate the flowers and match them to the ones indicated to earn aGarden Shears.
Use the Garden Shears to cut the vines and collect the Gemstones from the shed.
Travel to the Crystal Lattice and collect a Gemstone and Stone Tablet. Use the gemstones in the panel to activate a mini-game.
Clik here to view.
Awakening – The Skyward Castle – Gem stone Solution
Collect the two Stone Tablets that flank the stairs and travel to the Barracks using the map feature. Go to the stone chest with the tablets to activate a mini-game of changing tiles.
Solving this puzzle will award a Broken Hilt and a Torn Book. Return easily to the Giant Goldleaf Oak with the map.
Give the faun the Torn Book to receive a Scroll of Medicinal Herbs to take to the greenhouse area where you will enter the shed.
Leave the Scroll on the table and take on the mini-game in the egg crate to earn the Cockatrice Egg to give to the faun.
You will then earn the Barracks Pass; use the map to travel back to the Barracks area.
Complete the tile swap puzzle to gain entry to the next area.
Clik here to view.
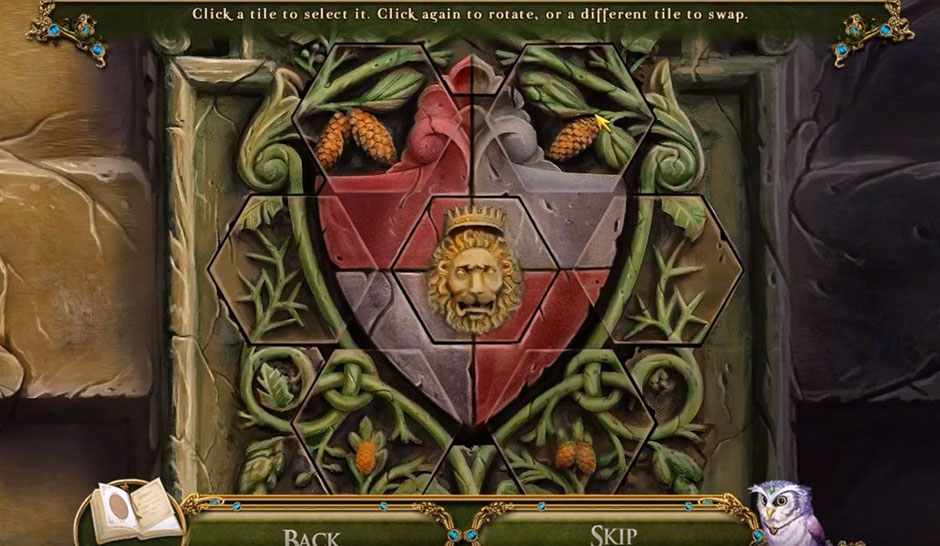
Awakening – The Skyward Castle – Tiles Swap Solution
Enter the courtyard and use the Broken Hllt to gain the Rusty Sword. Use Rusty Sword on door lock to enter the armory.
Clear items from your inventory; put the Handle on the Pump, put the bottle on the shelf, put the tip on the spear, put the metal into the casting pot, place wood under Casting Pot, use Pocket Dragon to light fire, select a vat, put horseshoe in closet, put swords on shield, add riding crop to whip, use tongs with the mold, enact the hammer and gloves with the anvil, and add nails to frame. Earn Incubator Parts and Grease.
Proceed to the courtyard.
Use the Grease on the gears of the ballista. Move the lever to start a mini-game.
Completing this puzzle will gain entry into the windmill.
Clik here to view.
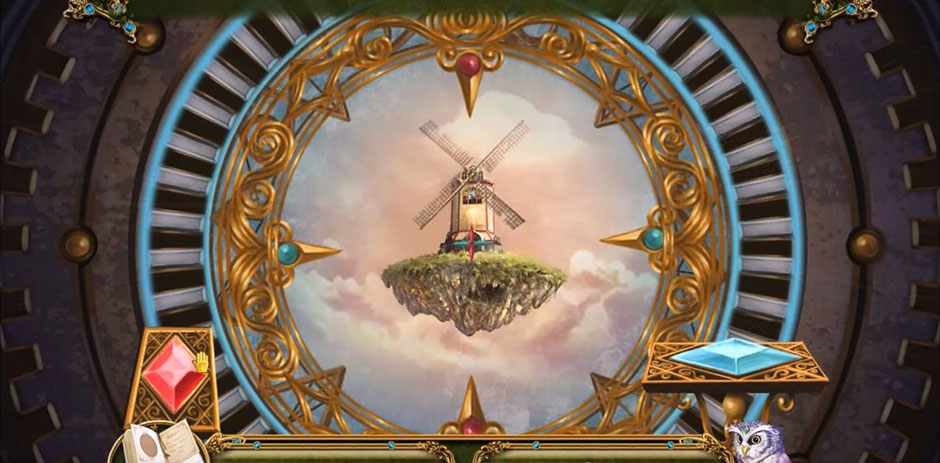
Awakening – The Skyward Castle – Windmill Puzzle Solution
Here you will use the Rusty Sword to remove boards (strike four times). Enact the Pocket Dragon with the chain and then go through the hole in the floor.
In this next area, you will collect a Sandbag and Soil Conditioners.
Return to the Barracks entryway and use the Sandbag with the hook to get into the Barracks.
Enter the area and collect the Crusty Chainmail, Sand Bucket, Quilt Patch, and Soil Conditioners. Solve the hidden object puzzle in the scrap metal pile.
Use the key to open the chest where you will find a helmet, a sword, and remove the cloth cover to collect the Round Whetstone before progressing to the Armory.
Put the Round Whetstone in the stand and then the sword on the stone. Use your mouse in a circular motion to make the wheel go around to earn a Sharp Sword.
Travel back to the windmill and go through the hole in the floor. Use the Sand Bucket to pick up the pile of sand.
Put Chainmail in the bucket and move mouse back and forth to shake. Earn Chainmail and return to the Barracks.
Place the Sharp Sword and Chainmail on the cursed captain to gain information. Select a locker for a mini-game.
This mini-game rewards you Incubator Parts and Soil Conditioner. Approach the faun to receive Medical Notes and Herb Seeds for the shed by the greenhouse.
Enter the shed and put the Soil Conditioners on the table and put the Herb Seeds into the flowering pots to activate a mini-game.
Complete the mini-game by following the formula on the planting pots.
Clik here to view.
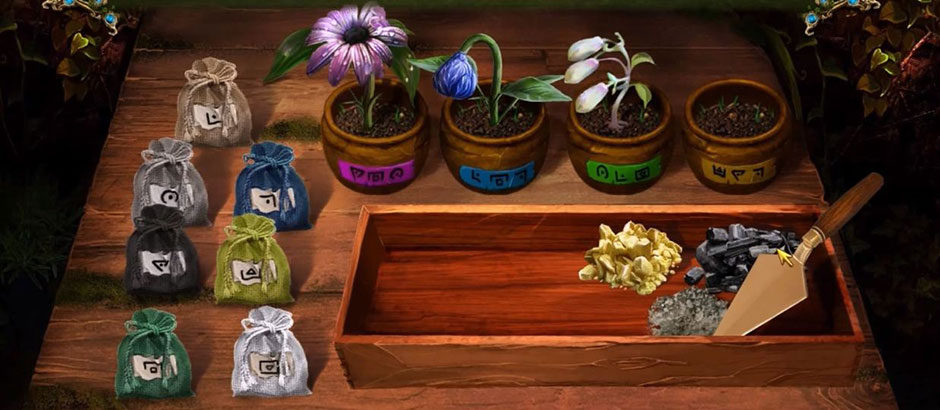
Awakening – The Skyward Castle – FloweringPotsPuzzle
Finishing this planting will earn Herb Saplings.
Activate the incubator by placing in the Herb Saplings.
Complete all three of these twisters to earn the Sunbright, Sparkleleaf, Dewglint, and Sapphirebud. Move on to the Windmill.
Clik here to view.
Awakening – The Skyward Castle – Twister Puzzle Solution
Check out the Alchemy work station for actions.
The Pocket Dragon will light the burner, put Sparkleleaf, Sapphirebud, Sunbright and Dewglint into dishes. Putting the Medical Notes on the bulletin board enacts a mini-game.
Image may be NSFW.
Clik here to view.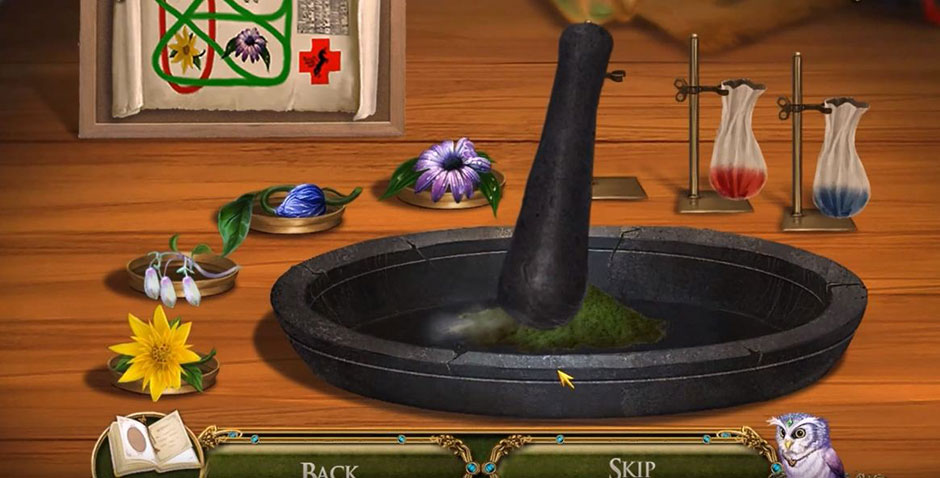
Mix the herbs, put them in the pan, and earn Healing Poultices to take to the castle landing.
Heal the unicorn with the Healing Poultices and select the Aviary from the map’s upper right. Go to the entrance for a mini-game.
Rotate the pieces of this puzzle to gain entry into the Aviary.
Image may be NSFW.
Clik here to view.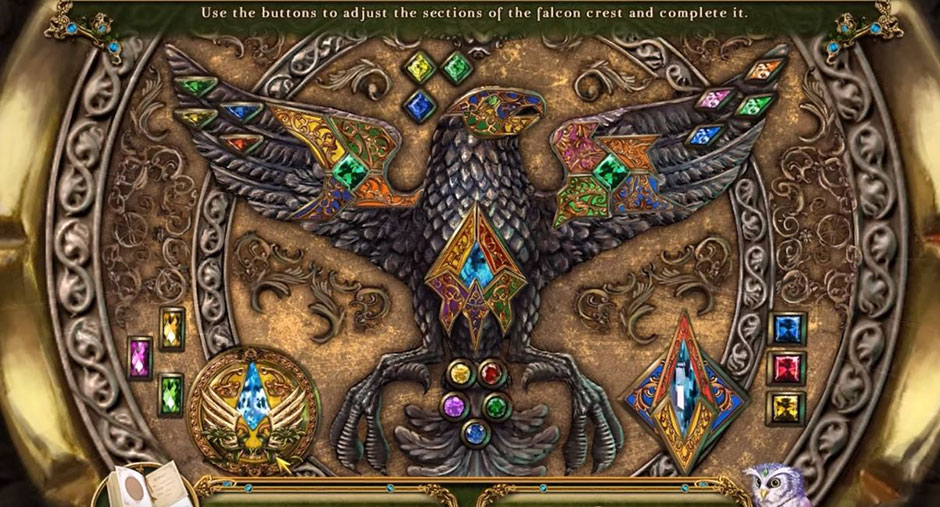
Enter the Aviary and collect Bird Feeders and a hidden object game in the storeroom.
Locate the many items on the list to obtain Incubator Parts and the Handle. Travel to Windmill-Crystal Forge using the map.
Collect the Gaff Hook, Quilt Patch, and information on the clipboard.
Locate the required items to earn Windmill Spurs for the Gear Room.
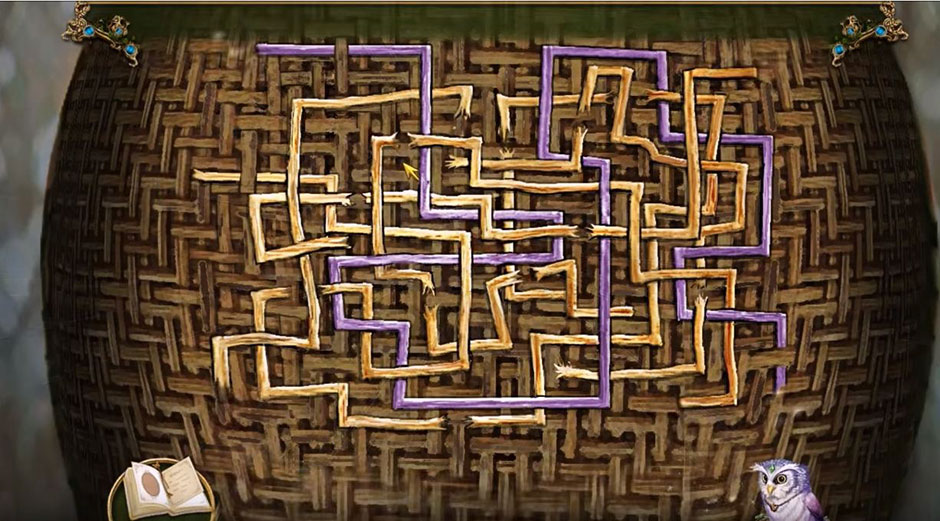
Use the Handle to open the box and the Windmill Spurs to open a mini-game.
Connect all of the gears from top to bottom and earn the Broken Bow. Take it with you to the Crystal Lattice.
Earn the Bronze Grapes by utilizing your Gaff Hook. Go to the Giant Goldleaf Oak to use the Bronze Grapes to trigger a mini-game.
Clik here to view.
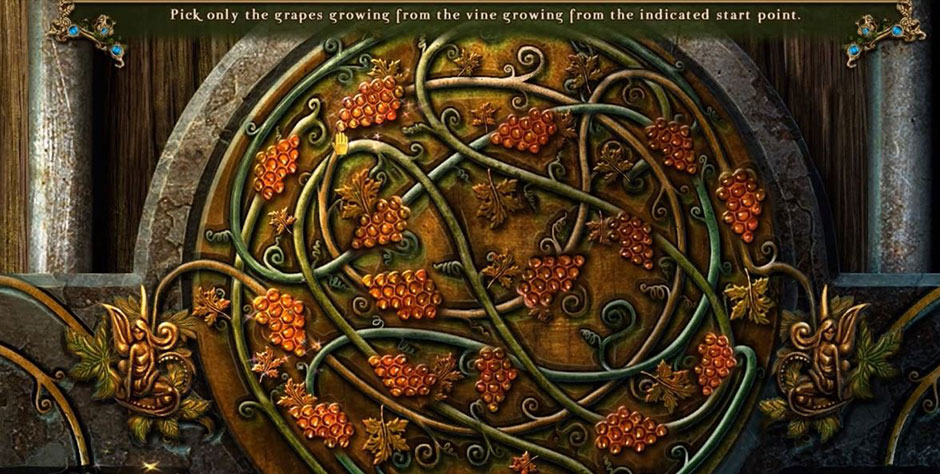
Awakening – The Skyward Castle – Grapes Solution
Earn entry to the Vineyard with this puzzle.
Use the Pocket Dragon on the door. The water pumping controls are the mini-game.
Solve the mini-game by rotating the pipes.
Clik here to view.
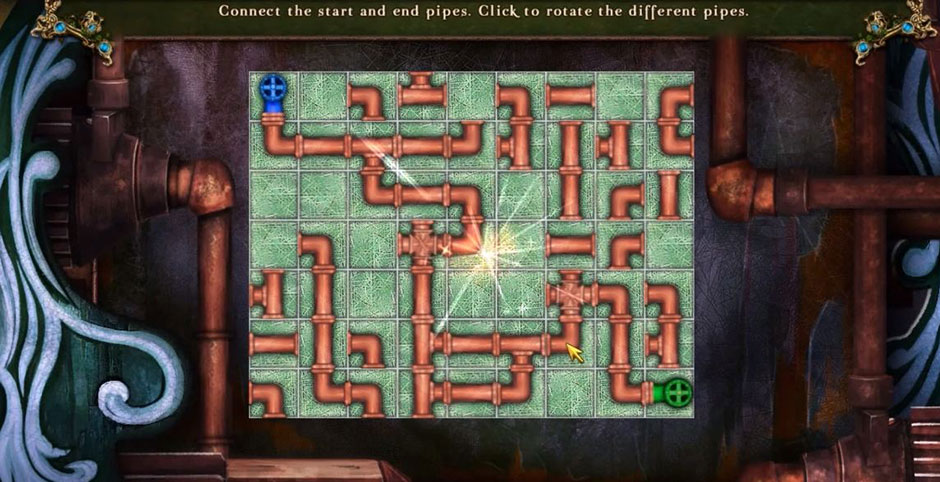
Awakening – The Skyward Castle – Pipes Puzzle Solution
Use the Gaff Hook on the blue key to enact a hidden object puzzle.
Locate all of the items to earn a Weapons Cabinet Key to take back to the Barracks Courtyard weapons cabinet.
Use the Weapons Cabinet Key to earn Dragon’s Tooth and open the cabinet. Put theBroken Bow on the table, the Goldleaf Branch in the stand, and use the saw on the branch for another mini-game.
Complete this game by drawing pattern lines on the bow.
Use your inventory items to complete this puzzle and earn the Goldleaf Bow.
Clik here to view.
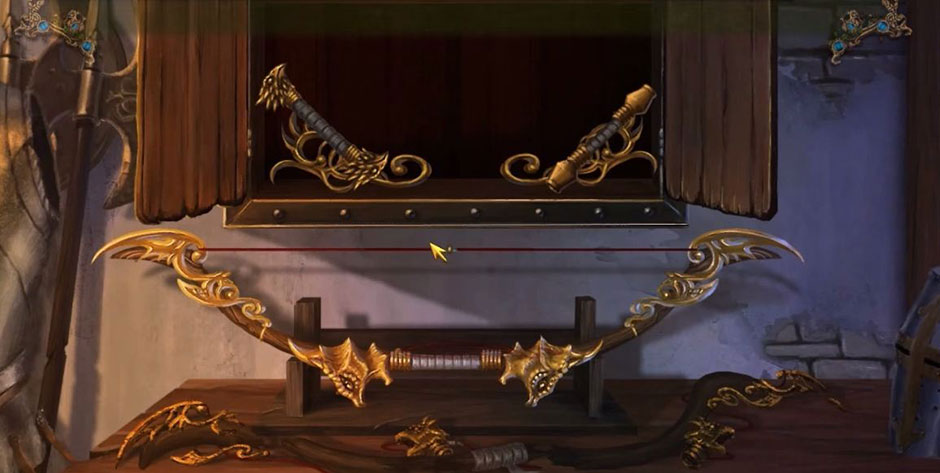
Awakening – The Skyward Castle – GoldLeaf Bow Solution
Travel to the Cliffside Caves.
Collect and use the Pocket Dragon on the tapestry, collect the Quilt Patch, Dragon’s Teeth, and Arrows. Put arrows and bows together to make Bow and Arrows to use on the tapestry for a mini-game.
Clik here to view.
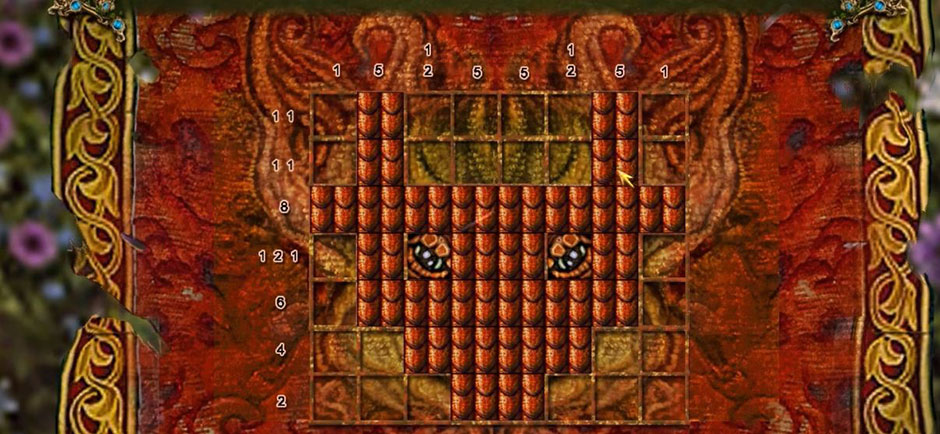
Awakening – The Skyward Castle – Dragon Tapestry
Collect the Dragon’s Tooth and move to the next screen to open a mini-game with the Broken Brazier.
Drag puzzle pieces in place to solve. Use the Pocket Dragon on the corn to earn Popped Sablecorn and Dragon’s Teeth.
Clik here to view.
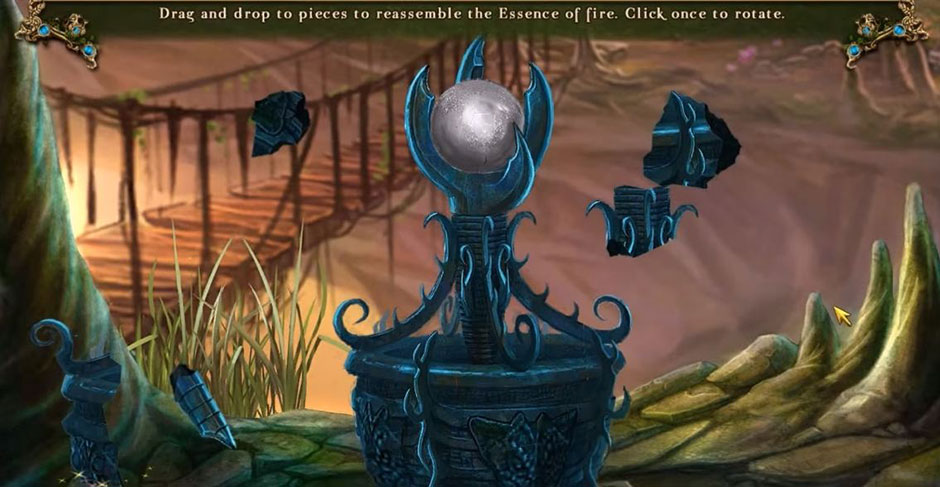
Awakening – The Skyward Castle – Essence of Fire Solution
Go to the petrified dragon and insert the Dragon’s Teeth.
Use the Pocket Dragon on the bulb with the Incubator Parts to begin a mini-game.
Place parts into incubator with the Cockatrice Egg to earn Essence of Fire and Cockatrice Chick.
Collect the Spyglass and then travel to the Windmill alchemy table.
The bulletin board is a hidden object game that will reveal a formula.
The formula in the book holds the key to a mini-game.
Use the Popped Sablecorn with the potion and the Cockatrice Chick on the bowl; exit this screen and the next screen to the big tree.
Hang the Bird Feeder with Popped Sablecorn on the branch. Go to the Castle bridge and hang a Bird Feeder and add Popped Sablecorn in it. Go ahead to hang another feeder on the lamppost and fill it with seed.
Utilize the map to return to the Windmill and Crystal Forge to enact a mini-game using the Essence of Fire.
Clik here to view.

Awakening – The Skyward Castle – Crystal Solution
Earn the Ballista Bolt Head and traverse to the Barracks Courtyard.
Use the Spyglass and Ballista Bolt Head on the ballista to spark a mini-game.
Spot and eliminate the 12 targets to advance to Chapter 3.
Part 3- The Skyward Castle
Enter the doors to retrieve an Apron and a Kitchen Knife. Light the Wall Sconce with the Pocket Dragon and take the Torch.
Zoom in on the pillars to reveal a hidden object game.
Click on the Artisan’s Satchel to open it to get the Charcoal and use it and the Paper on the pillars.
Conquer this puzzle to trigger a simple mini-game and clicking on the wooden plaque holds another mini-game.
Clik here to view.
Awakening – The Skyward Castle – Wooden Plaque Solution
Earn a Cipher Key Fragment for completing these puzzles.
Collect such things as Cipher Key Fragments and a Broken Chair Leg. Use such things as the Torch, Kitchen Knife, and Bow And Arrows to complete tasks. Zoom on the gate.
At the gate, collect the Cipher Key Fragment and use the fragments to unlock the door controls and to activate a matching type mini-game.
Clik here to view.
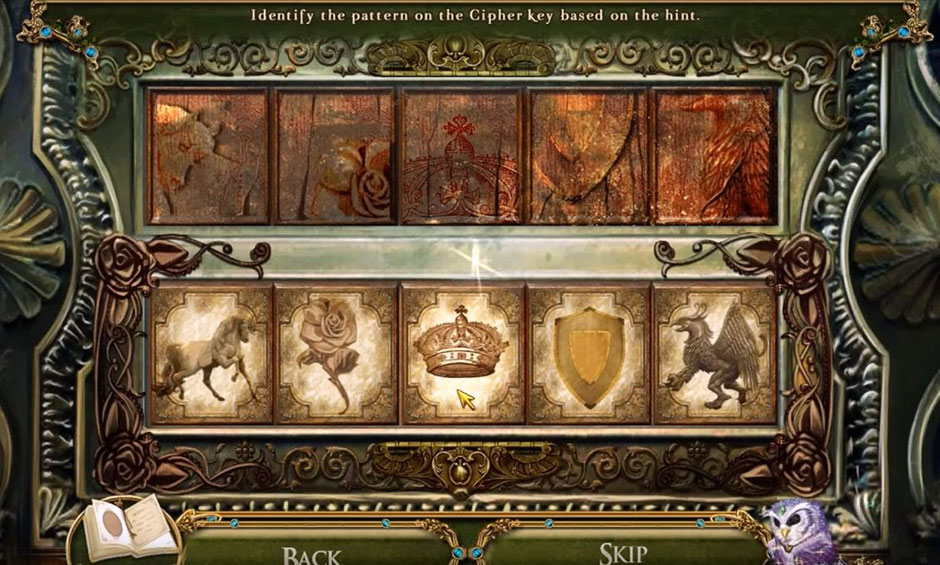
Awakening – The Skyward Castle – Cipher Key Puzzle
Match these tiles to gain access to the next area.
Zoom in on the sun painting and retrieve the Sun Emblem.
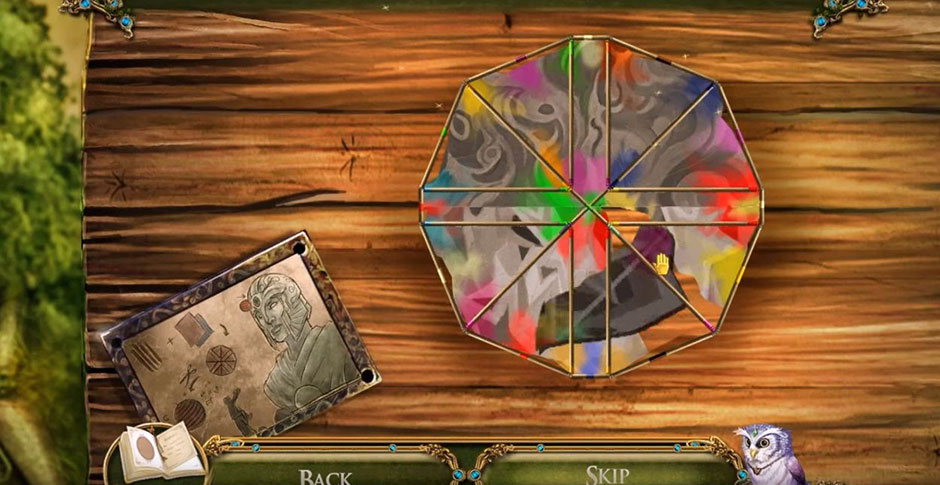
Select the door to the left for a mini-game of arranging colors.
Clik here to view.
Awakening – The Skyward Castle – Color Solution
Solving this puzzle will allow entrance into Sophia’s Bedroom.
Collect a quilt patch and two Runes. Zoom in on teddy bears for a mini-game.
Dress the teddy bears according to the photos and earn a Runes and the Doorknob.
Clik here to view.
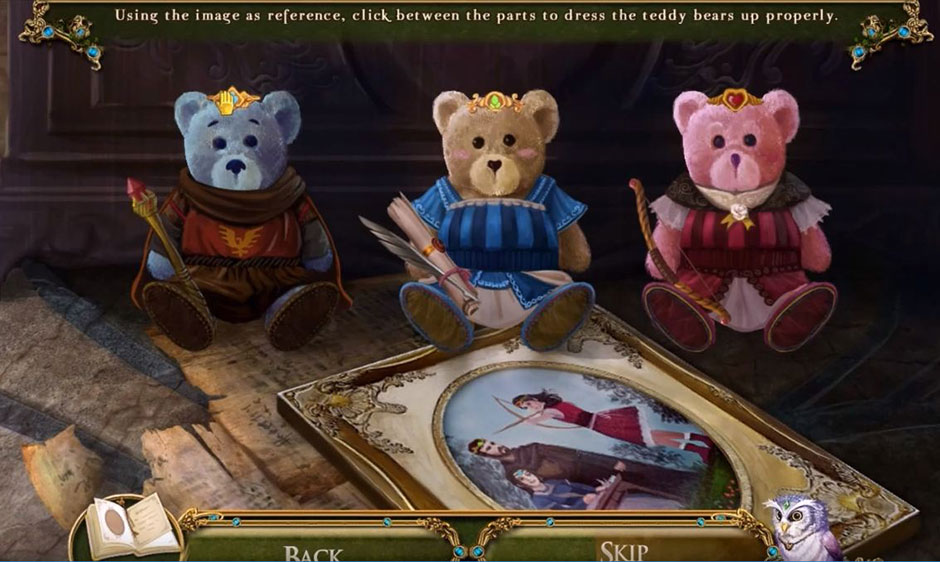
Awakening – The Skyward Castle – Teddy Bears Solution
Return to the previous screen. Use the Doorknob on the door at the far end. Click on the handle to enter the Cartographer’s Room.
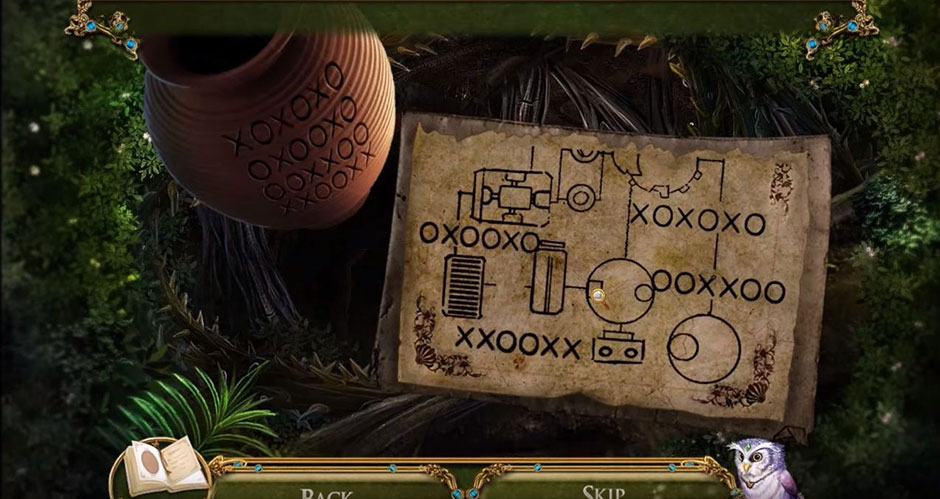
Click on the map in the center to activate a mini-game.
Clik here to view.
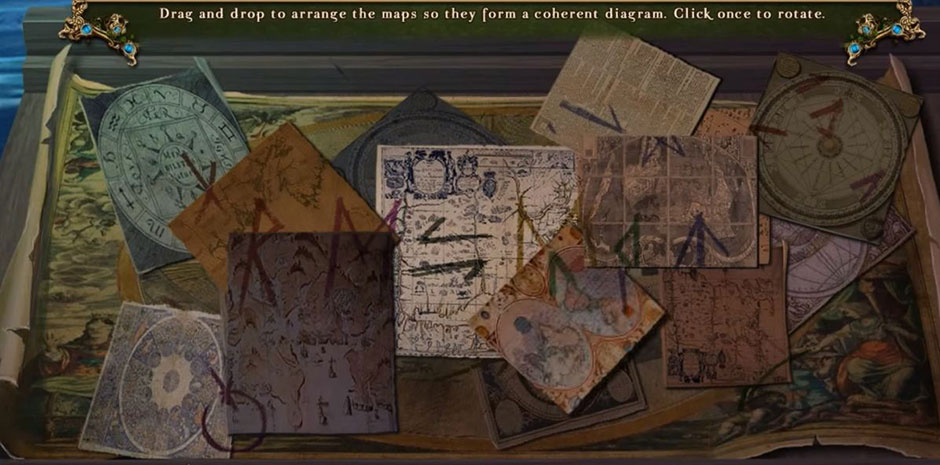
Awakening – The Skyward Castle – Diagram Solution
Arrange the pieces to form a diagram to recieve the Map Markings and the Loupe.
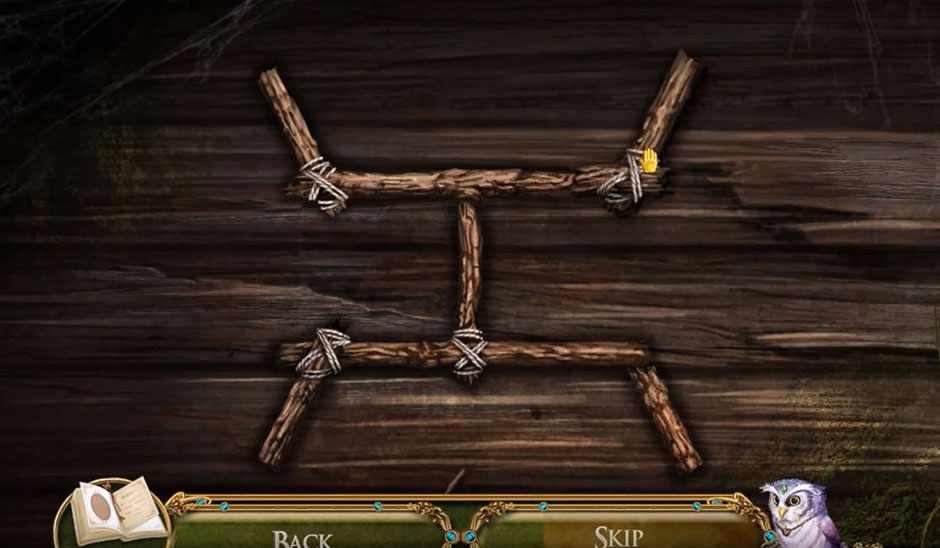
The star map on the far wall begins a mini-game. This game awards Runes.
Clik here to view.
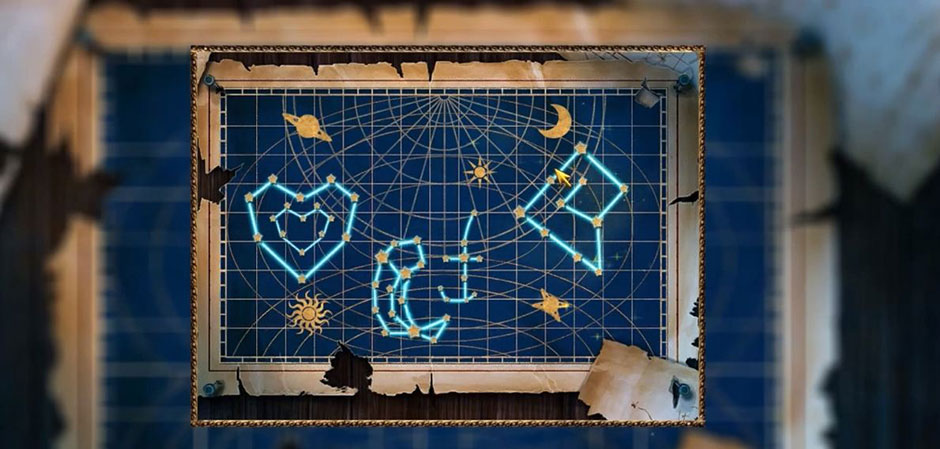
Awakening – The Skyward Castle – Constellation Solution
Collect the awarded Runes.
The book display hides a mini-game that awards a Compass Half and Runes from the carved figure before you return to Princess Sophia’s Bedroom.
The combination cheat for this puzzle is 1, 2, 6, 3, 5, 2, 3, 4, 5, 6, 1.
Zoom in on the mirror and use the Runes on the frame. Use the Loupe on the symbol to activate a mini-game.
Rotate the four rings to earn the Silver Star and then return to the main hall.
Use the Silver Star to unlock the door with aid of the key and enter the new area.
Collect the Constellations to add to your journal and use the Sun Emblem on the door to start a mini-game.
Move the dials to align the bird according to the example.
Clik here to view.
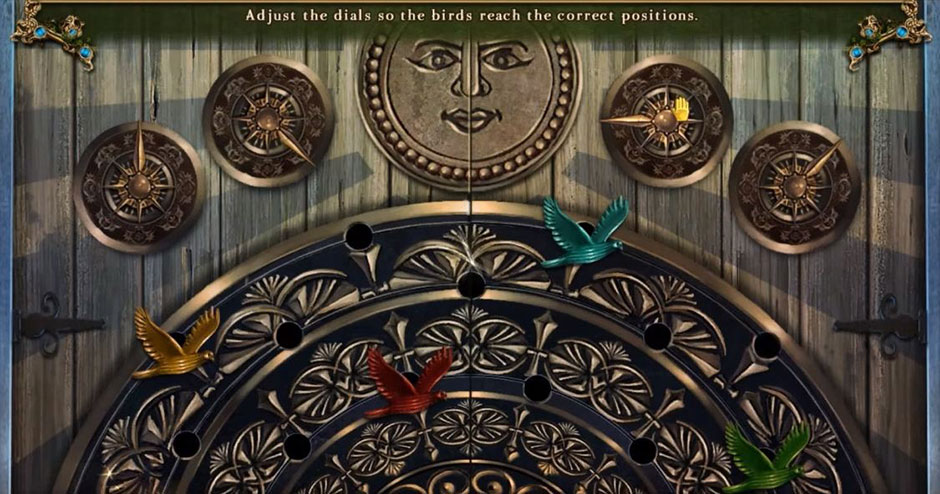
Awakening – The Skyward Castle – Bird Solution
Travel to the Wizard’s Retreat.
Collect a Quilt Patch and the Wax Tablet.
Zoom on the worktable and use the Pocket Dragon and the Wax Tablet on the mold to create a Wax Mold. Travel to Sophia’s Room with the map.
Go to the balcony and use the Wax Mold and the Pocket Dragon on the Worn Key to acquire a Key Mold. Travel by map to the Wizard’s Retreat.
Zoom in on the Worktable and use the Key Mold to turn the Frostbreath Resin and earn the Liquid Key Mold. The Specimen Case will give you the Frostbreath Key when you use the Liquid Key Mold. Travel by map back to Sophia’s Room.
Zoom in to see the wardrobe and use the Frostbreath Key to open it and enter. Begin a hidden object game by selecting the Dollmaker’s Stand.
Items on the list need to be found and then combined with other items to complete this puzzle.
The actions necessary for this puzzle are multiple and depend on each other.
Play a mini-game when you use the Triangle Chalk on the plans, Silk Cloth and Scissors to create a dress.
Collecting the Dress will activate another mini-game.
Clik here to view.
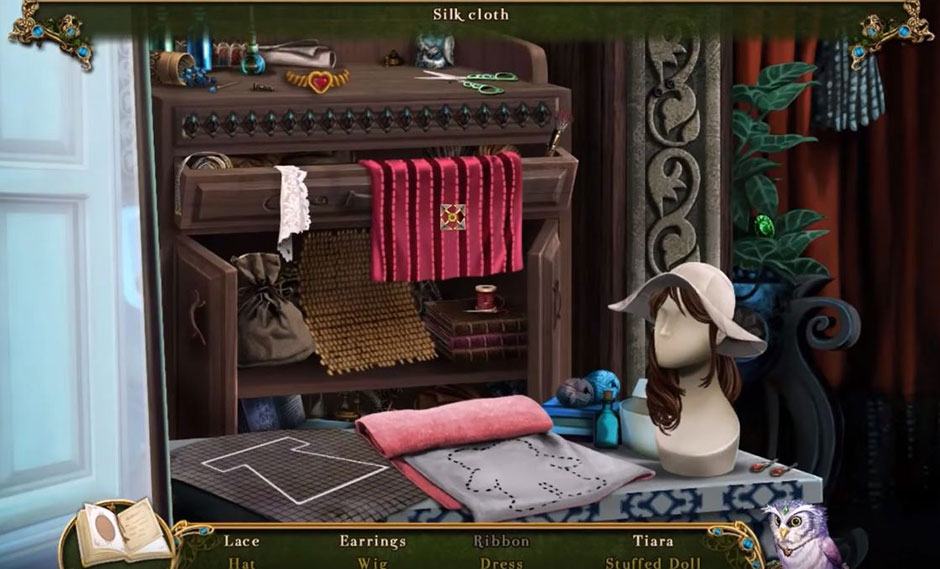
Awakening – The Skyward Castle – Create The Dress
Dress up this bear to earn a Quilt Patch and Compass Half. This will result in the formation of the Cartographer’s Compass. Use the map to speed to the Wizard’s Retreat.
Bring the cartographer back to life with the Cartographer’s Compass. He will award you the Solar Key. Go back to the long hallway.
Zoom on the Solar Door at the end of the room and utilize the Solar Key by clicking on it.
Move into the room and talk to the puppet on stage and click the Musician’s stand to start a hidden object game.
Finding all of the items on the list is rewarded with Music Sheets.
Use the map to go to the Walk-in Wardrobe.
The book on the bookshelf contains the mini-game and is activated by adding the music sheets.
Go to the puppet stage and use the Music Box on Xim to activate a new mini-game.
Place the notes correctly on the screen to talk to the puppets and earn Shimmer gems before traveling back to the Wizard’s Retreat.
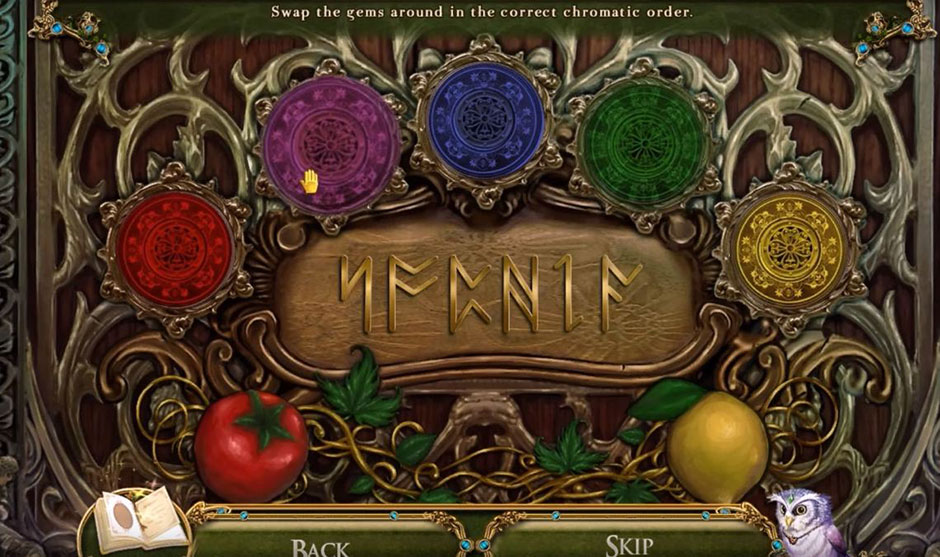
Activate the mini-game on the Research Room Door with the Shimmer gems.
Change the gems to the desired pattern to be awarded entrance to the Research Room.
The Crystal Brazier will begin a mini-game in which you have to collect crystals in a specific order: pink, purple, blue, green, yellow, orange, red, white.
Clik here to view.
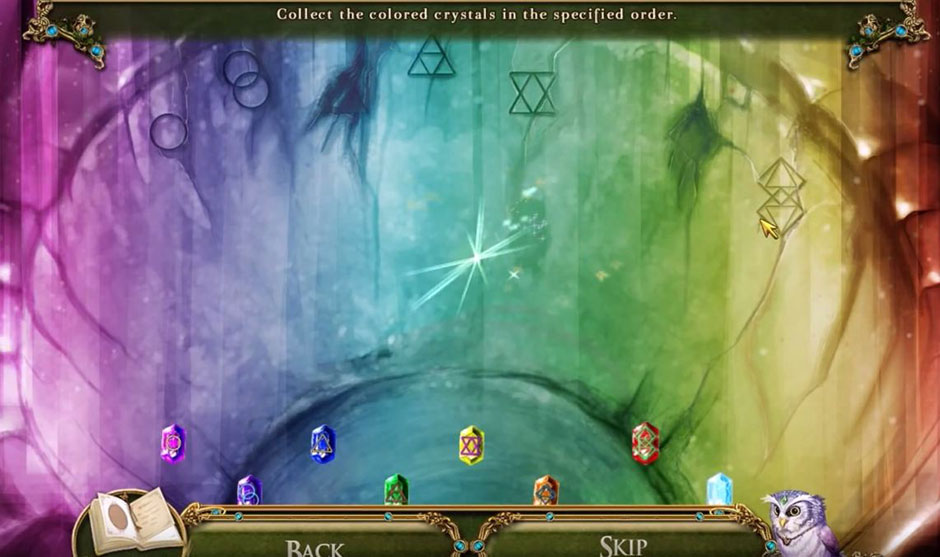
Awakening – The Skyward Castle – Crystal Brazier Solution
Open the book of Monsters and Mythical Creatures and find the Cloth Sun. Open the book Astrological Events and Phenomena to find the Cloth Moon. Collect these and fast travel to the Solarium. Zoom on the astral banner and collect a Quilt Patch and use the Cloth Sun and the Cloth Moon to complete the banner.
Travel fast back to Sophia’s Bedroom.
Go to the walk-in closet and click the clothes rack to begin a hidden object game.
Find all of the items and use your Key on the Accessories Shelf and the Shoe Horn on the wooden cover.
The Accessories Shelf hides a mini-game that challenges you to get the right color where it belongs.
Completing this puzzle will immediately start a new puzzle when you return to the accessories shelf.
Move the wheels to line up the gloves and be rewarded Gloves. The scarf rack is another mini-game.
Clik here to view.
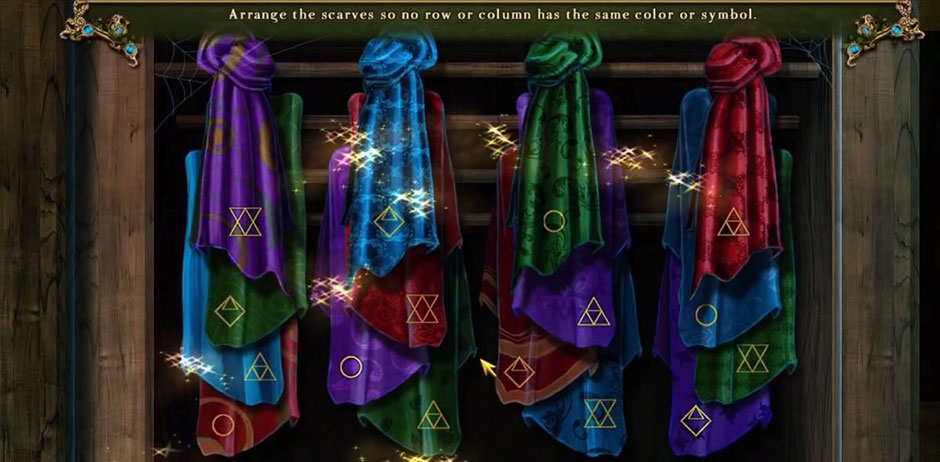
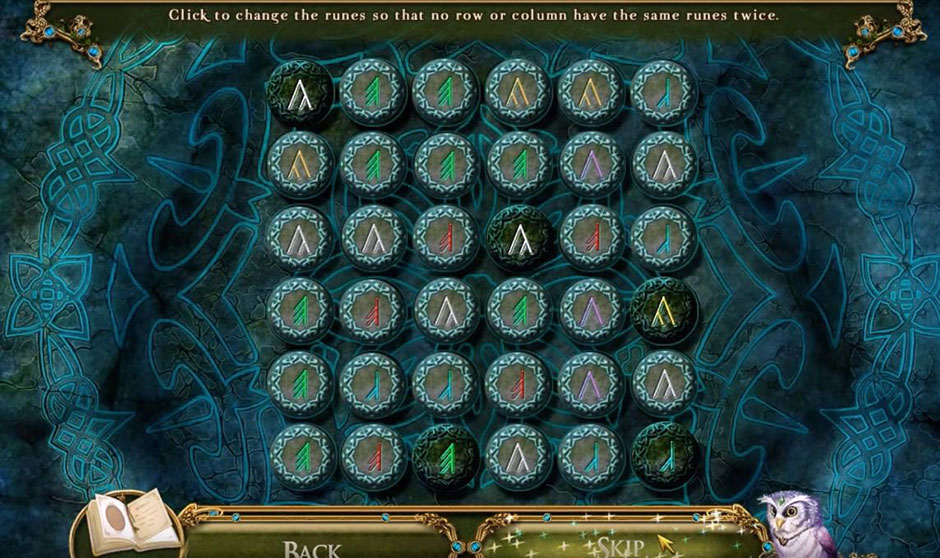
Awakening – The Skyward Castle – Scarf Rack Mini Game
Swap scarves until there are no matches in any row or column. Earn the Padded Glovesand go back to Sophia’s Bedroom. Use the Padded Gloves on the star to receive the Reigning Star. Travel by map to the Research Room and use the Reigning Star on the mural to begin a mini-game.
Corral all lights that are lit up into the center of the screen to gain entrance to the secret chamber.
Collect the Stepladder and the Tesseract Prism and select the fireplace to uncover a hidden object game.
Collect the Fireproof Pouch and use other inventory items to clear the board and return to the research room.
Use the Padded Gloves on the incubator door and the Fireproof Pouch to get a Fire Charm. Return to the Secret Chamber.
Uae the Fire Charm, Pocket Dragon, and Cauldron to earn a Cauldron of Water and return to the Wizard’s Retreat.
Use the Fire Charm on the freezer, the Broken Chair Leg to dig out the Frost Charm and the Fire Charm.
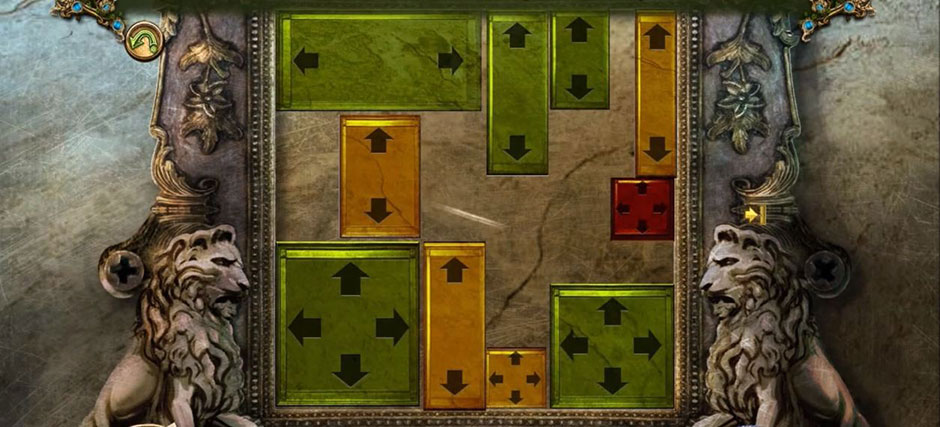
Travel back to the Cartographer’s Room and use the Stepladder to access the Maintenance Hatch. This is a mini-game location.
Complete this challenging puzzle and then travel to the Rafters.
Clik here to view.

Awakening – The Skyward Castle – Blocks Puzzle
Exit to the Rafters.
Use the Cauldron of Water, the Broken Chair Leg, the Fire Charm, and Pocket Dragon to complete this area and then move on to the Grand Archway.
Utlize your Frost Charm and Bow and Arrows to earn a Quilt Patch before you move on to Sophia’s Bedroom.
Use the Quilt Patches on the bed to begin a mini-game.
Clik here to view.
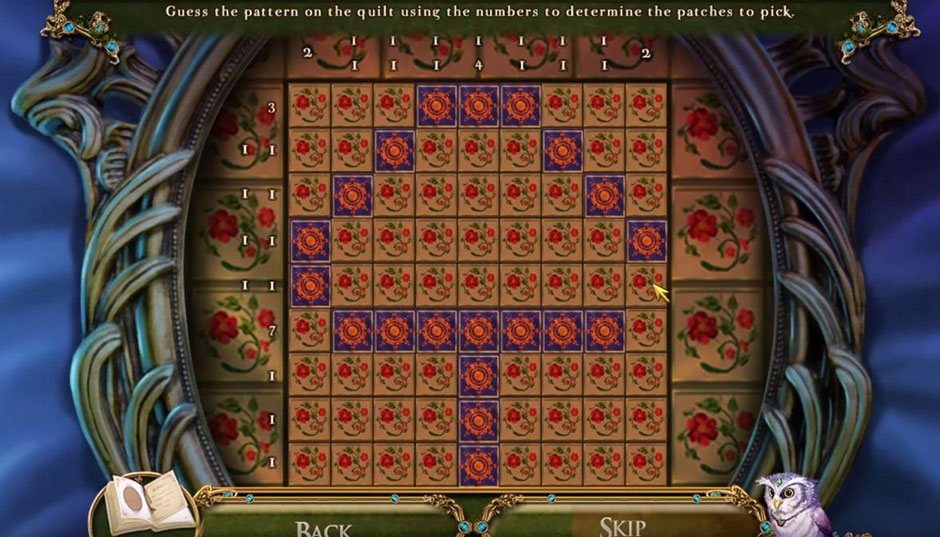
Awakening – The Skyward Castle – Quilt Patch
Re-create the pattern and earn a Paradise Pendant to take to the Grand Archway.
Use the Paradise Pendant to open the doors and start a mini-game.
Clik here to view.
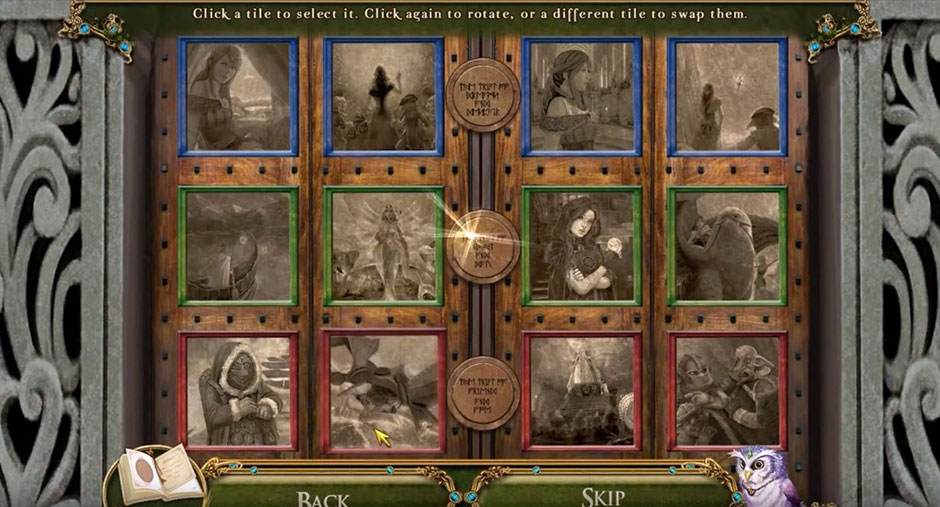
Awakening – The Skyward Castle – Puzzle Story Solution
Arrange this puzzle story in order to be granted access to the Throne Room.
Chapter 4: Ascension
Use your Bow And Arrows to hit the crystal tree branch and knock down the Ruby Apple. Go through the open doorway.
Use the Ruby Apple on the pedestal to start a mini-game.
Clik here to view.
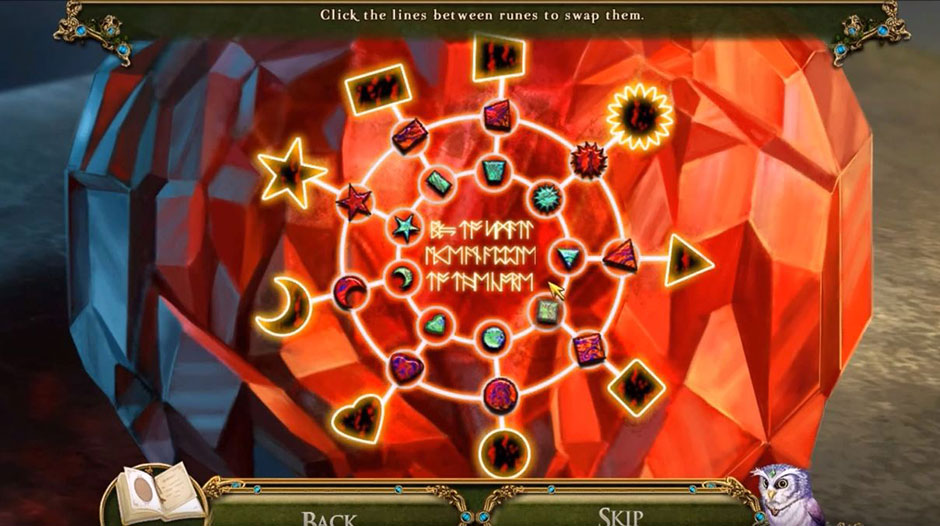
Awakening – The Skyward Castle – Ruby Apple Solution
Line up the Runes to earn five Sigil Stones. Travel to the Conduit.
Place the Sigil Stones with alike symbols into the circles to activate a mini-game.
Match the pairs and push the controls forward. Collect the Tuning Fork and use it on the crystal.
Return to the Crystal Tree and use the Tuning Fork to achieve a Tuned Fork.
Use the map to speed to the Navigator’s Cradle.
Turn the dark crystal into a mini-game with the Tuned Fork. This will open a mini-game of re-arranging musical notes.
Select the green button for accuracy of your puzzle.
Image may be NSFW.
Clik here to view.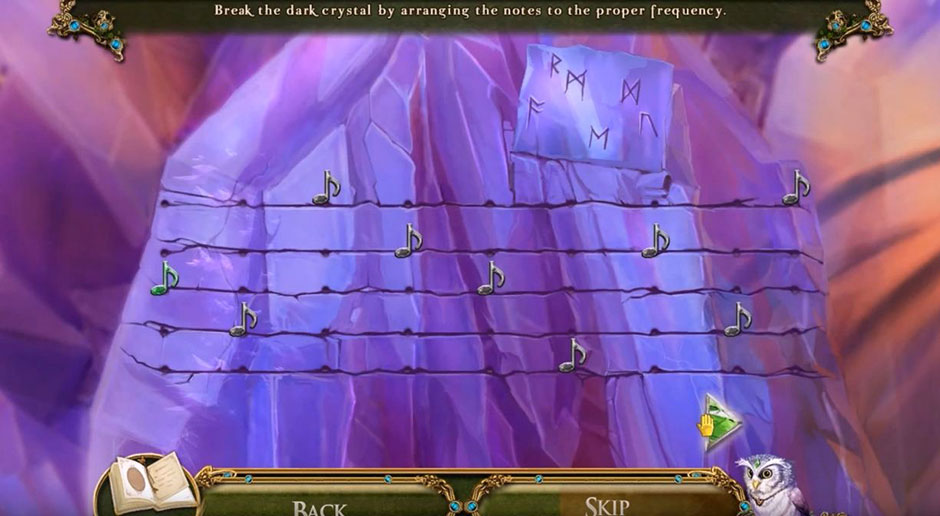
There is a hidden object game in the hammock.
Complete the necessary actions such as: using the bootlace on the talisman, the crowbar on the crate, the knife on the ritual doll, the chalk with a navigator, and take the lid off of the urn. Successfully move the four shells around and you are rewarded the Peg Leg.Travel to the Antechamber.
Use the Peg Leg on the chair.
The skull holds a hidden object search. Find all of the items to be rewarded the Skullface The Talisman.
Travel back to the Navigator’s Cradle area.
Use the Skullface The Talisman to the Navigator to collect the Captain’s Bracelet. Visit the Crystal tree where the Guardian Stone is located for a mini-game.
Use the Captain’s Bracelet to gain access to this random puzzle. This guessing game awards a Tapestry Patch. Leave the area to the left.
The Tapestry Patches can be used to complete a mini-puzzle that awards a Wheel Handle.
Clik here to view.
Awakening – The Skyward Castle – Tapestry Patches
Travel back to the Navigator’s Cradle.
Use the Wheel Handle to open the door and cause the Captain to give you a mini-game.
Untangle all of the strings to gain a Gem Of Giants.
The combinations of O-K, I-M, O-N, and J-I will untangle the red strings. Exit and go left to the cabin.
The Gem Of Giants will open the lock and start a memory mini-game that you must pass to move on.
After the completion of the puzzle, collect the Steel Button from the chest and use it on the purse clasp. The Pocket Dragon will help. There is a hidden obstacle puzzle inside of the coin purse.
Find all of the items and open the hairpin. Move coins to find a “V” and earn a Safety Pin.
Use items such as the Safety Pin to pick the vanity lock and be rewarded a Bent Safety Pin to use on the Grappling Hook. Use the Grappling Hook to get the comb.
Activate the Scissors to achieve the Comb. Try the Comb in the keyhole and then use the Grappling Hook on the comb. There is a mini-game in the keyhole.
This random game requires you to line up the colors within the tumblers.
This puzzle is random so your results may be different than Hx3, Ix4, Lx3, Ix2, Hx4, and Ix3.
In this room, collect the Keyring, Rope Pulley, and Iron Crown.
Exit the room at the bottom of the screen.
The Captain’s stash needs your Keyring to open it.
Find the Pickaxe in the chest. Hand the Captain the Keyring for a Bottle Of Krug that you can take back with you to the Antechamber.
Go to the toppled statue.
Use the Rope Pulley, Pickaxe, Pocket Dragon, and the Bottle of Krug on the statue.
Give the statue the Iron Crown and the Reigning Star to create a Princess Crown and earn Emerald Gemleaves. Go to the Crystal Tree.
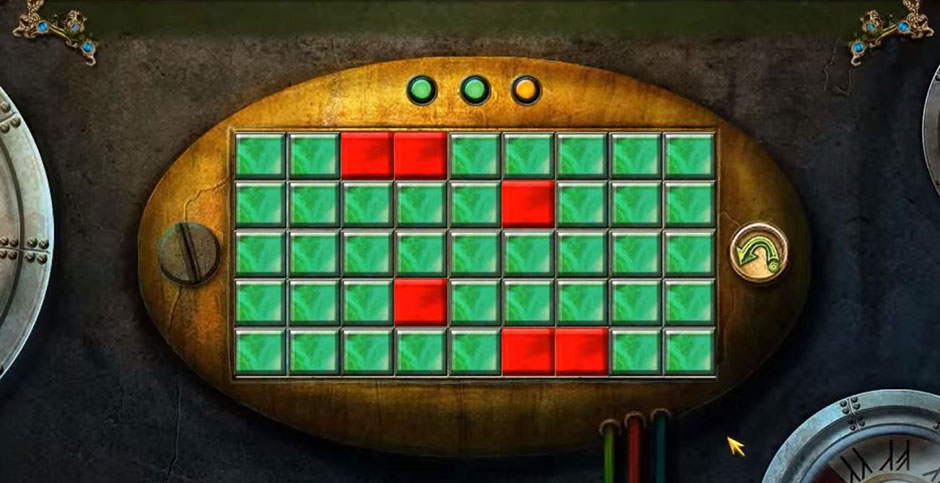
Place the Princess Crown in the circle to enact a mini-game of changing tiles.
Clik here to view.
Awakening – The Skyward Castle – Changing Tiles
Use the Emerald Gem leaves on the branch to obtain the Sigil Orb.
Exit to the right.
Uaing the Sigil Orb on the conduit controls to activate a mini-puzzle.
Trace the figure and press the correct numbered squares and exit at the bottom of the screen.
The mini-game at the end of the hall in the jeweled box to earn the Steering Wheel. Return to the Navigator’s Console.
Put the wheel in the console, talk to Captain and Skullface, and spin the wheel. Use theTesseract Prism on Dreadmyre.
To exit the game and prevail over Dreadmyre, it is necessary to choose the mirror that is different from the others on the screen.
This puzzle is random so individual experiences and answers will vary.
When it comes to life, no one likes a cheater. But when it comes to a series of challenging and mind bending puzzles, games, and hidden objects, it is sometimes necessary to get a few tips and tricks. There are many great walkthroughs, such as The Dreamatorium of Dr. Magnus 2, that are avalilable for gamers to use, and this walkthrough for The Awakening – The Skyward Castle will help you get over the brain teaser or puzzle in this series that has you pulling your own hair out.
Congratulations! You’ve completed our Awakening – The Skyward Castle Walkthrough! For more great tips and tricks, visit our blog!
Delicious – Emily’s Hopes and Fears Walkthrough
Big City Adventure – Shanghai Walkthrough
Building the Great Wall of China 2 Walkthrough
‘The Awakening – The Skyward Castle Walkthrough is meant as a guide and does not contain cheats, hacks or serials.’
The post Awakening – The Skyward Castle Walkthrough appeared first on GameHouse.