Quantcast
Channel: Guides – GameHouse
Viewing all 192 articles
Browse latest View live

8 tips to becoming a Text Express pro

$
0
0

The aim of the game is simple; make sure your train reaches the station before your competitor’s does. Create as many words as possible using 6 random letters. The first levels will be a piece of cake, but as the game progresses the other train gets faster and faster. This means you’ll have to step up your game by scoring more points. But how do you do that? We’ve got 8 great tips for you!

1. Reverse the order

When you’ve created a word, try looking at it in reverse order. Often you can score points quickly and easily by doing this. Try to begin with short words as you have a better chance when reversing the order. After you’ve reversed them, try switching the letters. For example, if you use the word BRO, reverse it to ORB and then switch the ‘O’ and the ‘R’ to make ROB.

Reverse the order

2. Prefixes and suffixes

Many words can be extended by adding letters to the beginning or the end of the word. For instance you can create ‘BIGGER’ from ‘BIG’. Usually you can place an ‘S’ behind a word, which renders lots of new combinations.

Prefixes and suffixes

3. Begin with vowels

Don’t forget words starting with a vowel. We can easily create words starting with a vowel, because they sound simple. We often overlook these words, because we’re searching for words that are more complex. Our tip: Don’t! When it comes to words, keep it simple.

Begin with vowels

4. Rhyming words

When you start with a three letter word, try to rhyme. Rhyming generates lots of options, just try them and press enter. Don’t panic when you can’t make a certain combination; just move on to the next one.

Rhyming words

5. Longer words generate more points

A word with 6 letters yields more points than a word with 3 letters. Twice as many letters means four times as many points. Have you already made a lot of short words? Then try to go for that six letter word on the tip of your tongue.

Longer words generate more points

6. Look at the gaps

The overview of possible combinations and the words that you’ve already created can be quite handy. The words are filled in alphabetically. In the picture below you see that there’s a word missing between ‘APT’ and ‘BAR’. Based on the available letters, you know the word has to start with an ‘A’. Therefore the only option is ‘ARC’. The same goes for 4, 5 and even 6 letter words.

Look at the gaps

7. Bonus, bonus, bonus

When you quickly create words in succession, you get bonuses. These multiply your score, quickly earning you a lot of points. Sometimes a coal will glow behind a certain letter. When you create a word using this letter your points will be doubled. So think hard before you create a word, as the longer the word, the more points you get.

8. Potluck!

As a last resort, you can always guess. Type in random words, it’s that simple. The most important thing is that you keep typing, as it doesn’t matter if you get words wrong. The more ideas you have, the more you type, and the greater the chance to earn points.

Do you have any vital tips that shouldn’t be left out? Tell us in the comments below!

The post 8 tips to becoming a Text Express pro appeared first on GameHouse.


Tips and tricks for Delicious – Emily’s New Beginning

$
0
0

Are you having a hard time completing Delicious – Emily’s New Beginning? No worries, we’re here for you and we’re not the only ones!! For example, Michelle Hornblow, who wrote a very interesting article about the latest Delicious game. We’ve found these amazing tips and tricks for Delicious – Emily’s New Beginning on her blog, and we’d love to share them with you!

(PLEASE NOTE: THIS ARTICLE MAY CONTAIN SPOILERS)

Index

How to unlock all trophies

Trying to unlock special trophies never gets boring, does it? However, we understand it can be very challenging at times. Do you need some help unlocking them? This list will help you out!


Elvis
Use your register 1,000 times.

The Foodies
Get a three-customer bonus twice in a row.

Edward
Hint “knock-knock” (SPOILER: in The Patio restaurant, knock on the door 4 times – Edward comes to the door to check on Paige).

Jimmy
Collect 1000 silver coins.

Evelyn
Clean a table while a customer is waiting for it.

Brigid
Play with every single product in the game (all 148 products!).

Antonio
Finish the second restaurant.

Francois
Finish the first restaurant.

The Ducks
Collect every other person (there are 19).

Carl the Mouse
Find the mouse on every level (there are 60).

Emily
Collect 10,000 silver coins.

Soccer Moms
Let Emily walk 15 miles.

Patrick
finish the third restaurant.

Angela
achieve three stars on all 60 levels.

Snuggy and Rosie
collect all the memorable moments (there are 18).

Julie, the violinist
Buy all shop items in all restaurants (there are 63 items).

Richard
Finish the fourth restaurant.

Dainton Wu
Finish the fifth restaurant.

Kate
Find 10 hidden objects in the game.

Sid, the cleaner
Burn 10 dishes and still complete the day with three stars.

Where to find the mouse

A level doesn’t feel completed until you’ve found that rascally little mouse, Carl! Sometimes it’s very hard to spot this little fellow. When you look really closely you’ll probably notice him. But when you’re caught up in the game it becomes more of a challenge. Haven’t found him yet? Here’s where he’ll pop up!

Restaurant 1: Emily’s Place

Restaurant 1 - Emily's Place

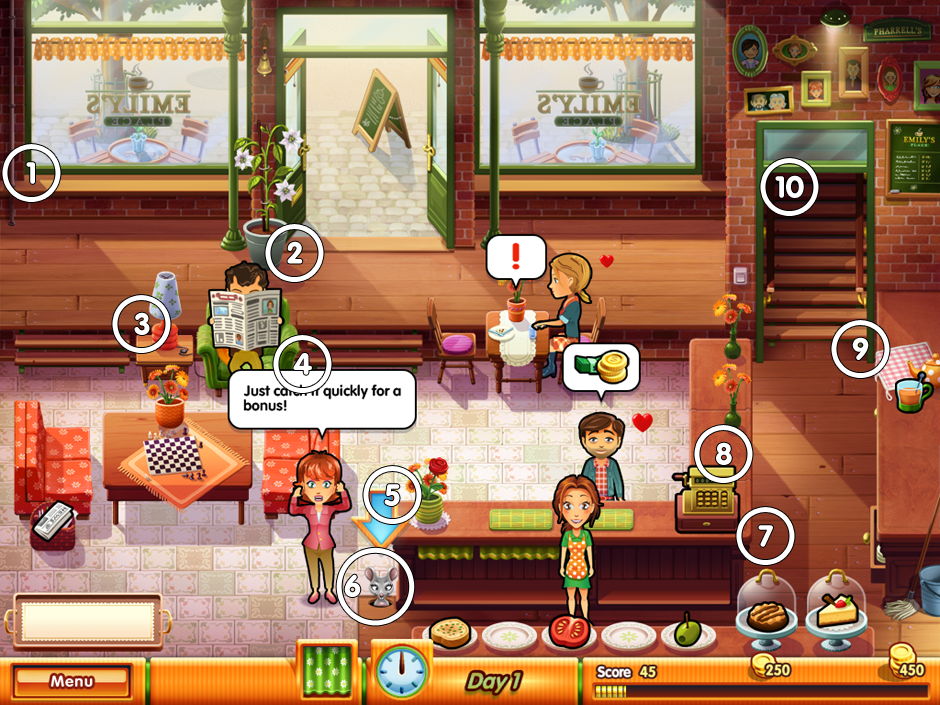
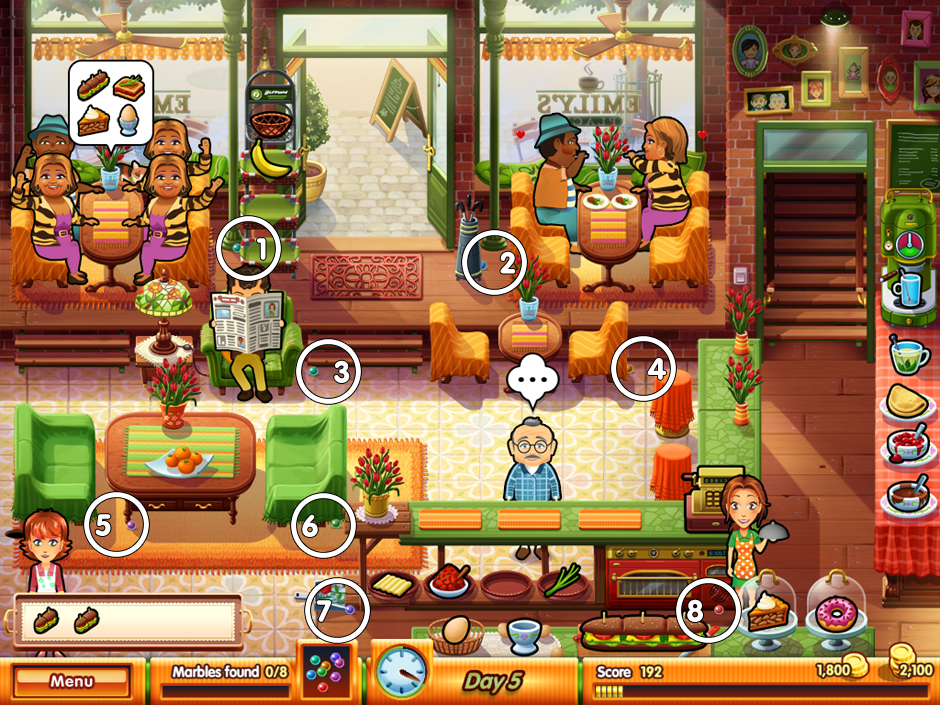
  1. Level 1-1:Behind the plant pot to the right of the front door.
  2. Level 1-2:Peeking out the top of Paige’s play pen.
  3. Level 1-3:Peeking over Emily’s counter top – the smaller counter on the right.
  4. Level 1-4:Look at the top of the stairs, in the little window (just below the light).
  5. Level 1-5:Looking inside from the main window – just above the first table. If there are customers sitting at that table, the mouse is covered by their speech/order bubble.
  6. Level 1-6:Just to the right of the cash register.
  7. Level 1-7:Peeking out from the stain-glass window at the top of the screen – above the Emily’s Place window (aim for the stain-glass above the Y’S in EmilY’S).
  8. Level 1-8:Peeking through the glass of the open front door – by the gold door handle on the door to the left.
  9. Level 1-9:At the end of the bench table with two stools.
  10. Level 1-10:Look to the center table with the flower display behind it – Carl pokes his head around the right-hand side of the flower display, near the floor.

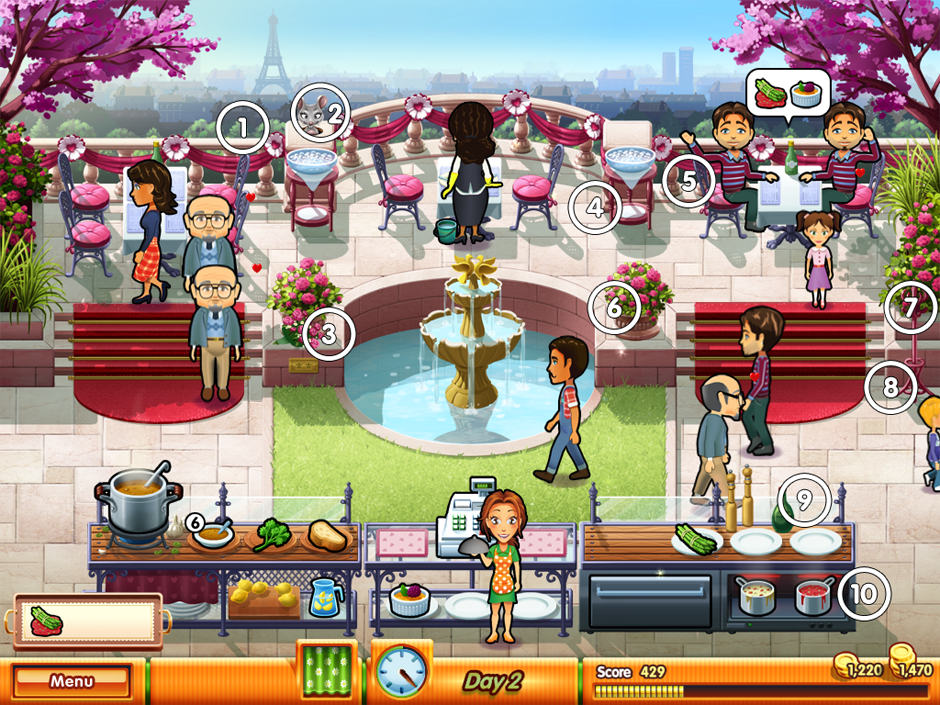
Restaurant 2: The Patio

Restaurant 2 - The Patio

  1. Level 2-1:Hiding between the pizza oven and the prep table, on the floor.
  2. Level 2-2:Behind the pot plant.
  3. Level 2-3:Peeking between the pasta prep station and the ice-cream prep station.
  4. Level 2-4:The center back table – just behind the condiments on the table, at the bottom of the vine/tree.
  5. Level 2-5:To the left of the cash register.
  6. Level 2-6:In the bottom left corner, by the gelato cart.
  7. Level 2-7:At the bottom right of the bread station.
  8. Level 2-8:Behind the wheel spoke of the gelato cart.
  9. Level 2-9:In the extra tray of the gelato cart (the one off to the side).
  10. Level 2-10:Pops up by Sid, the cleaner.

Restaurant 3: Patrick’s Garden

Restaurant 3 - Patrick's Garden

  1. Level 3-1:Right in the center garden – in the empty dirt spot.
  2. Level 3-2:Behind the fence, to the right of the garden door.
  3. Level 3-3:Just above the bush that is behind the oven.
  4. Level 3-4:Pops up just above the brick shelves that hold the sandwich ingredients.
  5. Level 3-5:Peeking out from the right side of the fruit prep station.
  6. Level 3-6:Along the top of the fence, peeking up from a brick pillar (above the purple leafy flowers).
  7. Level 3-7:Out the top of the oven.
  8. Level 3-8:Peeking out from the left side of Paige’s teepee.
  9. Level 3-9:Peeking over the little stone wall, by the table up the stairs.
  10. Level 3-10:Behind the fence – above where the tulips/daffodils grow.

Restaurant 4: Wu’s Cuisine

Restaurant 4 - Wu's Cuisine

  1. Level 4-1:Peeking in from the left-hand side window (just above the table).
  2. Level 4-2:On the red carpet inside the front door, to the right.
  3. Level 4-3:Peeking out from the flower display near the kitchen.
  4. Level 4-4:Hiding at the soup station.
  5. Level 4-5:Peeking out from the kitchen door, near the floor.
  6. Level 4-6:Peeking out next to the wine by the counter.
  7. Level 4-7:Just above the crêpe station.
  8. Level 4-8:Peeking in from the left-hand side window (just above the table… again?!).
  9. Level 4-9:Hiding above the recycle bin.
  10. Level 4-10:Peeking between the crêpe and the salad station.

Restaurant 5: Wu’s Place

Restaurant 5 - Wu's Place

  1. Level 5-1:Behind the privacy-screen at the right of the screen (where the stairs are), just above the table.
  2. Level 5-2:Peeking out from the top of Paige’s corner.
  3. Level 5-3:Peeking in the window at the very bottom right-hand corner.
  4. Level 5-4:On top of the privacy-screen that is by the front door – to the very left.
  5. Level 5-5:Peeking around the side of the sake/tea station.
  6. Level 5-6:Between the Udon/Mie and fry station.
  7. Level 5-7:Hiding behind the bamboo plants that are by the conveyor belt.
  8. Level 5-8:Outside, peeking around the front door, near the door handle on the right-hand side door.
  9. Level 5-9:By the bridge that goes over the pond, at the end with the tables.
  10. Level 5-10:Look at the top of the stairs, in the little window (just below the painting).

BONUS – Restaurant 6: The Farmhouse

Restaurant 6 - The Farmhouse

  1. Level 6-1:Hiding by the Christmas tree, at the top of the step-ladder.
  2. Level 6-2:Peeking in the window to the left of the front door, near the table.
  3. Level 6-3:Behind the center table, peeking out from behind the gold patterned banister.
  4. Level 6-4:Next to the barrel of candle wax.
  5. Level 6-5:Behind Santa.
  6. Level 6-6:At the left-hand end of the main counter – if Sid is standing there, he’s just behind his head.
  7. Level 6-7:In the right-hand window near the top – if you have the stars, he’ll be right by the star on that side.
  8. Level 6-8:To the left of Paige’s toy block.
  9. Level 6-9:In the right-hand window, in the left-pane.
  10. Level 6-10:By the chocolate milk/Glühwein.

Are these tips and tricks going to help you complete Delicious – Emily’s New Beginning? We’re very curious to find out! Do you need more tips and tricks, or do you have some tips and tricks of your own? Leave a comment below, and we’ll check it out. Thanks everyone!

And again, a big thanks to Michelle for taking the time and effort to create such a helpful article! :-)

The post Tips and tricks for Delicious – Emily’s New Beginning appeared first on GameHouse.

How to create some time fore yourself?

$
0
0

So many things to do and yet so little time! Unfortunately we can’t add days to your week, but we can assist you with some good task management. The more time you can spend on things you actually enjoy!

Create a list:

  1. Be clear on everything you need to do. Instead of ‘clean the house’, write ‘vacuum the floor (including the space under the seats, monsters live there), do dishes, polish your grandma’s lamp, clean Pookie’s litter box’ etcetera.
  2. Improve on your handwriting. It just helps.
  3. Use bright colors to highlight priorities and add due dates. Don’t be too hard on yourself; you can’t do everything at once!
  4. Draw some flowers on the side. Here’s not a particular function, it’s just fun.
  5. Put your list in a noticeable place… so you won’t forget where to find it!

happy+to+do+listing

The post How to create some time fore yourself? appeared first on GameHouse.

What if your pet could talk?

$
0
0

Always wondered what your furry friend would say if he/she could talk? Well, we’ve recently bumped in to some talking pets and had a good chat. (Isn’t that a coincidence?) Find out what they have to say…

  1. As it turns out, your dog Buddy wants to conclude a settlement on who gets to sleep in your bed. Precious Pookie doesn’t want to settle, she just wants you to sleep on the floor.
  2. Both Pookie and Buddy want you to share your human dinner (and lunch and breakfast). In return, they’re willing to share their pet food. Sounds like a good deal!
  3. Buddy would impersonate visitors, especially that strange neighbor of yours with the very loud voice.
  4. Pookie would provide you with some important lessons in life: ‘Don’t you dare date a non-cat person! Oh, and clean my litter box NOW please.’ As long as you stay focused on her everything should be just fine.
  5. They’d both constantly annoy you with phrases like: “Who’s a good girl? Is it you? Is it you? What a good little girl!”

Funny-Dog-3-1152x720-wide-wallpapers.net

The post What if your pet could talk? appeared first on GameHouse.

How to brighten up your home?

$
0
0

Your house is a reflection of your personality! As you’re a warm and lovable person, your home should be as well. Check out this easy and fun decoration activity. Once you’ve finished you can relax in your improved home, have fun! 

  1. Go to the woods (take your dog Buddy as well, he loves long walks!) and find yourself a nice firm branch around 50 – 100 cm long (Buddy will gladly assist you with that).branch
  2. Take the branch home and put it somewhere to dry. Once it has completely dried you’ll need to polish and stain it; after all, you don’t want splinters do you?! (Sounds like too much work? You can also just buy a branch at a gardening center!)
  3. Find all the ribbons, beads, tree lights, feathers and silk flowers you have and tie them to your dried out branch.
  4. Fix two small hooks to the ceiling and hang your beautiful creation, or if you don’t feel like doing it, ask your nice neighbor or a handy friend to do it for you!

The post How to brighten up your home? appeared first on GameHouse.

Tips and tricks for level 6-10 of Emily’s New Beginning

$
0
0

Having a hard time completing the very last level of Delicious – Emily’s New Beginning? You’re not alone! Even really experienced Delicious players seem to struggle getting three stars on the last level of ‘The Farmhouse’. We’d like everyone to be able to accomplish this and these tips and tricks are going to help you do just that!

(PLEASE NOTE: THIS ARTICLE MAY CONTAIN SPOILERS)

Level 6-10 – The Farmhouse

After 59 levels, 6 beautiful restaurants and some serious challenges in combining parenthood with your restaurant career, the bittersweet moment is there. It’s Christmas eve and you’re on the verge of finishing Delicious – Emily’s New Beginning.

However, you’re not there just yet. This final level is truly challenging and if you’re dedicated to getting three stars you’ll need quite a few attempts. Luckily, other Delicious players are always willing to help you out, and with the assistance of Michelle Hornblow and her amazing blogposts, we’re sure you’ll make it!

How to get three stars in the grand finale?

First, let’s have a look at the challenge ahead:

  • For 3 stars you need to earn $2,500 by serving all 33 customers
  • Make sure everything in the restaurant is already upgraded
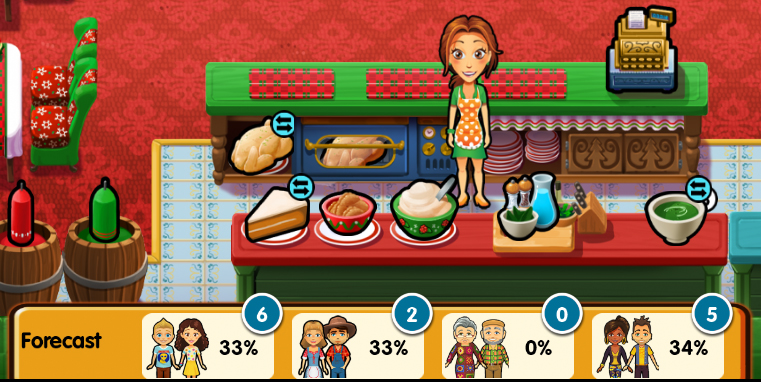
  • Forecast: 33% Children, 33% Local Farmers, and 34% Regulars

Forecast & menu
The forecast proves to be essential in reaching a three star score.

Local Farmers Regulars Children
High patience Average patience Low patience
Average tips Average tips Very low tips
Don’t like Paige Like Paige Like Paige

You need to play around with setting your menu to be able to reach three stars.
One menu that proves to work is the following:

  • 33% Children: Santa Figure, Chocolate Milk, Red Candle, Candy Cane, Cool Present, Insane Present
  • 33% Local Farmers: Fruit Cake, Turkey
  • 34% Regulars: Green Pea Soup, Pumpkin Cake, Modern Wreath, Snowman Card, Green Candle

A lot of thought was put into these choices, regarding general tipping behavior and patience levels.

Serving order
Never let Children wait! They have the lowest patience, so always serve them first. You can make Local Farmers wait, since they have high patience. Obviously, you shouldn’t make them wait too long. Regulars are somewhere in the middle regarding their patience level, so be careful with serving them in time.

Entertainment
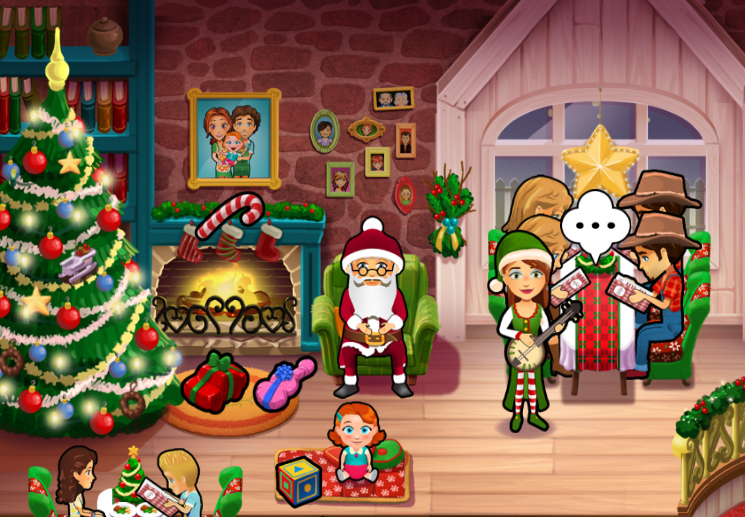
Make sure to entertain your guests for higher tips. And don’t forget; Local Farmers don’t like Paige so make sure you keep an eye on her!

Entertainment

Three-in-a-row bonuses
Since Local Farmers have high patience, you can make them wait a bit before paying. By doing so, try to collect money from two, or preferably three customers at once. This will give you bonuses that you really need to reach three stars. Keep in mind that you shouldn’t make them wait too long, because then your customers will lose hearts!

greatcombo

Other bonuses
Make sure to receive all bonuses possible by keeping the following in mind:

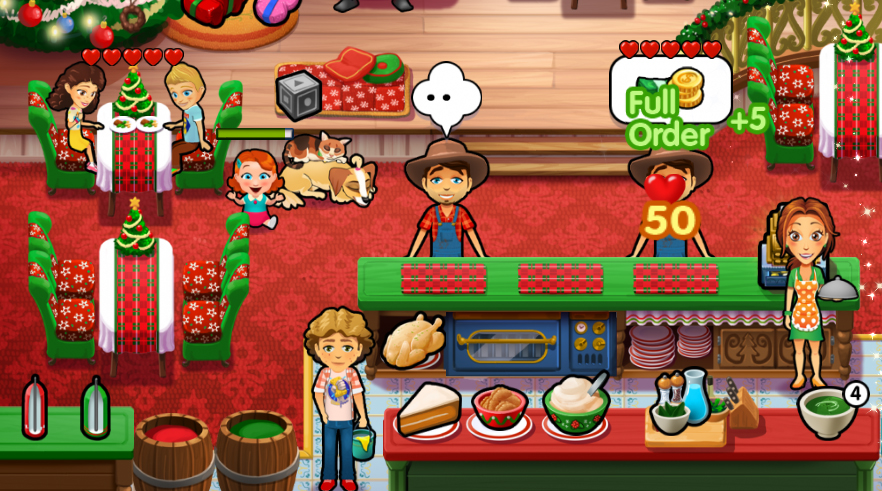
  • Never serve an incomplete order
  • Let Paige charm Children and Regulars
  • Find Carl the Mouse! Location: by the chocolate milk or glühwein, depending on your menu

FullOrder

Picking presents
The Children that go to see Santa always order a toy, which they pay for later. Choose the insane present and cool present, since they are preferred by Children and thus lead to more money on their orders.

Preparations
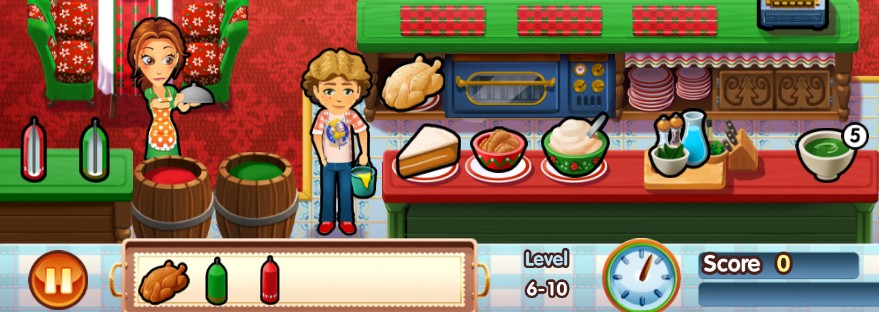
Make sure you’re as well prepared as possible. Whenever you find time for it, at the very beginning of the level for example, make sure there are 5 servings of soup available, pre-cook a turkey, grab a candy cane and make a couple of candles. You can always remove these items from your tray if they aren’t ordered.

Focus
Yes, it’s a lot to think about! But while you’re playing, stay focused! Make sure you really clicked all items, check if your tray contains the full order and don’t lose a single customer out of sight.

Good luck!

And this should do the trick! If you follow these guidelines, a few good attempts should do the job. Obviously, there’s a little luck involved so keep trying if you don’t succeed the first time!

Was this blog helpful and were you able to reach three stars? Do you possibly have some tips and tricks of your own to help other players? We’d love to hear from you so please leave a comment below. Thanks everyone!


Are you having a hard time completing other levels of Delicious – Emily’s New Beginning? No worries, we’re here for you! We’ve found these amazing tips and tricks for playing Emily’s New Beginning, and we’d love to share them with you!

The post Tips and tricks for level 6-10 of Emily’s New Beginning appeared first on GameHouse.

Delicious – Emily’s Honeymoon Cruise Walkthrough

$
0
0

We know what you’re thinking, Delicious – Emily’s Honeymoon Cruise is quite the challenge! Even the most advanced players among us have a hard time completing every challenge. For all of you who believe the game is a little too challenging, we’ve made a walkthrough. This Delicious – Emily’s Honeymoon Cruise walkthrough contains the most important tips and tricks. Read them carefully and you should be able to complete every challenge. Good luck!

Contents

How to unlock all collectables

Let’s start with the collectables. You’re probably missing a few and you’re having trouble figuring out how to get them. Don’t worry, this list will provide you with the answers. Most of the time it’s about reaching enough golden hearts, but some of them are harder to complete!

Francois
Collect 5 Golden Hearts to unlock “Francois”.
Angela
Collect 10 Golden Hearts to unlock “Angela”.
Brigid
Collect 15 Golden Hearts to unlock “Brigid”.
Evelyn & Edward
Collect 20 Golden Hearts to unlock “Evelyn and Edward”.
Jimmy
Collect 25 Golden Hearts to unlock “Jimmy”.
Brad
Collect 30 Golden Hearts to unlock “Brad”.
John Tones
Collect 35 Golden Hearts to unlock “John Tones”.
Chuck the Delivery Guy
Collect 40 Golden Hearts to unlock “Chuck the Delivery Guy”.
Kate & Jewel
Collect 45 Golden Hearts to unlock “Kate & Jewel”.
Cruise Kids
Collect 50 Golden Hearts to unlock “Cruise Kids (Emma, Eric and Jayden)”.
Jimmy’s Parrot
Collect 55 Golden Hearts to unlock “Jimmy’s Parrot”.
Georgeopolos & Jenny-Lee
Collect 60 Golden Hearts to unlock “Georgeopolos & Jenny-Lee”.
Eddy and Freddy
Collect 65 Golden Hearts to unlock “Eddy and Freddy”.
Uncle Antonio
Collect 70 Golden Hearts to unlock “Uncle Antonio”.
Josh
Collect 75 Golden Hearts to unlock “Josh”.
Robodog 3000 XT
Collect 80 Golden Hearts to unlock “Robodog 3000 XT”.
Emily and Patrick
Collect 85 Golden Hearts to unlock “Emily and Patrick”.
Ivy
Collect 90 Golden Hearts to unlock “Ivy”.
Harp Player
Reach Exert on all levels to unlock “Harp Player”.
Parcel on the Boat
Buy 61 Items in the Shop to unlock “Parcel on the Boat”.
Mouse
Find 90 Mice to unlock “Mouse”.

Episode 1: Starts with a Splash! (the Pool Deck)

The first episode starts off with a bang as we see Francois working at the Pool Deck (who would have thought?). Emily offers to help out, but Francois only wants her and Patrick to relax. While they’re relaxing, Francois can’t catch a break and it gets even worse when he has to compete with the young Josh. Meanwhile the cruise ship gets fixed by Jimmy, and Emily and Patrick have an awkward talk about children.

Mouse locations

  1. Level 1-1: On the upper-deck, peeking over the mosaic wall to the right.
  2. Level 1-2: On the upper-deck, peeking over the plants at the end of the mosaic wall.
  3. Level 1-3: Just above the pool-ladder.
  4. Level 1-4: By one of the token machines.
  5. Level 1-5: By the water spout.
Emily's Honeymoon Cruise - Mouse locations episode 1

Emily’s Honeymoon Cruise – Mouse locations episode 1

Episode 2: Coming Apart at the Seams (The Boutique)

Angela gets her own boutique on the cruise ship! Emily and Patrick are one of her first visitors and Angela is proud she gets to run the shop. She even starts designing her own clothes. Patrick’s little sister Kate loves her outfits and mentions that Jewel Jacobs would love them as well. And, as luck would have it, she happens to be on board! Emily avoids Patrick’s question on whether she would like to have kids and she’s not sure how to balance her life with having children…

Mouse locations

  1. Level 2-1: Peeking out from the head of the female mannequin.
  2. Level 2-2: In the wall mirror to the very left.
  3. Level 2-3: Peeking out from the jewelry cabinet.
  4. Level 2-4: Next to the red/white polka dot shirt.
  5. Level 2-5: Peeking out over the top of the changing rooms.
Emily's Honeymoon Cruise - Mouse locations episode 2

Emily’s Honeymoon Cruise – Mouse locations episode 2

Episode 3: No Time to Relax (The Spa)

Who wasn’t surprised to find out that Patrick’s mum, Brigid, was running the ship’s Spa!? But unfortunately she has some sad news; her husband left her for someone else. After a relaxing day at the Spa Emily feels much more at ease, until that is, Brigid starts talking about being a grandma. To get her mind off things Emily decides to help out at the Spa as a cleaner. But then there’s Uncle Antonio, he’s forming a crush on Brigid and in the meantime he’s bringing Emily and Patrick closer together.

Mouse locations

  1. Level 3-1: In the empty alcove/shelf.
  2. Level 3-2: By the faux counter (that has lotions and potions).
  3. Level 3-3: Peeking in through the window.
  4. Level 3-4: In the ice, by the tea.
  5. Level 3-5: In the grinder.
Emily's Honeymoon Cruise - Mouse locations episode 3

Emily’s Honeymoon Cruise – Mouse locations episode 3

Episode 4: Entertaining Possibilities (The Piano Lounge)

The surprises just keep on coming after we find out the Piano Lounge is run by Evelyn and Edward, Emily’s parents. Evelyn is in a very good mood after she finds out that her favorite singer and former boyfriend John Tones is on board. Emily and Patrick share a beautiful moment as they dance together on stage. Edward is feeling a little down as Evelyn and John Tones are getting a bit too cozy, but he does have a great talk with Emily.

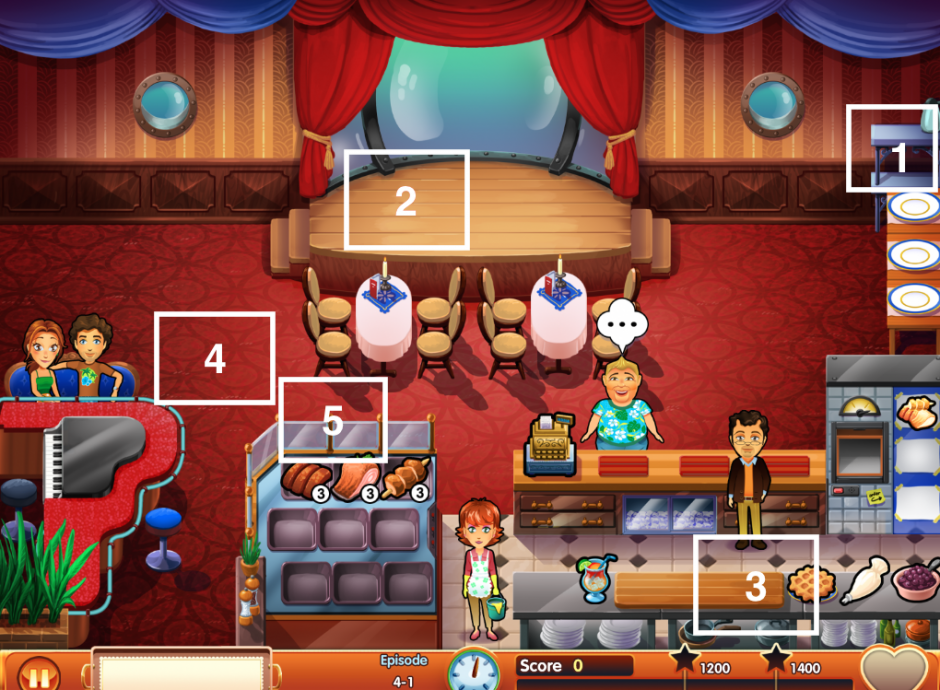
Mouse locations

  1. Level 4-1: On the coffee tray, at the back of the restaurant.
  2. Level 4-2: On the stage.
  3. Level 4-3: On the kitchen counter, to the left of the waffles.
  4. Level 4-4: On the carpet, to the right of Emily and Patrick’s couch.
  5. Level 4-5: Peeking in through the glass above the hot food station.
Emily's Honeymoon Cruise - Mouse locations episode 4

Emily’s Honeymoon Cruise – Mouse locations episode 4

Episode 5: Kid Crazy (The Kid’s Club)

While Emily and Patrick are exploring the ship they discover the day-care. Jimmy’s been locked in a drawer by the children and Emily’s trying to set him free, all the while Patrick entertains the kids. After Patrick finds out there’s no one who’d like to run The Kids Club, he immediately volunteers. Again, Patrick proves he’s very good with children and really enjoys running The Kids Club. Emily is frustrated with Patrick, because he’s too prepared for kids and she feels pressured by it.

Mouse locations

  1. Level 5-1: In the basket just above the yellow car.
  2. Level 5-2: Peeking over the top of the bottle warmer.
  3. Level 5-3: Peeking over the top of the oven.
  4. Level 5-4: Peeking out from the bottom table.
  5. Level 5-5: In the pink shelves.
Emily's Honeymoon Cruise - Mouse locations episode 4

Emily’s Honeymoon Cruise – Mouse locations episode 5

Episode 6: Throwing Dirt (The Beach)

The ship has reached its first destination, a beautiful beach in Greece. Patrick tries to talk to Emily, but she’d rather enjoy the beach instead. Especially when she finds out that her ex-suitor Brad runs the food stand. Brad has some relationship problems with multiple ladies (shame on him!). Patrick spends time helping a young ankle-biter rebuild his sandcastle, which triggers Brad to tell him he’s good with children. Patrick apologizes to Emily for being good with kids, but also mentions they’re in the perfect place to have kids. Emily’s angry and doesn’t want to give up her career yet.

Mouse locations

  1. Level 6-1: In the bushes by the tree.
  2. Level 6-2: Peeking out from the top of the cash register.
  3. Level 6-3: Peeking over the top of the left pillar.
  4. Level 6-4: Peeking over the top of a beach chair.
  5. Level 6-5: In the empty basket next to the shell.
Emily's Honeymoon Cruise - Mouse locations episode 6

Emily’s Honeymoon Cruise – Mouse locations episode 6

Episode 7: Not Entertained (The Piano Lounge)

Patrick has been left on the beach by accident. Emily, not yet aware of this, talks to her dad about the awful conversation she had with Patrick. Emily tries to talk with her mother too, but she’s too busy swooning over John Tones. Edward has to serve John and his entourage during dinner and after they go too far, Edward throws a punch. Evelyn gets mad at Edward for losing his temper and during all this nobody notices Patrick’s disappearance. When Emily and Evelyn finally have a talk they realize Patrick is missing. Evelyn apologizes for Edward’s behavior to John, but then they cross the line.

Mouse locations

  1. Level 7-1: Peeking over the couch next to Emily.
  2. Level 7-2: Peeking over the counter next to the cocktail.
  3. Level 7-3: Next to the ribs.
  4. Level 7-4: Next to the cream for the waffles.
  5. Level 7-5: Peeking through the left pot-hole.
Emily's Honeymoon Cruise - Mouse locations episode 7

Emily’s Honeymoon Cruise – Mouse locations episode 7

Episode 8: The Grand Gestures (The Spa)

Emily heads to the Spa where Antonio still has a crush on Brigid. Brigid hasn’t seen Patrick but she tells Emily to stay put for a while, Patrick will probably pop up soon (or will he?). Antonio tries to charm Brigid but fails miserably. After a few days there’s still no sign of Patrick. Brigid mentions that Emily might have scared him off. When a customer hears Emily talking about Patrick he shows a video of what happened to Patrick. Emily is in shock and rushes off to Angela to borrow her phone and call Patrick.

Mouse locations

  1. Level 8-1: To the very left, by the lavender.
  2. Level 8-2: In the pot for the roses.
  3. Level 8-3: Peeking through the window.
  4. Level 8-4: On the bar.
  5. Level 8-5: By the faux counter (that has lotions and potions).
Emily's Honeymoon Cruise - Mouse locations episode 8

Emily’s Honeymoon Cruise – Mouse locations episode 8

Episode 9: Fashion Victims (The Boutique)

Emily and Brigid explain to Angela what happened but there’s no reception when they try to call Patrick. Jewel Jacobs drops off some fabrics with which Angela needs to create a mini-collection. Emily talks to Angela about her fight with Patrick and tries to call him again and again, but there’s still no reception. Angela struggles with her mini-collection and when she’s finally done Jewel Jacobs criticizes her choices. Poor Angela! :(

Mouse locations

  1. Level 9-1: At the counter by the charms.
  2. Level 9-2: Next to the skirt pattern.
  3. Level 9-3: Next to Emily’s couch.
  4. Level 9-4: Above the two wall mirrors.
  5. Level 9-5: On the male mannequin’s head.
Emily's Honeymoon Cruise - Mouse locations episode 9

Emily’s Honeymoon Cruise – Mouse locations episode 9

Episode 10: Small Steps (The Kid’s Club)

Emily is back at the day-care and takes over after she finds out the children are unsupervised. The children ask after Patrick, which leaves Emily in tears. They try to comfort her and clean-up the place to surprise Emily. When a sleep-deprived couple drops off a baby, Emily needs to take care of the little one and soon realizes she’s better at it than she thought. The children try to convince Jimmy to turn the ship around and pick up Patrick. Luckily he agrees!

Mouse locations

  1. Level 10-1: By the milk box.
  2. Level 10-2: Behind the soft-toys at the back table.
  3. Level 10-3: Peeking through the left-hand window.
  4. Level 10-4: By the doll and the block.
  5. Level 10-5: By the cash register.
Emily's Honeymoon Cruise - Mouse locations episode 10

Emily’s Honeymoon Cruise – Mouse locations episode 10

Episode 11: Revenge is Best Served Wet (The Pool Deck)

Emily heads to the Pool Deck to look for the beach. Francois is decorating the deck for the crowning ceremony for Josh, ‘The King of the Pool’. In fact he’s trying to take revenge on Josh by putting a bucket on top of the throne. Francois has second thoughts after he hears about the present Josh bought him and after Josh’s parents thank him for being such a good friend. At the end of the level Francois tries to save Josh from embarrassment.

Mouse locations

  1. Level 11-1: By the salad.
  2. Level 11-2: Peeking over the side of the ship, under the waterslide.
  3. Level 11-3: At the back table, by the lifesaver (could be hidden behind an order bubble if customers are seated, so keep an ear out for Carl’s squeak).
  4. Level 11-4: At the bottom of the waterslide.
  5. Level 11-5: In the middle of the pool rings.
Emily's Honeymoon Cruise - Mouse locations episode 11

Emily’s Honeymoon Cruise – Mouse locations episode 11

Episode 12: Landlocked (The Beach)

This episode takes place a few days earlier, just after Patrick was left on the beach. Patrick helps out Brad while waiting for the ship to return. Patrick can’t believe the way Brad is treating women, but things start to make sense when he finds out Brad had his heart broken by a girl named Ivy and that’s why he’s acting this way. When Patrick spots a very rare flower and contacts the World Wide Flower Association they offer him a job. Before accepting it he needs to talk with Emily. In the final level of this episode Emily arrives at the beach. Emily and Patrick make up and apologize to each other.

Mouse locations

  1. Level 12-1: By the luau/pig.
  2. Level 12-2: Peeking over the counter, at the left end (opposite end to the cash register).
  3. Level 12-3: Next to the drinks and Patrick.
  4. Level 12-4: By the tree trunk.
  5. Level 12-5: Peeking out from the top of the tree.
Emily's Honeymoon Cruise - Mouse locations episode 12

Emily’s Honeymoon Cruise – Mouse locations episode 12

Episode 13: Stitching Up (The Boutique)

Back on the boat, Emily and Patrick check on Angela. She’s still very upset and has lost faith in herself. Emily decides to surprise Angela and creates designs based on Angela’s design book. She’s even building a runway! When Emily talks to Patrick about the flowers she needs for this, Patrick tells her about the job offer. Emily is confused after Patrick tells her not to worry about kids because he’s going to investigate rare flowers. The surprise fashion show is a great success and finally Angela is smiling again. People are even lining up to buy her designs right away.

Mouse locations

  1. Level 13-1: Behind the makeup counter.
  2. Level 13-2: By the table.
  3. Level 13-3: By the earrings and the watch.
  4. Level 13-4: Top of the very left changing room.
  5. Level 13-5: Peeking through the glass at the top of the stairs.
Emily's Honeymoon Cruise - Mouse locations episode 13

Emily’s Honeymoon Cruise – Mouse locations episode 13

Episode 14: Trial and Error (The Spa)

This episode takes place in the Spa where Emily and Patrick talk to Antonio who’s not having luck winning Brigid’s heart. Emily and Patrick advise him not to put too much pressure on her, especially after she receives a call from her ex that leaves her angry. Despite their advice Antonio makes another move which doesn’t go well. Brigid is sad because no one sees the hard work she put into the Spa. Then Antonio is there to compliment her on the fantastic job she’s doing which leaves Brigid in a much better mood. After a romantic indoor picnic Antonio even manages to get a kiss on the cheek!

Mouse locations

  1. Level 14-1: By the almonds and sugar.
  2. Level 14-2: By the mud-masks.
  3. Level 14-3: In the Spa :)
  4. Level 14-4: Peeking out from the left-hand side of the Spa.
  5. Level 14-5: In the chamomile flower pot.
Emily's Honeymoon Cruise - Mouse locations episode 14

Emily’s Honeymoon Cruise – Mouse locations episode 14

Episode 15: A Magical Reunion (The Pool Deck)

Emily and Patrick meet up with Francois at the Pool Deck. Francois is sad because Josh hasn’t been back to the pool since he’s mad at Francois for pulling a prank on him. Emily is figuring out a way for Francois to make it up with Josh and finds out Josh likes wizards and castles. They decide to make a castle and organize something for Josh. Patrick dresses as a wizard and brings Josh back to the pool. Francois dresses up as an evil king, so Josh can defeat him in a sword fight. In the end Francois and Josh finally make up.

Mouse locations

  1. Level 15-1: On the deck by the pool ladder.
  2. Level 15-2: Peeking over the plants.
  3. Level 15-3: Near the bottom of the slide.
  4. Level 15-4: Between the counter and the BBQ.
  5. Level 15-5: Peeking over the top of the BBQ.
Emily's Honeymoon Cruise - Mouse locations episode 15

Emily’s Honeymoon Cruise – Mouse locations episode 15

Episode 16: Kid-Friendly (The Kid’s Club)

The props from the castle need to be returned, so Emily and Patrick visit the day-care again. Patrick tells Emily he heard she ran The Kid’s Club while he was left on the beach. Patrick gets a call about his job offer and he asks for some time to think about it. Emily tells Patrick they need to look for a bigger house when they return from their honeymoon, but Patrick is distracted by the job offer. At the end of this episode Patrick talks to Emily about the job offer. He’ll have to travel a lot and that means spending a lot less time together as they’re used to. Emily says they’ll make it work. Then a sad Evelyn drops in looking for Edward who’s been away for days.

Mouse locations

  1. Level 16-1: Peeking over the top of the top crib.
  2. Level 16-2: Peeking over the top of the cake decorating station.
  3. Level 16-3: Peeking over the ice.
  4. Level 16-4: Peeking through the window, above the lolly-pop.
  5. Level 16-5: On top of the pink bookshelf.
Emily's Honeymoon Cruise - Mouse locations episode 16

Emily’s Honeymoon Cruise – Mouse locations episode 16

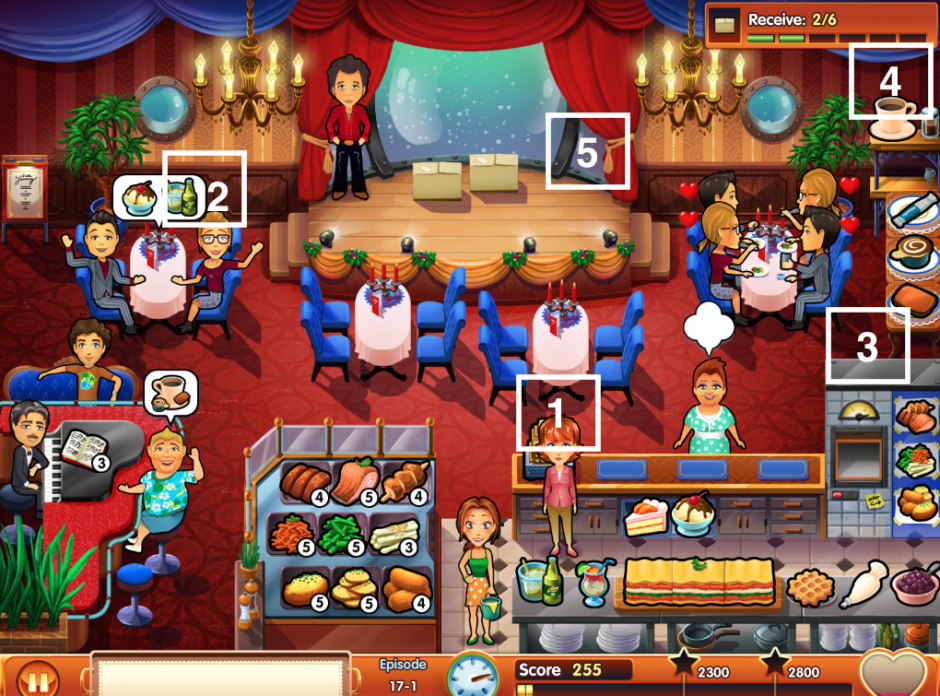
Episode 17: End-Entertainment (The Piano Bar)

At the Piano Lounge, Evelyn explains that Edward saw John kissing her. Emily helps her mum set-up for the open mic show. Patrick searches the ship to find Edward. Emily talks to her mum about Patrick’s job offer and how confusing it is. The open mic is a success with lots of different acts. Then out of the blue there’s a performance by Edward and The Studs. Evelyn dances on stage with Edward and they finally make up. Patrick invites Emily on stage and tells her that despite everything he loved their honeymoon. Josh announces that they’ve reached Snuggford. On deck Patrick tells Emily he turned down the job offer because he wants to be with her.

Mouse locations

  1. Level 17-1: Peeking above the cash register.
  2. Level 17-2: Between the table and the open mic poster to the left of the stage.
  3. Level 17-3: Above the oven.
  4. Level 17-4: In the white coffee mug.
  5. Level 17-5: Peeking through the big port hole.
Emily's Honeymoon Cruise - Mouse locations episode 17

Emily’s Honeymoon Cruise – Mouse locations episode 17

Episode 18: Epilogue (The Beach)

Three months later everyone is gathered on the beach with Brad and his girlfriend Ivy. Brad proposes a toast to Emily and Patrick who gave him the courage to reunite with Ivy. Angela calls with great news; she became the owner of her own boutique in New York and she’s going to create Ivy’s wedding dress. Meanwhile Jimmy decided to sell the ship. Antonio and Brigid arrive a little bit later and also have great news; they opened a Spa together in Snuggford. At the end of this episode Brad and Ivy get married after which it’s party time!

Mouse locations

  1. Level 18-1: By the statue of Neptune.
  2. Level 18-2: Peeking over the salt and pepper mills/shakers.
  3. Level 18-3: By the feta cheese and olive.
  4. Level 18-4: In the speedboat.
  5. Level 18-5: Peeking out from the top of Emily and Patrick’s swinging seat.
Emily's Honeymoon Cruise - Mouse locations episode 18

Emily’s Honeymoon Cruise – Mouse locations episode 18

The secret mini-game

Have you discovered the secret mini-game in Delicious – Emily’s Honeymoon Cruise yet? If not, you should check it out right away, it’s great fun! Go to the main screen of the game, first click on Patrick, then on Emily and then on the logo of the game. Try to collect as many coins as you can but watch out for the evil giant fish! What’s your high score?

Good luck!

That’s it! With the tips and tricks in this walkthrough and with a little help of your time management skills you should be able to complete every challenge. If you do, don’t thank us. We should all thank KittenChippy for the amazing YouTube videos and Michelle Hornblow for writing such an extensive article about Delicious – Emily’s Honeymoon Cruise. Your work is much appreciated and we’re glad to have you as Delicious fans!

Good luck to everyone and let us know in the comments if this walkthrough was helpful!

The post Delicious – Emily’s Honeymoon Cruise Walkthrough appeared first on GameHouse.

Virtual Villagers 5 – New Believers Walkthrough & Cheats

$
0
0

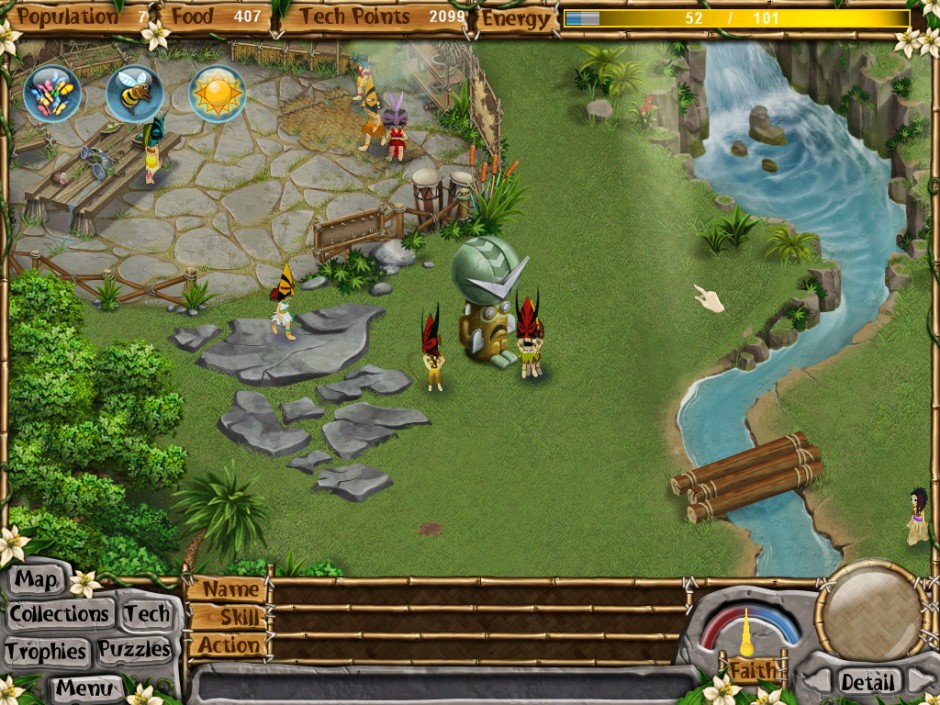
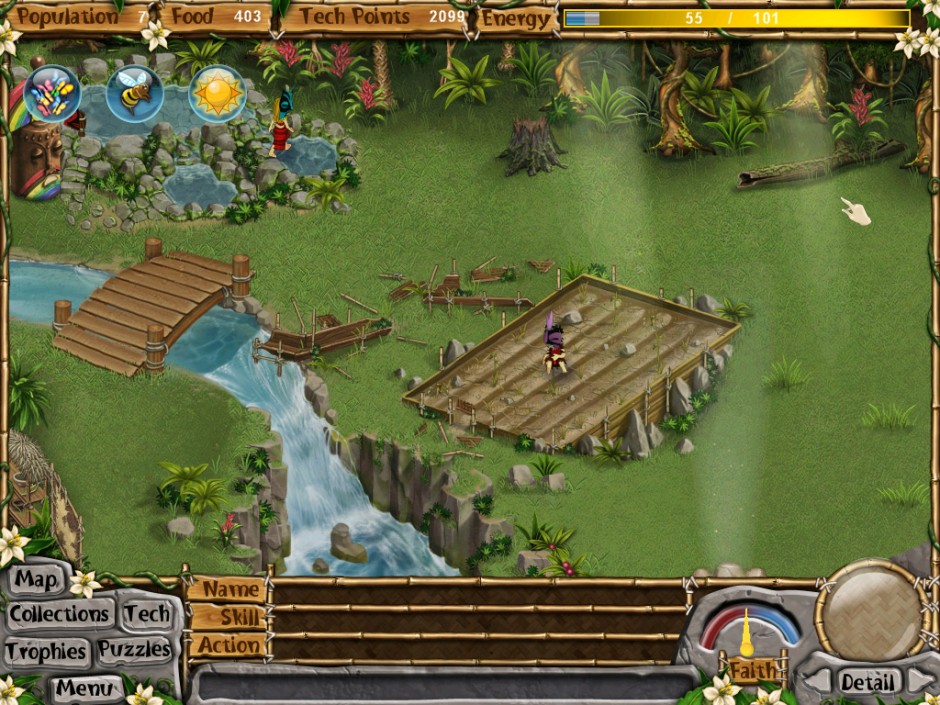
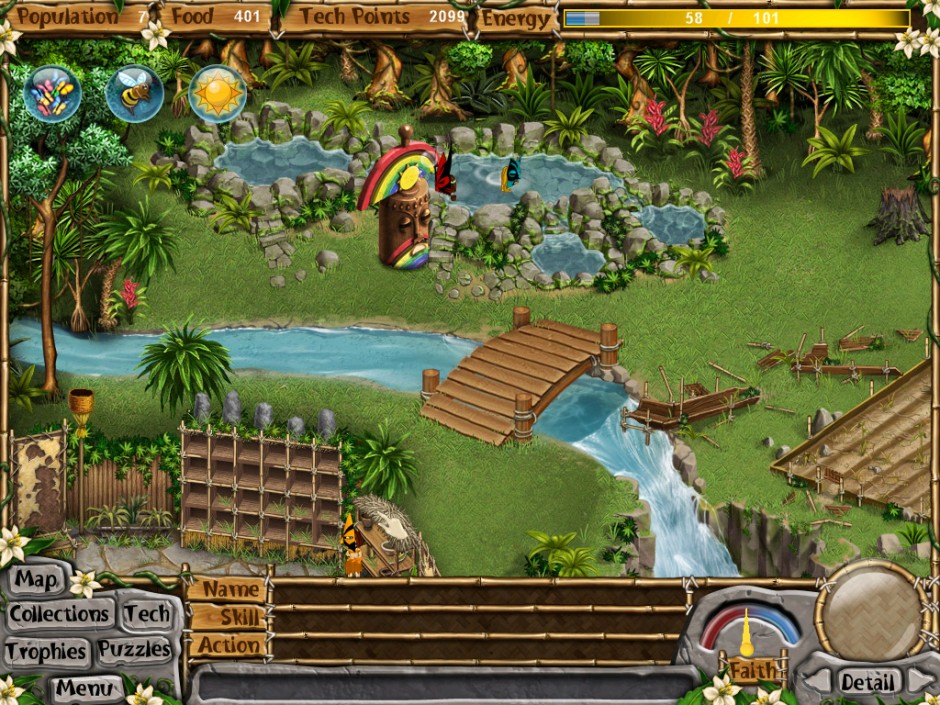
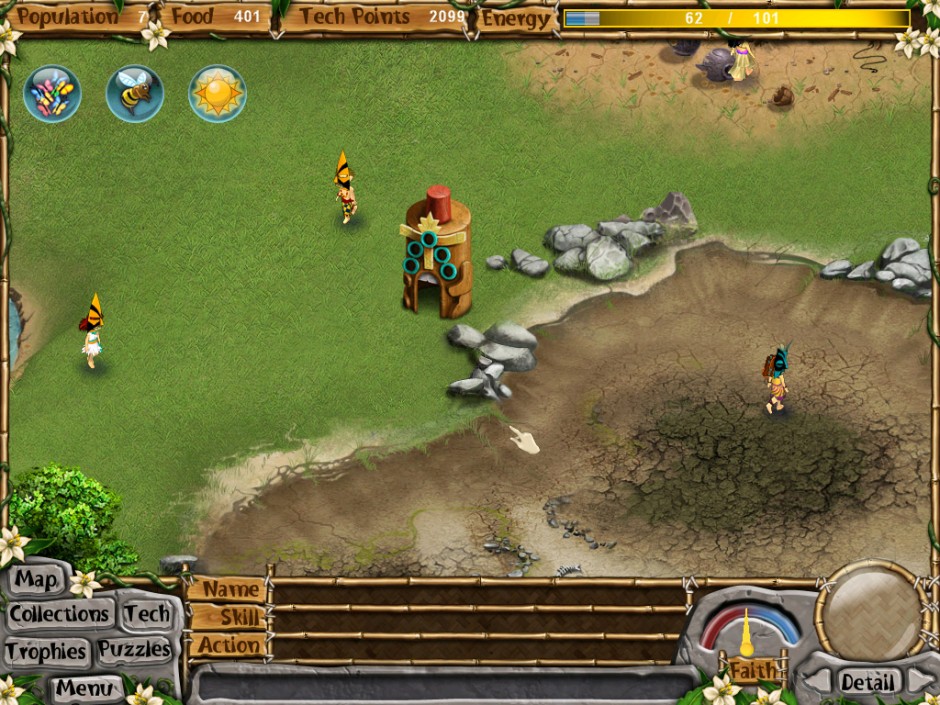
This Virtual Villagers 5 – New Believers walkthrough will guide you through the entire game, allowing you to swiftly and successfully complete the game. This walkthrough is filled with awesome tips, tricks and even some cheats here and there. Of course we won’t cover Virtual Villagers 5 cheats in too much detail, since it’s just a really nice and fun game to actually play. So are you ready to explore the mysterious center of the beautiful Isola and convert those pesky heathens to join your tribe?

A good setup from the start and a well thought out strategy is essential in converting those heathens and building up your tribe. Remember not to ignore the most overlooked aspect of the game, the camera screen in the bottom right corner. It helps you find your villagers quickly, really handy when you’re trying to find the children somewhere on the map.

Virtual Villagers 5 New Believers Walkthrough

Virtual Villagers 5 New Believers Walkthrough

Contents

Choosing your villagers

A crucial part of your success begins even before you start playing, namely when selecting the first 5 villagers. As you may have noticed some villagers are more useful than others. So below you’ll find a few do’s and don’ts:

Do Don’t
Balance males and females Avoid villagers that dislike work
Pick at least one male and female of 18yrs or older Avoid villagers that dislike learning
Select villagers in their 20’s Avoid villagers that dislike running
Choose at least one child (8-10 years old) Avoid villagers that dislike wood
Be picky about likes and dislikes Avoid villagers that dislike stone
Avoid villagers that dislike plants
Avoid villagers that dislike herbs
Avoid villagers that dislike fish
Avoid villagers that dislike swimming
Avoid villagers that dislike rest

It’s also important to keep the following in mind:

  • 1 hour in the game (Fast mode), is equal to a whole year in the lives of your villagers.
  • Only children (under 14) can pick stuff up and gather collectibles. So make sure to have at least one around.
  • Children between 14 and 18 can’t reproduce yet, but they can start working.
  • Villagers can reproduce between the ages of 18 to 50.
  • When a baby is born, the mother can’t work until her baby is 2 years old.
  • Collect as much as you can. Collecting lots of mushrooms early on can mean the difference between life and death. You’ll notice faint white sparkles, which help make sure you spot them quickly.
  • When actually playing the game, make sure it’s in “Fast mode”. But keep in mind when you leave the game, it continues. So it’s best to switch to “Normal” or “Slow”, or even “Pause” the game when necessary. That way you’ll avoid major issues with your villagers.

Make sure to set preferences for your villagers. If for example you want a villager to do some farming, set his/her preference to “Farming” (select a villager and click “Details” on the bottom right).

Villager detail screen

Villager detail screen

Navigate the map by left-clicking on and dragging the map, or for an even quicker way by using your keyboard’s numpad numbers 1 through 9. Each number corresponds to one of the 9 sections of the map:

Virtual Villagers 5 Overview Map

The Overview Map

Skills

In Virtual Villagers 5 there are six different skills your villagers can master. Of course the more experienced they are in a particular skill, the more efficient they become. For each skill there are three levels: Apprentice, Adept and Master. The highest skill level will be shown at the bottom of the screen when you select a villager, and furthermore it will show you which level they are.

Farming Farming obviously is food collection, the more farming skills the more effectively you can harvest food. The farming skill can be improved by picking berries, harvesting crops from the farm and fishing. Make sure there’s at least one person collecting food.
Building The building skill is useful for building structures faster and will increase with dismantling totems, working on the statue and doing repairs. It’s best to use male builders, as females might be occupied raising babies and therefore aren’t busy building.
Research By acquiring research skills you gain tech points. You can improve your research skills by doing research in the lab.
Healing Healing sick villagers increases your healing skills. Studying at the hospital has the same effect. Improving your healing skills means you can cure illnesses faster.
Parenting Having good parenting skills means you can make babies easier. The best way to improve your parenting skills is to just simply have more children. Telling stories and doing some teaching at the nursery school also helps with increasing your parenting skills.
Devotion The more devotion the more effectively you can instill faith in heathens. Devotion is increased by converting heathens with blue masks and honoring the statue.

Technologies

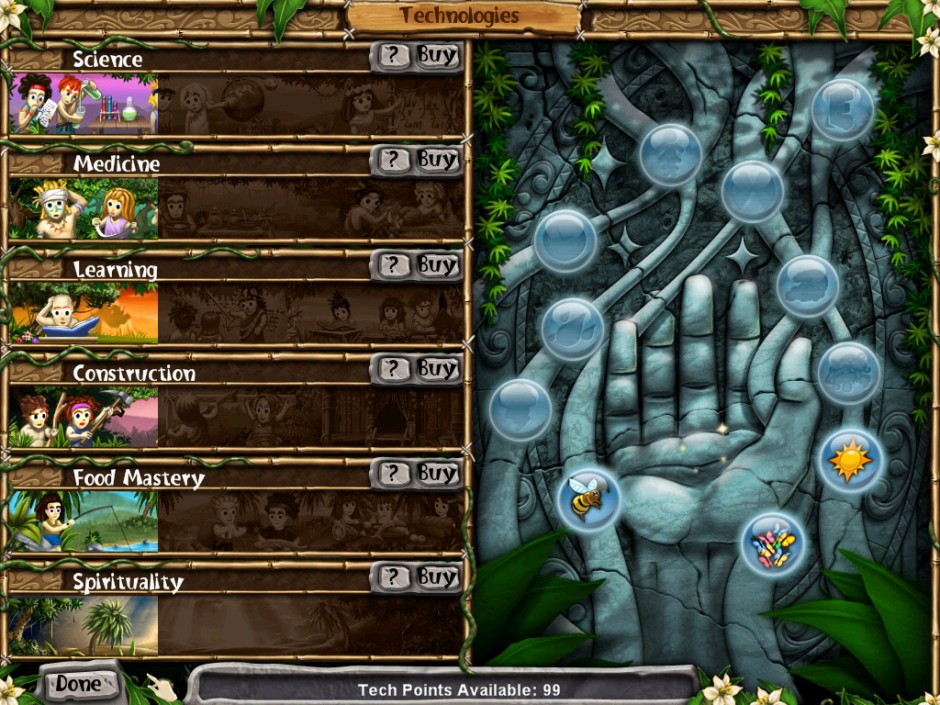
Virtual Villagers 5 – New Believers has 6 technologies that can be researched: Science, Medicine, Learning, Construction, Food Mastery and Spirituality. The “Technologies” menu can be found by clicking “Tech” in the lower left corner of the screen. Each technology has 3 different levels, and all start at level 1. So in total there are 12 upgrades you can buy.

Virtual Villagers 5 Technologies

6 Various technologies that can be improved

Science

Level 2: Allows you to build the clothing hut and makes sure the lab is restored so the heathens with the purple mask can be converted. Tech points are also accumulated faster.
Level 3: You can upgrade another lab and get more tech points faster.

Medicine

Level 2: Villagers live longer, until their late 60’s. It also upgrades the hospital and increases fertility.
Level 3: Villagers live until their late 70’s and beyond and it increases fertility even more.

Learning

Level 2: Villagers learn tasks faster and therefore reach the master level faster.
Level 3: The nursery foundation school appears which is meant to train children.

Construction

Level 2: The second hut can be built, as well as the next level construction of the Hand Statue and the repair of the aqueduct for the farm.
Level 3: You get the third hut and the final level of the Hand Statue.

Food Mastery

The higher the level the more food you get from gathering food.

Grey mushrooms Red mushrooms Noni fruit Fish
Level 1 6 food points 35 food points 2 food points 4 food points
Level 2 9 food points 52 food points 3 food points 6 food points
Level 3 12 food points 70 food points 4 food points 5 food points

Spirituality

Level 2: Gives you more energy capacity and allows the statue upgrade (with construction level 2).
Level 3: Increases the energy capacity some more and allows the final statue upgrade (with construction level 3). It also makes you more efficient at converting heathens.

Food

In Virtual Villagers 5 there are 5 different types of food: Gray mushrooms, Red mushrooms, Crops, Noni fruit and Fish. Having enough food is necessary for building and sustaining a larger population of villagers.

Gray mushrooms

Mushrooms can only be gathered by children under the age of 14, so start gathering straight away. Make sure to check your map constantly in search of these mushrooms.

Red mushrooms

Red mushrooms give a lot more food than the regular gray ones, but they appear less often. However, it is possible to use a god power to make mushrooms bloom. This also increases the chance for red mushrooms.

Noni fruit

Before being able to gather noni fruits from the noni bush, you’ll need to build a granary (Puzzle #2) and you need to dismantle the Hungry Totem (Puzzle #3). The noni bush will appear in area 6 (just press number 6 on your numpad).

Crops

In area 8 there’s a farm that can be unlocked by completing Puzzle #5. The farm will give you crops as a food source. If you harvest all crops from the farm it’ll take roughly 2 hours before the crops grow back again. You can however use the Hand of Bloom spell to instantly have them ready for harvest.

Fish

After completing Puzzle #10 you’ll be able to start fishing in the lake in the south (area 3). Catching fish is as easy as dropping one of your villagers in the lake and being patient until the fish eventually bite.

Godly Powers a.k.a. Spells

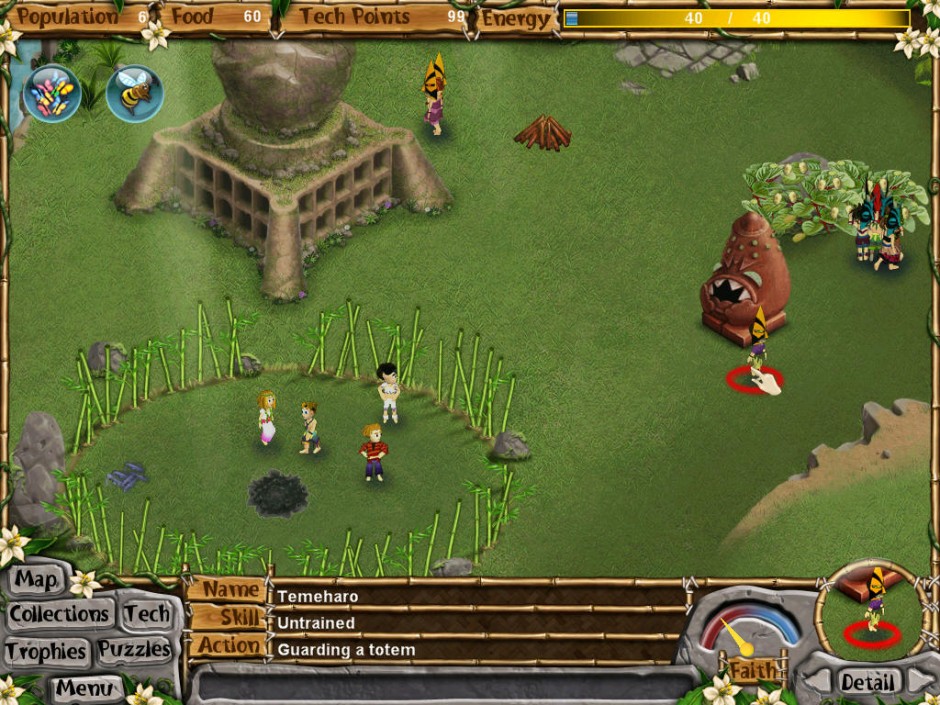
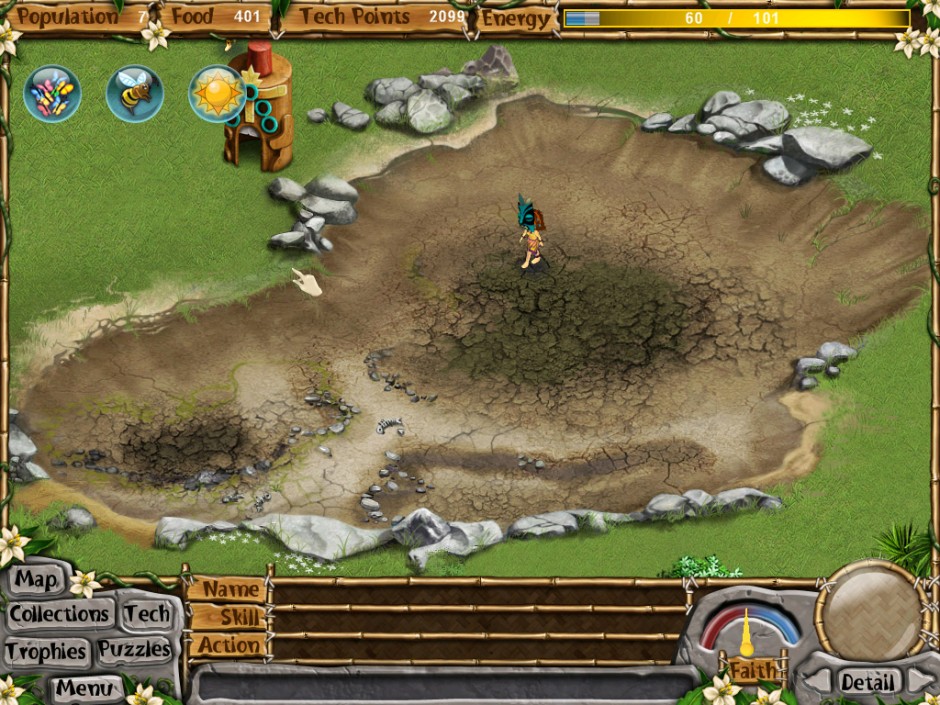
God powers (or godly powers or spells) will become available when your energy level increases. These god powers enable you to affect the environment. The Virtual Villagers 5 god powers are limited to 2 things, your energy capacity and the actual amount of energy. As you can see in the image below on the left of the energy bar is the amount of energy, on the right the energy capacity.

Virtual Villagers 5 Energy Bar

The Energy Bar

The energy capacity can be increased by discovering new relics, by having children and by converting heathens to villagers. Of course the energy capacity can also be increased by buying levels 2 and 3 of the spirituality technology. Below are the 12 god powers and the capacity you need before they become available.

God Power Capacity Effect
Butterflies 10 points Draws all children into the area where you cast the spell.
Bees 25 points Used to distract guards away from totems. The bees can also be used to increase the number of noni fruit.
Sunshine 50 points Drives away fog and stops rain.
Lightning 100 points Drives people away and can be used to light fires or take out the Pain Totem.
Bloom 150 points Gives instant food. It can be applied to any spot to grow flowers and mushrooms, or on the farm to instantly make crops ready for harvest.
Tempest 300 points Causes a big storm that’ll scare guards away or fill the lake in the south.
Fog of Doom 400 points Causes a dense fog which your villagers can see through but the heathens can’t. You’ll need this to convert the last blue heathens that are surrounded by red and orange ones.
Time Warp 500 points Speeds the game up really fast. You’ll need it in the build-off competition (Puzzle #9).
Revive 600 points This spell will revive anything that died and is needed for Puzzle #10.
Grant Youth 700 points Turns any older villager into a child again.
Earthquake 800 points An earthquake can pull down buildings and is needed to convert the last orange and red heathens.

Totems

There are 7 different Totems in Virtual Villagers 5, of which 6 will be destroyed eventually. The Totems are mostly guarded by orange and red heathens. By pulling these Totems down you’ll instill faith in heathens and be on your way to completing Virtual Villagers 5.

Totem Location How to destroy
Hungry Totem Area 6 The Hungry Totem guards the noni bush and can be destroyed by distracting the guards with bees or children (Puzzle #3).
Knowing Totem Area 7 The Knowing Totem guards the science lab and can be destroyed by distracting the guards with bees, lightning or children (Puzzle #4).
Pain Totem Area 4 The Pain Totem guards the hospital and can be destroyed by using lighting to neutralize it while pulling it down (Puzzle #11).
Hollow Totem Area 2 The Hollow Totem doesn’t do much and can only be destroyed by six children (Puzzle #7).
Blocking Totem Area 1 The Blocking Totem guards the Mausoleum and can only be destroyed by master builders and a lot of distractions like lightning and children (Puzzle #7).
Rainbow Totem Area 7 The Rainbow Totem guards the hot springs and can only be destroyed once the clothing hut is built (Puzzle #12).
Blind Totem Area 9 The Blind Totem is the only one that has to be repaired instead of being pulled down. By restoring the Blind Totem you restore you vision in the area (Puzzle #15).

The Heathens

Heathens come in 5 different types, each with their own specialties, behavior and mask colors: Blue, Purple, Orange, Red and The Chief. The goal of these heathens is to make your life difficult by scaring your villagers.

Blue Mask Heathens

The Blue ones are the easiest. They don’t scare off villagers and are open to talk to. Drop your villagers on top of them to start a conversation. When the conversation is finished, you’ll see a light appear over their head. That means they are contemplating the conversation and aren’t open to another one yet. Once the light disappears drop another one of your villagers on them until you eventually convert them.

Orange Mask Heathens

The Orange ones scare your villagers away and chase them, making it harder to access certain areas or pull down Totems. Orange Mask Heathens also cause villagers to drop things they collected like food or other collectibles.

Red Mask Heathens

Red Mask Heathens are senior guards and scare off villagers. They won’t however, chase the villagers. The Red ones mostly guard Totems and other important areas. The Red and Orange Heathens can only be eventually converted by using Earthquake spells. When you cast an Earthquake, lights will appear over their heads. When they’re gone, use another Earthquake spell until they are converted.

Purple Mask Heathens

Purple Mask Heathens can only be converted by words and solving puzzles #1, #5, #9 and #13. They are skilled Heathens and each has their own skill: Doctor, Farmer, Scientist and Builder.

The Chief

The last of the Heathens is The Chief. You’ll only see him every now and then walking in and out of the forest to the north. The Chief can be converted by solving Puzzle #16.

Walkthrough

If you want to finish Virtual Villagers 5 – New Believers as fast and as efficiently as possible it’s best to follow the strategy below. You can check off each part of this Virtual Villagers 5 walkthrough and make sure you convert all Heathens as quickly as possible.

Selecting your villagers

Required: –
Puzzle: 1, 2, 14

As mentioned in the first paragraph, a good selection of villagers right from the start is the best way to quickly get you going. The best mix of villagers is as follows, of course keeping the suggestions in the first paragraph in mind (especially regarding likes and dislikes):

  • One man with high building skill
  • One woman with high building skill
  • One man with high research skill
  • One nursing female
  • One child

When the game starts, drop every adult villager on the fence to start tearing it down and building a food bin. Once the fence is down, drop the villagers on the Knowing Totem in area 7, just below the hot springs. Of course use butterflies and bees to keep the hostile and scary Heathens away.

Then check the hospital in area 4 and drop one of your villagers on top of the sick Blue Heathen until you’ve treated his illness. That way he’ll join your tribe and give you a piece of the necklace.

It’s also good to start building the Tribute Statue right from the start. Make sure to drop some builders on it and just keep on improving it.

The Hungry Totem

Required: 1+ builder(s)
Puzzle: 3

The main objective at this first stage of the Virtual Villagers 5 walkthrough is getting a steady supply of food for your villagers. In order to do that, you’ll need to pull down the Hungry Totem in area 6. Use the Swarm of Bees spell to drive away the heathens and drop all of your adult villagers on the Hungry Totem. Right after that you can start to build the love shack and send some villagers to the west bank of the river to gather dry grass and wood from the woodpile. They’ll deposit the grass and wood in the fire pit. Once they’ve done that, drop a villager on the pit to start a fire. Then conceive 2 babies in the love shack, as you’ll need them later on.

Virtual Villagers 5 The Hungry Totem

The Hungry Totem

The Knowing Totem

Required: 1+ builder(s)
Puzzle: 4, 13

The Knowing Totem in area 7 is the second one to take down. Drive the red and orange heathens off with the Lightning Strike spell and destroy the totem. Once it’s taken down, the heathens will vacate the laboratory, and you should have at least half of all your villagers working on research. Then, in order to convert the Heathen Master Scientist, drop one of your Master Scientist’s in front of the drawing board. The board is situated on the left of the research facility.

Virtual Villagers 5 The Knowing Totem

The Knowing Totem

Repairing the Aqueduct

Required: 1+ builder(s), level 2 construction, 1 master scientist
Puzzle: 5

In order to repair the broken aqueduct in area 8 you need a Master Scientist. Just drop him on the broken aqueduct and he will supervise the repairs. Next you need at least one builder (preferably a few) and drop them on the aqueduct as well. Don’t forget to constantly drive off heathens using any of your spells. The repair of the broken aqueduct will convert the Master Farmer Heathen and will give you another piece of the necklace. Next you need to build some more houses and make a few babies.

Virtual Villagers 5 The Aqueduct

The Aqueduct

The Pain Totem

Required: 1+ builder(s), 100 energy
Puzzle: 11

Breaking down the Pain Totem is fairly easy. Just use your Lightning Strike spell a few times to stun it. Once it’s stunned, drop all of your builders on it to take it apart. Do pay attention, because using the Lightning Strike once might not be enough. After demolishing the Pain Totem, upgrade your technologies to level 2 and complete the second modification of the statue.

Virtual Villagers 5 The Pain Totem

The Pain Totem

The Rainbow Totem

Required: 2+ builder(s), clothing hut
Puzzle: 12

Once the clothing hut is completed, three pots of dye will appear near the farm. You’ll need to drop 2 builders on both the red and yellow dye almost simultaneously. The villagers will then carry the dye to the hot springs and pour them in. This will drive away the heathens and you can start destroying the Rainbow Totem. If the water starts to run clear, just drop 2 villagers on the dye again and carry on destroying.

Virtual Villagers 5 The Rainbow Totem

The Rainbow Totem

The Blocking Totem

Required: all master builder(s), 500 energy
Puzzle: 6, 7, 9

Before taking apart the Blocking Totem, start the building contest first in order to convert the Heathen Master Builder. Use your most experienced builder and use the Time Warp spell on him. This will cause your builder to win the contest and convert the heathen. You then get the final piece of the necklace. After winning the contest, use the Lightning Strike to scare off all heathens surrounding the Blocking Totem. Then quickly drop all of your builders on the totem and take it apart.

Virtual Villagers 5 The Blocking Totem

The Blocking Totem

The Hollow Totem

Required: 6 children
Puzzle: 8

First scare off any heathens by either a Lightning Strike or a Swarm of Bees. Then drop all 6 children on the Hollow Totem. Let those kids work their magic and soon the totem will be demolished.

Virtual Villagers 5 The Hollow Totem

The Hollow Totem

Replenishing the Lake

Required: 600 energy
Puzzle: 10

Replenishing the Lake can only be done when you have enough energy. Start off with two Tempest spells right after each other. This will fill the lake in no time. Then, when you have replenished your energy, use the Revive spell to bring the fish back to life. Replenishing the Lake will give your villagers enough food for the remainder of Virtual Villagers 5.

Virtual Villagers 5 The Lake

The Lake

Restoring the Faith

Required: all necklace pieces, restored mausoleum, lit fire
Puzzle: 15, 16

Drop a villager on the pan by the Mausoleum in area 1 and he’ll take it to the river. Drop another villager on the pan once it’s next to the river to pan for gold. You need to keep trying a few times in order to start panning for gold. You’ll need to do this 3 times in total to fill the pot with gold. When it’s full, drop a villager on the pot and he’ll start smelting the gold above the lit fire. Once he’s finished, a sphere of gold will appear. Drop a villager on it to put this sphere in the eye of the Blind Totem in area 9.

Drop a villager on the necklace, once the Heathen Chief’s woodland is revealed. Once the necklace is completed, drop another villager on it to take it to the Heathen Chief. This is enough to convert the last Heathen and complete Virtual Villager 5 New Believers.

So, there you have it. You’ve just successfully completed Virtual Villagers 5 – New Believers by following our pretty extensive walkthrough filled with tips, some cheats and lots of puzzle solving :-)

The post Virtual Villagers 5 – New Believers Walkthrough & Cheats appeared first on GameHouse.


Walkthrough for ‘I Know a Tale’

$
0
0

I Know a Tale

Chapter One

The latest Hidden Object Games, – ‘I Know a Tale’ – is already a big success. To help you through all the scary levels, we made a walkthrough for the first chapter to give you that little bit of help you need to make your way to the final scene, so you can sleep easy with your accomplishment. This is also a great opportunity for you to test out whether you like the game or not.

‘I Know a Tale’ is not as straight forward as many other hidden object games, where you can just collect all the hidden objects in one instant. This game requires you to move from one scene to another and backwards again, with short old school movies mixed in to complement the storyline. This makes it easy to get stuck at first, as you figure out how the game plays. A little help is never a bad thing!

To start, you must decide to play on ‘Casual’or ‘Expert’ mode. As you may have guessed, this walkthrough is more for the casual players than the seasoned experts. We don’t want to ruin it for all you experts out there!

‘I Know a Tale’ sets the stage with a theme song from live actors, which really lends an unusual and classic feel. The purpose of the little videos are to give you a sense of the time period and envirement the game is set in. Throughout the game, you constantly hear thunder and other sounds – did you catch the sound of the breaking glass – or see the lightning flash? The little videos are extras for the storyline of ‘I Know a Tale’.

Of course, the main goal of the game is to find all the Hidden Objects. But in order to find all Hidden Objects, you need to move from one scene to another, find objects, and sometimes even go back to the first scene to unlock or fix an item to move forward in the game. Scroll down to find the ideal way to move your way along the first chapter of ‘I Know a Tale’. The rest of the game really gets your brain cells working!

Note for the Casual Players: In every scene you can collect items, but not all items are already accessible to you from the beginning. Sometimes you need other (hidden) collector’s items to gain new specific items.

How to Move through I Know a Tale

Start
Enjoy.
Scene 1
2 items
“stone & knight figurine”.
Scene 2
6 items
“nails, hammer, dragon figurine, matches, powder, rake”.
continue
Move to scene 1.
continue
Move to scene 3.
Scene 2
3 items
“video cassette, king figurine, knight on horse figurine”.
Scene 3
14 items
“princess figurine and look in the armoire.
Scene 1
5 items
“dried leaves, pliers, knife, key to nursery, belt”.
Scene 3
1 item
“gargoyle”.
Scene 2
(SPOILER alert)
0 items
but open scenery 4 with your collected items.
Scene 4
0 items
“a Code”.
continue
Move back to scene 2.
continue
Move to scene 4.
Scene 2
1 item
“fingerprint”.
Scene 3
2 items
“tape, pencil”.
Scene 2
2 items
“key, crystal”.
Scene 4
1 item
“insulation tape”.
Scene 2
1 item
“razor”.
Scene 1
2 items
“rope, broom”.
continue
Move to Scene 2.
continue
Move to scene 2.
Scene 1
1 item
“crowbar”.
Scene 3
1 item
“boards”.
Scene 2
1 item
“magnet”.
Scene 2
(SPOILER alert)
0 items
Use the crowbar to enter scene 5.
Scene 5
4 items
“bolts, jack, video cassette, colored pencils”.
Scene 1
0 items
replace your flat tire.
continue
Move to scene 4.
Finish
Congratulations
you saved the girl.
Scene 5
0 items
Release the girl.
Scene 3
2 items
“video cassette, hairpin”.
Scene 4
1 item
“pieces of the firebird”.

The post Walkthrough for ‘I Know a Tale’ appeared first on GameHouse.

Infographic ‘I Know a Tale’ Walkthrough

$
0
0

Still struggling how to get through the first level of ‘I Know a Tale’.
We are experimenting with how would be the best way to show you walkthroughs.
So made an infographic of the first level.
Tell us what you think about it. Does it get a repeat?

Or did it make the confussion even worse. Let us know!

Infographic I Know a Tale – chapter 1

I know a Tale Infographic

I know a Tale Infographic

Any other ideas for great walkthrough visualization, reach out to us and let us know. Did you already read the written walkthrough of ‘I Know a Tale’.

The post Infographic ‘I Know a Tale’ Walkthrough appeared first on GameHouse.

Delicious – Emily’s Home Sweet Home Walkthrough

$
0
0
Walkthrough Delicious – Emily’s Home Sweet Home

If you’re a fan of time management games, chances are high that you’re a bit of a perfectionist. There’s nothing wrong with striving to be the best, and there’s also no shame in getting a little help along the way! The eleventh edition of the Delicious series is packed with tons of challenges beyond beating all 60 levels, which is why this Delicious Emilys Home Sweet Home walkthrough was written: to help you reach 100 percent completion. Below you’ll find the requirements for obtaining all trophies and items for Emily’s house including all mouse locations as well as general cheats, tips and tricks.

Contents

1. Basic Gameplay

In Delicious 11 – Emily’s Home Sweet Home, you manage six different restaurants in order to help Emily remodel her dream house. Each level consists of a shift during which you must take orders, prepare food, serve customers, accept payment and clean up. Customers may give you large tips if you serve them promptly, or they may get up and leave if you don’t attend to them quickly enough. Customer patience is measured in hearts; a customer will leave when they drop to zero hearts. You must reach a target amount of points for each level by satisfying enough customers to move on to the next day.

Level Completion

There are 60 regular levels, and 30 additional challenge levels. Each level can be completed with one, two or three stars depending on how much money you make. Every level also has a mini-challenge, for which the reward is a diamond that can be traded to purchase items for Emily’s home.

Bonuses

Extra points are awarded whenever you:

  • collect payment from multiple customers at once
  • serve complete orders
  • deliver several orders in one trip
  • serve a customer very quickly
  • complete a level’s mini-challenge
  • catch a mouse

Preparing Food

Food preparation increases in complexity throughout the game. Some items must be restocked, combined in a certain order, or cooked for a certain amount of time before serving. You’ll unlock new menu items as you complete levels, which can make pleasing customers easier, so make sure to update your menu regularly!

Cleaning

After customers leave, you must click on their dishes to clean up after them. If you don’t have clean tables when a new customer comes in, they might leave. As you progress, you will be given cleaners who handle this task.

Entertainment

You can maintain customers’ patience by sending them an entertainer while you serve other guests. Use your entertainers often to satisfy customers so that they leave bigger tips. Be aware the entertainers can only help customers which are seated at a table.

Decorating

Emily can reinvest her profits into decorations. Decorations improve customer patience and happiness, so they can help generate bigger tips. You can easily make extra profit by purchasing decorations, so don’t neglect your restaurant’s aesthetics!

Customer Types

You will encounter different customer types at each restaurant. See the walkthrough and diamond challenge section for customer profiles at each location. You can also see the different customer types in a level by accessing the menu. Customers of the same type have similar levels of patience, leave similar tips and make orders of similar complexity. Identifying a customer’s type can help you prioritize your serving when the restaurant is busy; for example, you may want to cater to a big tipper with low patience before helping your more frugal customers with higher patience.

Building Your Menu

At the beginning of each level, you must choose from your available items to set a menu for that day. You will have limited options at first, but new items will quickly become available as you progress through each day. New items offer various benefits. Some are quicker or easier to prepare, which means you can provide faster service and make better tips. Other items, such as spill-proof products, help you avoid mishaps that occasionally slow down your service. Experimenting with different menu combinations is a good strategy if you are having trouble with a particular level.

The Serving Tray

Emily’s serving trays only hold a set number of items, although you will be given larger trays as you reach higher levels. If you accidentally add an item to your tray that you didn’t mean to, just click on the item to put it down.

Shops

Each restaurant has a shop where you can purchase new equipment and other items to make your customers happier, which means they will leave bigger tips. Investments pay off quickly, so don’t hesitate to spend money when you have it.

Secret Game

On the map for Happy Funtime Land, you can click on the air plane near level 28. When you do, you’ll see Emily flying though the sky. Click on her to unlock a hidden game called Emily’s Air Race. You must use your mouse to guide Emily while collecting coins. If you hold the mouse down for a while, Emily will make a loop. This little game offers no trophies or other rewards, but it is a fun distraction if you want a break from the main game.

2. Walkthrough and Diamond Requirements

RESTAURANT ONE: EMILY’S GARDEN

Customer Types:

Customer types Emily's Home Sweet Home

Customers Types of Restaurant 1 in Delicious Emily’s Home Sweet Home

Diamond Requirements:

Level 1: Walk 100 yards.
Level 2: Set up the decorations.
Level 3: Achieve 5 quick bonuses by providing prompt service.

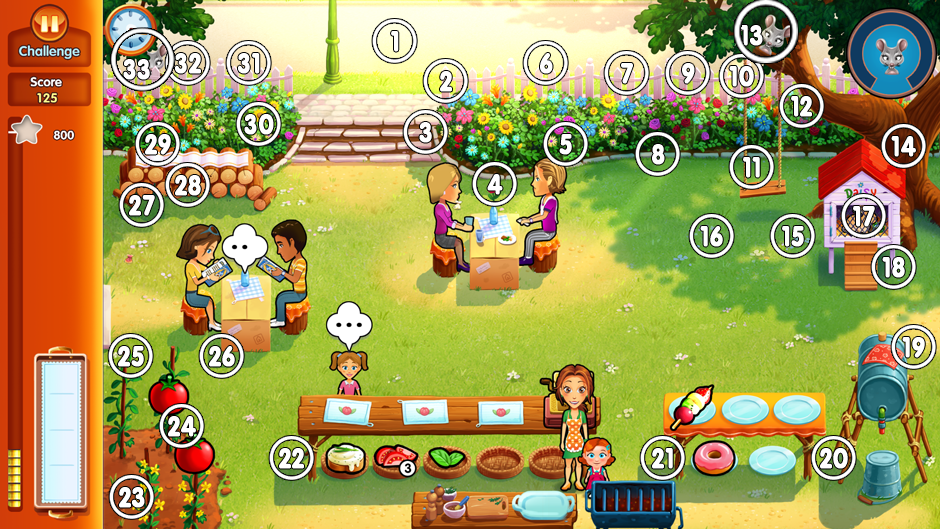
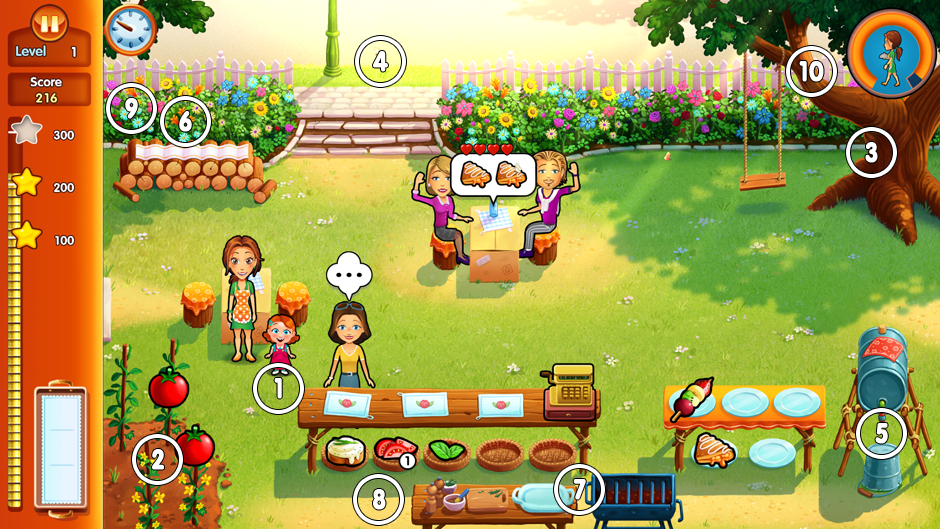
Challenge 1: Catch 33 mice while also meeting the target. If you miss one, don’t worry; it will appear elsewhere later. Mice appear randomly two at a time in the following locations:

Challenge 1 - 33 mice locations. Find all the mice in restaurant 1 of Delicious Emily's Home Sweet Home

Challenge 1 – 33 mice locations. Find all the mice in restaurant 1 of Delicious Emily’s Home Sweet Home

Challenge 2: Your serving tray slowly breaks away decreasing the number of items you can carry at once. Work as quickly as possible to meet the target.

Level 5: Only serve complete orders. Be careful not to burn the ribs; they only need to be on the grill for a few seconds. Purchase the new grill for $150 at the store to avoid this problem.

Challenge 3: All orders are for flowers. This may require several attempts to complete; if you unlock a new flower but fail to meet the target goal, you can still use the new item when you retry, so keep at it until you unlock all of your flower options. It becomes a lot easier when the new flowers are unlocked.

Level 6: Serve the committee members.
Level 7: Achieve one star during the first half of the day.

Challenge 4: Do not lose your VIP customers. Serve the VIP customers first, and send Billy to keep everyone else entertained.

Level 8: Locate all of the scouts. They appear randomly in the following locations:

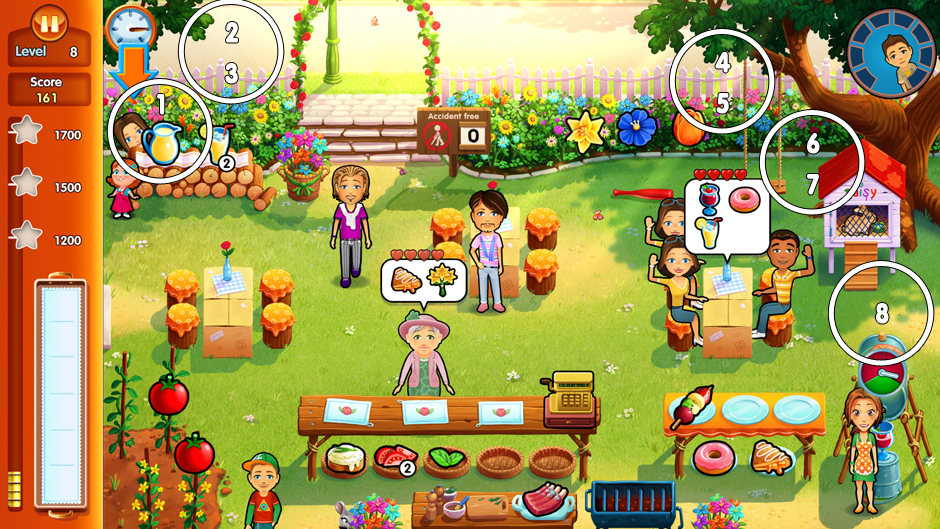
Level 8 - 8 scouts locations in Delicious Emily's Home Sweet Home

Level 8 – 8 scouts locations

Level 9: Serve five ecstatic customers of each type. That’s a total of 20 ecstatic customers. This requires serving the orders while the customers still have all of their hearts.

Challenge 5: Your tray can only carry three items and all customers enter in a bad mood. Serve the counter customers first while sending Billy Jr. to entertain the seated guests. Then serve the customers in order of patience from lowest to highest: yuppies first; kids and regulars next; and seniors last.

Level 10: Make one of every product, including a bouquet with each flower and all three sandwich types. Before customers start to order, you can simply add these items to your tray and immediately remove them to count toward your goal.

RESTAURANT TWO: TALON LAKE

Customer Types

Customers types restaurant 2 - Delicious Emily's Home Sweet Home

Customers types restaurant 2 – Delicious Emily’s Home Sweet Home

Diamond Requirements:

Level 11: Serve ten ecstatic customers. Toasting marshmallows over the fire gives you some extra time to prepare other items.

Challenge 6: Do not let children have the matches or knives. The children are creative they will come and ask for two items – like a drink and matches. You don’t have to serve! They will continue asking for the matches, and if not served eventually walk away angry. Canoeing is also introduced in the level; be sure to look out for people who need paddles.

Level 12: Pack the backpack.
Level 13: Serve 10 customers in 60 seconds. Let the orders build up, then carefully plan your serving trips.

Challenge 7: Serve customers precisely in the order they arrive. This can quickly become hard to keep up with, as customers sit in different locations. Focus on one order at a time. Extra tip for the challenge: Sometimes customers arrive at the same time. Usually one customer goes for food and the other customers heads to the canoeing. Most mistakes are made with those customers!

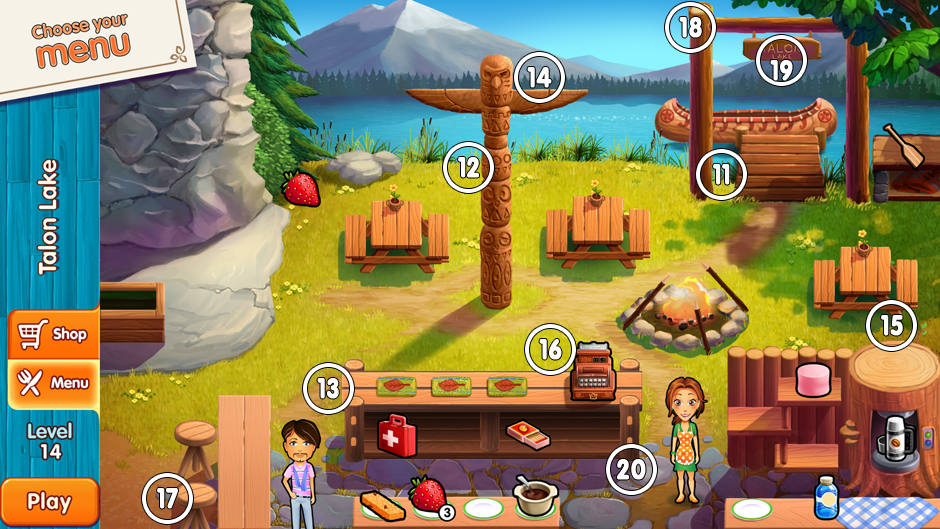
Level 14: Find all of the plants. They are in the following locations:

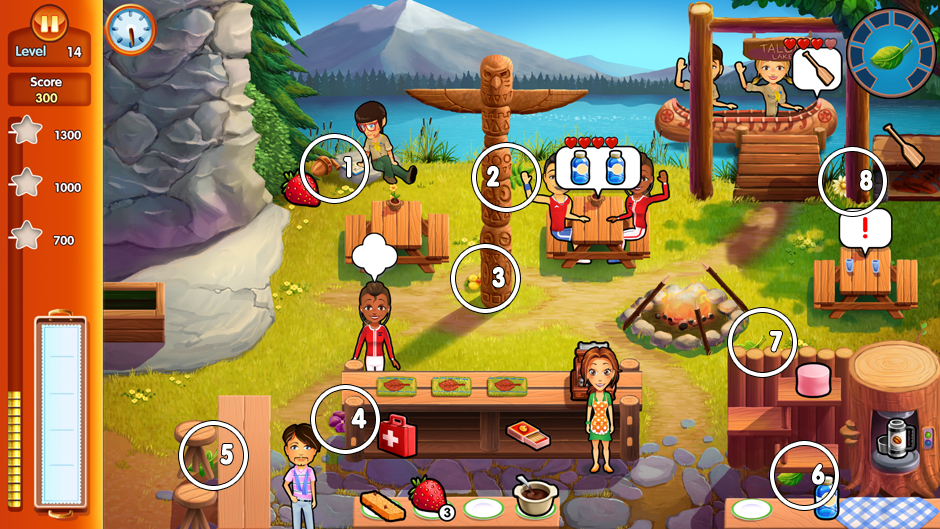
Level 14 - Plant locations in Delicious Emily's Home Sweet Home.

Level 14 – Plant locations in Delicious Emily’s Home Sweet Home.

Level 15: Do not burn any items.

Challenge 8: Clean large messes left by customers.

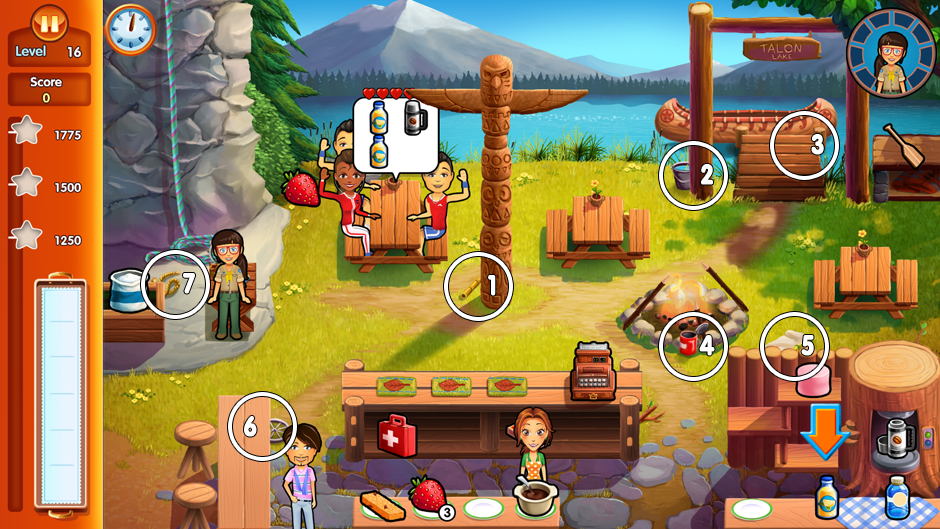
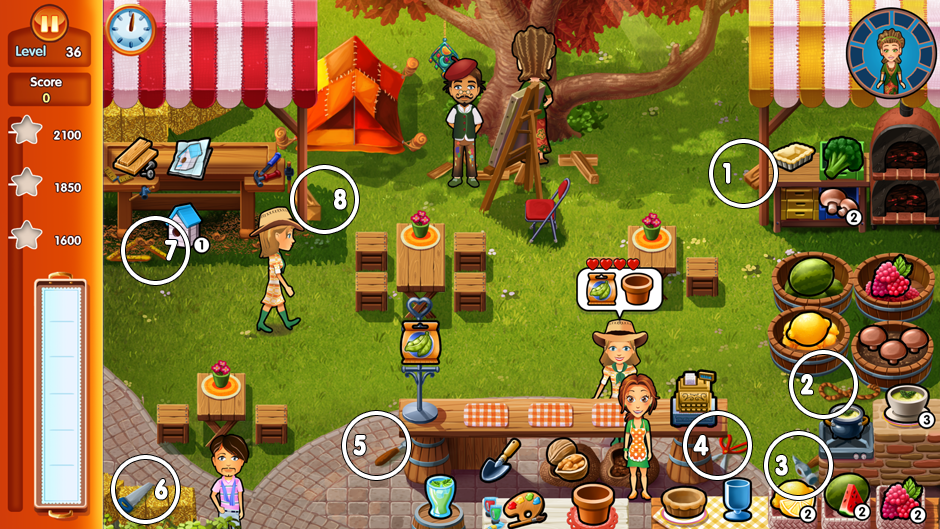
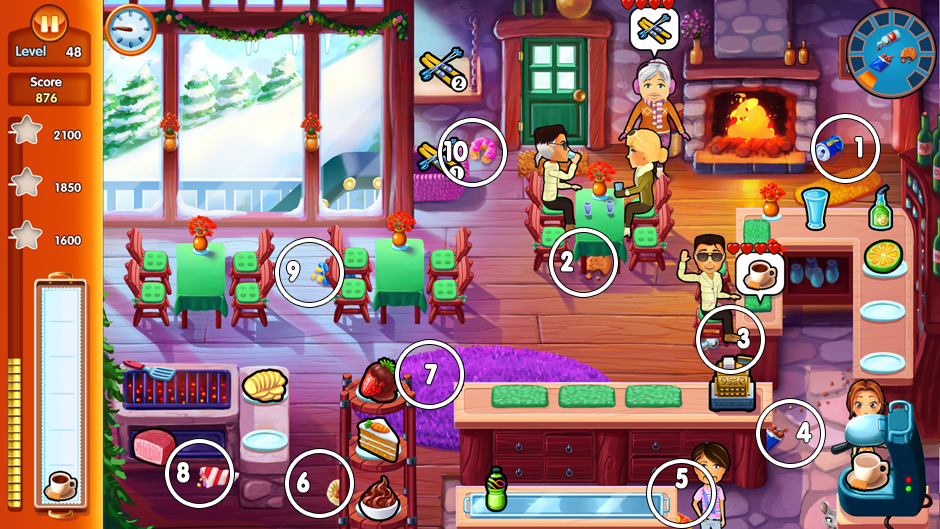
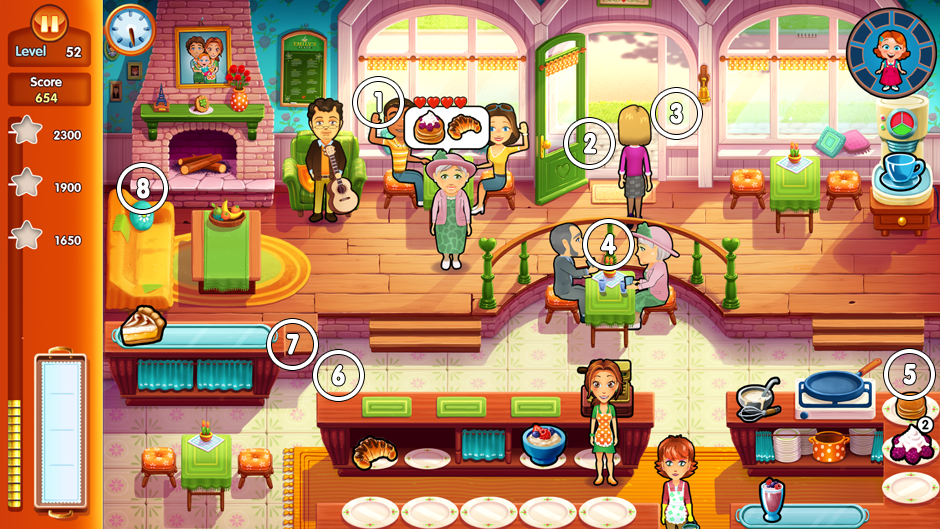
Level 16: Give the eight model parts to Enid. She requests them in random order. You can see them in these spots:

Level 16 - Model Parts locations in Delicious Emily's Home Sweet Home

Level 16 – Model Parts locations in Delicious Emily’s Home Sweet Home

Level 17: Utilize only two tray spots. Make sure to stir the soup in this level so that it doesn’t boil over. An alarm will sound if you do not stir frequently enough.

Challenge 9: Waste nothing during the day.

Level 18: Clean three tables in a row three times.
Level 19: Go 30 seconds without serving anyone.

Challenge 10: Groups come in waves.

Level 20: Receive the six packages.

RESTAURANT THREE: HAPPY FUNTIME LAND

Customer Types

Customers types restaurant 3 in Delicious Emily's Home Sweet Home.

Customers types restaurant 3 in Delicious Emily’s Home Sweet Home.

Diamond Requirements:

Level 21: Entertain five customers.

Challenge 11: Work without your cleaner.

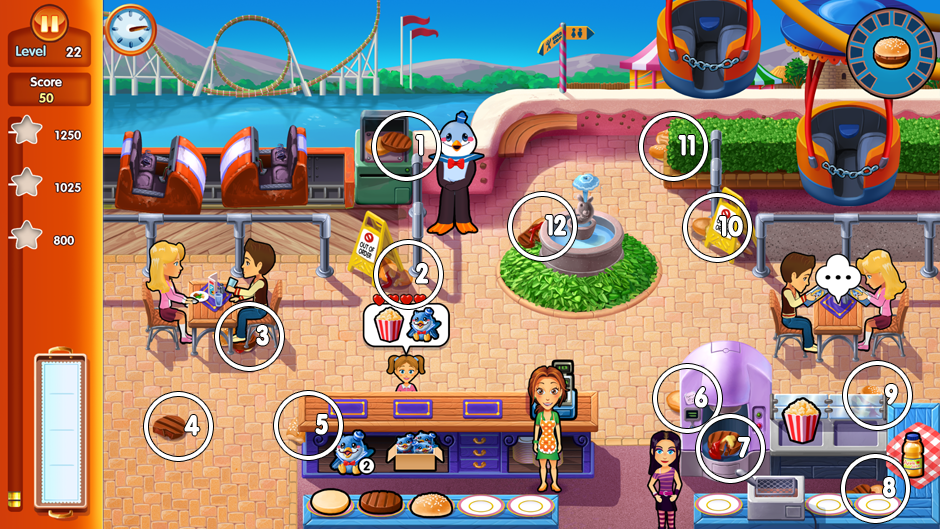
Level 22: Clean up the 12 bits of burger from the food fight:

Level 22 - pieces foodfight locations in Delicous Emily's Home Sweet Home.

Level 22 – pieces foodfight locations in Delicous Emily’s Home Sweet Home.

Level 23: Make 40 sweets. You can simply add and remove funnel cakes to and from your tray to count toward the total.

Challenge 12: Serve several large groups.

Level 24: Snap six pictures of Paige on the Ferris Wheel. Simply wait by the camera for her to pass by. You may be able to catch two pictures at once.
Level 25: Walk 1,000 yards. This may require extra walking between tables.

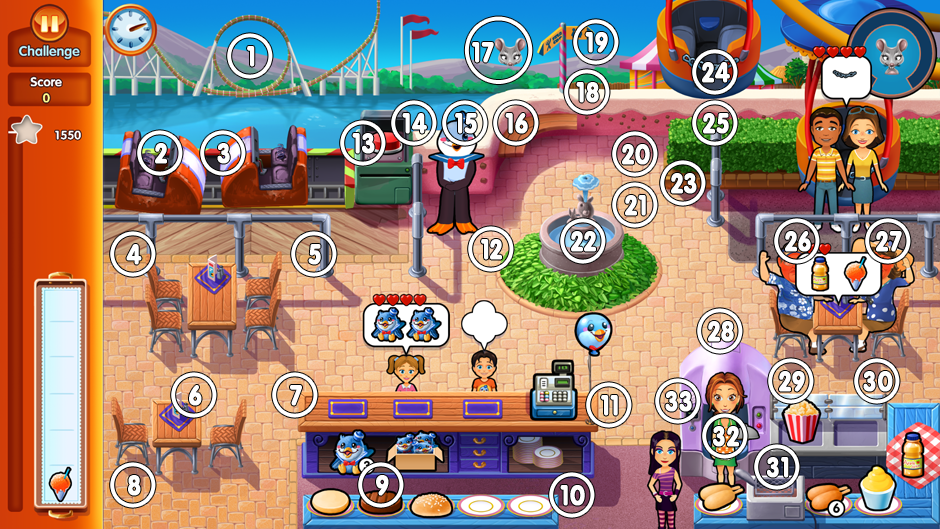
Challenge 13: Catch 33 mice while reaching the target. They appear randomly in these locations:

Challenge 13 - find mice locations in Delicious Emily's Home Sweet Home

Challenge 13 – find mice locations in Delicious Emily’s Home Sweet Home

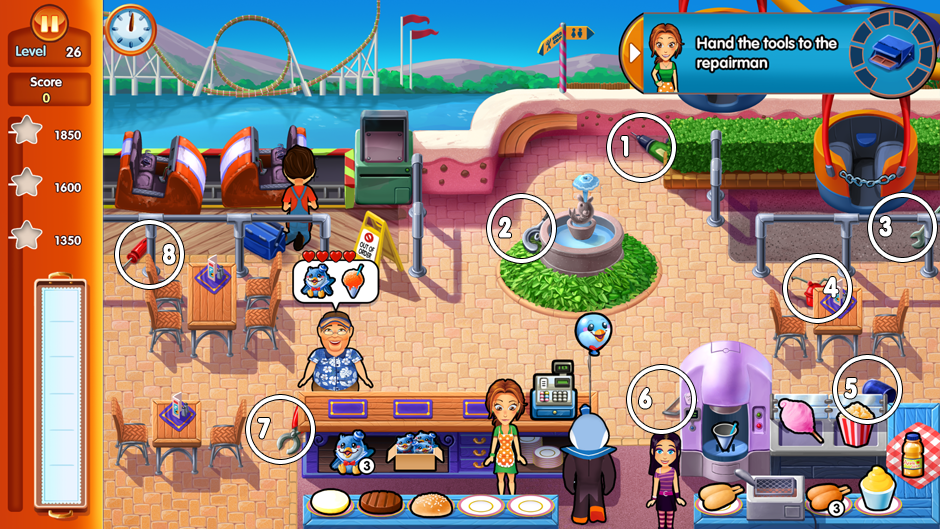
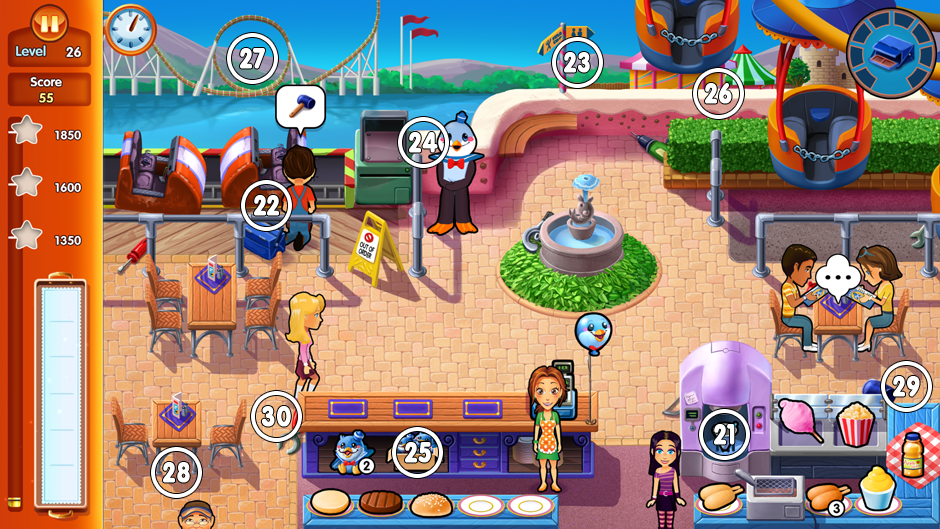
Level 26: Give the eight tools to the repairman. He asks for them in random order.

Level 26 - tools locations of Delicious Emily's Home Sweet Home

Level 26 – tools locations of Delicious Emily’s Home Sweet Home

Level 27: Launch three full roller coaster rides. Take pictures and serve them to the customers otherwise they are not willing to exit the ride.

Challenge 14: Receive 100 points for each table you entertain.

Level 28: Inflate the inflatable man.
Level 29: Make $850 in tips.

Challenge 15: Only receive points from ecstatic customers.

Level 30: Do not serve sodas or fried snacks to kids. Slushies are OK to serve.

RESTAURANT FOUR: FARMER’S MARKET

Customer Types

Customers Types restaurant 4 in Delicious Emily's Home Sweet Home

Customers Types restaurant 4 in Delicious Emily’s Home Sweet Home

Diamond Requirements:

Level 31. Achieve 20 chains, bonuses or combos.

Challenge 16: Table customers request double orders.

Level 32: Assemble the tent.
Level 33. Make sure all customers stay at four hearts or greater.

Challenge 17: No points are given for serving single customers. So try to combine single customers and check them out in pairs to gain points.

Level 34: Reassure Moon Blossom five times during the level.
Level 35: Use 45 re-stockable items.

Challenge 18: All customer order items that must be restocked.

Level 36: Give the eight tools to Moon Blossom. The order in which she requests them is random.

Level 36- tool locations for Moon Blossom in Delicious Emily's Home Sweet Home

Level 36- tool locations for Moon Blossom in Delicious Emily’s Home Sweet Home

Level 37: Don’t let any products fall to zero stock.

Challenge 19: Alternate between serving table customers and the counter customers.

Level 38: Serve the Moon Blossom and Sun Lotus.
Level 39: Get one star by the end of the first half of the day.
Level 40: Finish the level with all products fully stocked.

Challenge 20: Items spoil on the tray if not quickly served.

RESTAURANT FIVE: SKI LOUNGE

Customer Types

Customers Types restaurant 5 in Delicious Emily's Home Sweet Home

Customers Types restaurant 5 in Delicious Emily’s Home Sweet Home

Diamond Requirements:

Level 41: Recover the skies in 25 seconds.

Challenge 21: Emily works slower as the day progresses. Tip: Wait with giving Emily a new order until she slows down. She will catch her breatch very fast and this will help you to finish the challenge almost at normal serving speed.

Level 42: Receive the six packages from Chuck.
Level 43: Serve five customers of the same type in a row. This is best accomplished with the five seniors who appear near the beginning of the level. Extra Tip: bringing them the items one by one also counts towards the requirement!

Challenge 22: Cook 25 items on the grill.

Level 44: Untangle all of the skis.
Level 45: Make 10 of each type of dessert.

Challenge 23: Clean each table in 13 seconds.

Level 46: Serve Marissa and Aaron.
Level 47: Obtain 12 quick bonuses.

Challenge 24: Work with breaking appliances. You can see when an appliance is broken – it’s slightly disintegrated – when clicking it will not provide you with orders any more. To fix it, click on the appliance and wait. It will take a short while to do, but you can serve your orders again. Be aware it will probably break a second time during the challenge.

Level 48: Clean the restaurant. These are all of the items you must take care of:

Level 4 - 10 items to clean locations in Delicious Emily's Home Sweet Home

Level 4 – 10 items to clean locations in Delicious Emily’s Home Sweet Home

Level 49: Serve exactly eight angry customers. It’s best to allow the seniors and socialites to drop to one heart after ordering one item. That way you can quickly fix their order before they leave, and you won’t lose much money because they leave the smallest tips anyway.

Challenge 25: Locate 40 mice:

Challenge 25 - 40 mice locations in Delicious Emily's Home Sweet Home

Challenge 25 – 40 mice locations in Delicious Emily’s Home Sweet Home

Level 50: Serve three full trays.

RESTAURANT SIX: EMILY’S PLACE

Customer Types

Customer Types restaurant 6 in Delicious Emily's Home Sweet Home

Customer Types restaurant 6 in Delicious Emily’s Home Sweet Home

Diamond Requirements:

Level 51: Utilize only two spots on the serving tray.

Challenge 26: Customers sitting at tables order three times.

Level 52: Find Paige eight times. She appears in these locations in no specific order:

Level 52 - 8 hide locations Paige in Delicious Home Sweet Home

Level 52 – 8 hide locations Paige in Delicious Home Sweet Home

Level 53: Serve only complete orders.

Challenge 27: Serve a large number of business people.

Level 54: Receive the six supply packages from Chuck.
Level 55: Waste no pancake or tap products.

Challenge 28: Restock pancakes in just 8 seconds.

Level 56: Serve the scouts.
Level 57: Earn $1,260 in tips (In the previous versions of the game, the goal was $1500. You can download a newer version of Emily’s Home Sweet Home to lower the goal to $1,260 if necessary).

Challenge 29: Serve while walking super-fast.

Level 58: Set up decorations.
Level 59: Walk 1,500 yards.

Challenge 30: Serve a long single line of customers.

Level 60: Make one of every product in Emily’s Place.

3. Trophies

Trophies are awarded for meeting certain milestones. They come in the form of decorations for Paige’s room. Below is a list of all the trophies and how to unlock them.

Butterflies
Complete all Garden levels
Wood-Carved Owl Complete all Talon Lake levels
Sunflower Complete all Farmers Market levels
Toy Ferris Wheel Complete all Happy Funtime Land levels
Little Kitchen Complete all Emily’s Place levels
Snow-Colored Curtain Complete all Ski-hut levels
Paige’s Name Sign Have an order already on your tray before someone asks for it
Ballerina Get three stars on every level
Golden Camera Unlock all 12 photo moments
Blue Giraffe Watch the credits in their entirety
Tea Set Serve 500 beverages
Tiny Band Set Entertain a table 100 times
Quick Bunny Get 250 quick bonuses
Pink Chair Walk a total of 100 miles
Full Storage Chest Select every product in every restaurant at least once. There are 165 items to be chosen in total.
Play-Horse Complete all challenge levels
Cupcake Beanbag Unlock all 111 products
Carl The Mouse Catch all 60 mice
Decorative Lamp Purchase every item in all restaurant shops. There are 62 purchasable items total
Night Light Purchase all 30 items for your house
Princess Outfit Get all of the other trophies
All trophies Paige room in Delicious Emily's Home Sweet Home

All trophies Paige room in Delicious Emily’s Home Sweet Home

4.Memorable Photo Moments

At certain points during the story, a camera icon will appear over the characters. Click on it to capture the moment. You must take 12 pictures to receive the golden camera trophy. Photo opportunities occur in the following levels:

Level 1-1 Paige and her friend are playing
Level 1-7 Baseball Playing
Level 2-16 Patrick and the scouts
Level 2-19 Medal of bravery
Level 3-24 The family is sleeping
Level 3-30 Friends in the Fun Park
Level 4-37 Stargazing
Level 4-39 Moon Blossom and the tree
Level 5-45 Patrick finishes his work
Level 5-50 Marissa’s Trophy
Level 6-51 Angela’s gift
Level 6-60 Party

Pictures per room

The pictures are placed in the following rooms of the house.

Paige’s bedroom:
Paige and her friend are playing – 2nd scene at the start of level 1
Stargazing – scene at the end of level 37

Toilet:
medal of bravery – scene at the end of level 19

Livingroom:
Baseball playing – scene at the end of level 7
Angela’s gift – scene at the end of level 51
Marissa’s Trophy – scene at the start of level 50
The family is sleeping – scene at the end of level 24
Friends in the Fun Park – scene at the end of level 30

Restaurant:
Party – scene at the end of level 60

Bedroom:
Patrick finishes his work – scene at the end of level 45

Attic:
Patrick and the scouts – scene at the end of level 16
Moon Blossom and the tree – scene at the beginning of level 39

5. All Mouse Locations

Carl the mouse appears in a different location in each level. You will hear a squeak when he shows up on screen; click on him quickly to capture him before he disappears. You may get a couple of tries for each level. You must capture Carl in every level to win the Carl trophy.

Mouse Locations Restaurant 1 – Emily’s Garden
1. Left side of the main counter
2. In the vegetable garden
3. Atop Daisy’s cage
4. Near the lamp post
5. Sitting On the overturned bucket
6. In the lemonade jug
7. Between the grill and the ribs
8. Left side of the counter in the flower pot
9. Left of the lemonade stand
10. Hanging from the tree beneath the birdhouse

All mice in restaurant 1 in Delicious Emily's Home Sweet Home.
All mice in restaurant 1 in Delicious Emily’s Home Sweet Home.


Mouse Locations Restaurant 2 – Talon Lake
11. Beside the pole for the Talon Lake sign
12. Behind the totem pole
13. Left side of the counter
14. Atop the totem pole
15. Behind the vat
16. Left side of the register
17. Near the stool closest to the bottom of the screen
18. Top left side of the Talon Lake sign
19. Hanging from beneath the Talon Lake sign
20. Lounging in the soup

All mice in restaurant 2 in Delicious Emily's Home Sweet Home.
All mice in restaurant 2 in Delicious Emily’s Home Sweet Home.


Mouse Locations Restaurant 3 – Happy Funtime Land
21. Inside the snow cone maker
22. Between the roller coaster cars and the table
23. Hanging beneath the sign for the toilet
24. Right of the roller coaster controls
25. Inside the toy-box beneath the counter
26. Behind the hedges
27. In the roller coaster loop
28. Bottom left under the table
29. On the beverage table
30. Left side of the counter

All mice in restaurant 3 in Delicious Emily's Home Sweet Home.
All mice in restaurant 3 in Delicious Emily’s Home Sweet Home.


Mouse Locations Restaurant 4 – Farmers’s Market
31. Behind the pole holding up the awning over the work bench
32. Behind the pole holding up the awning over the quiche station
33. Left side of the counter
34. Hanging underneath the workbench awning
35. Underneath the easel
36. Inside the soup maker
37. Inside the topmost quiche oven
38. Climbing the branch
39. Near the barrel of fruit
40. Between the pie crust and the vase

All mice in restaurant 4 in Delicious Emily's Home Sweet Home.
All mice in restaurant 4 in Delicious Emily’s Home Sweet Home.


Mouse Locations Restaurant 5 – Ski Lounge
41. Atop the mantel
42. Eating the meat beside the grill
43. Second tier of the sweets tray
44. Behind the grill
45. Behind the liquor bottle
46. Peeking through the window
47. Behind the cocktail glass
48. Underneath the coffee maker
49. Atop the mantle
50. On top of the middle table

All mice in restaurant 5 in Delicious Emily's Home Sweet Home
All mice in restaurant 5 in Delicious Emily’s Home Sweet Home


Mouse Locations Restaurant 6 – Emily’s Place
51. On top of the pancake batter
52. Near the sidewalk gutter outside the window
53. By the front door
54. Behind the banister on the right side
55. In front of the family photo
56. Near the juice and toppings
57. In the middle cushion of the couch
58. Left side of the sweets counter
59. Near the green door
60. Right side of the sweets counter

All mice in restaurant 6 in Delicious Emily's Home Sweet Home.
All mice in restaurant 6 in Delicious Emily’s Home Sweet Home.


If you find yourself stuck on a level, consult these Delicious Emily’s Home Sweet Home walkthrough videos as a guide for cheats, tips and tricks to help you complete the game to 100 percent.

The post Delicious – Emily’s Home Sweet Home Walkthrough appeared first on GameHouse.

Nemo Secret Vulcania Walkthrough

$
0
0

The goal of this Nemo Secret Vulcania walkthrough is to take you step-by-step through each scene to help you 100% complete the game. Hidden object games can be tricky and sometimes it’s better to have a second set of eyes to help you past certain screens. As always, we want to help our gamers get through their games with the latest tips, tricks and cheats! Are you ready for an in-depth Nemo Secret Vulcania walkthrough? Let’s get started right away in helping Alice save Captain Nemo from Dardell!

Contents Nemo Secret Vulcania Walkthrough

Chapter 1: Emerald

Right on the first screen you’ll want to grab the wire sitting just right of the room’s center. Just a bit further right from the wire is a small black cylinder – snatch it up for later. From there we need to zoom in on broken handle in the middle of the room. Repair it with the wire and pull it. When you pull it, you’ll enter the next screen.

Cabin Adventure - Nemo Secret Vulkania

Cabin Adventure – Nemo Secret Vulkania

After going down the hatch, you’ll see a crowbar that you’ll need in front of the rocking chair. On the opposite side of the room, hanging by the stairs, is a hook. Take it to finish up the room so you can head into the pool area.

Submarine in the adventure room

Submarine in the Adventure room

First thing’s first in the pool area – zoom onto the photograph sitting by the lantern in front of the stairs. Get the switch along with the photo. Across the pool, by the submarine’s claw, is an oil can and right above it by the railing is a door. What’s the door for? The submarine! Attach it and then head up stairs.

Use your oil can on the door to the far right of the room and open it. Before you leave, talk to the little flying robot to the left of the steering wheel and he’ll give you a message. Now you can go through the newly opened door where you’ll find a bridge. On the bridge is a crate – zoom into the crate and use your crowbar to pry it open. Pick up the flipper and then zoom into the tree on the right. Yes, it really is a tree. In a cave. Once you’ve zoomed in, use the hook to pull down the cable inside the tree’s crack.

Move across the bridge and open the door. Before entering, make sure you grab the propeller lying on the ground in the left corner.

First Hidden Object Scene - Nemo Secret Vulkania Walkthrough

First Hidden Object Scene – Nemo Secret Vulkania Walkthrough

Here’s your first HOS, or hidden object scene, just zoom into the sparkling light to activate it. First you’ll move the poster at the top of the room next to the boar’s head to reveal a card. Subtracting the card, there is a total of 15 hidden objects in the room. Scan carefully for the remainder. Afterward, take the wrench sitting underneath the boar’s head and remove the valve in the front center of the room.

Attach the valve to the door to reveal the elevator room. Interact with the man in the top hat standing behind his creepy spider robots. In the center of the room is a map, zoom onto it and collect the Voltmeter along with the map. Leaning up against the barrel to the right of the room is an old ladder. Across the room on the chair is a lever. Collect both of these items. At the far back left of the room is cable spool, zoom in so you can replace it with the cable in your inventory.

Right next to the man in the elevator is a panel. Zoom in to wire up the elevator.

Controlbox minigame - Can you solve the puzzle

Controlbox minigame – Can you solve the puzzle?

Place the Voltmeter in the upper right corner of the panel and start connecting nodes to restore power. It’s simple when you look at it: from the reset switch at the bottom right, just follow the green wire in order. The gray wires make it easy as they push you in the right direction if you get lost.

Once you’ve returned power to the elevator, get inside it. On the left of the elevator is a small table, zoom in so you can open the drawer. Move the picture and grab the knob. When you see the spider, hit it with the crowbar. Next to the spider is a panel, zoom in so you can place your lever under the “3.” Pull the lever so you can move up to the third floor.

At the edge of the cliff by the telescope is a robot arm. Zoom in and pick up the button and electron tube. From there, zoom in on the telescope and place the knob so you can adjust the image. Play with the knobs until the image is clear, which will cause the green light to glow. Once it’s lit, pull the lever. You’ll have to repeat the process two more times and then click on the flying robot.

Go back through the elevator and return to the first floor. Zoom into the desk to start your next hidden object scene. Open the two small drawers to pick up the knife and the watch. After collecting those two, there will be 14 more objects to scan for. Once you’re done, take the rope cord hanging just beneath the key on the right of the screen and attach it to the lamp on the left. Grab the “part 1” from the lampshade and zoom out.

Hidden Object Scene - collect the 14 items of Nemo Secret Vulkania

Hidden Object Scene – collect the 14 items of Nemo Secret Vulkania

Zoom in on the panel above the desk and set the button into it. From here you have to solve a slider puzzle. There’s no set way to solve it, it’s just between you and your brain. Once you’ve completed the slider puzzle, pick up the code key for your prize.

Back track to the pool room with the submarine and go down the hatch. You’ll find yourself at another HOS. Move the rag hanging out of the chest to reveal a IX. There’s 17 items on the screen so go over everything carefully. Once you’re done, grab the fan blades to the right of the room and attach them to the fan on the far left and pick up the lantern next to it.

Start backing up and stop at the fourth scene. On the far left of this room will be a barred door, zoom in on the gate lock and insert your code key. Use the arrows to match the picture on the lock and go through the gate. Against the shelf unit on the right of the room is a saw and just in front of the saw is a note – collect both. Right next to the ominous skeleton is a switch panel, zoom in for a switch board. Insert the switch from your inventory and pull the switches like so: 8, 5, 2, 9, 6, 3, 1, 7, 4.

VIDEO

A flying robot will crash and once he’s down, scavenge the robot eye and propeller. Zoom in and replace the electron tube, robot eye and robot’s propeller to help the little guy. Afterward, pick up the windshield where the green light is shining. Back up a scene and click on the flying robot.

From there, go back to the elevator and head to the telescope. Zoom in on the robot arm and remove his claw with the saw and take it with you. Go back down the elevator and head back four scenes. Go down the hatch toward the pool room once more and zoom in on the sparkles for another HOS. Open the door to reveal three extra items for a total of 17 that you need to collect. Once you’re done there, grab the hammer on the shelf under the top shelf and break the glass to reveal the knight. Grab the knight and go.

Head back three more scenes and enter through the gate. In the left corner of the room is a chess table, zoom in so you can set the knight piece on it. The goal for this puzzle is to move the white knight pieces where the black knight pieces are stationed and vice versa for the black pieces. It’ll take some thinking, but it’s a fun puzzle to work out.

Chest minigame - place the Knight

Chest minigame – place the Knight

Once you’ve outsmarted the puzzle, it’ll open up to reveal the time wheel! Pick it up and click on the hovering robot. Return to the pool room to repair the submarine. Work your magic to place the claw, flipper, ladder, lantern screw propeller and windshield. Now you’ll be able to enter the submarine/bathysphere.

Chest minigame - Nemo Secret Vulkania

Chest minigame – Nemo Secret Vulkania

Click on the flying robot and zoom in to play another HOS. To the right of the screen’s center will be a crab. Click on the crab to reveal a piece of candy, giving you 19 total objects to seek out. Once you’ve finished the HOS, grab the match just under the ax in the front of the screen and light the smoker next to the starfish on the left. Directly above the smoker on the umbrella is insulating tape, you’re gonna need it.

In the next area, pick up the cylinder in the skeleton’s hand and the rod just left of it. Above the cylinder will be an empty oil can and across the area by the awning will be a connector for you to take. Zoom in on the giant stone in the center. Afterward, zoom in on the gate lock under the awning. You’ll see two panels with three buttons. Press the left button on the left panel, the top button the right panel and the bottom button on the left panel to gain access.

After you get through the gate, pick up the postcard on the floor, the sledgehammer in front of the stairs and the ladder sitting on the second set of stairs. On the right wall, zoom in on the phone and set the cylinder inside it. Get a board from the door right next to the phone and exit the room through the gate. Once you’re back outside, use your sledgehammer to smash the stone to pieces. You’ll find a screwdriver in the rubble. Somehow. Magically.

Return to the hallway and head downstairs. Place the insulating tape on the exposed wire on the top right of the room and flip the switch. Once you’ve accomplished that, grab the hammer and machete. Search the left side of the desk for a wrench and then pick up the newspaper. Zoom in on the radio on the desk and pull off the cover with the screwdriver. Grab the battery and pick lock. Before you leave, open the drawer to desk and pick up the handle.

Hidden Object Scene Fireplace in Nemo Secret Vulcania

Hidden Object Scene Fireplace in Nemo Secret Vulcania

Head back to the hallway and put the handle on the door on the left side of the room. Once you’re in, zoom in on the sparkly bits for another HOS. Open the screen for a bat so you can find all 18 objects in the room. Once you’ve grabbed your hoard, cut the upholstery on the chair with the knife on the wall above the seahorse. Under the chair’s upholstery is an emerald. End chapter 1! Whew!

Chapter 2: Amethyst

Pick up the nippers lying on the middle of the floor. Zoom in on the drawer to open it with pick lock so you can grab the cable and handwheel. Head back down the stairs so you can cut the chain with the nippers to open the cabinet. Put the handwheel on the tank inside and set your empty oil can under the valve. Turn the valve and pick up your new oil can. Head back to the hallway and zoom in on the door. You can use your oil can on the handle to enter the door.

Zoom in the sparkles to enter another HOS. Move the sheet and towel in the center of the room to reveal a sock for a total of 17 items you need to collect. Afterward, move the sheet and towel to the left. Grab the broom behind the ironing board to sweep away the cobwebs, which will reveal a tile for you to grab.

Hidden Object Scene First laundry minigame

Hidden Object Scene First laundry minigame

Return outdoors where you’ll zoom in on the wall at the far end of the screen. Cut the vines with your machete to gain a wagon wheel.

Return to the beach for another HOS. On the far right is a leaf, move it to reveal a butterfly. This time you have only 11 items to collect. Grab the shovel in the middle of the screen when you’re done to dig up the lantern right next to it.

Return to the room where you found the emerald to play another hidden object scene. Open the screen to reveal the apple, which gives you 18 items in this room. When you’re done, grab the hammer off from the mantle to pull up the nails on the ground.

Zoom into the tiles above the fireplace for a tile sliding puzzle after you set your tile piece into it.

Tiles minigame - move red and green correctly

Tiles minigame – move red and green correctly

The solution revolves around getting the red and green tiles to alternate without two of the same colors touching. Easy, right? When you’ve completed the puzzle, grab the ball that’s revealed to you.

Tiles minigame finished

Tiles minigame finished

By the chair is a lantern base, zoom into it to place your lantern on it and grab the carbide lamp.

Head back to the room where you swept the cobwebs and get ready for another HOS. This one is big. Move the sheet to reveal a cup that will give you a total of 21 objects to search for. Once you’ve grabbed everything, pick up the weight on the shelf to place it on the clock. Grab the chain under the clock and head back downstairs.

Cellar adventure start in chapter 2 Nemo Secret Vulcania

Cellar adventure start in chapter 2 Nemo Secret Vulcania

Zoom in on the manhole cover and place your ball in it. This puzzle is a little difficult, but the goal is to place all of the balls in the hole. Follow the lines from hole to hole – this corresponds to which hole a ball will go when you move it. There’s no set pattern, but understanding how you can move your pieces makes it way easier to complete.

Hatch Finished so it opens

Hatch Finished so it opens

When you’ve beaten the puzzle, head down the manhole where you’ll zoom in on the panel at the end of the room on the far left. Set your carbide lamp on the bottom left corner and connect the fuses. The red and green on the top need to connect to the red and green on the bottom. To do this, follow the wires and see where they connect on each wire splitter. It’s really simple and you should spot the method in no time. After you power the bottom most fuses, figure out the path for the second set and finish up with the top most fuses. It gets tricky, but just pay attention to wire’s pathways.

Pathways wires - look closely to see the right way

Pathways wires – look closely to see the right way

When everything is powered up, head down the hall and zoom in on the rails. Grab the lever and use your wrench to remove the bolts so you cans steal to the rail piece. At the top of the room you need to place your wire. Place your rail piece in front of the train and fix up the vehicle with the wagon wheel and the rod. Zoom in on the front of the train and place the lever and battery on it. Spin the lever and ride the track.

Once you’ve arrived at your destination, click the flying robot. Grab the lever down the hall and place your ladder by the rungs on the right side of the room to go up top. Click on the man when you reach the top. Place the chain above the wheel and grab the robot hand hanging on the right. On the edge of the pathway is a horn you’ll need. Zoom in on the wood next to the horn and lay down your board and nails and finish it off with the hammer. Pick up your fancy gangway.

Go back down the ladder where you came from and zoom in for another HOS. Open up the crate front and center to reveal a bottle. This HOS has 20 objects for you to snatch. On the left side of the room is a martini glass, grab the dropper and squeeze it into the jar in the center of the room for an amethyst. Woo hoo, chapter 2 is done!

Chapter 3: Diamond

Use your horn on the bats in the upper left corner of the room. As soon as the flying robot appears, attach the horn to him. At the top center of the room is a black sheet, grab it. At the mouth of the cave is an arm, zoom in on it. Place the robot hand and align the red and blues.

Repaired robot arm - connect red and blue and white

Repaired robot arm – connect red and blue and white

Press the left button three times. Up button once. Right button three times. Up button once. Left once. Up once. Left, up, left and up to finish the puzzle. Grab the key and head back up the ladder.

Place the black sheet on the pathway and zoom in on the control panel in front of it. Place your lever in with the others and let’s get to work on solving this puzzle.

Funicular minigame - organize you control panel

Funicular minigame – Start organize you control panel

The first sequence will be:

  • Green lever to bottom
  • Red lever to middle
  • Blue lever to middle
  • Pull the handle

Second sequence:

  • Green lever middle
  • Red lever bottom
  • Blue lever top
  • Pull the handle

Third sequence:

  • Green lever top
  • Red lever bottom
  • Blue lever middle
  • Push the start button
Funicular minigame -  Finished control panel

Funicular minigame – Finished control panel

Place the gangway to reach the sky train. Grab the brush on the left and clean up the controls. Pull the lever with arrow indicator. When you arrive click on the flying robot. Push the button on the wall to enter the elevator and pull the lever to go down to level one. Click on the ominous looking guy!

Exit the elevator and back up a scene. Zoom in for an HOS. You have 17 objects to grab up and once you’re done, take the key from the boar’s head, place it in the car and take the knob. After that, click on the flying robot yet again and head back two scenes so you can move down the hatch.

Hidden Object Scene - can you find all 17 items

Hidden Object Scene – can you find all 17 items

You’ll have another HOS to accomplish with 22 items to collect. Once you’re done, grab the acid with the little fire symbol, pour it on the wax close to the center of the shelf and grab a fuse.

Hidden Object Scene - Closet Minigame 22 items

Hidden Object Scene – Closet Minigame 22 items

Head back into the pool room and grab the cane at the base of the stairs. Place your knob in the door in the center wall so you can grab the razor and respirator. Use the razor on the hat’s lining to pick up the code.

Head backwards three scenes and head through the gate once more. Zoom in on the robot’s head, insert the key into it’s head and grab the hidden diamond. We’re almost done!

Chapter 4: Ruby

Put the respirator in front of you so you can enter the back room. Pull the lever on the wall in front of you to get some air going and pick up the rope sitting at the feet of the robot to the left.

Return to the pool area and attach the rope to the magnet by the stairs and pull it down. Drop the magnet over the pool and pick up the flanec.

In the next area will be another HOS for you to play with. Move the picture frame in the chest to reveal a stamp and strum the cello to make a clef note appear. That brings you to a total of 19 items you’ll need to find. When you’re done, grab a leaf from the chest and feed to the tortoise and pick up the wrench.

Hidden Object Scene - don't forget the tortoise

Hidden Object Scene – don’t forget the tortoise

Back up four scenes to where you found the diamond and zoom in the rocks just left of the robot’s head. Place the flanec inside the pipe followed by the handle. Grab the nail puller and open the hatch to the right of the robot’s head. Grab the “Part 2.”

Head to the elevator room and investigate the HOS at the desk. Open up the right drawer to reveal a compass, totaling up your items to 20. When you’re done snooping around, grab the key on top of the horn in the chair and open up the door on the desk to collect the staff.

Get in the elevator and head up to level three once again. Zoom in on the telescope and place the code into the slot. Adjust the dials to bring each image into focus, grab the code again and head down the elevator and back to the pool room. Zoom in on the door on the far right at the top of the stairs and place Part 1 and Part 2 on the puzzle. Arrange the pieces so the puzzle fits perfectly.

Empty puzzle from Nemo Secret Vulcania

Empty puzzle from Nemo Secret Vulcania

Finished puzzle from Nemo Secret Vulcania

Finished puzzle from Nemo Secret Vulcania

Head through the door and you’ll find yourself in the time device room. On the floor by the wires will be a note and just left to it will be the oven lever. Just a bit more left will be a safe, zoom in on it and place the code on the upper left corner of the safe. Enter the code in and grab the cylinder, tip and lever.

Head back five more scenes and zoom in on the telephone there. Place the cylinder in the phone and head to the elevator room. Use the lever so you can access level two. When you exit the elevator, grab the handle by the busted sky train and place the fuse in the control panel up ahead. You’ll need to flip the fuses using the arrows below.

Control Panel minigame in Nemo Secret Vulcania - Start position

Control Panel minigame in Nemo Secret Vulcania – Start position

The first sequence:Left,rotate and right.Rotate, left, rotate and right two times. Rotate, left two times, rotate three times, right, rotate three times, left, rotate and right three times.

The second sequence: Rotate, left three times, rotate three times, right, rotate and left. Rotate, right two times, rotate three times, left two times, rotate three times, right and then left.

The third sequence: Rotate twice, left, rotate and right four times. Rotate, left four times, rotate three times, right, rotate, left and rotate. Right two times, rotate, left two times, rotate three times and right.

Control Panel minigame in Nemo Secret Vulcania - Solution

Control Panel minigame in Nemo Secret Vulcania – Solution

When you finish up that headache, cross the bridge and click on our flying robot friend. Left of the train is a bucket and a cable. Behind the train in front of the giant doors is a handle bar that you’ll be needing. Zoom in between the two train cars and grab the rag.

Zoom into the back of the train and grab the vial to the left of the center screen. Place the oven lever and give it a pull. Zoom in on the pile of small odds and ends and grab the lighter along with the note. Place the handle bar to the right of the pile and clean the train’s window with the rag.

Head back down to level one, go through the pool room and reenter the time device room. Zoom in on the table to the left of the room and place the vial on the container and set the lighter underneath the vial. Grab the light once it’s full and jump back five scenes and head through the gate. Go forward one more scene and zoom in on the toolbox right in front of you. Take the newspaper clipping and place the tip on the jackhammer before grabbing it. Place the bucket right behind the toolbox and then zoom in on the robot. Place your sledgehammer and cable on the robot and pull the lever. Once the bucket is full of coal, pick it up and zoom in on the coal car. Remove the coupler with the wrench and head forward.

Zoom in for another HOS and move the rock to the left of the jar to reveal a turtle. Collect 20 items before taking the pick ax and breaking open the wall in the center to reveal a ruby. Now all that’s left is collecting the amber!

Chapter 5: Amber

Head back to the elevator and get to level two so you can return to the trains. Zoom in between the two cars once more and place the coupler. Zoom into the back of the train again and put the bucket of coal in the oven and get the train going by lighting the coal with your lighter. Spin the handle bar and move forward toward the newly unblocked path.

Get ready for another HOS! Close the book on the top shelf to reveal an inkwell, giving you 19 items to sift through. When you’re finished, place the key sitting on the far left in the key maker, which sits in the center shelf.

Hidden Object Scene - find all 19 items and get the key

Hidden Object Scene – find all 19 items and get the key

In the next area you’ll need to zoom into the chair to pick up the note and another cylinder. On the left of the desk is a circle cutter that you’ll need to take. Zoom in on the panel to the right of the desk and insert your staff. The object of this puzzle to get each staff to match their color at the bottom of the panel. It’s a little tough, but we’ve come this far, right?

Minigame Control Panal - Fished with all right colors together

Minigame Control Panal – Fished with all right colors together

Return to level one, leave the elevator and head back one more scene. Zoom in on the telephone and place the cylinder inside it. Head back to the time device room. On the glass case, to the right of the room, use your circle cutter so you can grab the starter crank.

Return to the trains and zoom in on the control panel by the back end of the black train. Place the handle and starter crank in it and turn the handle. Zoom in on the back of the train, spin the handle bar and you’ll find yourself on a new path.

Hidden Object Scene - advanced scene - can you detect all 21 items

Hidden Object Scene – advanced scene – can you detect all 21 items

Start up the next HOS and find all 21 objects. When you succeed, take the knife at the front of the box and drag it over the file on the edge of the chest. Now that you’re at the factory, zoom in on the motorcycle parked out front and open the box with your key. Take the bearing and go back to the elevator. Zoom in on the toolbox and cut the ropes with the knife you picked up. Pick up the weight on the top shelf and the tweezers on the middle shelf.

Go back to the station office and zoom in on the coat. Use your tweezers to remove the x-ray key. You’ll be able to zoom in for an HOS. Open the box at the front of the screen to reveal snuff, which brings your item count to 18. On the second shelf, squeeze the glue onto the mirror and examine the rest of the scene to place the shards back on the mirror.

Move back to the factory for another HOS with 19 objects to find. When you’re done, pick up the magnifying glass sitting on top the fan blades on the right and place it over on the papers in the chest. Grab the dial after doing so.

Match the symbols and numbers  and finally enter the pass code

Match the symbols and numbers and finally enter the pass code

Zoom into the door at the factory and place the x-ray key where it belongs. Match up the symbols and numbers until you can successfully enter the pass code. Now you can finally enter the factory! Zoom in on the control panel behind the robot and place the dial on it – turn it to the left. Place the bearing in the vice and smash it with the weight to receive balls. Throw the balls at the robot’s feet!

Head upstairs and click on our top hat fiend. Use the mirror to reflect his beam and zoom in on the bracelet once it settles. Zoom in on the flying robot and grab the paper knife. Zoom in on the bracelet once more and pry out the amber with your knife. Now zoom in on your journal.

Go to tasks, place the amber, amethyst, diamond, emerald and ruby into the time wheel and click on Captain Nemo.

Rush back to the time device room and zoom in on the stand. Get the time wheel onto the stand and finish your final puzzle. It’s a different kind of sliding tile puzzle, but the idea is to get each gem to make a diamond shape. Blue on the left, purple up top, green to the right, yellow on bottom and red in the center. Once you’re done, you’ve saved Captain Nemo! Congratulations!

Time Wheel puzzle - finished

Time Wheel puzzle – finished

I hope you enjoyed our Nemo Secret Vulcania walkthrough! Check out walkthroughs to our other games after you beat this one! We can help you with all the tricks and cheats you need to keep gaming fun and casual! Try out this neat walkthrough of I know a Tale

The post Nemo Secret Vulcania Walkthrough appeared first on GameHouse.

Love Story: The Beach Cottage Walkthrough

$
0
0

“Love Story – The Beach Cottage” is a tale about memories and lost love. The game is a point-and-click adventure. You will travel along a beach as Sandra, and our walkthrough will make her journey a touch easier. It has moments of difficulty, but the story is definitely worth it! Our “Love Story – The Beach Cottage” walkthrough will help guide you through Sandra’s journey as she rebuilds her father’s cottage. Her story welcomes exploration and curiosity. Along the way, we will provide you with a few tips and tricks to make her journey, and yours, a little easier. If you find yourself needing help, refer to this walkthrough for a helping hand and a few quick cheats.

Contents Love Story – The Beach Cottage Walkthrough

Tips, Tricks, and Cheats!

There are a few tips that are essential for the game. The in-game tutorial will provide you with the commands and most useful tricks. However, if you forget a tip, you can probably find it here!

  • An object can be grasped when your cursor turns into a hand.
  • Items in your inventory can be used on an object when the gears icon appears.
  • If you need a hint, then use the lantern.
  • A magnifying glass will appear when you can examine an object closely.
  • The memory chest holds important notes and clues.
  • The messages in a bottle can be found next to hints.
  • An arrow will materialize when you can move to a new area.
  • If an item is sparkling, then that item requires an item from your inventory.

Chapter 1: The Beach House

To begin, you will need to find several hidden items in the first scene.

  • Grab the wooden plank, stone, four plates, and screwdriver.
    • Click on the mailbox and grab the plate
    • Break the right lamp with the stone and grab the plate.
  • Zoom in on the gate and use your screwdriver on the lock.
  • Drop the plates on the lock.

Arrange the plates so that the patterns on the plates fit those that are on the lock.

Travel through the gate.

  • Grab the board and take a look at the ladder.

Travel straight.

  • Zoom in on the porch railing.
    • Grab the rail.
  • Zoom in on the pile of dirt.
    • Grab the thin piece of wood.
  • Zoom in on the steps.
    • Grab the door knocker.

Travel to the left.

  • Zoom in on on the work table near the left side of the house.
  • Grab the hammer, birdseed, wrench, and rope.
  • Grab the shovel against the wall.
  • Leave the work table.
  • Grab the board. The board is directly beneath the work table and to the left of the water pump.
  • Zoom in on the bag near the right corner of the home.
    • Grab the wooden peg.

Travel right twice.

Check the message in the bottle

Check the message in the bottle

  • Grab the wooden peg.
  • Grab on the bottle. Remove the letter from the bottle.

Travel down twice.

  • Zoom in on the ladder.
  • Drop your wooden pegs and rope onto the ladder.

Travel straight once. Travel left once.

  • Drop the ladder beside the birdhouse.
  • Climb the ladder.
    • Drop the birdseed in the birdfeeder.
    • Grab the key.

Leave the ladder and travel to the left.

  • Select the door.
    • Set the handle on the door.
  • The shovel will clear the sand from your path.
  • The key will allow you to go inside.

Travel inside.

  • Grab the piece of glass beneath the cabinet on the left.
  • To the right and below the first piece of glass is another piece of glass.
  • Above the first piece of glass is a cabinet door. Open the door.
    • Inside the door are a piece of glass and a nail.
  • Zoom in on the table with the lamp.
    • Grab the glass and photograph.
  • On the table’s lower shelf is the final piece of glass.
  • Pick up the picture frame in the center of the floor.
  • Zoom in on the wall to the right of the archway.
    • Place the nail on the wall.
    • Hammer the nail.
    • Hang the picture frame and photograph.
Hidden Object location Love Story - the Beach House. Can you find all items

Hidden Object location Love Story – the Beach House. Can you find all items

Congratulations! You will be rewarded with a hidden objects puzzle. See the picture for the solution.

Chapter 2: The Beach

This chapter begins with a treasure hunt to find hidden shells. Some of them are in the open, but other shells must be uncovered using objects in the room.

Hidden Object Scene - find the  Shells. Did you find them without help?

Hidden Object Scene – find the Shells. Did you find them without help?

  • Place the wheel, on the far right side, on the cart.
  • Break the vase with the slingshot.
  • Use the fishing hook on the sailboat.
  • Grab the key and drop it on the teddy bear.
  • Cut the bag with the knife.
  • Grab the green bucket, fruit basket, crab, and beachball and find the shells underneath them.

Open the treasure chest for a new puzzle!

The shells must be matched by color to the lights. The solution is never the same. Good luck!

Love Story - the Boat Shells minigame

Love Story – the Boat Shells minigame


  • Grab the scroll.

The 12 matching items in the campground can be difficult to find. Refer to the guide if you need help!
Once you acquire the necklace, hand it to Charlie.

Hidden Object Scene - find the 12 items and recover the necklace

Hidden Object Scene – find the 12 items and recover the necklace

A panel, containing the next puzzle, will appear on the right wall.

  • The combination sequence is: 4, 7, 8, 9, 1, 2, 5, 3, 6.

Travel straight once.

  • Zoom in on the glass shelf.
    • Grab the duct tape.
  • Look at the book.
  • Zoom in on the carpet and grab the screw.
  • In the doorway, use the duct tape on the wire.

Travel right once.

  • Zoom in on the sink.
  • Grab the scissors and pump nut.

Travel down once.

  • Zoom in on the doors. The scissors will cut the string.

Travel outside.

  • Grap the pump handle and chain near the swing.
  • Zoom in on the broken chair and grab the screw.
  • Zoom in on the porch.

Travel down once and travel right once.

  • Zoom in on the shutter.
    • Place the two screws in the holes. Screw them tight with the screwdriver.
  • Open the upper cupboard.
    • Grab the knife and funnel.
  • Next to the sink, grab the washrag on the counter.

Travel down three times. Travel left once.

  • Grab the pump.
    • Drop the handle and pump nut onto the pump.
    • The wrench will tighten both items.
  • Grab the pump to pump water.
    • Drop the washrag beneath the pump to make it a wet washrag.

Travel to the right twice.

  • Grab the bottle and take the note.

Travel down once.

  • Open the door.

Travel up once.

  • Travel into the kitchen.
  • Wipe off the chest with the wet washrag.
  • Find the two locks on the left. Use the knife on the two locks.
  • Grab the right lock to open the chest.
  • Take the note.

The note will prompt the next puzzle! Refer to the solution image to find all of the hidden items.

Hidden Object Scene at the beach - find all items

Hidden Object Scene at the beach – find all items

  • To open the bottle, grab the nail and pry the cork off.
  • Grab the message.

Chapter 3: The Magic Cave

It is time to find the magic cave! First, we need to discover its exact location. Travel straight in the direction of the lighthouse.
The 12 map pieces are all beneath the tide pool that leads to the cave.

Hidden Object Scene - Collect the 12 puzzle pieces

Hidden Object Scene – Collect the 12 puzzle pieces

Once the pieces are collected, another puzzle appears!

  • Move the stones so that the picture on the stone is the opposite of the one on the map piece.
  • A completed map will manifest. Well done!
    • Move the cursor over the map coordinates that correspond to the coordinates on the right.

The map will designate the location of the magic cave.

Travel into the cave.

  • There are 16 stones inside the cave.
  • After collecting the stones, use the magnifying glass to reveal the storage compartment.
  • Assemble the mosaic with the stones.
Unique Stone Mosaic puzzle solutions

Unique Stone Mosaic puzzle solutions

  • Leave the map in the storage compartment.
  • Select the trunk and grab the crowbar.
Hidden Object Scene - Find the 16 unique stones

Hidden Object Scene – Find the 16 unique stones

Travel down three times.

  • Grab the stone on the left side of the house.
  • The crowbar can lift the stone.
  • Grab the wooden board.
  • Drop the chain on the head of the axe.
  • Grab the winch and spin the crank.
  • Grab the axe head.

Travel up twice. Travel through the doors onto the porch.

  • Place the boards onto the porch.

Travel to the beach.

  • Zoom in on the green bottle on the left side.
  • Grab the bottle. Break the bottle on the stone.
  • Grab the note and half the necklace.

Travel up once.

  • Grab the crabs to begin a new puzzle.

This puzzle requires you to move the stones out of the way of the crab. Stones with four arrows can move in any direction. Stones with vertical lines can only move up, and stones with horizontal lines can only move side-to-side.

There are 16 fishing supplies that you need to collect. Refer to the guide if you need help!

Hidden Object Scene - Can you find all fishing supplies?

Hidden Object Scene – Can you find all fishing supplies?

Chapter 4: The Boat

After finding all of the supplies, the small house on the dock will become unlocked. Travel to the boat house.

  • Find the fourteen hidden items.
Hidden Object Scene - Find the 14 Boat pieces

Hidden Object Scene – Find the 14 Boat pieces

  • With the pieces, put the boat together. First few we already combined together, just follow the numbers for adding the other pieces.
Love Story - The Beach minigame Ship

Love Story – The Beach minigame Ship

  • Hand the ship to Charlie.
  • Grab the fishing rod near the bench.
  • Zoom in on the boat.
    • Grab the wire cutters and fuel canister.

Travel down once.

  • Grab the net.
    • Grab the matches inside the vest pocket.
  • Cut the net with the wire cutters.
    • Grab the telescope piece.

Travel up once and into the boat house.

  • Zoom in on the table beneath the window.
  • Remove the lid from the oil can.
    • Drop the funnel and fuel canister onto the oil can.
  • Grab the oil can.
  • Grab the boat from the top shelf and the telescope piece.

Travel down once. Travel right once.

  • Zoom in on the steps.
    • Using the crowbar, pry up the board.
    • Grab the number eight.
  • Grab the rope lying on the bench seat.

Travel down four times.

  • Zoom in on the distant steps.
  • Drop the axe head and rope on the pole.
  • Grab the axe.
  • Chop the hull of the ship.
  • Pick up the net.

Chapter 5: The Lighthouse

It’s time to go to the lighthouse. Somehow, we need to get it working once more.

Travel up twice and travel left once towards the lighthouse.

  • Zoom in on the hole in the pier.
  • Grab the key with the net.
  • Cut the key free with the knife.
  • Zoom in on the water.
    • Drop the net on the bottle.
    • Grab the note.
  • Fish with the rod. You will catch a fish!

Travel up once.

  • Grab the lantern off of the wall of the lighthouse.
  • Using the oil can, fix the hinges on the door.
  • The key will open the door.
  • Grab the door to start a puzzle!

This puzzle is different for every playthrough. The trick is to line the middle circle with the other four circles so that the numbers match.

  • You will receive a set of instructions.
    • Hit the balloons following the instructions.
  • The key will unlock the door.
Look at that beautiful view - Love Story - the Beach Cottage

Look at that beautiful view – Love Story – the Beach Cottage

Zoom in on the scrapbook on the bench.

  • Uncover the hidden items.
Find the 12 Scrapbook pieces

Find the 12 Scrapbook pieces

Place the telescope to open a new puzzle!

  • Simply rotate the pieces of the puzzle to complete it. The finished puzzle is a sail ship.
Minigame telescope - a Sail ship

Minigame telescope – a Sail ship

Travel inside the lighthouse.

  • Zoom in on the box.
    • Grab the brush.

Travel up the stairs.

  • Grab the spatula on the floor near the vine.

Travel down four times. Travel right once. Travel up twice into the cave.

  • Zoom in on the left side of the wall.
  • Drop the lantern onto the hook towards the right.
  • The matches will light the lantern.
  • Zoom in on the secret hiding place to the left of the lantern.
    • Remove the debris with the brush.
    • The spatula can open the hiding place.
    • Grab the letters.

Chapter 6: Charlie’s House

Charlie’s house holds something important for Sandra. The home may unlock important memories, but we are sure to find useful equipment, too!

Travel down twice and left once.

  • The rod and fish will attract the cat if used on the tree.
  • Zoom in on the steps.
    • Grab the telescope piece beside the largest step.

Travel through the door.

  • Zoom in on the distant wall.

Travel through the doorway.

  • Grab the dumbbell between the bed covers and the nightstand.

Zoom in on the bookshelf for your next puzzle! You need to move books away from the doorway to reveal it.
It has more solutions – this is a winning option.

  • On the top, place the books in the following order:
    • longer brown and gold book,
    • shorter gold and brown book,
    • exposed-pages book,
    • red book,
    • green book,
    • and the blue book beneath the previous four.
  • On the bottom, place the books in the following order:
    • red book,
    • thick black and red book,
    • pink book,
    • brown and gold book on top,
    • thick book on the bottom.

Travel down four times. Travel into the boat house.

Grab the kettle to begin a new puzzle! The kettle should be filled to the red line.

  • Grab the pot.
    • Grab the pitcher and fill kettle.
    • Grab the cup and fill pitcher.
    • Grab the kettle and fill cup.
Minigame Water Transfusion

Minigame Water Transfusion

Zoom in on the map. Grab number two.

Travel down once. Travel right once into Charlie’s house.

  • Zoom in on the vase.
  • The kettle will fill the vase.
  • Grab the telescope piece.

Travel down three times. Travel left once. Travel up once. Travel into the lighthouse.

  • Zoom in on the window.
    • The dumbbell can prop the window open.
    • Grab the valve.

Travel down three times. Travel right once. Travel down the stairs.

  • Zoom in on the grate above the park bench.
  • Take off the clamps.
  • Grab the grate.
  • Use the valve to turn off the water.
  • Zoom in on the fountain.
  • Grab the clock hand from the fish’s mouth.
Hidden object item - did you watch the fish mouth?

Hidden object item – did you watch the fish mouth?

  • Zoom in on the clock.
      • Drop the number two, number eight, and the clock hand.

    Grab the gears to start a new puzzle

Remove the stone by dragging it across the tubes. The gears will move into place.

  • Set the clock to 7:35.
  • Grab the telescope piece.

Travel down twice. Travel left once. Travel up once. Travel inside the lighthouse. Travel up the stairs to the top.

  • Zoom in on the telescope.
  • Drop the telescope pieces onto the telescope.
  • Zoom in on the telescope. You will see Charlie.
  • Grab the telescope.

Travel down once.

  • Zoom in on the window.
  • Grab the key.

Travel down three times. Travel right once. Travel left once into Charlie’s house. Travel into Charlie’s room.

  • Zoom in on the desk.
  • The key will open the desk.
  • Grab the switch.

Travel down four times. Travel left once. Travel up once. Travel inside the lighthouse. Travel up the stairs.

  • Zoom in on the glass.
  • Drop the lamp and the switch into their proper places.
  • Grab the clamps to open the device.
  • Grab the wires to begin a new puzzle!

First some written help with your puzzle

  • The topmost plug on the left is five.
  • Beneath five is eight.
  • Beneath eight is one.
  • The lowest plug is seven.
  • The topmost plug on the right is four.
  • Beneath four is two.
  • Beneath two is six.
  • Beneath six is three.
Minigame wires - can you connect the wires?

Minigame wires – can you connect the wires?

If you enjoyed this walkthrough, consider one of our other guides! Delicious Emily’s Honeymoon Cruise walkthrough is full of rumors, intrigue, and is a blast to play.

The post Love Story: The Beach Cottage Walkthrough appeared first on GameHouse.

Elly Cooper and the City of Antiquity Walkthrough

$
0
0

Elly Cooper and the City of Antiquity Walkthrough

An official Elly Cooper and the City of Antiquity walkthrough guides you through all the levels of her epic adventure. With the main goal of uncovering an unbelievable treasures. Can you help Elly, find her missing father and search for the right clues in all different rooms and locations. Who are the intriguing men and women in the dark brown capes? Do they have anything to do with the disapperance of her father. Join Elly on her adventure play all the hidden object challenges and tease your brain with the puzzles and mini-games. Stuck at a certain point in the game, no worries. With below tips and tricks we made a mini guide to help you to enjoy the full game.

Contents

General tips

  •  This guide will mention when a Hidden-object puzzle is available and the inventory item you’ll collect from it.
  • Random puzzles will appear in the game – this is really up to you to solve.
  • Step-by-step solutions will be given for all the puzzles which are not random. Please read the instructions in the Elly Cooper and the City of Antiquity game for each puzzle.

Prologue

  • Play the Hidden Object puzzle; earn the Hook
  • Drag Crate to the window
Basement of Elly Cooper and the city of Antiquity

Basement of Elly Cooper and the city of Antiquity

Go to the bathroom

  • Use the Hook to drain the sink to get Ice Pick
  • Grab the Journal on the table
  • Touch the Mirror
Sink - drain it and grab the Ice Pick

Sink – drain it and grab the Ice Pick

Move to the Dock

  • Talk to the Dock Worker
  • Play the Hidden Object puzzle; earn the Envelope
Dock station of city of Antiquity

Dock station of city of Antiquity

Return to the Bathroom Cabinet

  • Play the Hidden Object puzzle; earn the Hair Pin

Return to basement

  • Touch the window
  • Place the Hair pin and Ice pick into the lock for a mini-game (F)
  • Play the mini-game
    • Solution:
      • 1). Ice Pick – Up, Hair Pin – Up
      • 2). Ice Pick – Down, Hair Pin – Down
      • 3). Ice Pick – Left, Hair Pin – Right
      • 4). Ice Pick – Left, Hair Pin – Right
  •  Touch the window to exit

Chapter 1: Back on Your Feet

View City map – Touch the Elly’s Apartment pulsing location

City Map of Elly Cooper and the City of Antiquity

City Map of Elly Cooper and the City of Antiquity

  •  Touch the fireplace mantle
  • Grab 1/2 of the Forceps
Elly Cooper's Apartment

Elly Cooper’s Apartment

Go to the bedroom

Bedroom Elly Cooper

Bedroom Elly Cooper

  • Grab the Candles
  • Go to the bedside table
  • Touch the drawer
  • Grab the Glue Chips
  • Open the drawer
  • Grab the paintbrush
  • Grab the other 1/2 of the Forceps
  • Combine the forceps from the invertory

Return to the Living room of Elly’s Cooper aparment

  • Touch the fireplace
  • Place the glue chips into the fireplace
  • Go to the Embedded End Table
  • Place your collected glue chips next to the cup
  • Use the paintbrush on the glue chips
Use the glue chips on the Cup

Use the glue chips on the Cup

  • Receive Cup

Go to the Kitchen

Kitchen of Elly Cooper in City of Antiquity

Kitchen of Elly Cooper in City of Antiquity

  •  Play Hidden Object puzzle; earn the Crowbar
  • Go to the kitchen sink and place the cup in the sink

Return to City Map mode – move to the Restaurant

Restaurant Level 1 Elly Cooper and the City of Antiquity

Restaurant Level 1 Elly Cooper and the City of Antiquity

  • Play the Hidden Object puzzle; earn Map pieces
  • Go to Embedded Storm Drain
  • Use your collected Forceps on hidden map pieces
  • Go to Restaurant Table and place the map pieces from the inventory
  • Play the mini-game for a clue
Embedded Storm Drain

Embedded Storm Drain

  • Go to Restaurant Table
  • Grab the matchbox
  • Grab the faucet knobs

Return to City Map mode – move to Elly’s Apartment

  •  Go to the Fireplace
  • Grab a Hot Knob with the collectd forceps from the inventory

Go to the Kitchen go to the Kitchen Sink

  • Place faucet knobs into the sink
  • Grab the cup filled with water
  • Place the forceps with hot knob into the cup filled with water
  • Receive missing Knob

Go to Elly’s Bedroom

  • Go to the bedside table
  • Place missing knob onto the drawer
  • Grab Bracelet
  • Grab the Necklace

Return to City Map mode – go to Henry’s office pulsing location

Henry Office

Henry Office

  • Go to front door
  • Grab the Rag

Go to the Alleyway

  • Slide the Trash
  • Use the rag on the trash
  • Use crowbar from inventory on the Ladder
  • Climb the stairs
  • Use the crowbar on the alley window

Enter Henry’s Office

Henry's office room

Henry’s office room

  • Place the candles into the holder areas
  • Use the matchbox on the candles
  • Play the Hidden Object puzzle; earn the letter opener

Move to the Poster on the wall

  • Use crowbar on poster frame
  • Grab the clue

Go to the office desk compartment

  • Place the bracelet onto left side embed of the desk
  • Play the mini-game
    • Solution sequence:
      • Starting from the top left joint – Yellow to Red to Blue to Green to Purple to Light Blue to Orange to Brown
  • Place the bracelont onto the right side embod of the desk
  • Play the mini-game
    • Solution sequence:
      • Starting from the top left joint- Yellow to Orange to Light Blue to Green to Blue to Red to Purple to Brown.
  • Grab 1/2 of the Map
  • Grab clue to the location of Cell

Go to bookshelf

  • Use letter opener on the book, “Death in Venice”
  • Turn to end cover of book
  • Use letter opener
  • Grab the Yellow Cell

Return to City map mode – Go to Train Station pulsing location

Chapter 2: Journey West

Train Station in the City of Antiquity

Train Station in the City of Antiquity

  • Go to bench
  • Open Brown bag and grab walnuts inside
  • Grab and open the Note on the bench
  • Get the key on the note
Can you solve it

Can you solve it

  • Talk to the conductor by train
  • Grab the cane when conductor looks away

Go to Station Doorway – Go to the Ticket Booth

  • Play the Hidden object Game; receive the crank

Go to the nutcracker doll

  • Place walnut into nutcracker dollar and crack it with the left arm
Nutcracker Doll in Elly Cooper and the City of Antiquity

Nutcracker Doll in Elly Cooper and the City of Antiquity

Go to the Station Doorway

  • Place the cracked walnuts onto birdbath
  • Grab the ‘Minute hand’ inside the nest
Minutes Hand in bird nest

Minutes Hand in bird nest

  • Use the cane on doorway
  • Grab the ‘Hour hand’

Go to the Ticket Booth

  • Touch the grandfather clock
  • Open the window cover
  • Place ‘Hour hand’ and ‘Minute hand’ onto the clock
  • Place the crank arm from inventory into the clock
  • Place the key from inventory onto the clock
    • Solution(s); there are four solutions avialable
      • 10:15, 3:50, 9:20 and 4:45. When the hands are at any of these times and the key is turned, they will open
  • Open the clock and grab the Train Ticket
Grandfathers Clock

Grandfathers Clock

Grandfathers Clock opened

Grandfathers Clock opened

Go to the Train Platform

  • Give your train ticket to conductor
  • Grab the empty glass cup
  • Go to paper box embed and grab blank sheet of paper
Paperbox in Train station

Paperbox in Train station

Go to the Hallway

  • Grab the pencil sharpener
  • Talk to conductor
  • Place empty glass from inventory onto Guardian Suite to listen if they are sleeping

Go to dining cart

  • Play the Hidden Object puzzle; earn the screwdriver
Dining Cart with Hidden Object game

Dining Cart with Hidden Object game

Go to kitchen cart

  • Grab the spatula
  • Slide the chair

Go to the vent embed

  • Use screwdriver to remove the screws
  • Go to cargo cart through the vent
  • Play the Hidden Object puzzle; earn the rope
Cargo Cart Hidden Object Puzzel

Cargo Cart Hidden Object Puzzel

  • Go to bucket and open the bucket
  • Grab thegrease from inside bucket
  • Go to crate and break it open to grab the barbital

Move to the Kitchen Cart

  • Go to drawer
  • Use grease on the drawer
  • Get corkscrew

Return to Elly’s suite

  • Use Corkscrew on Wine bottle
  • Pour barbital from inventory into wine bottle
Wine spiked with barbital

Wine spiked with barbital

Go to the Dining Cart

  • Give spiked wine to Bartender

Go to Elly’s Suite

  • Unlatch the window lock
  • Place rope onto bar and slide rope
Place Rope onto Train bar

Place Rope onto Train bar

  • Guardian Suite window use spatula to unlatch the lock on window

Enter Guardian Suite

  • Grab Pencil
  • Sharpen pencil with sharpener from inventory
  • Grab the key on the sleeping guardian who sits in the chair
  • Grab the riddle card inside the guardians pocket
Pick pocket the guardian

Pick pocket the guardian

Riddle card in Dragon's mouth

Riddle card in Dragon’s mouth

Go to Cabinet

  • Place cabinet key into key hole and slide the cabinet door open
  • Play mini-gmae to equal 47 located in center
  • Solution:
    • inner ring = 7
    • middle ring = 16
    • outer ring = 24 (7 + 16 + 24 = 47)

The number 47 is the code that is seen from the dragons flame on the riddle card

  • Once safe is opened, place the blank sheet of paper on top of the map
  • Use the sharpened pencil from inventory to rub over the blank sheet of paper on map
Rub the pencil over the blank sheet to copy Map

Rub the pencil over the blank sheet to copy Map


Chapter 3: The Wild West

Go to Saloon

Saloon in Elly Cooper and the city of Antiquity

Saloon in Elly Cooper and the city of Antiquity

  • Talk to bartender
  • Go to Piano and retrieve story key
  • Go to wall and grab magnet
Magnet in wall

Magnet in wall

Return to Main Street – go to General Store Front

  • Play the Hidden Object Puzzle – receive huckleberries
  • Go to Store’s back
  • Place log onto tree stump
  • Use axe on log; receive two wood planks
  • Grab cash register lever
Store's back

Store’s back

Return to General Store

  •  Use register level on cash register
  • Grab key from inide of register
  • Use key on case to grab axe

Return to Main Street

  • Go to Station Front
  • Grab Closed Sign

Enter Station

  • Grab magnet

Return to Main Street

  • Go to Power Pole
  • Use axe to chop bits out of the the power pole
  • Place wood planks from inventory into power pole openings
  • Grab Hotel room key

Go to Saloon

  • Give Huckleberries to Bartender
  • Grab bucket

Go to Hotel Room

  • Use room key
  • Grab the String on the table

Return to main street

  • Tie String on Rake

Go to Train Station Front

  • Use bucket to grab water from trough

Move to General Store and go to the back to the Shooting Range

  • Use rake on tree branch to grab leather glove

Return to Station

  • Use leather glove on furnace
  • Use water bucket on furnace fire
  • Grab ceramic box, receive 1/2 key
Ceramic box with half key

Ceramic box with half key

Go to Saloon and enter Hotel Room

  • Place both chest keys onto chest and slide
  • Open Chest; grab the gun

Return to the shooting range at the back of the Store

  • Place map onto tree
  • Use gun to shoot the map

Return to the Station and enter through the door and go to Wagon

  • Play a Hidden Object puzzle – earn the knife

Go to Campsite

  • Grab hammer and go to the tent
  • Use knife to cut open an entry way
Tent at campsite

Tent at campsite

  • Enter the Tent
  • Play Hidden Object puzzle – receive Pyramid Puzzle piece
  • Leave the tent and enter the campsite

Go to the wall

  • grab Lantarn

Retrun to Wagon

  • Place Lantarn on barrel
  • Use hammer to detach a nail
  • Place nail on barrel cork
  • Use hammer on nailed in cork
  • Grab oil filled lantarn
Place Lantarn in city of Antiquity

Place Lantarn in city of Antiquity

Got to Campsite to the Wall

  • Place oil filled lantarn on Wall
  • Go to the pyramid puzzle and place missing pyramid puzzle piece to activat puzzle
  • Solve the puzzle – grab (after solving) the mirror inside
Pyramid Puzzle on Wall

Pyramid Puzzle on Wall

  • Place map onto wall and get clues

Return to tent and speak with Thomas

Chapter 4: Across the Atlantic

Talk to Henry – go to the end table

  • Grab the nail file and the key
  • Grab the small bowl from antique bowl

Move to the lower Deck

  • Play the Hidden Object puzzle – receive hand trowel

Return to Atrium and move on to the Upper Deck Hallway.
Talk to Thomas and move into the Library.

  • Play the Hidden Object Puzzle; reeive Palette Knife

Go to Cabinet

  • Unlock cabinet with nail file
  • Grab ship crank
Ship Crank in Library

Ship Crank in Library

Go to Smoking Room

  • Go to the Clock
  • Use clock key to open the clock door
  • Grab golden die
  • Move to the end table
  • Grab cigar cutter

Return to Upper Deck Hallway

  • Go to Flower Pot
  • Place bowl next to the Flower pot
  • Use hand trowel to dig dir
  • Use cigar cutter to cut the string to grab key

Return to Atrium and move to Lower Deck

  • Go to the Camera
  • Use Palette knife on camera; receive cell
Camera with cell inserted

Camera with cell inserted

Return to Atrium – move to the Lounge

  • Talk to Hugh
  • Give golden die to Hugh
  • Play Yacht game to beat Hugh’s score and receive golden mirror
  • Grab vinegar bottle
Play a Yacht game

Play a Yacht game

Return to lower Deck and move forward to Upper Deck

  • Use crank arm to lower the life boat
  • Use vinegar bottle on lug nuts
  • Grab wrench
  • Screw the bolt onto crank arm with wrench to lower life boat
  • Grab Pool Skimmer

Move to the Pool room

  • Grab wooden pole hung on the wall
  • Attach pool skimmer with wooden pole to grabe note floating in pool
Floating note in pool

Floating note in pool

Return to Atrium – move to Upper Deck Hallway into Guardian’s room

  • Use key retrieved from flower pot to open door
  • Note the code on the mirror
  • Move chair out of the way

Go to the Balcony

  • Play Hidden Object Puzzle; receive wainscoting piece

Return to Guardian’s room

  • Place wainscoting piece into top left corner of compartment
  • Open lock box inside wall; combo: “PLATO”
  • Retrieve call

Chapter 5: Egypt

Talk to Thomas and talk to Heny. Move to the Stone brick

Chapter 5-Egypt of Elly Cooper the City of Antiquity

Chapter 5-Egypt of Elly Cooper the City of Antiquity

  • Grab scroll
  • Move to the Temple Front
  • Play Hidden Object Puzzle; receive flint spark lighter
Temple Front

Temple Front

Go to Tethered Ship

  • Get charcoal and sledgehammer
  • Talk to Adena
  • Grab rope
  • Grabe shovel head

Return to Giza Plateau

  • Go to Pyramid Entry
  • Play Hidden Object Puzzle; receive ladder
  • Place bent shovel head on the anvil and use sledgehammer to bent back into shape
Pyramid Entry

Pyramid Entry

Move back to Pyramid Doorway

  • Grab three small projection lamps
  • Grab constellation map fom Kamala

Return to Giza Plateau and move to the Sphinx Side

  • Talk to thomas
  • Move to the fron to th Sphinx
  • Play Hidden Object Puzzle; receive stone chisel
  • Break crate open with sledgehammer
  • Grab grapplink hook
  • Combine grapplink hook with rope

Return to Sphinx Entrance

  •  Remove sand
  • Use sledgehammer on bricks

Return to Sphinx Side

  • Use grappling hook with rope on Pyramid Ear
  • Grab the Red Gem and the fuel flow puzzle piece
Red Gem in Sphinx ear

Red Gem in Sphinx ear

  • Place ladder into Sphinx Room
  • Go to Sphinx Room
  • Place ancient mirrors into holes
Place the ancient mirrors

Place the ancient mirrors

  • Examine wall
  • Talk to Thomas
  • Grab statue shield
  • Grab Ceramic Sword

Return to Sphinx Side – go to Temple Front

  • Place missing shield
  • Grab yellow gem with chisel
  • Place ceramic sword
  • Grab Red cell

Return to Giza Plateau

  • Grab blue glass gem inside of stone brick with chisel

Go to Pyramid Doorway

  • Place gems into door mini-game, to solve the mini-game, the glyphs represent the sun, night sky and land. The slots will change color depending where the gems land.
Mini game with Gems

Mini game with Gems

  • Enter Stairway
  • Play oil flow puzzle
  • Place oil puzzle piece to activate puzzle
  • Solution is to make the lines match up starting from the pitcher to the bottom right corner
Oil flow puzzle. We almost gave you the solution

Oil flow puzzle. We almost gave you the solution!

Go to Pyramid Room

  • Place charcoal into catapults
  • Fling the charcoal into oil pods on the wall
  • Open cell pillars
  • Grab gate puzzle piece

Return to Giza Plateau

Catapults to fling charcoal

Catapults to fling charcoal

Go to Tethered Ship

  • Give constellation map to Athena

Chapter 6: Into The Unknown

  • Play the mini-game, solution:
    • First is Big dipper
    • Second is Cassiopea
    • The third is Sagittarius
  • Talk to Kamala
Mini Game with the stars

Mini Game with the stars

  • Play Hidden Object Puzzle; receives wood boards

Go to Desert – go to Oasis Entry

  • Pull tarp off campsite
  • Play Hidden Object Puzzle; receive knife

Return to Desert

Desert in Elly Cooper and the City of Antiquity

Desert in Elly Cooper and the City of Antiquity

  • Grab palm fronds
  • Grab cacti with knife

Return to Airship

  • Use knife to cut brush

Go to Oasis – move to Oasis Water

  • Place wood boards on water
  • Use knife to cut straws
Oasis Water place

Oasis Water place

  • Use brush on gate key piece
  • Grab gate key piece

Return to Oasis Entry

  • Place cacti onto wood board and cut with knife
  • Attach palm fond and straw to goggles
Goggles

Goggles

Go to Oasis Water

  • Use new goggles
  • Use Gate key piece
  • Play Mini-Game.
  • Solution:
    • First and Fourth circles rotate fully 360 degrees in both directions.
    • The Second and Third circles rotate individually in each segment (3 segments).
    • When matched correctly, the image will glow.
Circles mini game

Circles mini game


Chapter 7: The city Of Antiquity

Finally you almost there – fulfill the last task to save everything

  • Play Hidden Object Puzzle; receive rope
  • Attach rope to rock
Your campsite

Your campsite

  • Go to Corridor of the City of Antiquity
  • Talk to Thomas
  • When Thomas leaves, grab machete
Corridor in Elly Cooper and the City of Antiquity

Corridor in Elly Cooper and the City of Antiquity

  • Use machete to cut rope
  • Grab weight piece embedded in the broken pillar
A guardian angel of City of Antiquity

A guardian angel of City of Antiquity

Go to Garden

  • Use machete on branch

Return to corridor – go to Arena

  • Use branch on boulder
  • Grab weight piece
Weight piece

Weight piece

Go to Circular Statue

  • Play Hidden Object Puzzle; receive ancient water container

Return to Corridor – go to Doorway

  • Roll the large rock to get the key on top of the pillar
Grab the Key on the pillar

Grab the Key on the pillar

  • Grab the weight piece
  • Grab the moon key
Did you detect this little secret place

Did you detect this little secret place

Don't forget this item

Don’t forget this item


Go to Courtyard

  • Grab weight piece
Weight piece in Courtyard

Weight piece in Courtyard

  • Place the weight pieces onto the pillars to start the mini-game.
  • Play Mini-Game.
    • Solution: The weight pieces must be placed in their correct orbital pattern around the sun, but with the sum total of each piece (1,2,4,5,6) equal to one another.
    • In the left hand pillar: Mercury is the first orbit, Venus is the second orbit, and Saturn is the sixth orbit. The sum total for those is 9.
    • On the right hand pillar: Mars in the fourth orbit and Jupiter in the fifth orbit which totals as 9 as well. The reverse is also a solution.
  • When mini-game is solved, the sun opens; grab the center floor key.
Pillars in which to put the weight pieces

Pillars in which to put the weight pieces

Return to Doorway

  • Place the weight pieces on the door to open

Go to Discussion Hall

  • Place the center floor key
  • Go to Underground Room Front
  • Go to Projection room
  • Grab Garden Water Key

Return to Discussion Hall – return to Corridor

  • Enter the Garden
  • Place Garden Water Key into rock wall to activate waterfall
  • Use Ancient water container to collect water

Return to Corridor – go to Arena

  • Pour water into the cylinder to reveal the crystal
  • Collet the crystal
Pour water in the cylinder

Pour water in the cylinder

Go to Circular Statue

  • Pour water into the cylinder to reveal the crystal
  • Collet the crystal
Reveals the crystal

Reveals the crystal

Return to corridor – go to Doorway – go to Discussion Hall

  • Pour water into the cylinder to reveal the crystal
  • Collect the crystal
Crystal collection in Discussion Hall

Crystal collection in Discussion Hall

Go to Underground Room Front – Go to Projection Room

  • Place crystals to activate water screen

Return to Underground Room Front

Placed Crystals

Placed Crystals

Go to Underground Room Back

  • Talk to Ahmed
  • Play the Hidden Object game; receive torch

Go to Underground Room Front

  • Open Secret Compartment to grab door puzzle piece
  • Place door puzzle piece into door
  • Play mini-game.
    • Solution: Line up all the checkers
Door Puzzle - can you solve it

Door Puzzle – can you solve it

Go to Town Center

  • Cut over grown vines with machete to create a path toward center Island
  • Get dry tinder
  • Light fire pit with flint stick

Go to Center Island

  • Player decides to either save Thomas or let him fall
  • Play Bridge Puzzle Mini-Game.
  • To initiate puzzle, place the necklace into the slot.
    • Solution: cover the yellow circles with the blocks.
Bridge mini puzzle

Bridge mini puzzle

Go to Cave Entrance – Go to Cave

  • Throw the lit torch down to light up cave
  • Play Cave mini-game.
    • Solution: Number represents the order of the steps taken: 1, 2, 3, 2, 3, 4, 3, 4, 5, 6, 5, 6, 7
  • Escape Cave
Finally you found the Escape route

Finally you found the Escape route


The post Elly Cooper and the City of Antiquity Walkthrough appeared first on GameHouse.

Delicious Emily’s True Love walkthrough

$
0
0

Walkthrough Delicious Emily’s True Love

At the beginning of Delicious – Emily’s True Love, Emily’s restaurant has been open for a year! But even a successful business is not enough to keep the weddings from appearing in her dreams. She knows she has so much in her life, but it would still be lovely to encounter true love with a person with whom she could share her bounty.

Could a mysterious letter from her past lead her to the true love she so craves?

Ooo la la, it’s from Jean Paul, the boy from Paris! How magical that summer had been! All this time she thought he had given up on her, and now she learns that he had felt the same way about her! Mon Dieu! Emily decides to take a chance on love and sets out on an epic journey through four restaurants and an entire ocean to find her old flame. To give you a little help here is an official Delicious – Emily’s True Love walkthrough, we are offering some tips, cheats and tricks to help her accomplish just that!

Contents

Delicious Emily’s True Love – walkthrough’s General tips

  • There is a clock at the bottom of the screen. Use it to gauge how much time you have left in the level.
  • Watch your position in the restaurant. Keep as central as you can to avoid eating up time walking everywhere.
  • When on the edges, grab items you might need later.
  • Watch for mice! Keep an ear out for their “chirps,” as they make the noise a few seconds before they appear.
  • Some customers are more forgiving than others. Serve children and the fancy crowd before you serve the older crowd and the big guys.
  • Keep the restaurant clean! Mom and dad offer to help out, so use them. As soon as you see the exclamation points, click on it!
  • When the restaurant closes, no more customers come through the front door, so you don’t need to prep for any new orders.
  • Use any downtime for prep work, or collecting needed objects that are farther away from the counters.
  • The trays get bigger in time, so in level one, put an extra newspaper on the end before you even need it to avoid having to run get it the during lunch rush.
  • If you make an error on a sandwich, click on it on the tray to make it disappear.

Click, click, click! The game will catch up with you.

You don’t have to wait to see the money fly above the register to move on to the next task. Click and GO! Fixing up the place is good for business: Use your hard-earned points to add items that will increase patience and buy you more time. There is a box at the bottom of the screen with a green curtain to help you identify the extra point activity currently on screen. Too tough? Change the settings at the beginning of the game to an easier level: There are beginning, normal, and advanced levels of difficulty.

Restaurant 1 Emily’s Place

In every level, mice pop out during the game in different locations. Clicking on them gives you extra points. Here’s a cheat sheet with all the mice locations in Restaurant 1 of Delicious Emily’s True Love!

All mice locations Restaurant 1 Emily's Place

All mice locations Restaurant 1 Emily’s Place

“The Letter”

Day 1: It’s the start of a new day. Mom, the perfectionist, isn’t liking how late the store is opening, but friendly florist Patrick doesn’t seem to mind as he offers a hand-picked rose to Emily.

Here, you will be given the option of watching a tutorial to learn the basics: Fill the customers’ orders (the quicker the better. More tips!) tap the cash register when the order is filled and they are ready to pay, and clean up when they leave.

Day 2: And suddenly everything changes with one simple letter – a love letter! Mom intercepts a letter that, for 16 years had been lost. It had been penned by the object of her affection from so many years ago – Jean Paul, from France! Ooo la la.

Extra Challenge 1: clean up the mess left over from the night before for extra points.

4 locations to clean day 2 Delicious Emilys True Love

4 locations to clean – day 2 Delicious Emilys True Love

“I’m Getting Married”

Day 3: Emily is still anxious about reading that letter, Does he still love her? Could this be the love she so desperately craves. Her florist friend lightens the mood by making her laugh…like he always does. And what’s contained in the letter is enough to keep her from going out that night with her friend Francois.

Extra Challenge 2: Read the letter between customers to earn extra points

Day 4: Emily lets her friend, Francois, in on her big secret only seconds before her own sister, Angela, steals her thunder with some news of her own!

“The Dress Debacle”

Day 5: Angela’s fiancé, Jimmy, comes across as a tad bit insensitive and self-absorbed. Sigh. But he is going to be part of the family, now, and he seems to make Emily’s sister happy.

Extra Challenge 3: Keep Jimmy well fed to earn extra points

Day 6: Surprise! Jimmy offered up Emily’s place for the reception. Surprise! The dress Jimmy ordered is a disaster!

TIP: Use Francois the mime as entertainment to take the customers minds off any of the slower orders.

“The Big Day”

Day 7: That sweet Patrick offers to help out with the wedding in the best way he can. Time is of the essence, and they still have to do something about that hideous wedding dress.

Extra Challenge 4: Help Mom fit the dress between customers.

Day 8: It’s the Wedding Day, and Emily’s mom is talking grandchildren. Who will catch the bouquet? And who is that girl going to Sundance with Patrick?

“The Decision”

Day 9 – Just as the day-after mess from the wedding must be cleaned, the day-after mother-in-law must take jabs at the still-unmarried daughter. Also: a decision is made…

Extra Challenge 5: Find all wedding decoration when you clean up – it gives you extra bonus points to reach Expert level. Can’t find all 9 wedding decorations, take a look at the cheat sheet.

9 wedding decorations to clean

9 wedding decorations to clean

Day 10 – Francois covers for Emily for as long as he can!

Tip: Use Emily’s Dad – the Paper-doll master – to provide entertainment for the guests.

Restaurant 2: Carmen’s Comedor

Thanks to a little volcano, Emily’s plane is diverted to Madrid, Spain. So until she gets her luggage, she helps out at Carmen’s Comedor – a busy restaurant in the airport.
Turns out there are mice in Spain, too! Here’s a chart to show you where the mice are in Carmen’s Comedor! The number corresponds with the day you play with the mice location.

All mice locations - Restaurant 2 Carmen's Comedor

All mice locations – Restaurant 2 Carmen’s Comedor

“A Detour”

Day 1: Not only is she NOT in Paris, but she is missing her luggage.

Challenge 6: Extra points for helping find customers’ bags as they swing by the corral in the upper right-hand corner.

Day 2: It’s Day 2 without a suitcase, and Emily is beginning to second guess her great adventure. Maybe she should just go back. But Carmen encourages her to keep going.

Challenge 7: Extra points for helping find customers’ bags as they swing by in the upper right-hand corner.

“The Dancer”

Day 3: When Carlos gets a little distracted while watching Carmen do her work, he vacuums up a suitcase and it explodes. Emily offers to clean it up.

Challenge 8: Clean up the items from the suitcase for extra points. Here are the locations.

8 items from the suitcase

8 items from the suitcase

Day 4: Emily figures out that Carlos is secretly in love with Carmen and hatches a plan to get the star-crossed lovers together.

“The Offer”

Day 5. Emily’s suitcase is found!

Challenge 9: Carlos gives a salsa class! Earn extra points by clicking on the colored steps in the same order that Carlos does. Carlos shows the steps first, so watch carefully.

Carlos' Flamenco class

Carlos’ Flamenco class

Day 6: Carlos and Carmen’s love connection seems to be working. Carmen tells Emily that Carlos has a surprise for her, tonight!

TIP: A flamenco dancer is available to help entertain the customers, today.

TIP: Don’t leave the food in the fryer for too long or it will burn!

“Good bye”

Day 7: Carlos’ plan backfired, and he is heartbroken.

Challenge 10: Carlos is heartbroken over Carmen, have a comfort talk with poor Carlos and earn extra points. Earn extra points by consoling poor Carlos

Comfort heartbroken  Carlos

Comfort heartbroken Carlos

Day 8: Meanwhile, Carmen receives some heart-stopping news, herself! And Carlos packs his bags for a new life. Are he and Carmen over for good?

“Hello…Again”

Day 9: Carmen feels abandoned by her mother and fears she passed up her chance for a happy life.

Challenge 10: Earn extra points by making sure the flight crew is fed.

Day 10: It’s Happily Ever After for Carmen and Carlos, and time for Emily to say her “goodbyes”….and her “thank you’s”

TIP: Use the flamenco dancer to help entertain the customers.

Restaurant 3 Fresco’s Diner Express

Emily is finally in France and is headed to Paris by train. Suitcase in hand, she comes across “Fresco’s,” a dining car restaurant that has seen better days. Behind the counter is Franco, a father of five who is panicking at the thought of an impending health inspection. Emily offers to help the man out, then finds herself running the whole operation. Mais non!

Here are the locations of the French mice:

All mice locations - Restaurant 3 Fresco's Diner Express

All mice locations – Restaurant 3 Fresco’s Diner Express

“The Mix-Up”

Day 1: Franco panics when he thinks Emily is a health inspector. Emily offers to help Franco out, but when he takes the day off to order fresh ingredients, she finds herself running Fresco’s Diner Express! Mais non!

Challenge 11: Clean up the mess to earn more points.

Day 2: After a suitcase mix-up, Emily spends a night on an uncomfortable cot in a stranger’s room. Without the ticket in her suitcase, she will have to leave the train.

“Just Dinner”

Day 3. Fresco returns the favor and saves the day for Emily when he buys her train ticket. Phillippe, Emily’s unfortunate new roommate, reads her love letter behind her back.

Challenge 12: Chase and stabilize the serving cart for extra points.

Day 4: Phillipe complains that he got food poisoning at Fresco’s restaurant and threatens to report them if Emily doesn’t have dinner with him that night. Emily stands up for herself and teaches him a lesson about how to treat women.

“Smooth Sailing”

Day 5: When the health inspector shows up, and Phillipe surprises everyone when he reveals himself to be a food critic, then gives the restaurant a glowing review.

Challenge 13:  Make sure the health inspector is well taken care of to earn extra points.

The food inspector in Fresco Diner Express

The food inspector in Fresco Diner Express

Day 6: The health inspector got food poisoning! But from where?

Tip: The conductor is also a toy train magician! Use him to entertain the customers.

“A fresh start”

Day 7: Emily saves the day…….again!

Challenge 14: Unload the boxes of fresh produce for extra points.

Day 8: Phillipe is a little more forthcoming with his affections for Emily.

“End of the line”

Day 9: In a fit of jealous rage, Phillipe rips up his review in the middle of her shift, throwing eight pieces all over the train car.

Challenge 15: To earn extra points, collect all eight of the torn pieces so Emily can read what it says.

8 pieces of the torn letter

8 pieces of the torn letter

Day 10: It is a busy last day in Fresco’s dining car, but it is time to say good-bye. As a peace offering, Phillippe offers Emily a lead as to where Jean Paul might be.

Restaurant 4 Chez Jean Paul

“Reunited”

Emily arrives at Chez Jean Paul, an outdoor cafe with a little pigeon problem. Yep! You guessed it! There are mice in France and here where they are!

All mice locations - Restaurant 4 - Chez Jean Paul

All mice locations – Restaurant 4 – Chez Jean Paul

Day 1: No sign of Jean Paul, so Emily might as well help out in his restaurant while she waits for him.

Challenge 15: Chase the pigeons away to earn extra points.

Day 2: Emily wanders through the romantic streets of Paris, hopeful for a love reconnection. She buys some flowers from Amelie. (Oddly, buying flowers reminds Emily of Patrick, her florist friend back home. But never mind, she’s in Paris!) And then, finally, after sixteen long years, Emily and Jean Paul are REUNITED, AT LAST!

“The Suprise”

Day 3: It has been a long night of catching up for the reunited couple. After sharing a family recipe, Jean Paul initiates a friendly game of hide and go seek.

Challenge 16: Find the sneaky Jean Paul for extra points. He will appear at random locations 4 times. Can you spot him?

Hide and “Cheats”

Find sneaky Jean Paul

Find sneaky Jean Paul

Day 4: Emily returns to Amelie with the good news. Amelie shares that she, too, is dating a fellow herself and is eagerly awaiting his proposal. After her shift, Emily learns Jean Paul’s restaurant has a two-star rating from the prestigious Blumfield organization. As Jean Paul leaves, a ring box falls out of his pocket!

“A promise”

Day 5: Still flying high from the discovery of the ring box, she remains a tiny bit baffled at how quickly things are going. The two lovebirds make plans for a romantic getaway to the country, just the two of them.

Challenge 17: Return the engagement ring back into the pocket of Jean Paul’s jacket for extra points.

Tip: A famous painter has been brought in to entertain the guests.

Day 6: Emily reconnects with Amelie, and the two promise to attend each others’ weddings. Jean Paul has other plans without Emily, tonight, but they are definitely on for that trip to the country, tomorrow. “No excuses!”

TIP: Use the painter to entertain the crowd.

“A Bitter Blow”

Day 7: Jean Paul doesn’t like children and he cancels plans. Perhaps he is not so perfect after all?

Challenge 18: Collect the boxes from the five men with special deliveries to the restaurant for extra points.

Day 8: Emily fears Jean Paul might be getting cold feet about proposing.

TIP: Use the famous painter to entertain the crowd.

“Falling Stars”

Day 9: Emily is brokenhearted, and Amelie promises revenge against the two-timing Frenchman. Phillipe the food critic comes to Jean Paul’s restaurant to write a review. Amelie delivers on that promise…..

Challenge 19: Attend to Phillipe for extra points.

Phillipe the Food Critic

Phillipe the Food Critic

Day 10: Emily says goodbye to her new friends, and to her dream of romance.

TIP: Use the famous painter to entertain the crowd.

Emily’s Return

The scene is bleak upon Emily’s return. It’s pouring rain, and her beloved restaurant has been badly damaged. But when she walks in she doesn’t even have it in her to get too upset about it. After all, she’s heartbroken.
And there are, of course, mice!

All mice locations - Restaurant 5 Emily's Return

All mice locations – Restaurant 5 Emily’s Return

“Heartbreak at Home”

Day 1: Francois covers Emily’s shift in the restaurant.

Challenge 20: Due to a heartbroken Emily Francois fills her place: excuse Emily’s absence 4 times to earn extra points.

Francois covers for Emily

Francois covers for Emily

Day 2: After two day in bed, Emily comes down to work only after Francois forces her hand.

“Getting Better”

Day 3: Patrick announces that he’s moving to New York. Angela brings her dogs into the restaurant and leaves them there while she goes for a hair appointment. Emily finally opens up to her Mom.

Challenge 21: Call the dog back off the restaurant floor 6 times for extra points.

Call the dog

Call the dog

Day 4: Emily, recognizing that she is surrounded by people who love her, begins to return to her normal self. (And it’s like the restaurant knows it, too. It begins to shine once again!)

“Memory Lane”

Day 5: Patrick comes in to save the day when a little girl trips in the restaurant, a far cry from that Frenchman and his two-star restaurant. Francois calls Emily out on the flirting happening between her and Patrick, but Emily still can’t see what is between her and the florist.

Challenge 22: pick up the marbles from the shattered vase to collect extra points.

8 marbles

8 marbles

Day 6: Francois goes from Mime to dog trainer, and life for Emily gets a little better every day.

Tip: Use the terrific Francois to entertain the customers.

“One Last Cry”

Day 7: Time to clean Emily’s room! A single rose in a vase from Patrick seems to affect her like never before.

Tip: Francois is there with his dog act, once again, to entertain the customers.

“No More Goodbyes”

Day 9: Patrick’s date’s secret identity is revealed.

Challenge 23: Serve the “special treats” behind the green curtain for extra points.

Day 10: Emily’s true love is revealed!

Trophies

There are many different ways to earn trophies. Earn them all to fill up the giant heart-shaped box of chocolates. How romantic!

Time Flies
Finishing the second restaurant
Leaving your Tracks Finishing the third restaurant
Haute Cuisine Finishing the fourth restaurant
The Finishing Touch Finishing the fifth restaurant
Ka-Chinggg Using the register one-thousand times
That’s Pretty Cheese Serving 150 cheese dishes
Ecstacy Sending all of your customers in restaurant 5 home feeling ecstatic
Combolicious Achieving a 2 customer bonus three times (in a row)
Delicious Expert Achieving expert on all days
Trying for Target Getting only the target score three days in a row
Deliciously quick Serving 100 products each within 5 seconds
Making Snuggy Proud Finding the mouse in every level
Saving for the Future Having 1000 decoration bucks or more
Three Variations Having three variations on the tray
Sweet Tooth filling the tray with desserts 10 times
Women’s Intuition Completing two orders in a row before they were ordered
Making Evelyn Proud Finishing 5 successive days without leaving dirty tables
Making Some Room Cleaning a dirty table just in time so a waiting customer could sit down
Keep on Walking Letting Emily walk 15 miles altogether
Shopping Spree Buying all shop items in five restaurants
Ring the Bell Picking 50 bell peppers in a day
Serving Charcoal Achieving expert score even after burning ten dishes
Trophies - Delicious Emily's True Love

Trophies – Delicious Emily’s True Love

With this official Delicious Emily’s True Love walkthrough hopefully you are able to complete all levels. Any questions or remarks please let us know and give you the best directions to finish the level.
Looking for the latest Delicious game – visit our Delicious Home Sweet Home gamepage or the official walkthrough.

The post Delicious Emily’s True Love walkthrough appeared first on GameHouse.


Rescue Team 5 Walkthrough

$
0
0

Deserts, swamps, jungles, volcanoes- no obstacle is too great for the everyday heroes of Rescue Team 5! Whether it’s clearing a roadway, rescuing a citizen in need, rebuilding structures or putting out fires: every day, and every level presents a new challenge in the latest title of the Rescue Team series. However, even the most experienced of heroes can use a guide now and then. Allow the Rescue Team 5 walkthrough to come to your aid when unexpected challenges arise so that you, too, can be at your very best for those in peril. After all, time is of the essence when there’s people to be saved!

Table of Contents

Getting Started: Basic Gameplay

Game Modes

When creating a new player, you will get to choose from three game modes: Normal, Multi-click, and Relaxed. Normal mode will allow you to assign tasks only when you have free workers. Multi-click mode will allow you to assign tasks even when your workers are busy. Relaxed mode has no time limit- simply relax and have fun! Game mode selection is permanent. If you want to change the game mode at any time, you will need to create a new player.

Levels

Each level is represented by a traffic cone along a winding road on the main map. When hovering your cursor over a level, you’ll be able to see how many times you’ve completed it, as well as your times and scores. Completing a level successfully will allow you to progress to the next traffic cone and thus unlock the next level. Levels you’ve already completed will replace the traffic cone with a statue, as well as stars to indicate your score at a glance.

Objectives

A unique challenge awaits you in each level you play. These objectives are shown in the upper right corner of your screen. Objectives will update as you work your way through a level. Once you’ve completed an objective, it will be checked off of your list. Complete all the level objectives within the time given to unlock the next level!

Score

Your score is determined by three factors: time spent, resources collected, and buildings built. If this sounds complicated, not to worry: You can easily keep track of how much time you have remaining via the colored bar in the upper left corner of your screen. Complete a level before the bar runs empty to unlock the next one. Complete a level before the green portion of the bar runs out to obtain a 3-star ranking!

Resources

There are four types of resources in Rescue Team 5: Food, Wood, Money, and Fuel. Your resource amounts are always visible in the upper left corner of your screen. Each task you do requires resources. Resources may be obtained by clearing obstructions, as rewards for having certain types of buildings built (e.g. Burger Cafes, Lumber Mills, Houses, or Gas Stations respectively), or simply by gathering them sitting out in the open. Resource management is key in completing levels within the amount of time provided.

Workers

Each level you play features workers. These handy heroes are responsible for helping you complete various tasks. By default, construction workers will be a part of your crew. They’re responsible for gathering resources, maintaining buildings, and repairing or clearing structures. Other types of workers will become available as you progress through the game. Click on an object to assign a task to one of these workers. Each type of worker has a home base from which they originate. Hat icons over these bases will let you know whether any extra workers are available that aren’t currently working on a task.

Rescue Team 5 Walkthrough

Level 1

Rescue people: 3

Tips & Tricks Level 01 Rescue Team 5

Tips & Tricks Level 01 Rescue Team 5

  • The goal of today is quite simple: Rescue three people unable to reach the main road on their own. This will act as your tutorial level.
  • Pick up the Food and Wood resources on the left.
  • Clear the obstruction on the first road leading up. This will free the man trapped here and give you access to another Food resource.
  • Repair the bridge spanning the chasm heading down.
  • Clear the obstructions on the bottom road, and don’t forget to collect your food resources on the sides of the road.
  • Repair the final bridge heading east-west across the chasm to rescue the final individual.

Level 2

Rescue people: 3

Tips and Tricks Level 02 Rescue Team 5

Tips and Tricks Level 02 Rescue Team 5

  • This is the first level in which buildings are introduced. You will need to repair them in order to gain access to their resources.
  • Burger Cafes produce food. In addition to a normal output which is automatically added to your resources, occasional bonus income will show up in front of the building. You will need to click on it to have a worker collect it. Once the worker returns to their base with the resource, it will be added to your resource amount in the upper left corner.
  • Repair the bridge to gain access to the second part of the level. From here, repair the House. Houses will provide you with Money resources.
  • Clear the wood obstructions first, followed by the stone obstruction blocking the path.
  • Once the stone obstruction has been cleared, repair the final two buildings, a Burger Cafe and another House, in order to gain access to their resources.
  • Clear the final Big stone to rescue the final individual.

Level 3

Rescue people: 5

Hints Level 03 Rescue Team 5

Hints Level 03 Rescue Team 5

  • Construction sites are introduced in this level. Click on a construction site and select the building you would like to build here. For this level, you will want to build a House.
  • Clear the stone and wood obstructions and gather the spare resources, starting with the southernmost roads and heading upward.
  • Clearing the two northern obstructions will free up two more workers for your workforce.
  • Clear the Big stone to gain access to the second part of the level, where ordinary people are in need of rescuing.
  • Once the Big stone has been cleared, you will no longer need Money as a resource. Click on the House to demolish it, then build a Burger Cafe in its place. This will provide you with more Food resources.
  • Clear the obstruction blocking the way to the Wood resources first, then gather them.
  • Use your resources to repair the three Large bridges leading to the civilians to rescue them.

Level 4

Rescue people: 13

Tips and tricks Level 04 Rescue Team 5

Tips and tricks Level 04 Rescue Team 5

  • In this level, you will have access to an ATV. ATVs require the Fuel resource to work.
  • Workers are among the people who need rescuing, but only the ATV can reach them. Rescuing these guys will allow them to work for you right away, giving you more helping hands to accomplish your goals.
  • Restore the Gas Station to create a Fuel income for the ATV.
  • Use the ATV to reach the workers whenever possible.
  • Clear the stone blocking the road leading to the right. This will allow you access to a construction site.
  • Restore the Saw Mill and build a Burger Cafe on the construction site.
  • Clear the stone blocking the road leading south to gain access to two more construction sites. Build Burger Cafes on these sites to gain additional Food resources.
  • Repair the bridges and clear the obstructions one by one to rescue the stranded citizens. It’s easier to repair the wooden bridges than the Large bridge that’s broken up north.

Level 5

Rescue people: 6
Rescue animals: 16

All animals and people Level 05 Rescue Team 5

All animals and people Level 05 Rescue Team 5

  • This level introduces animals. Much like ordinary people, animals are also in need of rescuing. However, unlike ordinary people, animals will wander, and require Food resources to capture.
  • Make your way around the map clearing wood and small stone obstructions. Do not tackle Large stone obstructions: You only need to clear one to complete the level, so don’t waste your resources.
  • Build Burger Cafes and Houses on construction sites to increase your Food and Money incomes.

Level 6

Purify the basins: 2
Rescue people: 2
Rescue animals: 6

Level 06 Rescue Team 5

Level 06 Rescue Team 5

  • You cannot build Burger Cafes in this level.
  • There are two waste disposal pipelines in this level which are dumping toxic waste into the water basins. You will need to click on them to have a worker shut them off.
  • Purifying the basins will give you access to the piers. Restore these to gain the ability to use boats to retrieve Food resources.
  • The two people stranded are workers. Therefore, rescuing them should be your priority.
  • Six animals will need rescuing. However, be aware that once the path has been cleared, the animals will begin to wander. Don’t lose track of them, or they will be more difficult to find.

Level 7

Rescue people: 2
Rescue animals: 7

Tips and tricks Level 07 Rescue Team 5

Tips and tricks Level 07 Rescue Team 5

  • There are three generators in this level. You will need to gather Fuel resources in order to use them to pump the water off the roads.
  • A large boulder marked with a yellow “i” sign will require dynamite to clear it. The dynamite is located just to the bottom left of it. You will need to clear a stone obstruction to reach it.

Level 8

Rescue people: 9
Rescue animals: 10

Level 08 Rescue Team 5

Level 08 Rescue Team 5

  • Doctors are a new type of worker that are introduced in this level. Hospitals act as their base, and they are required to cure sick people in need of rescuing.
  • People who are ill will sit on roads and block them. You will not be able to move past them until they are cured by a doctor.
  • You will not be able to build Saw Mills in this level. All Wood resources are gathered by clearing obstructions.
  • Click on pipeline valves to clear patches of fog.
  • You will need to use Fuel on the generators in order to pump water off the any roadways that may be flooded.
  • Collect the blueprint boosts to allow your workers to run faster for a short period of time.

Level 9
Rescue people: 9
Rescue animals: 3

Tips and tricks Level 09 Rescue Team 5

Tips and tricks Level 09 Rescue Team 5

  • You will be able to work out of two (construction) bases at once in this level.
  • Freeing people from the obstructions blocking their path on the lower half of the level will allow them to run to the broken portion of the road. You will need to restore the pier and use the boat to save them before they will count as rescued.
  • You will not be able to build Gas Stations in this level, so make sure you work with the resources you have. Restore the existing Gas Stations, but don’t demolish them.
  • Collect the blueprint boost to give your boat a speed boost for a short period of time.

Level 10

Rescue people: 13

Level 10 Rescue Team 5

Level 10 Rescue Team 5

  • Helicopter Pads will be introduced in this level. Using these will allow you to order large quantities of Fuel.
  • Collect the burger blueprint to temporarily increase your production of Food from Burger Cafes.
  • Collect the boat blueprint to temporarily increase the speed of your rescue boat.
  • Twelve of the thirteen people you will need to rescue are on top of flooded houses. Make sure to put plenty of emphasis on Fuel for this level.

Level 11

Rescue people: 11

Tricks for Level 11 Rescue Team 5

Tricks for Level 11 Rescue Team 5

  • Most of this level is obstructed by fog. Click on the pipeline valves to disperse it.
  • Building upgrades will become available for the first time in this level. Select a building and choose “Upgrade” to increase resource production output from this building. It will cost Wood resources to upgrade, however.
  • Policemen will be introduced in this level. Click on thieves to have a policeman come and drive them away. A thief may either reside within an establishment, or simply block a roadway. Thieves residing within a building will prevent that building from giving you resources until they’re driven out.
  • Click on the money blueprint to temporarily increase your output of Money from Houses.

Level 12

Rescue people: 31

Where are the people Level 12 Rescue Team 5

Where are the people Level 12 Rescue Team 5

  • There is a fire that is gradually spreading in the valley in this level. Using the Helicopter Pads to airlift people to safety is crucial. If you don’t rescue them all by the time the fire gets to them, you will need to restart the level.
  • Place priority on rescuing the people closest to the fire.
  • In addition to using Fuel to rescue people with helicopters, you can also use Money to pay helicopters to put out spreading fires.
  • Collect helicopter blueprints to give your helicopters a speed boost for a short period of time.
  • It is possible to complete this level with a three star rating without putting out any fires.
  • Highest emphasis should be put on gathering Fuel resources, since you will need them to airlift people to safety.

Level 13

Rescue people: 12

Level 13 Rescue Team 5

Level 13 Rescue Team 5

  • Firefighters will be introduced in this level. Fire stations act as the home base for these workers.
  • Firefighters are required to put out any fires which may be smoldering on the roads.
  • The ATV is required to rescue workers trapped in the ravine on the lower left. Gathering the Wood resources here is not required.
  • Gather the blueprints scattered throughout the area to give temporary speed and output boosts to your various workers and resources.

Level 14

Stop the oil leak: 2
Rescue people: 12
Rescue animals: 1

Level 14 Rescue Team 5

Level 14 Rescue Team 5

  • There are two oil leaks on this level which will need to be shut off in order to continue. Click on the pipeline valves to have a worker shut them off.
  • There’s a doctor, a worker, and two firefighters (in addition to a cat) located on top of the plateau. Save them with the helicopter in the following order to maximize your time: doctor, firefighters, worker, cat.
  • You will not be able to build Gas Stations on this level. Fuel resources must be gathered from the surrounding environment.

Level 15

Rescue people: 3
Rescue animals: 9
Save money: 350

Level 15 Rescue Team 5

Level 15 Rescue Team 5

  • Clear the path to the train station and repair the station in order to receive large shipments of food.
  • Multiple areas of fog cover the map. Click on the pipeline valves to disperse them.
  • Two workers are stranded in the water. You will need to repair the pier and use the boat to reach them.
  • In addition to saving people and animals, you will need to save $350 to complete your objective, so be sure to have a House pulling in income. This should, however, be your last priority.

Level 16

Rescue people: 6
Rescue animals: 8

Level 16 Rescue Team 5

Level 16 Rescue Team 5

  • Saw Mills and Burgers Cafes cannot be built on this level.
  • Collect debris in the water and clear obstructions from the road to gain Wood resources.
  • The pre-existing Burger Cafe and Saw Mills are the only ones available on the level, so be careful not to tear them down.
  • Place priority on reaching the Burger Cafe so that it can be upgraded to turn a higher output of Food resources.
  • Three of the six people stranded are located on a small cliff shelf toward the upper left corner of the map. They are easy to overlook, so make sure you restore the helicopter pad and rescue them in a timely manner.

Level 17

Rescue people: 10
Rescue animals: 3

Level 17  Rescue Team 5

Level 17 Rescue Team 5

  • Send medicine to the people to the southeast before the doctor arrives. Failing to do this within the allotted time period will result in the level needing to be replayed.
  • Hover over the medical tent in the bottom left corner to view a timer showing the status of the people’s fevers.
  • Gas Stations cannot be built on this level. You will need to gather Fuel resources from the barrels on the road in the southern portion of the level.
  • The hospital will need to be repaired, as well as doctors saved from the water, before sick people can be rescued.

Level 18

Rescue animals: 8
Drive away thieves: 3

Level 18 Rescue Team 5

Level 18 Rescue Team 5

  • Click on the red valve on the large striped pipeline to clear the fog in the lower right corner of the level.
  • Gas Stations cannot be built in this level. Fuel resources can only be gathered after restoring the run down Gas Stations already in existence.
  • Most of the animals in need of rescuing will need to be air lifted from the pit in the lower right corner of your map, so be sure to put an emphasis on Fuel resources.
  • Once an animal has been airlifted to safety, a worker will need to catch them before they will count as rescued.

Level 19

Rescue people: 11
Drive away thieves: 5

Level 19 Rescue Team 5

Level 19 Rescue Team 5

  • All doctors and policemen on this level start out stranded in the water. You will need to restore their bases and rescue them before you can drive away thieves or put out fires.
  • You cannot build Gas Stations in this level. Fuel resources can only be gathered via helicopter.

Level 20

Rescue animals: 15
Rescue people: 6

Level 20 Rescue Team 5

Level 20 Rescue Team 5

  • Burger Cafes cannot be built in this level. You will need to use the helicopter pad to gather Food resources.
  • Most of the animals in this map are free-roaming, and therefore easy to miss. Be careful not to let them too far out of your sight.

Level 21

Rescue people: 11

Level 21 Rescue Team 5

Level 21 Rescue Team 5

  • This level features two bases you can work out of simultaneously.
  • You will not be able to put out fires until you rescue the firefighter stranded in the water. To do this, you will first need to rebuild the pier.
  • People rescued on the right half of the map will additionally need to be ferried by boat to safety before they count toward the rescued total.
  • Gas Stations cannot be built in this level. Fuel resources will need to be gathered from the environment and the single Gas Station already pre-existing, so be certain not to demolish it.

Level 22

Rescue people: 8
Rescue animals: 7

Level 22 Rescue Team 5

Level 22 Rescue Team 5

  • Most of the people stranded in this level will suffer from a fever if they aren’t given medicine or rescued in a timely manner. Place emphasis on reaching them as quickly as possible. You will need Fuel resources to drop medicine in the event their fevers spike.

Tips, Tricks, and Hints

In need of a few more tips and tricks, or perhaps just looking for a hint? Not to worry! This section will guide you through a few extra pointers to help you use your time in Rescue Team 5 most efficiently.

  • Stack your tasks!- In Multi-click mode especially, you can click on multiple tasks even if you don’t immediately have a worker available to complete them. This “stacking” can help you complete tasks in a more timely manner, especially if you need an extra moment to think.
  • Blueprint bonuses go into effect immediately!- On levels which contain blueprints, which can boost your resource output or help your workers to move faster, it’s important to know when to use these. You don’t need to pick them up right away. In fact, you can ignore them entirely if you chose. Save these boosts for the moments in which you really need them: when you’ve got multiple workers that can benefit from it, or even just that extra push to finish the level on time. Unlike resources, blueprint bonuses go into effect immediately when gathered.
  • Demolish and rebuild!- The key to completing a lot of levels quickly is to know when to demolish a building and build a new one in its place. Keep an eye on your resource amounts and don’t hesitate to hover over remaining tasks or obstacles to see what their requirements are. If, for example, you have two Burger Cafes, but none of your remaining tasks require Food resources, then there’s no point in keeping those two Burger Cafes. Instead, build something else in its place that will give you the resources you need.
  • Animals tend to wander!- Try to keep an eye on the animals in the levels they appear in. Animals may initially be trapped behind an obstruction, but once that obstruction is cleared, they will wander anywhere and everywhere they can. An extra task to safely capture the animals is needed before they can be rescued, so be careful not to let them wander so far it may be difficult to find them again.
  • Know your objectives!- This may seem self-explanatory, however- each level has a unique objective, and sometimes you’ll be thrown a curve ball you haven’t seen before. Make sure you look at your objective every time you load a level so you know exactly what needs to be done to complete it. Not all levels rely 100% on rescues; some levels may require you to save up a certain amount of a particular resource.
  • Before demolishing buildings, know what you can build!- Some levels will have restrictions on which types of buildings you can build. Sometimes these levels will have the type of building you can’t build already built somewhere else in the level, e.g. You cannot build Gas Stations, but there is a Gas Station already there which may be restored. Check your resource requirements and make sure you don’t demolish these buildings if they’re needed for your objectives!
  • Prioritize!- It’s always important to know your priorities. For example, when it comes to tasks, you may have to choose between rescuing a person or gathering a resource. If rescuing that individual is what helps you complete your objective, you should rescue them and not spend extra time gathering a resource you no longer need.

We hope you’ve enjoyed our walkthrough for the first section of Rescue Team 5. Stuck at a certain level or need a little extra help? Let us know!

Disclaimer: This Rescue Team 5 walkthrough is meant as a guide and does not contain hacks, cheats, or serials.

The post Rescue Team 5 Walkthrough appeared first on GameHouse.

The ultimate Plants vs. Zombies strategy guide

$
0
0

“Brains! BRAINS! A huge wave of zombies is approaching!” If you’re a Plants vs. Zombies enthusiast, you’ve probably already come up with some top-notch zombie-blasting tactics by the time you read this. Sunflowers first, oh and potato mines, do I need wall-nuts? But before you put your craved brain in overdrive, read this expert advice on how to defend your home from these skull-ripping, brain-slurping zombies first. This strategy guide will help you build the perfect green army to get through all levels!

The post The ultimate Plants vs. Zombies strategy guide appeared first on GameHouse.

The Dreamatorium of Dr. Magnus 2 Walkthrough

$
0
0

Long live the cog! A world run by gears and the steam of progress awaits you in The Dreamatorium of Dr. Magnus 2. But not all is as it seems! Abductions, strange apparitions, and unsolved mysteries plague the air around the curious Dr. Magnus. Answers lie hidden away in the secrets of the Dreamatorium. Feel like there’s a wrench in your cogs keeping you from advancing? Let The Dreamatorium of Dr. Magnus 2 walkthrough oil your joints and guide you back to the path of progress!

Contents

General Tips & Tricks

In this section you’ll find various general tips, hints, and tricks to help guide you on your journey through The Dreamatorium of Dr. Magnus 2.

Four difficulty modes are available via the Options menu of the game: Regular, Advanced, Expert, and Custom. Regular mode features an included tutorial, quick hint and skip button recharges, active areas having a “glimmer” effect, as well as no missclick penalties within these areas, and examination items being indicated by a gold star in your inventory. Advanced mode also includes these features, however the hint and skip recharges are slower, and active zones are not indicated. In Expert mode, all of these features are disabled, with the exception of examination items still being indicated by a gold star. Custom mode will allow you to create your own difficulty mode!

The Extras button in the Main Menu will allow you to access Achievements, Concept Art, and Wallpapers.

  • Items you pick up are stored in your inventory at the bottom of your screen. Your inventory bar can be locked into place by clicking the lock button in the upper left corner, otherwise it will minimize when you move your cursor away. Inventory items are marked in bold in the guide below.
  • Unless you’re playing on Expert difficult mode, you will be able to use the Hint button when you become stuck. Hints take time to recharge after each use, but not to worry: The button will remain charged if you need to change locations.
  • When you encounter a hidden object scene, you will need to find all the hidden objects indicated in the bar where your inventory is normally located to complete it. You may have to find objects by name, or even silhouette, depending on the scene’s goal. Items listed in orange often require an additional action or item combination to uncover. Hidden object areas are indicated with shining crystals.
  • To the left of your inventory is your Journal. The Journal automatically keeps track of any clues or pieces of story you encounter as you progress through the game. The Objectives tab will highlight your current tasks. The Notes tab will keep track of any important clues you may uncover.
  • Next to the Journal is your Map. This indicates your current position, and depending on your difficulty settings, also shows any active scenes you can access next. You can select any location on the map, so long as it’s not blocked, to fast travel to that location.
  • Minigames you encounter will show their objective listed at the bottom of the screen. Depending on difficulty settings, minigames may be skipped after a certain amount of time has passed.
  • The Amulet is located next to your Hint button. Use this over any glowing areas of similar outline to view scenes from the past.
  • When your cursor changes into a magnifying lens, it indicates you can take a closer look at an area. Similarly, if your cursor changes into a hand, it indicates you can directly interact with an object, or add it to your inventory. The cursor changing into lips indicates you can talk with someone.
  • Inventory items marked with a gold star indicates you can select them to take a closer look. Some items may simply need to be opened or examined to reveal a new inventory item. Others may require you to combine them with other inventory items to achieve a new item you’ll need. Depending on your difficulty, you may also see a gray star next to inventory items that can be combined later, but require additional components.
  • Once acquired, the Multitool will be ever-present in your inventory. This item has a Knife, Screwdriver, and Scissors function. Not sure how to interact with an item? Try giving the Multitool a spin. It can be used for numerous purposes, and not always how you would expect.
  • Hidden throughout the game are various collectibles, taking the shape of the Eye of Horus. These collectibles are circled in blue in the guide below.

The Dreamatorium of Dr. Magnus 2 Walkthrough

Chapter 1: House Lobby

Front

  • Click on the Amulet held out in your hand. The Amulet will be added to the lower right corner of your screen. The Amulet can sense supernatural traces and be used to view past events.
  • Use the Amulet on the glowing outline that appears in the center of your screen, then watching the cutscene that follows.
  • Take a closer look at the newspaper vending machine on the left.
  • Examine the bicycle lying on the sidewalk straight ahead. Click on the teal back to open it, then click on the Map to collect it. The Map will appear in the lower left corner of your screen and help you to navigate between areas.
  • Click on the Wallet to add it to your inventory.
  • Select the Wallet and click to open it. Collect the Note inside to add it to your Journal, then click on the ID Card to add it to your inventory.
  • Proceed forward to the Door.

Door

  • Collect the Eye of Horus 1/22 next to the number placard.
Dreamatorium Dr Magnus 2 Eye of Horus 1 of 22

Dreamatorium Dr Magnus 2 Eye of Horus 1 of 22

  • Ring the doorbell on the left of the doorframe.
  • Speak with Dr. Magnus. Show him the ID Card.
  • Finish your conversation with Dr. Magnus, then proceed forward into the Lobby.

Lobby

  • Speak with Dr. Magnus again. You will receive the new objective “Make Mint Tea”.
  • Collect the Eye of Horus 2/22 at the foot of the balcony.
Dreamatorium Dr Magnus 2 Eye of Horus 2 of 22

Dreamatorium Dr Magnus 2 Eye of Horus 2 of 22

  • Enter the Kitchen on the left.

Kitchen

  • Click on the hidden object area over the kitchen table.
  • Find and place each item and collect all tiles. For example: use the flowers on the vase.
  • Upon placing each item in its correct location, take a closer look at the bread box on the upper left.
  • Switch the positions of the adjacent triangles to solve the minigame. The solution is shown below.
Dreamatorium Dr Magnus 2 koi fish puzzle solution

Dreamatorium Dr Magnus 2 koi fish puzzle solution

  • Click on the bread box to open it once you’ve completed the puzzle. Click on the Dessert Set to add it to your inventory.
  • Select the Dessert Set and open the case. Click on the Spoon to add it to your inventory.
  • Take a closer look at the kitchen cabinets above the sink. Click to open the cabinet, then select the Focusing Knob and the Tea Box to add them to your inventory.
  • Select the Tea Box and open the case. Select the Instructions inside, as well as the Tea Bag.
  • Examine the stove on the left. Use the Spoon, the Tea Bag, and the Instructions on the stove to trigger a puzzle.
  • To make the perfect cup of tea, follow the steps on the drawing. First, place the pot on the stove and click the knob to apply heat. Next, place the Tea Bag inside the teacup and use the Spoon to add sugar. Finally, select the teapot and pour the hot water in the tea cup, then top it off with a slice of lemon. Select the perfectly prepared Mint Tea to add it to your inventory.
  • The “Make Mint Tea” objective is now complete. Exit the Kitchen back to the Lobby.

Lobby

  • Enter through the double doors ahead to proceed into the Library.

Library

  • Give the Mint Tea to Dr. Magnus, then speak with him regarding Lara. Once the conversation is complete, Dr. Magnus will give you the Lab Key and the objective “Laboratory Investigation” will become active.
  • Collect the Eye of Horus 3/22 on the front of the desk.
Dreamatorium Dr Magnus 2 Eye of Horus 3 of 22

Dreamatorium Dr Magnus 2 Eye of Horus 3 of 22

  • Examine the glass case over the bookshelf ahead. Click on the Lens nestled into the lower right corner to add it to your inventory.
  • Take a closer look at the telescope on the left. Use the Lens and the Focusing Knob on their applicable slots to restore the telescope and trigger a minigame.
  • Use the telescope to find the objects in the drawings. Use the slider on the right to adjust the focus. Upon completing the minigame, you will be rewarded with a code: 8-1-3.
  • Examine the desk on the right. Click on the desk drawer to open it, then take a closer look at the green box inside. Input the code 813 on the sliders to unlock the box.
  • Collect the Token 1/2 and the Lobby Cabinet Key inside the box to add them to your inventory.
  • Before exiting the desk view, click on the Paper Pieces on top of the desk to add them to your inventory.
  • Select the Paper Pieces from your inventory and click on them until a message is arranged. The message will be added to your Journal.
  • Exit the Library back to the Lobby.

Lobby

  • Use the Amulet on the glowing outline that appears over the mirror.
  • Proceed through the door on the right to the Backyard.

Backyard

  • Collect the Eye of Horus 4/22 on the grass in front of the fountain.
Dreamatorium Dr Magnus 2 Eye of Horus 4 of 22

Dreamatorium Dr Magnus 2 Eye of Horus 4 of 22

  • Examine the table on the left. Click on the papers strewn about the table to move them aside, then collect the Golden Sun lying beneath to add it to your inventory.
  • Take a closer look at the lion fountain on the right. Read the note to the right of the fountain, then use the Golden Sun on the indentation to reveal the Fuse 1/3 within the lion’s mouth. Click on it to add it to your inventory.
Dreamatorium Dr Magnus 2 Golden Sun in Fountain Gives Fuse

Dreamatorium Dr Magnus 2 Golden Sun in Fountain Gives Fuse

  • Examine the bucket at the base of the fountain. Click on the Awl inside to add it to your inventory.
  • Return to the Lobby.

Lobby

  • Examine the cabinet on the left between the Kitchen and the Library. Use the Lobby Cabinet Key on the lock to reveal a hidden object area.
  • Find the pieces shown at the bottom of the screen. Upon locating all the pieces, you will receive the Multitool. This item has a Knife, Scissors, and Screwdriver function that will be useful for various tasks throughout the game.
  • Take a closer look at the plant on the right side of the staircase. Use the Multitool from your inventory on the planter, then select the Knife function to dig up the soil.
  • Click on Puzzle Tile 1/2 to add it to your inventory.
  • Examine the broken mirror on the wall above the cabinet. Click on Puzzle Tile 2/2 wedged beneath the glass to add it to your inventory.
  • Exit the Lobby back to the Door.

Door

  • Take a closer look at the box beneath the number placard. Use the Puzzle Tiles on the box to trigger a minigame.
  • Assemble the puzzle by finding the right place for each tile. The solution is shown below.
Dreamatorium Dr Magnus 2 Horn Puzzle Solution

Dreamatorium Dr Magnus 2 Horn Puzzle Solution

  • Upon completing the puzzle, the box will open. Click on the Letter and the Wire to add them to your inventory.
  • Select the Letter in your inventory to open it, then click on the Token 2/2 to add it to your inventory. The objective “Who is Graves?” will become active.
  • Select the Wire in your inventory, then click on it to bend it until you obtain the newly formed Wire Hook.
  • Proceed to the Front.

Front

  • Collect the Eye of Horus 5/22 on the side of the middle set of steps.
Dreamatorium Dr Magnus 2 Eye of Horus 5 of 22

Dreamatorium Dr Magnus 2 Eye of Horus 5 of 22

  • Take a closer look at the drainage grate at the foot of the lamppost on the left. Use the Wire Hook to fish out the Shears Part and add it to your inventory.
  • Return to the Backyard.

Backyard

  • Take a closer look at the gate on the far end of the yard. Use the Tokens on the steel lock to trigger a minigame.
  • Keeping one spot empty, move the tokens to their proper places to open the gate lock. The solution is shown below.
Dreamatorium Dr Magnus 2 Backyard Gate Lock Solution

Dreamatorium Dr Magnus 2 Backyard Gate Lock Solution

  • Proceed through the now open gate to the Laboratory Building.

Laboratory Building

  • Collect the Eye of Horus 6/22 in the middle of the sky on the left.
Dreamatorium Dr Magnus 2 Eye of Horus 6 of 22

Dreamatorium Dr Magnus 2 Eye of Horus 6 of 22

  • Examine the green brick base of the building straight ahead. Use the Awl to remove the loose brick, then click on the Fuses 2/3 to add them to your inventory.
  • Take a closer look at the clothesline on the left. Click on the green Cloth to add it to your inventory.
  • Examine the large wooden box beneath the steps on the right. Click on the Rotten Apple on top of the box to add it to your inventory.
  • Take a closer look at the trash can on the left, beneath the laundry line. Open the trash can and place the Rotten Apple inside, then click on the Crumpled Paper to add it to your inventory.
  • Select the Crumpled Paper from your inventory and click to unfold it until you receive the Threatening Note.
  • Proceed through the door at the top of the steps to enter the Laboratory Hall.

Laboratory Hall

  • Take a closer look at the wooden box hanging on the wall on the left. Select your Multitool, then use the Scissors function to clip the wire holding the box shut.
  • Collect the final Fuses 3/3 located in the bottom left corner of the box to add them to your inventory.
  • Back in the main view of the Hall, remove the sheet from the panel on the right, then take a closer look. Use the Fuses on the panel to trigger a minigame.
  • Place the fuses in the right slots so the sum of the connected fuses matches the values given. The solution is shown below.
Dreamatorium Dr Magnus 2 Fuses Sum Minigame Solution

Dreamatorium Dr Magnus 2 Fuses Sum Minigame Solution

  • Upon completing the puzzle, light will be restored to the Hall.
  • Collect the Eye of Horus 7/22 in the painting on the far left side of the Hall.
Dreamatorium Dr Magnus 2 Eye of Horus 7 of 22

Dreamatorium Dr Magnus 2 Eye of Horus 7 of 22

  • Examine the lock to the left of the door closest to you. Use the Lab Key on the lock to open the door.
  • Proceed through the door into the Laboratory.

Laboratory

  • Collect the Eye of Horus 8/22 on the upper left drawer of the bureau.
Dreamatorium Dr Magnus 2 Eye of Horus 8 of 22

Dreamatorium Dr Magnus 2 Eye of Horus 8 of 22

  • Click on the hidden object area over the broken portion of the cabinet on the lower left.
  • Find the items as indicated by their outlines. Use found items to reveal the locations of the other missing items. Successfully finding all the outlined items will reward you with three Tiles. Use the Tiles on the metal safe to unlock it, then collect the Box Key inside to add it to your inventory.
Dreamatorium Dr Magnus 2 Box Key Safe Location

Dreamatorium Dr Magnus 2 Box Key Safe Location

  • Take a closer look at the small wooden chest on the middle shelf of the bureau. Use the Box Key to open it, then click on the Pattern inside to add it to your inventory.
  • Examine the microscope on the left side of the desk. Use the Cloth to clean the dirty lens. A code will be revealed: L9 R9 L0 R1.
  • Open the lower right desk drawer. Click on the Folder inside to add it to your inventory.
  • Select the Folder from your inventory to open it. This will complete the objective “Who is Graves?” Additionally, the Photo will be added to your inventory.
  • Click on the Photo in your inventory to examine it and gather additional information on Dr. Magnus and Graves.
  • Proceed through the door on the right and into the Laboratory Office.

Laboratory Office

  • Collect the Eye of Horus 9/22 at the top of the bookcase on the right.
Dreamatorium Dr Magnus 2 Eye of Horus 9 of 22

Dreamatorium Dr Magnus 2 Eye of Horus 9 of 22

  • Examine the bookcase on the right. Click on the Figurine to the left of the binders to collect it. Click on the binders for a closer view and collect the Note The objective “Find the Dreamatorium” will be activated.
  • Take a closer look at the chair with the stitched tear on the right. Use the Knife function of the Multitool to cut the stitching, then click on the Pearl 1/2 hidden inside to add it to your inventory.
  • Click on the Cane hooked over the back of the chair in the center of the room to add it to your inventory.
  • Examine the empty frame sitting on the desk. Place the Photo inside the frame, then click on it again for a closer view. Once you exit the zoomed view, you will be able to click on the Screw and add it to your inventory.
  • Go back to the Laboratory.

Laboratory

  • Take a closer look at the cabinet on the left. Click on the cabinet door to open it, then place the Figurine inside the music box. Click on the Pearls 2/2 once the hidden compartment drawer opens to add them to your inventory.
Dreamatorium Dr Magnus 2 Music Box Pearl 2 of 2 Location

Dreamatorium Dr Magnus 2 Music Box Pearl 2 of 2 Location

  • Return to the Laboratory Office.

Laboratory Office

  • Examine the small table on the left. Place the Pearls in the top of the wooden box to open it.
  • Use the Note and the Threatening Note on The Finder to trigger a minigame.
  • Find matching symbols by clicking on them. A wrong move resets the game. Upon completing the puzzle successfully, the remaining Safe Code L2 will be revealed.
Dreamatorium Dr Magnus 2 The Finder Safe Code Solution

Dreamatorium Dr Magnus 2 The Finder Safe Code Solution

  • Click on the painting hanging on the wall above the desk to knock it down, revealing a hidden safe.
  • Take a closer look at the safe hidden in the wall. A minigame will be activated.
  • Rotate the circle, following the code. Click and hold the dial to move it. Codes with L require you to move the dial counterclockwise, while codes with R require you to move the dial clockwise. Once you’ve input the code L9 R9 L0 R1 L2, click on the safe handle to open it. The objective “Laboratory Investigation” will be marked as completed. Examine the red notebook inside, then click on the blue Crystal hidden beneath to collect it.
Dreamatorium Dr Magnus 2 Safe Code Solution

Dreamatorium Dr Magnus 2 Safe Code Solution

  • Exit to the Laboratory Hall.

Laboratory Hall

  • Take a closer look at the light fixture to the right of the door leading into the Laboratory. Use the Cane to retrieve the Wooden Hand and add it to your inventory.
  • Go back outside of the Laboratory Building.

Laboratory Building

  • Examine the wooden chest beneath the stairs on the right. Use the Wooden Hand on the slot on top of the chest to open it, then click on the Cube and the Shears Part inside to add them to your inventory.
  • From your inventory combine the Shears Parts and the Screw, then use the Screwdriver function of the Multitool to complete the Shears.
  • Return to the Backyard.

Backyard

  • Take a closer look at the flowery hedge to the right of the open gate. Use the Shears to cut away the overgrowth, then use the Pattern on the symbols etched into the brick to reveal a code.
  • Examine the table on the left. Use the Cube on the square base in the bottom right corner. Click on it again to trigger a minigame.
  • Rotate each segment until you get the symbol indicated on the cipher. Empty fields are included, too. The solution is shown below.
Dreamatorium Dr Magnus 2 Cube Cipher Puzzle Solution

Dreamatorium Dr Magnus 2 Cube Cipher Puzzle Solution

  • Upon completing the puzzle, click on the Bookshelf Key to add it to your inventory.
  • Go back to the Lobby.

Lobby

  • Use the Amulet on the glowing outline to trigger a cutscene. Once completed, enter the Library.

Library

  • Take a closer look at the glass case over the bookshelf straight ahead. Use the Bookshelf Key on the lock to trigger a minigame.
  • Collect pairs of matching books. Your solution is behind them. Once you’ve completed this task, you will need to follow the sequence shown on the levers and repeat it to open the passage.
  • Once completed, the Secret Passage will be revealed. Enter through to this new area.

Secret Passage

  • Upon entering the Secret Passage, the objective “Find the Dreamatorium” will be completed.
  • Collect the Eye of Horus 10/22 near the top of the stone wall.
Dreamatorium Dr Magnus 2 Eye of Horus 10 of 22

Dreamatorium Dr Magnus 2 Eye of Horus 10 of 22

  • Examine the door at the bottom of the staircase. Use the Crystal on the door. The note over the crystal slots will move, and the item will now be re-added to your inventory as Crystal 1/5.
  • Click on the note to reveal the Phone Number and add it to your inventory.
  • Return to the Lobby.

Lobby

  • Take a closer look at the phone on top of the cabinet between the Kitchen and Library doors. Use the Phone Number on the phone to dial, unlocking a new location.

Chapter 2: King’s Mansion

Mansion Front

  • Upon arriving, the objective “Explore the Mansion” will become active.
  • Collect the Eye of Horus 11/22 along the top row of pillars and to the right.
Dreamatorium Dr Magnus 2 Eye of Horus 11 of 22

Dreamatorium Dr Magnus 2 Eye of Horus 11 of 22

  • Examine the piece of paper lying on the steps ahead to add it to your Journal.
  • Take a closer look at the boxes sitting on the left side of the steps. Click on the Matches and the Diamond to add them to your inventory.
  • Select the Matches from your inventory. Click on the matchbox to open it and grab a match from inside. Click on the side of the matchbox to strike the Match and light it, adding it back to your inventory.
  • Examine the door of the mansion straight ahead. Click on the note taped to the window to add it to your Journal and activate the objective “Find the Purple Crystal”.
  • Click on the Box Lock 1/2 wedged into the corner of the right door window to add it to your inventory.
  • Enter through the doors to the Mansion Lobby.

Mansion Lobby

  • Collect the Eye of Horus 12/22 located at the top of the first pillar to the left of the staircase.
Dreamatorium Dr Magnus 2 Eye of Horus 12 of 22

Dreamatorium Dr Magnus 2 Eye of Horus 12 of 22

  • Examine the doors on the left. You will enter a minigame.
  • Move the board by dragging it around the circle to guide each ball through the maze to its target. The easiest way to complete this puzzle is to focus on one ball at a time.
  • Once the minigame is completed, the doors to King’s Study will be unlocked. Proceed through to the next area.

King’s Study

  • Collect the Eye of Horus 13/22 at the top of the globe on the left.
Dreamatorium Dr Magnus 2 Eye of Horus 13 of 22

Dreamatorium Dr Magnus 2 Eye of Horus 13 of 22

  • Take a closer look at the papers lying on top of the couch on the right. Click on the Sheet of Paper to add it to your inventory.
  • Examine the small stand with the radio between the couch and the desk. Click on the Acorn to add it to your inventory.
  • Click on the glass cabinet door on the left to open it, then take a closer look inside. Click on the Golden Bulb to add it to your inventory, then take a look at the award in the frame.
  • Take a closer look at the desk. Use the Scissors function of the Multitool to cut the string tying the package together. Click to tear the paper away, revealing the typewriter. The objective “Find the Typewriter” will be completed.
  • Use the Amulet on the glowing outline over the typewriter to trigger a cutscene.
  • Place the Sheet of Paper in the typewriter, then click on the bottle of Denatured Alcohol to add it to your inventory.
Dreamatorium Dr Magnus 2 Denatured Alcohol on Typewriter Desk

Dreamatorium Dr Magnus 2 Denatured Alcohol on Typewriter Desk

  • Return to the Mansion Lobby.

Mansion Lobby

  • Examine the dark corner of the lobby on the right. Click on the Denatured Alcohol and remove the cap, then use it on the lamp in the upper corner. Next, use the Match to light the lamp, restoring light to the area.
  • Click on the playing cards scattered across the top of the cabinet to move them aside, revealing the Club. Click on it to add it to your inventory.
Dreamatorium Dr Magnus 2 Cabinet Club Location

Dreamatorium Dr Magnus 2 Cabinet Club Location

  • Go back outside to the Mansion Front.

Mansion Front

  • Take a closer look at the squirrel up in the tree toward the upper right corner of your screen. Give the Acorn to the squirrel, who in return will drop the Box Lock 2/2. Click on it to add it to your inventory.
  • Examine the boxes on the left of the steps. Use the Box Lock on the groove in the top of the red box to reveal a hidden object area.
  • Find all of the buttons; there are 12 total. Some require an additional action, such as assembling scissors to cut them free, or clicking on various materials to reveal their locations. Once you’ve completed the area, the Zipper Slider will be added to your inventory.
  • Make your way back to King’s Study.

King’s Study

  • Take a closer look at the large black bag sitting on the floor at the foot of the chair. Use the Zipper Slider on the bag to open it, then collect the Envelope and the Flower Locket inside to add them to your inventory.
  • Select the Envelope from your inventory for a closer view. Open it to reveal the Lock Code, 512, as well as a heart locket. Click on the locket to open it and add the Heart inside to your inventory.
  • Exit to the Mansion Lobby.

Mansion Lobby

  • Take a closer look at the table on the left side of the stairs. Use the Flower Locket on the journal to open it, revealing a minigame.
  • Select tiles according to the numbers in order to recreate the shape on each drawing. The solutions are shown below.
Dreamatorium Dr Magnus 2 Tile Minigame Spade Solution

Dreamatorium Dr Magnus 2 Tile Minigame Spade Solution

Dreamatorium Dr Magnus 2 Tile Minigame Diamond Solution

Dreamatorium Dr Magnus 2 Tile Minigame Diamond Solution

Dreamatorium Dr Magnus 2 Tile Minigame Heart Solution

Dreamatorium Dr Magnus 2 Tile Minigame Heart Solution

  • Upon completing the minigame, the doorway to the Garden will be revealed. Proceed through to the next area.

Garden

  • Collect the Eye of Horus 14/22 in the wooden ceiling paneling in the upper left corner.
Dreamatorium Dr Magnus 2 Eye of Horus 14 of 22

Dreamatorium Dr Magnus 2 Eye of Horus 14 of 22

  • Examine the drawers on the left. Click on the left drawer to open it, revealing Bob the Robot Click on him to add him to your inventory.
  • Open the right drawer and take a closer look at the Top Secret notepad. Thumb through the pages to find the Spade and add it to your inventory.
Dreamatorium Dr Magnus 2 Spade Location Notepad

Dreamatorium Dr Magnus 2 Spade Location Notepad

  • Close the left and right drawers, then use the Golden Bulb on the bottom drawer. Click to open it, revealing the Metal Box Click on it to add it to your inventory.
  • Back in the main view of the Garden, examine the paper package lying on the table straight ahead. Click on the paper to tear it open, then read the note inside. The objective “Blackmail” will be added.
  • Use Bob the Robot on the chessboard within the paper packaging to trigger a minigame.
  • Highlight all the fields by moving the Robot Figure the way the Knight chess piece moves. The minigame is finished when all the squares are green. Once finished, click on the Code Lock Part 1/2 inside to add it to your inventory.
  • Back in the main view of the Garden again, take a closer look at the green chair on the right. Click on the pink Glove resting on top of the chair cushion to add it to your inventory.
  • Go back to the Mansion Lobby.

Mansion Lobby

  • Examine the cabinet on the right side of the Lobby again. Place the Club, Spade, Heart, and Diamond in their respective slots in the face of the cabinet. Doing this will reveal a hidden object area.
  • Find the items listed at the bottom of the screen. Upon locating all of them and completing the area, the Wooden Box will be added to your inventory.
  • Select the Wooden Box in your inventory for a closer view. Click to open it, then click on the Crown inside to add it to your inventory in its stead. The objective “Explore the Mansion” is now complete.
  • Return to the Mansion Front.

Mansion Front

  • Take a closer look at the ivy to the immediate right of the steps. Use the Glove to clear the vines away and retrieve the Code Lock Part 2/2.
  • Select the Metal Box from your inventory, then use the Code Lock Parts on it. You will be asked to input a code. Input the code V I II, or 512, which you discovered earlier in King’s Study. The box will open, revealing the Winding Key. Click on it to add it to your inventory.
Dreamatorium Dr Magnus 2 Metal Box Opens Revealing Winding Key

Dreamatorium Dr Magnus 2 Metal Box Opens Revealing Winding Key

  • Go back to King’s Study.

King’s Study

  • Take a closer look at the typewriter on the desk. Use the Winding Key on it to restore it to working order, revealing a clue which will be added to your Journal.
  • A new objective will be added: “Set the Clock”.
  • Exit to the Mansion Lobby.

Mansion Lobby

  • Examine the grandfather clock at the base of the pillar on the left. A minigame will be triggered.
  • Place the gears in the correct positions so all of them rotate, then set the time to 6:15. The solutions are shown below.
Dreamatorium Dr Magnus 2 Clock Minigame Gears Solution

Dreamatorium Dr Magnus 2 Clock Minigame Gears Solution


Dreamatorium Dr Magnus 2 Clock Minigame Time Set Solution

Dreamatorium Dr Magnus 2 Clock Minigame Time Set Solution

  • Upon completing the minigame, the objective “Set the Clock” will be completed. Click on the purple Crystal 2/5 inside the clock to add it to your inventory.
  • Once you collect the crystal, the objective “Find the Purple Crystal” will be completed, and a new location will be unlocked.


Chapter 3: Research Center

RC Front

  • Upon entering the area for the first time, the objective “Enter the Rearch Center” will be added.
  • Collect the Eye of Horus 15/22 located at the foot of the robot sculpture.
Dreamatorium Dr Magnus 2 Eye of Horus 15 of 22

Dreamatorium Dr Magnus 2 Eye of Horus 15 of 22

  • Examine the newspaper lying on the bench. It will give you a clue as to how the robot sculpture should appear.
  • Take a closer look at the toolbox sitting on the ground on the left. Click on the Elevator Switch to add it to your inventory.
  • Examine the toolbox again to trigger a minigame.
  • Rotate each set of intersecting circles to create the symbols indiciated beneath the dials. The solution is shown below.
Dreamatorium Dr Magnus 2 Intersecting Circle Minigame Solution

Dreamatorium Dr Magnus 2 Intersecting Circle Minigame Solution

  • Completing the minigame will cause the toolbox to open. Click on it to reveal a hidden object scene.
  • Find the items listed at the bottom of the screen. Upon finding them all, the Button will be added to your inventory.
  • Take a closer look at the doors in the distance. Use the Button on the empty slot to repair the code panel.
  • Use the Amulet on the glowing outline that appears to reveal the door code. Input the same sequence to gain access to the RC Foyer.

RC Foyer

  • Upon entering the RC Foyer, the objective “Enter the Research Center” will be completed and “Deactivate Alarm” added.
  • Collect the Eye of Horus 16/22 on the back of the robotic hand of the large gold sculpture.
Dreamatorium Dr Magnus 2 Eye of Horus 16 of 22

Dreamatorium Dr Magnus 2 Eye of Horus 16 of 22

  • Continue up the staircase to the RC Reception.

RC Reception

  • Once you’ve entered this area, the objective “Trick the Receptionist” will be added.
  • Collect the Eye of Horus 17/22 on the red tile wall between the left doorway and pillar.
Dreamatorium Dr Magnus 2 Eye of Horus 17 of 22

Dreamatorium Dr Magnus 2 Eye of Horus 17 of 22

  • Talk with the Receptionist, then offer her your Multitool.
  • The area is now clear. Examine the Notebook lying on the reception desk to add it to your inventory.
  • Select the Notebook from your inventory and click to open it. Thumb through the pages until you find the Boxcutter, then add it to your inventory.
  • Click on the gold gates to open then, then take a closer look at the elevator.
  • Use the Elevator Switch in the slot between the elevator buttons, then click the “Up” button.
  • Enter the elevator to head to King’s Office.

King’s Office

  • Upon entering the office, the objective “Trick the Receptionist” will be completed.
  • Collect the Eye of Horus 18/22 within the large circular light fixture toward the upper right corner.
Dreamatorium Dr Magnus 2 Eye of Horus 18 of 22

Dreamatorium Dr Magnus 2 Eye of Horus 18 of 22

  • Take a closer look at the cardboard box sitting on the floor ahead. Use the Boxcutter to open it. Click on the Helmet inside to add it to your inventory, as well as the clock arrangement paper clue to add it to your Journal.
  • Examine the desk on the right. Use the Amulet over the glowing outline. The objective “The Green Crystal” will be added.
  • Make your way back to the RC Front.

RC Front

  • Use the Helmet on the robot sculpture, then zoom in on the robot’s hand. Click on the Alarm Box Key to add it to your inventory.
  • Return to the RC Reception.

RC Reception

  • Examine the metal box on the wall to the left of the elevator. Use the Alarm Box Key to open it, triggering a minigame.
  • Solve the jigsaw puzzle without rotating the pieces. The solution is shown below.
Dreamatorium Dr Magnus 2 Alarm Box Jigsaw Puzzle Solution

Dreamatorium Dr Magnus 2 Alarm Box Jigsaw Puzzle Solution

  • Upon completing the minigame, the objective “Deactivate Alarm” will be completed.
  • Go down to the RC Foyer.

RC Foyer

  • Take a closer look at the display cabinet on the left side of the large gold sculpture. Click on the case to open it, then click on the Pyramid inside to add it to your inventory.
  • Examine the gold-framed picture of the pyramid hanging on the wall beneath the stairs. Place the Pyramid in the slot at the top of the painting. A hidden object area will be revealed.
  • Find the objects listed at the bottom of the screen. Upon locating them all, the Clock will be added to your inventory.
  • Return to King’s Office.

King’s Office

  • Examine the large case of clocks ahead. Place the Clock on the empty shelf to trigger a minigame.
  • Set the clocks in the right order by switching their positions. The solution is shown below.
Dreamatorium Dr Magnus 2 Clock Arrangement Minigame Solution

Dreamatorium Dr Magnus 2 Clock Arrangement Minigame Solution

  • Once the minigame is finished, click on the Crown Key to add it to your inventory.
  • Examine the desk on the right again. Use the Crown Key on the slot beneath the left drawers. This will open the display case. Click on the Crystal 3/5 to add it to your inventory.
  • Upon collecting the item, the objective “The Green Crystal” will be completed.
  • Speak with the Receptionist to reacquire your Multitool. The objective “Blackmail” will be marked as completed, and a new location unlocked.

Chapter 4: Hotel Reception

Hotel Reception

  • Collect the Eye of Horus 19/22 on the wall above the elevator buttons.
Dreamatorium Dr Magnus 2 Eye of Horus 19 of 22

Dreamatorium Dr Magnus 2 Eye of Horus 19 of 22

  • Take a closer look at the reception desk and ring the service bell.
  • Speak with the Receptionist. The objective “Enter the Suite” will be added. Take the Elevator Key from him.
  • Examine the portion of the counter below the Receptionist’s right arm. Click on the Scissors Half to add it to your inventory.
  • Take a closer look at the elevator on the right. Press the “Up” button, then examine the inside of the elevator.
  • Read the note taped to the elevator panel, then use the Elevator Key on the slot beneath it and press the “Up” button once again. This will take you to the next floor.

Royal Suite

  • Collect the Eye of Horus 20/22 hidden within the painting over the mantle.
Dreamatorium Dr Magnus 2 Eye of Horus 20 of 22

Dreamatorium Dr Magnus 2 Eye of Horus 20 of 22

  • Take a closer look at the red alarm on the far wall and to the right. The objective “Activate the Alarm” will be added. Click on the Desk Key hanging next to it to add it to your inventory.
  • Examine the small desk along the right wall. Click on the Rag to add it to your inventory.
  • Use the Desk Key on the desk drawer to open it, then click on the Diary and the Brush inside to add them to your inventory.
  • Select the Diary from your inventory, then open it. Click on the Spring inside to add it to your inventory.
  • Examine the fireplace on the far end of the room. Use the Brush to clear the cobwebs away, then click on the Magnet and the Scissors Half (2) to add them to your inventory.
  • Combine the two Scissors Halves to add the (incomplete) Scissors to your inventory. We’ll finish assembling these later.
  • Return to the Hotel Reception.

Hotel Reception

  • Take a closer look at the vent on the bottom left portion of the wall next to the elevator. Use the Magnet to retrieve the Alarm Handle and add it to your inventory.
  • Go back to the Royal Suite.

Royal Suite

  • Examine the red alarm again. Use the Alarm Handle on it, then click to complete the objective “Activate the Alarm”.
  • Return to the Hotel Reception.

Hotel Reception

  • Now that the alarm has been thrown, the Receptionist is gone, and a hidden object area has appeared over the front part of the counter.
  • Find the objects listed at the bottom of the screen. Upon locating them all, the Suite Key will be added to your inventory.
  • Examine the wooden cabinet behind the reception desk. Click on the right set of drawers to open them, then collect the Turpentine Can to add it to your inventory.
Dreamatorium Dr Magnus 2 Turpentine Can Location

Dreamatorium Dr Magnus 2 Turpentine Can Location

  • Select the Turpentine Can and click on the lid to unscrew it. Use the Rag on it to achieve the Turpentine, which will be added to your inventory in their stead.
  • Go back up to the Royal Suite.

Royal Suite

  • Examine the mantle on the far end of the room again. Use the Turpentine on the mirror covered in blue paint to clean it. A series of glyphs will be revealed and added to your Journal.
  • Take a closer look at the taped off door on the right. Use the Knife function of the Multitool to cut the tape away.
  • Examine the lock on the door and use the Suite Key to open it.
  • Enter the Royal Suite Bedroom.

Royal Suite Bedroom

  • Speak with the apparition. The objective “Enter the Suite” will be marked as complete.
  • Click on the hidden object area beneath the painting in the far right corner of the room.
  • Find the items listed at the bottom of the screen. You may need to click on the clothes hanging in the closet to reveal their locations. Upon completing the area, the Star Gem will be added to your inventory.
  • Take a closer look at the mantle on the left. Click on the small box to open it, then click on the Drawer Button inside to add it to your inventory.
  • Collect the Eye of Horus 21/22 on the cushion of the blue chair at the far end of the room.
Dreamatorium Dr Magnus 2 Eye of Horus 21 of 22

Dreamatorium Dr Magnus 2 Eye of Horus 21 of 22

  • Return to the Hotel Reception.

Hotel Reception

  • Take a closer look at the wooden cabinet behind the reception desk again. Use the Drawer Button on the empty peg slot in the left drawer to trigger a minigame.
  • Rotate the circles following the instruction on each circle to turn all the lights of the middle dial green. Upon completing the minigame, the drawer will be unlocked.
  • Take a closer look at the cabinet drawer again and click to open it. Read the note left inside, then click on the Screw to add it to your inventory.
  • Select the Scissors in your inventory and use the Screw on them. Next, select the Screwdriver function of the Multitool and use it to finish assembling the Scissors, adding them back to your inventory.
  • Examine the reception counter again. Use the Star Gem on the slot at the top of the ornamental container to trigger a puzzle.
  • The colors of the gems’ halves correspond with the flowers’ petals. Set each whole gem into one color. The solution is shown below.
Dreamatorium Dr Magnus 2 Star Gem Minigame Solution

Dreamatorium Dr Magnus 2 Star Gem Minigame Solution

  • The container is now open. Click on it for a closer view. Click on the Button 1/2 to add it to your inventory.
  • Go back up to the Royal Suite.

Royal Suite

  • Take a closer look at the planter on the left. If you try to use the Scissors function of the Multitool, it will break. Use the Scissors on the branches to cut them away, then click on the Square Tile to add it to your inventory.
  • Enter the Royal Suite Bedroom.

Royal Suite Bedroom

  • Examine the painting in the far right corner of the room. Use the Knife function of the Multitool to cut the canvas away, revealing a hidden alcove beneath. Place the Square Tile in the empty slot of the mechanism to trigger a minigame.
  • Use the arrows to move the symbols until you match them all with the drawing. The solution is shown below.
Dreamatorium Dr Magnus 2 Square Tile Minigame Solution

Dreamatorium Dr Magnus 2 Square Tile Minigame Solution

  • Upon completing the minigame, click on the Envelope and the Button 2/2 to add them to your inventory.
  • Select the Envelope from your inventory to open it. Click on the Gooseberries to add them to your inventory. The note inside the envelope will be added to your Journal.
  • Examine the dome-shaped ornamental container at the foot of the bed. Use the Buttons on the empty slots to trigger a minigame.
  • Solve the minigame by releasing all the buttons. A released button will appear yellow in hue. Once the container has been opened, take a closer look at the note inside.
Dreamatorium Dr Magnus 2 Button Release Puzzle Solution

Dreamatorium Dr Magnus 2 Button Release Puzzle Solution

  • The apparition will appear again. Once you’ve spoken with them, click on the Bedroom Key to add it to your inventory, and proceed to the final location.

Chapter 5: House Lobby Revisited

Lobby

  • Use the Bedroom Key on the door at the top of the stairs to open it.
  • Enter Magnus Bedroom.

Magnus Bedroom

  • Collect the final Eye of Horus 22/22 within the painting above the bed.
Dreamatorium Dr Magnus 2 Eye of Horus 22 of 22

Dreamatorium Dr Magnus 2 Eye of Horus 22 of 22

  • Take a closer look at the desk on the left. Click on the bottle of Cranberry Juice to add it to your inventory.
  • Select the Cranberry Juice, then remove the cap and use the Gooseberries with it to obtain the Elixir of Dreams.
  • Use the Elixir of Dreams on Dr. Magnus to wake him.
  • Speak with Dr. Magnus. The objective “Wake up Dr. Magnus” will be completed and “Assemble the handle” added.
  • Take a closer look at the writing desk on the left again. Click on the lock to trigger a minigame.
  • Rotate the rings to assemble the picture. The center circle can’t be rotated. The solution is shown below.
Dreamatorium Dr Magnus 2 Ring Rotation Puzzle Solution

Dreamatorium Dr Magnus 2 Ring Rotation Puzzle Solution

  • Upon completing the puzzle, click on the red knob to open the drawer.
  • Take a closer look at the writing desk once again and click on the drawer to open it. Click on the Handle inside to add it to your inventory.
  • Examine the nightstand to the left of the bed. Click on the drawer to open it, then click on the Handle Base inside to add it to your inventory.
  • Examine the clock hanging on the wall. Click on the Rusty Metal Bar sitting on top of it to add it to your inventory.
  • Take a closer look at the bottom right corner of the painting on the wall above the bed. Click on the corner to pull the canvas away, then click on the Metal Pipe beneath to add it to your inventory.
  • Select the Handle Base from your inventory, then use the Rusty Metal Bar, the Metal Pipe, the Spring, and the Handle on it in that order. You will acquire the Dreamatorium Handle, and the objective “Assemble the handle” will be completed as well as “Open the Dreamatorium” added.
  • Exit to the Lobby.

Lobby

  • Proceed forward through the double doors and into the Library.

Library

  • Speak with Dr. Magnus.
  • Use the Amulet on the glowing outline that appears, then speak once again with Dr. Magnus. The three Crystals in your inventory will be separated.
  • Continue forward into the Secret Passage.

Secret Passage

  • Speak with the apparition, then take the White Crystal from him and add it to your inventory.
  • Examine the door at the base of the stairs. Place the Purple Crystal, the Blue Crystal, the Green Crystal, and the White Crystal in their respective slots.
  • Use the Amulet on the final crystal slot, then enjoy the final cutscene!


Congratulations! You’ve completed The Dreamatorium of Dr. Magnus 2!

Disclaimer: The Dreamatorium of Dr. Magnus 2 walkthrough is intended to guide you through the game and does not contain cheats, hacks, or serials.


The post The Dreamatorium of Dr. Magnus 2 Walkthrough appeared first on GameHouse.

Halloween: Trick or Treat 2 Walkthrough

$
0
0

Trick-or-treat; the sweetest of nights are filled with candy and frights! Guide young Emma and Mike on a nostalgic night out as they prepare for their favorite holiday. Whether it’s carving pumpkins, celebrating with parades, visiting spooky venues or even a haunted hotel- the town of Springfield has never been so excited for Halloween! Feel like the game has played a few too many tricks on you? Treat yourself to our Halloween: Trick or Treat 2 walkthrough!

Contents

General Tips & Tricks

  • Upon creating a new player for the first time, you may choose between two difficulty modes: Casual and Challenge. Casual mode features a tutorial, as well as faster hint and skip recharge. Challenge mode features no tutorial and a slower hint and skip recharge.
  • Objects listed in red at the bottom of your screen are hidden either in or behind something. You will need to perform an additional action to uncover these items. These items are circled in red in the guide below.
  • Objects listed in blue at the bottom of your screen are tasks you will need to complete. These objects are outlined in blue in the guide below.
  • Special objects known as Halloween Items will appear in silhouette form inside a pumpkin at the bottom left corner of your screen. Locate these to earn Items Bonus Points. These objects are circled in purple in the guide below.
  • Each hidden object area contains Gold Pumpkins. Locate these to earn Bonus Coins to spend on Halloween Gifts. Gold Pumpkins are circled in golden yellow in the guide below.
  • You can access the Halloween Store during any hidden object scene or puzzle by clicking on the shopping cart icon at the top of the screen. Coins you’ve saved up will be stored here, allowing you to purchase various Halloween Gifts. You can view the Halloween Gifts you’ve purchased at any time by clicking the pumpkin icon to the right of the Halloween Store.
  • Click on the pumpkin icon with the trophy silhouette in the lower right corner of your screen to view your trophies and achievements.
  • There are two types of Hints in Halloween: Trick or Treat 2- Hints, and Mega Hints. Hints will reveal the location of a single object, while Mega Hints will briefly show the location of any and all items you haven’t found yet. Both require time to recharge after use.
  • Puzzles you encounter may be skipped after a certain amount of time has passed.
  • Hidden object areas may be replayed at any time by selecting them at the top of the screen, or opting to replay them once you’ve completed the area.

Halloween: Trick or Treat 2 Walkthrough

Preparing for Halloween

It’s just not Halloween without pumpkins. Not just any pumpkin will do, though; half the fun is picking the right one and carving it just right. There’s so much to do before you can go trick-or-treating. Help Mike and Emma prepare for Halloween.

Bill’s Pumpkin Farm

Gold Pumpkins: 1

Halloween Items: 1

Halloween Trick or Treat 2 Bill's Pumpkin Farm

Halloween Trick or Treat 2 Bill’s Pumpkin Farm

  • Locate the objects listed at the bottom of the screen.

Puzzle

  • Click to rotate the pieces to make Springfield’s Halloween Map. Clicking a piece will rotate it clockwise. The completed solution is shown below.
Halloween Trick or Treat 2 Springfield Halloween Map Puzzle Solution

Halloween Trick or Treat 2 Springfield Halloween Map Puzzle Solution

The Pumpkin Patch

Gold Pumpkins: 3

Halloween Items: 3

Halloween Trick or Treat 2 The Pumpkin Patch

Halloween Trick or Treat 2 The Pumpkin Patch

  • Locate the objects listed at the bottom of the screen.

Puzzle

  • Click on the pumpkins to match the pairs of items. The revealed solutions are shown below.
Halloween Trick or Treat 2 Pumpkin Pair Match Puzzle Solutions

Halloween Trick or Treat 2 Pumpkin Pair Match Puzzle Solutions

 Kids’ Street

Gold Pumpkins: 3

Halloween Items: 3

Halloween Trick or Treat 2 Kids' Street

Halloween Trick or Treat 2 Kids’ Street

  • Locate the objects listed at the bottom of the screen.

Puzzle

  • Find Halloween items hidden in the grid. Click on the first letter of the item, then drag along the rest of the letters of the Halloween item. The solution is shown below.
Halloween Trick or Treat 2 Kids Street Crossword Puzzle

Halloween Trick or Treat 2 Kids Street Crossword Puzzle

Mom’s Kitchen

Gold Pumpkins: 3

Halloween Items: 3

  • Locate the objects listed at the bottom of the screen
Halloween Trick or Treat 2 Mom's Kitchen

Halloween Trick or Treat 2 Mom’s Kitchen

Puzzle

  • Click then drag the pieces into place to make the town’s Halloween poster they got from Grandma. The solution is shown below.
Halloween Trick or Treat 2 Town Poster Puzzle Solution

Halloween Trick or Treat 2 Town Poster Puzzle Solution


Kids’ Bedroom

Gold Pumpkins: 3

Halloween Items: 3

  • Locate the objects listed at the bottom of the screen.
Halloween Trick or Treat 2 Kids' Bedroom

Halloween Trick or Treat 2 Kids’ Bedroom

Puzzle

  • Work out each number, then click on it on the number pad. After the last number, click on the Key. If you get any numbers wrong, the puzzle will reset. The solution is shown below.
Halloween Trick or Treat 2 Locked Safe Puzzle Solution

Halloween Trick or Treat 2 Locked Safe Puzzle Solution

Halloween in the Neighborhood

The best Halloweens are those where the whole town gets involved, and Springfield is no exception. Parades, parties, and celebrations galore await you in this chapter. That’s not all, though. It’s time to get in some early trick-or-treating, too!

Costume Parade

Gold Pumpkins: 2

Halloween Items: 3

  • Locate the objects listed at the bottom of the screen.
Halloween Trick or Treat 2 Costume Parade

Halloween Trick or Treat 2 Costume Parade

Puzzle

  • Click then drag the pirate heads into the correct places to make a puzzle they got at the parade. The solution is shown below.
Halloween Trick or Treat 2 Pirate Puzzle Solution

Halloween Trick or Treat 2 Pirate Puzzle Solution

 Springfield Main St.

Gold Pumpkins: 3

Halloween Items: 3

  • Locate the objects listed at the bottom of the screen.
Halloween Trick or Treat 2 Springfield Main St

Halloween Trick or Treat 2 Springfield Main St

Puzzle

  • Find 20 differences in the scene. The solution is shown below.
Halloween Trick or Treat 2 Springfield Main St 20 Differences Puzzle Solution

Halloween Trick or Treat 2 Springfield Main St 20 Differences Puzzle Solution

 Uncle John’s

Gold Pumpkins: 3

Halloween Items: 3

  • Locate the objects listed at the bottom of the screen.
Halloween Trick or Treat 2 Uncle John's

Halloween Trick or Treat 2 Uncle John’s

Puzzle

  • Click on the rings to make the Smith’s Halloween door wreath. The solution is shown below.
Halloween Trick or Treat 2 Halloween Door Wreath Puzzle Solution

Halloween Trick or Treat 2 Halloween Door Wreath Puzzle Solution

 The Smith’s House

Gold Pumpkins: 3

Halloween Items: 3

  • Locate the objects listed at the bottom of the screen.
Halloween Trick or Treat 2 The Smith's House

Halloween Trick or Treat 2 The Smith’s House

Puzzle

  • Click on two pieces to swap them and make a bowl of Halloween candy. The solution is shown below.
Halloween Trick or Treat 2 Halloween Candy Bowl Puzzle Solution

Halloween Trick or Treat 2 Halloween Candy Bowl Puzzle Solution

 Spooky Park Walk

Gold Pumpkins: 3

Halloween Items: 2

  • Locate the objects listed at the bottom of the screen.
Halloween Trick or Treat 2 Spooky Park Walk

Halloween Trick or Treat 2 Spooky Park Walk

Puzzle

  • Click to rotate the pieces to make a view toward the town’s museum. The solution is shown below.
Halloween Trick or Treat 2 Town Museum View Puzzle Solution

Halloween Trick or Treat 2 Town Museum View Puzzle Solution

Spooky Museum

The Springfield Museum has also gotten into the spirit of Halloween. Many a monster await you within the museum’s interior, but perhaps not the ones you would expect! Our Halloween: Trick or Treat 2 walkthrough will ensure you make it back out in once piece.

Museum Bone Yard

Gold Pumpkins: 3

Halloween Items: 3

  • Locate the objects listed at the bottom of the screen.
Halloween Trick or Treat 2 Museum Bone Yard

Halloween Trick or Treat 2 Museum Bone Yard

Puzzle

  • Find museum items hidden in the grid. Click on the first letter of the item, then drag along the rest of the letters of the museum item. The solutions are shown below.
Halloween Trick or Treat 2 Museum Crossword Puzzle Solutions

Halloween Trick or Treat 2 Museum Crossword Puzzle Solutions

 Mysterious Mammals

Gold Pumpkins: 3

Halloween Items: 3

  • Locate the objects listed at the bottom of the screen.
Halloween Trick or Treat 2 Mysterious Mammals

Halloween Trick or Treat 2 Mysterious Mammals

Monsters of the Past

Gold Pumpkins: 3

Halloween Items: 3

  • Locate the objects listed at the bottom of the screen.
Halloween Trick or Treat 2 Monsters of the Past

Halloween Trick or Treat 2 Monsters of the Past

Puzzle

  • Click two pieces to swap them and make a museum wall chart. The completed solution is shown below.
Halloween Trick or Treat 2 Museum Wall Chart Puzzle Solution

Halloween Trick or Treat 2 Museum Wall Chart Puzzle Solution

 Chamber of Horrors

Gold Pumpkins: 3

Halloween Items: 3

  • Locate the objects listed at the bottom of the screen.
Halloween Trick or Treat 2 Chamber of Horrors

Halloween Trick or Treat 2 Chamber of Horrors

Mall & Dracula’s Castle

Perhaps “Dracula” and “mall” isn’t the first combination of words that comes to mind, but tonight for one night only, the legendary vampire is making a special appearance at the local Springfield Mall. Visit the former shopping areas, now transformed into a creepy crypt worthy of a Halloween legend. There may also be some spooky sales available at the Halloween Store.

Mall Parking Lot

Gold Pumpkins: 4

Halloween Items: 3

  • Locate the objects listed at the bottom of the screen.
Halloween Trick or Treat 2 Mall Parking Lot

Halloween Trick or Treat 2 Mall Parking Lot

Puzzle

  • Find 25 differences in the scene. The solution is shown below.
Halloween Trick or Treat 2 Mall Parking Lot 25 Differences Puzzle Solution

Halloween Trick or Treat 2 Mall Parking Lot 25 Differences Puzzle Solution

 Halloween Store

Gold Pumpkins: 4

Halloween Items: 3

  • Locate the objects listed at the bottom of the screen.
Halloween Trick or Treat 2 Halloween Store

Halloween Trick or Treat 2 Halloween Store

 Dracula’s Castle

Gold Pumpkins: 3

Halloween Items: 3

  • Locate the objects listed at the bottom of the screen.
Halloween Trick or Treat 2 Dracula's Castle

Halloween Trick or Treat 2 Dracula’s Castle

Puzzle

  • Work out each number, then click on it on the number pad to get a ticket into Dracula’s crypt. If you get any wrong, the puzzle will reset. The solution is shown below.
Halloween Trick or Treat 2 Dracula's Castle Ticket Entry Puzzle Solution

Halloween Trick or Treat 2 Dracula’s Castle Ticket Entry Puzzle Solution

 Dracula’s Crypt

Gold Pumpkins: 3

Halloween Items: 3

  • Locate the objects listed at the bottom of the screen.
Halloween Trick or Treat 2 Dracula's Crypt

Halloween Trick or Treat 2 Dracula’s Crypt

 Deli-Diner

Gold Pumpkins: 5

Halloween Items: 4

  • Locate the objects listed at the bottom of the screen.
Halloween Trick or Treat 2 Deli-Diner.jpg

Halloween Trick or Treat 2 Deli-Diner.jpg

Puzzle

  • Click then drag the pieces to make the ice cream sundae. Click more than once on any piece to rotate it. The solution is shown below.
Halloween Trick or Treat 2 Ice Cream Sundae Puzzle Solution

Halloween Trick or Treat 2 Ice Cream Sundae Puzzle Solution

Trick-or-Treat at Night

The best part of Halloween is here, and our Halloween: Trick or Treat 2 walkthrough is ready to take you past the best houses Springfield has to offer. Brave the scares of Spook Hollow Rd. and gather as much candy as you can, while you can!

Spook Hollow Rd.

Gold Pumpkins: 3

Halloween Items: 3

  • Locate the objects listed at the bottom of the screen.
Halloween Trick or Treat 2 Spook Hollow Rd

Halloween Trick or Treat 2 Spook Hollow Rd

Puzzle

  • Find then click on the cats and dogs which you see in the handheld. Their locations are shown below.
Halloween Trick or Treat 2 Cats and Dogs Handheld Puzzle Locations

Halloween Trick or Treat 2 Cats and Dogs Handheld Puzzle Locations

 Spook Mansion

Gold Pumpkins: 4

Halloween Items: 3

  • Locate the objects listed at the bottom of the screen.
Halloween Trick or Treat 2 Spook Mansion

Halloween Trick or Treat 2 Spook Mansion

 Trunk or Treat

Gold Pumpkins: 4

Halloween Items: 3

  • Locate the objects listed at the bottom of the screen.
Halloween Trick or Treat 2 Trunk or Treat

Halloween Trick or Treat 2 Trunk or Treat

Puzzle

  • Click on the rings to make a jack-o’-lantern. The solution is shown below.
Halloween Trick or Treat 2 Jack-o'-lantern Ring Puzzle Solution

Halloween Trick or Treat 2 Jack-o’-lantern Ring Puzzle Solution

 Graveyard

Gold Pumpkins: 3

Halloween Items: 3

  • Locate the objects listed at the bottom of the screen.
Halloween Trick or Treat 2 Graveyard

Halloween Trick or Treat 2 Graveyard

Haunted Hotel

Many a mysterious room and ghoulish guest lurk in Springfield’s Haunted Hotel. While the Creepy Kitchen cooks up dark delights, the halls grow larger and the night grows longer. Our guide will ensure you don’t fall victim to this treacherous location nor its many puzzles.

Ghostly Lobby

Gold Pumpkins: 3

Halloween Items: 3

  • Locate the objects listed at the bottom of the screen.
Halloween Trick or Treat 2 Ghostly Lobby

Halloween Trick or Treat 2 Ghostly Lobby

Puzzle

  • Click to rotate the pieces and make a hotel floor plan. The solution is shown below.
Halloween Trick or Treat 2 Hotel Floor Plan Puzzle Solution

Halloween Trick or Treat 2 Hotel Floor Plan Puzzle Solution

 Creepy Kitchen

Gold Pumpkins: 4

Halloween Items: 3

  • Locate the objects listed at the bottom of the screen.
Halloween Trick or Treat 2 Creepy Kitchen

Halloween Trick or Treat 2 Creepy Kitchen

Puzzle

  • Find 20 differences in the scene. Their locations are shown below.
Halloween Trick or Treat 2 Creepy Kitchen 20 Differences Locations

Halloween Trick or Treat 2 Creepy Kitchen 20 Differences Locations

 Scary Bedroom

Gold Pumpkins: 4

Halloween Items: 3

  • Locate the objects listed at the bottom of the screen.
Halloween Trick or Treat 2 Scary Bedroom

Halloween Trick or Treat 2 Scary Bedroom

Puzzle

  • Click two pieces to swap them and show the kids’ way home. The solution is shown below.
Halloween Trick or Treat 2 Way Home Puzzle Solution

Halloween Trick or Treat 2 Way Home Puzzle Solution

 Elevator & Stairs

Gold Pumpkins: 4

Halloween Items: 4

  • Locate the objects listed at the bottom of the screen.
Halloween Trick or Treat 2 Elevator & Stairs

Halloween Trick or Treat 2 Elevator & Stairs

Puzzle

  • Click to rotate the pieces to fix the elevator’s broken wiring panel. The solution is shown below.
Halloween Trick or Treat 2 Elevator Wiring Panel Puzzle Solution

Halloween Trick or Treat 2 Elevator Wiring Panel Puzzle Solution

 The Conservatory

Gold Pumpkins: 4

Halloween Items: 4

  • Locate the objects listed at the bottom of the screen.
Halloween Trick or Treat 2 The Conservatory

Halloween Trick or Treat 2 The Conservatory

Puzzle

  • Click then drag the pieces to make an “Impossipuzzle” of the hotel maze and the way out. The completed puzzle is shown below.
Halloween Trick or Treat 2 Hotel Maze Puzzle Complete

Halloween Trick or Treat 2 Hotel Maze Puzzle Complete

Home Sweet Home

No more spooky skeletons or creepy crawlies; it’s time to enjoy some well-deserved treats. Help the children sort their spoils and snag a treat or two before their mother catches them.

Home at Night

Gold Pumpkins: 3

Halloween Items: 3

  • Locate the objects listed at the bottom of the screen.
Halloween Trick or Treat 2 Home at Night

Halloween Trick or Treat 2 Home at Night

 Kids’ Living Room
Gold Pumpkins: 4

Halloween Items: 3

  • Locate the objects listed at the bottom of the screen.
Halloween Trick or Treat 2 Kids' Living Room

Halloween Trick or Treat 2 Kids’ Living Room

You’ve completed the Halloween: Trick or Treat 2 walkthrough. Happy Halloween!

The Halloween: Trick or Treat 2 walkthrough is meant as a guide and does not contain cheats, hacks, or serials.

The post Halloween: Trick or Treat 2 Walkthrough appeared first on GameHouse.

Jewel Match Twilight Walkthrough

$
0
0

Halloween is upon us, and Jewel Match Twilight is here to fulfill your spooky Match-3 adventure needs. Collect haunted Match-3 pieces and amulets to assemble a haunted castle perfect for the holiday. Feeling puzzled? Our Jewel Match Twilight walkthrough will be the perfect match to guide you through the game’s numerous spine-tingling boards.

Contents

Getting Started

  • The “Play” button is located at the bottom center of your screen. Click on it to play Jewel Match Twilight!
  • You can change the difficulty at any time before clicking “Play”. Jewel Match Twilight features three difficulty levels: Relaxed, Time limited, and Moves limited. Play against the timer in Time limited mode. In Moves limited mode, you won’t have the stress of a timer, but you will have a limited number of moves to make matches. In Relaxed mode, you have no timer and no move limit. Your score reward will be lower than other modes, but you can relax and play at your own pace.
  • Options can be accessed at any point during the game. From here you can toggle your Music, Effects, and Ambient volumes. You may also adjust your AutoScroll speed. Additionally, you can opt for help, adjust your resolution and effects, and opt whether or not to receive hints.
  • High Scores are visible from the Options menu.
  • While playing a level, on the right side of your screen you will see four tabs with numbers. These keep track of the various types of items you’ve collected while playing the game.
  • The Shop can be accessed at any time during a level. Gold you’ve collected while playing will be displayed at the top of the screen. Hover your cursor over any item to view its description. Some items you can purchase, such as the Medium Hammer, are permanent upgrades, so choose wisely!

Jewel Match Twilight Walkthrough

How to Play

Our walkthrough will guide you through the basic mechanics of how to play and how various features work. Jewel Match Twilight features two types of games: Match-3 and Mahjong, along with a bonus scene builder.

Match-3

Match-3 is the primary game mode of Jewel Match Twilight. Each Level you play features a new set of Match-3 boards you must clear in order to progress.

  • Swap pieces to match rows of 3 or more. Click on a piece to select it, then click on the piece you would like to swap it with. Pieces can only be moved if there’s a match of 3 or more to be made. Once a match of three-in-a-row or more has been made, those pieces will be removed from the board. Pieces must be swapped with adjacent pieces and cannot be moved diagonally.
Jewel Match Twilight Match-3

Jewel Match Twilight Match-3

  • Each time you clear pieces from the board, they will be added to your total displayed on the right, beneath the large box icon. Pieces gathered can be used to purchase scene parts.
  • The goal of each level is to clear the tiles from the board. Tiles are white to cream in color, and can be cleared by making matches over them. The number of tiles remaining is displayed at the top of your screen.
  • Some levels feature multiple boards. When a board is completed, the border will turn green. You can click on arrow buttons to navigate between boards. Some boards may require you to unlock them within a level first.
  • Keys may sometimes be found on the boards. Keys open portals, or locks of the same color within a level. Sometimes they are needed to navigate between boards, and other times they are needed to clear portions of adjacent boards. Keys are color matched to their portals and can be collected by bringing them down to the bottom of the board.
Jewel Match Twilight Keys and Portals

Jewel Match Twilight Keys and Portals

  • A Minimap can be found in the upper left corner of your screen. Click on the map icon to enable it. The Minimap will grant you a quick view of all the boards on a level, as well as any remaining amulets or incomplete rooms yet to be found.
Jewel Match Twilight Minimap

Jewel Match Twilight Minimap

  • Amulets may be found on some of the levels you play. Amulets can be collected to purchase scene parts. To collect an amulet, bring it down to the bottom of the board by clearing the pieces beneath it.
Jewel Match Twilight Amulet

Jewel Match Twilight Amulet

  • The hammer can be found on the right side of your screen from Level 2 and onward. Each time you make a match, the meter behind the hammer will fill. Once the meter has been filled, you can use the hammer to clear any piece from the board. However, you cannot use the hammer on frozen pieces unless it has first been upgraded in the Shop.
  • Hammer refill items can be found on some levels. Bring them down to the bottom of the board to collect them and instantly refill your hammer.
  • Wooden boxes may sometimes block portions of a level. Match a match near a wooden box to cause it to explode, revealing the tile below. Keys or other magic items may be hidden within wooden boxes.
Jewel Match Twilight Wooden Boxes

Jewel Match Twilight Wooden Boxes

  • Coins will randomly appear on the board. Click on them to collect them. Coins can be used for purchasing upgrades in the Shop.
  • Sometimes you will encounter pieces locked within chains. Chains look like swirls of mud surrounding a piece. Destroy the chain by making a match using the piece affected by the chain. Some pieces may have multiple chains and require multiple matches before they can be cleared.
Jewel Match Twilight Pieces Locked in Chains

Jewel Match Twilight Pieces Locked in Chains

  • Stomper boxes may be found on some levels. Make a match next to a stomper box to automatically activate it. Stomper boxes will move on their own, clearing pieces along the way until the reach the edge of a board.
Jewel Match Twilight Stomper Boxes

Jewel Match Twilight Stomper Boxes

  • Atomic pieces have blue rings around them and will explode 3×3 tiles around them when matched with other pieces.
  • Safes may sometimes be found on a board. Safes will cover a tile and have a number displayed on them. Make matches that touch the safe to bring the number down. Once the number has been cleared, the safe will disappear.
Jewel Match Twilight Safes

Jewel Match Twilight Safes

  • Frozen pieces may appear on some levels in the form of ice cubes. These can only be destroyed with a big hammer, a Fishbone, or a bomb spell. This piece cannot be moved otherwise. Frozen pieces do not have to be removed to finish levels.
  • Once a level has been completed, you may opt to move on to the next one, or explore the Crypt Room for bonus items first. Bonus items may be gold for the Shop, or various currencies that can be used for purchasing scene parts.
  • Magic Stars can be found in Crypts and are used to enable animations within your scenes. You are not required to collect them to complete a level.
Jewel Match Twilight Magic Star

Jewel Match Twilight Magic Star

  • When you quit the game, the board is saved and you can resume where you left off later.

Bonus Games: Mahjong

When you reach various game score milestones, you’ll unlock bonus games. Bonus games can be accessed from scenes.

  • Complete a bonus game to earn extra gold, which can be spent in the Shop.
  • Click on 2 identical free tiles to remove them. A tile is considered free when it’s not enclosed by any other tiles on the left or right sides. A tile must also not be overlapped by another.
  • If you run out of possible moves, click “shuffle”. However, doing this will cost you extra time.
  • Click “Hints” to get match hints. Using this button will cost you extra time.
Jewel Match Twilight Mahjong

Jewel Match Twilight Mahjong

  • Complete the board faster than your previous best time to earn a gold bonus.
  • Hidden object bonus games may also be unlocked in the bonus games menu.

Scenes

  • Between each level you play, you will have access to a scene builder.
  • Use pieces and amulets you’ve collected from Match-3 levels to purchase various scene parts shown at the bottom of your screen.
  • You may purchase bonus animated items shown on the left with Magic Stars. These items don’t count toward game progress, but do make your scenes look nicer. Magic Stars can be found in bonus Crypt Rooms upon completing a level.
Jewel Match Twilight Scenes Haunted Castle

Jewel Match Twilight Scenes Haunted Castle

Tips & Tricks

Here are a few extra tips and tricks to help you, should you find yourself in need of a hint or two:

  • Make a match of four pieces to create a rainbow piece. Rainbow pieces can be matched with any other piece. If you want to make a match with the pieces around a rainbow piece in its current location, simply swap it with one of the pieces you’d like to match it with.
  • Make a match of five pieces to create a Fishbone. Click on a Fishbone to destroy and entire column or row of pieces. Fishbones will have pointed arrow tips indicating where they will go. Some Fishbones may wiggle, so you will need to time when you click on them. Fishbones can travel diagonal.
  • Press and hold the right mouse button to drag and scroll the board around.
  • Earn extra gold by playing bonus games. You can earn additional gold by improving on your previous score. If you start with a lower score and gradually improve it, you can continue to earn gold from the same game.

Congratulations, you’ve completed the Jewel Match Twilight Walkthrough! Be sure to check our blog for more great tips and tricks!

The Jewel Match Twilight walkthrough is meant to guide you through the game’s basics, and does not include serials, hacks, or cheats.

The post Jewel Match Twilight Walkthrough appeared first on GameHouse.

Viewing all 192 articles
Browse latest View live