Welcome to the Heart’s Medicine – Hospital Heat Official Walkthrough. Allison is back, and things are about to heat up like never before! Lives are on the line in the most intense addition to the series yet. This is the official guide and contains in-depth strategies, tips and tricks for all levels and challenges. Also included are all Oliver the guinea pig locations, trophies, minigames – and even a complete video walkthrough! Select one of the topics from the Contents list to get started.
Contents
General Tips & Tricks
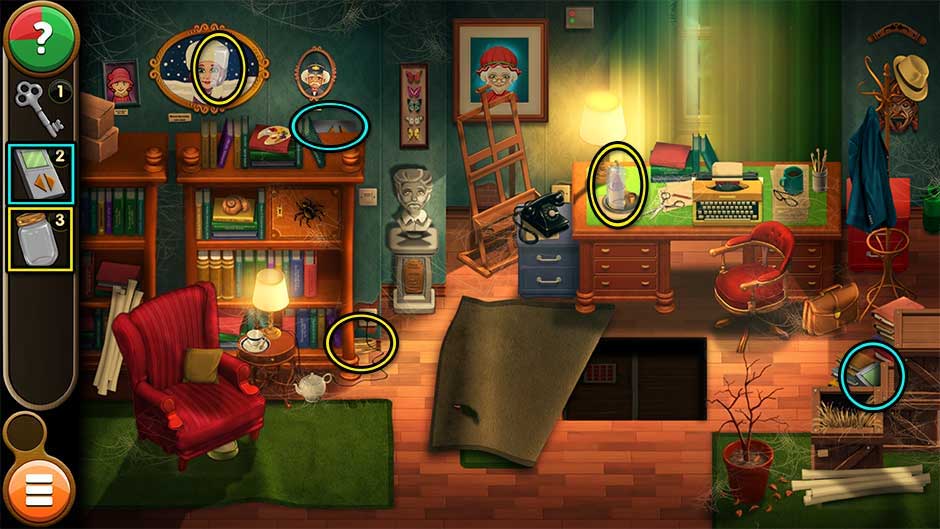
Welcome to the tips and tricks section of Heart’s Medicine – Hospital Heat. This section covers all the game’s basics, as well as essential tips and how-to’s that will help you earn the highest scores.
How to Play
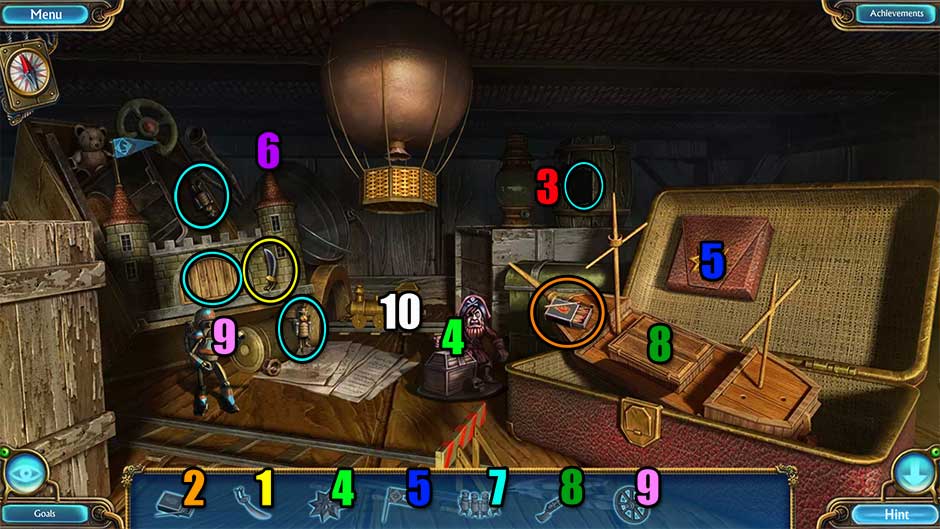
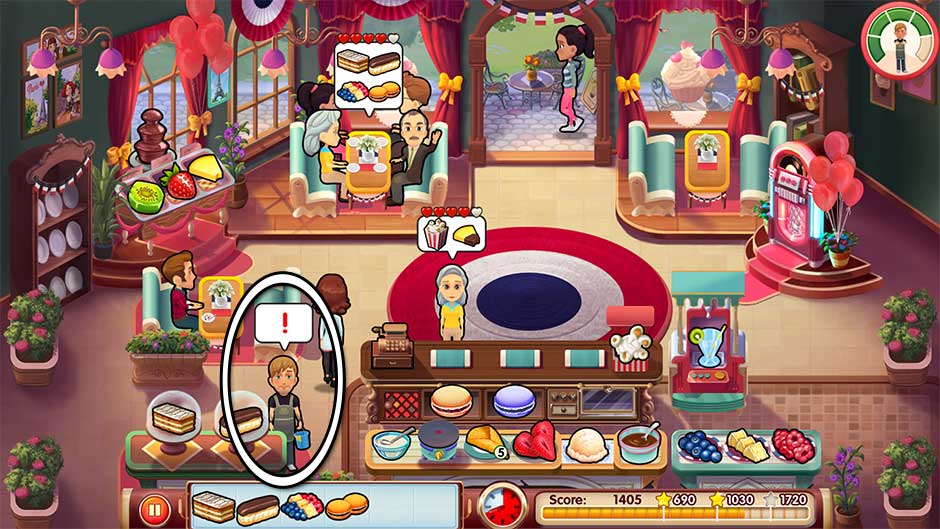
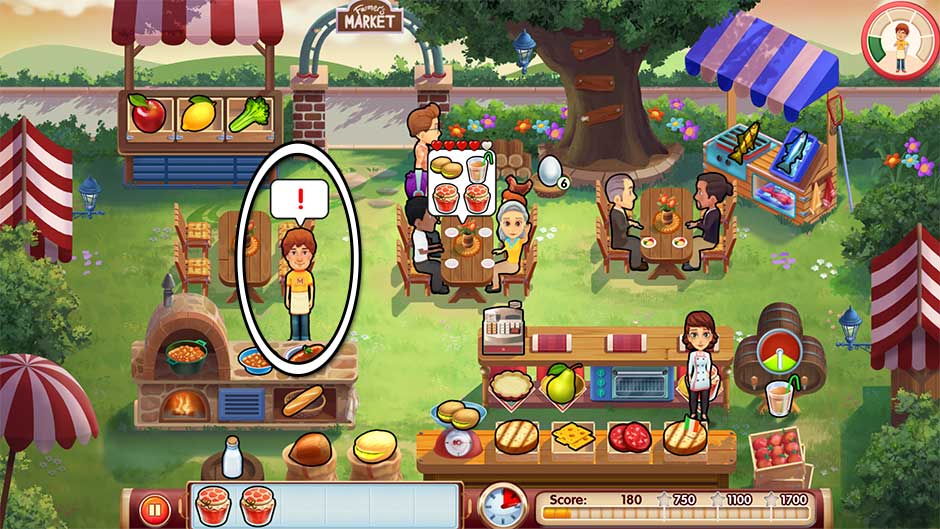
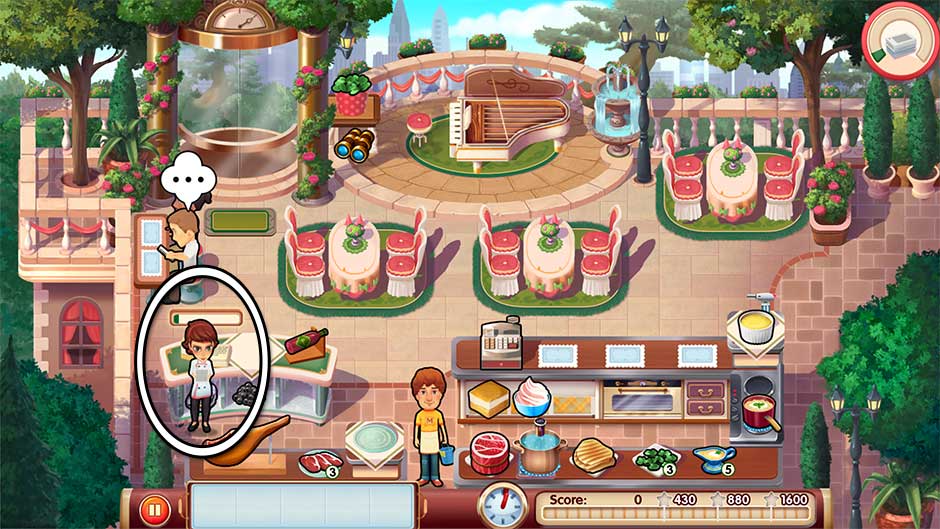
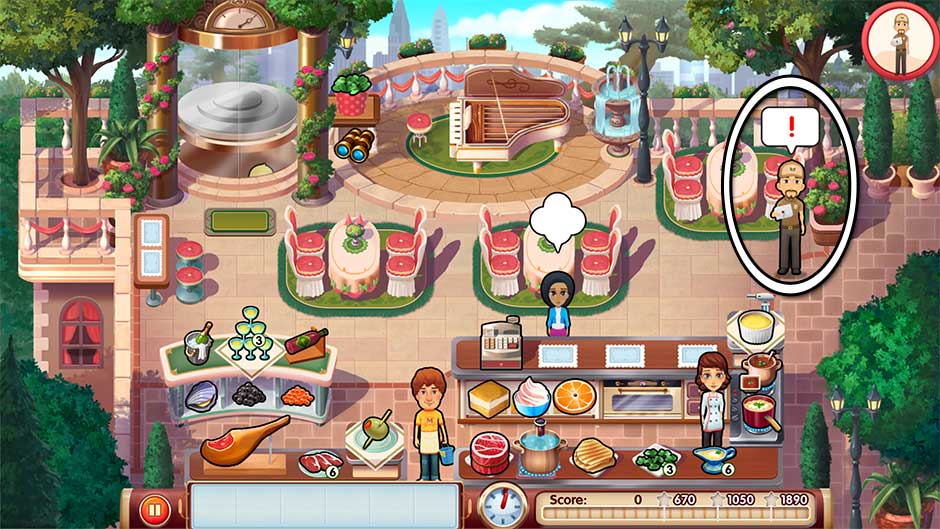
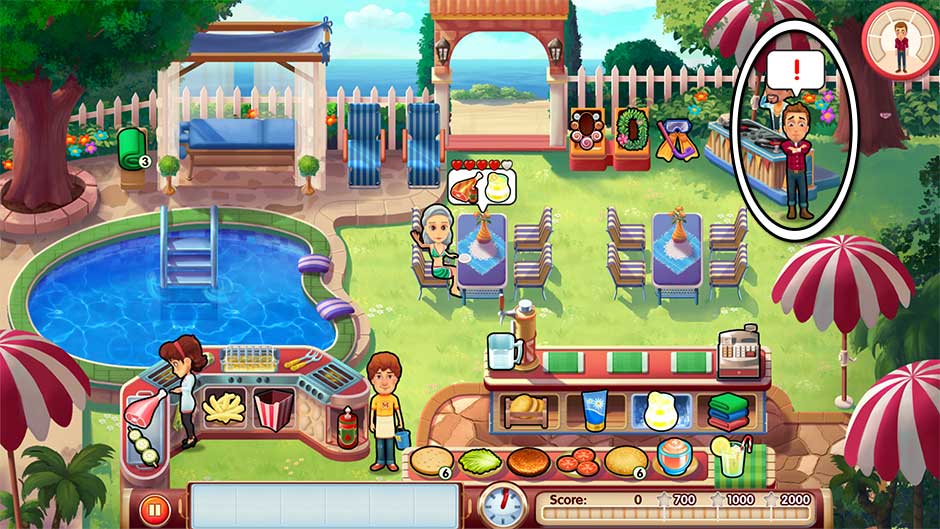
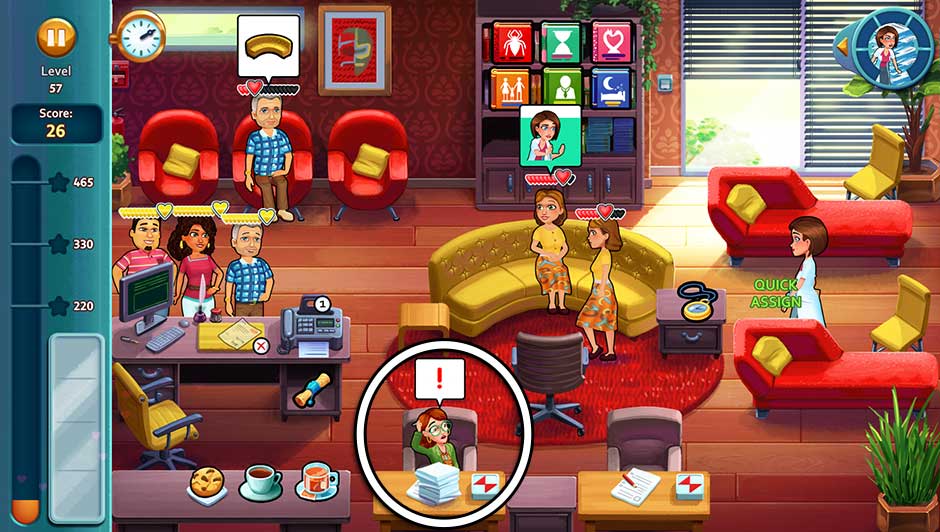
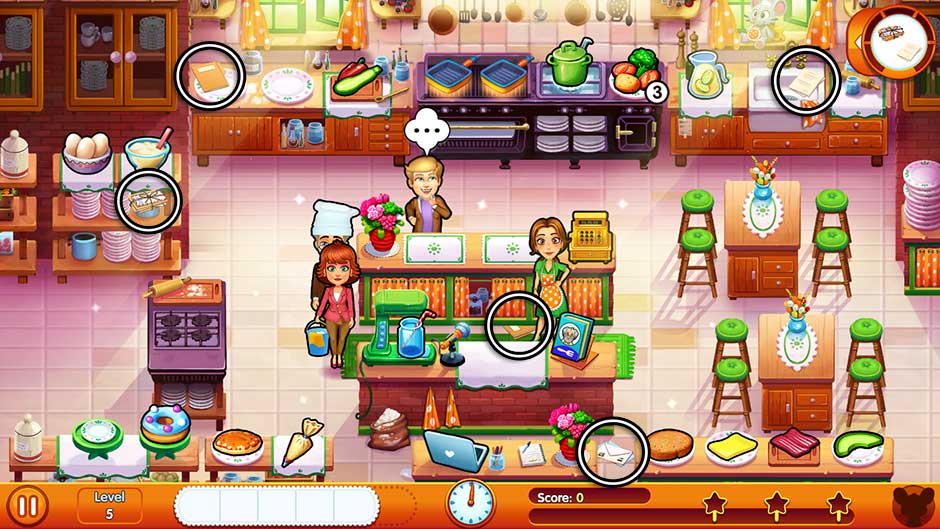
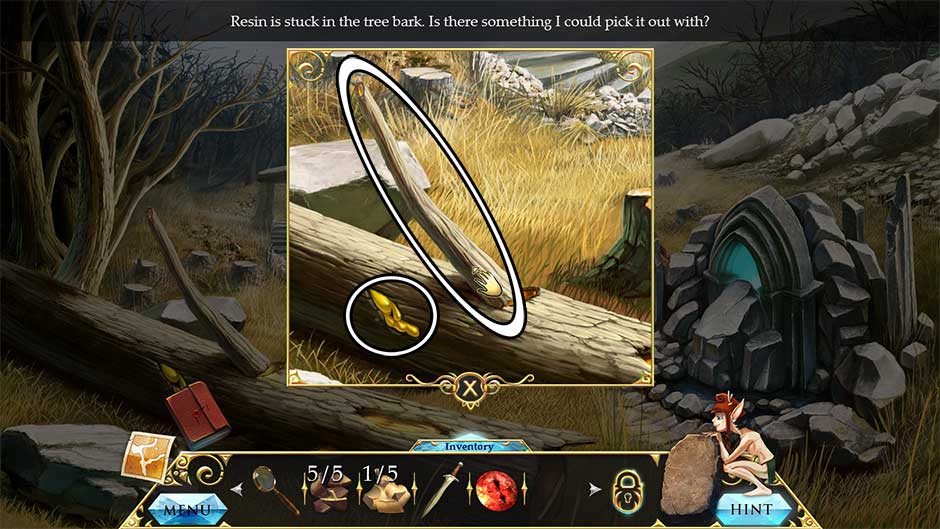
Being a doctor requires patience, in addition to patients! When patients enter the department you’re working in, they’ll start by sitting in one of the waiting chairs. A bubble will pop up over their head indicating where they need to go. When you see the bubble, click on the patient, then click on the station they need to go to for treatment.
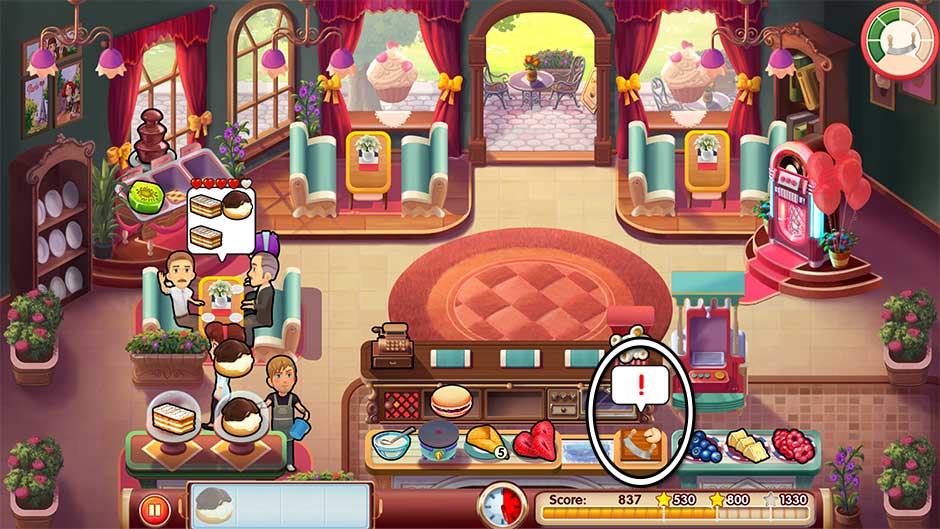
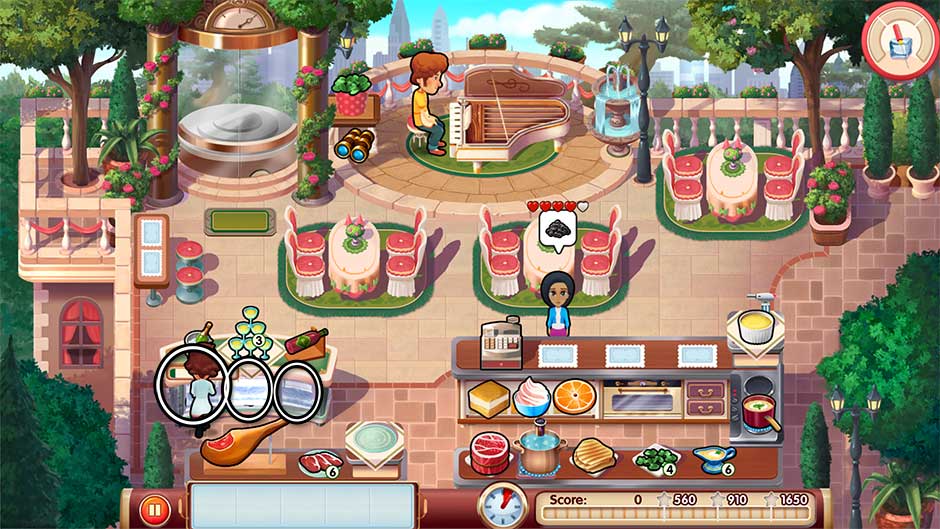
When a patient is at the treatment station they need, another bubble will appear showing what item they need for treatment. Treatments are different per department. Sometimes these bubbles will be filled with a color when they appear. Each color indicates the type of treatment they will need.
- GREEN indicates a quick, normal treatment. Clicking on a patient with a green-colored bubble will make Allison treat them immediately. No further action is necessary to complete the treatment.
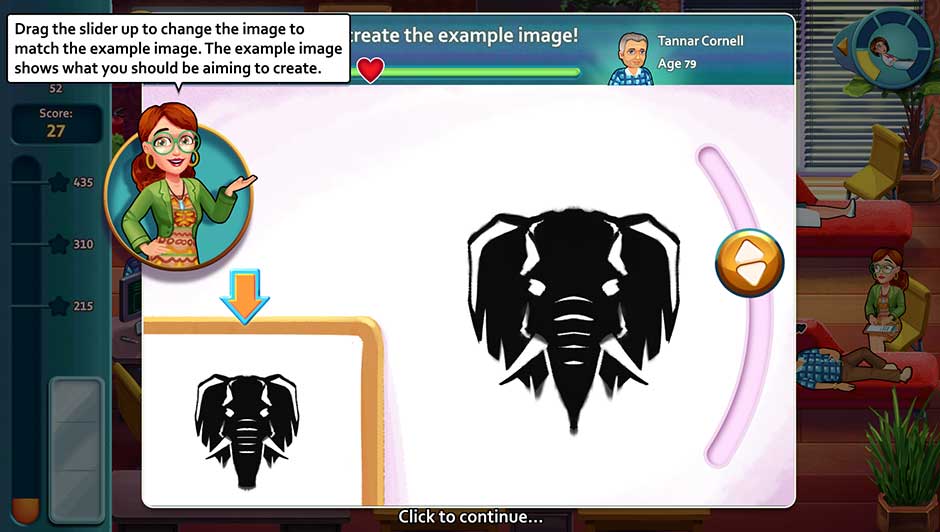
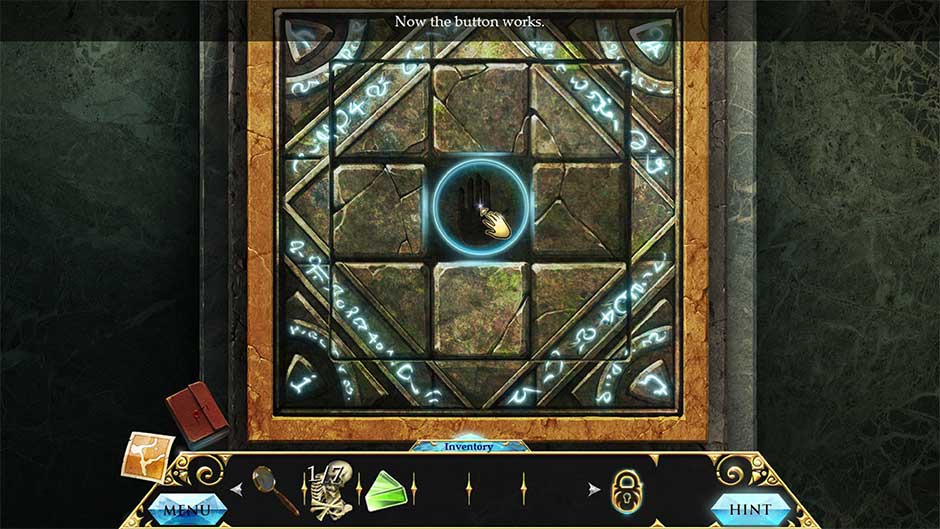
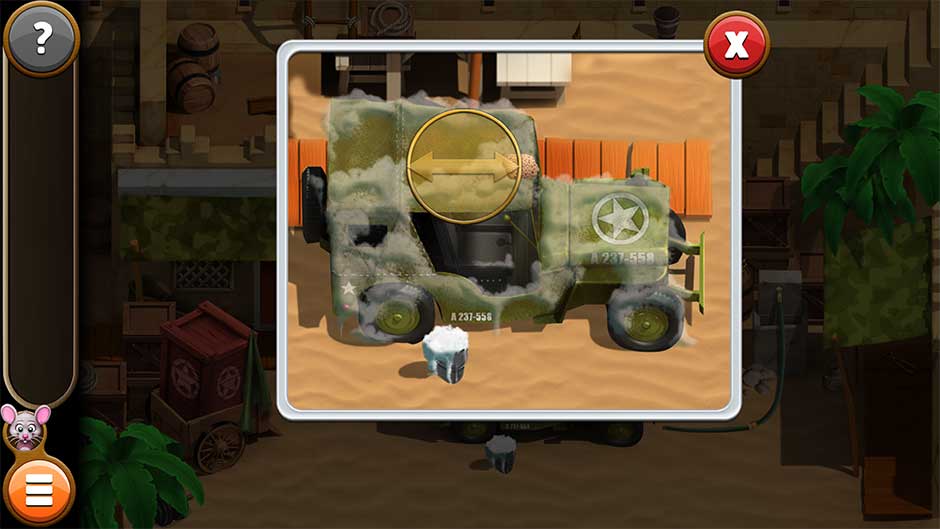
- PURPLE requires your personal touch! For example, you may need to tap a button multiple times, or move a slider with your mouse or finger. This kind of treatment will finish once you’ve successfully performed the gesture.
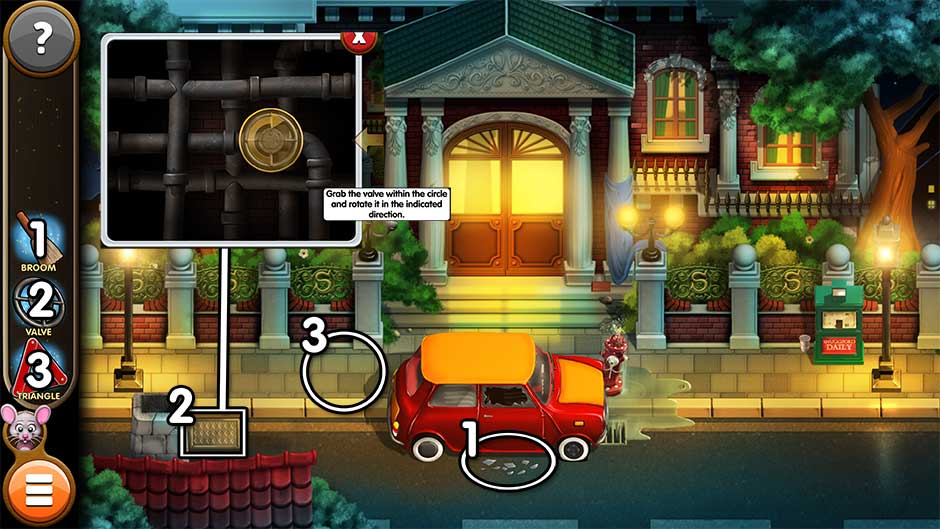
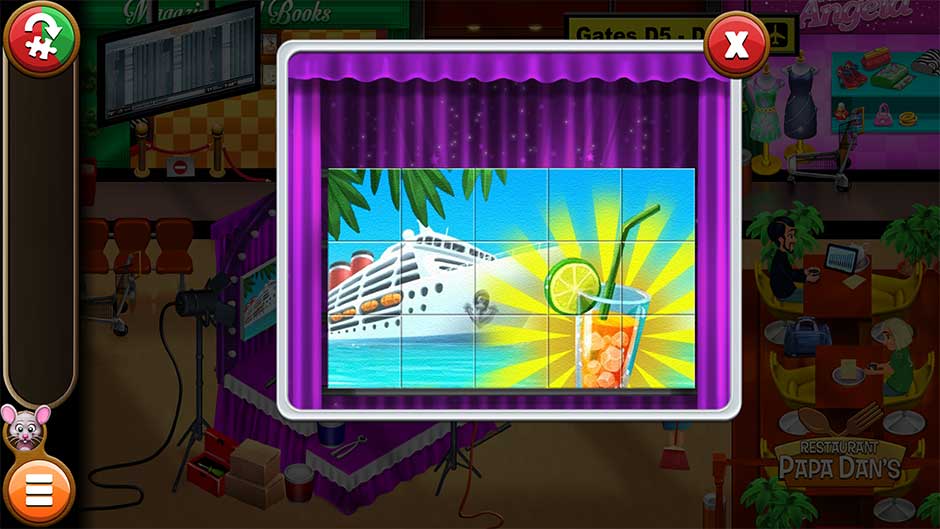
- BLUE means you’ll need to complete a minigame. All other timers, such as the shift clock and patients’ patience, will temporarily pause while you play the minigame. To view a list of minigames and how to complete them, go to the Minigame Section of our guide.
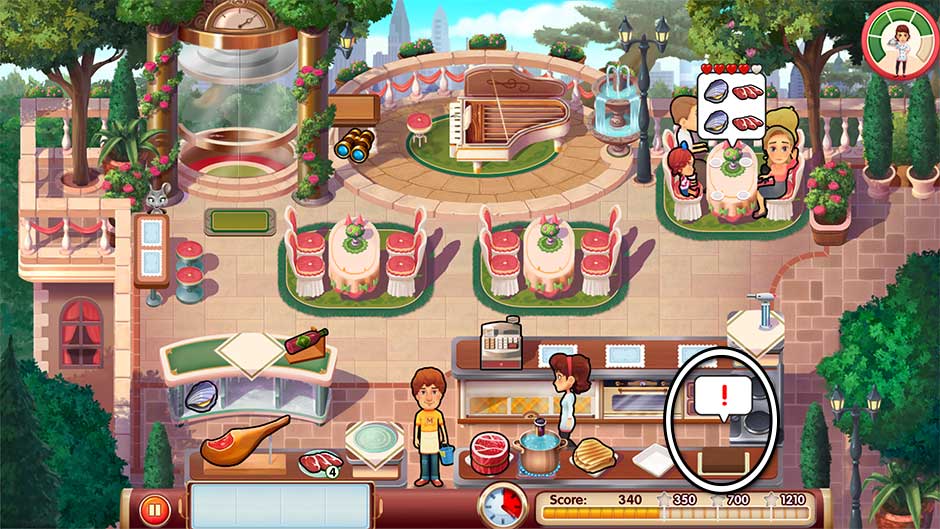
Once a patient has received all the treatments they need, they will go to the checkout monitor. Click on the monitor to check the patient out and send them on their way!
Scoring and Customer Happiness
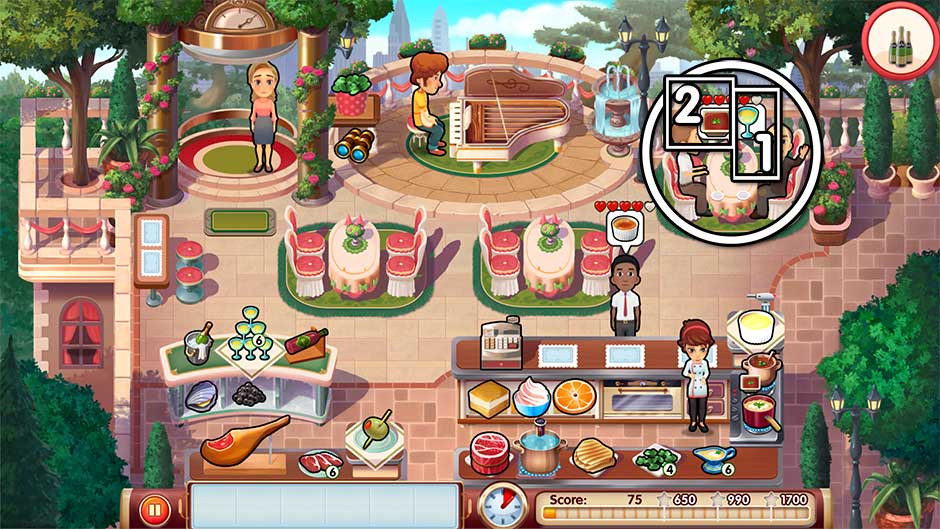
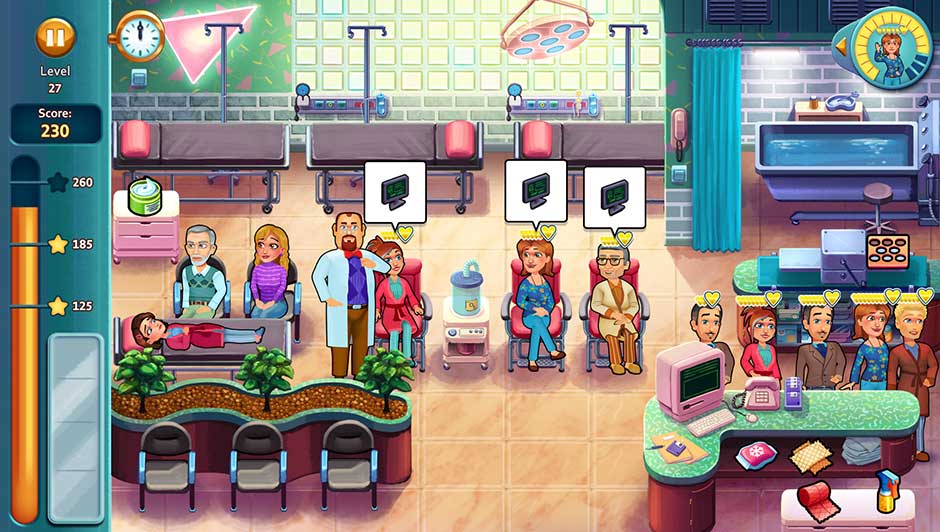
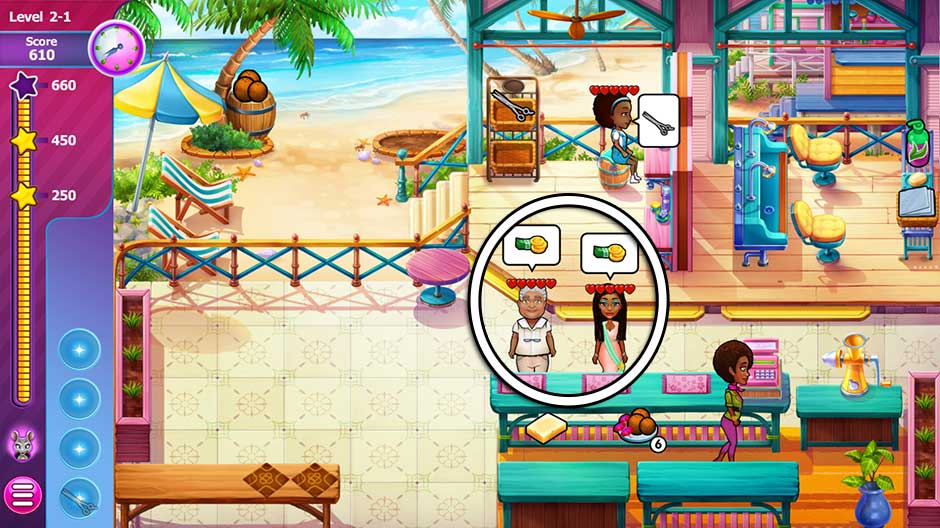
Every patient who enters the clinic will have a number of hearts over their head. The faster you treat a patient, the more hearts you’ll earn. Hearts will be converted into scores once a patient has checked out. Patients who couldn’t be happier will have gold hearts over their head. These gold-hearted patients have infinite patience when waiting at the checkout monitor.
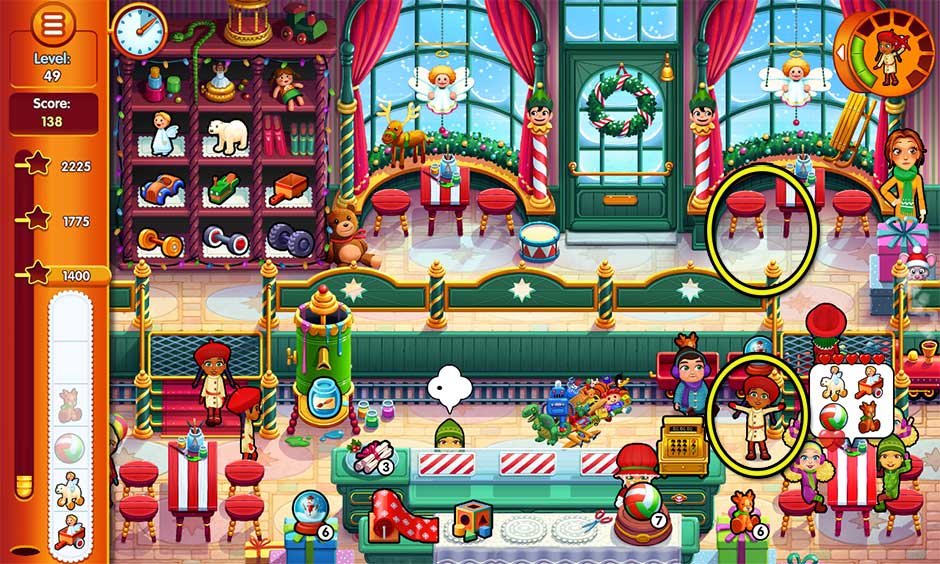
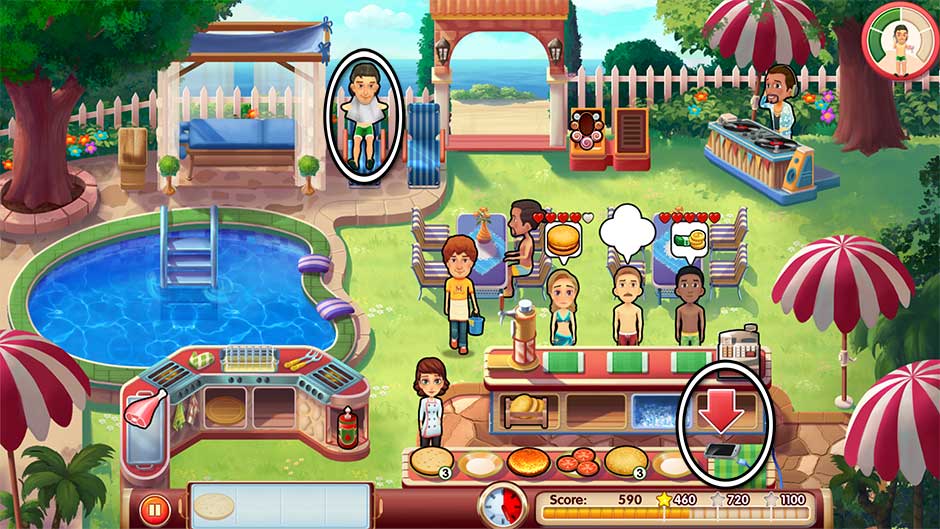
One way to earn higher scores is to check patients out in groups. Up to 5 people can wait at the checkout monitor at a time. Gold-hearted patients can wait at the checkout monitor for an infinite period of time without losing happiness, so there’s no need to rush with them! If a patient doesn’t have gold hearts over their head, their hearts will decrease over time the longer they have to wait. Check patients out in groups to add bonus points to your score. If more than 5 people are waiting to check out, as long as Allison is at the checkout monitor, any additional patients will be added to the score chain.
Bonus Scores and Treatment Chains
Earn extra bonus points by treating patients quickly. If you treat a patient before the color displayed drains from their bubble, you’ll earn a quick bonus. You can also earn quick bonuses for checking out patients within a couple seconds of their arriving at the register, or assigning them to treatment stations quickly. Treating multiple patients back-to-back will give you a treatment chain. Try earning various chains and combos to improve your score!
Upgrades
After selecting a level in the level select map, you’ll have the option to purchase upgrades. Earn coins to buy upgrades by completing levels. The higher your score, the more coins you’ll earn! Upgrades can increase patience, increase speed, and even replenish hearts.
Additional Tips and Tricks
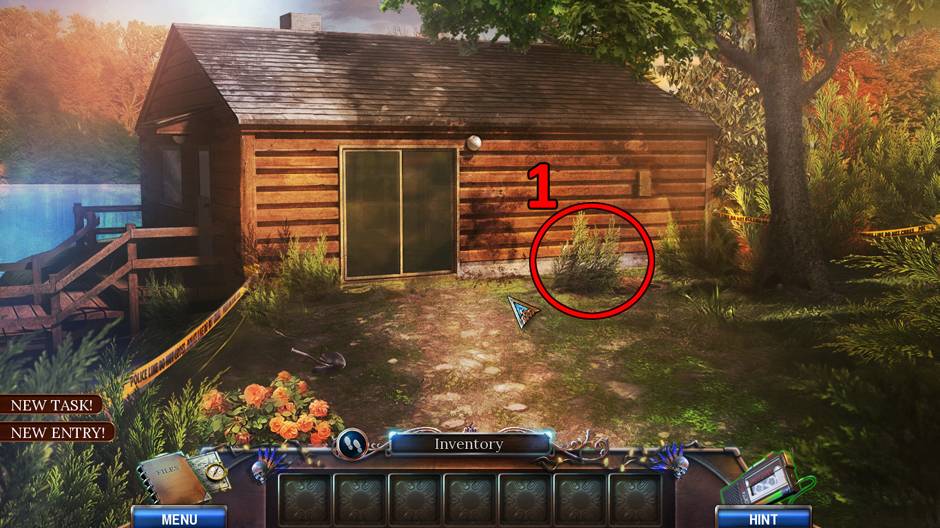
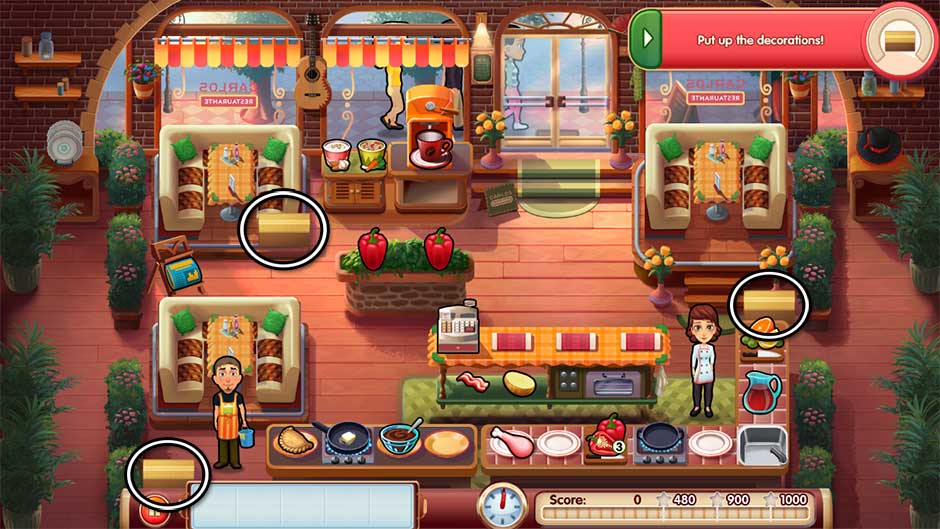
- The Diamond Standard – Complete level challenges to earn diamonds, which can be used to upgrade Allison’s apartment. There’s 150 to earn in total.
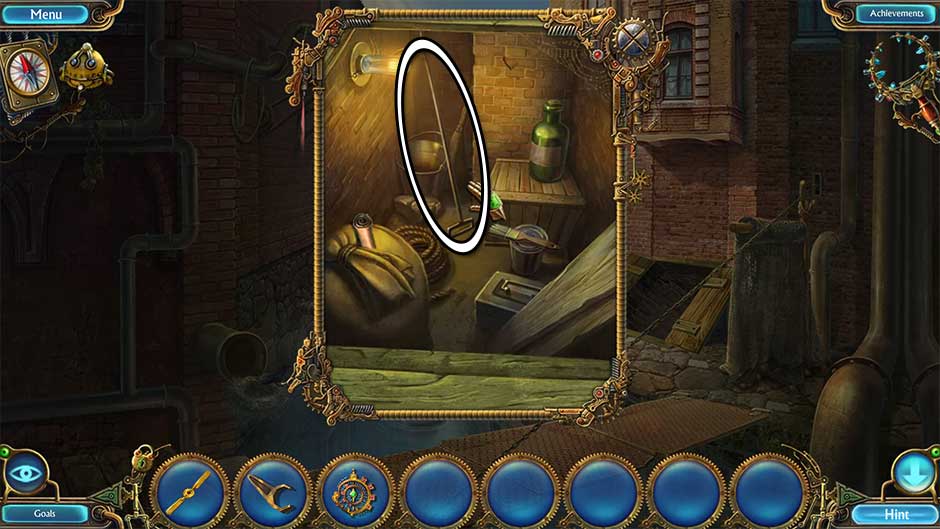
- Oliver Twist – Oliver the guinea pig is hiding in each of the game’s story levels. Listen for the squeak to know when he appears.
- A Patient Here, a Patient There – Swap patients between stations to increase your efficiency!
- A Big Heart – The more hearts a patient has when they enter the clinic, the more treatments they’ll need.
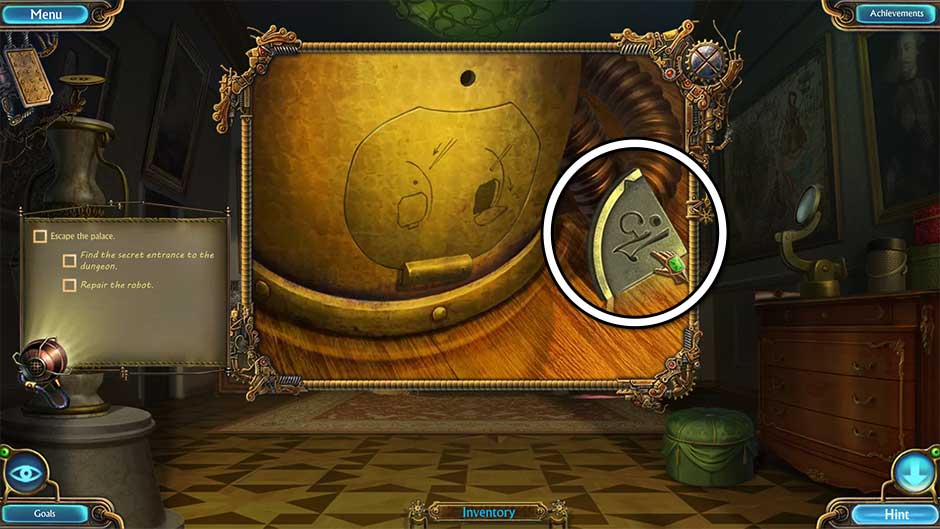
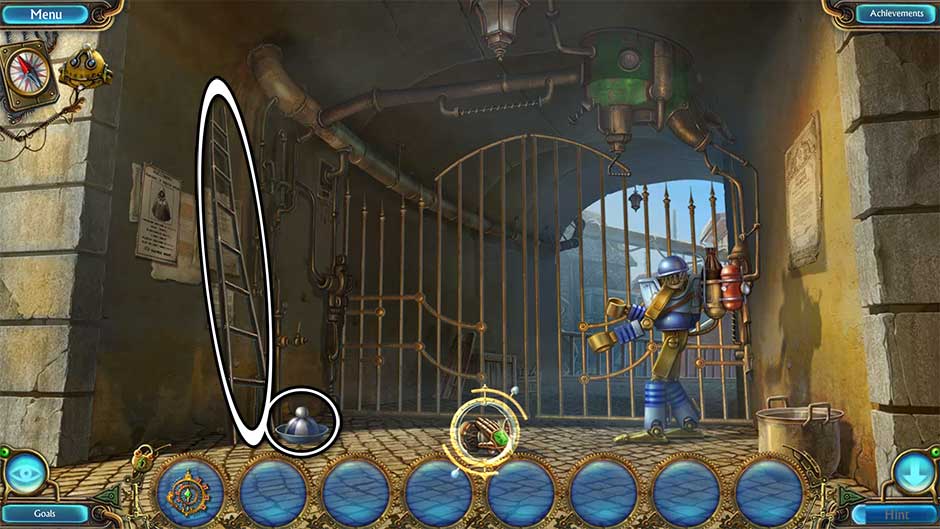
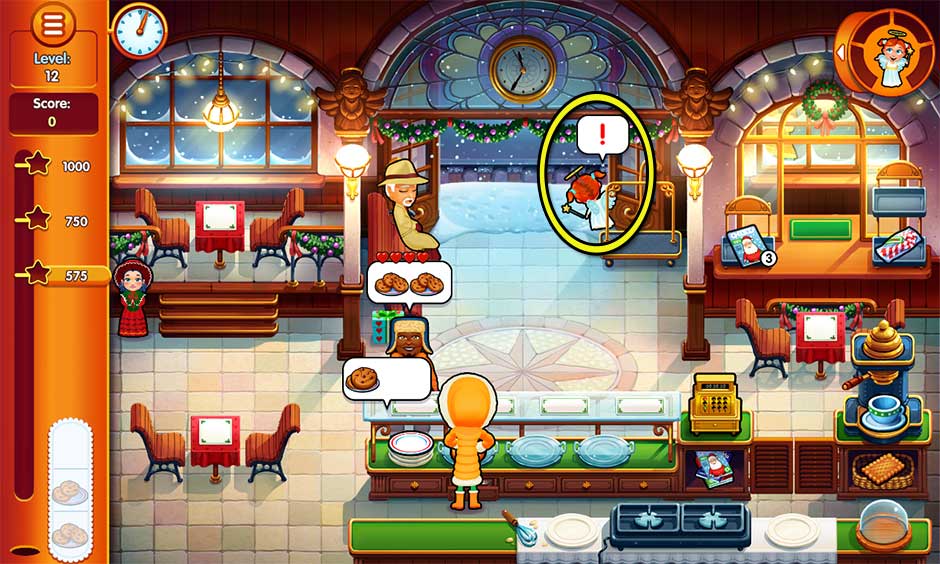
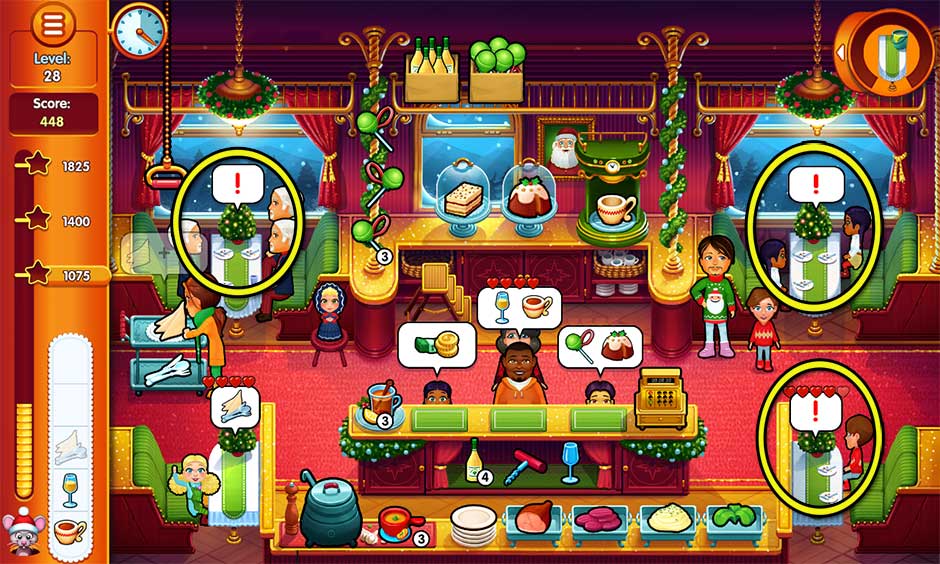
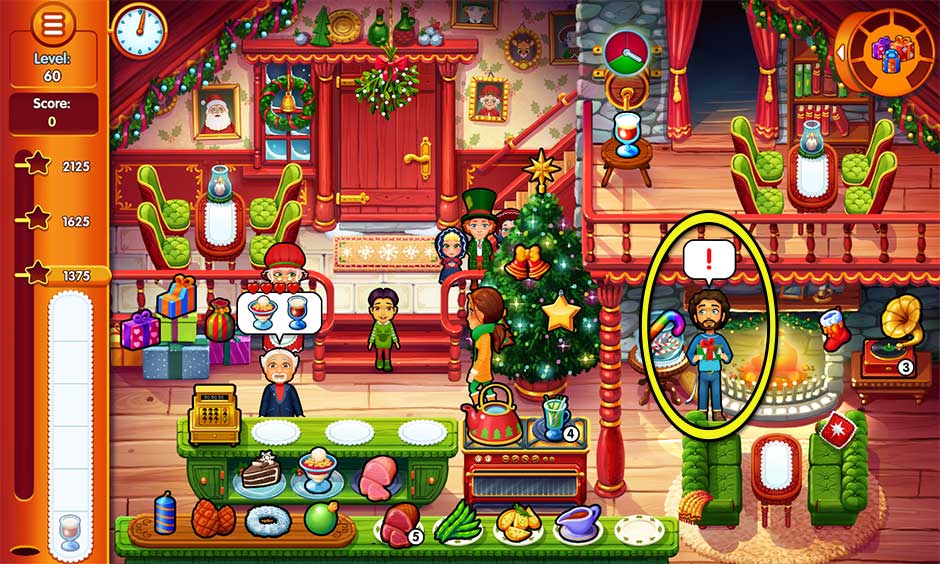
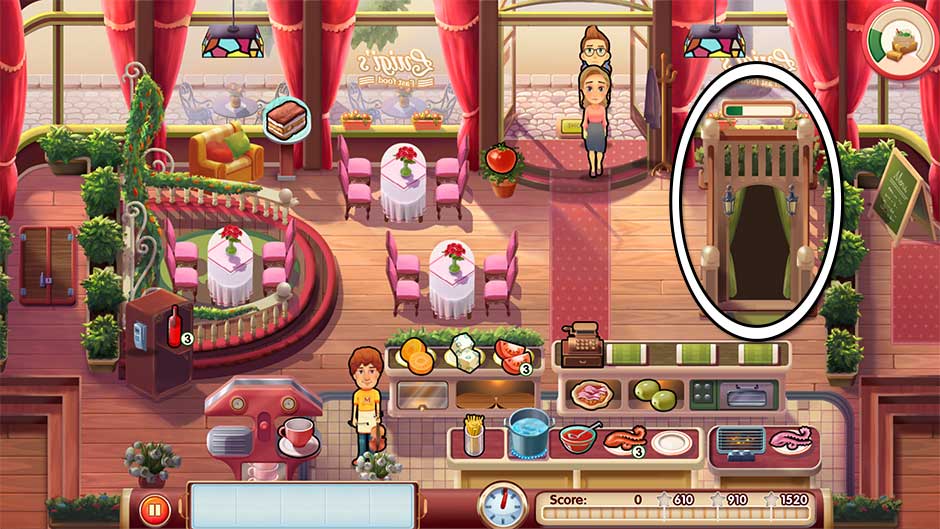
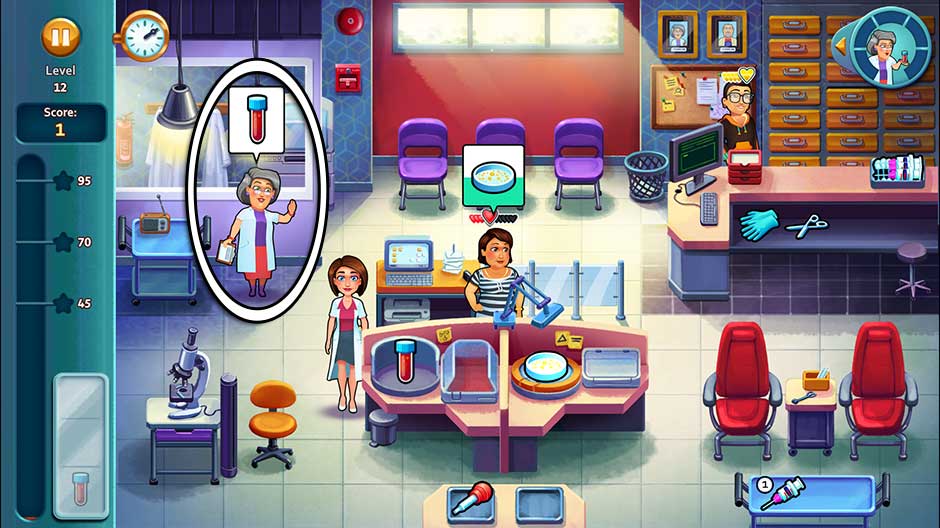
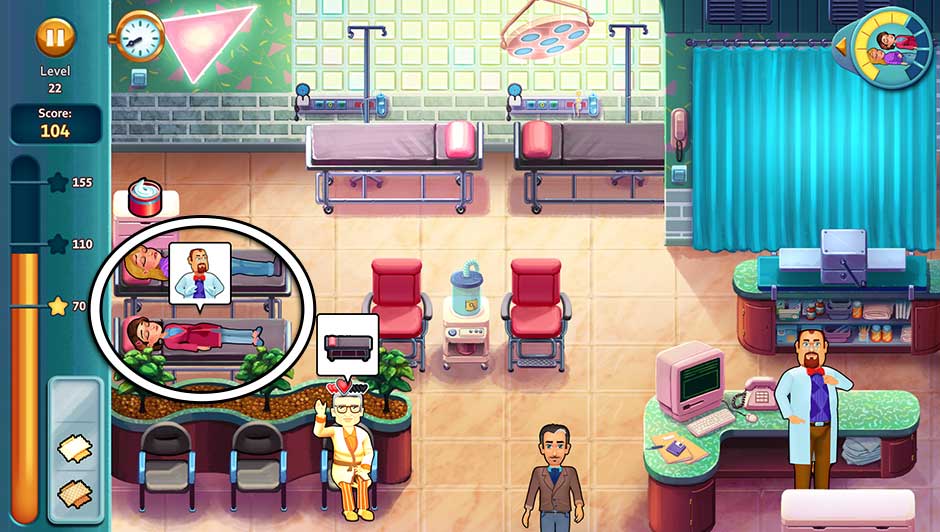
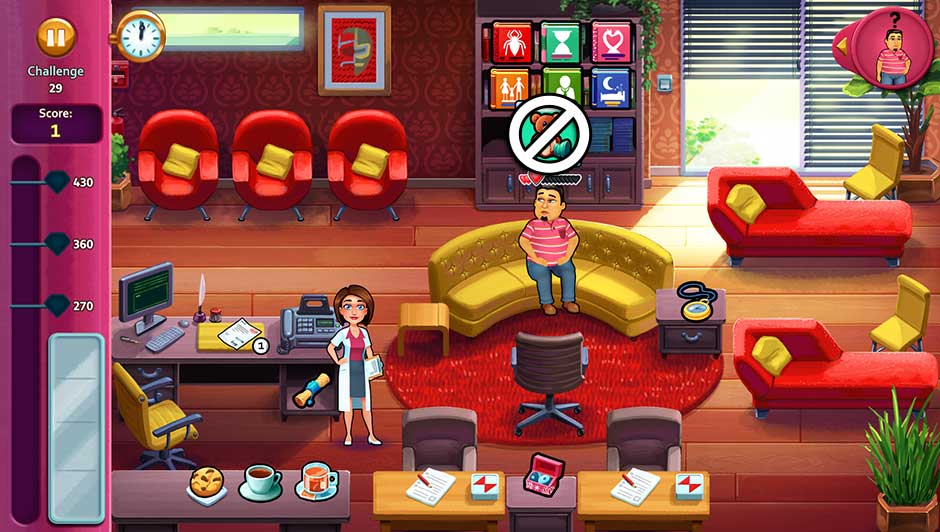
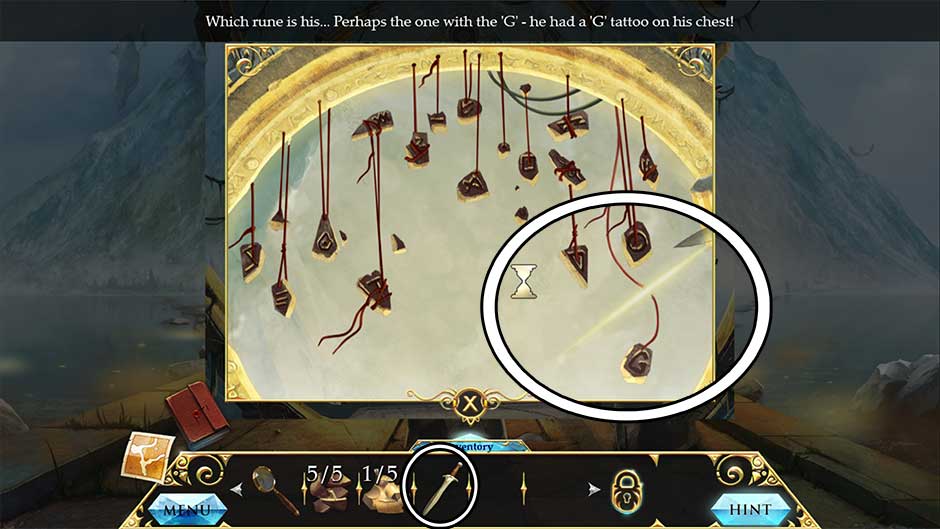
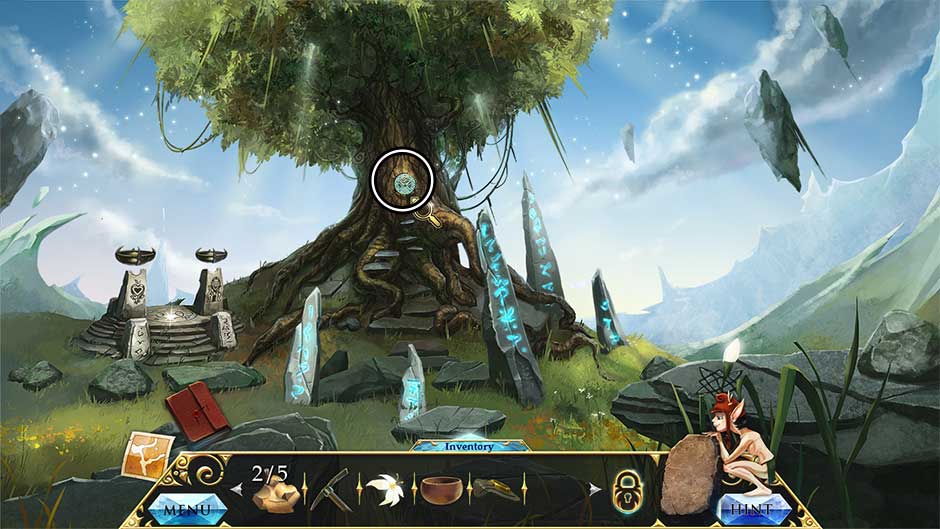
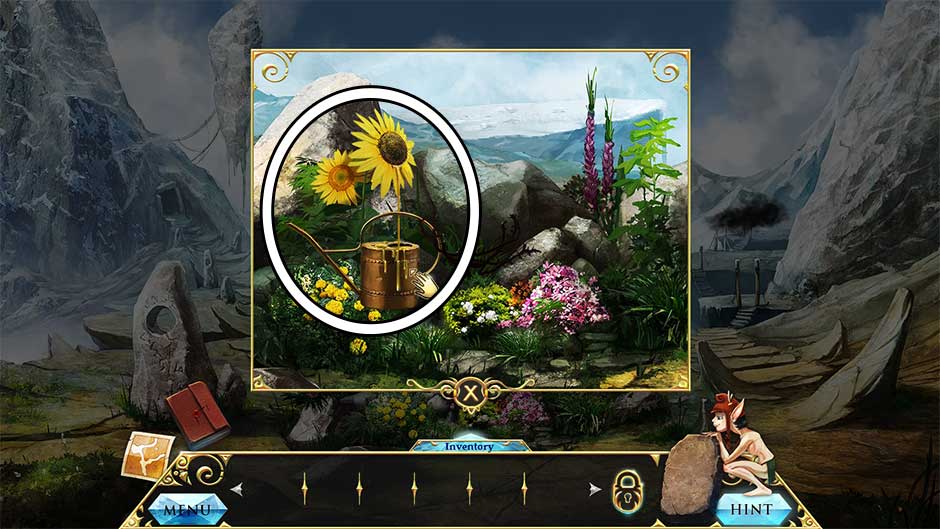
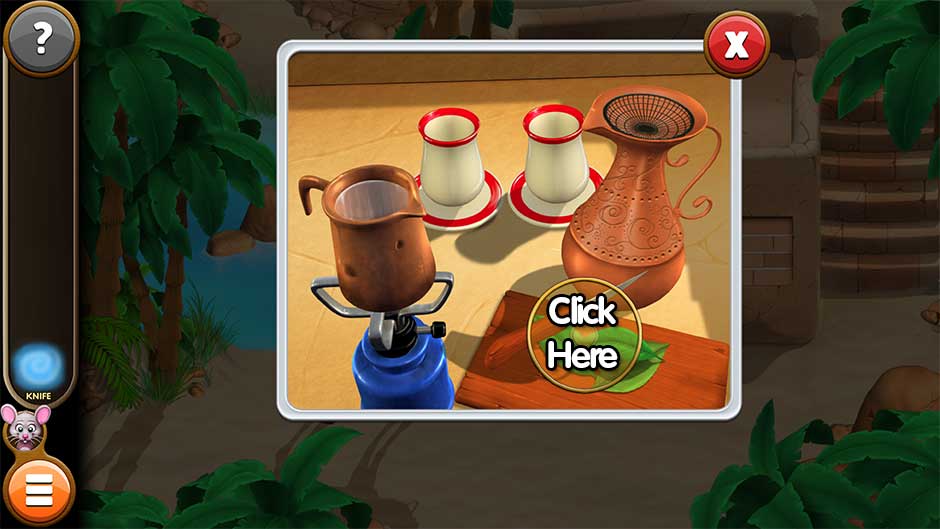
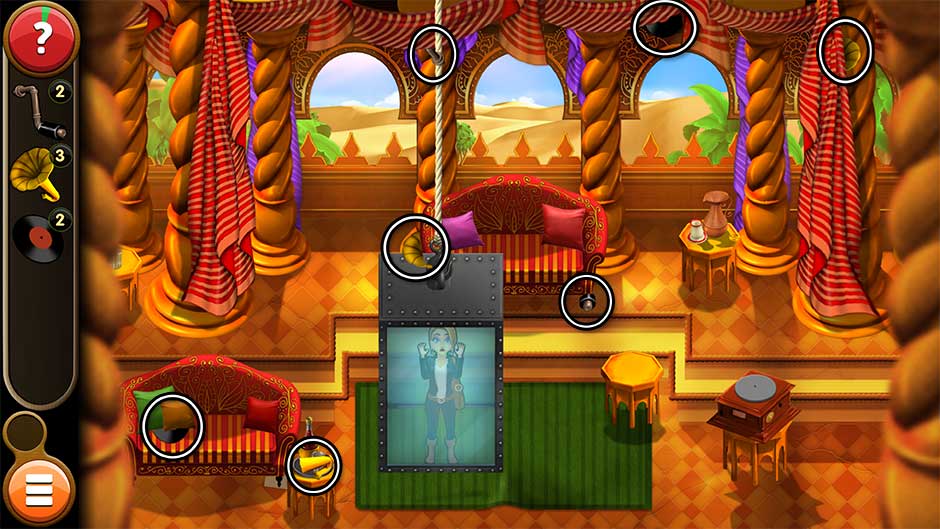
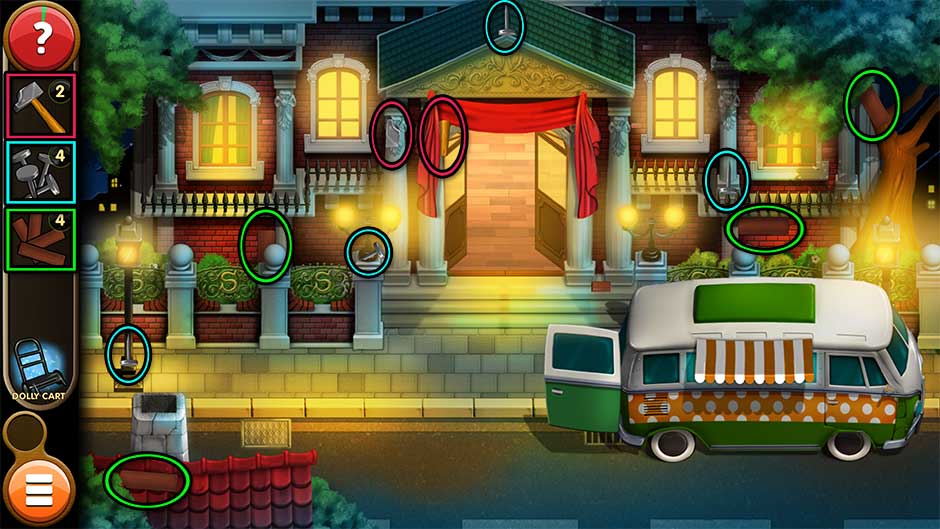
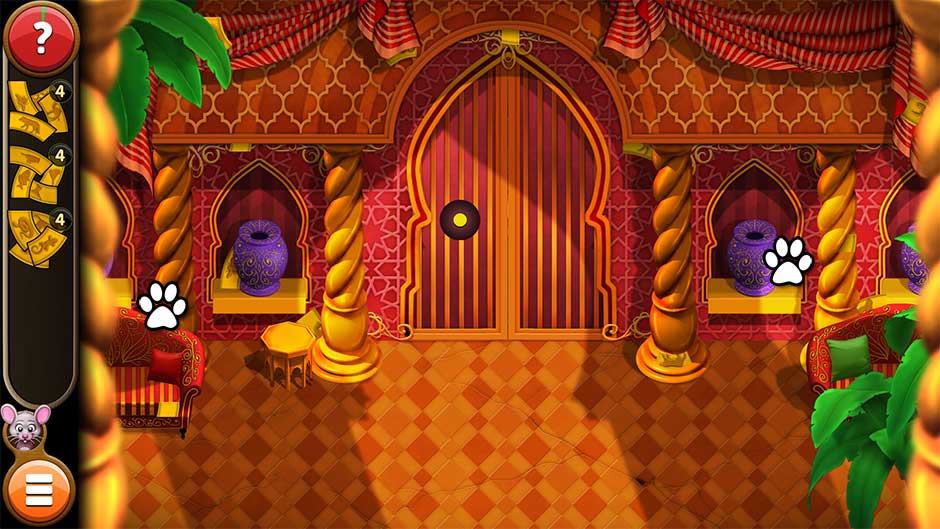
- I Feel Golden – Patients with gold hearts have infinite patience, and can wait an indefinite amount of time at the register. Gold-hearted patients that aren’t at the register but also want to check out will also have an infinite amount of patience while staying at their treatment stations. Just make sure they don’t block the station for any other incoming patients!
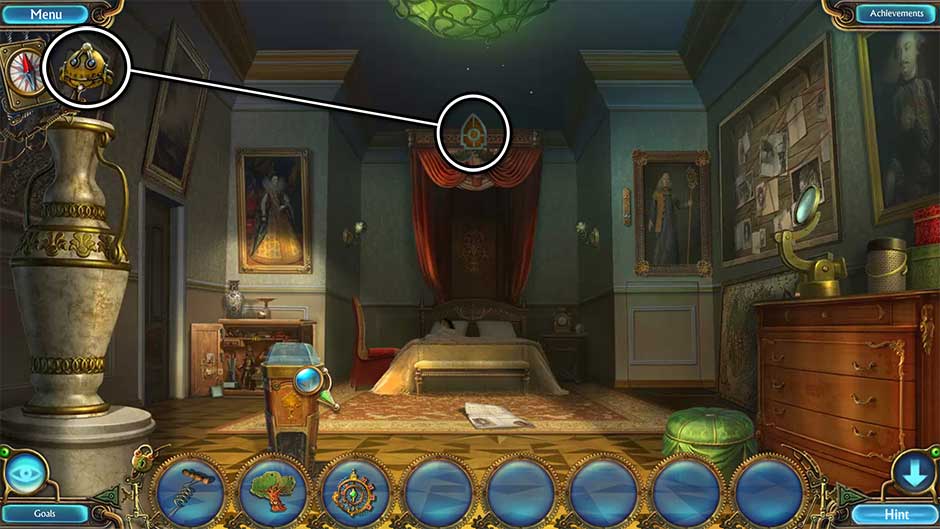
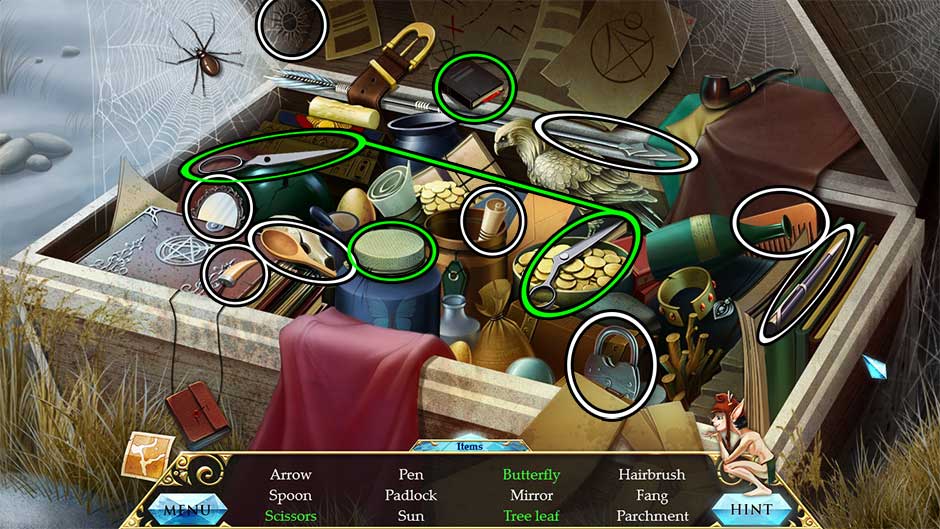
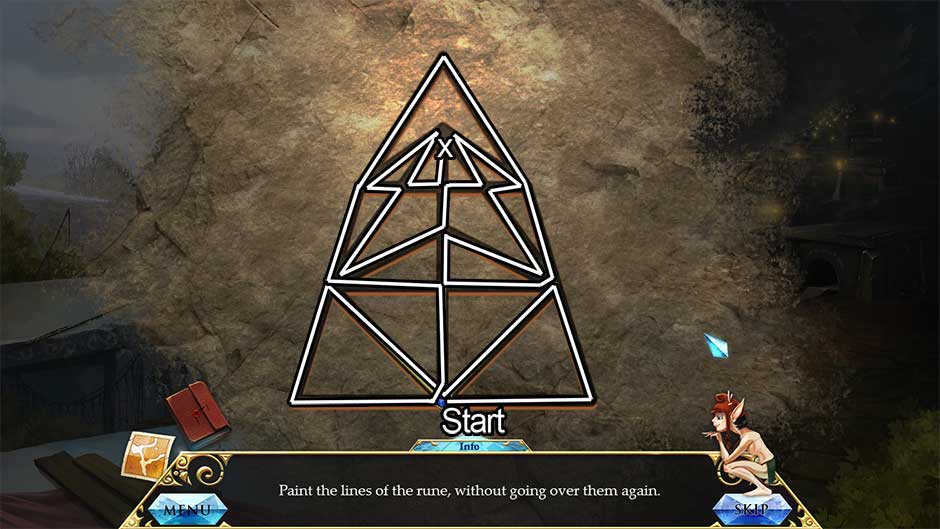
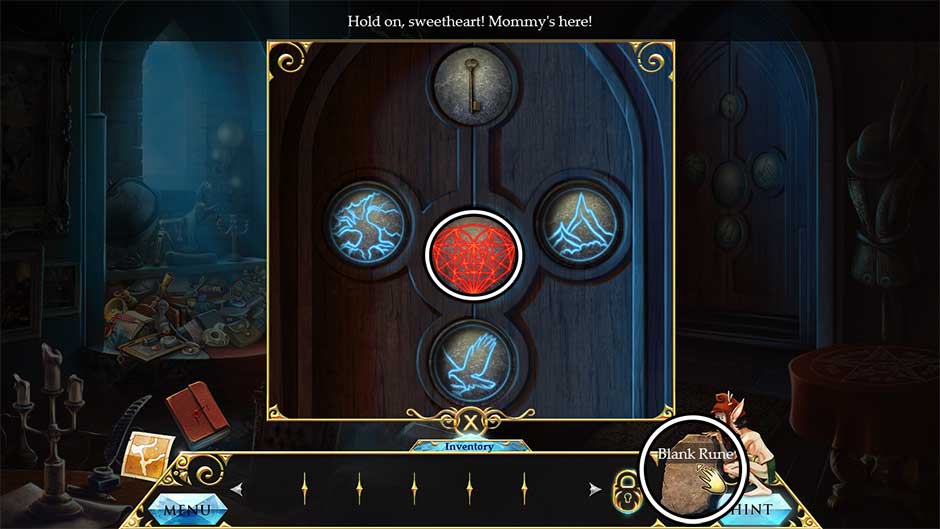
![Golden Patients, Infinite Patience]()
Golden Patients, Infinite Patience
Heart’s Medicine – Hospital Heat Walkthrough
Welcome to the official walkthrough of Heart’s Medicine – Hospital Heat! This guide covers every part of the game. Level-by-level strategies, all challenges, hidden Oliver locations, minigames, trophies, and more! Refer to the Contents section above to get started, or keep scrolling to dive right in.
Chapter 1 – Pediatrics
There’s nothing childish about pediatrics! Pediatrics features levels 1 – 10.
Cutscene: Intro
Once prompted, click on all the children in the department to make them leave. When all of the children have left, another child will appear behind the office chair. Click on him until he leaves, too.
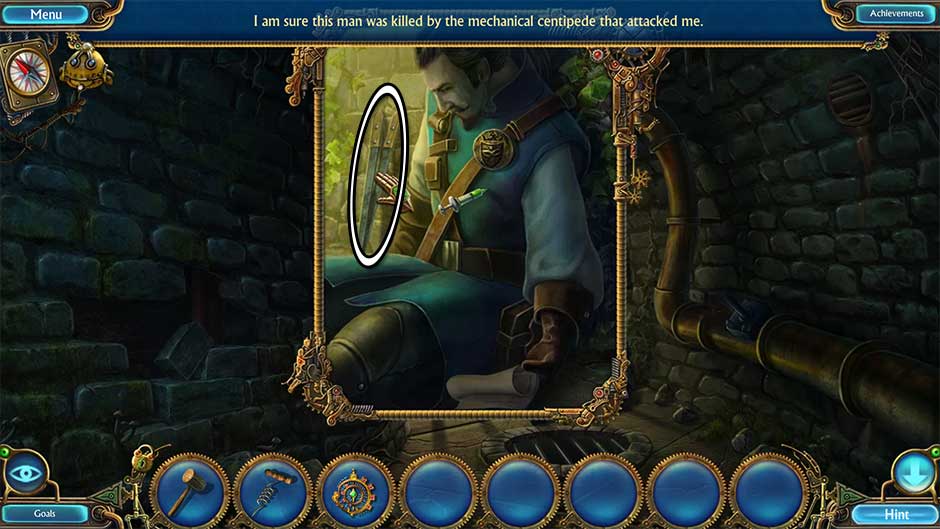
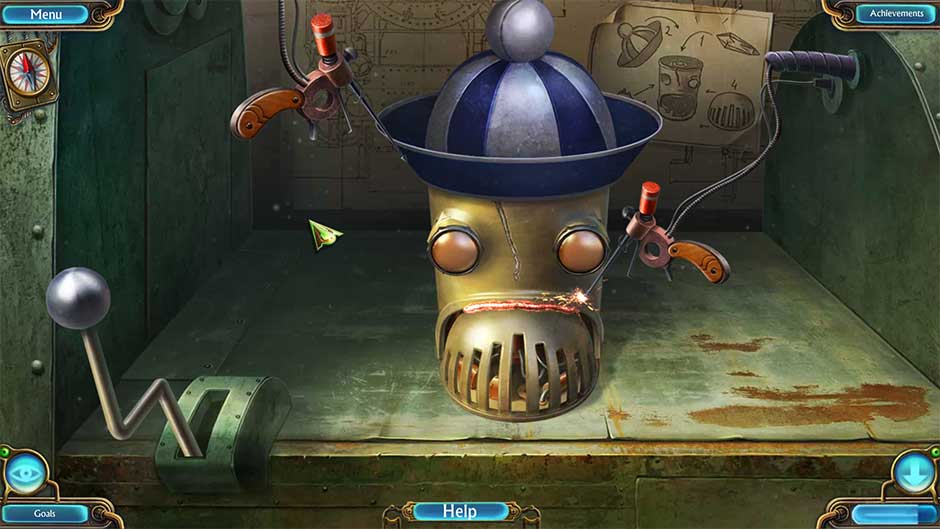
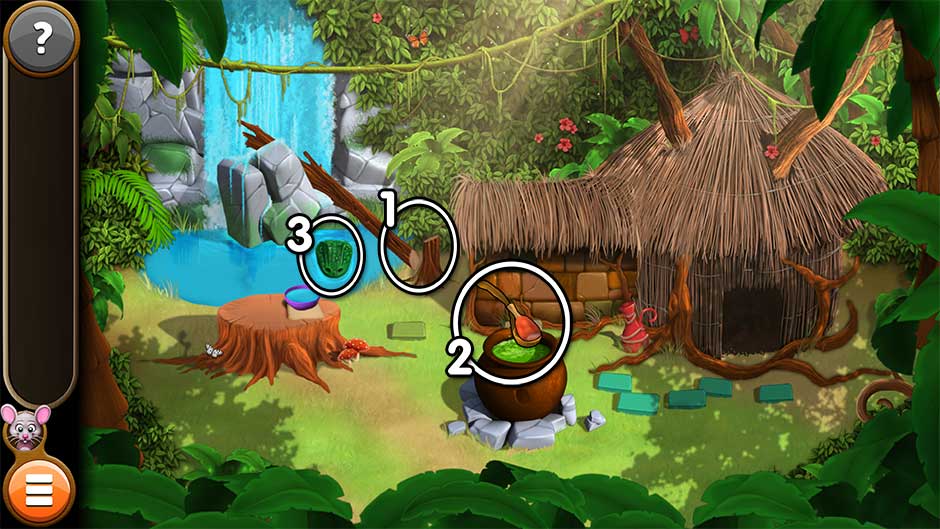
Next, when prompted, click and hold the shards of glass, dragging them out of the wounds. Once all of the shards have been removed, a new minigame will start. Click the bandage roll and move it downward into the dotted outline. Repeat this gesture until the arm is completely wrapped. Once the minigame is finished, tap on the button that appears repeatedly until the circle has been filled with the purple color.
From the helicopter, click and drag the buttons down in the direction indicated to interact with the door. Click on the spot down on the ground to jump down, then repeat this gesture to jump across the gap. Finally, tap the button that appears repeatedly until the purple color fills the circle. What happens next…?
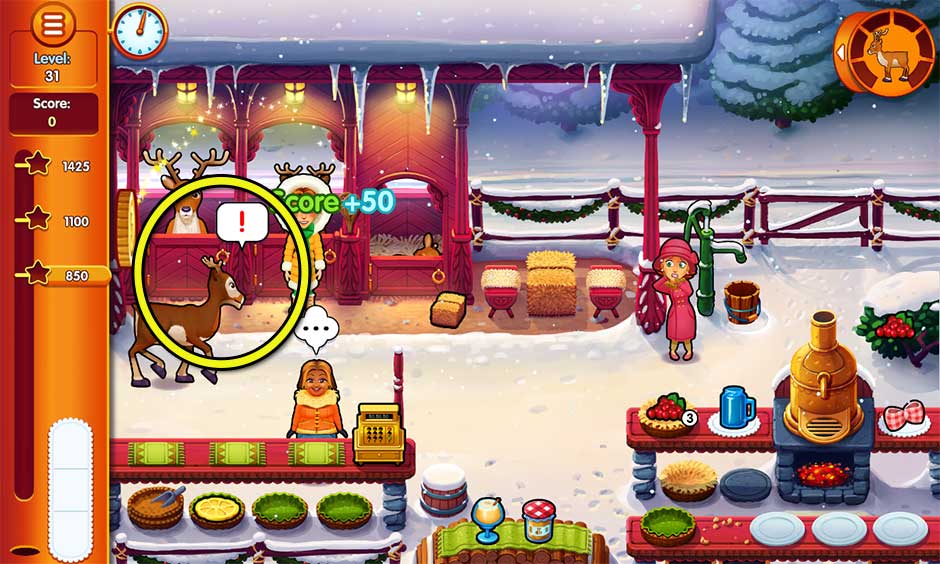
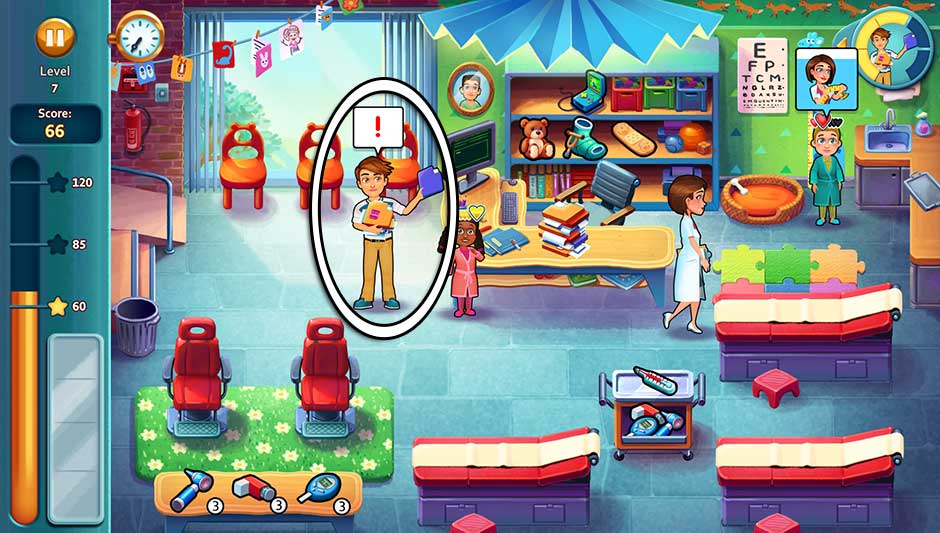
Level 1 – New Beginnings
Earn one star.
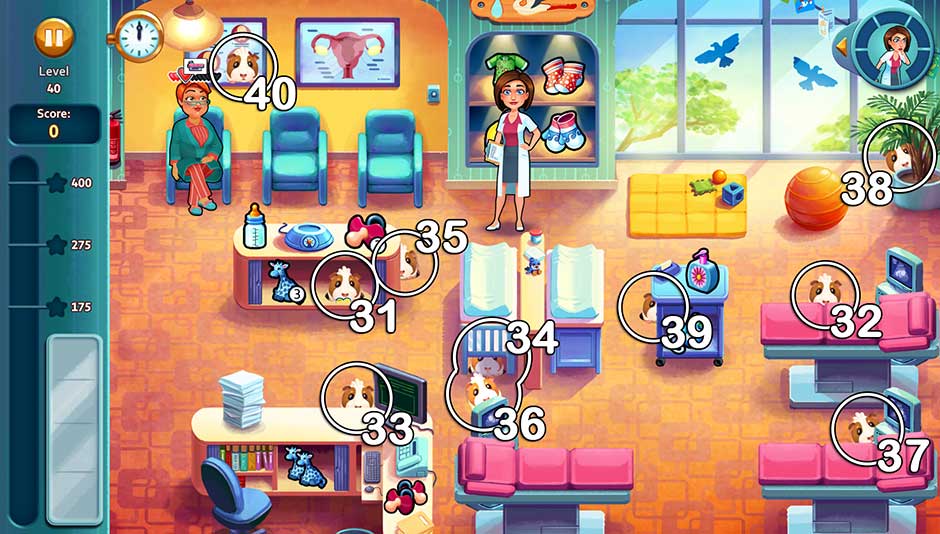
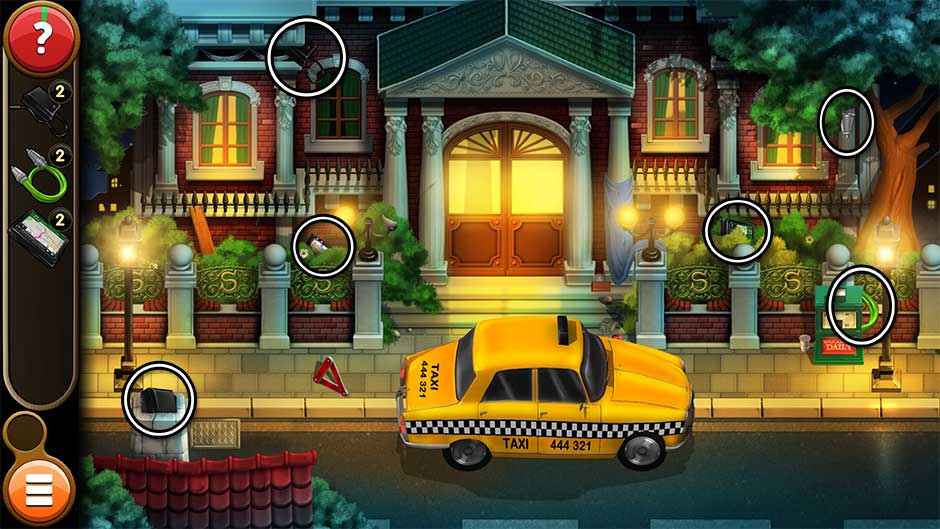
Oliver Location: At the foot of the examination table on the bottom right.
Today is all about learning the ropes. Connor’s help is optional. Treat patients as they come in. Their needs will be displayed in a bubble over their head. If the bubble contains an image of Allison, click on the patient to have Allison administer treatment. Otherwise, bring the item shown in the bubble. Once you’ve earned a score of 10 or higher, you will have completed today’s goal.
Level 2 – Man the Fort
Restock 3 inhalers.
Oliver Location: At the inner corner of the desk with the checkout monitor.
Inhalers are a new item in the ward today. Some children who sit in the examination chair will request an inhaler. Click on the inhaler on the table in the lower left corner, then click on the child to bring it to them. The maximum stock of inhalers is 3, displayed in a small circle next to the inhaler on the table. You can restock the inhalers when the number displayed reaches 2 or lower. Click on the bottom section of the tray table containing the thermometer to restock the inhalers. Restock the inhalers a total of 3 times to complete today’s goal.
Tip! Restock the inhalers as soon as the number drops below 3. This is your best chance for easily reaching the number of restocks required for today’s goal.
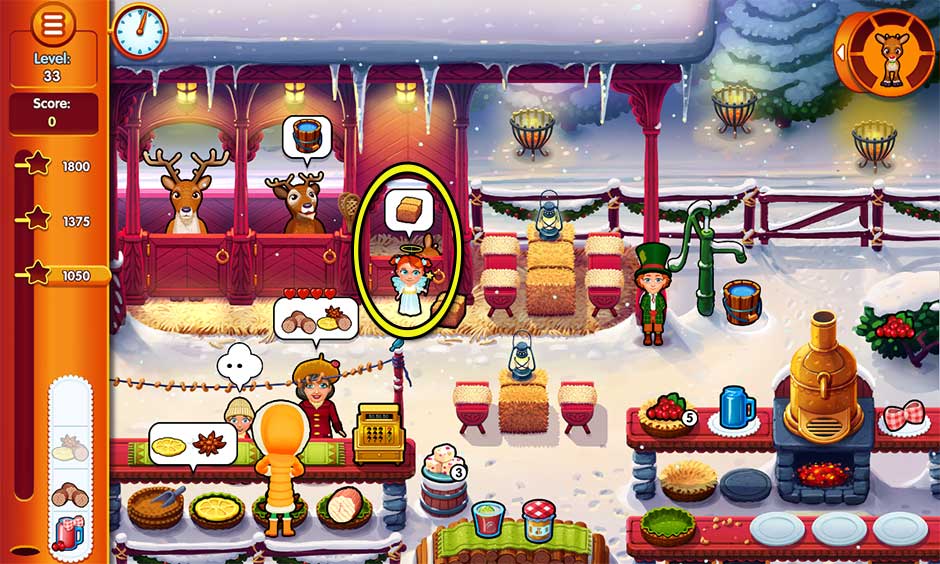
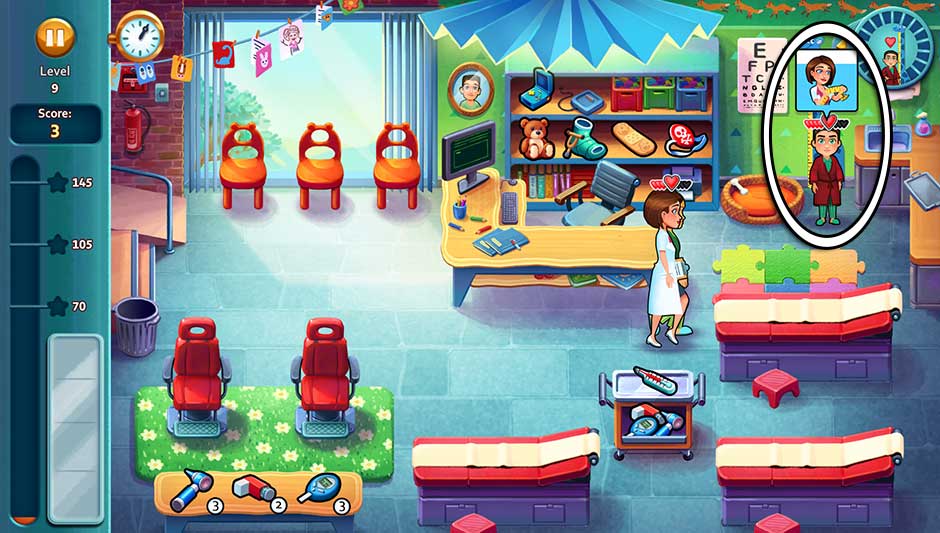
Level 3 – Plenty to Think About
Make 3 checkout combos.
Oliver Location: Behind the center tray table with the thermometer.
A checkout combo is when you checkout 2 or more patients at the checkout monitor. Checkout patients in groups of 2 today for the best results. If a patient is already waiting at the checkout monitor, don’t worry. The hearts shown above their head indicates how happy they are. Hearts will not begin to deplete until several seconds have passed, allowing you plenty of time to treat other patients and them make their way to the checkout monitor. Make a total of 3 checkout combos to complete today’s goal.
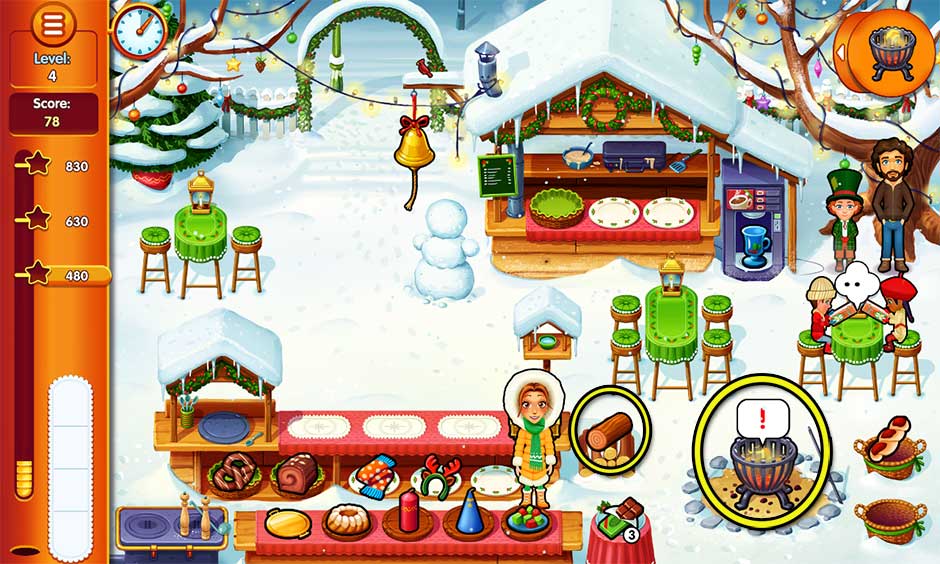
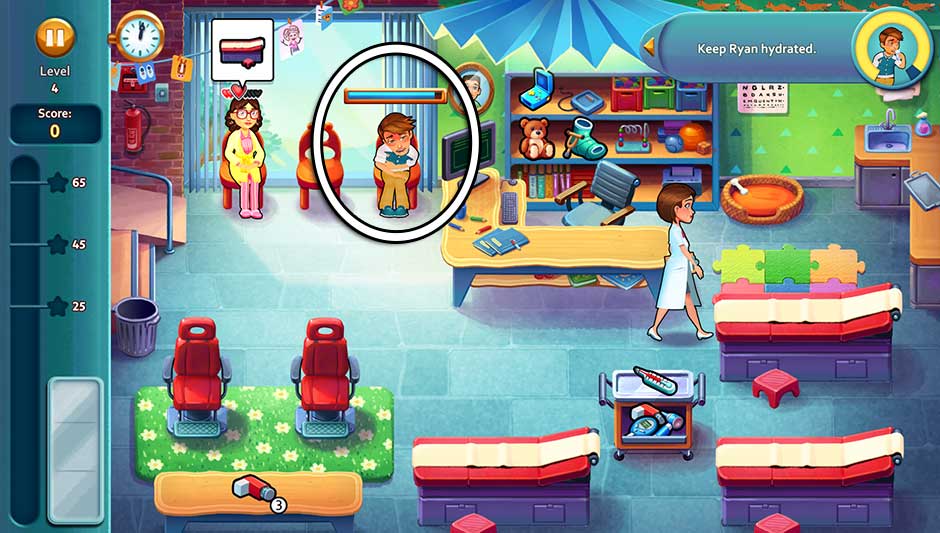
Level 4 – Trouble in Paradise
Keep Ryan hydrated.
Oliver Location: In the sink in the upper right corner.
New arrival Ryan is sitting in the rightmost waiting chair. A bar will appear over his head that slowly empties over time. Click on Ryan to rehydrate him. Each time you do this, the bar will refill. You can rehydrate Ryan as often as you like. Keep Ryan hydrated until the last patient leaves to complete today’s goal.
Tip! Try rehydrating Ryan between treating patients, or click on him once the bar over his head is half-empty for the best results.
![Heart's Medicine - Hospital Heat - Level 4]()
Heart’s Medicine – Hospital Heat – Level 4
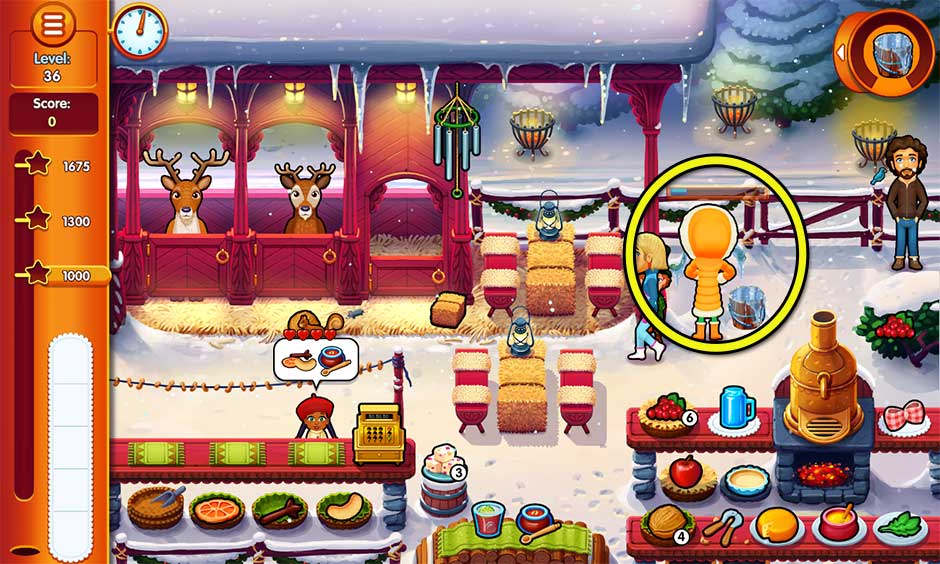
Level 5 – Complications
Get 24 quick time bonuses.
Oliver Location: Behind the right side of the table in the lower left corner.
Each time you treat a patient quickly, or within a few seconds of their requesting treatment, you will earn a quick time bonus! Earn a total of 24 bonuses throughout the day. By quickly assigning patients to the correct station, or treating them before the colored indicator drains from the bubble over their head, you will earn a quick bonus. You can also obtain quick checkout bonuses, though it’s still recommended you checkout as many patients together in one group as possible.
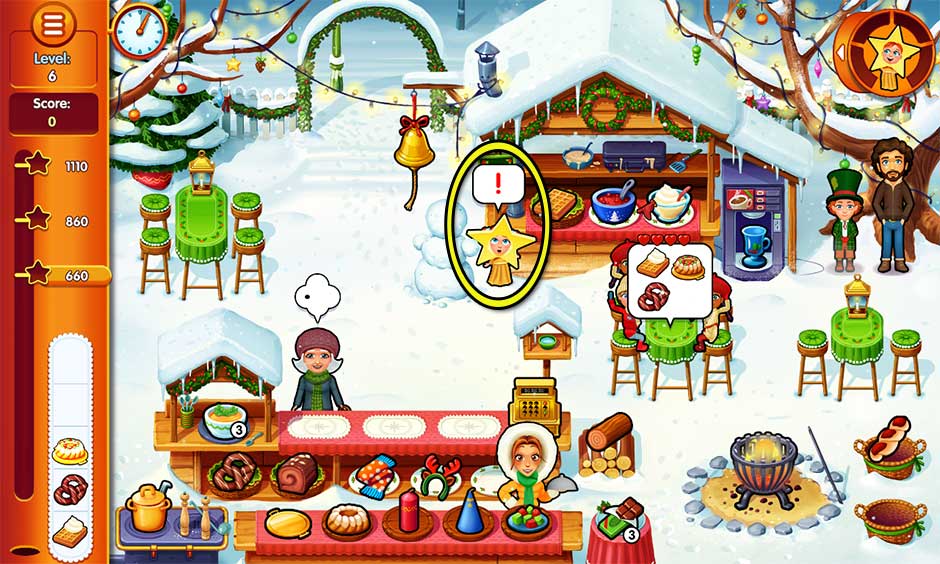
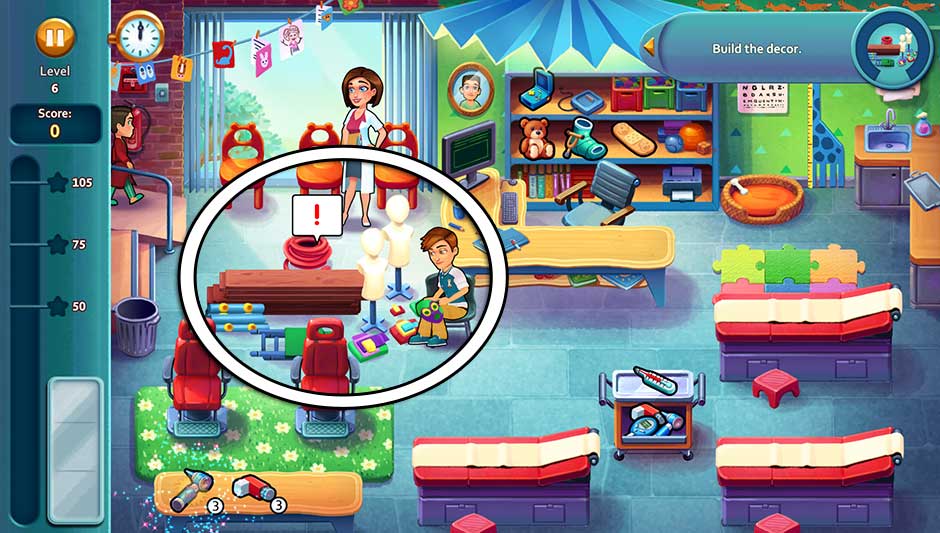
Level 6 – The Play
Build the décor.
Oliver Location: Behind the upper left corner of the stage building supplies, between the first two waiting chairs.
Help Ryan build the décor necessary for the play. At the start of the day, a “!” bubble will appear over the supplies needed. Click on the materials to begin building. Once you start building, a meter will appear showing how far along your progress is. Once the meter has been completely filled, you will complete the challenge. Do your best and focus on building the décor every spare moment you have between treating patients.
Tip! Allison can continue working on building the décor while assigning patients. If a patient is moving to a station, use the opportunity to keep building.
![Heart's Medicine - Hospital Heat - Level 6]()
Heart’s Medicine – Hospital Heat – Level 6
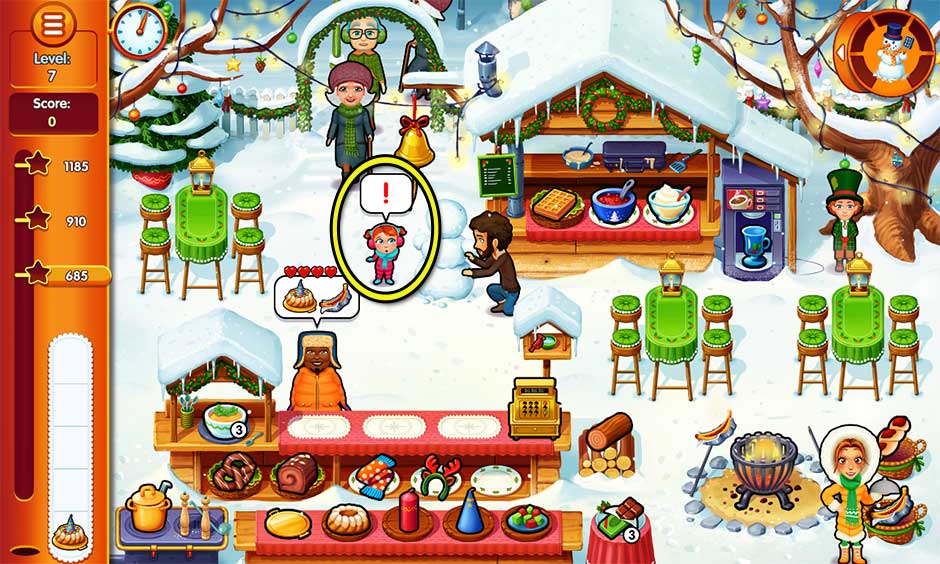
Level 7 – Ryan to the Rescue
Gather all the files.
Oliver Location: Underneath the middle of the checkout desk. *Note: Oliver may be obstructed from view if 3 or more children are waiting at the checkout monitor.
Ryan will walk in with the files you need today. Every time a file is ready, Ryan will stop near the checkout monitor, and a “!” bubble will appear over his head. Click on Ryan to collect the file. Do this a total of 5 times before the end of your shift to complete today’s goal.
![Heart's Medicine - Hospital Heat - Level 7]()
Heart’s Medicine – Hospital Heat – Level 7
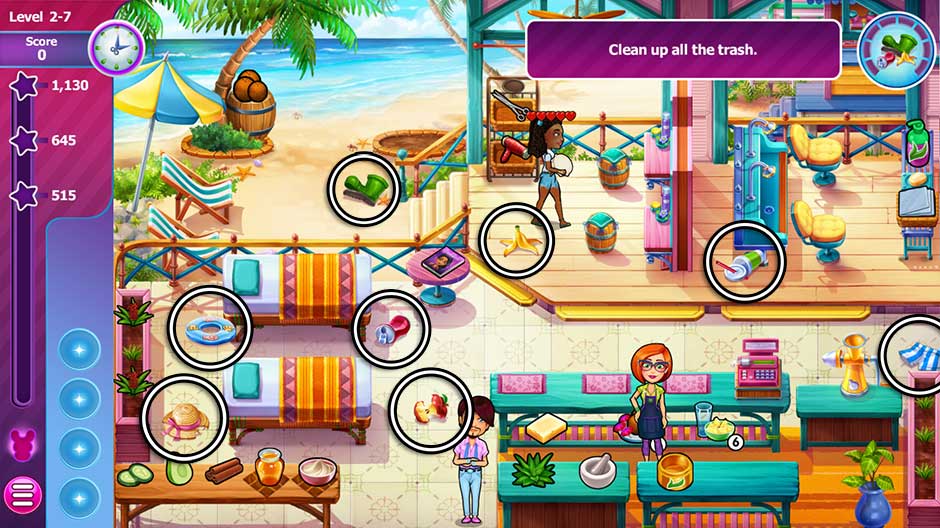
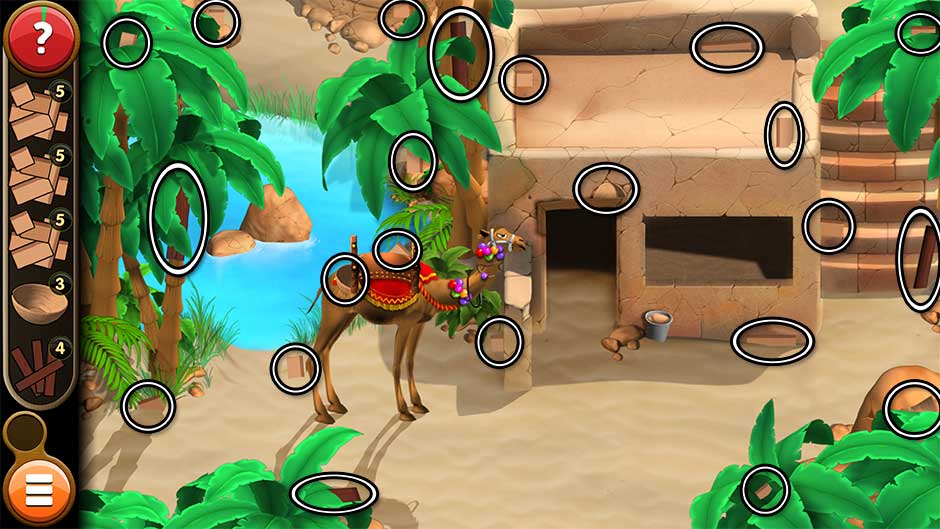
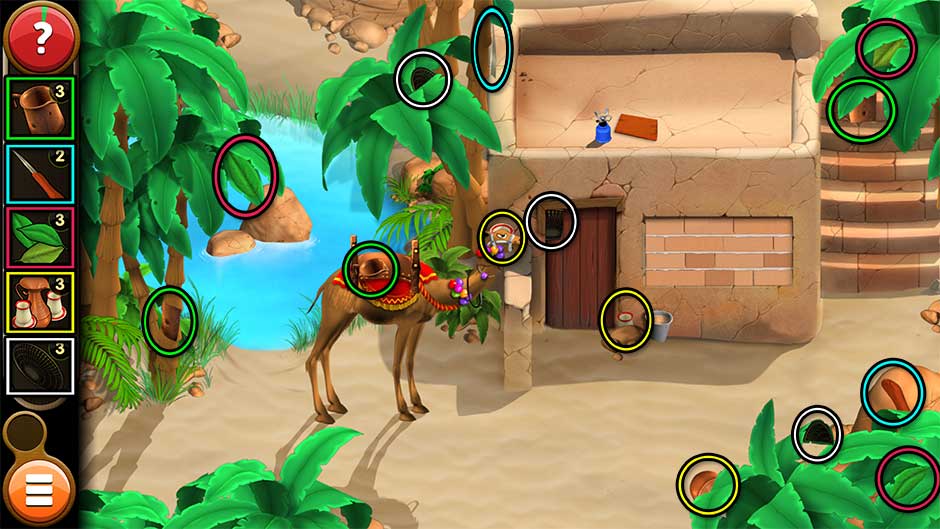
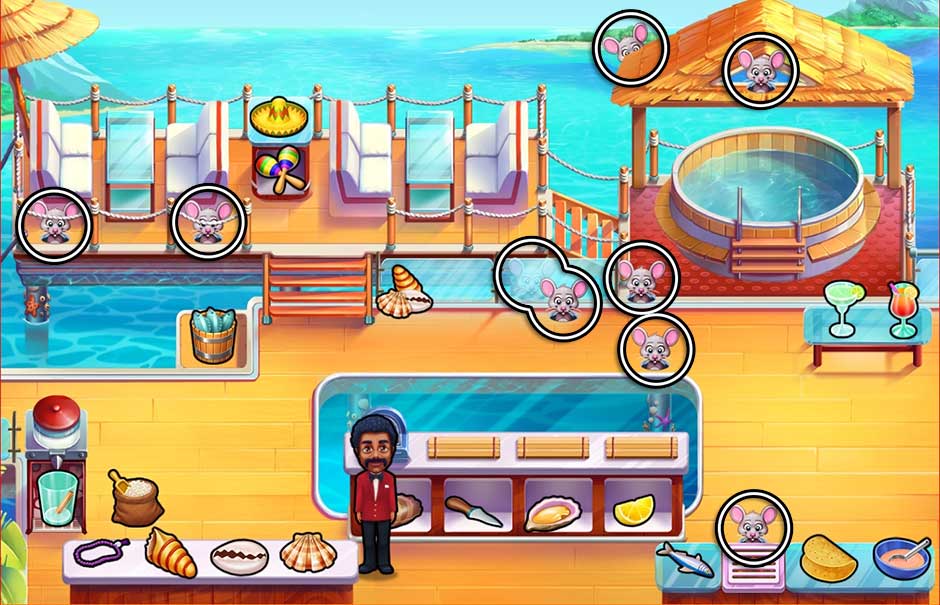
Level 8 – Mind Your Step
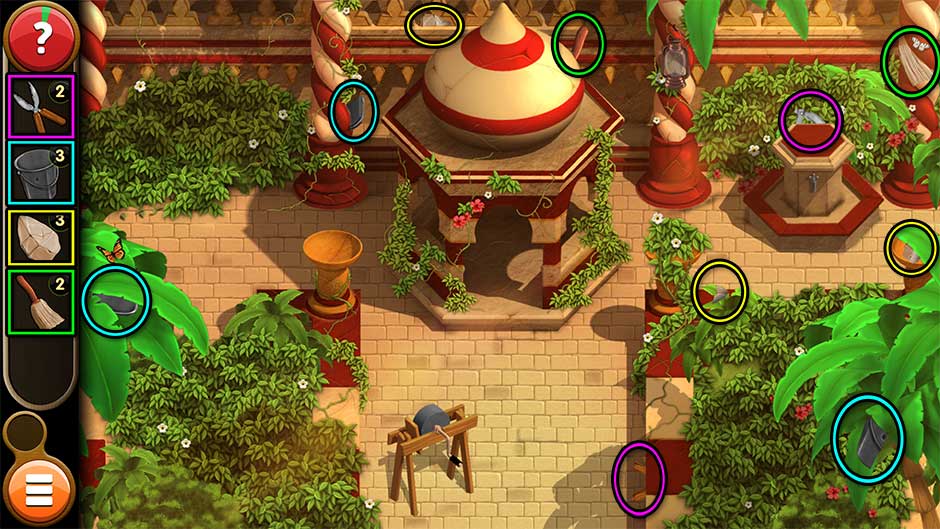
Clean up all the toys in pediatrics.
Oliver Location: On the chair behind the desk with the checkout monitor.
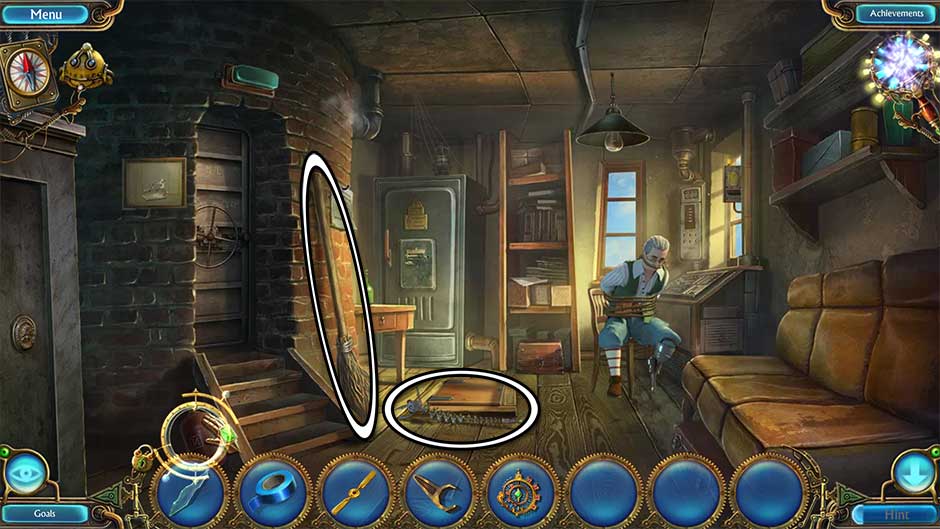
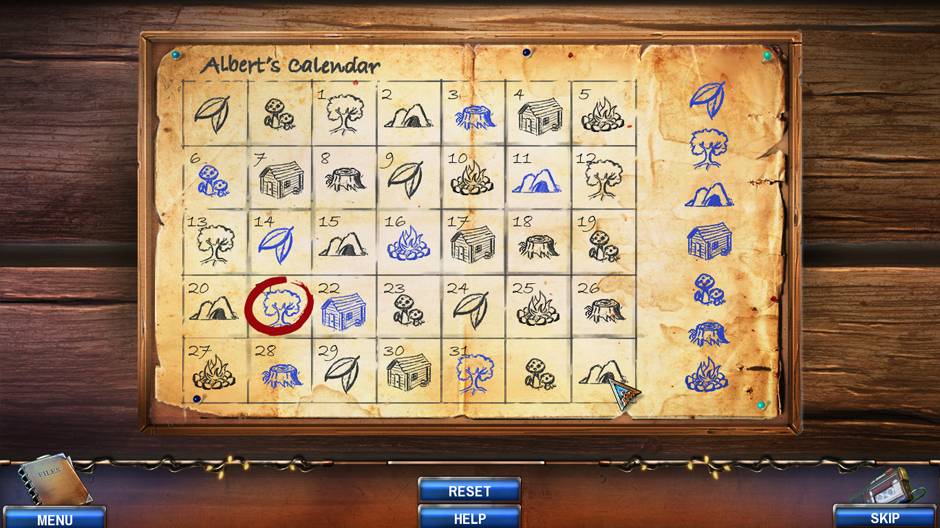
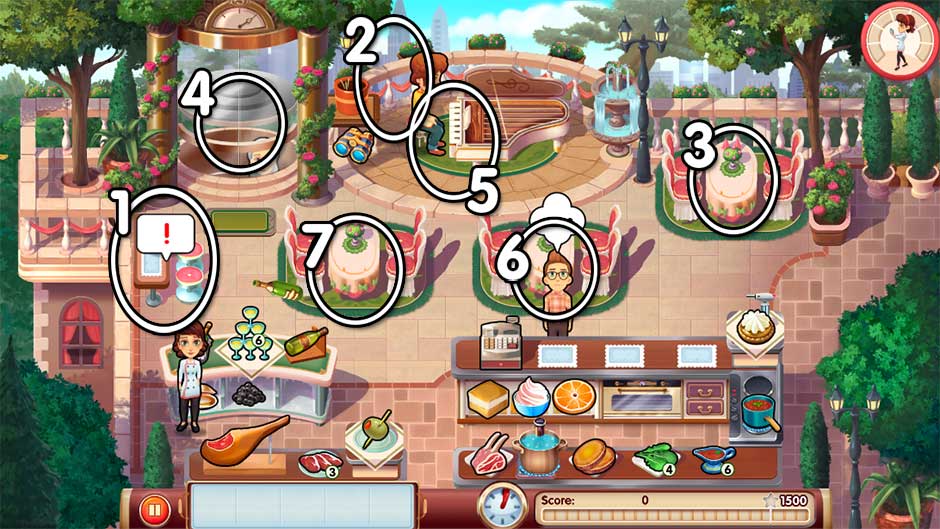
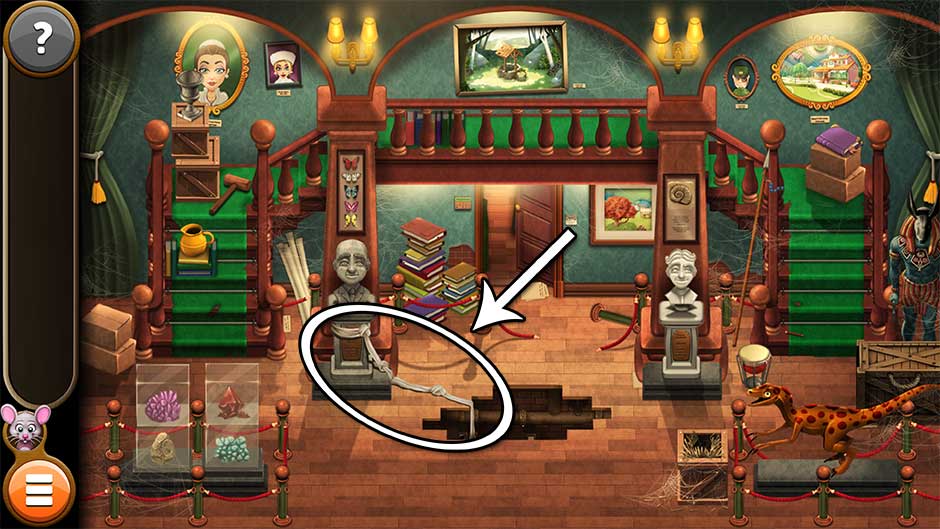
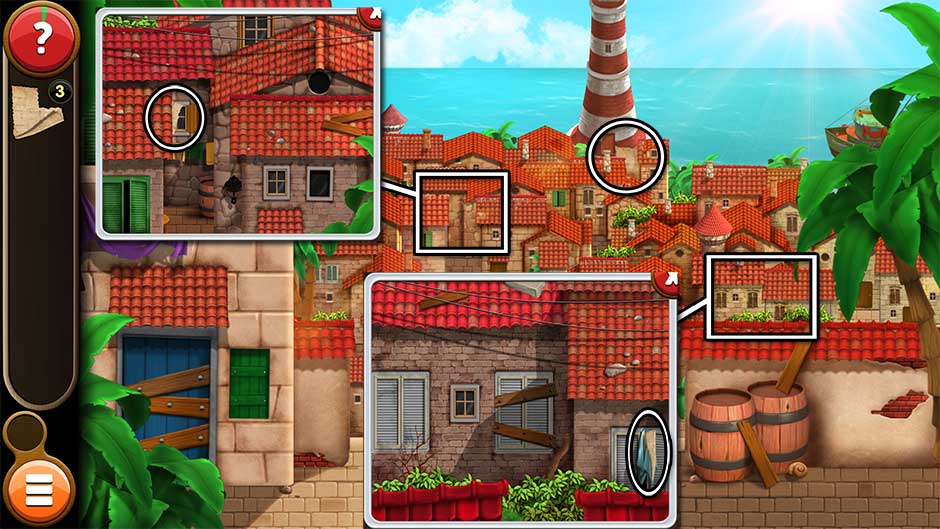
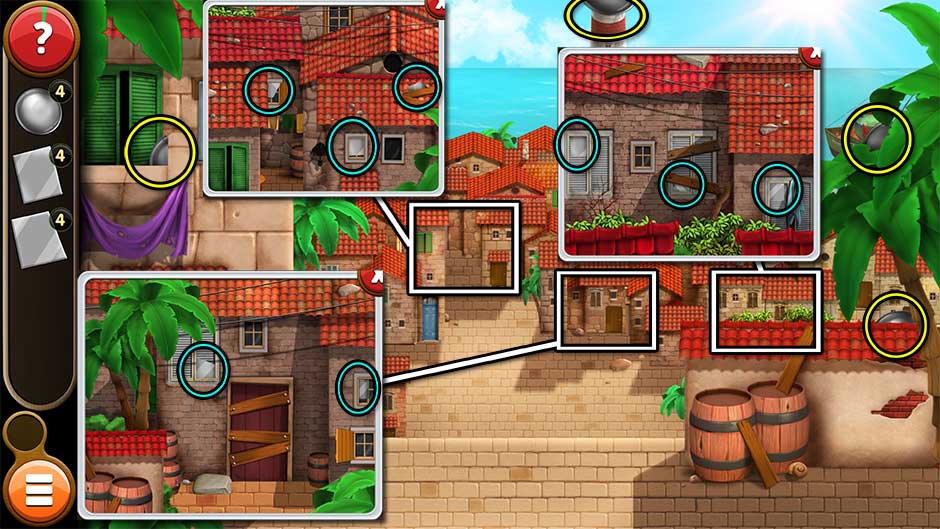
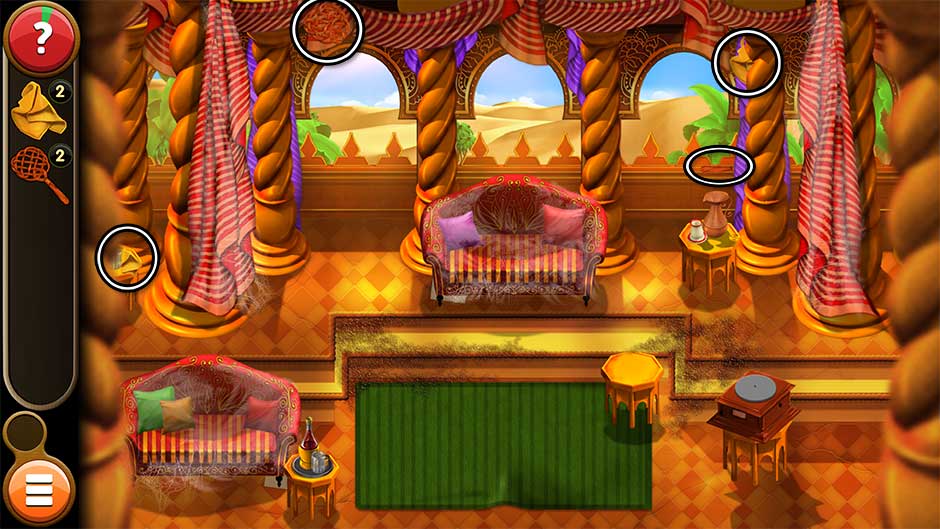
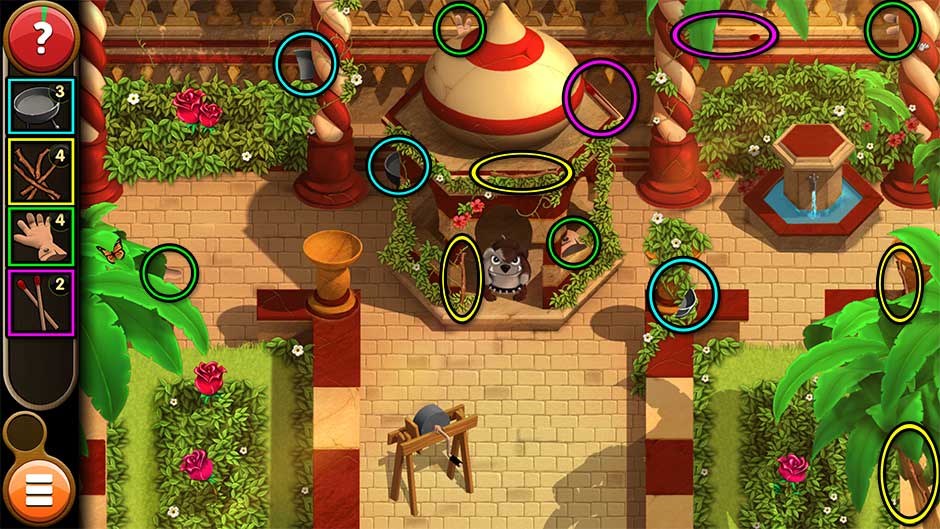
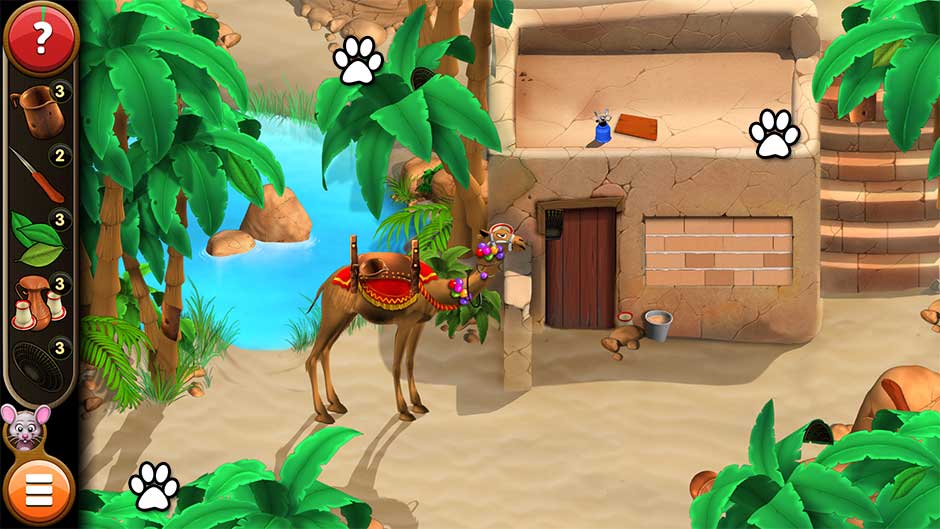
What a mess! There’s toys all over the place in pediatrics today. Clean up the toys scattered throughout the department. You will need to find a total of 8 todays before the end of the day. Their locations are pictured here:
![Heart's Medicine - Hospital Heat - Level 8]()
Heart’s Medicine – Hospital Heat – Level 8
Level 9 – Revelations
Earn 16 hearts by measuring kids.
Oliver Location: Behind the top of the checkout monitor.
Kids grow like weeds, and there’s a lot of kids to measure today! Children with the blue giraffe icon over their head will need to go to the measuring tape in the upper right corner. Once there, a new bubble will appear indicating they’re ready to be measured. Complete the minigame quickly to earn hearts. Earn a total of 16 hearts by measuring kids before the end of the day to complete your goal.
Tip! If you’re having difficulty with the measuring minigame, check out the Minigame Section of this walkthrough.
![Heart's Medicine - Hospital Heat - Level 9]()
Heart’s Medicine – Hospital Heat – Level 9
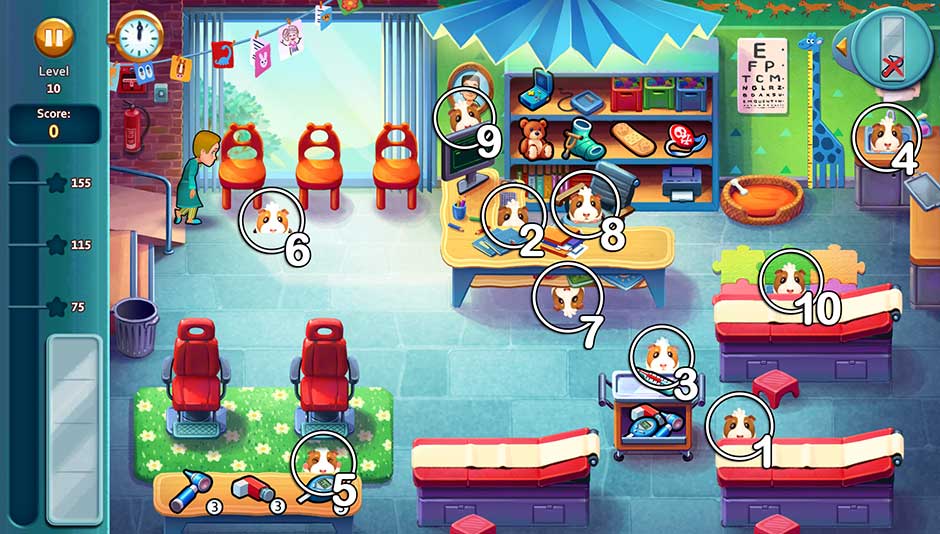
Level 10 – It Takes Some Time
Don’t delete anything from the tray.
Oliver Location: Behind the center portion of the upper right examination table.
Today requires medical perfection. Don’t remove a single item from your tray today. Click on items only as patients need them, and don’t hesitate to take an extra moment where necessary. If you can get through the day without deleting a single item off your tray, you will earn a diamond for your efforts.
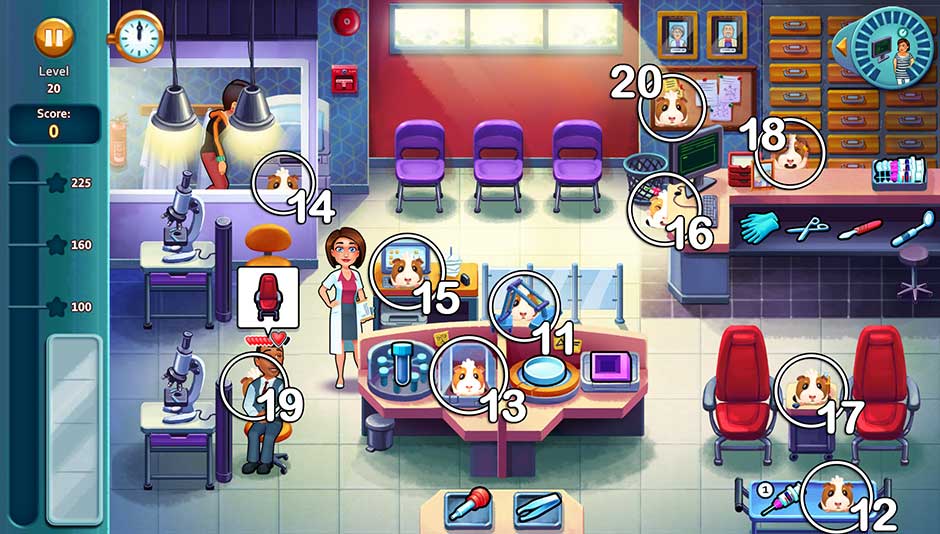
Chapter 2 – Pathology
Ah, that new-department smell! Pathology features levels 11 – 20.
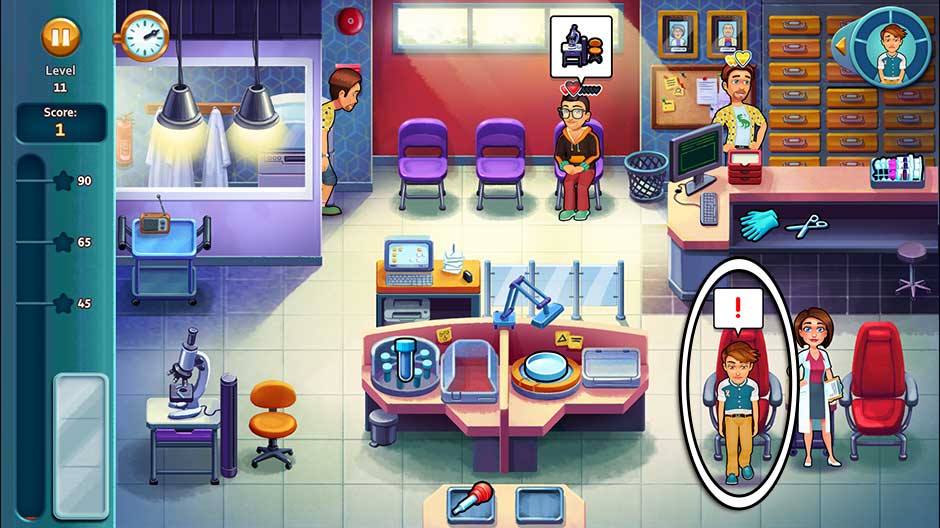
Level 11 – Under Stress
Make sure Ryan stays in for observation.
Oliver Location: Underneath the desk lamp on the divider of the center pathology station.
Ryan will try to sneak off several times over the course of your shift. While trying to sneak out, a “!” bubble will appear over his head. Click on Ryan before he exits Pathology. Successfully prevent his escape 4 times to complete today’s goal.
Tip! Prepare a blood sample and petri dish and keep them on your tray. Having one of each will leave you with 1 slot for additional items as needed. By having the samples on your tray ahead of time, you’ll save time when serving customers. As soon as you give the sample from your tray to a patient, immediately start preparation of another of the same sample, then add that to your tray once it’s done preparing.
Tip! The center station can handle multiple customers at a time. Use this to your advantage!
Tip! You cannot assign patients to stations while Allison is confronting Ryan. Additionally, the color will continue to drain from patients’ bubbles who are waiting for items as long as Allison is in the midst of talking with Ryan. Clicking on Ryan while the “!” bubble is visible while preparing an item for a patient will cause Allison to stop preparing that item. Try to only click on Ryan once Allison’s current task is complete.
![Heart's Medicine - Hospital Heat - Level 11]()
Heart’s Medicine – Hospital Heat – Level 11
Level 12 – Time to Work!
Run 5 vial tests for Ruth.
Oliver Location: On the tray in the bottom right corner, next to the IV.
Ruth needs your help running tests today. Throughout your shift, Ruth will walk in and a bubble over her head will appear displaying the item she needs. Bring Ruth the item she asks for. Do this 5 times to complete today’s goal.
Tip! Ruth will ask for blood samples, so try to keep an extra vial of blood on your tray to help move things along faster.
![Heart's Medicine - Hospital Heat - Level 12]()
Heart’s Medicine – Hospital Heat – Level 12
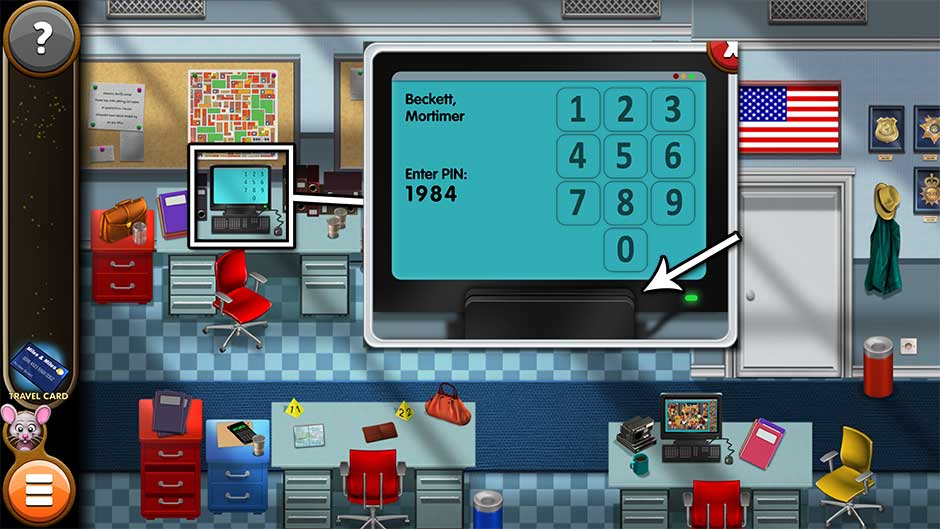
Level 13 – More Paperwork
Find the files for Victor.
Oliver Location: In the device to the right of the blood centrifuge at the center pathology station.
Find the files Victor asked for. The filing cabinet is located in the upper right corner. At the start of the day, a “!” will appear over the cabinet. Click on the cabinet to have Allison search for files. Once Allison starts searching, a meter will appear displaying her progress. Fill the bar completely before the end of the day to complete the task at hand.
Tip! Restock your needles at the start of the day, and keep a vial of blood and a petri dish sample on your tray to serve patients faster. You can also minimize clicks by swapping patients between stations.
![Heart's Medicine - Hospital Heat - Level 13]()
Heart’s Medicine – Hospital Heat – Level 13
Level 14 – No Promises
Check out 10 patients with golden hearts.
Oliver Location: In the bottom right corner of the viewing window on the left.
The quicker you help a patient, the more their hearts will grow. If you can bring a patient what they need while the color is still displayed within their request bubble, you will get bonus points. A very happy patient who’s been served within this timeframe can obtain golden hearts. These patients can wait at the register indefinitely without becoming upset! Check out 10 patients with golden hearts today.
Tip! The more hearts a patient has over their head, the more opportunities you have to obtain their golden hearts. As long as one of their hearts hasn’t drained while waiting, oftentimes you can still obtain golden hearts, even if you didn’t serve a patient within the quick bonus timeframe.
Level 15 – Are We a Match?
Complete all the tests with Ruth.
Oliver Location: On the computer keyboard at the center pathology station.
Ruth will be making several stops into the lab today. When Ruth wanders in and the “!” bubble appears over her head, click on her to have Allison complete the necessary tests with her. Do this successfully 4 times to earn today’s diamond.
![Heart's Medicine - Hospital Heat - Level 15]()
Heart’s Medicine – Hospital Heat – Level 15
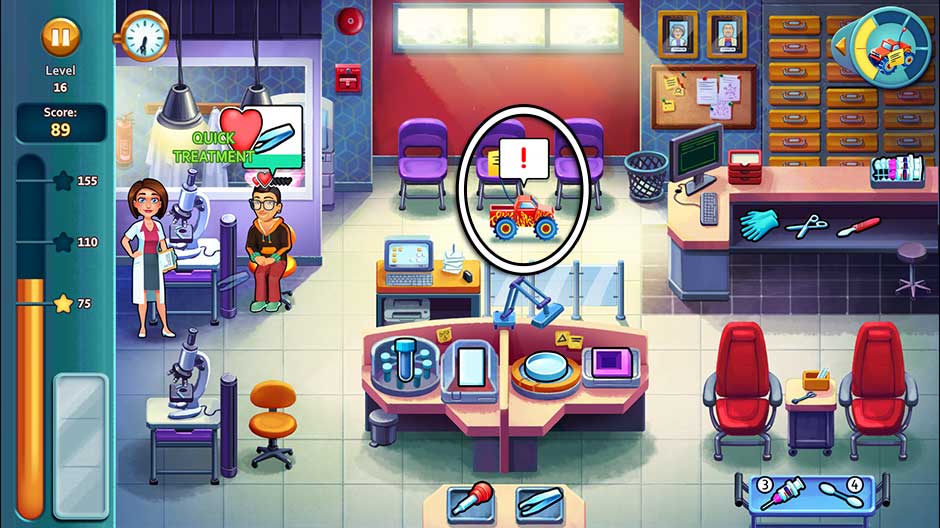
Level 16 – Message on Wheels
Collect every message.
Oliver Location: On the left side of the checkout counter, on the floor between the trash can and the monitor.
Today’s challenge is to receive all Connor’s messages. A red monster truck will drive across the top of the screen displaying a note. When the “!” bubble appears above it, click on it to have Allison collect the note. Collect 5 notes before the end of the day to complete today’s challenge.
![Heart's Medicine - Hospital Heat - Level 16]()
Heart’s Medicine – Hospital Heat – Level 16
Cutscene: Hallway Escape
This is no simple stroll through the hospital hallway! Follow Allison as she makes her escape. When in need of places to hide:
- Click the plants to hide! Click the planter on the left side of the lobby.
- Hide in the closet! Click the double-doored closet against the wall.
- Hide behind the plants! Click the plant beneath the tiger painting on the upper right.
- Hide in the broom closet! Click on the green door.
Level 17 – Heavy Heavy
Have a maximum of 1 item on your tray at any time.
Oliver Location: On the center table between the two patient chairs in the lower right corner.
Today’s challenge requires you to have a maximum of only 1 item on your tray at any time. If multiple patients need items at the same time, you’ll need to serve them one at a time. Prioritize according to their patience. Preparing items does not count as a filling a tray slot – only picking up items.
Level 18 – Story Time
Recollect what happened that day.
Oliver Location: Behind the checkout counter, to the right of the photo frame.
Run the pathology clinic while Ruth recalls her nostalgia. There is a picture frame sitting on the checkout counter. Occasionally, a “!” bubble will appear over the picture frame. Click on the frame to recall a memory. The memory will float in the middle of the screen where you can view it. Once you’ve had an eyeful, click on the memory to dismiss it. Gameplay will pause while the memory is present. Clicking on the picture frame while the “!” is present will not interrupt any of Ruth’s current tasks.
![Heart's Medicine - Hospital Heat - Level 18]()
Heart’s Medicine – Hospital Heat – Level 18
Level 19 – Having a Bad Day
Restock 15 items.
Oliver Location: On the floor above the stool of the bottom left station with the microscope.
Restock 15 items today – specifically, the IV syringe and the Q-tips cotton swabs. A maximum number of 4 can be stocked at a time per item. You can restock these by clicking on the tray on the right side of the checkout counter. Serving patients normally won’t be enough, however. To complete today’s challenge, you’ll need to add extra IVs or cotton swabs to your tray to deplete the number available. Click on the container to restock, then click on the excess items on your tray you don’t need to remove them.
Tip! If you have extra time near the start of the day, use the strategy above. You can complete the goal much earlier in the day this way.
Level 20 – Decisions Have to be Made
Get 20 quick checkout bonuses.
Oliver Location: In the bottom left corner of the bulletin board above the checkout monitor.
Today’s all about fast checkouts. Obtain checkout bonuses by clicking on the checkout monitor and checking out a patient within a few seconds of their arriving at the counter. You will need to do this quickly, so no group checkouts today! Checkout 20 customers within a few seconds of their arriving at the counter to complete today’s challenge.
Tip! The more hearts that are filled over a patient’s head, the closer they are to being ready for checkout. Once the hearts are filled and they get up from their current station, they’ll head straight to the monitor. Click on the checkout monitor while they’re making their way over to guarantee a quick bonus while also saving time!
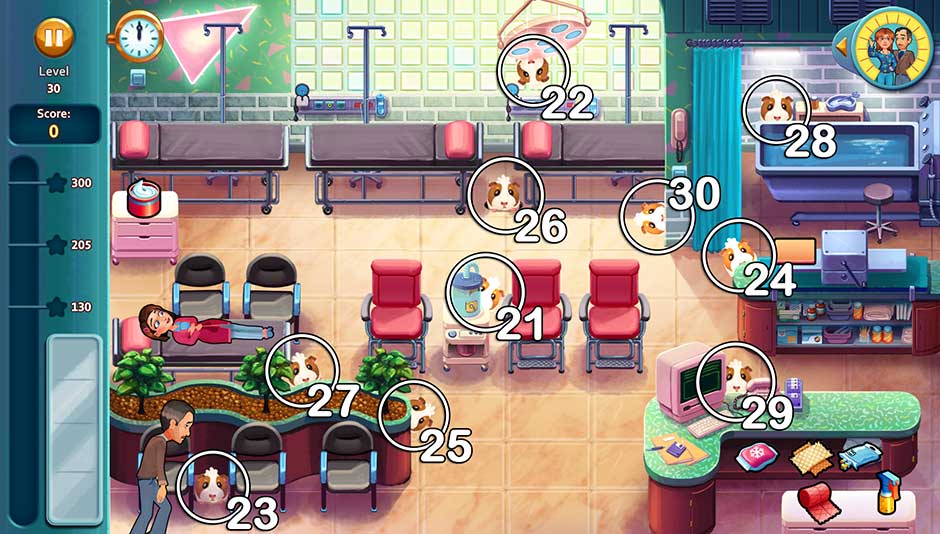
Chapter 3 – Burn-Unit
Don’t get burned by Victor’s scathing remarks! The burn unit features levels 21 – 30.
Level 21 – Good Beginnings
Earn a gold star in the first half of your shift.
Oliver Location: Peeking around the right side of the tank on the table between the two chairs, in the center of the room.
Earn a gold star by the halfway point of your shift. If you can treat your first 5 patients quickly and check them out at the register at the same time in a combo, you can make the halfway deadline near-perfectly.
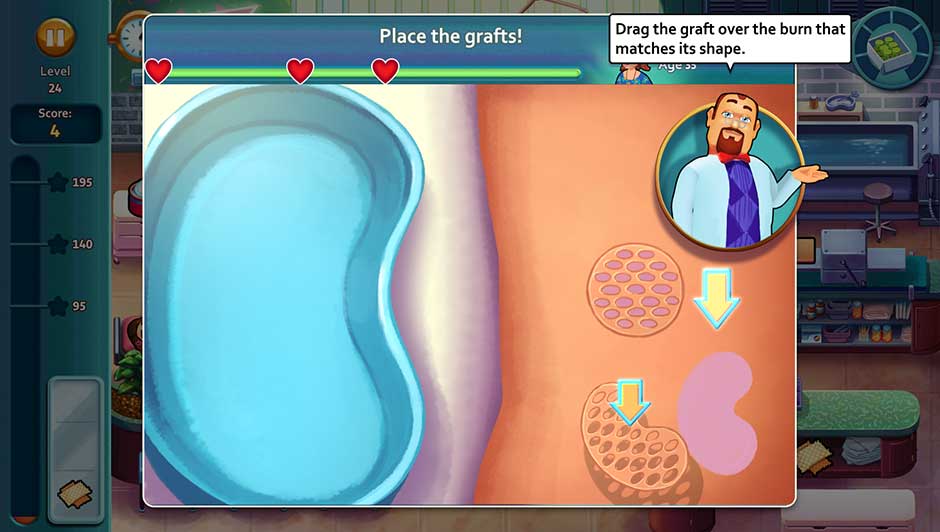
Tip! Keep a set of bandages from under the checkout counter on your tray. This will minimize the amount of time needed for picking them up while moving back and forth. This strategy is useful for nearly all days you will be spending in the burn unit.
Level 22 – Time to Heal
Complete all treatments on Allison and Mathilda.
Oliver Location: Hanging upside-down from the surgical light above the rightmost gurney.
Two very important patients are in the burn unit today. Treat Allison and Mathilda throughout the day. They will be located exclusively on the left side of the screen, and a bubble will pop up whenever they need treatment. Click on them to administer the treatment. Complete 10 treatments before the last patient leaves for the day to earn this level’s diamond.
![Heart's Medicine - Hospital Heat - Level 22]()
Heart’s Medicine – Hospital Heat – Level 22
Level 23 – Worry
Don’t let any patients leave with fewer than 4 hearts.
Oliver Location: Between the first and second waiting chairs in the lower left corner.
Today is all about managing your patients. Treat patients as quickly as possible. Quick bonuses will raise the number of hearts a patient receives from treatment. Remember gold-hearted patients will happily wait at the register indefinitely, so focus on patients whose hearts are still red.
Tip! Not all patients have the same number of hearts. Put extra priority on treating patients who enter the clinic with fewer total hearts today.
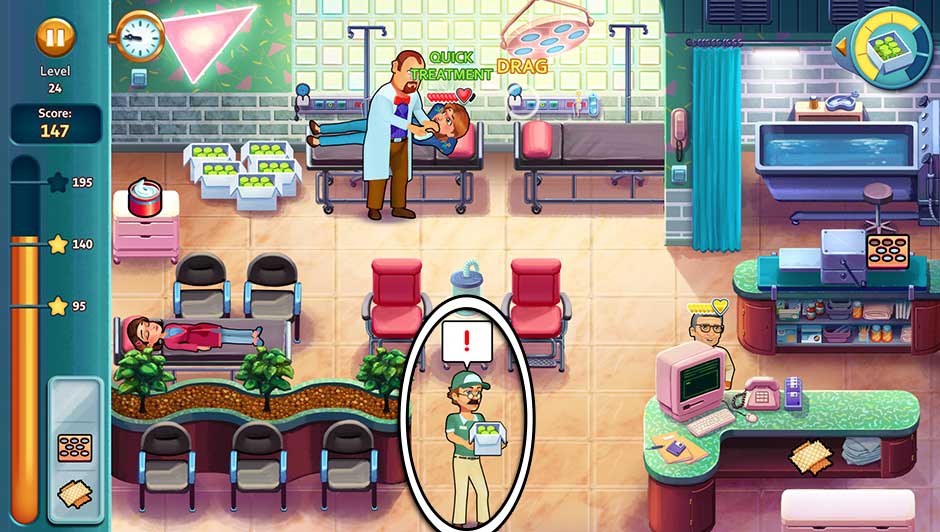
Level 24 – A Matter of Opinion
Gather all the boxes of the new cream.
Oliver Location: Peeking around the top-left side of the counter with the skin graft equipment.
Shipments of a new cream will be arriving today. Throughout the day, a delivery man will show up carrying boxes of cream. A “!” will pop up over his head whenever he’s ready for you to pick up a shipment. Click on him to pick up the box of cream. You will need to do this 6 times before day’s end to complete today’s challenge.
Tip! You can still assign patients to stations while carrying boxes, however you won’t be able to treat them until the box you’re carrying has been set aside.
![Heart's Medicine - Hospital Heat - Level 24]()
Heart’s Medicine – Hospital Heat – Level 24
Level 25 – Sleep Now
Don’t walk more than 500 steps.
Oliver Location: Peeking around the right side of the island behind the waiting chairs.
Don’t walk more than 500 steps today. This is perhaps one of the most difficult levels you will play through. Keeping extra items on your tray is a must to minimize walking. We recommend at least keeping an extra bandage on your tray, though a bandage, pot of cream, and skin graft are ideal. Treat patients in clusters whenever possible to minimize walking, and try to pick up multiple items from the same location as circumstance allows. Remember, it’s better for a patient to lose a heart waiting so you can treat them in a cluster rather than walking extra steps across the clinic.
Tip! Only check out patients in groups today. If you need to pick up a cold compress or bandage, feel free to check out patients while you’re at it. Otherwise, only check them out in groups of 5 or more.
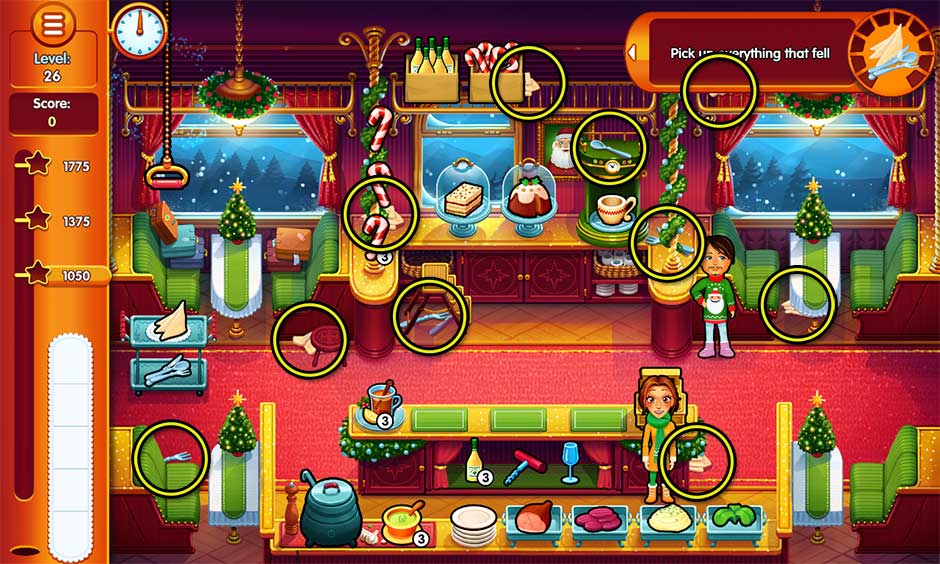
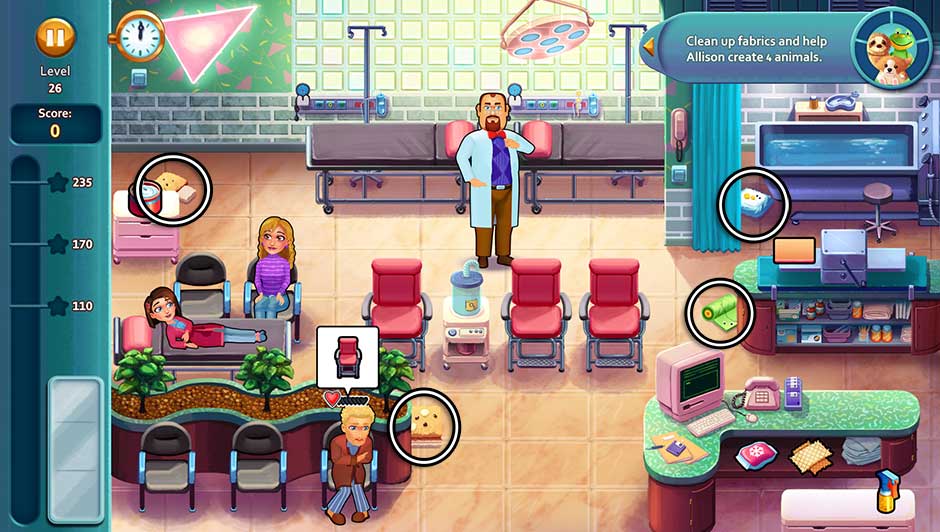
Level 26 – Crafts
Clean up fabrics and help Allison create 4 animals.
Oliver Location: On the floor between the gurneys.
Today’s challenge is a little tricky. A total of 4 pieces necessary to make stuffed animals have been scattered throughout the room. Mathilda will not ask for these materials to start today’s challenge. Instead, as soon as the day begins, click on one of these 4 pieces to have Mathilda pick it up. She will then return to Allison and begin sewing. As soon as the meter that appears over her head is filled and disappears, click on the next piece of stuffing on the floor. Mathilda will pick it up and begin sewing the next animal. Repeat this process until all 4 stuffed animals have been created. Remember Mathilda will not have a “!” notification, so you’ll need to keep an eye on her today.
Tip! If your shift has ended and Mathilda is still sewing, there’s a trick you can use to buy yourself extra time. Today’s challenge will not end until the last customer has left. It’s possible for your shift to have already ended and you still have time to complete the challenge. Remember, gold-hearted patients will wait at checkout indefinitely, allowing you to finish the challenge before checking them out. The challenge will only be marked as complete once the last patient leaves.
![Heart's Medicine - Hospital Heat - Level 26]()
Heart’s Medicine – Hospital Heat – Level 26
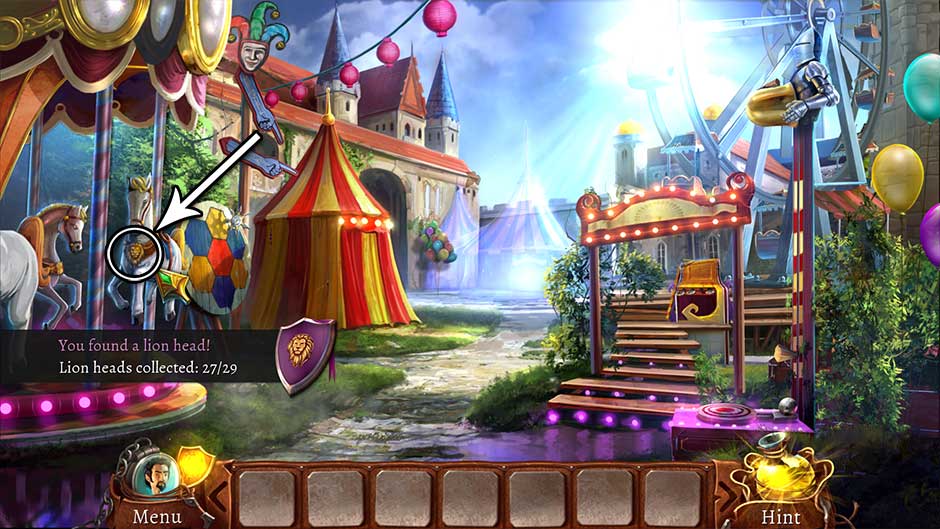
Level 27 – The Whole Truth
Check out 18 patients with gold hearts.
Oliver Location: Behind the island in the lower left corner, to the right of the center plant.
Check out 18 patients with gold hearts today. Treating patients quickly is essential to increasing their hearts and earning gold hearts. Gold-hearted patients have infinite patience, allowing you to build up strong combos today.
![Heart's Medicine - Hospital Heat - Level 27]()
Heart’s Medicine – Hospital Heat – Level 27
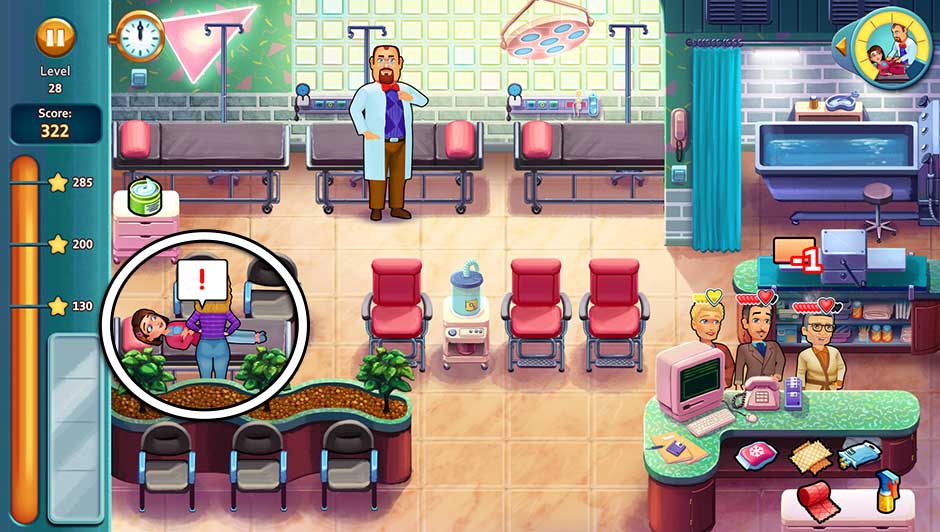
Level 28 – Mayhem
Treat Allison’s burns 8 times.
Oliver Location: Behind the upper left corner of the bath tub.
Treat Allison’s burns. Mathilda will be helping, so you don’t have to worry about treatment pulling you away from other patients. A “!” bubble will appear over Mathilda’s head whenever Allison is ready for another treatment. Click on her to have her apply the cream. Do this a total of 8 times today to complete today’s challenge.
Tip! Need extra time? It doesn’t matter if your shift has already ended. As long as you complete Allison’s treatment before the last patient leaves, you will complete today’s challenge.
![Heart's Medicine - Hospital Heat - Level 28]()
Heart’s Medicine – Hospital Heat – Level 28
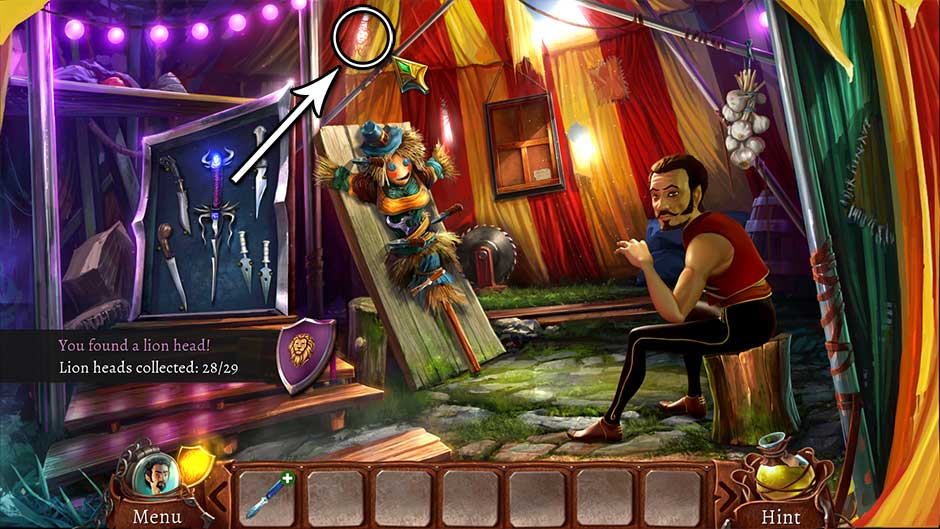
Level 29 – No End to Them…
Don’t let the waiting chairs fill up.
Oliver Location: Between the computer and the phone at the checkout counter.
Don’t let the waiting chairs fill up today. Patients will be arriving in quick succession, so it’s important to assign them to their treatment stations ASAP. Try to keep at least 2 chairs empty at all times. Keep an extra bandage on your tray and skin graft ready to speed up treatment times. The faster patients move to checkout, the faster new ones can be treated, and the less likely they’ll stack up at the waiting area.
Level 30 – Happy Ending?
Treat patients within 15 seconds of each other.
Oliver Location: Poking out from the bottom left side of the wall, between the rightmost gurney and the bath tub.
Treat all patients within 15 seconds of each other. This is an easy goal to accomplish as long as you keep an eye on the clock! A meter in the upper right corner will keep track of how long it’s been between treating patients. Do your best to always keep it in the yellow zone.
Tip! Minigames do not count. The 15-second countdown will be paused every time you play a minigame.
Tip! Checking out customers does not count as treating them. Be careful not to get carried away when checking out multiple customers at once!
Cutscene: A Day with Mom
As soon as the car starts to drive away, click repeatedly as fast as you can to run.
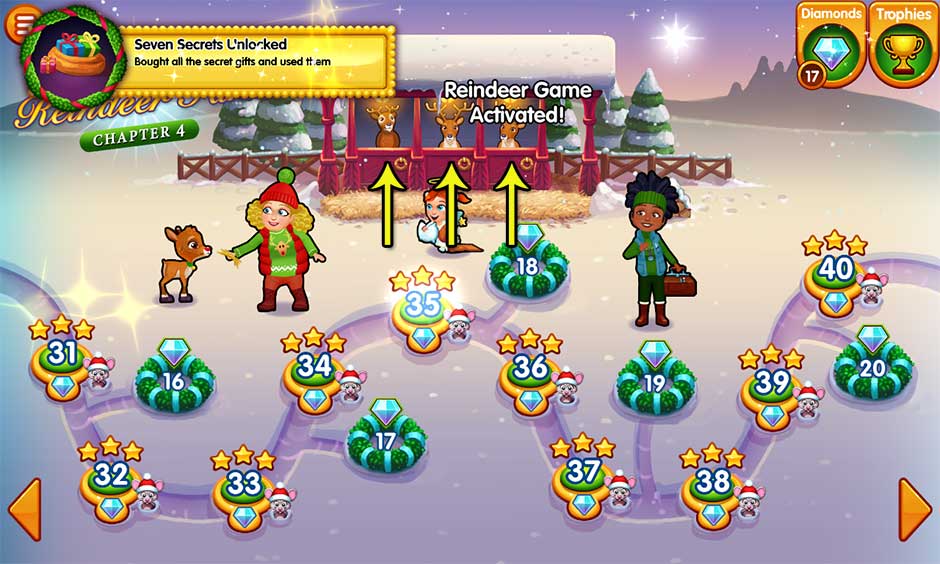
Chapter 4 – Maternity Ward
Mothers are the ultimate multi-taskers, and the maternity ward requires no less! Featuring levels 31 – 40.
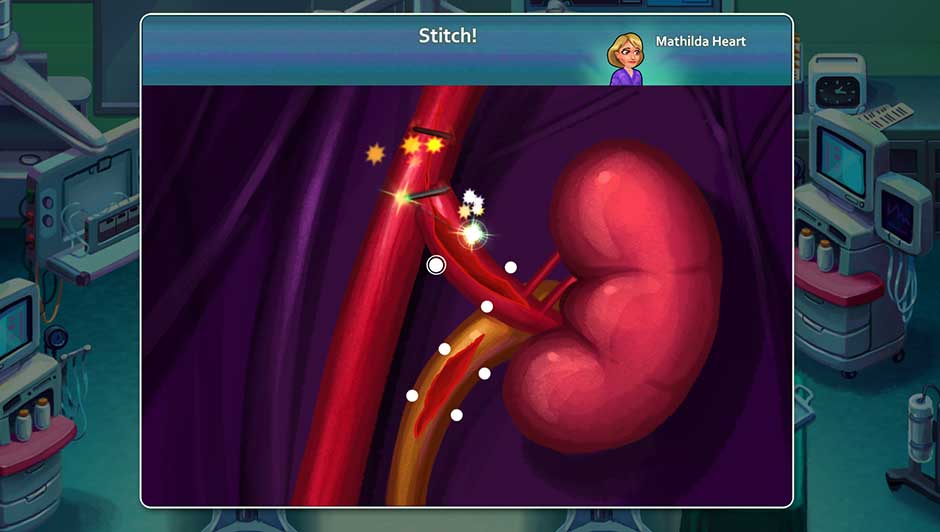
Cutscene: Kidney Transplant Operation
The first time the minigame window pops up, don’t panic! Wait a moment for things to settle down. Once things have calmed, the “Stitch!” minigame will begin. Click on the flashing white dot, then drag the stitch to the new flashing white dot directly across from it. You do not need to hold said click to complete the action.
![Kidney Transplant Operation - Stitch!]()
Kidney Transplant Operation – Stitch!
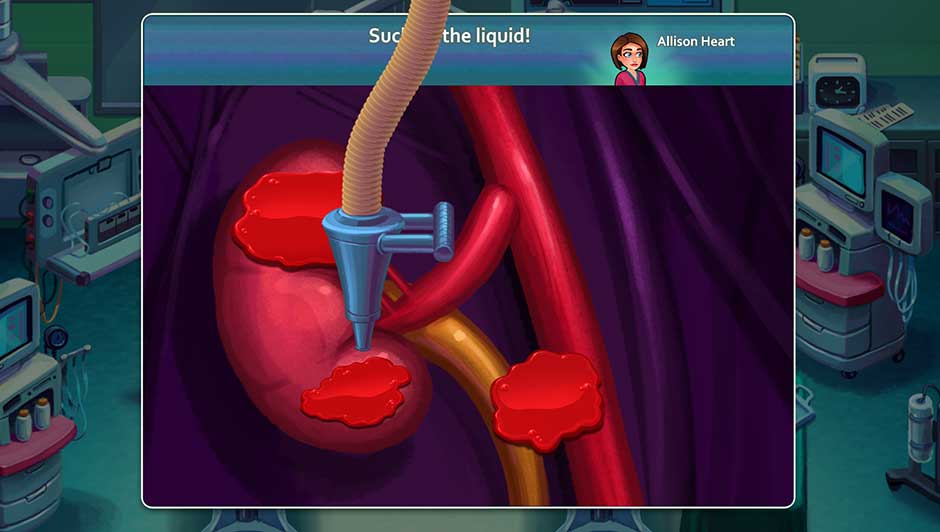
Next, you’ll encounter the minigame “Suck up the liquid!”. Click and hold to activate the nozzle and clean up the liquid puddles. If you move the nozzle back and forth over the liquid, it will be sucked up much faster.
![Kidney Transplant Operation - Suck up the liquid!]()
Kidney Transplant Operation – Suck up the liquid!
Level 31 – The Waiting Game
Complete 15 treatments in under a minute.
Oliver Location: Underneath the counter next to the blue giraffe plushes (not the checkout counter).
Complete 15 treatments in under a minute. Each step in treating a patient counts toward this total. So you don’t need to serve 15 customers, only complete 15 treatments. Keep a onesie and pair of socks duo on your tray if you need to save a little extra time. Otherwise, today should be smooth sailing.
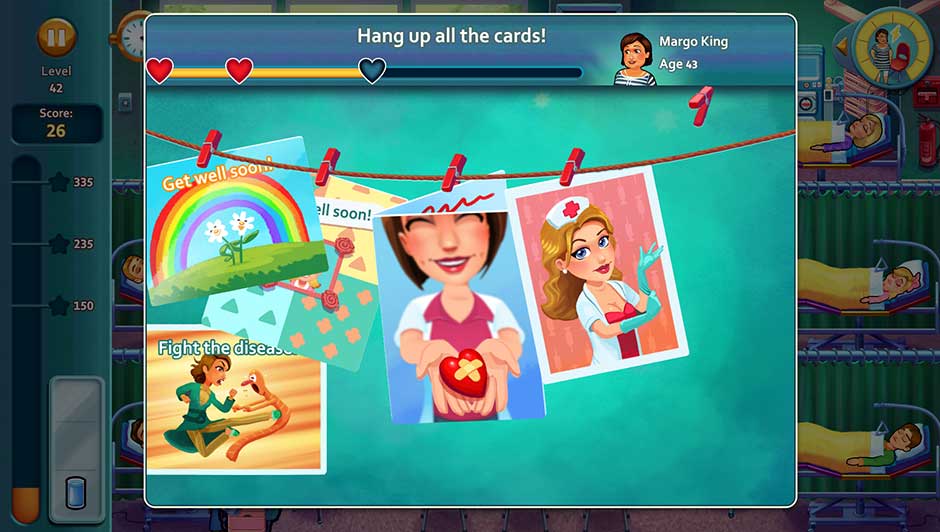
After the level ends, you will encounter a new minigame: “Hang up all the cards!”. Click and hold a card from the stack, then drag it to a red clip at the top of the screen. Once the card clips onto the string, hang the next one the same way. Repeat this until all the cards have been hung up.
![Minigame - Hang up all the cards!]()
Minigame – Hang up all the cards!
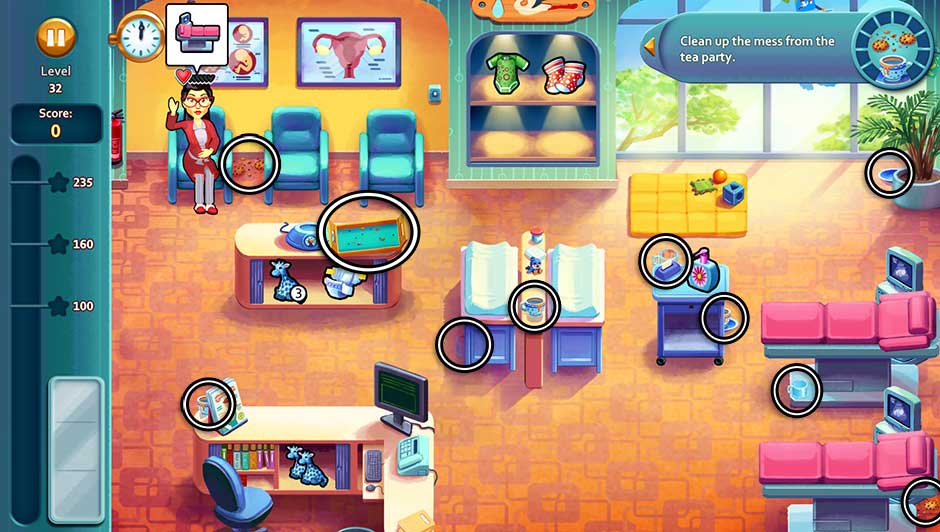
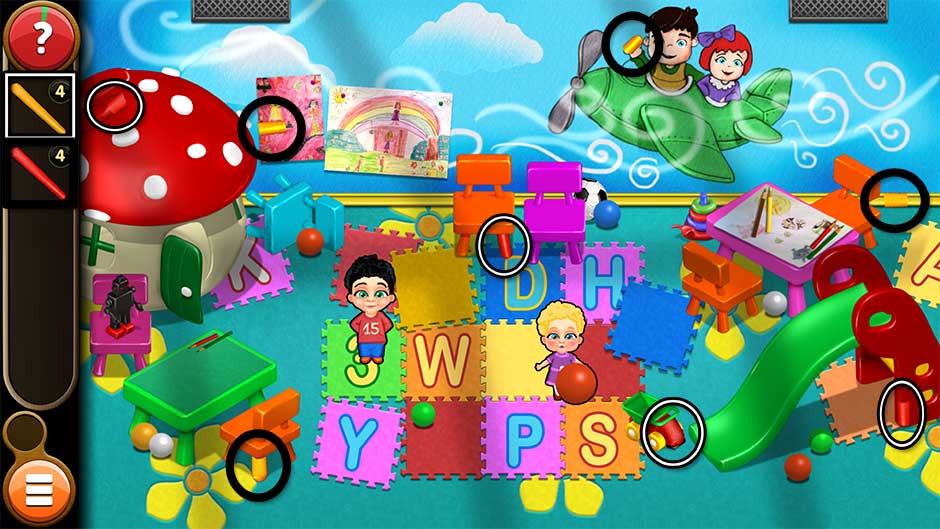
Level 32 – Messes Will Be Made
Clean up the mess from the tea party.
Oliver Location: On the upper side of the topmost examination table on the right.
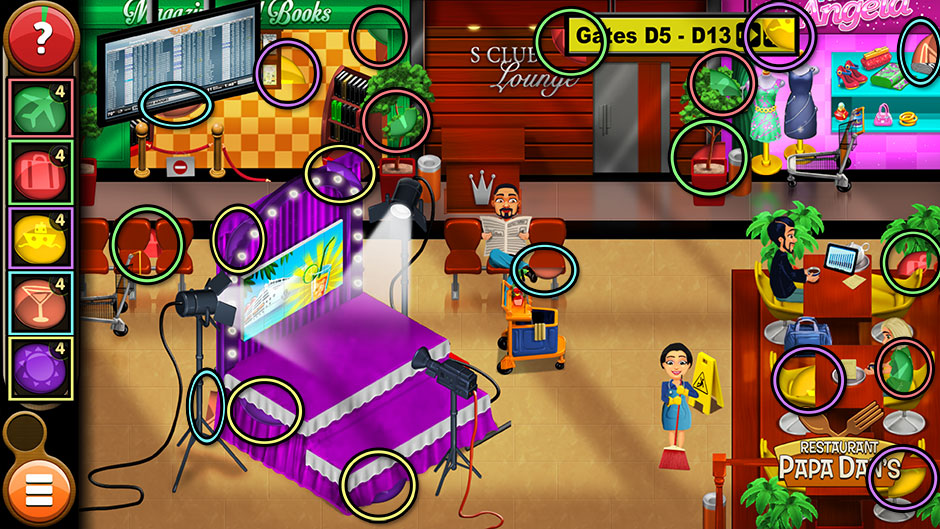
Clean up the mess from the tea party. A total of 10 items are scattered around the clinic. Locate and click on all of them before day’s end to complete today’s challenge. Their locations are shown here:
![Heart's Medicine - Hospital Heat - Level 32]()
Heart’s Medicine – Hospital Heat – Level 32
Level 33 – Good News
Walk 600 steps.
Oliver Location: Behind the checkout counter to the left of the checkout monitor.
Walk 600 or more steps today. A trick you can use to achieve this goal faster is to click on empty changing and examination tables to move back and forth whenever you’re not helping patients.
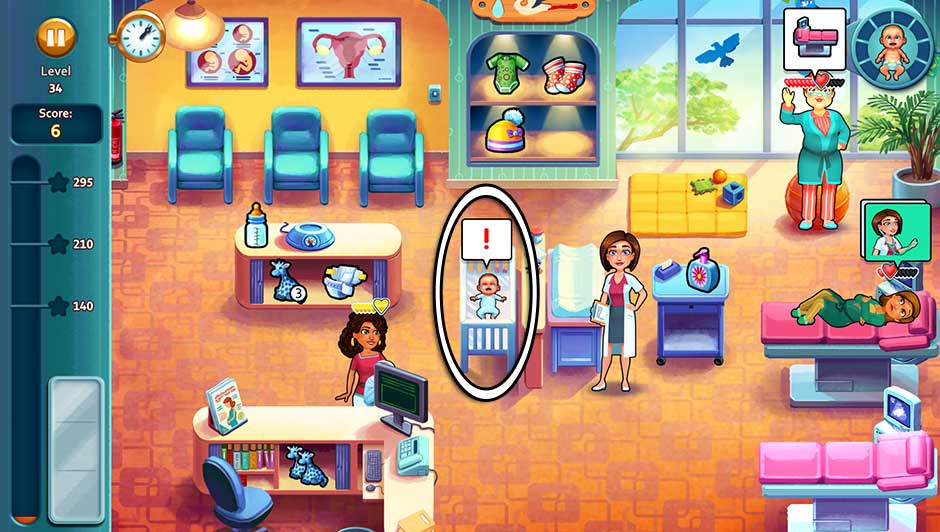
Level 34 – Peek-a-boo!
Cheer up the sad baby.
Oliver Location: Underneath the bottom of the baby crib.
Someone’s in a bad mood! A crib has replaced one of the changing tables today. A “!” bubble will appear over the baby inside whenever it’s upset. Click on the baby to cheer them up. You will need to do this a total of 8 times today. It’s very possible your shift may end before the baby has been cheered up 8 times. If this happens, don’t panic! As long as at least 1 patient is left in the clinic that hasn’t been checked out, you’ll still have time to complete today’s challenge.
Tip! One less changing table means you’ll have to help patients at the changing table faster. Keep a warmed bottle of milk on your tray at all times today. To warm a bottle of milk, click on the bottle on the counter to place it in the warmer. Once warmed, the bottle will blink. Click on the bottle to add it to your tray. An extra bottle on your tray means you’ll be able to help several customers at the changing table much faster.
![Heart's Medicine - Hospital Heat - Level 34]()
Heart’s Medicine – Hospital Heat – Level 34
Level 35 – Missing
Get at least one gold-hearted patient of each type.
Oliver Location: On the floor behind the right side of the counter with the pacifier, bottle, plush, and diapers.
There are 6 different types of customers that will come in today, and you’ll need to check out a gold-hearted version of each. Each of the 6 types has a unique appearance, and multiple of each type will come in to the clinic throughout the day. Focus on serving customers quickly, and keep an extra bottle on your tray to help you serve patients faster.
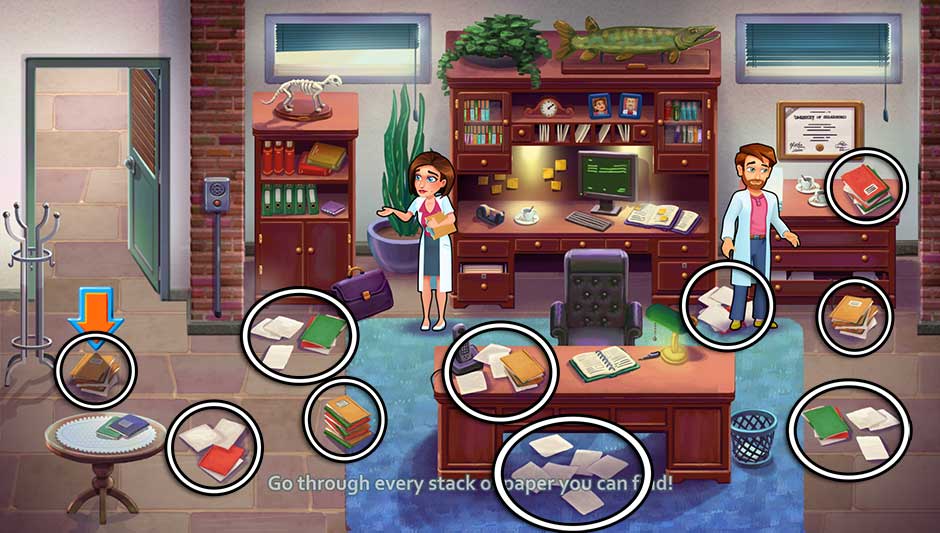
After the level ends, a cutscene will take place in Daniel’s office. Click on every stack of paper you can find to sort through it. All paper stacks you’ll need to click on are shown here:
![Go through every stack of paper you can find!]()
Go through every stack of paper you can find!
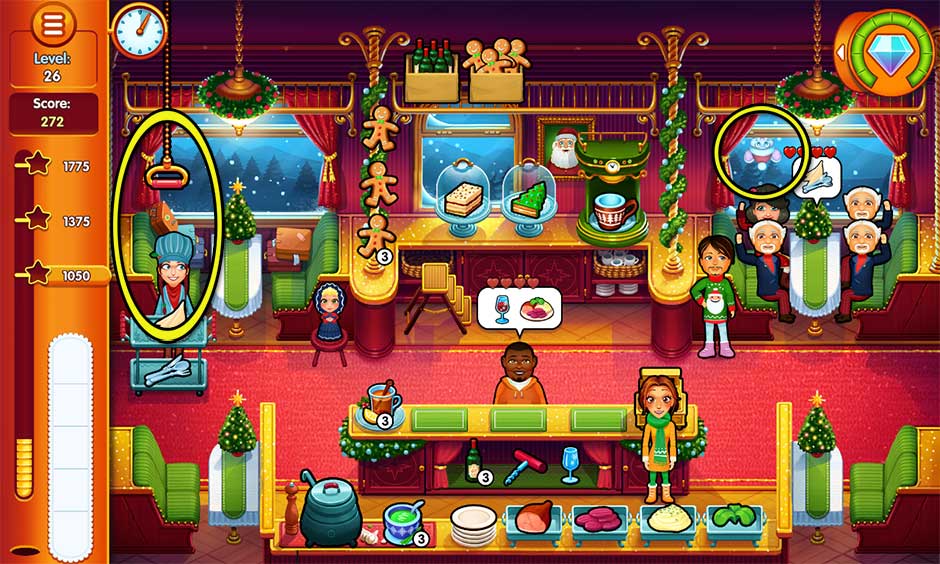
Level 36 – No Worries
Try not to fall asleep.
Oliver Location: At the top of the small monitor attached to the bottom left examination table.
Allison will start to nod off throughout the day. Each time Allison starts to fall asleep, an interactive circle will appear around her. Tap on the button in the center of the circle until it’s filled, waking her up. It’s important to tap as quickly as possible. The faster Allison wakes up, the faster she can get back to her tasks!
Tip! If Allison starts to fall asleep, it will cancel all current tasks she has lined up. You will need to click on items and patients again for her to resume her duties.
![Heart's Medicine - Hospital Heat - Level 36]()
Heart’s Medicine – Hospital Heat – Level 36
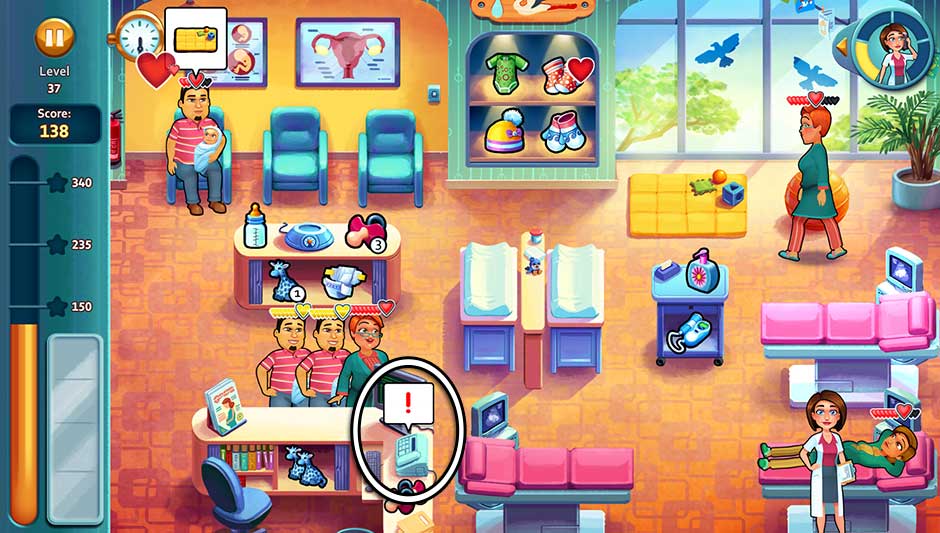
Level 37 – Hold the Phone
Make the necessary phone calls.
Oliver Location: Peeking out from the corner of the monitor and examination table in the bottom right corner.
Allison will need to make some calls today. Click on the phone at the checkout desk whenever the “!” bubble appears over it. Do this a total of 4 times before day’s end to complete the challenge.
![Heart's Medicine - Hospital Heat - Level 37]()
Heart’s Medicine – Hospital Heat – Level 37
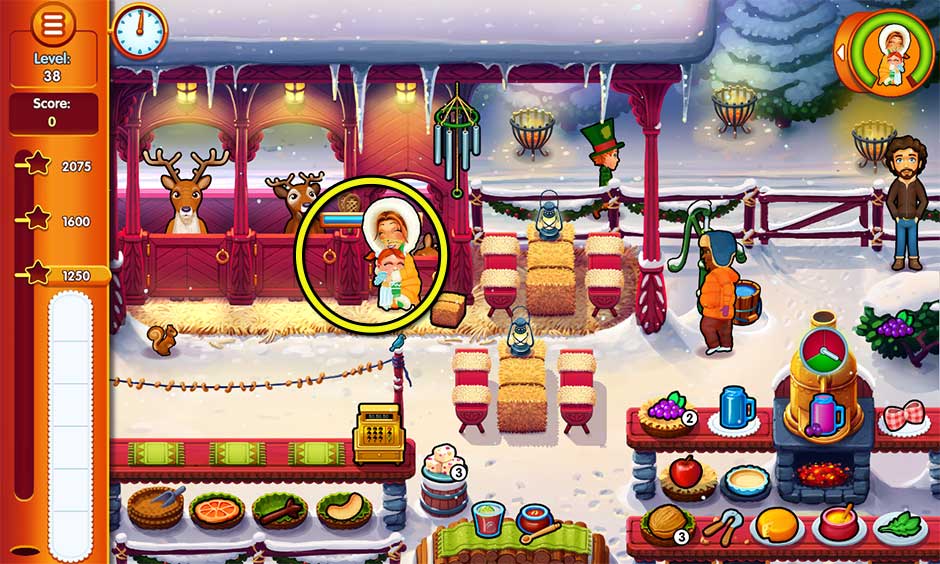
Level 38 – Motherhood
Earn 15 hearts by changing babies.
Oliver Location: Peeking out from behind the pot of the plant in the upper right corner.
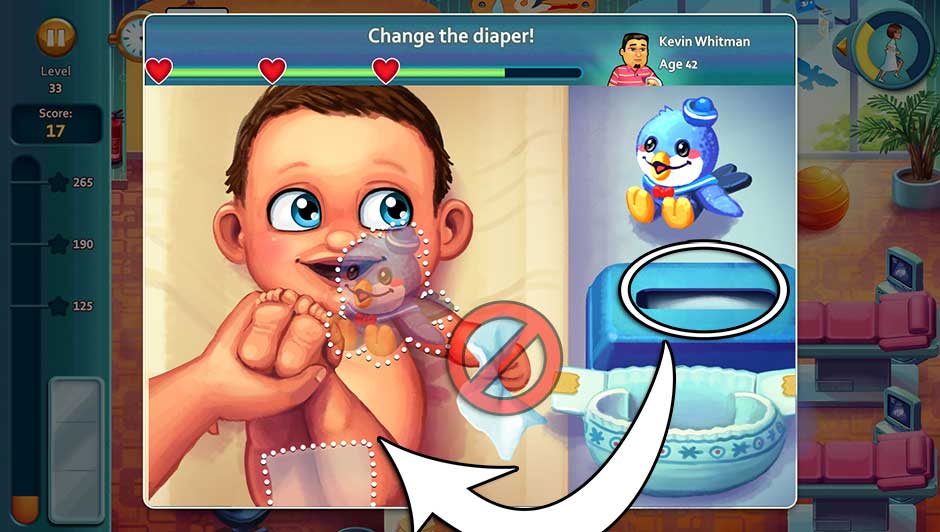
Earn 15 hearts by changing babies today. How many hearts you earn is entirely dependent on how well you do in the “Change the diaper!” minigame. You can earn up to 3 hearts per baby. If you find yourself struggling, refer to the Minigame Section of this walkthrough for more in-depth minigame strategies.
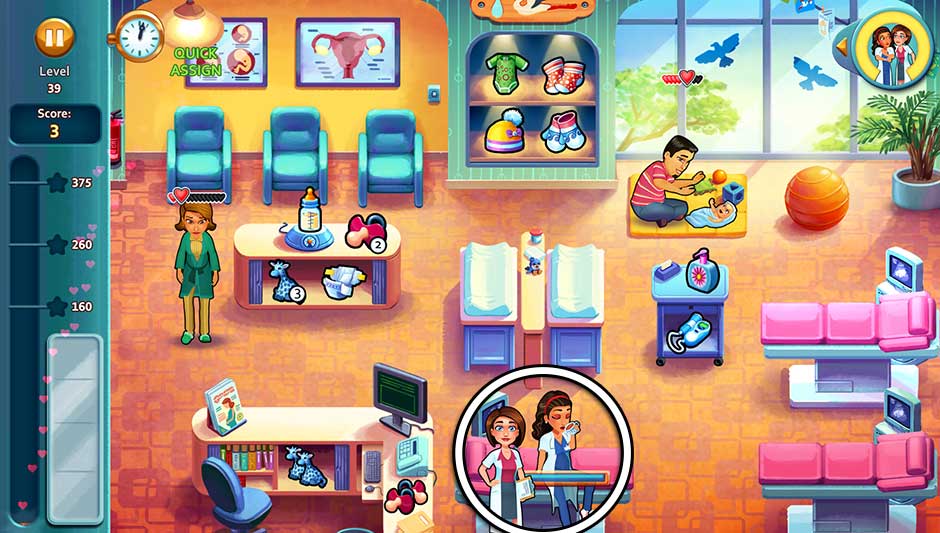
Level 39 – Look on the Bright Side
Cheer up Sophia.
Oliver Location: On the floor behind the left side of the counter containing the ultrasound lotion and scanning device.
Today’s duties include checking up on Sophia periodically. Sophia will be sitting on the examination table at the bottom center of your screen. A meter will be present showing how Sophia is currently doing. Click on Sophia to check up on her and refill the meter. The meter will continually empty throughout the day and can only be refilled by checking on her. The challenge won’t end until the last patient has been checked out. Try to check up on Sophia by the time the meter is half-empty to keep things running smoothly.
Tip! Since Sophia is sitting on the examination table, you’ll have one less to work with today. Place priority on serving the pregnant women as quickly as possible so you’ll have examination tables free for incoming women. They’ve been pregnant long enough – don’t keep them waiting!
![Heart's Medicine - Hospital Heat - Level 39]()
Heart’s Medicine – Hospital Heat – Level 39
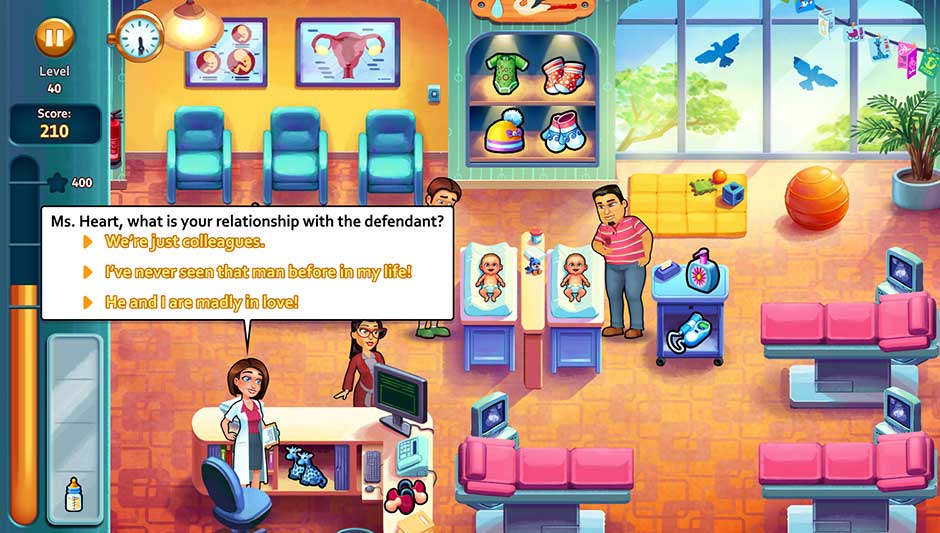
Level 40 – Living a Lie
Make up excuses for the board.
Oliver Location: In the bottom right corner of the upper left picture frame on the wall.
There’s a stack of papers on the left side of the checkout desk today. Whenever a “!” bubble appears over them, click on the papers to have Allison review them and make up an excuse. Click on the excuse you’d like Allison to use. Answer carefully! Do this a total of 5 times before day’s end to complete the challenge.
Tip! All tasks will pause while Allison is looking over the papers. This includes both the clock and customer patience, allowing you time to put thought into your answers.
![Heart's Medicine - Hospital Heat - Level 40]()
Heart’s Medicine – Hospital Heat – Level 40
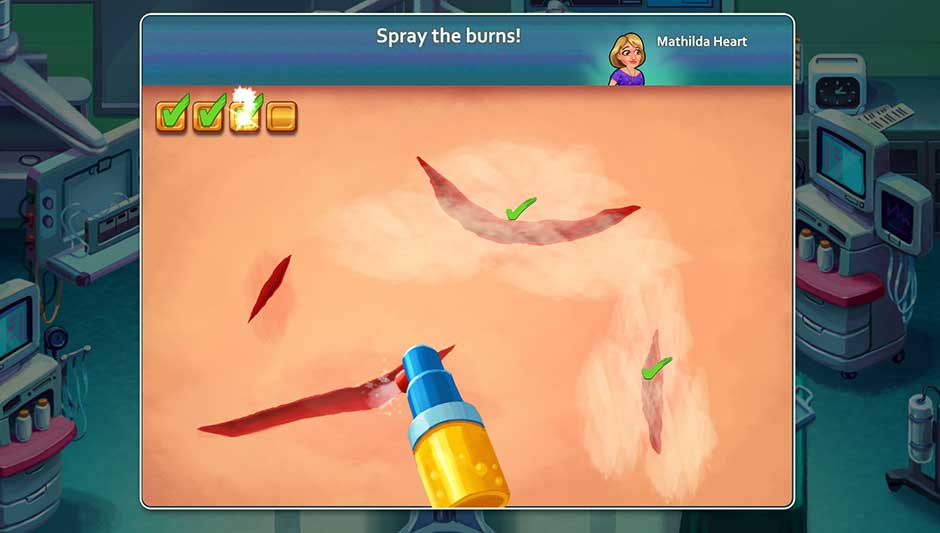
Cutscene: Car Crash Operation
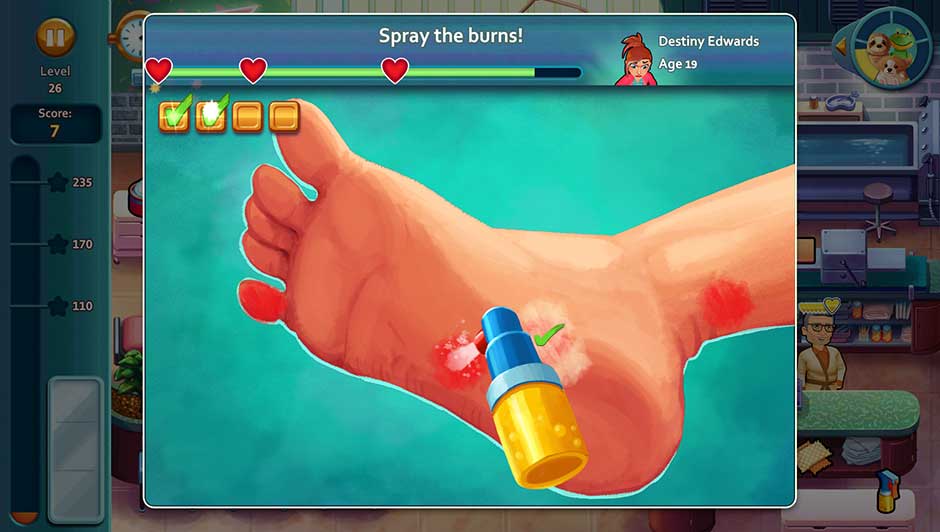
The first minigame you will encounter is “Spray the burns!”. Click on one of the lacerations to spray disinfectant over it. Repeat this process for all the wounds.
![Car Crash Operation - Spray the burns!]()
Car Crash Operation – Spray the burns!
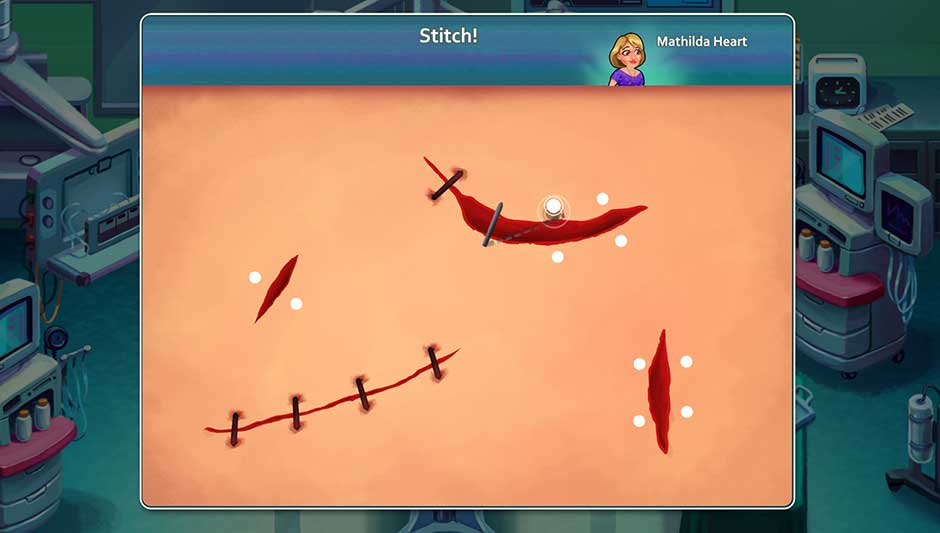
Next, you’ll need to stitch the wounds. Click on the flashing white dot to start the stitch, then drag it to the new flashing white dot. Repeat this process until all wounds have been sewn up.
![Car Crash Operation - Stitch!]()
Car Crash Operation – Stitch!
An hour later (in game-time, don’t worry!), you’ll be asked to repeat the process. Complete the “Spray the burns!” and “Stitch!” minigames again.
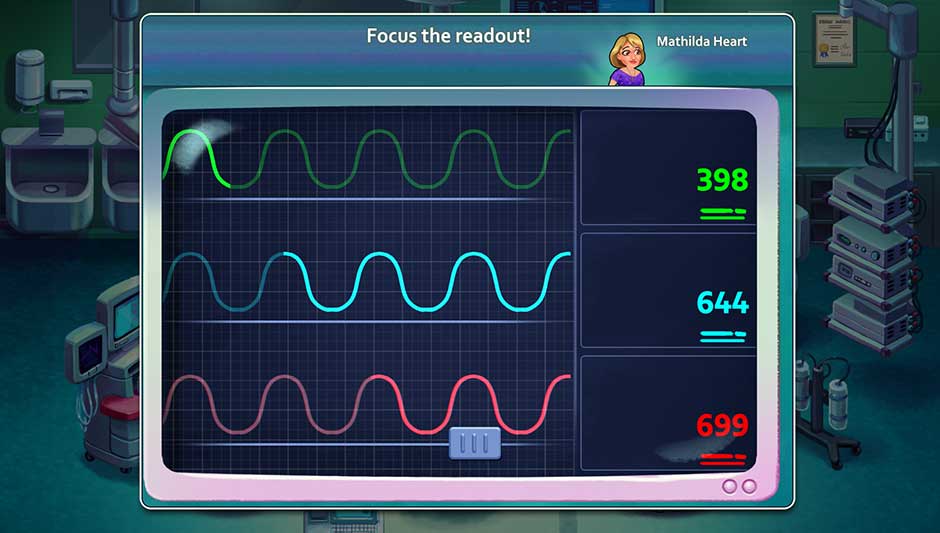
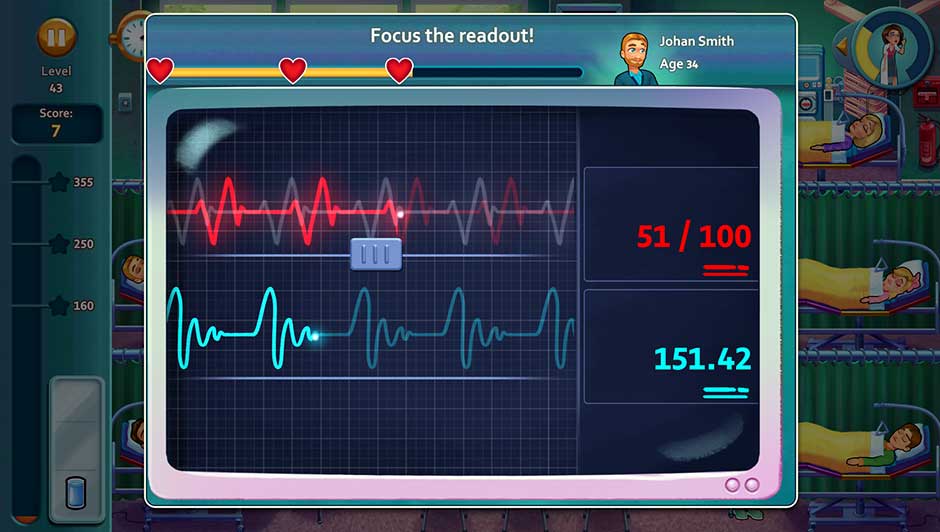
Next, focus the readout. Click on the sliders beneath the colored lines. Drag the slider left or right until the colored line matches the pattern behind it. Do this for all the lines and sliders until the minigame is complete.
![Car Crash Operation - Focus the readout!]()
Car Crash Operation – Focus the readout!
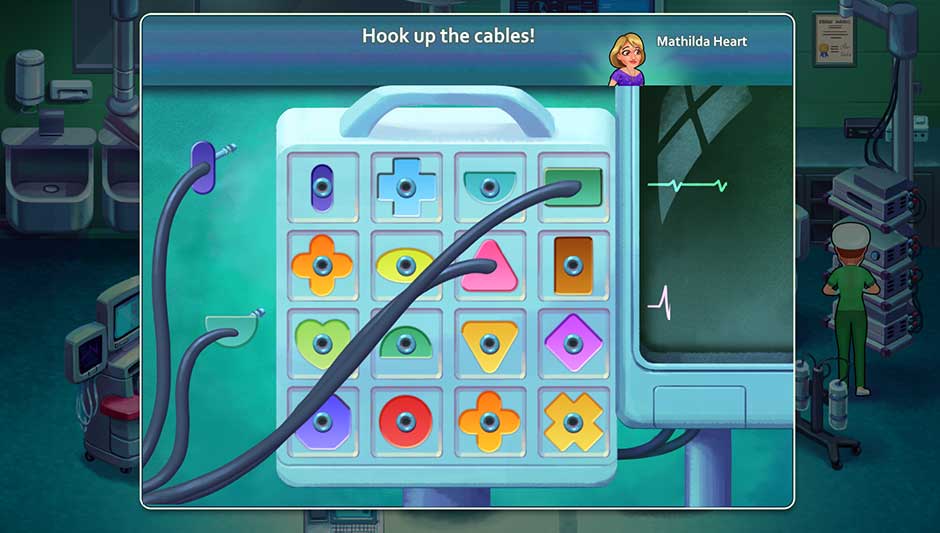
Now just one more minigame to complete. Hook up the cables by clicking on a cable end on the left, then drag it to the corresponding color and shape on the grid. Once all the cables have been hooked up, the operation will be complete.
![Car Crash Operation - Hook up the cables!]()
Car Crash Operation – Hook up the cables!
Chapter 5 – Intensive Care
Intensive care is full of intensive time management. Featuring levels 41 – 50.
Level 41 – Troubled Times
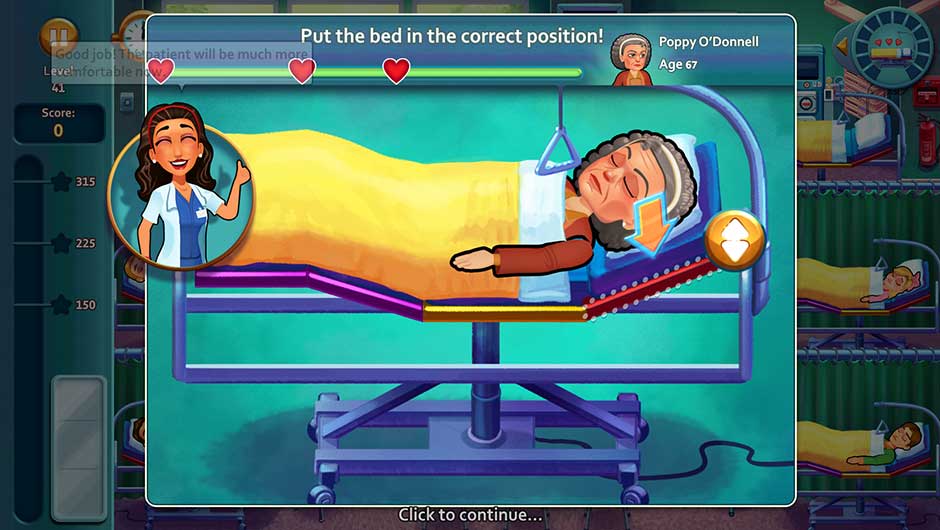
Earn 12 hearts by moving beds.
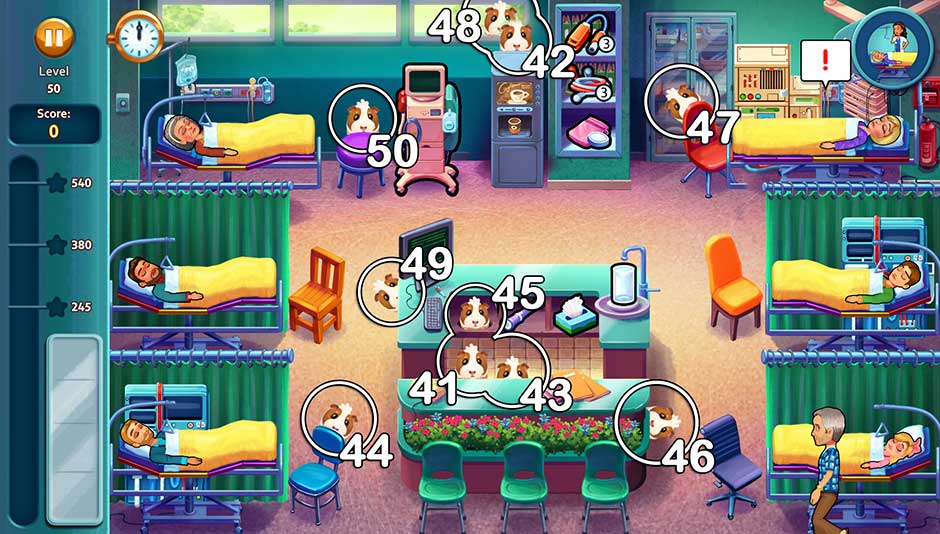
Oliver Location: Behind the counter beneath the checkout monitor, toward the left and near the phone.
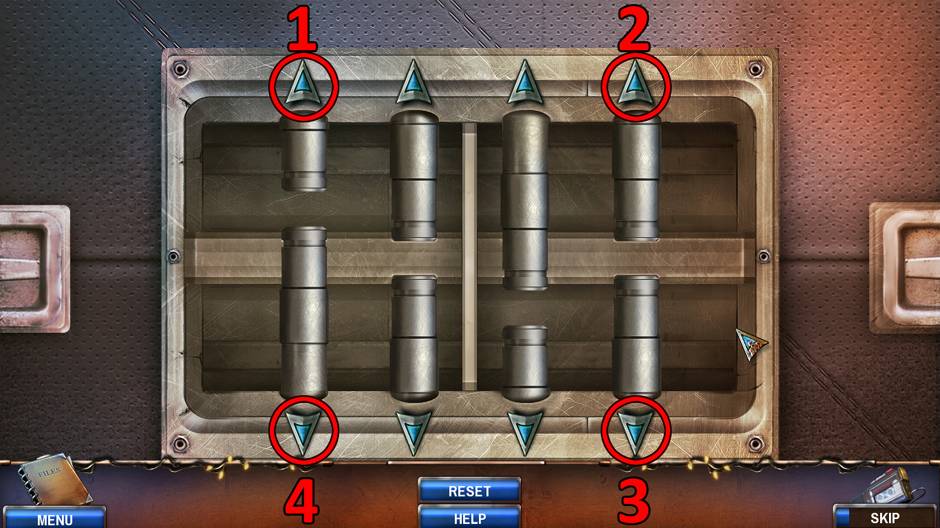
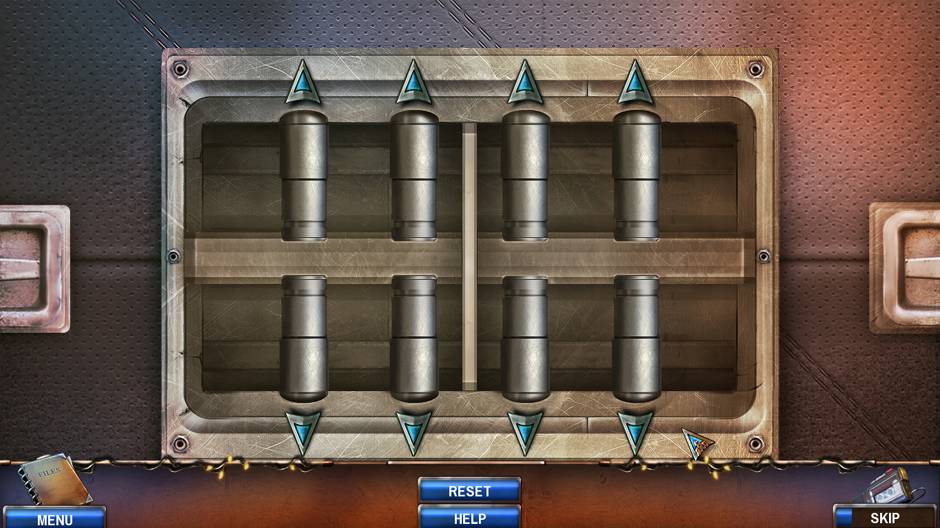
Earn 12 hearts by playing the “Put the bed in the correct position!” minigame. You can earn a maximum of 3 hearts per time you play the minigame. Start by adjusting the center panel of the bed, then work on the outer portions. If you need additional help, refer to the Minigame Section below.
Level 42 – Silence
Send visitors to the correct chairs within 10 seconds of them arriving.
Oliver Location: On top of the coffee machine.
Today’s goal requires you to send visitors to their correct chairs within 10 seconds of them arriving. This only applies to new visitors entering the clinic, not visitors who have already been seated. Keep an eye on incoming visitors at the bottom of the screen and place priority on seating them quickly. If you let things back up too far, you may not be able to seat new visitors right away. In this scenario, try aiding the visitor currently sitting in the chair as quickly as possible so you can seat the new one.
Level 43 – Tuckered Out
Don’t tire Allison out any further.
Oliver Location: Behind the center portion of the bottommost counter.
Allison is exhausted, so you’ll have to be careful not to tucker her out! A meter in the upper right corner will keep track of Allison’s exhaustion. If this meter fills completely, you will fail today’s challenge. Instead, make sure there’s always one half of the meter empty. Wait a moment if you need. Allison can safely make it from one corner of the clinic to the other in a half meter’s worth of energy. As long as the meter is half-empty, you will be safe completing any task.
Level 44 – No Giving Up
Checkout 3 gold-hearted people at once, 5 times.
Oliver Location: Behind the top of the blue chair in the lower left corner.
Today you’ll need to check out a total of 5 groups of 3 gold-hearted people. The key for today is: Don’t go too big! Check out groups of 3 golden-hearted customers as soon as they gather at the register. If you wait for 4 or more, you may not get enough for the day to complete your goal.
Level 45 – It’s All in the Budget
Deliver the cart to the patient within 10 seconds of them asking for it.
Oliver Location: In the first cubby beneath the counter with the checkout monitor. *Note: Oliver may be obstructed from view if Allison is standing at the checkout monitor.
Deliver carts to patients who ask for it within 10 seconds of them asking. When helping patients today, place priority on the cart first and foremost. Whenever a patient asks for it, drop everything and bring it to them as quickly as possible. If multiple patients ask for it at once, serve them in the order they asked so you can make the most of your time.
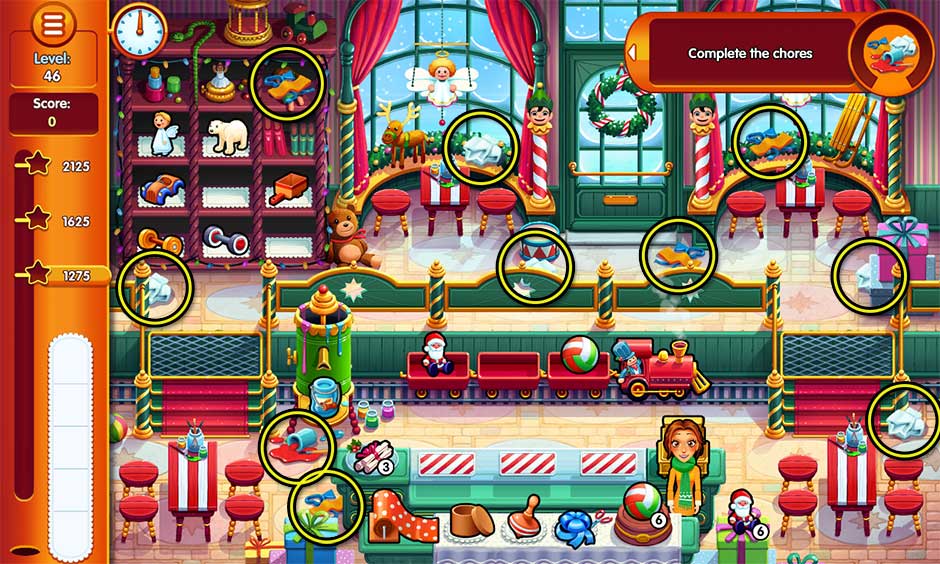
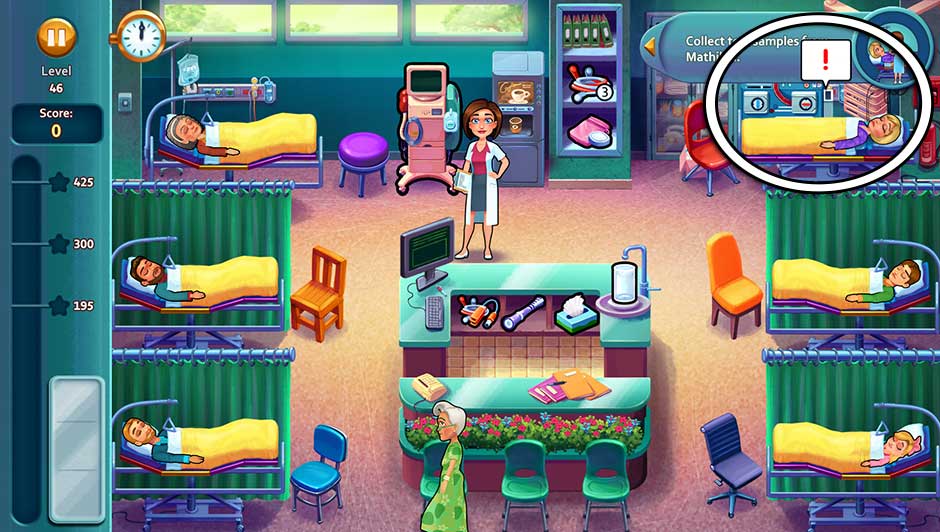
Level 46 – Time to Act
Collect test samples from Mathilda.
Oliver Location: Poking out from the right side of the bottommost counter.
Today you’ll need to collect test samples from Mathilda. At the start of the day, a “!” bubble will appear over Mathilda’s bed in the upper right corner. Click on the bed to start collecting samples. A meter will appear showing Allison’s progress. Collect samples throughout the day every spare moment you get. If you can collect all the samples before checking out the final patient, you will complete today’s goal.
Tip! Use the shift clock as your reference point. If the day is half done, the meter should be half-full.
![Heart's Medicine - Hospital Heat - Level 46]()
Heart’s Medicine – Hospital Heat – Level 46
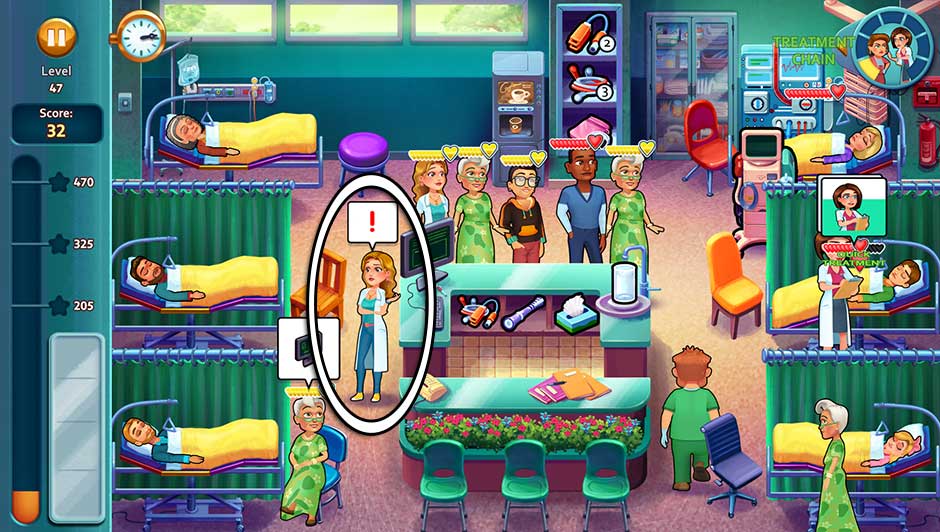
Level 47 – Ruckus
Calm the doctors and staff coming into intensive care.
Oliver Location: Peeking out from the top of the red chair in the upper right corner.
Doctors and staff will enter throughout the day with a need to complain. Whenever one of the cast appears with a “!” bubble over their head, click on them to let them vent. You’ll need to do this a total of 7 times during your shift to complete today’s goal.
Tip! Clicking on a doctor with a “!” bubble will pull Allison away from any tasks she may currently have lined up.
![Heart's Medicine - Hospital Heat - Level 47]()
Heart’s Medicine – Hospital Heat – Level 47
Level 48 – Blast From the Past
Don’t stand still for longer than 13 seconds.
Oliver Location: In the window at the top of the screen, on the far right.
Don’t stand still for longer than 13 seconds today. The meter in the upper right corner will help you keep track of how long it’s been. If the meter starts to flash red, move! Allison will move when retrieving items for patients, as well as when you interact with other stations. Stay nimble on your feet and you’ll complete today’s challenge with ease.
Tip! Click on chairs to move Allison if she’s been standing still for too long.
Tip! Be careful not to spend too much time at the register with checkout combos. This is the easiest way to accidentally lose sight of today’s goal since Allison will stand still while checking patients out.
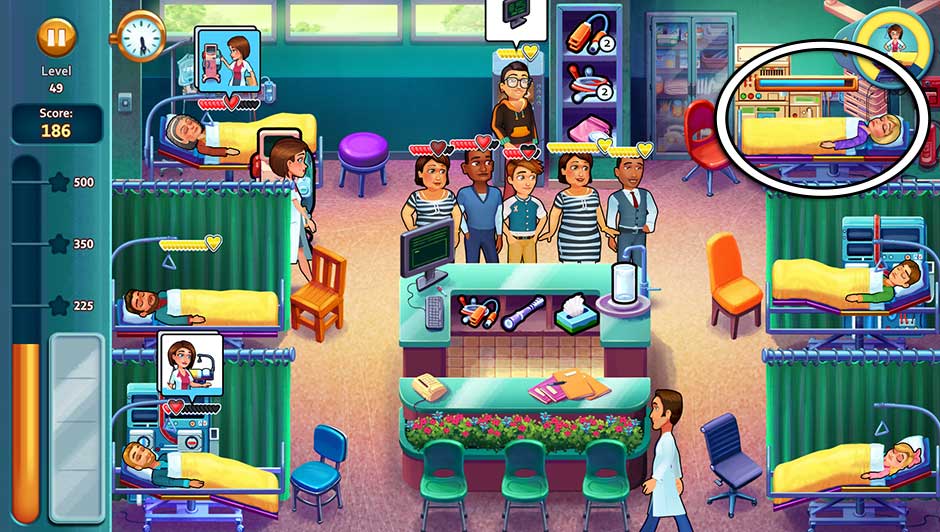
Level 49 – Final Hope
Keep applying the medication to Mathilda during the day.
Oliver Location: Peeking out from around the upper left corner of the counter, next to the checkout monitor.
A meter will appear over Mathilda’s bed today that slowly empties over time. Click on Mathilda to apply her medication and refill the meter. Your goal today is to make sure the meter never empties completely. Be advised that the challenge will not count as complete until the last customer leaves. Even after your shift has ended, as long as patients are around, the meter will continue to deplete.
![Heart's Medicine - Hospital Heat - Level 49]()
Heart’s Medicine – Hospital Heat – Level 49
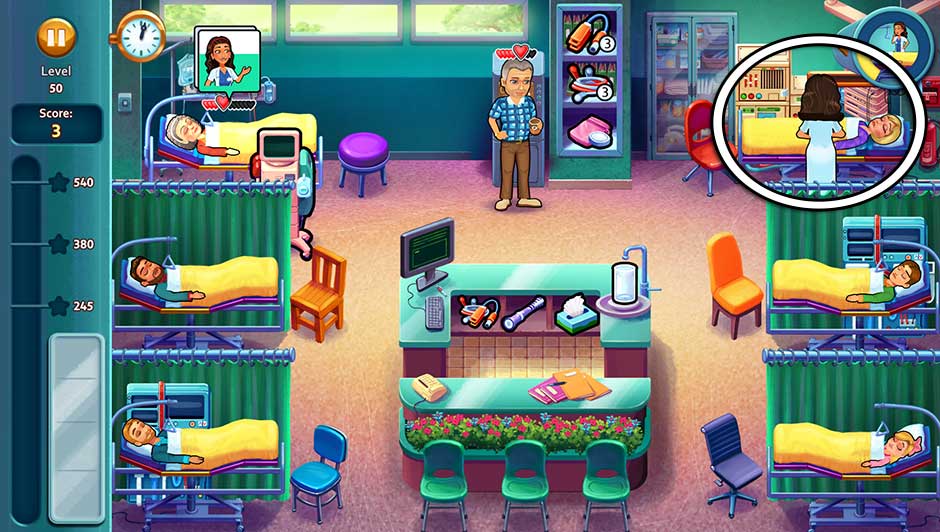
Level 50 – The Time is Now
Prepare Mathilda for surgery.
Oliver Location: At the top of the purple stool in the upper left corner. *Note: Oliver may be obstructed from view if a customer is sitting on this stool.
In addition to helping other patients, you’ll need to prep Mathilda for surgery today. Click on Mathilda’s bed to start prepping her for surgery. Keep an eye on the clock and try to keep up! Finish prepping her before the end of the day to complete today’s challenge.
![Heart's Medicine - Hospital Heat - Level 50]()
Heart’s Medicine – Hospital Heat – Level 50
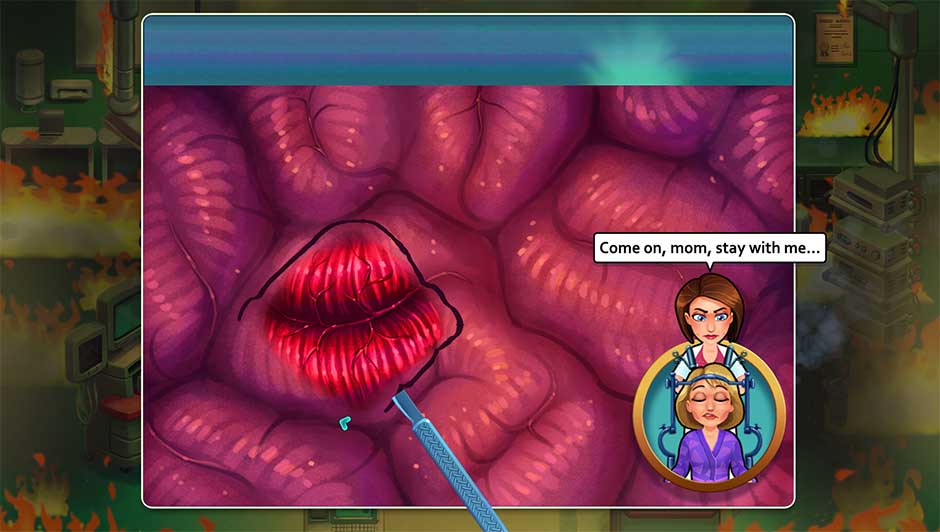
Cutscene: The Grand Finale
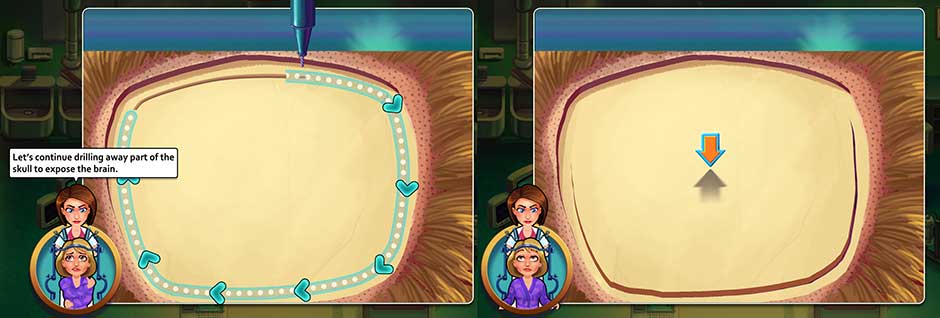
Don’t worry, this cutscene isn’t brain surgery. Wait…
When prompted, drill away the skull to reveal the brain. Click and hold, dragging along the blue-arrowed line around the skull cap. Once finished, click on the top of the skull to remove it.
![Brain Surgery Part 1]()
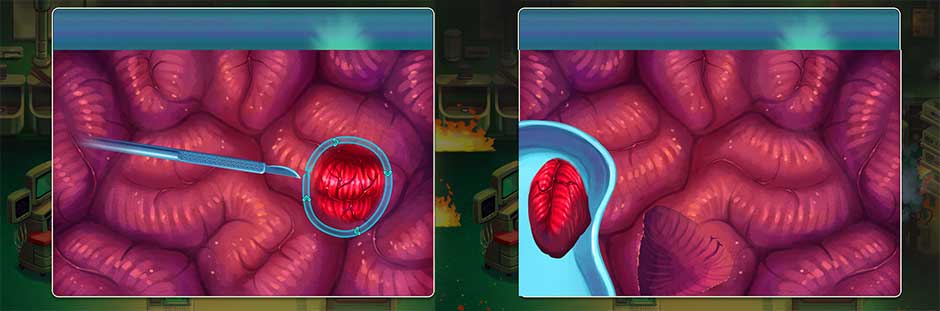
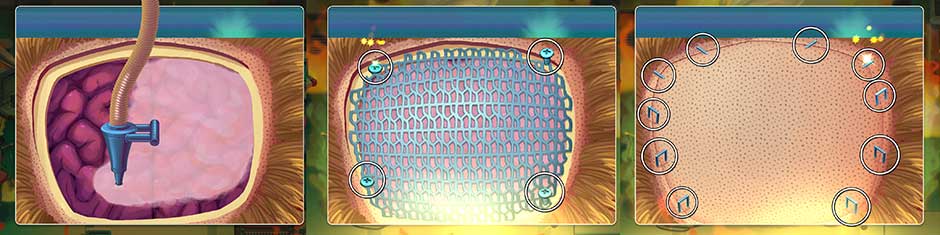
Next, apply cream to the top of the brain. Make sure to coat it thoroughly! Once the brain has been thoroughly coated, small sections will begin to light up. Click on these sections to begin the removal process.
![Brain Surgery Part 2]()
A blue line will appear around the section that needs to be removed. Click and hold, following the line and direction of the arrows until the section has been cut away. Then click on the piece and place it in the tray to remove it.
![Brain Surgery Part 3]()
Repeat this process until you reach the final section. The blue arrows will still appear, but the line will be gone. Outline the bright, shiny section of the brain with your scalpel. You can do it!
![Brain Surgery Part 4]()
Finally, apply the cream to the top of the brain. Again, make sure to coat it thoroughly. Then click on the 4 screws in the corners to secure the wire mesh. Lastly, click on each of the staples to secure the scalp back in place.
![Brain Surgery Part 5]()
There! That wasn’t so hard, was it? Now you can add Little Creek’s hottest brain surgeon to your resume!
Chapter 6 – Psychiatry
Welcome to the psychiatry department, levels 51 – 60. How does that make you feel?
Level 51 – Promoted
Finish all the paperwork.
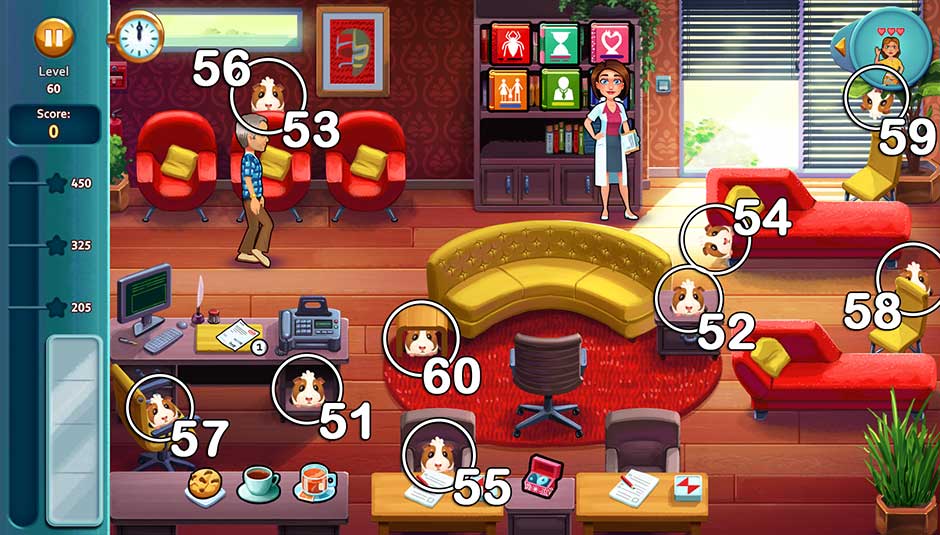
Oliver Location: In the cubby underneath the stack of papers on the desk.
Paperwork is incoming by the droves today. Throughout the day, clinicians will show up with stacks of papers for you. A “!” bubble will appear over their head when you can collect the papers. Successfully gather incoming papers 3 times before the end of the day to complete your goal.
![Heart's Medicine - Hospital Heat - Level 51]()
Heart’s Medicine – Hospital Heat – Level 51
Level 52 – Feelings
Evaluate Allison.
Oliver Location: On top of the side table to the right of the couch.
Allison is in the office, so one of the chaise lounge chairs will be taken up by her during the entire day. This means you’ll need to place priority on helping patients who need the chaise lounge. Whenever a “!” bubble appears over Allison’s head, you can continue your evaluation with her. Successfully complete all 5 steps of Allison’s evaluation to complete today’s goal.
Tip! Today’s goal will not be marked as finished until the last patient has checked out. It’s very likely you’ll still need to evaluate Allison one more time even after the day has ended. As long as you wait to check out the final patient(s) until after you’ve finished the evaluation, you’ll complete the challenge and earn your diamond.
![Heart's Medicine - Hospital Heat - Level 52]()
Heart’s Medicine – Hospital Heat – Level 52
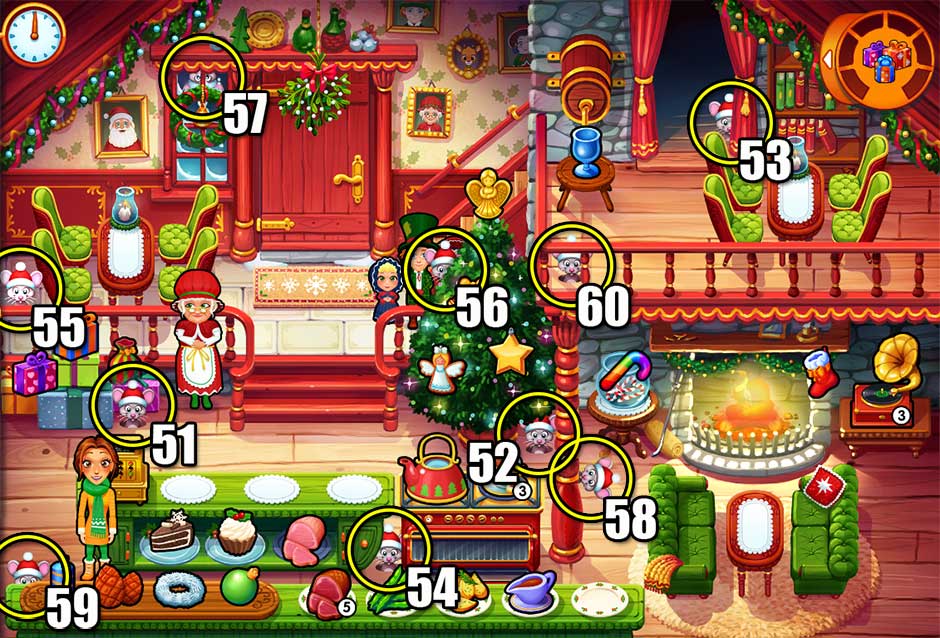
Level 53 – Active Duty
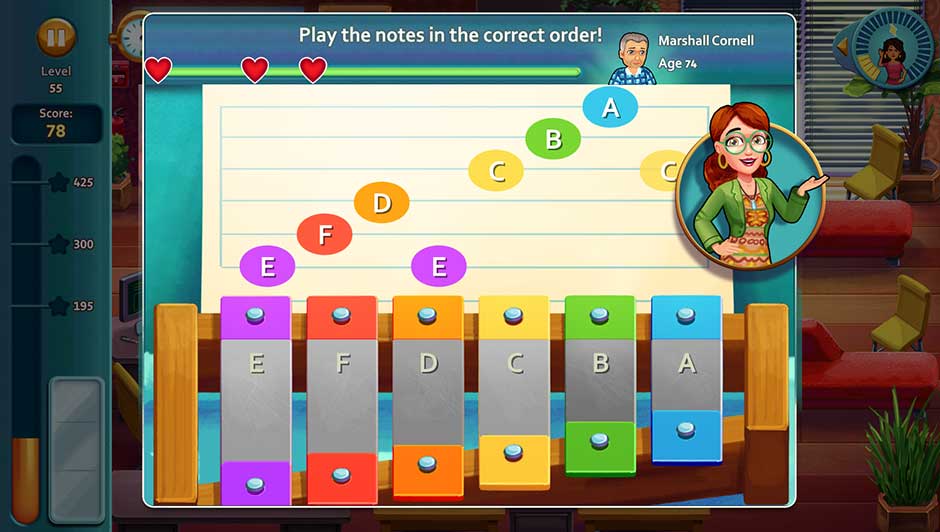
Collect 30 hearts by playing minigames.
Oliver Location: Behind the top of the center waiting chair in the upper left corner. *Note: Oliver may be obstructed from view if a patient is sitting in the center waiting chair.
Earn 30 hearts by playing minigames today. This applies to all minigames available. You can earn up to 3 hearts per patient per minigame. Make sure you’re ready when starting each minigame, because today’s challenge leaves little room for error. If you need additional help, refer to the Minigame Section below.
Level 54 – New Beginnings
Deliver all the books as quickly as possible.
Oliver Location: Peeking out from the bottom left side of the upper right chaise lounge.
Patients asking for books are your top priority today. You must bring the book(s) the patient asks for before the color drains from their bubble, or else you’ll fail today’s challenge. As long as you place absolute priority on grabbing books as soon as they’re asked for, you’ll have nothing to worry about today.
Level 55 – Cloud Nine
Get 30 quick checkout bonuses.
Oliver Location: In the left brown chair at the bottom of the screen. *Note: Oliver may be blocked from view if there is a patient at this station.
Today’s challenge can be tricky if you’re a fan of group checkouts. Get 30 quick checkout bonuses today. To get a checkout bonus, you will need to check out a patient within a couple seconds of their arriving at the register. The best strategy to use today is to focus on checking out patients ASAP and ignore group combos. As soon as a patient starts walking toward the checkout monitor, click on it to guarantee you meet them there as quickly as possible. You will need to successfully do this with nearly all incoming patients today to complete the challenge.
Level 56 – Down to Earth
Keep at least one slot free on the couch at all times.
Oliver Location: Behind the top of the center waiting chair in the upper left corner. Same location as Level 53. *Note: Oliver may be obstructed from view if a patient is sitting in the center waiting chair.
The couch can sit up to 3 people at a time, however you’ll need to keep at least 1 of these spots empty at all times today. It doesn’t have to be a specific spot, as long as at least 1 is empty. If more than 2 people are asking to use the couch, they’ll need to wait. Place priority on helping the patients on the couch the fastest today. If you can get by with only using a maximum of 2 spaces at any one time, you’ll complete today’s challenge.
![Heart's Medicine - Hospital Heat - Level 56]()
Heart’s Medicine – Hospital Heat – Level 56
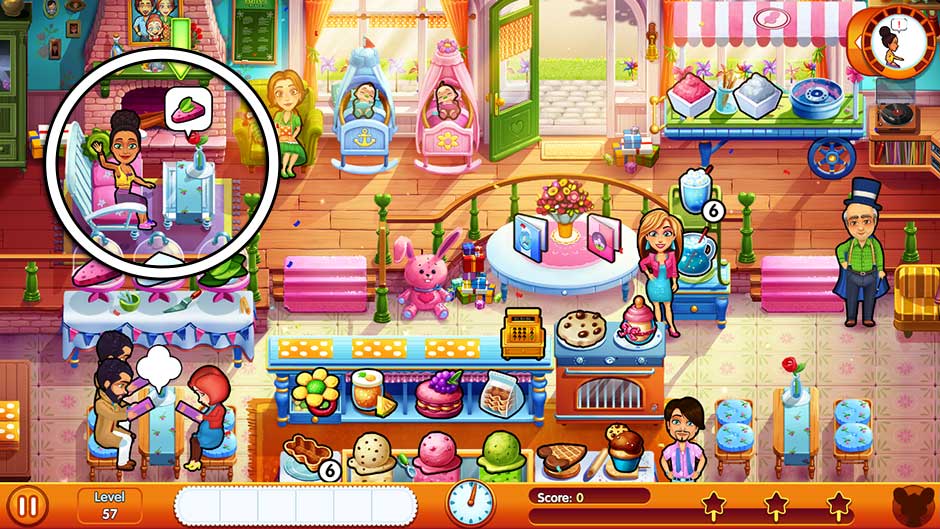
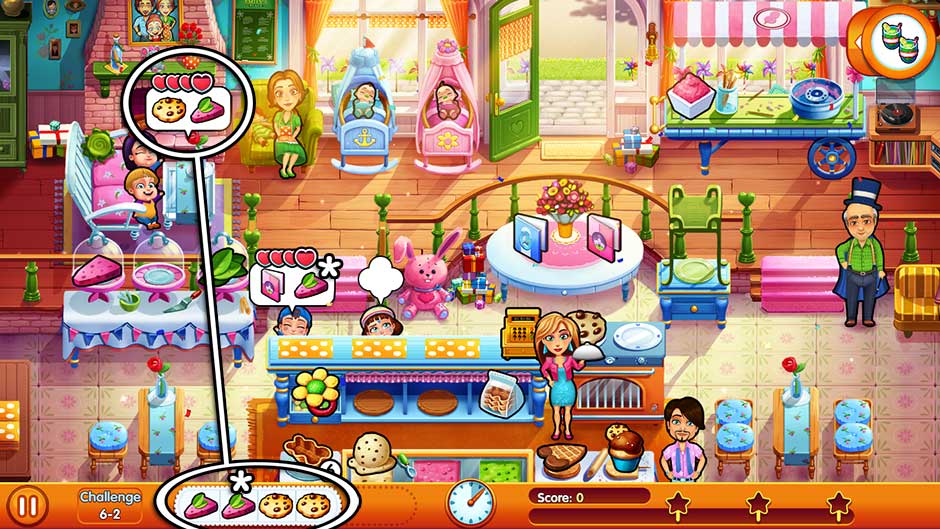
Level 57 – Co-operation
Finish all the paperwork, again.
Oliver Location: On the yellow chair at the checkout desk.
Busy bees! Finish all the paperwork today. Sam will be taking up one of the desks at the bottom of the screen for the entire day, so be careful not to let backlogs happen when assigning patients to the remaining desk. Place your priority on helping patients at the desk as quickly as possible along to their next station. Whenever a “!” bubble appears over Sam, click on her to have her fill out the paperwork. Do this a total of 5 times before day’s end to complete the challenge.
![Heart's Medicine - Hospital Heat - Level 57]()
Heart’s Medicine – Hospital Heat – Level 57
Level 58 – Moving Day
Walk more than 1,800 steps.
Oliver Location: On the floor on the far right, behind the top of the bottommost yellow chair.
Walk more than 1,800 steps today. In order to complete this challenge, you’ll need to keep Sam moving almost constantly throughout the entire day. Every spare moment you have – even if it’s only half a second – make sure you’re clicking on another station and keeping Sam on her toes! A meter in the upper right corner will help you keep track of your progress. The challenge doesn’t end until the last patient has been checked out. So if you need extra time, wait on checking out the final patient and keep Sam moving until you complete the challenge.
Level 59 – Check Up
Help Ruth collect all the test samples.
Oliver Location: Hanging from the plant leaves in the upper right corner.
Ruth is popping by today, and you’ll need to provide her with samples. Every time Ruth walks in and a “!” bubble appears over her head, click on her to help her collect the samples she needs. Repeat this process 5 times over the course of the day to reach your goal.
![Heart's Medicine - Hospital Heat - Level 59]()
Heart’s Medicine – Hospital Heat – Level 59
Level 60 – Finale
Don’t let patients leave with less than 3 hearts.
Oliver Location: Underneath the side table to the left of the couch.
The last level. And even though patients are sure to love you by now, make sure they don’t leave with less than 3 hearts today! Different patients will have different numbers of hearts over their head. Be most careful with the patients who only have a handful of hearts and require less treatment. These patients will reach 3 hearts much faster if you’re not careful! Remember that golden-hearted patients can wait indefinite periods of time without losing any of their hearts. If you can get through the day just as loved as before, you’ll complete the challenge with ease.
Congratulations! You’ve completed Heart’s Medicine – Hospital Heat!
Challenges
In addition to the game’s 60 story levels, there are 30 challenge levels for you to complete. This section lists each challenge and how to complete it with the highest score.
Chapter 1 – Pediatrics
Challenge 1 – Oliver Extravaganza
Find as many Olivers as you can!
It’s a guinea-palooza! Find as many Olivers as you can before the day ends! Each guinea pig you find will add +5 to your score. Find 26 Olivers or more in the short period of time to complete today’s challenge with a 3-diamond score.
Tip! Oliver will squeak each time he appears. Turn up that volume and give that little guinea pig a run for his money!
Challenge 2 – A Deteriorating Situation
Cure as many patients to keep your score as high as possible.
During this challenge, your score will decrease by -1 point per second. Cure as many patients as possible as quickly as possible to keep your score up. Completing minigames quickly and getting quick bonuses will help! The higher your score, the more time you’ll have before your diamond rank potentially drops. Therefore focus on doing your best, and don’t worry about the countdown until the challenge ends.
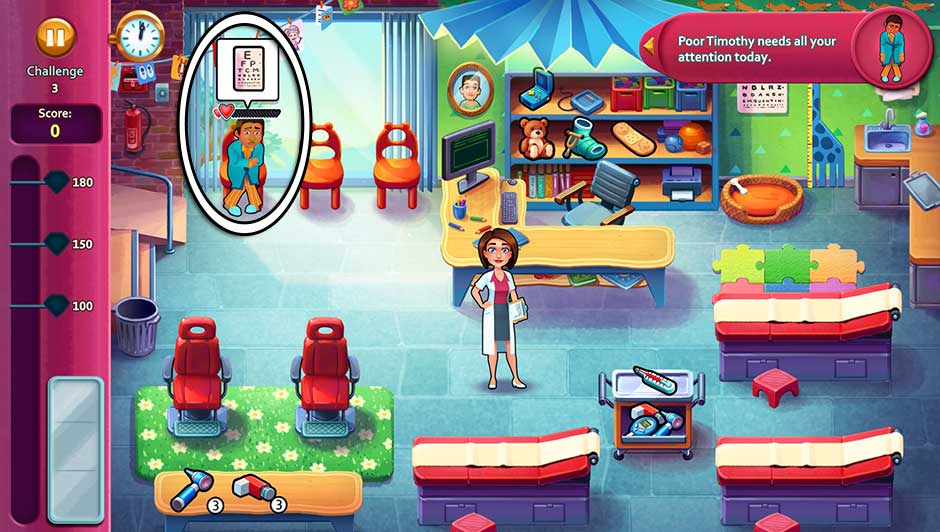
Challenge 3 – Poor Timothy
Poor Timothy needs all your attention today.
There’s a special patient in pediatrics today for this challenge. Almost everything is wrong with him! Timothy has way more hearts than the normal patient, so the majority of your score today will be determined by how quickly you help him. Place absolute priority on helping Timothy as quickly as possible at each station. The higher his hearts are, the higher your score will be.
Tip! If your score looks low before the end of the day, don’t panic! A huge part of your score won’t be tallied until Timothy checks out.
Tip! Keep a charged Gameboy on your tray to reduce the time needed for prep between treatments of kids who ask for games.
![Heart's Medicine - Hospital Heat - Challenge 3]()
Heart’s Medicine – Hospital Heat – Challenge 3
Challenge 4 – Minigame Mayhem
Score big by completing as many minigames as possible!
Complete as many minigames as you can, as quickly as you can before time’s up! This is a short level whose score is tallied based entirely on how quickly you can complete minigames. The faster you are, the higher the score! If you need help with a specific minigame, refer to the Minigame Section of this walkthrough.
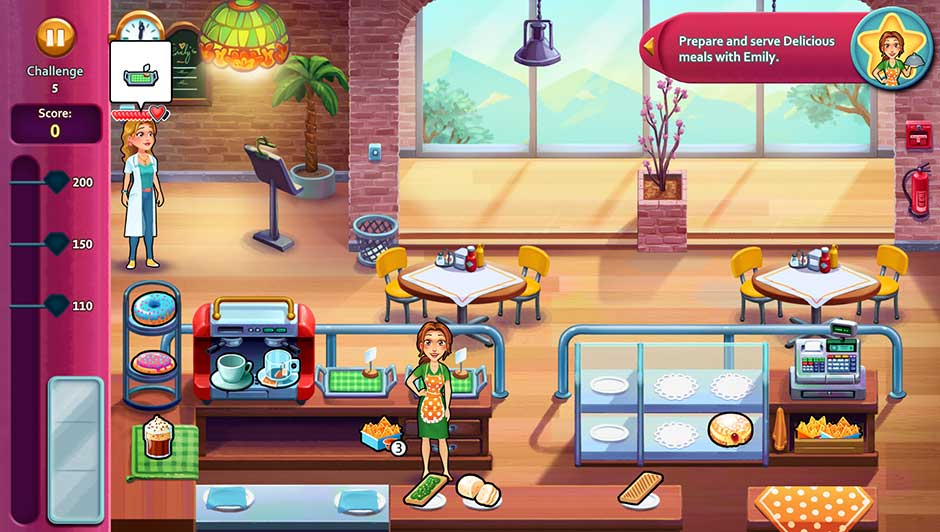
Challenge 5 – Emily’s Canteen Challenge
Prepare and serve Delicious meals with Emily.
Here’s a fun callback for Delicious fans! Emily is working the canteen today. Customers who walk in will either need to be clicked and moved to a cafeteria tray at the counter, or clicked and moved to a chair at a table. Some customers may order more than once. You will be able to tell which customers these are by the number of hearts over their head. The more hearts, the more they’ll order!
![Heart's Medicine - Hospital Heat - Challenge 5]()
Heart’s Medicine – Hospital Heat – Challenge 5
Chapter 2 – Pathology
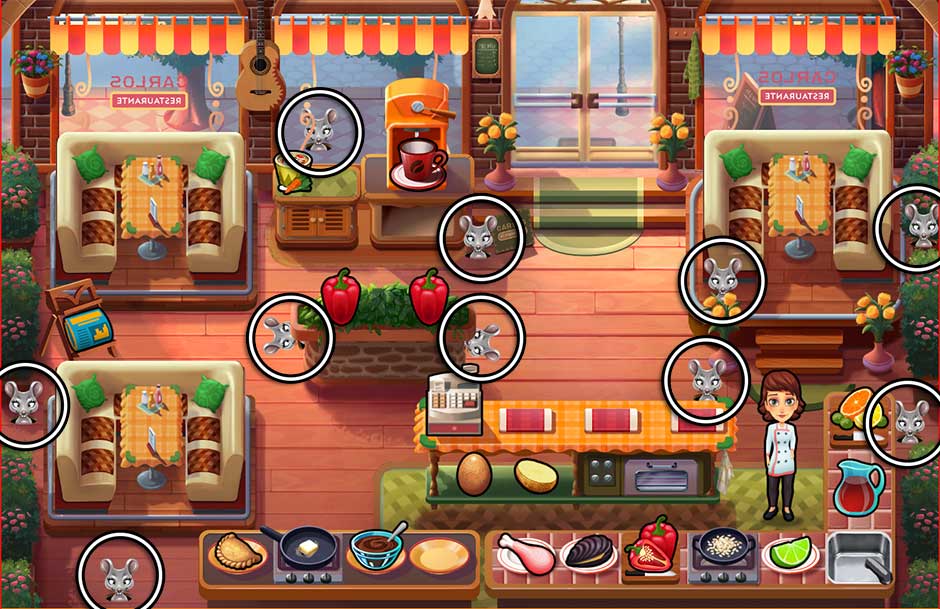
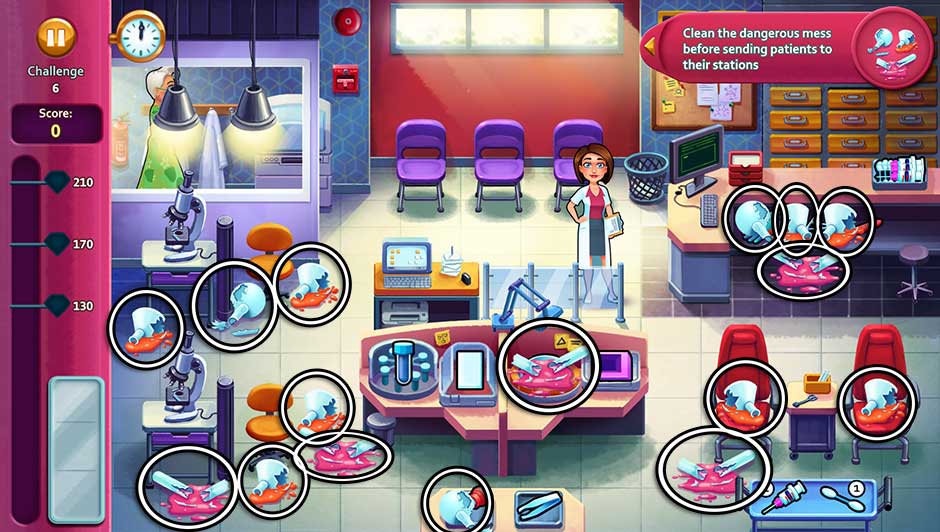
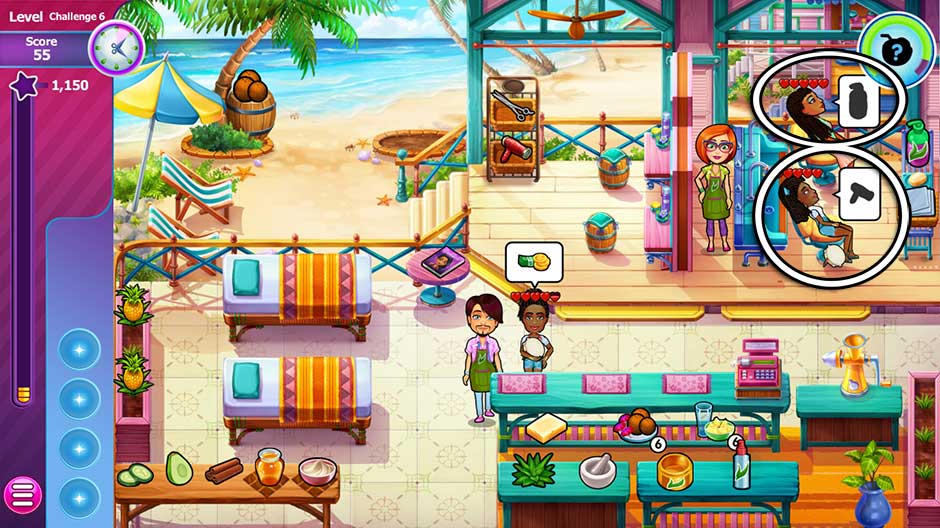
Challenge 6 – Watch Your Step!
Clean up the dangerous mess while helping your patients.
There’s dangerous messes all over pathology today, and they’re preventing you from using the tools you need! Refer to the screenshot below for the mess locations. It’s a very good idea to try and clean the messes in a general order:
- Clear the mess at the checkout desk. This mess will prevent you from being able to pick up supplies.
- Clear the messes at one of the red chairs in the lower right corner. This mess will prevent patients from being able to go to this station.
- Clear the mess over the petri dish at the center station. This mess will prevent you from being able to prepare samples.
- Clear the mess at one of the stations with the microscope on the left. This mess will prevent patients from being able to sit here.
- Clear the mess over the dropper at the bottom of the screen. This mess will prevent you from picking up the dropper for treatments.
- Continue clearing any and all remaining messes according to patients’ needs. If a patient needs a specific station, focus on cleaning that first. You’ll want to clear all messes before the day ends.
![Heart's Medicine - Hospital Heat - Challenge 6]()
Heart’s Medicine – Hospital Heat – Challenge 6
Challenge 7 – Oliver Extravaganza 2
Find as many Olivers as you can!
Find as many Olivers as you can in the short amount of time! You’ll need to find at least 28 guinea pigs before time’s up to reach a 3-diamond score. Listen for the squeaks. Each time you hear a squeak, a new guinea pig will appear. Oliver can appear all over, so use a combination of sight and sound to find enough before time’s up!
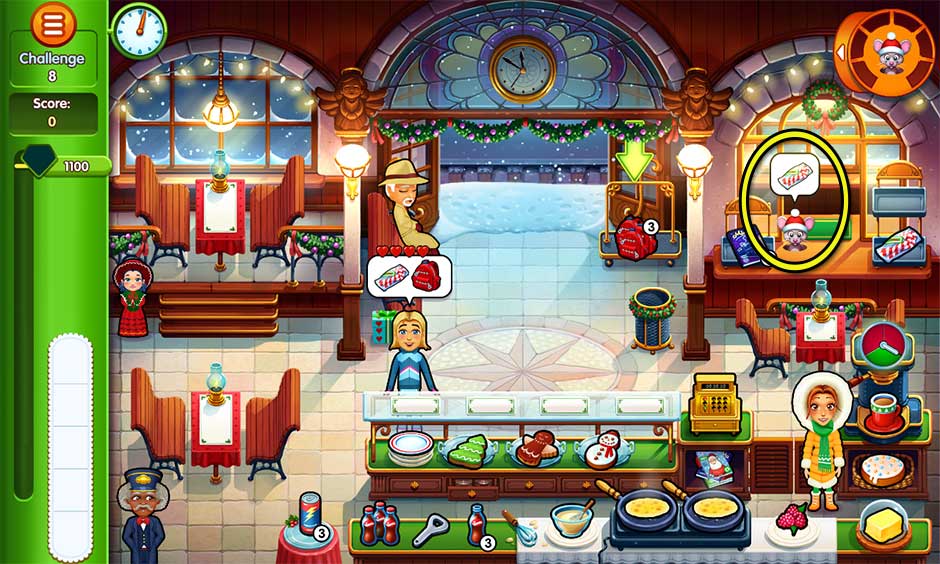
Challenge 8 – A Deteriorating Situation
Cure as many patients to keep your score as high as possible.
During this challenge, your score will decrease by -1 point per second. Cure as many patients as possible as quickly as possible to keep your score up. Completing minigames quickly and getting quick bonuses will help! The higher your score, the more time you’ll have before your diamond rank potentially drops. Therefore focus on doing your best, and don’t worry about the countdown until the challenge ends.
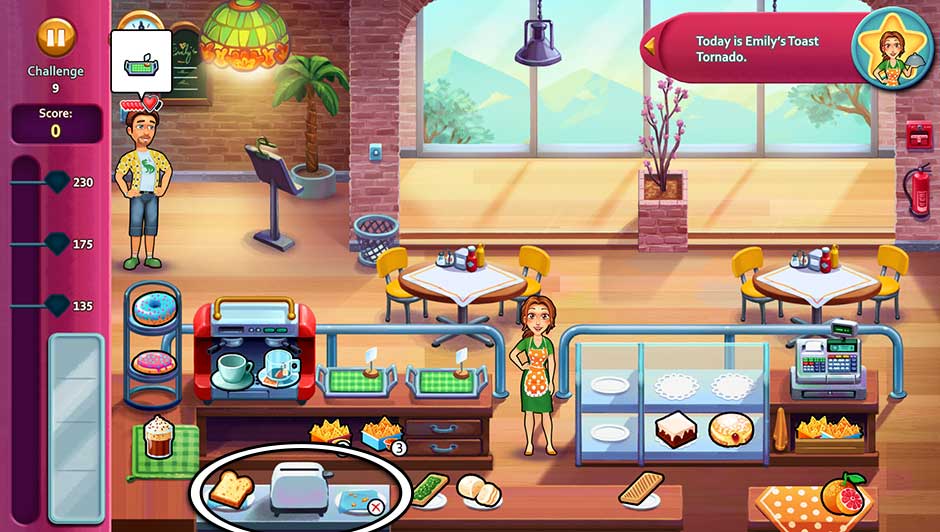
Challenge 9 – Emily’s Canteen Challenge 2
Today is Emily’s Toast Tornado.
Toast is the newest item on the menu today, and is guaranteed to be a customer favorite. Click on the slice of bread in the lower left corner to have Emily throw a slice in the toaster. Once finished, the toast will automatically be added to the plate to the right of the toaster, complete with complementary egg. Try to keep this plate restocked as often as possible to help you with today’s challenge.
![Heart's Medicine - Hospital Heat - Challenge 9]()
Heart’s Medicine – Hospital Heat – Challenge 9
Challenge 10 – Minigame Mayhem 2
Score big by completing as many minigames as possible!
Complete as many minigames as you can, as quickly as you can before time’s up! This is a short level whose score is tallied based entirely on how quickly you can complete minigames. The faster you are, the higher the score! If you need help with a specific minigame, refer to the Minigame Section of this walkthrough.
Chapter 3 – Burn-Unit
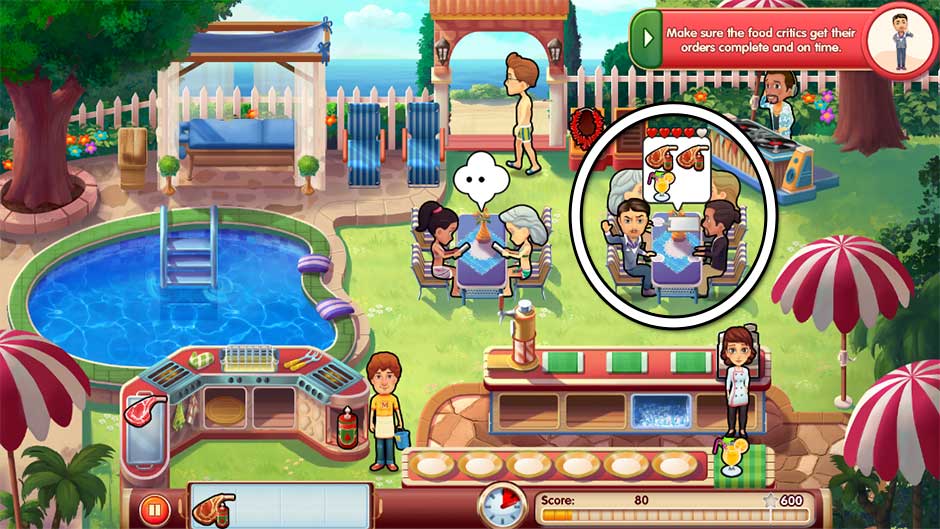
Challenge 11 – Emergency!
Save as many patients as you can within 3 minutes. Patients will enter with only 2 hearts.
It’s non-stop today, and patients will be entering the clinic near-constantly. Your waiting chairs are guaranteed to instantly refill the moment you reassign patients. The best strategy to use for this challenge is to move entire stations at once. For example, assign all waiting chair patients to their stations. Treat all gurney patients, then treat all examination chair patients. Check out patients in large groups at the register. Try to do this was soon as they stack up, though. Patients have very few hearts today, so there’s little room for waiting.
Challenge 12 – Emily’s Canteen Challenge 3
As Emily always says, a flan a day keeps the doctor away!
Flan has been added to the menu today, but doesn’t require any extra preparation time. Just pick it up and go! Serve customers normally and remember to keep the toast and chips stocked.
Challenge 13 – Oliver Extravaganza 3
Find as many Olivers as you can!
Find as many Olivers as you can in the short amount of time! You’ll need to find at least 30 guinea pigs before time’s up to reach a 3-diamond score. Listen for the squeaks. Each time you hear a squeak, a new guinea pig will appear. Oliver can appear all over, so use a combination of sight and sound to find enough before time’s up!
Challenge 14 – Minigame Mayhem 3
Score big by completing as many minigames as possible!
Complete as many minigames as you can, as quickly as you can before time’s up! This is a short level whose score is tallied based entirely on how quickly you can complete minigames. The faster you are, the higher the score! If you need help with a specific minigame, refer to the Minigame Section of this walkthrough.
Challenge 15 – Product Blockers
Get rid of the branded products so you can use the original ones.
Victor is busy replacing products in the burn unit with branded knock-offs. Products with predominantly blue or green colors are branded. You’ll need to click on them to remove them from their shelves and replace them with the original. Any time Victor enters the clinic, he’s guaranteed to replace a product. Keep an eye on him and he’ll lead you right to the new knock-off.
Tip! Branded products will be added to your tray on the lower left. You cannot use them on patients. Instead, you’ll have to click on the product to remove it from your tray. Try to do this as soon as possible, otherwise you may suddenly find yourself lacking much-needed tray space.
![Heart's Medicine - Hospital Heat - Challenge 15]()
Heart’s Medicine – Hospital Heat – Challenge 15
Chapter 4 – Maternity Ward
Challenge 16 – Emily’s Canteen Challenge 4
Watch out Emily, it’s hush hush rush hour.
Even more products are available today, and the canteen is busier than ever. Assign customers as quickly as possible when they enter the canteen, and remember to keep your toast and chips stocked!
Challenge 17 – Oliver Extravaganza 4
Find as many Olivers as you can!
Find as many Olivers as you can in the short amount of time! You’ll need to find at least 52 guinea pigs before time’s up to reach a 3-diamond score. Listen for the squeaks. Each time you hear a squeak, a new guinea pig will appear. Oliver can appear all over, so use a combination of sight and sound to find enough before time’s up!
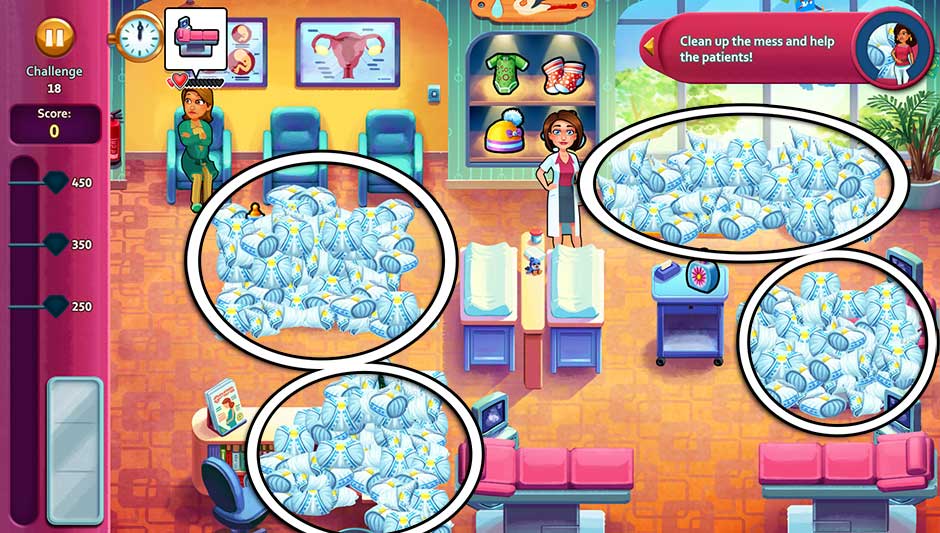
Challenge 18 – Diapers Everywhere
Clean up the mess and help the patients!
Dirty diapers are absolutely everywhere, covering nearly all the important stations. Click on a diaper to remove it. They will instantly be removed once clicked, so click on them as quickly as possible! Start with the pile in the upper right corner so patients can access the exercise ball and play mat. Then focus on cleaning the pile on the upper left, so you have access to the bottle, pacifier, giraffe plushes, and diapers. Clear off the checkout desk next, followed by the remaining examination table.
Tip! You can click on diapers to remove them even while Allison is moving or busy helping patients. Clear them away every spare moment you get!
![Heart's Medicine - Hospital Heat - Challenge 18]()
Heart’s Medicine – Hospital Heat – Challenge 18
Challenge 19 – Minigame Mayhem 4
Score big by completing as many minigames as possible!
Complete as many minigames as you can, as quickly as you can before time’s up! This is a short level whose score is tallied based entirely on how quickly you can complete minigames. The faster you are, the higher the score! If you need help with a specific minigame, refer to the Minigame Section of this walkthrough.
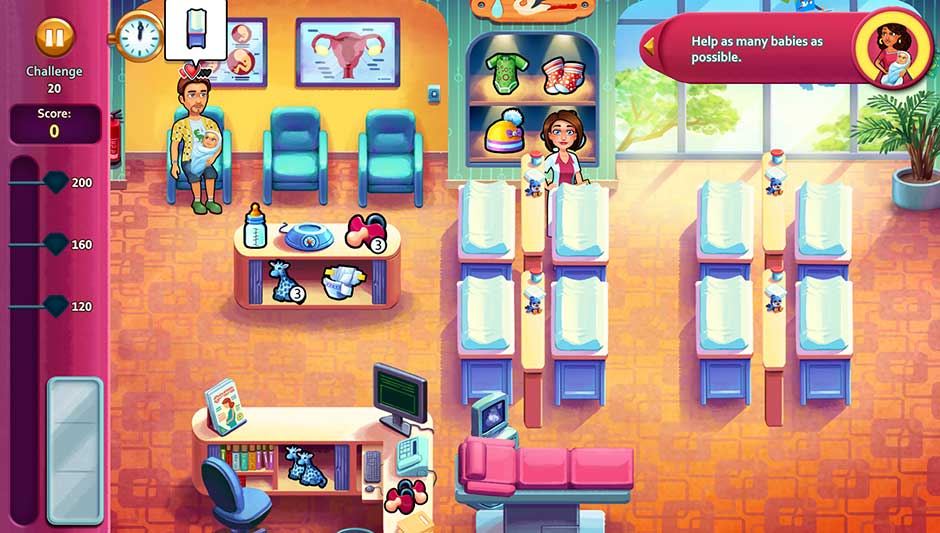
Challenge 20 – Baby Boom!
Help as many babies as possible.
Nearly the entire room is filled with changing tables today, putting your management skills to the ultimate test. It’s best to assign and care for patients in small waves of 2-4. If you’re feeling brave, you can go all-in and try 8 at a time, though hearts may deplete as a result! Try and keep an extra bottle on your tray if possible, and make sure to keep the pacifiers and giraffe plushes stocked. Combine checking out customers with restocking to save time.
![Heart's Medicine - Hospital Heat - Challenge 20]()
Heart’s Medicine – Hospital Heat – Challenge 20
Chapter 5 – Intensive Care
Challenge 21 – Emily’s Canteen Challenge 5
Serve steady and don’t panic, Emily!
The canteen is hopping, and an extra topping has been added to the cracker sandwiches. Remember to keep products stocked and stay on top of assigning customers to their correct locations – tray or table. It’s best to try and serve multiple customers at a time and do checkout in groups of 5.
Challenge 22 – Oliver Extravaganza 5
Find as many Olivers as you can!
Find as many Olivers as you can in the short amount of time! You’ll need to find at least 37 guinea pigs before time’s up to reach a 3-diamond score. Listen for the squeaks. Each time you hear a squeak, a new guinea pig will appear. Oliver can appear all over, so use a combination of sight and sound to find enough before time’s up!
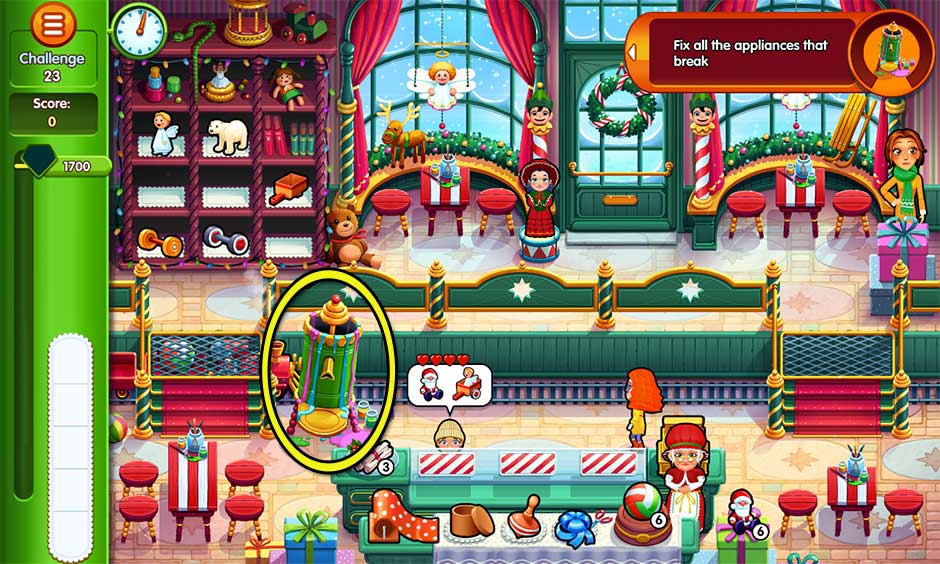
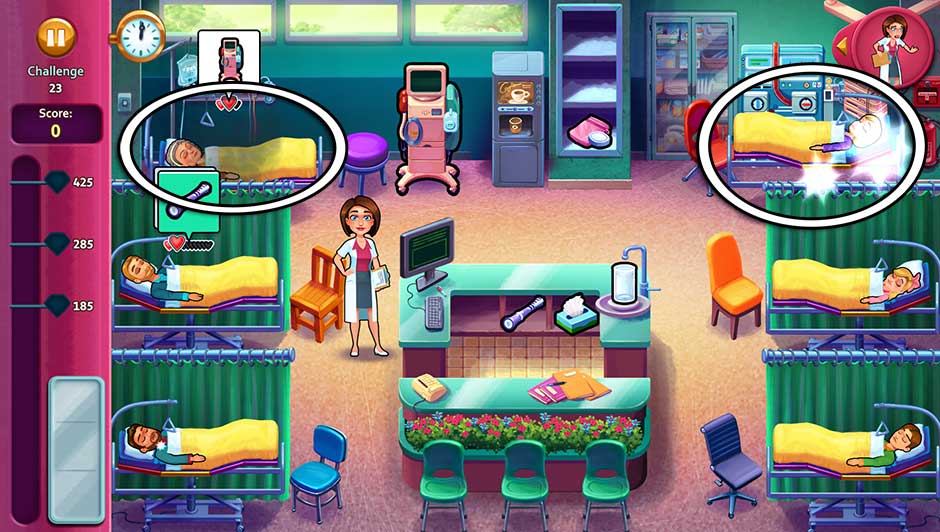
Challenge 23 – Broken Beds
All the beds are malfunctioning! Stabilize them quickly before treating your patients.
The beds are malfunctioning on a massive scale today. Sparks will flash over a bed followed by smoke. Beds that are malfunctioning will move around on their own – a sure sign something is wrong! Click on a moving bed to reposition it correctly. Start with the center (yellow) portion of the bed, then adjust and head and foot as necessary. Beds tend to malfunction in quick succession, so it’s best to try and stabilize them in groups. Remember a patient can’t be treated until the bed malfunction has been addressed.
![Heart's Medicine - Hospital Heat - Challenge 23]()
Heart’s Medicine – Hospital Heat – Challenge 23
Challenge 24 – Minigame Mayhem 5
Score big by completing as many minigames as possible!
Complete as many minigames as you can, as quickly as you can before time’s up! This is a short level whose score is tallied based entirely on how quickly you can complete minigames. The faster you are, the higher the score! If you need help with a specific minigame, refer to the Minigame Section of this walkthrough.
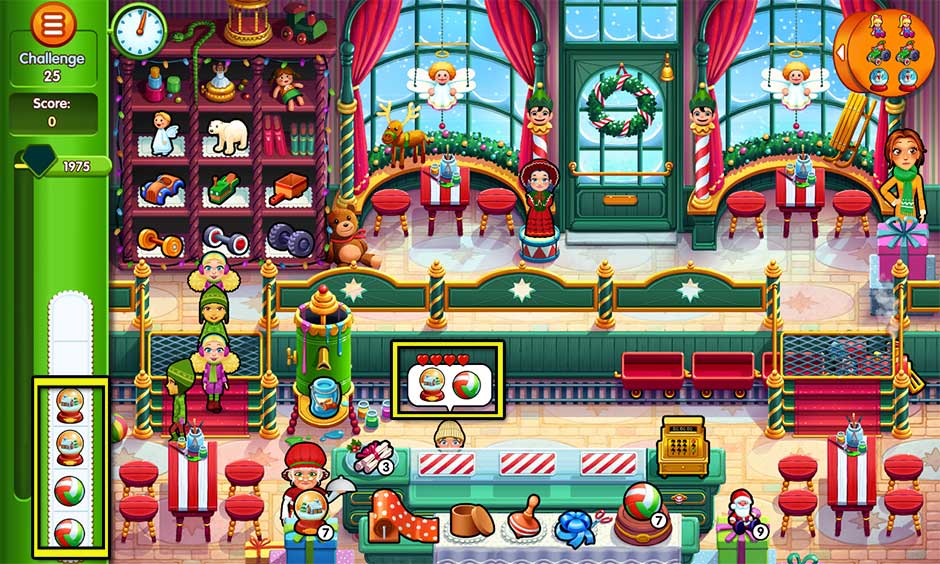
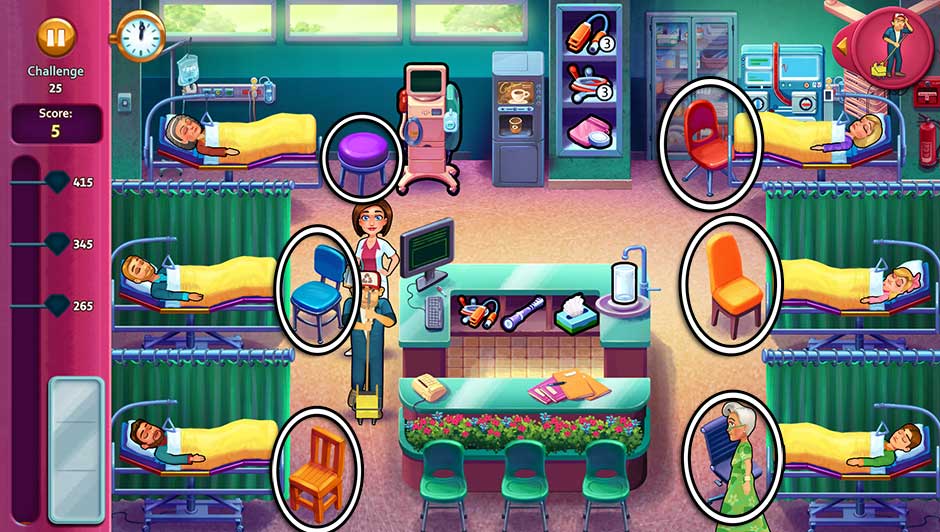
Challenge 25 – Janitor Jokes
The Janitor is joking around with the chairs, so keep a close eye on them!
The Janitor is quite the practical joker. Every time the screen goes black, the Janitor will rearrange the visitor chairs at the foot of the patient beds. Pay extra close attention when assigning visitors to the correct seats today.
![Heart's Medicine - Hospital Heat - Challenge 25]()
Heart’s Medicine – Hospital Heat – Challenge 25
Chapter 6 – Psychiatry
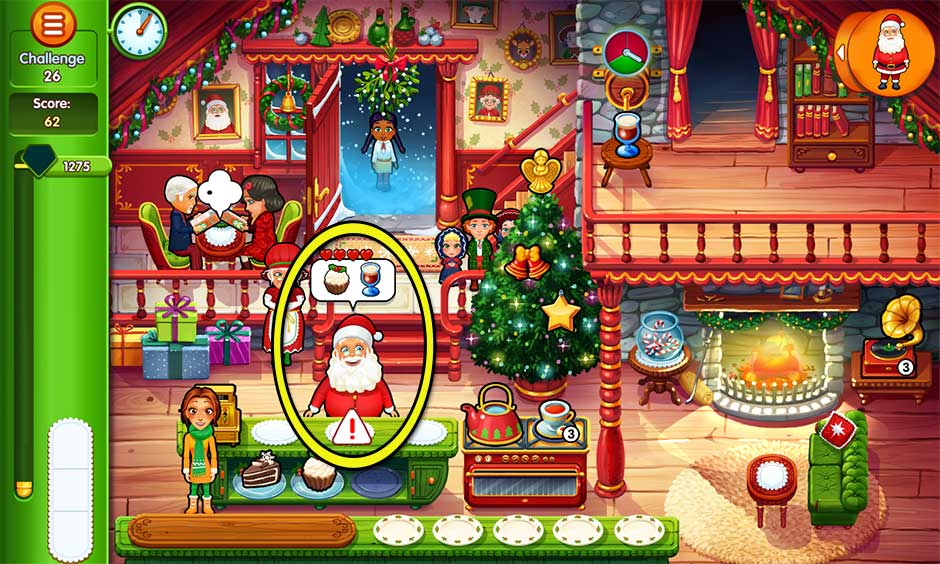
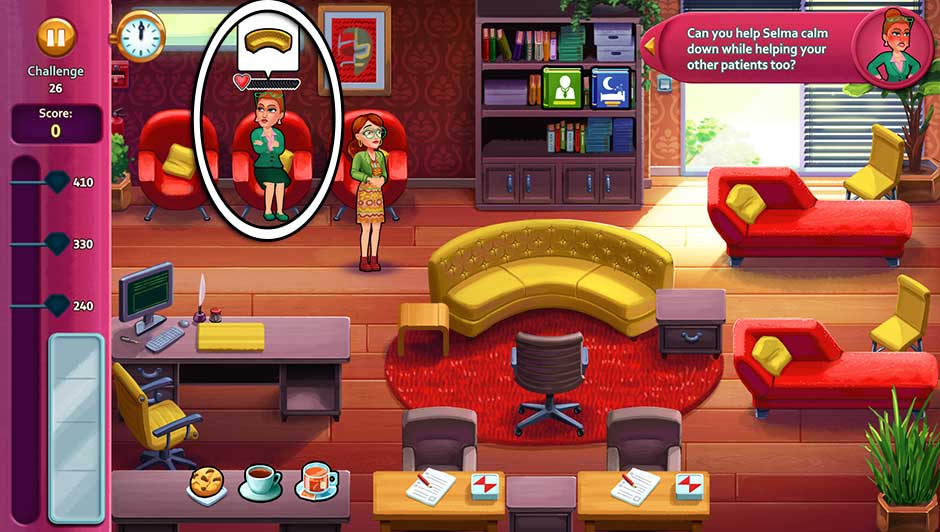
Challenge 26 – Super Stressed Selma
Can you help Selma calm down while helping your other patients, too?
Selma is quite the complicated patient. She has way more hearts than the normal patient, so the majority of your score today will be determined by how quickly you help her. Place absolute priority on helping Selma as quickly as possible at each station. The higher her hearts are, the higher your score will be.
Tip! If your score looks low before the end of the day, don’t panic! A huge part of your score won’t be tallied until Selma checks out.
![Heart's Medicine - Hospital Heat - Challenge 26]()
Heart’s Medicine – Hospital Heat – Challenge 26
Challenge 27 – Emily’s Canteen Challenge 6
Emily’s customers are ordering seconds and thirds.
The canteen is fully-stocked with all options today. Customers coming in will order multiple times. Try to serve orders in waves of 2-3 at a time when possible. The more hearts a customer has, the more times they’ll order.
Challenge 28 – Oliver Extravaganza 6
Find as many Olivers as you can!
Find as many Olivers as you can in the short amount of time! You’ll need to find at least 48 guinea pigs before time’s up to reach a 3-diamond score. Listen for the squeaks. Each time you hear a squeak, a new guinea pig will appear. Oliver can appear all over, so use a combination of sight and sound to find enough before time’s up!
Challenge 29 – I Know What I Want!
Patients get confused about their requests.
Patients today will have difficulty asking for the right items. They may ask for items that aren’t even available here! When this happens, simply click on the patient. If you do this quickly, you’ll earn a quick treatment bonus before the patient asks for the next time. Simply click on a patient any time they ask for an item that isn’t available in the clinic, but don’t forget to bring them items that are! Patients tend to have more hearts today, so if you can click on them quickly, you can quickly build up a high score.
![Heart's Medicine - Hospital Heat - Challenge 29]()
Heart’s Medicine – Hospital Heat – Challenge 29
Challenge 30 – Minigame Mayhem 6
Score big by completing as many minigames as possible!
Complete as many minigames as you can, as quickly as you can before time’s up! This is a short level whose score is tallied based entirely on how quickly you can complete minigames. The faster you are, the higher the score! If you need help with a specific minigame, refer to the Minigame Section of this walkthrough.
Congratulations! You’ve completed all the challenges!
Oliver the Guinea Pig Locations
Oliver is a mischievous guinea pig with a love of adventure! Oliver appears in each of the game’s 60 story levels. Can you find them all? The following list reveals all the hidden locations where Oliver will turn up. Note: This does not apply to challenge levels.
Chapter 1 – Pediatrics
![Heart's Medicine - Hospital Heat - Chapter 1 Oliver Locations]()
Heart’s Medicine – Hospital Heat – Chapter 1 Oliver Locations
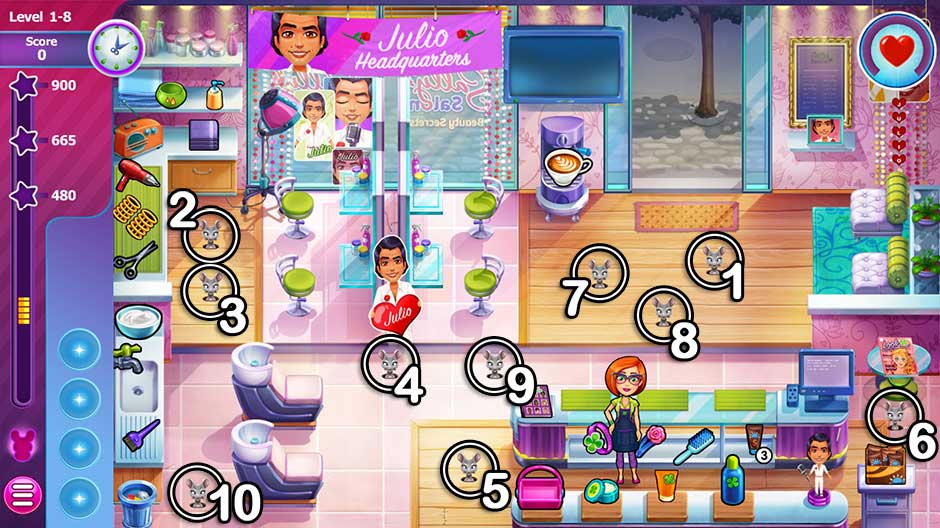
Level 1: At the foot of the examination table on the bottom right.
Level 2: At the inner corner of the desk with the checkout monitor.
Level 3: Behind the center tray table with the thermometer.
Level 4: In the sink in the upper right corner.
Level 5: Behind the right side of the table in the lower left corner.
Level 6: Behind the upper left corner of the stage building supplies, between the first two waiting chairs.
Level 7: Underneath the middle of the checkout desk. *Note: Oliver may be obstructed from view if 3 or more children are waiting at the checkout monitor.
Level 8: On the chair behind the desk with the checkout monitor.
Level 9: Behind the top of the checkout monitor.
Level 10: Behind the center portion of the upper right examination table.
Chapter 2 – Pathology
![Heart's Medicine - Hospital Heat - Chapter 2 Oliver Locations]()
Heart’s Medicine – Hospital Heat – Chapter 2 Oliver Locations
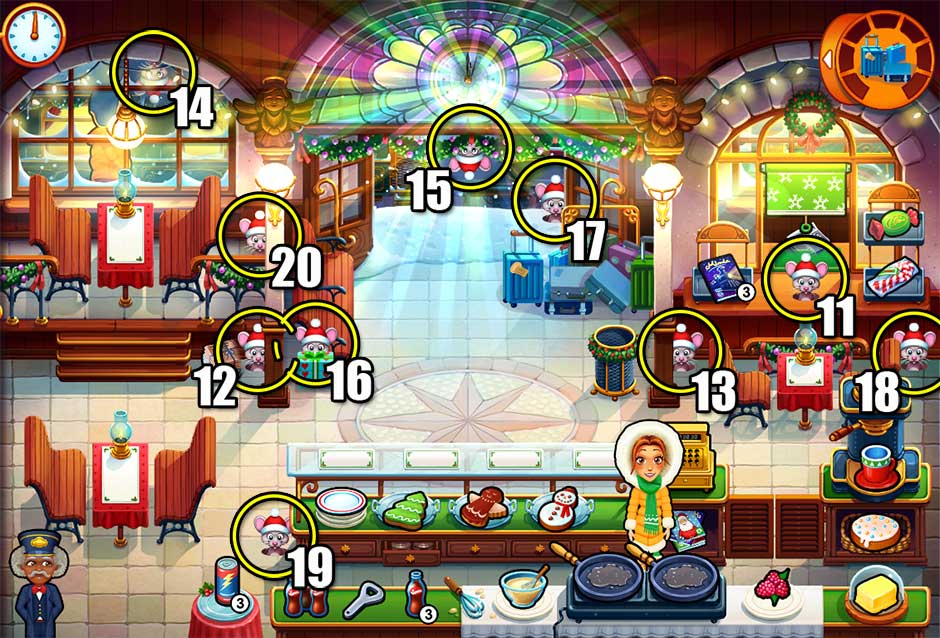
Level 11: Underneath the desk lamp on the divider of the center pathology station.
Level 12: On the tray in the bottom right corner, next to the IV.
Level 13: In the device to the right of the blood centrifuge at the center pathology station.
Level 14: In the bottom right corner of the viewing window on the left.
Level 15: On the computer keyboard at the center pathology station.
Level 16: On the left side of the checkout counter, on the floor between the trash can and the monitor.
Level 17: On the center table between the two patient chairs in the lower right corner.
Level 18: Behind the checkout counter, to the right of the photo frame.
Level 19: On the floor above the stool of the bottom left station with the microscope.
Level 20: In the bottom left corner of the bulletin board above the checkout monitor.
Chapter 3 – Burn-Unit
![Heart's Medicine - Hospital Heat - Chapter 3 Oliver Locations]()
Heart’s Medicine – Hospital Heat – Chapter 3 Oliver Locations
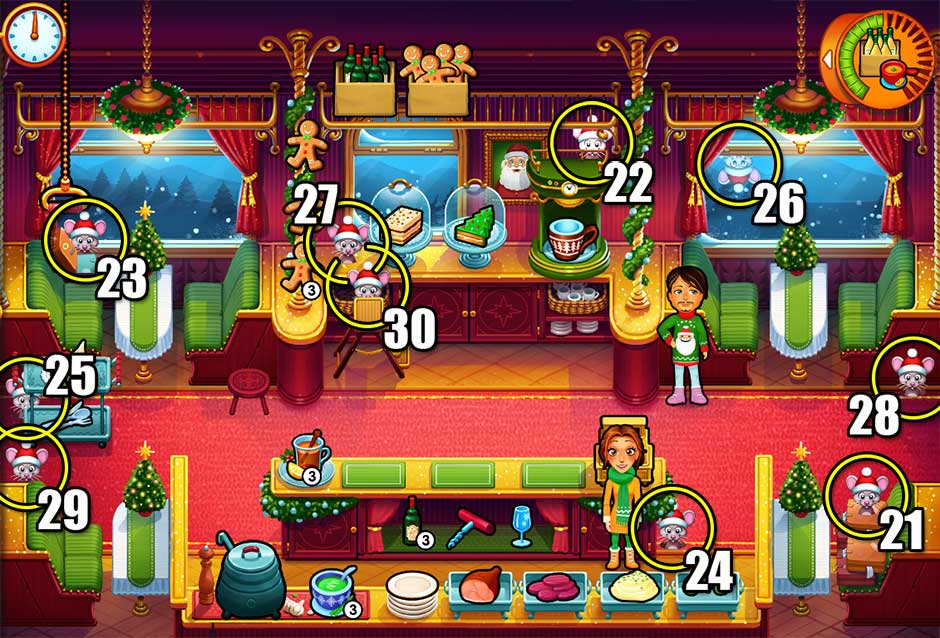
Level 21: Peeking around the right side of the tank on the table between the two chairs, in the center of the room.
Level 22: Hanging upside-down from the surgical light above the rightmost gurney.
Level 23: Between the first and second waiting chairs in the lower left corner.
Level 24: Peeking around the top-left side of the counter with the skin graft equipment.
Level 25: Peeking around the right side of the island behind the waiting chairs.
Level 26: On the floor between the gurneys.
Level 27: Behind the island in the lower left corner, to the right of the center plant.
Level 28: Behind the upper left corner of the bath tub.
Level 29: Between the computer and the phone at the checkout counter.
Level 30: Poking out from the bottom left side of the wall, between the rightmost gurney and the bath tub.
Chapter 4 – Maternity Ward
![Heart's Medicine - Hospital Heat - Chapter 4 Oliver Locations]()
Heart’s Medicine – Hospital Heat – Chapter 4 Oliver Locations
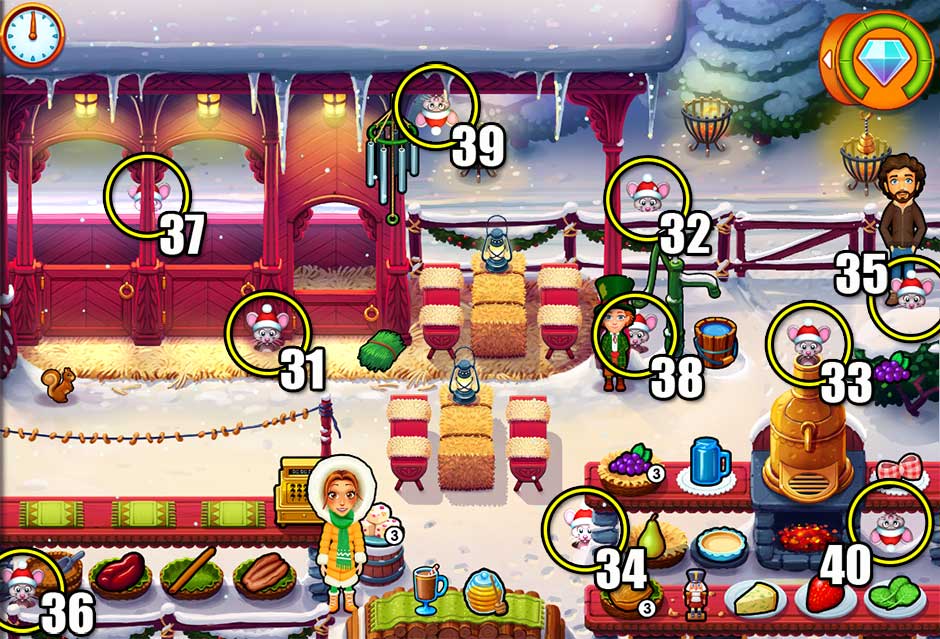
Level 31: Underneath the counter next to the blue giraffe plushes (not the checkout counter).
Level 32: On the upper side of the topmost examination table on the right.
Level 33: Behind the checkout counter to the left of the checkout monitor.
Level 34: Underneath the bottom of the baby crib.
Level 35: On the floor behind the right side of the counter with the pacifier, bottle, plush, and diapers.
Level 36: At the top of the small monitor attached to the bottom left examination table.
Level 37: Peeking out from the corner of the monitor and examination table in the bottom right corner.
Level 38: Peeking out from behind the pot of the plant in the upper right corner.
Level 39: On the floor behind the left side of the counter containing the ultrasound lotion and scanning device.
Level 40: In the bottom right corner of the upper left picture frame on the wall.
Chapter 5 – Intensive Care
![Heart's Medicine - Hospital Heat - Chapter 5 Oliver Locations]()
Heart’s Medicine – Hospital Heat – Chapter 5 Oliver Locations
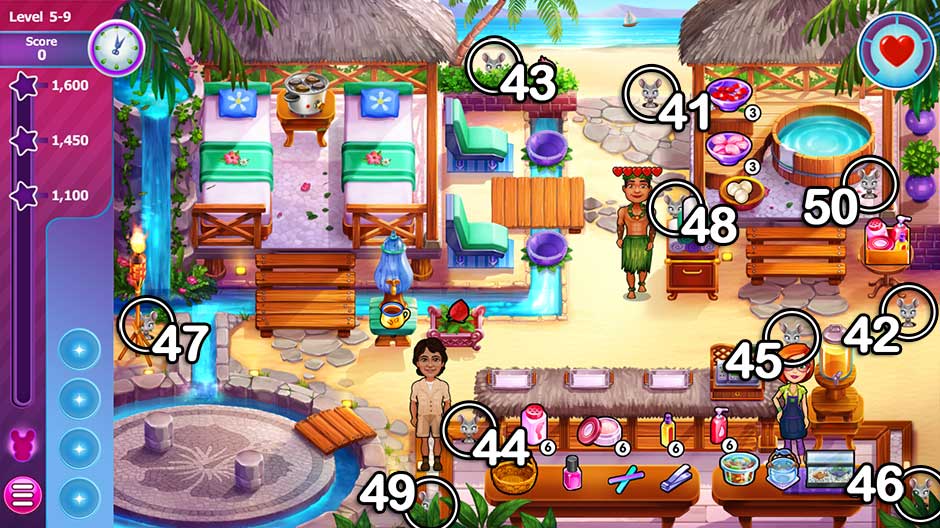
Level 41: Behind the counter beneath the checkout monitor, toward the left and near the phone.
Level 42: On top of the coffee machine.
Level 43: Behind the center portion of the bottommost counter.
Level 44: Behind the top of the blue chair in the lower left corner.
Level 45: In the first cubby beneath the counter with the checkout monitor. *Note: Oliver may be obstructed from view if Allison is standing at the checkout monitor.
Level 46: Poking out from the right side of the bottommost counter.
Level 47: Peeking out from the top of the red chair in the upper right corner.
Level 48: In the window at the top of the screen, on the far right.
Level 49: Peeking out from around the upper left corner of the counter, next to the checkout monitor.
Level 50: At the top of the purple stool in the upper left corner. *Note: Oliver may be obstructed from view if a customer is sitting on this stool.
Chapter 6 – Psychiatry
![Heart's Medicine - Hospital Heat - Chapter 6 Oliver Locations]()
Heart’s Medicine – Hospital Heat – Chapter 6 Oliver Locations
Level 51: In the cubby underneath the stack of papers on the desk.
Level 52: On top of the side table to the right of the couch.
Level 53: Behind the top of the center waiting chair in the upper left corner. *Note: Oliver may be obstructed from view if a patient is sitting in the center waiting chair.
Level 54: Peeking out from the bottom left side of the upper right chaise lounge.
Level 55: In the left brown chair at the bottom of the screen. *Note: Oliver may be blocked from view if there is a patient at this station.
Level 56: Behind the top of the center waiting chair in the upper left corner. Same location as Level 53. *Note: Oliver may be obstructed from view if a patient is sitting in the center waiting chair.
Level 57: On the yellow chair at the checkout desk.
Level 58: On the floor on the far right, behind the top of the bottommost yellow chair.
Level 59: Hanging from the plant leaves in the upper right corner.
Level 60: Underneath the side table to the left of the couch.
Minigames
Minigames are short challenges that will appear during levels. This section lists every minigame available and how to play.
-Pediatrics-
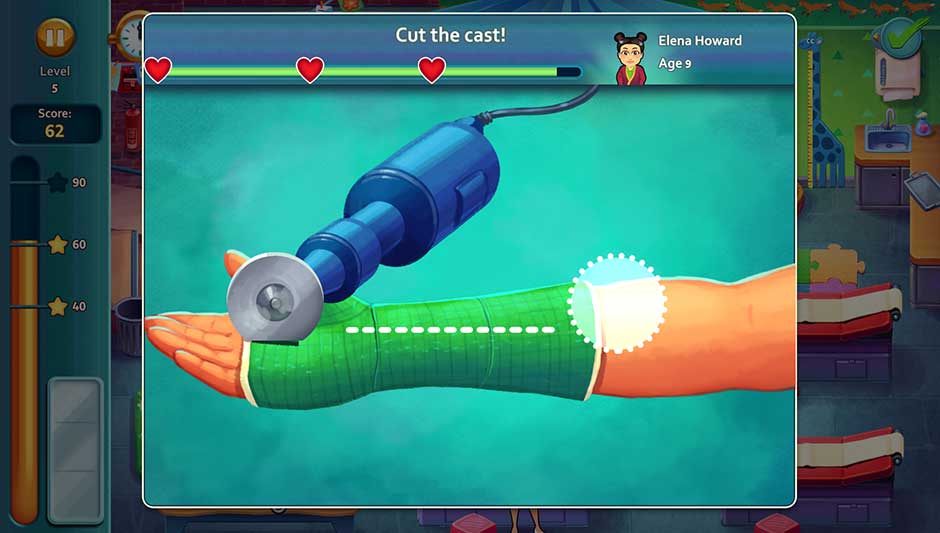
Cut the cast!
Click and hold the circular saw, dragging it along the dotted line to the circle shown.
![Minigame - Cut the cast!]()
Minigame – Cut the cast!
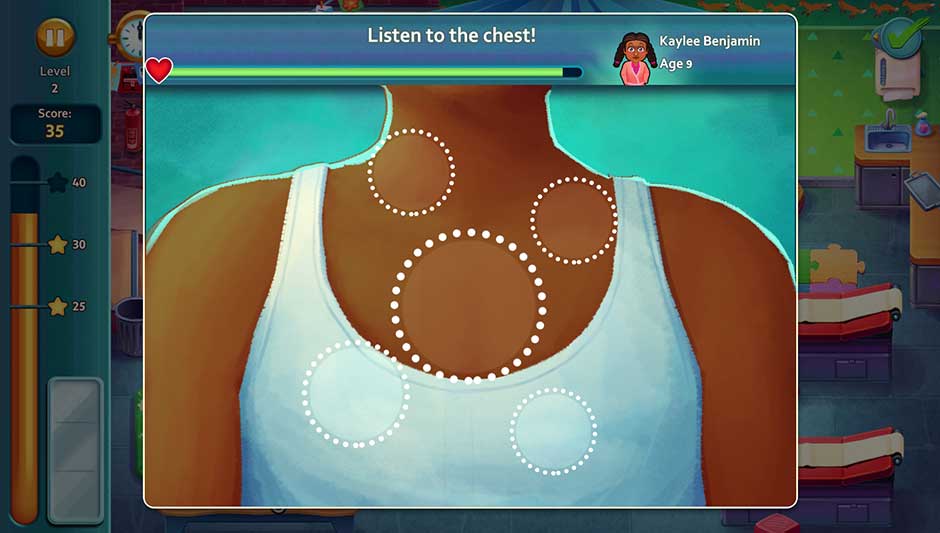
Listen to the chest!
Click inside each of the dotted circles as quickly as possible to listen to the patient’s heartbeat.
![Minigame - Listen to the chest!]()
Minigame – Listen to the chest!
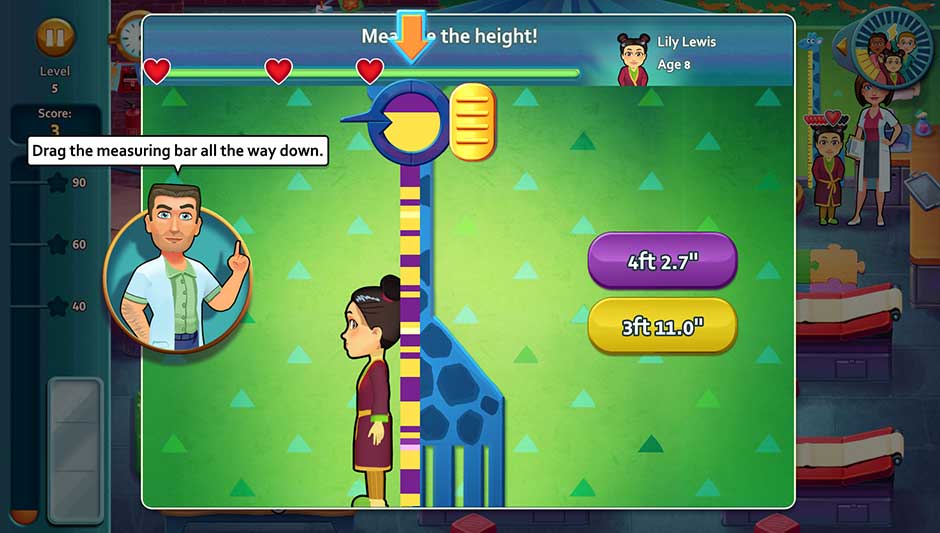
Measure the height!
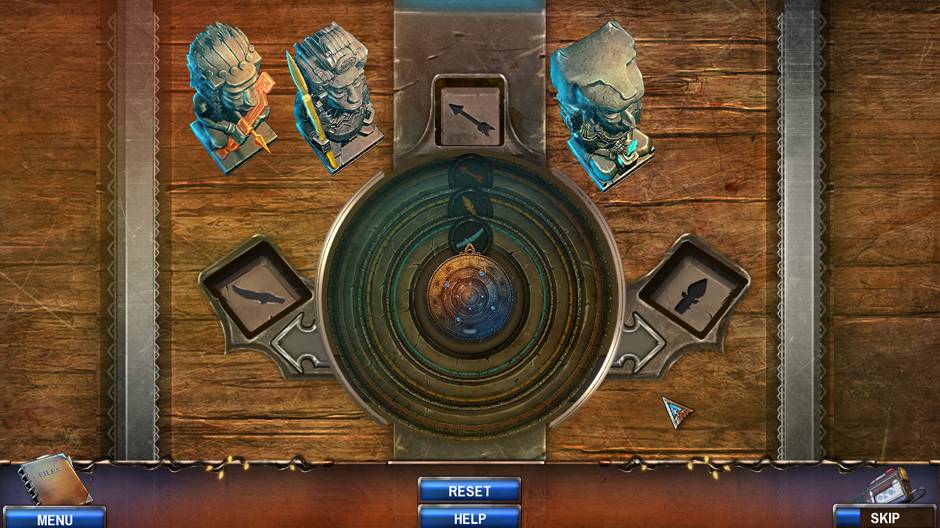
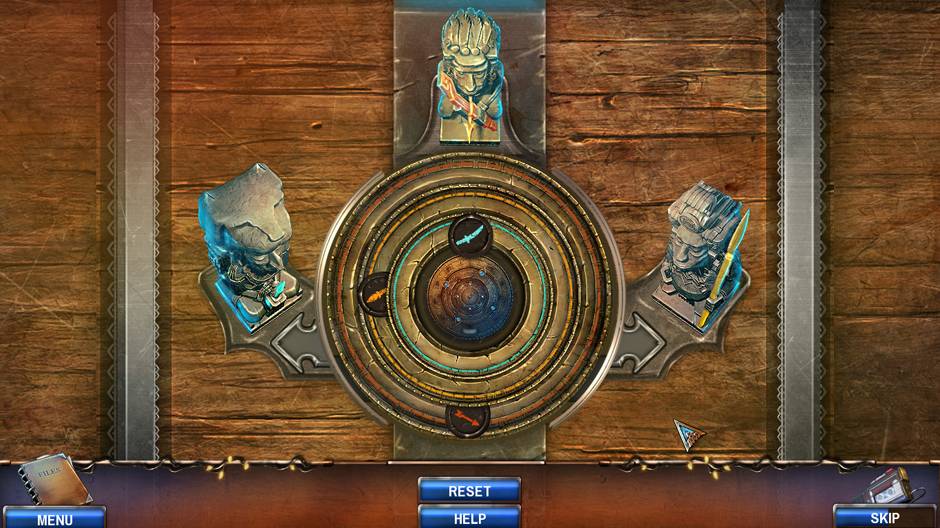
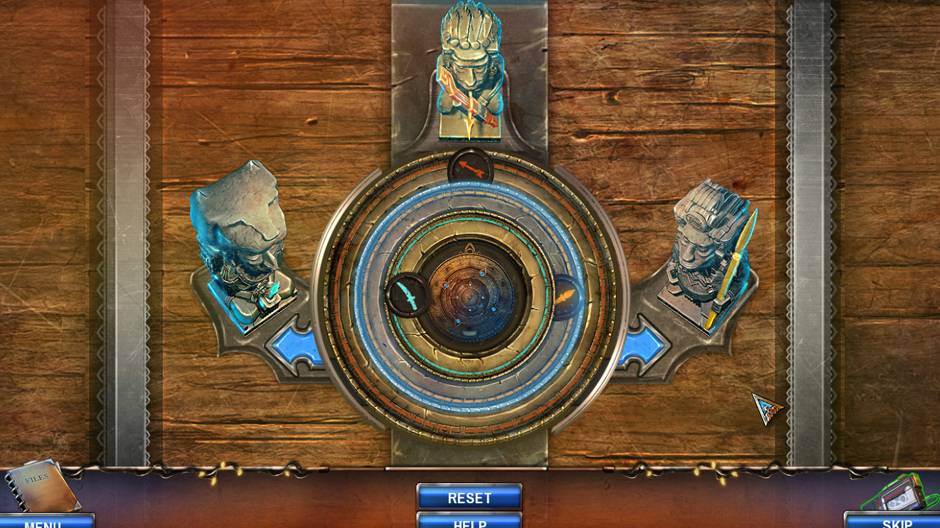
Click on the gold-colored slider on the right side of the circular lens. Drag the slider down until it reaches the top of the child’s head. The slider will stop automatically as soon as it lands on the child, so you can drag it down as quickly as possible. The needle inside the lens will land on a color. Click on the button of the corresponding color on the right to determine the child’s height.
![Minigame - Measure the height!]()
Minigame – Measure the height!
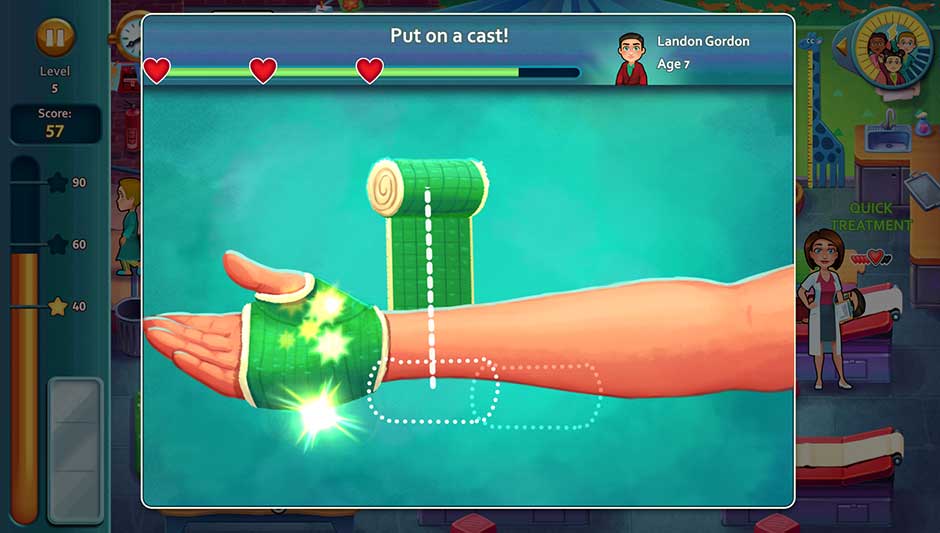
Put on a cast!
Click and hold the bandage roll, moving it downward to the dotted outline. Repeat this gesture until the arm is completely wrapped.
![Minigame - Put on a cast!]()
Minigame – Put on a cast!
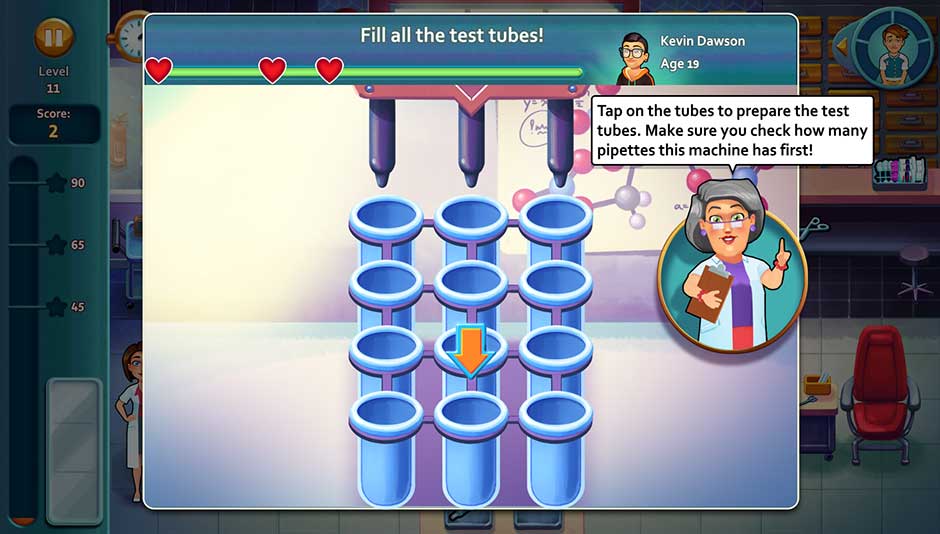
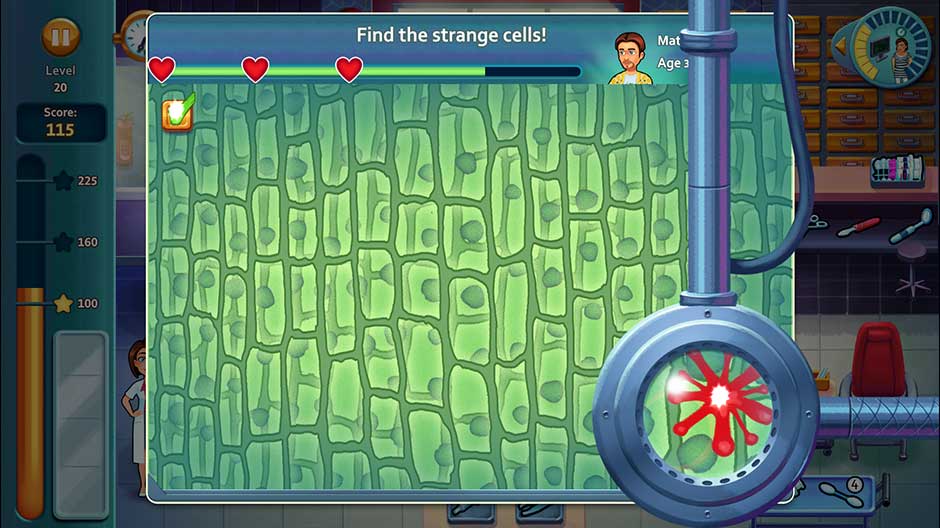
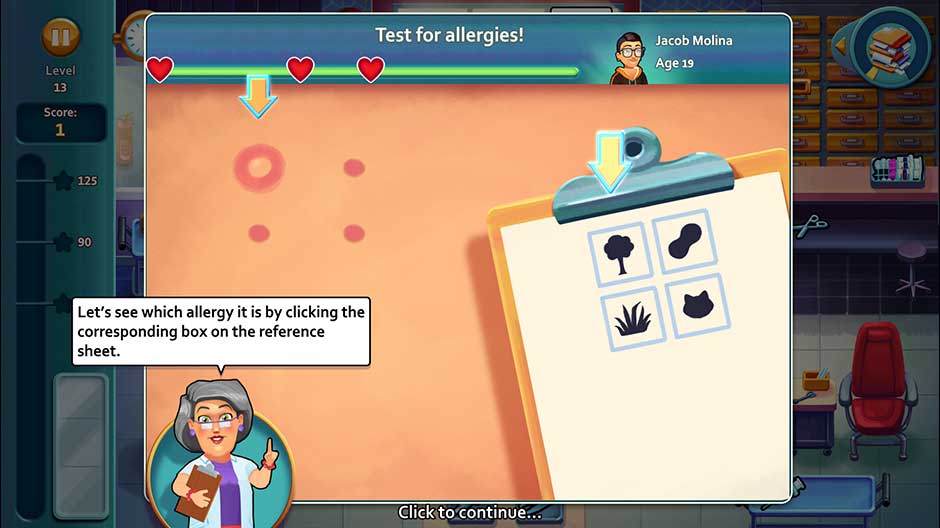
-Pathology-
Fill all the test tubes!
Click on the test tubes to fill them. It’s important to note the number of pipettes the machine at the top of the window has first! Click on the center tube of the set. For example: If the machine has 3 pipettes and the tubes are aligned in rows of 3, click on the middle or center tube to fill all 3 at once. You do not have to wait for the machine to finish filling tubes before you click on the next set, so click on them as quickly as possible.
![Minigame - Fill all the test tubes!]()
Minigame – Fill all the test tubes!
Find all the positive tests!
Click on all the green test tubes as quickly as possible to mark them. A checkmark will appear over tubes that have successfully been selected.
![Minigame - Find all the positive tests!]()
Minigame – Find all the positive tests!
Find the strange cells!
Click and hold the handle on the right side of the viewing lens. While holding the click, move the lens around the frame until you spot a strange cell. Strange cells have a red glow around them. When you see the red glow, move the lens over the cell to find and remove it. The minigame will finish once you’ve located all the strange cells in the frame.
![Minigame - Find the strange cells!]()
Minigame – Find the strange cells!
Test for allergies!
A stamp allergy test will be administered. Once lifted, dots will appear. A swollen dot with a light center and red ring around it indicates an allergy. The number and layout of the dots on the left will match the allergy sheet on the right. Click on the corresponding icon to label the allergy. For example, if an allergy shows up on the top left dot, click on the top left icon on the sheet to label the allergy.
![Minigame - Test for allergies!]()
Minigame – Test for allergies!
-Burn-Unit-
Fill the lungs with oxygen!
Click on the blue on/off button on the right to begin filling the lungs with oxygen. Click again as soon as the oxygen level rises into the green zone marked over the lungs. As soon as the very top of the light-blue layer of oxygen reaches the green zone, click! If you press too early, you’ll need to try again. If you press too late, you’ll have to wait for the oxygen to drain naturally. The lower the green bar is, the faster the oxygen will fill the lungs.
![Minigame - Fill the lungs with oxygen!]()
Minigame – Fill the lungs with oxygen!
Place the grafts!
Click and hold a graft in the blue tray, then drag it to the matching outline on the right.
![Minigame - Place the grafts!]()
Minigame – Place the grafts!
Spray the burns!
Click on the red spots on the patient’s skin to spray the burns. They can be hard to spot, so if you’re having difficulty, start from the outer edges and work inward.
![Minigame - Spray the burns!]()
Minigame – Spray the burns!
-Maternity Ward-
Change the diaper!
Click and hold the baby wipe on the right, dragging it to the baby’s bottom. Be careful, the baby might try to grab it! If the baby grabs hold of the wipe, click and drag the toy on the upper right to the outline over the baby. Once the baby grabs the toy and releases the wipe, drag the wipe to the baby’s bottom to clean it. Drag the diaper over the baby’s bottom once it’s been wiped to complete the minigame.
Tip! Drag the wipe in a wide circular u-shape to move around the baby’s grabby hand. This picture will show you exactly where you should drag the wipe to avoid the baby:
![Minigame - Change the diaper!]()
Minigame – Change the diaper!
Find the baby!
Click and hold, spreading the cream about the mother’s belly. An image will begin to appear on the left. You don’t need to cover the mother’s entire belly, you only need to reveal the image of the baby. As soon as you spot the baby’s face, quickly spread the cream around to reveal the entire baby and complete the minigame.
![Minigame - Find the baby!]()
Minigame – Find the baby!
Turn the baby upside-down!
Click and hold the arrow around the outside of the dotted circle. Move the arrow clockwise until the baby’s head is pointed downward. The baby will give a thumbs-up once it’s been aligned correctly. You cannot move counter-clockwise, and babies will rotate at different speeds, so it’s best to take this minigame a little slower than the others.
![Minigame - Turn the baby upside down!]()
Minigame – Turn the baby upside down!
-Intensive Care-
Focus the readout!
Click and hold the slider beneath the colored lines. Move the slider back and forth until the colored line matches the grey outline behind it. Repeat this for all the readouts on the monitor.
![Minigame - Focus the readout!]()
Minigame – Focus the readout!
Hang up all the cards!
Click and hold a card in the lower left corner, moving it up to one of the red clips at the top of the frame. The card will click onto the clip and string once placed correctly. You’ll need to be precise with this minigame. Make sure you’re dragging the card directly onto the red clip and not just into their general vicinity.
![Minigame - Hang up all the cards!]()
Minigame – Hang up all the cards!
Put the bed in the correct position!
Click and hold the arrow buttons on the bed to move it to the position indicated by the dotted outline. You should always start with the center yellow portion of the bed. Once that’s correctly positioned, move the foot and head of the bed as needed to match the outline. Sometimes you will only need to move one portion of the bed, while other times the entire thing will need to be adjusted.
![Minigame - Put the bed in the correct position!]()
Minigame – Put the bed in the correct position!
-Psychiatry-
Play the notes in the correct order!
Look at the colored notes on the graph paper. Each note has a color and letter. From left to right, read the notes on the sheet and click on the corresponding key at the bottom of the frame. A checkmark will indicate once a note has been played.
![Minigame - Play the notes in the correct order!]()
Minigame – Play the notes in the correct order!
Recreate the example image!
Click and hold the slider on the right, moving it up and down to focus the image. Move the slider until the image matches the one shown in the lower left corner.
![Minigame - Recreate the example image!]()
Minigame – Recreate the example image!
Remove all the negative emotions!
Click on the negative emotions to remove them. Purple and red emojis are negative emotions. Any emojis of the same color touching each other will all be removed at the same time if you click on them, no matter how big or small the group. The minigame will end once all the negative emotions have been cleared. Note that some negative emotions may drop down only after others have been removed.
Tip! You can also remove blocks of positive green and yellow emojis. This will not harm the patient. Instead, it may help you create large groups of negative emotions that will be easier to click away.
![Minigame - Remove all the negative emotions!]()
Minigame – Remove all the negative emotions!
Trophies
A total of 20 unlockable trophies await in Heart’s Medicine – Hospital Heat. Click on the trophy icon in the upper right corner of the level select screen to view your trophies and progress. Each trophy features an iconic character from the series. Can you collect them all? This section will tell you how!
| Character Trophy |
Description |
How to Unlock |
| Connor |
Complete your internship at the pediatrics department! |
Complete Levels 1 – 10. |
| Ruth |
Complete your internship in pathology! |
Complete Levels 11 – 20. |
| John |
Complete the burn unit flashback! |
Complete Levels 21 – 30. |
| Chance |
Complete your internship at the maternity ward! |
Complete Levels 31 – 40. |
| Sophia |
Complete your internship at the intensive care unit! |
Complete Levels 41 – 50. |
| Sam |
Complete your internship in psychiatry! |
Complete Levels 51 – 60. |
| Jenny |
Restock 250 items! |
Restock items with small numbers next to them in any level. Restockable items in Emily’s Canteen challenge levels also count. |
| Robin |
Get 200 quick checkout bonuses! |
Check 200 customers out within a couple seconds of their arriving at the register. |
| Mason |
Earn 250 hearts in minigames! |
Complete minigames to earn hearts. Excluding minigame challenges, you can earn up to a total of 3 hearts per minigame per patient. |
| Little Girl |
Check out 600 patients with golden hearts! |
Treat patients quickly to increase the number of hearts over their head. Successful quick treatment can result in an overall golden-heart patient. Check out 600 of these patients to unlock this achievement. |
| Princess |
Walk 40,000 yards! |
Walk a total of 40,000 yards. Any movement between stations or locations during a level counts toward this total. |
| Michael |
Have an item on your tray before someone asks for it! |
Easiest to unlock in the earliest levels of a chapter when patients have fewer items to choose from. Select one and keep it on your tray, giving it to a patient when asked to unlock this trophy. |
| Victor |
Fill up every spot where a patient could stand or lie down, and have at least one person standing at the checkout desk! |
This can be unlocked during any level as long as all the stations are filled. Challenge 11 is one of the best levels to unlock this achievement due to the volume of patients you’ll have. |
| Ruth’s Mom |
Use the heart booster stations to earn 200 hearts! |
Heart booster stations can be purchased in the upgrades menu after selecting a level. Assign patients to these stations to boost their hearts. The following is a list of heart booster station upgrades and how much they cost:
Pathology (Levels 11 – 20)
· 3D Combination Puzzle – 600 coins
Burn Unit (Levels 21 – 30)
· Fun Magazines – 500 coins
Maternity Ward (Levels 31 – 40)
· Baby Crib – 500 coins
Intensive Care (Levels 41 – 50)
· Bonbons – 600 coins
Psychiatry (Levels 51 – 60)
· Self-Help Flyer Stand – 500 coins
|
| Janitor |
Complete all “clean up” tasks in the game! |
Complete all clean up tasks. The following is a list of levels that count toward this achievement:
Pediatrics: Level 8
Pathology: Challenge 6
Burn-Unit: Level 26
Maternity Ward: Level 32
Maternity Ward: Challenge 18
|
| Quinn |
Finish all bonus levels with at least one diamond! |
Complete all challenge levels with at least 1 diamond. Challenge levels are indicated by clipboard icons in the level select map. You can earn up to 3 diamonds per challenge. |
| Daniel |
Buy all the upgrades in every department! |
The upgrades menu will open after selecting a level. Purchase all the upgrades available per each department. You can earn coins to purchase these upgrades by completing levels. The higher your score, the more coins you’ll earn. |
| Mathilda |
Earn 3 stars in each story level! |
Earn 3 stars in every story level. This excludes challenges, indicated by clipboards in the level select map. For strategies on how to complete each level with the highest scores, refer to the walkthrough above. |
| Ryan |
Collect all the diamonds in the game! |
Collect all the diamonds in the game. You can collect 1 diamond per story level by completing the day’s challenge, and up to 3 diamonds per challenge level based on your score. There are a total of 150 diamonds to unlock. |
| Allison |
Get all other trophies! |
Unlock all other trophies. Refer to the list above for more details. |
Video Walkthrough
Welcome to the video walkthrough section! For visual learners, the video walkthrough is a 100% complete playthrough of all Heart’s Medicine – Hospital Heat levels – including challenges. All Oliver the guinea pig locations are also revealed. Click the play button below to get started, or click on the options icon in the upper left corner of the video frame to select a level.
Didn’t Find What You Need?
We Can Help!
If you need additional help with the game, our Customer Support team is there for you! Struggling with a level? Is your game not working correctly?
Click here to send a support ticket!
The Heart’s Medicine – Hospital Heat Platinum Edition Official Walkthrough is meant as a guide and does not contain cheats, hacks, or serials.
The post Heart’s Medicine – Hospital Heat Official Walkthrough appeared first on GameHouse.