Quantcast
Channel: Guides – GameHouse
Viewing all 192 articles
Browse latest View live

Reveries – Sisterly Love QuickStart Guide

$
0
0

Welcome to the Reveries – Sisterly Love QuickStart Guide! Reveries – Sisterly Love is a Hidden Object game in which you must collect items and explore locations in order to progress. Monica, your sister, has saved your life by agreeing to trade her soul to an evil witch. Empowered by her sacrifice, it’s your job to track down the sorceress before your sister’s soul is lost forever! This game is a Platinum Edition title, as and such, includes an integrated walkthrough. The Reveries – Sisterly Love walkthrough can be accessed by clicking on the “Strategy Guide” button located in the lower left corner of the screen.

Reveries - Sisterly Love Walkthrough Location

Reveries – Sisterly Love Walkthrough Location

How to Play

Are you new to hidden object titles? Have you simply forgotten some of the basics? Don’t worry! Here are a handful of helpful pointers to guide you in the right direction:


  • All items you collect throughout your adventure will be added to your Inventory. Your inventory is located at the bottom of your screen. When you want to use and item, select the item you’d like to use from your inventory, then click on the location where you’d like to use it.
  • When your cursor turns into a directional arrow, it means you can click to access a new area. Navigate by clicking when arrows appear to move between screens and locations.
  • Reveries – Sisterly Love is a Hidden Object game, and as such, you will encounter Hidden Object Scenes! In these locations, a list of items you need to find will be displayed at the bottom of your screen. Locate all the items in this location in order to progress. Upon locating all the items successfully, a Key Item will be added to your Inventory!
  • Key Items are items which are necessary in order for you to progress in the game. These items are stored in your inventory, and will automatically be removed once they have been used correctly.
  • Feeling stuck? There’s a Hint button located in the bottom right corner of your screen. Hints tend to be unlimited, but often require time to recharge. Unable to solve a puzzle? The Hint button will become a Skip button during puzzles, but often requires time to charge up before use.


What is a QuickStart Guide?

Our QuickStart Guides are intended to provide you with all the essential information you need to access pre-existing walkthroughs. Many of our Platinum Edition games contain integrated strategy guides to help you when you’re feeling stuck, without having to exit the game. For more information on how to access Reveries – Sisterly Love’s integrated walkthrough, scroll up to the top of this page.


The post Reveries – Sisterly Love QuickStart Guide appeared first on GameHouse.


Wedding Salon 2 Essentials Walkthrough

$
0
0

Being a world-famous wedding planner isn’t easy, especially when your reputation precedes you so much, your honeymoon is cut short! Jump into the time management mayhem of Wedding Salon 2 with Holly and make all those days magical. Our Wedding Salon 2 walkthrough features all the essentials you’ll need, such as how to play, tips, tricks, and more!

Contents

Wedding Salon 2 Essentials Walkthrough

Welcome to our Wedding Salon 2 walkthrough. Wedding Salon 2 is a time management game featuring 10 international locations and 90 levels. Almost every level follows the same basic strategy. As such, our Wedding Salon 2 walkthrough focuses on the essentials – How to Play, Tips & Tricks, and all the general strategies and how-to’s you’ll need to achieve high scores.


How to Play

Whether you’re just starting in your own salon or need a refresher, this section covers the game’s general gameplay and how everything works. Each location is divided up into 10 levels, or days. Almost all days feature the same basic challenge: complete the day with the highest score possible before time runs out.


First, a customer will enter the salon. New customers will take a seat on the left as they wait to be taken to the station they’re requesting. Once a customer has decided where they’d like to go, an icon with the corresponding station and color will pop up over their head. Click and hold the customer to drag them to the location of their choosing.

Wedding Salon 2 - Click and Drag a Customer

Wedding Salon 2 – Click and Drag a Customer

Once a customer has been taken to the station of their choosing, click on them to perform the action associated with that station. Sometimes, simply clicking on the customer will be enough to complete the action, e.g. styling someone’s hair. However, sometimes a mini-game will pop up in which you must complete a task before that customer will be happy. Most mini-games come in the form of matching or selecting an item. A couple examples are listed here:

  • Example: Match a Pair of Earrings

Match a pair of earrings by clicking on them. Earrings will rotate around the stand as you look for the matching pair. The customer will not be satisfied until the minigame task is complete. Complete it successfully to bolster their mood.

Wedding Salon 2 - Match a Pair of Earrings

Wedding Salon 2 – Match a Pair of Earrings

  • Example: Unique Gift

Choose the unique gift from a lot of gifts available. A unique gift will be unique in both color and design. Do this successfully to bolster a customer’s mood.

Wedding Salon 2 - Choose a Unique Gift

Wedding Salon 2 – Choose a Unique Gift

Sometimes customers will want to make multiple stops at different stations before they’re ready to check out and pay. If your stations are full, but a customer from one station wants to go to another and vice versa (and they match), simply click and drag one of the customers to the station they’d like to have them automatically switch.


Once a customer is finished with their makeover, they’ll move to the cash register. Click on the register to collect a customer’s cash. A maximum of 4 customers can wait at the register at once before they will start to back up.


That’s it! It’s that simple. Once you feel comfortable, you can stack multiple actions by clicking multiple locations. A number will appear showing in which order Holly will complete tasks. If you made a mistake and assigned a task you don’t want Holly to do, don’t worry – just click on the task number to cancel it instantly.


General Tips & Tricks

You know how the basics work, now it’s time to delve into more advanced strategies to help you in your quest to give every wedding a happy ending. This section focuses on the more advanced aspects of the game.


  • Make sure you always have an available seat. Customers entering your salon will want to be seated immediately. If a customer is unable to be seated, a timer will appear over their head. You will have a very short period of time to free up a seat for them, otherwise they will leave the establishment. It’s almost impossible to get a gold score if a customer leaves, so make sure you always have a seat free!
Wedding Salon 2 - Waiting Customer

Wedding Salon 2 – Waiting Customer

  • Help your indecisive customers decide. Sometimes a customer will have difficulty choosing a product or service. In these instances, you have two options:
  • If you have a catalogue available, give this to the customer with a “?” mark over their head. This will help them instantly decide what they’d like without the need for Holly to move over to them.
  • Click on the customer with the “?” mark over their heads to have Holly go to them and help them decide. An indecisive customer won’t make decisions on their own, so it’s important to focus on them right away to make sure that seats remain free!
  • Click quickly to make actions go faster. When the circular meter appears over a customer’s head showing how much longer is needed to complete their task, click repeatedly to make the task go that much faster. This will save you a lot of time.
  • Serve multiple clients of the same gender in a row. If you serve multiple clients of the same gender in a row at a station, you will build up a series of combos that will allow you to skip minigames and improve your score! The best tactic to use, in the event you have two or more stations, is to dedicate one station to male customers and one to female as much as possible.
Wedding Salon 2 - Gender Combo Bonus

Wedding Salon 2 – Gender Combo Bonus

  • Hire Help! One of the best investments you can make while purchasing upgrades is to hire the help of an assistant to manage a station for you. This is by far the most time-efficient upgrade you can purchase, so try to save up as much as possible.
  • Serve the VIPs first. VIPs are valuable customers that tend to be impatient, but will tip more. Make sure these customers are always your priority when they’re present.
  • Keep one station free at all times. As much as possible, try to ensure there’s an empty spot at one of every station. This will allow you room to maneuver and prevent customers from backing up and leaving.
  • When in doubt, don’t worry about the combos – Focus on the customers! It’s better to check out customers individually than to try and check them out or help them in pairs. Attempting to check people out in pairs will often result in a customer back-up that will prevent you from obtaining a high score.
  • Collect bonus happiness and gold when available. A happy customer makes everyone happy – including you! Bonus happiness and gold will appear when a happy customer is helped. Collect these for free bonuses to your score!
Wedding Salon 2 - Collect Free Bonuses

Wedding Salon 2 – Collect Free Bonuses


Home Improvement

As you complete levels and obtain high scores, you will obtain gold for upgrades and tokens for renovating your home. Each time you earn a new token, you will automatically be taken to the Home Improvement screen. Click on the arrows at the top of the screen to navigate between home locations. Click on gold-colored tokens to select the upgrade you’d like to install in your home. You can also access the Home anytime by clicking on the house icon in the upper left corner of the level select screen.

Wedding Salon 2 - Home Improvement

Wedding Salon 2 – Home Improvement


Wedding Salon Series by Sugar Games

The big day only comes once in a lifetime. And that’s where Holly comes in – wedding planner extraordinaire! With Holly’s skills, endless couples have left her salon pleased as punch. If you’ve enjoyed Wedding Salon 2, check out the game that started it all!


Play the original Wedding Salon and join Holly as she runs multiple wedding salons. There’s nothing simple about planning a wedding – but especially not while also planning her own! Help Holly manage the chaos of the big day and help customers leave happy while making her own dream wedding come true!


Congratulations, you’ve completed our Wedding Salon 2 Guide and Essentials Walkthrough!


The Wedding Salon 2 Walkthrough is meant as a guide and does not contain cheats, hacks, or serials.


The post Wedding Salon 2 Essentials Walkthrough appeared first on GameHouse.

Empress of the Deep 3 – Legacy of the Phoenix QuickStart Guide

$
0
0

Welcome to the Empress of the Deep 3 – Legacy of the Phoenix QuickStart Guide! Empress of the Deep 3 – Legacy of the Phoenix is a Hidden Object game in which you must collect items and explore locations in order to progress. Join Empress Anna on a journey back to her home tribe after vanquishing her evil twin, Pandora. This game is a Platinum Edition title, as and such, includes an integrated walkthrough. The Empress of the Deep 3 – Legacy of the Phoenix walkthrough can be accessed by clicking on the “Strategy Guide” button in the upper left corner of the screen.

Empress of the Deep 3 - Legacy of the Phoenix Walkthrough Location

Empress of the Deep 3 – Legacy of the Phoenix Walkthrough Location

How to Play

Are you new to hidden object titles? Have you simply forgotten some of the basics? Don’t worry! Here are a handful of helpful pointers to guide you in the right direction:


  • All items you collect throughout your adventure will be added to your Inventory. Your inventory is located at the bottom of your screen. When you want to use and item, select the item you’d like to use from your inventory, then click on the location where you’d like to use it.
  • When your cursor turns into a directional arrow, it means you can click to access a new area. Navigate by clicking when arrows appear to move between screens and locations.
  • Empress of the Deep 3 – Legacy of the Phoenix is a Hidden Object game, and as such, you will encounter Hidden Object Scenes! In these locations, a list of items you need to find will be displayed at the bottom of your screen. Locate all the items in this location in order to progress. Upon locating all the items successfully, a Key Item will be added to your Inventory!
  • Key Items are items which are necessary in order for you to progress in the game. These items are stored in your inventory, and will automatically be removed once they have been used correctly.
  • Feeling stuck? There’s a Hint button located in the bottom right corner of your screen. Hints tend to be unlimited, but often require time to recharge. Unable to solve a puzzle? The Hint button will become a Skip button during puzzles, but often requires time to charge up before use.


Empress of the Deep Series by Silverback Productions

A thrilling hidden object adventure series, Empress of the Deep follows the journey of Anna, from awakening to fighting evil, to making her way back home. Each game further expands the saga of the Empress of the Deep.


Empress of the Deep – The Darkest Secret follows the awakening of Anna after a one hundred year slumber. Locked in a temple beneath the waves, Anna learns of the true identity of the Empress of the Deep, as well as the torment of the people living above the waves. Only Anna holds the key to defeating the evil sorceress that oppresses them. Witness the awakening of the Empress of the Deep in this, the first title of the series.


Empress of the Deep 2 – Song of the Blue Whale continues Anna’s story as she fights to save her kingdom from the grasp of the evil Pandora. Four Children of Light are missing from their home in the Temple of the Clouds. It’s only with their help that Anna will be able to combat her evil twin’s dark powers.


Play the Empress of the Deep series, available at GameHouse!


What is a QuickStart Guide?

Our QuickStart Guides are intended to provide you with all the essential information you need to access pre-existing walkthroughs. Many of our Platinum Edition games contain integrated strategy guides to help you when you’re feeling stuck, without having to exit the game. For more information on how to access Empress of the Deep 3 – Legacy of the Phoenix’s integrated walkthrough, scroll up to the top of this page.


The post Empress of the Deep 3 – Legacy of the Phoenix QuickStart Guide appeared first on GameHouse.

Love Chronicles – Salvation QuickStart Guide

$
0
0

Welcome to the Love Chronicles – Salvation QuickStart Guide! Love Chronicles – Salvation is a Hidden Object game in which you must collect items and explore locations in order to progress. Defeat the evil Alura and her puppet master, Zander. Can her spirit be saved, or will it be lost to evil forever? This game is a Platinum Edition title, as and such, includes an integrated walkthrough. The Love Chronicles – Salvation walkthrough can be accessed by clicking on the small “SG” button in the lower right corner of your screen. Alternatively, click on the Extras button in the game’s main menu to be taken directly to the Strategy Guide.

Love Chronicles - Salvation Walkthrough Location

Love Chronicles – Salvation Walkthrough Location

How to Play

Are you new to hidden object titles? Have you simply forgotten some of the basics? Don’t worry! Here are a handful of helpful pointers to guide you in the right direction:


  • All items you collect throughout your adventure will be added to your Inventory. Your inventory is located at the bottom of your screen. When you want to use and item, select the item you’d like to use from your inventory, then click on the location where you’d like to use it.
  • When your cursor turns into a directional arrow, it means you can click to access a new area. Navigate by clicking when arrows appear to move between screens and locations.
  • Love Chronicles – Salvation is a Hidden Object game, and as such, you will encounter Hidden Object Scenes! In these locations, a list of items you need to find will be displayed at the bottom of your screen. Locate all the items in this location in order to progress. Upon locating all the items successfully, a Key Item will be added to your Inventory!
  • Key Items are items which are necessary in order for you to progress in the game. These items are stored in your inventory, and will automatically be removed once they have been used correctly.
  • Feeling stuck? There’s a Hint button located in the bottom right corner of your screen. Hints tend to be unlimited, but often require time to recharge. Unable to solve a puzzle? The Hint button will become a Skip button during puzzles, but often requires time to charge up before use.


Love Chronicles Series by Vendel Games

An evil spell lies over the land of Love Chronicles. But darkness permeates more than the land itself! Try your hand at Love Chronicles – The Spell. Play through the series’ origin as you discover a kingdom under an ancient evil spell. Rescue the kingdom, and the Princess, before it’s too late! This hidden object adventure features loads of hidden object puzzles and mini-games.


What is a QuickStart Guide?

Our QuickStart Guides are intended to provide you with all the essential information you need to access pre-existing walkthroughs. Many of our Platinum Edition games contain integrated strategy guides to help you when you’re feeling stuck, without having to exit the game. For more information on how to access Love Chronicles – Salvation’s integrated walkthrough, scroll up to the top of this page.


The post Love Chronicles – Salvation QuickStart Guide appeared first on GameHouse.

Heart’s Medicine – Time to Heal: Oliver the Guinea Pig Locations Walkthrough

$
0
0

Welcome to the Heart’s Medicine – Time to Heal: Oliver the guinea pig locations walkthrough! Put your time management skills to the test in the latest installment of the Heart’s Medicine series. Throughout each of the game’s sixty levels (Challenges excluded) is hidden Oliver, the guinea pig. This lovable guy is crafty and pops up from time to time, but miss him, and he’ll disappear!


The following walkthrough reveals all of Oliver’s hiding spots, from the cozy ward all the way to the deluxe surgical suite. Each level number is outlined in the guide below. Now go find that adorable furball!

Contents

Oliver the Guinea Pig Locations

The Ward

Heart's Medicine - Time to Heal - Oliver Ward Locations

Heart’s Medicine – Time to Heal – Oliver Ward Locations

Level 1: In the middle of the floor, below the counter with the thermometer.

Level 2: In the planter hedge in the lower left corner, between the first two waiting chairs.

Level 3: In front of the window, between the upper left gurney and the counter with supplies.

Level 4: Just above the tray table in the bottom right corner of the screen, in front of the binders beneath the checkout.

Level 5: At the checkout, in the same location behind the counter as Allison stands.

Level 6: In the top left corner of the cabinet that contains the adhesive bandages, cotton swabs, and cream.

Level 7: In the shower room on the left, over the red rug.

Level 8: In the picture frame above the shower on the left.

Level 9: Behind the foot of Earl’s bed, peeking over the side.

Level 10: Around the left corner of the counter with the checkout monitor.


Pharmacy

Heart's Medicine - Time to Heal - Oliver Pharmacy Locations

Heart’s Medicine – Time to Heal – Oliver Pharmacy Locations

Level 11: Just above the pink carpet on the floor in the lower left corner.

Level 12: In his cage habitat near the register, behind the checkout.

Level 13: Behind the glass divider wall, between the second and third waiting chairs in the lower right corner.

Level 14: Behind the small stepping stool to the immediate right of the checkout monitor.

Level 15: Under the table at the second blood donor station.

Level 16: To the left and just behind the glass wall divider next to the magazine rack.

Level 17: Behind the base of the magazine rack.

Level 18: Just behind the right end of the checkout counter.

Level 19: On the right side of the mixing station in the upper right corner.

Level 20: Hiding behind the bottom left corner of Allison’s coat when she’s standing at the checkout monitor.


The E.R.

Heart's Medicine - Time to Heal - Oliver ER Locations

Heart’s Medicine – Time to Heal – Oliver ER Locations

Level 21: On the top of the orange tray to the left of the checkout monitor.

Level 22: On the left side and just behind the first examination chair from the right.

Level 23: In the flower hedge in the lower right corner of the screen, between the first two waiting chairs.

Level 24: In the center of the blue mat on top of the counter with the checkout monitor, next to the desk lamp.

Level 25: On top of the shelf in the upper left corner, right next to the daily shift clock.

Level 26: In the upper right corner of the counter, just below the dial showing the day’s objective.

Level 27: On the center shelf containing the scissors and scalpel.

Level 28: Behind the checkout counter, just above the file folders.

Level 29: On the left side of bed on the lower right of the arrivals section.

Level 30: Underneath the bed in the upper right corner of the arrivals section.


Physiology/Physiotherapy

Heart's Medicine - Time to Heal - Oliver Physiotherapy Locations

Heart’s Medicine – Time to Heal – Oliver Physiotherapy Locations

Level 31: In the middle of the floor, beneath the weight mat.

Level 32: At the base of the exercise stairs, next to the table with the vitamin bottles.

Level 33: Behind the glass partition, between the feet of the second and third waiting chairs.

Level 34: Behind the checkout counter, between the monitor and the magazines.

Level 35: Behind the green yoga ball at the bottom of the screen.

Level 36: Behind the center of the bottommost bed in the lower left corner.

Level 37: Behind the dog bed, next to the crutches.

Level 38: Between the first and second waiting chairs.

Level 39: Between the staircase and the ice cooler.

Level 40: Behind the weights stand, at the end of the glass partition.


Radiology

Heart's Medicine - Time to Heal - Oliver Radiology Locations

Heart’s Medicine – Time to Heal – Oliver Radiology Locations

Level 41: On the floor to the right of the last waiting chair, in the lower left corner.

Level 42: In the center of the checkout counter.

Level 43: Behind the glass partition, to the upper right of the last waiting room chair from the left.

Level 44: Behind the foot of the MRI scanner.

Level 45: Hanging from the center of the ceiling. Oliver, that’s dangerous!

Level 46: Behind the glass partition above the first waiting room chair in the lower left corner.

Level 47: Behind the tray to the right of the injection chairs.

Level 48: At the foot of the bottommost bed in the lower right corner.

Level 49: Behind the table in the waiting section on the lower left.

Level 50: Hiding behind the interior of the center counter, toward the right.


Surgery

Heart's Medicine - Time to Heal - Oliver Surgery Locations

Heart’s Medicine – Time to Heal – Oliver Surgery Locations

Level 51: Above the top of the operating table.

Level 52: In the observation window in the upper left corner.

Level 53: Behind the tray table on the lower right, between the needle and thread.

Level 54: Behind the right side of the tray table in the lower left corner.

Level 55: In the observation window toward the upper left corner, to the right of the sinks.

Level 56: On the right surgeon’s stool next to the operating table.

Level 57: Behind the checkout monitor.

Level 58: Behind the table with the chest paddles, to the left of the operating table.

Level 59: Behind the screen of the first monitoring station on the right.

Level 60: Behind the head of the operating table.


Coming Soon!

Stay tuned and check back frequently for the full version of our Heart’s Medicine – Time to Heal Walkthrough, featuring level-by-level tips and tricks, challenges, trophies, and video walkthrough!

Heart's Medicine - Time to Heal Walkthrough - Coming Soon!

Heart’s Medicine – Time to Heal Walkthrough – Coming Soon!


The post Heart’s Medicine – Time to Heal: Oliver the Guinea Pig Locations Walkthrough appeared first on GameHouse.

Fitness Bustle – Energy Boost Essentials Walkthrough

$
0
0

Mr. Gristleman’s magic pills are all the hype, but you know the real way to get an energy boost is through hearty exercise! In this time management game, you will open up your own gym and help your clients get the training they need. Our Fitness Bustle – Energy Boost walkthrough will give you the leg up you need to help you get through this mental workout with tips, tricks, and an explanation of how to play.

Fitness Bustle - Energy Boost Opening

Fitness Bustle – Energy Boost Opening

Contents

Fitness Bustle – Energy Boost Essentials Walkthrough

Welcome to our Fitness Bustle – Energy Boost Essentials walkthrough. Fitness Bustle – Energy Boost us a time management game that boasts 64 levels taking you across the whole of the United States. This game is designed with the same basic strategy from level to level, so this walkthrough focus on the essentials of the game – How to Play, Tips & Tricks, and all the general strategies and how-to’s to help you play your best game.


How to Play

Whether this is your first dive into running a gym or if you’re in need a refresher, this section covers the game’s general gameplay and how everything works. There are eight levels to each section of the map. Select the level by pressing the by blue button. Each level starts with your Score Card.

Fitness Bustle - Energy Boost Scorecard

Fitness Bustle – Energy Boost Scorecard

On the right (Green) the Goals for the level are listed. These are the things you need to complete to finish the level.

On the left (Red) you will find your Scores. Use these guidelines to maximize your score. Hover your mouse pointer over each image to see more details.


After you are done looking at your Score Card, the game begins. Customers enter and sit in the upper left of the screen. After a moment of thinking, a thought bubble will appear over their head with the gym equipment they would like to use. Click on the customer and drag them to the first equipment they wish for.  As they begin using the equipment a green button will appear beside them. Click this to start training the customer, allowing them to use the machine faster.

  • Tip: If another customer is moved onto the equipment you are currently training at, you will automatically start training that customer.
Fitness Bustle - Energy Boost Gameplay

Fitness Bustle – Energy Boost Gameplay

After the customer is done with the equipment, they will want one of several things:

  • More exercise. The customer will ask to be moved to another piece of gym equipment.
  • To shower. Right click the customer to send them to the shower. They will pay and leave the gym afterwards.
  • An item. The customer may want an item before choosing to shower or use another piece of gym equipment. In example, they may want water or a hot towel. Right click on the correct station to give them this item.


Awards (Bonus Items)

As you play, you earn stars. The more stars you earn, the more awards you can unlock. Each award is a useful item you can use help you in your game. You can have up to three Awards selected at once.


To access the full rewards screen, rom the level selection map, you can click on the Awards button in the lower right to see the full rewards menu. You can select the Hide/Show button at the top of the screen to quick select the rewards you’d like to use.

Fitness Bustle - Energy Boost Awards

Fitness Bustle – Energy Boost Awards

  • Misting Fan (2 Stars) – The cooling breeze speeds up all your customers.
  • Extra Chair (14 Stars) – This gives you an extra chair in the upper left of the screen. Use this when you need to move more customers through the gym in a shorter amount of time.
  • Tip: Some levels already have 2 or more chairs. Be careful an extra chair does not overwhelm you!
  • Boom Box (25 Stars): These jams make your staff work faster.
  • Energy Bar (35 Stars): Giving these treats to unhappy customers will raise their happiness a small amount.
  • Extra Shower (46 Stars) This will give you another shower, allowing you to let customers wash up and leave faster. An extremely useful award.
  • Relaxation Station (58 Stars): This gives you an extra Relaxation Station in the gym. Use on levels where you’re running into problems with customers who want to use the same machine.
  • Shop (120 Stars): Bring in that extra dough with a shop for your customers to purchase things, giving you extra tips.
  • Advertising Robot (140 Stars): Use this guy to bring more customers into the store. Can be used in combination with the Extra Chair reward for a double boost!
  • Robot Trainer (160 Stars) A robot to help you train your customers, so you can hire less humans.
  • Device Upgrade (180 Stars): Give your machines a makeover, allowing customers to be trained quicker.
  • Device Upgrade 2 (260 Stars): You machines become even faster, allowing customers to be trainer even quicker.


You can also unlock two different modes by collecting stars.


  • Relax (220 Stars) allows the Relax mode to be accessed for play.
  • Survival (240 Stars) allows the Survival mode to be accessed for play.


Tips and Tricks

  • Room Layout: While your first customer is walking in, take a moment to look over the gym. Your equipment changes position from level to level, so you will want to make sure you know where everything is.
  • Fast Showers: When a customer is ready for a shower, you can right click on them to send them directly to the shower without having to use time clicking and dragging the customer.
  • Fast Water: When someone wants a drink, right click on the prepared machine to automatically send them a full glass!
    • Tip: Remember to click on the machine again right away to prep the next glass of water.
    • Tip: The Hot Towel Tables work in the same way.
  • Two Hands Are Better than One: Do not hesitate to hire extra help. If you are feeling overwhelmed by training your customers or you’re pulling your hair out as things break down, an extra Trainer can ease your struggle. Some levels start you off with an extra trainer!
  • Rest and Relaxation: Make sure to use the Relaxation Station to good use. Customers who sit in this chair do not loose happiness. It is very useful for when two customers want to use the same gym equipment.


Congratulations, you’ve completed our Fitness Bustle – Energy Boost Guide and Essentials Walkthrough!


The Fitness Bustle – Energy Boost Walkthrough is meant as a guide and does not contain cheats, hacks, or serials.


The post Fitness Bustle – Energy Boost Essentials Walkthrough appeared first on GameHouse.

Awakening – Moonfell Wood Walkthrough

$
0
0

There’s nothing like a nice long nap to put things in perspective. However, after Princess Sophia awakens from her century-long siesta, there’s no one in sight! Get the sleep out of your eyes, because it’s up to you to find your family, your friends, and your throne. This Awakening – Moonfell Wood Walkthrough will contain guides to the many levels, tips and hints for solving puzzles, and some additional hints to help you find your way through this mysterious landscape. Rise and shine, the woods say hello!

Contents

General Tips & Tricks

  • Mira, your fairy guide, can give you hints and even solve puzzles for you if you get stuck.
  • Notes and diagrams that can help you solve puzzles go in your Journal: check it if you get stuck.
  • Don’t be ashamed to turn the difficulty down to Casual if you’re having a tough time.

Awakening – Moonfell Wood Walkthrough

Part 1

Start by grabbing the Stick in front of you. Continue to the next screen and examine the bush to the right to uncover a Hidden Object Puzzle. You will receive a Rope: combine this with the oar piece on the stone with the Rope and you will create an Oar. Don’t forget to grab the four Painted Tiles nearby! Inside the nearby boat is four more Painted Tiles, which can be used on the nearby box to solve a puzzle. Refer to the screenshot below for the solution. Opening the box will reveal a Signet Ring and a Magic Card: The Forest. Locate the nine birds hidden on the Magic Card and it will be yours! Finally, use the oar on the boat to continue onto the next area.

Awakening - Moonfell Wood - Part 1 Puzzle

Awakening – Moonfell Wood – Part 1 Puzzle

Part 2

Grab the Wooden Stick, then pick up all six Purple Mushrooms on this screen. There are six more Purple Mushrooms inside the fallen log to the left, but you’ll need the Wooden Stick to grab one of them. Continue onward, hanging a left at the waterfall, and you’ll find yourself at the Cliffside pool. On the ground near you is a small stone lantern, with some nearby broken figurines. Rearrange the broken pieces into the shapes shown in the screenshot below to solve the first part of this puzzle. You will receive the Stone Lantern Figurines, which need to be arranged in a particular way according to the inscription on the stone lantern. The order they need to be placed are, from left to right, smallest to largest, in groups separated by color, light to dark.

Awakening - Moonfell Wood - Part 2 Puzzle

Awakening – Moonfell Wood – Part 2 Puzzle

Inside the stone lantern is a scroll with another puzzle. Cross out every item except for the purple mushroom and white flower in the middle. Your reward will be a Potion of Moondew, which you should take to the previous screen and use on the bush to your right in order to start another puzzle. You will receive some Mossflowers: Now, select the nearby tree stump and use the stick to goad out the tiny dragon. Then, feed it the Mossflowers and Mushrooms to add the Pocket Dragon to your inventory. Use it to open the lock on the gate to the right of the waterfall, one screen down.


Awakening - Moonfell Wood - Feeding Dragon Guide

Awakening – Moonfell Wood – Feeding Dragon Guide

Collect all the Acorns in this area: there are eight, with some in the stump to the left and a few in the rock pile to the right. Then, grab the Axe Handle in the next room and backtrack to the path leading up to the waterfall. Combine the Axe Handle with the axe head resting on the stump to construct the Axe, then use the Pocket Dragon to light the candle next to the tree on the left with the hole in it. Giving the squirrel your Acorns will trigger another Hidden Object Puzzle, and your reward will be the Claw Hammer. Head back up to the Cliffside pool and use the Axe to chop down the tree with the wooden boards nailed to it, blocking the waterfall in the process. Don’t forget to pry off the boards with the assistance of the Claw Hammer.

Back to the path previously blocked by the gate, use the Boards and Claw Hammer on the side of the tree to make a ladder. Climbing the ladder to the nest will yield you a Block of Tin and Gem Keystone. Use the Block of Tin on the anvil at the base of the stone centaur and heat it up four times with the Pocket Dragon. This will give you a Tin Rose, which is used to free the petrified centaur and receive the Sunstone. Going back to the waterfall, examine a stone near the right path: there should be a slot for your Gem Keystone, which will trigger a short puzzle. To solve, match the diamond shaped gems, then the square gems, the circle gems, and the heart gems. The final gem you’ll find is the Moonstone, which will allow you to open the door behind the waterfall along with the Sunstone.

In the next room, grab the three Candles and fill the nearby Silver Basin with water. Underneath the Silver Basin is the Magic Card: The Moon, which will be added to your inventory after finding the hidden butterflies. Place the now filled Silver Basin on its original spot to trigger another puzzle. The solution to this one is to press the buttons around the circle until the light pattern matches the one in your Journal. You will receive the Sun Medallion, which belongs in the center of the fresco at the end of the cave. First, place the broken pieces in the same position as the below screenshot. After placing the Sun Medallion in the center, swap the larger outside pieces around until the wings are formed and the door will open.

Awakening - Moonfell Wood - Fresco

Awakening – Moonfell Wood – Fresco

There are three more Candles to grab in this area. Place them on the Gate of Sun and Moon, then light them with the Pocket Dragon in this order: square, star, diamond, circle, triangle and heart. These shapes will also come in handy as a guide to which candles should be used to color which section of the diagram, similar to paint-by-numbers. When fully colored, the Gate will activate, allowing you to walk through to the next area…

Part 3

Take a step back and grab the Fairy Beads, including the one in the nest. The sunflowers hold the Magic Card: The Fairy Queen, which will be yours after finding the hidden hearts. Heading back to the waterfall, talk to the Fairy Queen and she will ask you to find 21 Fairy Beads. Three of them can be found on the path the right (one’s in the stump), and there are four more on the next screen, including one in the nest.

Back to the path before the waterfall, you’ll see a goblin woodsman who will challenge you to a game of Tripeaks. Don’t worry if you mess up: you can try as many times as you like. Your prize is a Cherry Berry Basket and first pickings of the stuff in his rucksack, which is another Hidden Object Puzzle. Get the Oil Tap from the rucksack, then grab the Wooden Pole.

Heading to the path on the left of the waterfall, there are four more Fairy Beads, one hidden in the stump. the next screen has 3 more, one hidden by a frog. Picking the matching berries in the bush will fill your Cherry Berry Basket, which you can bring back to the goblin in exchange for some paper. Rearrange the paper so it looks like the screenshot below and you will learn how to get Everlasting Oil.

Awakening - Moonfell Wood - Guide Puzzle

Awakening – Moonfell Wood – Guide Puzzle

Continue on the path right of the waterfall to the lake. Collect the three Fairy Beads and then use the Wooden Pole on the lantern to knock it over, letting you access the Brass Key after repairing the broken glass. The Brass Key can be used to open the nearby box, giving you the Fishing Line and Decorative Brick. combine the Fishing Line with the Wooden Pole to make the Flexible Pole with String. Placing the Decorative Brick with the others on the wall will trigger a matching game. Your rewards for completing it are an Empty Spider Jar, Empty Honey Pot, Empty Oil Flask and a Fishing Lure, which creates the Fishing Rod when combined with the Flexible Pole with String.

Walking down two screens, grab the 3 Fairy Beads and use the Oil Tap on the tree to fill the Empty Oil Flask. Then, go to the Cliffside pool and use the Fishing Rod to catch a Fish. Head back to the fallen lantern and fill it with the Oil Flask, lighting it with the Pocket Dragon. Hanging the lit lantern will give you a Copper Key, which will open the right side of the lockbox containing Glass Marbles and four Runes. In the next area, give the Fish to the cat and you will receive the Magic Card: The Moon. Then, grab the Glass Marbles in the fountain. Place the Glass Marbles in the nearby gate according to the screenshot below and enter the pavilion.

Awakening - Moonfell Wood - Pavilion

Awakening – Moonfell Wood – Pavilion

In the pavilion, grab the Incense Censer from the statue, and place the four Magic Cards you’ve collected on the center pedestal: the order from left to right is The Forest, The Sun, The Fairy Queen, and The Moon. collect the four Fairy Beads, then rearrange the tiles on the left to form three pictures of a bee, granting you a Wax Knife and some Smoky Incense. Exit the pavilion and go back three screens.

In this area, hang the Incense Censer on the tree, place the Smoky Incense inside, and light it with the Pocket Dragon. This will allow you to collect Beeswax using the Wax Knife and fill your Empty Honey Pot with some honey. Back at the waterfall, give the Fairy Beads to the Fairy Queen and she will give you a Letter to the Witch, which can be placed in the cat’s envelope, closed with Beeswax, and sealed with the Pocket Dragon and Signet Ring.

Placing the Sheet of Paper on the flat stone, rub it with the Burnt Branch to reveal a Rune. Back at the falls, the five Runes can be placed on the puzzle to get an Ornate Key and Stone Tile. The Ornate Key opens the gate. Enter the cave and collect all the spiders on the web to the right, filling your Empty Spider Jar, then burn the webs with the Pocket Dragon.

There are three frescos that need to be rearranged, granting three Wooden Discs. Arrange the Wooden Discs in the correct order on the stone portal, then arrange the color gems in kind. You can see the correct order in the screenshot below. Once you pass through the gate, arrange the symbols on the snake in order from 2 to 10, starting from the head. This will allow you to pass through to the next area.

Awakening - Moonfell Wood - Combination

Awakening – Moonfell Wood – Combination

Part 4

Walking down from the vista, play another round of Tripeaks with the goblin. He will give you a Potion of Rapid Growth. Head down the path to the right and rearrange the shapes on the nearby spider web so the like shapes are lined up, with the large ones on the outside and the small ones on the inside. Then, move the bricks so that they form the flower shapes, and your reward will be the Black Orb and Grappling Hook Head.

In the nearby storage box are some parts which can be assembled into Gardening Shears, which can be used to cut the Rope hanging on the tree. Combine the Rope with the Grappling Hook Head, then walk forward. The Gardening Shears can be used by the tree on the left to get the Pickaxe Handle, and then solve the flower puzzle above it to receive a Bouquet of Moonflowers.

Head into the pavilion and solve the matching tile puzzle on the stone slab: you will need the Signet Ring, and your reward is a map and crest for your Journal. Select the ivory chest and use the Bouquet of Moonflowers to open it by placing them in the correct position. In the chest are some scraps of the Magic Card: The Witch, which you should arrange and then collect after solving the puzzle. Solve the puzzle of the strings on the board to the left to get the Hemp Rope.

Exiting the pavilion, walk down one screen and combine the Pickaxe Handle with the head to get the Pickaxe, which is used to break the stone marked with an X. Use the Grappling Hook on the hole, tie the other end to the Hemp Rope and use the Potion of Rapid Growth to recover a chest. Form the crest to open the chest and collect the hidden objects to receive a White Orb and some Statue Fragments.

Head back to the front of the pavilion and use the Statue Fragments to reassemble the right statue. Check the screenshot if you get stuck. Place the White Orb in its hand and take the Moon Medallion, then reassemble the statue on the left and place the Black Orb in its hand, taking the Small Silver Key. In the pavilion, use the Moon Medallion to activate another tile matching puzzle, which will give you some glyphs for your Journal when solved. Place the Magic Card: The Witch on the stone table, getting the Small Gold Key and go back to the statues: using the glyphs in your Journal, solve the two puzzles and use the two keys to activate the bridge leading to the next area…

Awakening - Moonfell Wood - Statue Puzzle Solution

Awakening – Moonfell Wood – Statue Puzzle Solution

Parts 5 and 6

Collect three Pinecones, then play Tripeaks with the goblin. Get two more Pinecones on the next screen and light the lantern with the Pocket Dragon. Match the moths to get a Net Full of Moths, then light the candle by the alcove and solve the match-3 puzzle. Grab the Empty Snail Pot and fill it with the nearby snails, then head to the left for two more Pinecones. Match the moths to open the door, then match the gourds in the next room to get the Giant Gourd. You’ll find the Key Fragments by the pots on the shelf, which can be used to open the door and enter the tower.

Grab the Garden Trowel, then find the hidden objects on the desk to get the Botany Book. Reconstruct the broken pot and head up the stairs, where you can find a Doorknob next to the bitey plant. Place the Botany Book on the shelf and match the books to connect the vines: Check the screenshot if you get stuck. Get the Magic Beans and exit the tower, using the Doorknob to open the shed.

Awakening - Moonfell Wood - Books Solution

Awakening – Moonfell Wood – Books Solution

Solving the Hidden Object Puzzle will give you the Weedkiller Spray, which can kill the bitey plant in the tower, giving you the Pot of Dirt and the Magic Card: The Griffin. Place the pot on the bench with the others, add the dirt with the Garden Trowel and arrange the flowers according to the books, referring to your Journal. Take the gems and head back up the tower, placing them on the paintings after solving them, getting eight Rotary Dials.

Head back to the pavilion and place the Magic Card: The Griffin on the stone slab to get the Disc of Sun and Moon, which you can take to the middle of the tower to open the door and head up the stairs, where you can grab the Crowbar, Oil Can and Wire Brush. Place the Onyx on the grimoire and rearrange the rings, then complete the diagram to add it to your Journal.

Balance the scales on the back wall by swapping the tiles, and then go to the vent shaft. You can place the five Rotary Dials on the device behind the glass door and rotate the gems to open the chest. Arrange the jars and items into the same position as the screenshot below, and you’ll get the Jar of Eyeballs. Leave and climb up the ladder to obtain the Bird’s Egg and Packet of Seed, and use the Crowbar to pry off the boards.

Awakening - Moonfell Wood - Jars Solution

Awakening – Moonfell Wood – Jars Solution

Get the Twilight Gem from the goblin and drop the Giant Gourd over the edge because it’s funny. Go back down the ladder and use the Twilight Gem to open the alchemy chest after solving a puzzle. Take the steel weight and then repair the broken glass pieces of the Alchemical Flask to add it to your inventory. Exit the tower and take the Small Bronze Key out of the smashed Giant Gourd. Use the Birdseed to get rid of the bird and steal its three Bird’s Eggs, then go back in the tower and unlock the nightstand drawer with the Small Bronze Key. Match the keys until one is left to take, then go to the well and place the Steel Weights in the cage, tipping it with the Crowbar.

Using the Oil Can, the Wire Brush, and the Iron Key, grab the Lead Block from the other cage and head up the stairs. At the alchemy set, add the Jar of Spiders, Jar of Snails, and Jar of Eyeballs to the top, as well as the four Bird’s Eggs. Make a fire with the Pinecones and Pocket Dragon, and refer to your Journal to match the pointers to their correct position. Fill the Flask with the Philosopher’s Balm and grab the Crystal Gem as well, then exit the tower and backtrack to the crossroads.


For more great tips and tricks, visit our blog!


The Awakening – Moonfell Wood Walkthrough is meant as a guide and does not contain cheat codes, hacks or serials.

The post Awakening – Moonfell Wood Walkthrough appeared first on GameHouse.

Heart’s Medicine – Time to Heal Official Walkthrough

$
0
0

Allison is an aspiring surgeon with big dreams of becoming a success. However, things grow complicated when she starts to develop feelings for the Head of the Hospital, and all while working near her old flame. Things take a dramatic turn with a horrifying accident that will affect all of the hospital staff. Our Heart’s Medicine – Time to Heal walkthrough covers all the twists and turns of this medical drama!

Contents

General Tips & Tricks

Welcome to the tips and tricks section of the Heart’s Medicine – Time to Heal walkthrough. This section covers the game’s basics, as well as essential how-to’s that will help you obtain the highest scores.


How to Play

Doctors and patients who enter the hospital will require Allison’s help! Most patients who enter the hospital will immediately sit down in one of the chairs in the waiting area. A bubble will pop up over their head indicating where they need to go. When this happens, click on the patient, then click on the station they need for treatment.


Once a patient has relocated to the station they need, another bubble will pop up over their head indicating which treatment they need. Treatments vary per department, however sometimes these bubbles will be filled with a color. Each color corresponds to a type of treatment. They are as follows:

  • Green – This is a normal, quick treatment. Clicking on a patient with a green bubble will cause Allison to treat them immediately. No further treatment action is necessary.
  • Purple – This treatment requires a touch input of some kind. For example: you may need to tap the button displayed multiple times, or move it back and forth along a slider. The treatment will be completed once the touch input has been completed.
  • Blue – This treatment involves you to complete a minigame. All other department activities will temporarily pause while you’re playing this minigame. For more information on specific minigames, see the Minigames section of our guide below.


Once the patient has finished treatment, they will move to the checkout monitor at the nurse’s station. Click on the monitor to check out your patient.  It’s that simple!


Scoring and Hearts

Each patient will enter the department with a certain number of hearts. The faster you complete actions and treat your patient, the more hearts you will earn! The happiest patients will have their hearts turn gold. Patients with gold hearts have infinite patience when waiting at the checkout monitor.


The trick to obtaining high scores is to check out patients in groups. Up to 5 people can be waiting at the register at any given time. If a patient has gold hearts while at the register, they will wait there until they’re checked out without losing any hearts, so don’t be in a rush! If a patient does not have gold hearts while waiting at the register, their happiness [hearts] will start to deplete over time. Checking patients out in groups will result in bonus points being added to your score. The more patients and the happier they are, the better!


If you don’t have 5 people at the register, but a patient is approaching the register while Allison is still checking others out, as long as Allison is still moving at the register the patient will be counted on that scoring chain.


Bonus Scores and Treatment Chains

In addition to checking out groups of people at the checkout register, Allison can obtain bonus points via helping patients and treating them quickly. Helping a patient before the color depletes from their bubble will result in a Quick Bonus. Treating multiple patients back-to-back will result in a Treatment Chain. Both add bonus points to your score.


Diamonds and Upgrades

Each level features a specific challenge. Completing the challenge successfully will reward you with a diamond. Diamonds can be saved and used to purchase various additions to the new hospital wing. Click on the diamond icon in the upper right corner of the level select screen to access the new hospital wing.


Additionally, each level you complete will reward you with coins. Coins can be used to purchase upgrades at the beginning of each level before it begins. Coins are universal, so you can use them in any department you want, whenever you want.


Heart’s Medicine – Time to Heal Walkthrough

Welcome to the Heart’s Medicine – Time to Heal walkthrough! Our guide covers every aspect of the game with level-by-level strategies. Complete every challenge with 3 stars and discover all the hidden locations of Oliver the guinea pig. Refer to the Contents section of our guide for quicker navigation!


The Ward: Level 1 – 10

It’s Allison’s first day as an intern in the Surgery department. But the first day is far from the easiest, especially when she finds out the position’s already been taken! Thankfully, there’s still room for a new intern in the Ward.


Introduction Cutscene

The scene begins with Joe, Allison, and Jenny rushing in an ambulance back to the hospital. A number of prompts will come up in this cutscene, teaching you touch input and the basic game mechanics. These steps are outlined below:

  1. Click/Tap on the button in the center of the circle until the entire circle is filled with the color purple.
  2. Choose how Allison should respond. You can choose either option with some slight variation.
  3. Locate the items scattered around the ambulance as Allison requests them. Their locations are shown in the screenshot below.
  4. Click and hold the button shown, dragging upward to remove the straps.
  5. Stitch up the wound. Click on the flashing white dot and hold, moving the stitch to the new flashing white dot. Repeat until the wound is stitched up completely.
Heart's Medicine - Time to Heal Introduction Cutscene

Heart’s Medicine – Time to Heal Introduction Cutscene

Day 1 – A Stellar Performance! –

Score a star in the first half of your shift…

Oliver Location: In the middle of the floor, below the counter with the thermometer.


Tend to your first 3 patients before checking anyone out at the register. Once you’ve finished treating your third patient, go to the register and check out the group together. The shift clock will be 5 before halfway done at this point. Doing this will allow you to fulfill the day’s challenge while simultaneously reaching the highest score possible for the day if you continue to check out happy patients in groups.


Tip! Patients with gold hearts have an infinite amount of patience! Wait until you have a group of patients before checking them out at the nurse’s station in order to reach max group bonuses.


Day 2 – Cheer Up Earl! –

Cheer up Earl, he seems a little agitated!

Oliver Location: In the planter hedge in the lower left corner, between the first two waiting chairs.


Throughout the day, Earl will need special attention. Every time you need to tend to Earl, a “!” bubble will pop up over his bed. When this appears, click on Earl to cheer him up. Any other tasks you have lined up will be temporarily paused while Allison tries to calm Earl. Do this 4 times before the end of the day to achieve your goal.

Heart's Medicine - Time to Heal Level 2

Heart’s Medicine – Time to Heal Level 2

Day 3 – Storage Delivery! –

Daniel wants to store some renovation materials in the ward.

Oliver Location: In front of the window, between the upper left gurney and the counter with supplies.


A delivery man will show up in the Ward several times today. When he pauses and a boxed package icon appears over his head, click on him to accept his delivery. Do this 4 times before the end of the day to complete your goal.


Tip! Patients on beds will still require items such as cotton swabs even when the delivery man is around. Place priority on helping these patients before accepting packages.

Heart's Medicine - Time to Heal Level 3

Heart’s Medicine – Time to Heal Level 3

Day 4 – Earl’s blood pressure! –

Earl’s blood pressure needs to be monitored!

Oliver Location: Just above the tray table in the bottom right corner of the screen, in front of the binders beneath the checkout.


Earl’s blood pressure needs to be checked throughout the day. This task is time-sensitive. There’s two places you can keep track of Earl’s blood pressure: via the meter over his bed, or the circular meter in the upper right corner of the screen. Click on Earl’s bed at any time to have Allison check his blood pressure. The best tactic to use throughout the day is to click on Earl’s bed to check his blood pressure every time you complete a task or help a patient.


Tip! Earl’s blood pressure meter will stop going down as soon as you click on his bed. Even if you’re mid-task with another patient or have several tasks lined up, clicking on his bed will prevent it from dropping any further, so don’t panic if it’s getting low – just click on him quickly!

Heart's Medicine - Time to Heal Level 4

Heart’s Medicine – Time to Heal Level 4

Day 5 – Work Efficiently! –

Deliver multiple items in one go, multiple times!

Oliver Location: At the checkout, in the same location behind the counter as Allison stands.


Have a minimum of two items on your tray and take them to patients back-to-back. The best time to do this is when you have two or more patients lying in the beds. Make sure you have the items both patients need, then click on the patients consecutively to fulfill a delivery of multiple items in one go. Do this successfully 4 times to complete the day’s goal.


Tip! Try not to wait too long! Plenty of patients will come in throughout the day, so if one patient is in a bed and no one else is around, don’t keep them waiting in hopes of doing a consecutive item delivery.


Day 6 – First Responder! –

Help 30 patients before their quick bonuses run out!

Oliver Location: In the top left corner of the cabinet that contains the adhesive bandages, cotton swabs, and cream.


Each time a patient enters and needs something, a bubble will pop up over their head. This bubble will usually start a particular color – green, blue, or purple. Help the patient before all the color drains from the bubble in order to obtain a quick bonus. Quick bonuses also apply when assigning a patient to a chair, shower, or bed quickly. You need to do this 30 times before the end of the day to complete the objective.


Tip! You do not need to per se help 30 individual patients. Each bubble with a quick bonus counts toward your total. For example – a patient may need 3 things from you: to use the shower, to be assigned a bed, and to have their temperature taken. Each one of these individual needs has a quick bonus attached to it. That means you have multiple chances with each patient.

Heart's Medicine - Time to Heal Level 6

Heart’s Medicine – Time to Heal Level 6

Day 7 – Golden Groups! –

Check out 4 or more golden heart patients at once, multiple times!

Oliver Location: In the shower room on the left, over the red rug.


Serving patients quickly before their hearts start to deplete will improve their hearts. Serving a patient with quick bonuses will improve their hearts to such an extent, they will turn gold. Focus on serving patients as quickly as possible today. You will need at least 4 gold-heart patients at the register at the same time before checking them out to qualify toward the goal. You can have up to 5 patients at the register at a time. Do this three times before the end of the day to complete your objective.


Day 8 – Earl’s Files! –

Earl’s files are scattered! Find them all!

Oliver Location: In the picture frame above the shower on the left.


There are 8 files scattered around the Ward. Find all of them before the day is done to complete your objective. Their locations are shown in the screenshot below.


Tip! Even if the day is over, as long as you still have patients, you still have time to find the files! The objective will not be marked as over until the last patient leaves.

Heart's Medicine - Time to Heal Level 8

Heart’s Medicine – Time to Heal Level 8

Day 9 – Keeping Stock! –

Never run out of stock!

Oliver Location: Behind the foot of Earl’s bed, peeking over the side.


Today’s goal is quite simple. Make sure the stock of bandages and cotton swabs doesn’t run out! Patients will need more of these today, so it’s a good idea to click on the stocking cabinet (pictured below) to refill your supplies every spare moment you have – usually best done after helping patients.

Heart's Medicine - Time to Heal Level 9

Heart’s Medicine – Time to Heal Level 9

Day 10 – A Good Effort! –

Help 10 patients in one minute!

Oliver Location: Around the left corner of the counter with the checkout monitor.


Today’s objective is straight-forward. You will need to help 10 patients within the span of a minute. The one-minute span is ongoing, so all you need to do is help 10 patients within a window of 60 seconds during any portion of the day. Treat patients as per normal and don’t let them back up. If you treat patients as per normal, you should reach your goal by the time the day reaches the halfway mark.


The Pharmacy: Level 11 – 20

Allison’s internship in the Ward is over, and now it’s time to join Ruth in the Pharmacy! Questions regarding the hospital’s supply of medicine has come into question, though. Can Allison get down to the root of the issue?


Day 11 – Knowing Your Stock! –

Score 9 hearts by finding medicine!

Oliver Location: Just above the pink carpet on the floor in the lower left corner.


Customers who go to the purple medicine counter will sometimes need you to find medication for them. When this happens, a blue pop-up showing Allison looking at boxes of medication will pop up. Click on this bubble to trigger a minigame. Find the medication! The quicker you do this, the more hearts your customer will receive. You can receive a maximum of 3 hearts per person per minigame. Score 9 hearts before the end of the day to meet your goal.


Tip! If you’re helping a patient at the green blood donation chair, you risk blocking Oliver. If you hear the guinea pig squeak, try moving to another location quickly to make sure you can see him.

Heart's Medicine - Time to Heal Level 11

Heart’s Medicine – Time to Heal Level 11

Day 12 – Delivery! –

The new medicine has arrived!

Oliver Location: In his cage habitat near the register, behind the checkout.


A delivery man will appear throughout the day. Whenever he’s ready to deliver a package, a bubble with a box icon will pop up over his head. Click on him to sign for the package. You will need to do this five times before the end of the day.


Tip! Worried you won’t have enough time to sign for the delivery? Don’t worry – after selecting the customers you need to help, you can click on the delivery man. Even if it takes you several seconds before you reach him, as long as he’s been clicked, he’ll wait.

Heart's Medicine - Time to Heal Level 12

Heart’s Medicine – Time to Heal Level 12

Day 13 – Box by Box –

Those pills have to be somewhere!

Oliver Location: Behind the glass divider wall, between the second and third waiting chairs in the lower right corner.


At the start of the day, there will be a brief cutscene before patients arrive. Click on the cabinet in the upper left corner to search for the medication. A “Find the medicine!” minigame will pop up, however you will not be able to find the bottle the doctors are searching for, since it’s not there.


Once the day begins, click on the cabinet in the upper left corner again. A meter will appear showing how far along Allison is in searching for the missing medication. Fill the bar completely before the end of the day to complete your goal. The best time to search for the medication is between helping customers, and after checking out groups at the register.

Heart's Medicine - Time to Heal Level 13

Heart’s Medicine – Time to Heal Level 13

Day 14 – Nothing to Waste! –

Don’t remove any items from your tray!

Oliver Location: Behind the small stepping stool to the immediate right of the checkout monitor.


Retrieve items per customers’ requests, and nothing more! If you’re attentive to their needs, you’ll sail through today without any problems.


Day 15 – The New Printer –

The new printer needs to be warmed up!

Oliver Location: Under the table at the second blood donor station.


Print 7 prescriptions before the day is done. When the printer is ready to print, a small “1” will appear in the upper right corner of the machine. Click on it to have Allison print off a prescription. The printer can only print off one prescription at a time, and requires time before it can print again. Keep an eye on it throughout the day – as soon as the number appears, you can print again. The circular meter in the upper right corner of your screen will keep track of your progress.

Heart's Medicine - Time to Heal Level 15

Heart’s Medicine – Time to Heal Level 15

Day 16 – Attention Everyone! –

Don’t treat the same patient twice in a row!

Oliver Location: To the left and just behind the glass wall divider next to the magazine rack.


Don’t treat the same patient twice in a row! Moving a patient to a station doesn’t count. However, hooking them up for blood donations, searching for medication, etc does. You’ll need to pay extra close attention to make sure you don’t serve the same customer twice. Wait as needed if only one customer is in the Pharmacy, and don’t panic! Another customer will show up soon enough.


Day 17 – First! –

Arrive at 12 stations before the patient gets there!

Oliver Location: Behind the base of the magazine rack.


When a patient needs to be moved to a station, click on the patient, then select the station the patient needs. Click on the station a second time quickly to have Allison move there. As long as she’s there before the patient, it’ll count toward your goal.


Tip! Don’t worry if the patient’s bubble blinks red when they arrive at a station if Allison is already there –  particularly at the purple medication counter. A red-blinking bubble will not affect a customer’s hearts.


Day 18 – Promotions! –

The new wing needs some popularity! Luckily, Daniel is here to help!

Oliver Location: Just behind the right end of the checkout counter.


There are 4 posters that will need to be hung up before the end of the day. But don’t worry, Daniel’s on the job! Click on a poster marked with a “!” icon to have Daniel work on hanging it up. A meter will pop up showing his progress. Daniel’s progress does not affect Allison or the patients, so play as per normal and just make sure as soon as Daniel’s done hanging one poster, you immediately assign him to the next.


Tip! You’ll want 2 of the posters to be done being put up by the time the day reaches the halfway point. If you need to buy more time, the goal for the day won’t officially end until the last patient has been checked out. If you need to buy extra time to complete the goal, simply wait on checking out the final customer(s) while Daniel finishes hanging the final poster(s).

Heart's Medicine - Time to Heal Level 18

Heart’s Medicine – Time to Heal Level 18

Day 19 – Take a Number! –

Fill all the waiting spots!

Oliver Location: On the right side of the mixing station in the upper right corner.


Before the day is done, you’ll need to fill all three waiting chairs a total of 6 times. The best way to do this is as follows: At the start of the day, two customers will come in. Wait for a third. As soon as a third arrives (and one bar is filled on the goal meter in the upper right), move the most impatient customer/the customer that’s been waiting the longest to the station they need. Repeat this cycle, keeping two chairs filled at all times and the third being filled by new customers coming in in order to complete the goal quickly. As soon as the goal is completed, continue through the day as per normal.


Alternatively, you can also follow the strategy of keeping two customers in waiting chairs after the day has reached the halfway mark. Keep these two customers in the waiting chairs, moving the third customer that sits in a chair to the station they need as soon as they sit down. Using this strategy, you’ll be able to keep things under control easier, for the price of making two customers unhappy.


Tip! If using the second strategy, try to use two patient customers with a number of hearts already filled. Do not do this with the well-to-do man with the mustache, nor the shrewd woman with the spectacles.


Tip! Using the magazine stand in the waiting area does not count toward filling a waiting spot.


Cutscene – Cold Turkey

After following the dialogue prompts, find all of Daniel’s medication hidden in his apartment. There are 6 bottles total, and their locations are shown below.

Heart's Medicine - Time to Heal Cutscene - Cold Turkey

Heart’s Medicine – Time to Heal Cutscene – Cold Turkey

Day 20 – Just Browsing –

Have 20 patients use the magazine stand!

Oliver Location: Hiding behind the bottom left corner of Allison’s coat when she’s standing at the checkout monitor.


The best strategy to use today is to immediately move every patient that comes in to the magazine stand. To do this –

  • Click on a patient as soon as they sit down in the waiting area.
  • Select the magazine stand on the left side of the waiting area.
  • As soon as the patient starts to read, immediately select them again and move them to the station they need.


If you do this with each customer that comes in, you’ll sail through the objective in no time!


Emergency Room: Level 21 – 30

Couple Sophia and Joe are more than just a dynamic dance duo, they’re also the king and queen of the E.R. Here, Allison will learn all the in’s and out’s of life-saving treatment, but not without reliving a few life-changing moments from her past…


Day 21 – Incoming! –

Treat the patients on stretchers within 6 seconds.

Oliver Location: On the top of the orange tray to the left of the checkout monitor.


Patients on stretchers refer to patients who are specifically wheeled in on white stretchers when the alarms go off. Carry a pair of Scissors and a Scalpel at all times – you won’t have time to treat the patient right away and retrieve an item if they need it! Put top priority on treating these patients as soon as they arrive, getting them off the stretchers as quickly as possible. If you use a pair of Scissors or Scalpel, make sure you restock it as soon as you’re done. Be aware that the 6-second timer will continue to tick down even while in the middle of treating the patient, and will not stop until they’ve been helped.


Day 22 – Quick and Clean! –

Spend under a total of 20 seconds disinfecting.

Oliver Location: On the left side and just behind the first examination chair from the right.


Patients sitting in the red-orange examination chairs may require disinfectant. When they do, a purple bubble with cotton swabs and a disinfectant bottle will appear. The number of cotton swabs in the bubble is important: this is the number you will need to click and gather from the tray in the lower left corner, before selecting the bottle of disinfectant. Once selected, take the item to the patient. You will need to perform a touch gesture in order to disinfect their wound. Click and hold (or tap and hold if on a mobile device) the button within the circle, rubbing up and down until the purple color fills the bubble completely. Your objective requires you do this quickly – the total time spent disinfecting patients will need to be under 20 seconds by the time the day finishes. You can keep track of the time spent on this action via the circular meter in the upper right corner of your screen.


Tip! To restock cotton swabs, click on the box of cotton swabs beneath the yellow scalpel toward the top of the screen. The moment the number of swabs on the tray on the lower left drops below 4, restock right away!

Heart's Medicine - Time to Heal Level 22

Heart’s Medicine – Time to Heal Level 22

Day 23 – Mr. Asher –

Administer Mr. Asher’s treatment!

Oliver Location: In the flower hedge in the lower right corner of the screen, between the first two waiting chairs.


Keep an eye on Mr. Asher on the stretcher in the lower left corner. When the “!” icon appears over him, click on him to administer his treatment. Follow the touch prompts – hold the button on the outside of the circle, moving around twice in a clockwise fashion to complete the first phase of treatment. Repeat this process a total of 4 times throughout the day when prompted to complete your goal.

Heart's Medicine - Time to Heal Level 23

Heart’s Medicine – Time to Heal Level 23

Cutscene – Hide and Seek

Follow the dialogue prompts. Once the game begins, click on the large sheet of wood in the lower right corner to find Allison’s dad.

Heart's Medicine - Time to Heal Cutscene - Hide and Seek

Heart’s Medicine – Time to Heal Cutscene – Hide and Seek

Day 24 – Quick Remove Glass! –

Score at least 15 hearts with the remove glass minigame.

Oliver Location: In the center of the blue mat on top of the counter with the checkout monitor, next to the desk lamp.


Patients who sit in the examination chairs will sometimes need glass removed. When this happens, a blue pop-up showing the doctor holding tweezers will appear. Click on the bubble to trigger the “Remove the glass!” minigame. Click and hold a glass shard, then move it out of the patient’s body and release. Do this with all the glass shards to complete the minigame. You can earn a total of 3 hearts per a patient if you remove the glass quickly enough. Score 15 hearts before the end of the day to achieve your objective.

Heart's Medicine - Time to Heal Level 24

Heart’s Medicine – Time to Heal Level 24

Day 25 – A Turn for the Worse –

Mr. Heart is not doing better.

Oliver Location: On top of the shelf in the upper left corner, right next to the daily shift clock.


Treat Mr. Heart and talk with little Allison. When the “!” bubble pops up over the two, the doctor will move over to perform treatment and talk with Allison. Any other patient tasks you currently have lined up will be paused until the cutscene that starts is complete. Do this 4 times before the end of the day to complete your goal.


Tip! You can skip the dialogue and cutscenes by clicking the “Skip” button in the lower right corner.

Heart's Medicine - Time to Heal Level 25

Heart’s Medicine – Time to Heal Level 25

Day 26 – Little Lisa –

Cheer Lisa up, she needs it!

Oliver Location: In the upper right corner of the counter, just below the dial showing the day’s objective.


Click on the “!” bubble over Lisa in the lower left corner. Allison will help Lisa with her drawing. A meter will appear showing your progress. Complete the drawing with her and completely fill the meter before the end of the day to complete your goal. Help Lisa as often as you can between waves of patients.


Tip! Make sure the drawing is at least half complete by the time the day is halfway done. If you haven’t completed the picture with Lisa before the end of the day, don’t panic! As long as at least 1 patient is still waiting at the register, you still have time to complete the drawing.

Heart's Medicine - Time to Heal Level 26

Heart’s Medicine – Time to Heal Level 26

Day 27 – It’s an Emergency! –

Help each patient within 15 seconds of each other.

Oliver Location: On the center shelf containing the scissors and scalpel.


Feel free to take a little more time with your patients today. Instead of checking out patients as quickly as possible, you can wait a second or two longer per patient in order to create a smoother rhythm. Serving patients in this more relaxed manner guarantees you will not have periods longer than 13 seconds between patients at any time during the day. You can keep track of your timing via the circular meter in the upper right corner.


Day 28 – A Cure! –

Administer the treatment!

Oliver Location: Behind the checkout counter, just above the file folders.


Mr. Asher will require treatment throughout your shift. A meter will appear over his stretcher in the lower left corner keeping track of how long you have to administer his next dose. You can also keep track of this time remaining via the meter in the upper right corner. Try to administer treatment between helping other patients. Never wait longer than the halfway point on the meter to treat him, or it’s very likely you won’t make it in time! Prevent his meter from emptying completely when the day ends to achieve your goal.


Tip! Selecting Mr. Asher, even if you have other tasks already lined up, will prevent his bar from sinking down further. Use this to your advantage when the meter’s getting low!

Heart's Medicine - Time to Heal Level 28

Heart’s Medicine – Time to Heal Level 28

Day 29 – Marathon Shift –

Walk 800 steps during this shift.

Oliver Location: On the left side of bed on the lower right of the arrivals section.


The trick to this objective is knowing what to do when you’re not helping patients. Every spare moment you have, have Allison keep moving between two stations in order to keep racking up steps. The best places to click to do this are the register (but only if completely full or completely empty!), one of the examination chairs, and one of the stretchers.


Cutscene – The Crash

Follow the touch prompts that appear. They work similarly to the minigames you’ve played in previous levels. When prompted to retrieve the bag of supplies, click on the nearby stick (pictured below), then follow the new touch prompts that appear. You will need to perform multiple gestures before completing the cutscene.

Heart's Medicine - Time to Heal Cutscene - The Crash

Heart’s Medicine – Time to Heal Cutscene – The Crash

Day 30 – Beside Manners –

Don’t let any patients leave with less than 3 hearts!

Oliver Location: Underneath the bed in the upper right corner of the arrivals section.


All you need to do to complete today is stay attentive to your patients. If a patient comes in with a particularly low number of hearts, place priority on helping them first. Don’t let patients with low amounts of hearts idle at the register too long, or else they will continue to deplete. Pay attention to your patients as per normal, and you should get through today just fine.


Physiotherapy: Level 31 – 40

One month later, friendships and relationships alike still lie shattered. Allison is back at work, but can she find the time to heal more than just her patients?


Day 31 – Bad Manners –

Have exactly two patients served with three hearts or less.

Oliver Location: In the middle of the floor, beneath the weight mat.


The best trick to use to complete this objective is to wait until the day has ended and you’re at your final two customers. When they go to their needed stations, leave them be! Wait until they’re at approximately 2 hearts each. Now you can help them, fulfilling your goal without worrying about upsetting other customers in the process.


Day 32 – Watch Your Step! –

Don’t walk more than 500 steps during this shift.

Oliver Location: At the base of the exercise stairs, next to the table with the vitamin bottles.


Today you want Allison to do as little back-and-forth as possible. Keep a bottle of vitamins and a purple arm brace on your tray from the start of the day to minimize Allison’s need to move back and forth. Keep Allison at the stations that patients move to, and don’t go to the register until you have a group of 5 to check out. Follow these rules, and you should be well on your way to success.


Day 33 – Princess’s Ball! –

Gather Princess’s toys!

Oliver Location: Behind the glass partition, between the feet of the second and third waiting chairs.


Princess’s toys are scattered throughout the area. Find all 9 of them before the day is done. Their locations are shown in the screenshot below.

Heart's Medicine - Time to Heal Level 33

Heart’s Medicine – Time to Heal Level 33

Day 34 – Clean-up Duty! –

Clean-up the mess in the room!

Oliver Location: Behind the checkout counter, between the monitor and the magazines.


There are three mess piles in the room, all marked with a “!” bubble. Click on each pile to clean it. Once you start, a meter will appear showing your progress. Clean all 3 before the end of the day to complete your goal. Focus on one at a time to stay organized, and remember the objective won’t be completed until the very last patient leaves.

Heart's Medicine - Time to Heal Level 34

Heart’s Medicine – Time to Heal Level 34

Day 35 – Rushing is Dangerous! –

Don’t help more than 15 patients per minute.

Oliver Location: Behind the green yoga ball at the bottom of the screen.


Work with patients as per normal today, only take a little extra time for each. The meter in the upper right corner of the screen will help you keep track of how many patients you’ve helped. If you feel strapped for time, leave patients with a lot of hearts in the waiting chairs until you feel comfortable helping them without jeopardizing your goal.


Day 36 – Sophia is Looking for You! –

Hide from Sophia!

Oliver Location: Behind the center of the bottommost bed in the lower left corner.


Sophia will turn up suddenly three times today. When she’s about to appear, a “!” bubble will appear in the room. Quickly click on it in order to hide from her. Place emphasis on hiding Allison as quickly as possible. Sophia will show up quickly, so put patients on hold for a moment when the bubble appears.

Heart's Medicine - Time to Heal Level 36

Heart’s Medicine – Time to Heal Level 36

Day 37 – One for All! –

Score at least one golden heart patient of each type!

Oliver Location: Behind the dog bed, next to the crutches.


Help patients as per normal today. Keep practicing your quick skills and use the above tips to ensure they’re as happy as possible. Do this, and your objective will easily be completed before the end of the day.


Day 38 – Girls’ Night! –

Prepare the food for tonight!

Oliver Location: Between the first and second waiting chairs.


Allison needs to help prepare the food for girls’ night. A table, as well as a pie dish will appear near the register with a “!” bubble over them. Click on these to prepare the food. A meter will show your progress. Finish preparing these before the end of the day to complete your goal. Try to make sure that at least one of these is finished by the time the day reaches the halfway mark. Focus on working on these between helping patients and after checking groups out at the register.

Heart's Medicine - Time to Heal Level 38

Heart’s Medicine – Time to Heal Level 38

Day 39 – Freeze! –

Prepare 6 ice packs.

Oliver Location: Between the staircase and the ice cooler.


There’s a very easy trick to today’s objective. Go to the ice cooler and click on an ice pack to prepare it. As soon as it’s finished being prepared, add another to the ice cooler and put the finished one on your tray. When it’s on your tray, click on it to remove it. You can immediately prepare 6 ice packs at the start of your day and finish your objective before large waves of patients start to come in.


Day 40 – Puppy Power! –

Cheer up the kids!

Oliver Location: Behind the weights stand, at the end of the glass partition.


When a sad or grumpy child asks to go to a station, immediately click on Princess the dog, followed by the station the child is at. This way, Princess will be ready to cheer up the child while they’re there. Do this 3 times before the end of the day to complete your goal.


Tip! Princess the dog cannot cheer up patients waiting at the register.


Radiology: Level 41 – 50

With one tragic chapter closed, Allison works hard on a new beginning. One life may have been lost, but there’s still a chance she can save another.


Day 41 – Check ‘em Out! –

Check out patients within 20 seconds after their treatment!

Oliver Location: On the floor to the right of the last waiting chair, in the lower left corner.


Today you will need to check out patients within 20 seconds of completing their treatment. The 20 second countdown will start as soon as the patient reaches the register. Be careful! Clicking on the register will not stop or pause the countdown! Make sure you leave at least 5 seconds for Allison to reach the register from anywhere in the room, and be careful not to get stuck helping a patient when the countdown gets low. The meter in the upper right corner of your screen will help you keep track of the time.


Day 42 – Quick Counts! –

Score 28 quick treatment bonuses!

Oliver Location: In the center of the checkout counter.


Assign patients to their stations quickly and help them before the colors deplete from their popup bubbles in order to receive quick treatment bonuses. The meter in the upper right corner of the screen will help you keep track of your progress. Be careful, there’s very little room for error! A total of 30 patients will come in today, and you will need to successfully get 28 quick treatment bonuses to complete today’s challenge.


Day 43 – Toner Time! –

Pick up all the toner!

Oliver Location: Behind the glass partition, to the upper right of the last waiting room chair from the left.


Six toner cartridges are scattered throughout the department. Find them all before your shift is finished! Their locations are shown below.

Heart's Medicine - Time to Heal Level 43

Heart’s Medicine – Time to Heal Level 43

Day 44 – Management Issues! –

Only use one bed at a time!

Oliver Location: Behind the foot of the MRI scanner.


The beds are located in the lower right corner of the room. Make sure only one patient at a time is using them. When a patient is moved to a bed, treat them right away, and don’t assign any more patients to beds until that patient has finished their treatment.


Tip! Try using one specific bed to help yourself keep track.


Day 45 – Guess Who’s Back? –

Perform a scan.

Oliver Location: Hanging from the center of the ceiling. Oliver, that’s dangerous!


Click on Mr. Asher at the bottom of the screen, indicated by the “!” bubble, to help prepare him for a scan. A meter will appear showing your progress. Work on preparing Mr. Asher whenever you’re done treating patients, and after checking out groups. As soon as the meter’s been filled, the day’s objective will be complete.

Heart's Medicine - Time to Heal Level 45

Heart’s Medicine – Time to Heal Level 45

Day 46 – Variety! –

Don’t get the same item twice in a row!

Oliver Location: Behind the glass partition above the first waiting room chair in the lower left corner.


Be careful not to pick up the same item twice in a row! If, for example, a patient needs a neck pillow, you cannot pick up a neck pillow again until you’ve picked up at least one other item. Try to keep track of what patients are asking for, and when in doubt, pick up an extra item to prevent accidentally doubling-up.


Day 47 – Check the X-rays! –

Score at least 12 hearts with the x-ray minigame.

Oliver Location: Behind the tray to the right of the injection chairs.


Patients who are moved to the MRI scanner often require x-rays. A blue bubble will pop up over these patients, indicating Allison needs to play an x-ray minigame. Find the differences on a patient’s x-rays. The quicker you do this, the more hearts you’ll score. You can score a maximum of 3 hearts per patient per minigame. Score 12 hearts before the end of the day to achieve your goal. This can be done with as little as 4 patients, though you will need 5 if you get less than 3 hearts for any of them.


Tip! Quickly look between the two x-rays. Differences between the two x-rays almost always show up as either pink spots, or dark gaps. Immediately click on these on either x-ray to single out the differences.

Heart's Medicine - Time to Heal Level 47

Heart’s Medicine – Time to Heal Level 47

Day 48 – Only One Item! –

Don’t have more than one item on your tray at the same time!

Oliver Location: At the foot of the bottommost bed in the lower right corner.


Pick up only one item at a time. The best way to keep on top of this is to only serve one patient at a time. As soon as the patient receives the item they need, you can move on to the next patient. Continue this pattern throughout the day to complete the challenge. If you make a mistake, simply remove the wrong item, pick up the right one, and continue the pattern.


Day 49 – Perfection! –

Only check out golden heart patients!

Oliver Location: Behind the table in the waiting section on the lower left.


Today’s challenge is one of the most difficult in the game. You will need to be on top of all patients coming and going as quickly as possible in order to complete this challenge. Pay extra close attention to patients on the other end of the room, and be prepared to pick up the items they need as quickly as possible.


Tip! Purchase all the upgrades you can! It’s very likely you will need all upgrades available in order to complete this challenge. Complete levels to earn coins you can spend on upgrades prior to starting your day.


Day 50 – We’re Out of Time! –

Prepare Mr. Asher for surgery!

Oliver Location: Hiding behind the interior of the center counter, toward the right.


The trick to today is to be both attentive and patient. At 4 points during the day, a “!” bubble will pop up over Mr. Asher at the bottom of the screen. When this happens, quickly click on the bubble to help prepare Mr. Asher for surgery. Perform the touch gestures as shown to complete preparations.

Heart's Medicine - Time to Heal Level 50

Heart’s Medicine – Time to Heal Level 50

Surgery: Level 51 – 60

Finally, the moment of truth! Allison tries her hand at the demanding shifts of the Surgery department. It’s anything but easy. Can she face her fears and earn the respect of Quinn while trying to save Mr. Asher?


Day 51 – Efficient Worker –

Finish your shift with an empty tray and don’t discard items!

Oliver Location: Above the top of the operating table.


Pay close attention to the surgeons’ needs, and only pick up items when they ask for them. Repeat this pattern throughout the day and you’ll finish the challenge with flying colors.


Day 52 – HeartBeats –

Score 12 hearts with the HeartBeat minigame!

Oliver Location: In the observation window in the upper left corner.


The HeartBeat minigame happens at the machines on the right. When Allison appears next to a heartrate monitor in one of the surgeons’ bubbles, the HeartBeat minigame will begin as soon as you select it and reach them. Click on the matching patterns at the bottom of the popup which match the green highlighted sections. You will not have many opportunities to do this minigame – in fact you may not even get your first chance until the day is nearly halfway complete – so make sure you get the 3 heart maximum for each time in order to complete today’s goal!

Heart's Medicine - Time to Heal Level 52

Heart’s Medicine – Time to Heal Level 52

Day 53 – No Late Deliveries! –

Surgeons need their items quickly!

Oliver Location: Behind the tray table on the lower right, between the needle and thread.


Don’t miss a single quick bonus at the surgery stations. Surgeons will need their items quicker than usual today. Be prepared by keeping a syringe with pink liquid and a needle and thread handy in your inventory at all times, since these take the longest to prepare. Surgeons just entering the suite will always require items from the tray on the lower left, so click on this tray to have Allison move there so she’s ready to give them the item they need by the time they finish washing at the sink.


Tip! All surgeons have a small timer which appears next to them. When this timer completes, the surgeon will either finish what they’re doing, or require another item or action before they can continue. Keep a sharp eye on these timers in order to stay on top of your quick bonuses!


Day 54 – Sterile Items –

Use an item within 7 seconds of picking it up!

Oliver Location: Behind the right side of the tray table in the lower left corner.


Today you will need to pick up items on request and will not be able to use the trick of keeping spare items on your tray. Only pick up items as surgeons request them, and don’t risk delivering multiple items for bonuses. A meter in the upper right corner of the screen will help you keep track of how long you’ve held on to an item.


Day 55 – Toxin Checkup! –

Keep the toxins in check!

Oliver Location: In the observation window toward the upper left corner, to the right of the sinks.


Today a special monitor will appear on the right. A meter over this new station will deplete over time. You will need to click on this station to check the patient’s toxin levels before the bar is fully depleted. The meter in the upper right corner will also help you keep track of time. Try to swing by this station by the time the bar is half depleted. Clicking on this station will temporarily stop the bar and keep it from depleting further, even if you’re currently working on other tasks. Continue to check the monitor between helping doctors and checking others out of the surgery suite. Prevent the bar from emptying completely by the end of the day to complete today’s goal.

Heart's Medicine - Time to Heal Level 55

Heart’s Medicine – Time to Heal Level 55

Day 56 – Variety Bonus! –

Use a different item every time!

Oliver Location: On the right surgeon’s stool next to the operating table.


Today’s challenge is very similar to the challenge you faced in Level 46. For example – if you pick up a pair of gloves to give to a surgeon, the next item you pick up and give to a surgeon cannot be gloves. You will need to first pick up and give another item first, such as a scalpel. Deliver items to surgeons on a case-by-case basis, being diligent not to pick up the same item twice in a row. Do this successfully and by the end of the day, you’ll reach your goal.


Day 57 – Management Expert! –

Score at least two Treatment Chains of three or more treatments!

Oliver Location: Behind the checkout monitor.


You will get a Treatment Chain every time you help a surgeon, then immediately help another surgeon back-to-back. You will need to help 3 surgeons back-to-back in order to fulfill the requirements of today’s challenge. You will need to do this a total of two times before the day is done. If you’re setting up a chain with surgeons that require items, you will need to have all the items those surgeons need on your tray before you start the chain, or else it will be broken. An example of a Treatment Chain is shown in the screenshot below, and involves the first 3 surgeons that enter today.

Heart's Medicine - Time to Heal Level 57

Heart’s Medicine – Time to Heal Level 57

Day 58 – Ruth’s in Surgery! –

Does Ruth have the results?

Oliver Location: Behind the table with the chest paddles, to the left of the operating table.


Ruth is in the surgery suite today, working in the lower right corner. Three times today, a “!” bubble will pop up over her head. As soon as this happens, click on Ruth to have Allison question her about the results.

Heart's Medicine - Time to Heal Level 58

Heart’s Medicine – Time to Heal Level 58

Day 59 – Mason Steps In! –

But he lacks a certain hospitality…

Oliver Location: Behind the screen of the first monitoring station on the right.


Today you will be playing as Mason! However, unlike Allison, Mason cannot acquire any treatment bonuses of any kind. Play through today normally, keeping close tabs on helping all the surgeons. Since you won’t have any bonuses to help you, it’s more important than ever to keep on top of things and make them happy. Complete the day to fulfill the goal.


Tip! It’s easy to forget about the surgeons at the register on the upper right. Make sure you check them out before they lose hearts! It’s recommended you check them out in groups of 4 instead of groups of 5 today.


Cutscene – Mr. Asher’s Surgery

The time has come for Allison to try and save Mr. Asher by performing surgery. It’s complicated, and it requires several steps, but with your help, she can make it! Referring to the screenshot below as reference, perform the following steps:

  1. Apply disinfectant – Click and hold, moving your cursor around to apply disinfectant to the area marked in blue.
  2. Make the cut – Click and hold, tracing the line shown from top to bottom to make the incision.
  3. Vacuum the fluids – Click and hold to use the pump and remove the fluid from Mr. Asher’s lungs. Move the pump back and forth over the fluid to remove it faster.
  4. Move the lungs – Click and hold, moving each of the lungs toward the outer frame to reveal the heart.
  5. Remove the fat – Click on the globs of fat to remove them from the heart.
  6. Scan for parasites – Click and hold the handle of the scanner to scan for parasites. There are none to be found. Keep looking until Allison starts talking again, prompting the next step.
  7. Destroy the parasites – Click and hold to use the scanner again. Focus on the parasites within the scope to destroy them. Continue to do this until all parasites have been removed. Tip! Parasites can show up in the same places they did before, so you will need to check the entirety of the heart multiple times.
  8. Stitch up the heart – Using the highlighted dots as guidance, stitch up the heart.
  9. Restart the heart – Click within the dotted circles that show up over the heart. Do this over and over again until the screen eventually blacks out.
Heart's Medicine - Time to Heal Cutscene - The Surgery

Heart’s Medicine – Time to Heal Cutscene – The Surgery

Day 60 – Attention Everyone! –

Never assist the same surgeon twice in a row!

Oliver Location: Behind the head of the operating table.


Today’s goal is fairly straight-forward: only assist one surgeon at a time. Make sure to never help the same surgeon twice in a row. Giving a surgeon an item, or helping with a task counts as assisting. If you face the scenario of helping a surgeon twice, wait until a new or different surgeon needs help before aiding the original.


Tip! Clicking on a surgeon, followed by the station they want to move to does not count as assisting a surgeon.


Challenges

In addition to the 60 regular Challenge levels of the game, there are 30 Bonus Challenge levels: 5 per department. This section covers each of those challenges, as well as strategies for completing each without skipping a beat.


The Ward

Challenge 1 – Emily’s Hospital Food –

Help Emily in the hospital canteen.


Help Emily run the hospital canteen. There are two types of customers who will come in: customers who want to be seated at a table, and customers who want to order at a tray at the counter. Select the incoming customers, then assign them a tray or a seat according to their preference. Customers sitting at the tables will make multiple orders. Keep in mind customers at a tray may wish to be seated and customers sitting at tables may wish to order again at one of the counter trays. Serve customers as per normal and check them out at the register once 5 of them have gathered for the maximum score!


Challenge 2 – Don’t Steal My Medicine! –

Other departments are out of supplies!


Each time a member of hospital staff enters from the lower left, they will walk over to the supplies on the shelf on the right and clear one of them out completely. As soon as these staff members enter and go to the cabinet, click on the supplies in the bottom of the center cabinet at the top of the screen to immediately restock them all.


Challenge 3 – Combo Time! –

Only combos and bonuses give hearts.


Assign patients to their stations as soon as they walk in, and treat them before the color drains from their bubbles. If you find yourself falling behind, focus on the newer patients which have more time for bonuses. It’s better to keep combos going with new patients than to try catching up with old ones. Make sure you keep the supplies on the right shelf in stock and check patients out in groups, stringing together Treatment Chains by helping patients back-to-back where possible.


Challenge 4 – Oliver Brought Friends! –

Oliver brought friends, and they’re everywhere!


Find 30 of Oliver’s friends and family throughout the course of the day. Listen for the tell-tale squeak and click on the guinea pigs as soon as they show up. Guinea pigs can show up anywhere, however they tend to gravitate toward locations where Allison would find them in the normal Challenge levels. Refer to the Oliver the Guinea Pig Locations Section to view these areas!


Challenge 5 – Keep Moving! –

Don’t stand still for 8 seconds!


Keep Allison moving by clicking between the bed and one of the chairs when she’s idling. Treating a patient in a single location counts as standing still, so get moving again as soon as you’re done treating them! Be especially careful of leaving her standing still after aiding customers with touch sequences, minigames, and checking them out at the register.


Pharmacy

Challenge 6 – The Blues –

Only patients with 3 or less hearts enter today!


You will not be able to get any golden heart bonuses today. Instead, focus on serving patients as quickly as possible. Continue to check patients out in groups of 5 and line up Treatment Chains as much as possible. Your priority should be treating customers as quickly as possible, but don’t let quick treatment force you into checking people out in groups of less than 3!


Challenge 7 – Extra Help –

Jenny lends a hand!


Jenny will pick up all the items you need today. Jenny moves very quickly, so you will be able to focus on moving Allison to the stations patients are at while Jenny places items on the tray. Focus on completing the day as per normal and the rest should be smooth-sailing!


Tip! Try to allow for a moment’s delay when Jenny is picking up items. It takes a moment for the actual item to be transferred to your tray.


Challenge 8 – Minigame Madness! –

Minigames earn an extra heart!


Extra minigames will pop up today, and each one will reward an extra heart! Remember that bubbles with a blue filling indicate that clicking on that patient will trigger a minigame. Refer to our Minigames section for additional tips and tricks.


Challenge 9 – Emily’s Hospital Food II –

Help Emily in the hospital canteen.


Extra items have been added to the menu today. Pay close attention to when customers order sandwiches, since not all toppings will always be used! Try to keep a cup of pre-prepared coffee on your tray at all times.


Tip! Hospital staff regulars tend to enjoy the same orders. For example, Connor always orders coffee, so as soon as you see him, make sure you have a cup prepared! Similarly, Ruth loves sandwiches and Allison loves pastries, so when you see these staff regulars, you’ll know what to expect. This strategy can be applied to all Hospital Food days.


Challenge 10 – Small Tray! –

You can only carry one item at a time!


For today’s strategy you’ll need to focus on one customer at a time, especially if they require items. If a patient is going to the green blood donation chair, you can move there before they arrive. That way, as soon as they sit down, Allison will immediately hook them up and you’ll be guaranteed a Quick Bonus. Continue to check out customers in groups of 5 as per normal.


Tip! Three-pill combinations count as a single item.


E.R.

Challenge 11 – Emily’s Hospital Food III –

Help Emily in the hospital canteen.


There’s a new variety of chips, soup, and tea available today! To save time, immediately prepare a cup of coffee and a cup of tea and keep these on your tray. About ¾ of the way through the day, one of the tray customers will order both coffee and tea, so make sure you’re prepared so you don’t fall behind! Remember – hospital staff are also regulars with predictable orders, so use this to your advantage.


Challenge 12 – It’s Serious! –

Patients can’t gain golden hearts!


Patients can’t gain golden hearts, but they can still gain full hearts otherwise. Treat patients quickly as per normal and continue to try checking them out in groups of 5. If a patient’s hearts are draining too quickly at the register, check them out in groups of 4 instead.


Challenge 13 – Strep Throat Patients! –

Memorize the treatments, so patients don’t have to ask twice!


Today, focus on treating patients as quickly as possible. After a moment, a patient’s need within their bubble will turn into a “?”. A useful trick to use when dealing with multiple patients is to place priority on the patients which require items – such as the scalpel. Patients which only require treatment or an action will automatically be treated without penalty when you click on them, even if you forgot what they needed.


Challenge 14 – Combos Only! –

Only patients that check out with at least 2 other patients count towards the score total!


In order to maintain high scores, you’ll always want to try and check out patients in groups of 5. However, if this isn’t possible, try checking them out in groups of 4 instead. You need to check out a minimum of 3 patients at once in order for their hearts to count toward your score.


Challenge 15 – Oliver’s Back! –

Oliver’s back and so are his friends!


Find Oliver and his friends 30 times before the end of the day. The guinea pigs’ locations are randomized, however they tend to show up in the same locations as Oliver pops up during the daily challenge levels. To view these locations, see the Oliver the Guinea Pig Locations section of our guide.


Physiology

Challenge 16 – No Time to Wait –

There’s only 1 spot to wait. Don’t lose 3 or more patients!


Place priority on moving patients to stations as quickly as possible. The moment a patient comes in, immediately hover your cursor over them and place them in their proper location as soon as they sit down. It’s better to focus on incoming patients and leave the others waiting a moment than to risk losing patients.


Challenge 17 – At Their Own Pace! –

Every patient has their own tempo!


A wider variety of patients are available today, and each one is unique. You never know what the heart level of an incoming patient will be. Therefore, pay close attention to the number of hearts on a patient and place priority on helping the ones with the lowest happiness levels first. Remember to check out patients in groups of 5 as much as possible.


Challenge 18 – Emily’s Hospital Food IV –

Help Emily in the hospital canteen.


The canteen shelves are now full of food and drink items, and the sandwich bar is full of options! More customers will be making multiple orders today. Be especially careful making sandwiches and pay close attention to what a customer wants on them. Have a cup of coffee and tea prepared on your tray at all times to prevent yourself from falling behind, and remember to restock the chips beneath the register!


Challenge 19 – Man’s Best Friend! –

Cheer up Allison by sending Princess to a station she’s at!


The best way to align today’s goal is to look at where a patient wants to go. For example, if a patient is moving to a bed, this is a location where Allison needs to go to treat them. As soon as you see a patient wants to be moved to a bed, select Princess, then click on the bed. Immediately following, click on the bed so Allison will treat the patient there. In this way, Princess will have time to cheer up Allison, even if she treats a patient especially quickly. Successfully complete this 4 times before the end of the day to achieve your goal.


Challenge 20 – Healthy Lifestyle –

Treatments per patient are increased!


More patients will need to visit multiple stations today. Make sure you always have ice packs prepared and keep your vitamins fully stocked. The number displayed in the upper right corner of a patient’s bubble will indicate how many more stops they need to make before they’re finished with treatment. Similarly, you can look at the happiness levels of a patient coming in for a clue on how much treatment they will need. Generally speaking, the lower the number of hearts, the more stations they will need to stop at.


Radiology

Challenge 21 – Take It Easy! –

Allison is very tired!


Allison’s energy levels are very sensitive today. Keep an eye on the meter in the upper right corner of the screen. Let this meter deplete completely before moving Allison to another location. If Allison exceeds the meter, she will move especially slow, resulting in patients who are less than happy. You can use the yellow chairs at the top of the screen as a check point between the beds and the MRI scanner.


Challenge 22 – Rush Hour! –

Patients enter in groups!


Patients will enter the Radiology department in waves today. Keep an eye on the color levels within patients’ bubbles and use this as reference to decide which patients need treatment priority. Once you’ve finished treating a group, you can check them all out together at the register for bonus points.


Challenge 23 – Emily’s Hospital Food V –

Help Emily in the hospital canteen.


There’s a new item on the menu today: waffles! Click on the waffle to the left of the waffle maker to place it inside. As soon as the waffle is cooked, click on it within the cooker to add it to the plate immediately to the right. You can keep a stack of up to 4 waffles at a time, so prepare extra waffles whenever you have a free moment. Remember to keep a pre-prepared cup of coffee and tea on your tray to prevent customer backup.


Challenge 24 – Guess Who’s Also Back?! –

Oliver is back again with friends and family!


Oliver and friends are back again! Find 30 guinea pigs before the day is done. These little guys can pop up anywhere, but tend to show up in the same locations as Oliver can be found during normal days. To view these locations, see our Oliver the Guinea Pig Locations section.


Challenge 25 – Extra Help! –

Jenny cares about you!


Jenny will help by retrieving items today. Jenny is especially fast, so you can focus on moving Allison to patients’ stations and locations. Remember to allow a moment for Jenny to actually pick up an item and transfer it to your tray and don’t get too far ahead of yourself!


Surgery

Challenge 26 – Doctors Can’t Wait! –

Doctors lose hearts faster while waiting outside the room!


Keep an eye out for new surgeons entering the suite from the upper left corner. As soon as they ask to be taken to a sink or machine, click on them and move them to these stations immediately. If you wait more than a few seconds, the surgeons will leave, depriving you of essential points you need to complete today’s goal.


Tip! Make sure to always address surgeons standing outside the room and waiting for the sink first and foremost!


Challenge 27 – The Specialist! –

Keep the Specialist happy!


The Specialist can be identified by his blue cap and mask, blue-colored scrubs, and black hair. If you forget which surgeon is the Specialist, just refer to the portrait in the upper right corner of your screen. The Specialist loses an average of 1 heart per second, so place complete priority on helping him above all else.


Tip! Always have a needle and thread handy on your tray to save crucial time!


Challenge 28 – Super Allison! –

Allison walks a lot faster!


Today’s quite easy as far as challenges go. Allison is super-fast, so you’ll be able to help surgeons faster than ever before! Take your time and don’t get too far ahead of yourself. Remember to restock surgical items by clicking on the items beneath the monitor on the right.


Challenge 29 – Intricate Operation! –

Minigames are harder, and treatments take more time!


Minigames today have extra steps, but otherwise work the same as usual. Take a deep breath and don’t get too flustered. Remember to keep an eye on new incoming surgeons, and keep your supplies stocked. The most crucial element of today is to remember the doctors at the checkout – it’s easy to forget them when you’re busy with more intricate treatments and minigames. Check them out in smaller groups if necessary, but try to make sure there’s at least 4 doctors at the checkout monitor before you do.


Challenge 30 – Emily’s Hospital Food VI –

Help Emily in the hospital canteen.


Prepare a cup of coffee and tea to keep on your tray as soon as the day begins, and as soon as you have a spare moment afterward, start stocking up on waffles. Customers will want to be moved from chairs to trays and vice versa more than ever. You can help keep this managed by placing customers in the chairs closest to you to cut down on serving time. Similarly, if you need to buy time, send them to a chair further away. Keep your chips stocked and the favorite dishes of your regulars in mind (Connor likes coffee, Allison likes pastries, and Ruth likes sandwiches).


Congratulations! You’ve completed Heart’s Medicine – Time to Heal! Click on the heart icon that’s appeared in the upper right corner of the level select screen for an exclusive sneak-peak at the next title in the series!

Next Time on Heart's Medicine

Next Time on Heart’s Medicine…


Oliver the Guinea Pig Locations

Oliver is quite an adventurous guinea pig, and turns up in each of the game’s 60 challenge levels! Find Oliver in each location to unlock the Oliver trophy. The following list outlines his locations per level, and is divided by hospital department.


The Ward

Heart's Medicine - Time to Heal - Oliver Ward Locations

Heart’s Medicine – Time to Heal – Oliver Ward Locations

Level 1: In the middle of the floor, below the counter with the thermometer.

Level 2: In the planter hedge in the lower left corner, between the first two waiting chairs.

Level 3: In front of the window, between the upper left gurney and the counter with supplies.

Level 4: Just above the tray table in the bottom right corner of the screen, in front of the binders beneath the checkout.

Level 5: At the checkout, in the same location behind the counter as Allison stands.

Level 6: In the top left corner of the cabinet that contains the adhesive bandages, cotton swabs, and cream.

Level 7: In the shower room on the left, over the red rug.

Level 8: In the picture frame above the shower on the left.

Level 9: Behind the foot of Earl’s bed, peeking over the side.

Level 10: Around the left corner of the counter with the checkout monitor.


The Pharmacy

Heart's Medicine - Time to Heal - Oliver Pharmacy Locations

Heart’s Medicine – Time to Heal – Oliver Pharmacy Locations

Level 11: Just above the pink carpet on the floor in the lower left corner.

Level 12: In his cage habitat near the register, behind the checkout.

Level 13: Behind the glass divider wall, between the second and third waiting chairs in the lower right corner.

Level 14: Behind the small stepping stool to the immediate right of the checkout monitor.

Level 15: Under the table at the second blood donor station.

Level 16: To the left and just behind the glass wall divider next to the magazine rack.

Level 17: Behind the base of the magazine rack.

Level 18: Just behind the right end of the checkout counter.

Level 19: On the right side of the mixing station in the upper right corner.

Level 20: Hiding behind the bottom left corner of Allison’s coat when she’s standing at the checkout monitor.


Emergency Room

Heart's Medicine - Time to Heal - Oliver ER Locations

Heart’s Medicine – Time to Heal – Oliver ER Locations

Level 21: On the top of the orange tray to the left of the checkout monitor.

Level 22: On the left side and just behind the first examination chair from the right.

Level 23: In the flower hedge in the lower right corner of the screen, between the first two waiting chairs.

Level 24: In the center of the blue mat on top of the counter with the checkout monitor, next to the desk lamp.

Level 25: On top of the shelf in the upper left corner, right next to the daily shift clock.

Level 26: In the upper right corner of the counter, just below the dial showing the day’s objective.

Level 27: On the center shelf containing the scissors and scalpel.

Level 28: Behind the checkout counter, just above the file folders.

Level 29: On the left side of bed on the lower right of the arrivals section.

Level 30: Underneath the bed in the upper right corner of the arrivals section.


Physiology/Physiotherapy

Heart's Medicine - Time to Heal - Oliver Physiotherapy Locations

Heart’s Medicine – Time to Heal – Oliver Physiotherapy Locations

Level 31: In the middle of the floor, beneath the weight mat.

Level 32: At the base of the exercise stairs, next to the table with the vitamin bottles.

Level 33: Behind the glass partition, between the feet of the second and third waiting chairs.

Level 34: Behind the checkout counter, between the monitor and the magazines.

Level 35: Behind the green yoga ball at the bottom of the screen.

Level 36: Behind the center of the bottommost bed in the lower left corner.

Level 37: Behind the dog bed, next to the crutches.

Level 38: Between the first and second waiting chairs.

Level 39: Between the staircase and the ice cooler.

Level 40: Behind the weights stand, at the end of the glass partition.


Radiology

Heart's Medicine - Time to Heal - Oliver Radiology Locations

Heart’s Medicine – Time to Heal – Oliver Radiology Locations

Level 41: On the floor to the right of the last waiting chair, in the lower left corner.

Level 42: In the center of the checkout counter.

Level 43: Behind the glass partition, to the upper right of the last waiting room chair from the left.

Level 44: Behind the foot of the MRI scanner.

Level 45: Hanging from the center of the ceiling. Oliver, that’s dangerous!

Level 46: Behind the glass partition above the first waiting room chair in the lower left corner.

Level 47: Behind the tray to the right of the injection chairs.

Level 48: At the foot of the bottommost bed in the lower right corner.

Level 49: Behind the table in the waiting section on the lower left.

Level 50: Hiding behind the interior of the center counter, toward the right.


Surgery

Heart's Medicine - Time to Heal - Oliver Surgery Locations

Heart’s Medicine – Time to Heal – Oliver Surgery Locations

Level 51: Above the top of the operating table.

Level 52: In the observation window in the upper left corner.

Level 53: Behind the tray table on the lower right, between the needle and thread.

Level 54: Behind the right side of the tray table in the lower left corner.

Level 55: In the observation window toward the upper left corner, to the right of the sinks.

Level 56: On the right surgeon’s stool next to the operating table.

Level 57: Behind the checkout monitor.

Level 58: Behind the table with the chest paddles, to the left of the operating table.

Level 59: Behind the screen of the first monitoring station on the right.

Level 60: Behind the head of the operating table.


Minigames

Throughout each of the game’s levels, a number of minigames are available to play. Three different types of minigames are available per hospital department. This section outlines each of the minigames available and how to play them.


The Ward

  • Apply cream! – Click and hold to rub cream onto the burned spots. A green checkmark will appear once the cream has been fully applied successfully.
Heart's Medicine - Time to Heal Minigame - Apply Cream

Heart’s Medicine – Time to Heal Minigame – Apply Cream

  • Click away the bubbles! – Click on the bubbles in the syringe until all of them are gone. Click on the center bubbles in clusters to clear them away faster.
Heart's Medicine - Time to Heal Minigame - Clear Bubbles

Heart’s Medicine – Time to Heal Minigame – Clear Bubbles

  • Adjust the IV drip! – Click and hold the knob on the right to adjust the IV drip levels. Move the dial up and down until the patient is smiling, then click “Set”.
Heart's Medicine - Time to Heal Minigame - Adjust IV Drip

Heart’s Medicine – Time to Heal Minigame – Adjust IV Drip

The Pharmacy

  • Find the medication! – Look at the medication shown on the clipboard in the lower left corner. Find the identical medication on the shelf and click on it to complete the minigame.
Heart's Medicine - Time to Heal Minigame - Find the Medication

Heart’s Medicine – Time to Heal Minigame – Find the Medication

  • Make pills! – Click on the grooves in the capsule machine until all of them are filled, then click on the red button to make the medication.
Heart's Medicine - Time to Heal Minigame - Make Pills

Heart’s Medicine – Time to Heal Minigame – Make Pills

  • Fill the Bottle! – Liquid medication will pour into the bottle shown. Click on the bottle when the liquid reaches the green line. Do this until each of the bottles are filled.
Heart's Medicine - Time to Heal Minigame - Fill the Bottle

Heart’s Medicine – Time to Heal Minigame – Fill the Bottle

Emergency Room

  • Remove the glass! – Click on a glass shard and hold, moving the shard out of the wound until it disappears. Do this for each of the shards until all of them are removed.
Heart's Medicine - Time to Heal Minigame - Remove the Glass

Heart’s Medicine – Time to Heal Minigame – Remove the Glass

  • Stitch the wound! – Click on the flashing white dot and hold as you move the stitch from the starting point to the next white dot. Repeat until the wound is stitched completely.
Heart's Medicine - Time to Heal Minigame - Stitch the Wound

Heart’s Medicine – Time to Heal Minigame – Stitch the Wound

  • Hook up the patient! – Click on a plug on the left and hold, moving it to the matching jack on the machine before releasing. Do this for each of the plugs until the patient is fully hooked up.
Heart's Medicine - Time to Heal Minigame - Hook Up the Patient

Heart’s Medicine – Time to Heal Minigame – Hook Up the Patient

Physiology/Physiotherapy

  • Practice Punching! – Click within the dotted circles that appear to catch a patient’s punches. Do this until the number of hits left in the upper left corner is reduced to 0.
Heart's Medicine - Time to Heal Minigame - Practice Punching

Heart’s Medicine – Time to Heal Minigame – Practice Punching

  • Set the bones! – Click and hold the bones shown in red, moving them to the correct locations outlined in dark blue. Set all bones correctly to complete the minigame.
Heart's Medicine - Time to Heal Minigame - Set the Bones

Heart’s Medicine – Time to Heal Minigame – Set the Bones

  • Massage the patient! – Click and hold at the start of the line pattern, following along it in the direction of the arrows until you reach the end. If you accidentally let go, don’t worry – just click and hold again where the line cut off.
Heart's Medicine - Time to Heal Minigame - Massage the Patient

Heart’s Medicine – Time to Heal Minigame – Massage the Patient

Radiology

  • Ultrasonic removal! – Click and hold the handle on the right side of the lens, moving it around the patient’s body to look for clots. When you find one, you will see a red dot and an alarm will go off. Hold the lens over the clot to remove it. Repeat this process until all the clots are removed.
Heart's Medicine - Time to Heal Minigame - Ultrasonic Removal

Heart’s Medicine – Time to Heal Minigame – Ultrasonic Removal

  • Match the x-rays! – Click on the x-rays on the left, holding as you move it to the matching location on the body on the right. X-rays may rotate as you move them. Match all the x-rays correctly to complete the minigame.
Heart's Medicine - Time to Heal Minigame - Match the X-rays

Heart’s Medicine – Time to Heal Minigame – Match the X-rays

  • Check the scan! – Click on the differences between the two x-rays shown. Look for pink spots and black spots. You can click on either x-ray. Once you’ve found all the differences, the minigame will be complete.
Heart's Medicine - Time to Heal Minigame - Check the Scan

Heart’s Medicine – Time to Heal Minigame – Check the Scan

Surgery

  • Suction, please! – Click and hold the nozzle, moving it to the puddles of green liquid to suck it up. Move the nozzle back and forth over the liquid to remove it faster. The minigame will end once all the liquid has been removed.
Heart's Medicine - Time to Heal Minigame - Suction Please

Heart’s Medicine – Time to Heal Minigame – Suction Please

  • Set Anesthetics! – Click on the red button on the lower right to pump air into the tube, causing the ball inside to rise. The goal is to pump anesthetic into the tube so that the ball hovers in the green zone. The best way to do this is to press the button quickly to send the ball near the top, then click as needed when the ball falls to keep it hovering in the green zone.
Heart's Medicine - Time to Heal Minigame - Set Anesthetics

Heart’s Medicine – Time to Heal Minigame – Set Anesthetics

  • Check stability! – Click on the section of heart rate on the paper at the bottom that matches the section highlighted in green on the monitor. Match each section correctly to complete the minigame.
Heart's Medicine - Time to Heal Minigame - Check Stability

Heart’s Medicine – Time to Heal Minigame – Check Stability


Trophies

Challenge yourself by unlocking the 18 hidden trophies in Heart’s Medicine – Time to Heal! Access the game’s trophies by clicking on the trophy icon in the upper right corner of the level select screen. Each trophy features an iconic character from the game. Below you will find a description of each of the trophies and how to unlock them.


Trophy Name Description How to Unlock
The Patients Complete all Challenges and Bonus Challenges! Complete every level of the game. There are 90 total.
Oliver Found all Olivers! Find all Olivers in the game! There are 60 total. See the Oliver the Guinea Pig Locations section of our guide above.
Ruth Complete your shift at the Pharmacy! Complete Levels 11 – 20
Quinn Complete your shift at the O.R.! Complete Levels 51 – 60
Connor Achieve 3 stars on each day! Score 3 stars on each day for Levels 1 – 60. Does not include Bonus Challenges. Refer to the walkthrough above for more detailed information and strategies per day.
Jenny Fill up every station, and have at least one patient at the checkout desk! The easiest place to unlock this achievement is Level 1. Help the first patient that walks in and send them to the register. Do not check them out yet! Send the second patient that arrives to the bed, but do not help them yet. The third patient that arrives will need to sit in the chair. Send them to the chair, but do not help them yet. The fourth patient that arrives will need to use the shower. Send them to the shower. During this time, the fifth patient will arrive. Send them to the bed to unlock the achievement! Tip! Only help the first patient that walks in. Let the others wait to be treated until the achievement unlocks.
Heart's Medicine - Time to Heal Jenny Trophy

Heart’s Medicine – Time to Heal Jenny Trophy

Earl Have the item on your tray before a patient asks for it. The best time to complete this achievement is during your shift in the E.R. Keep a scalpel and a pair of scissors on your tray most days to save time. The achievement will unlock as soon as you deliver the item to the patient in need.
John Buy all items for the new wing. There are 13 items total. Complete the Challenges for each level to earn diamonds. These diamonds can be used to purchase upgrades for the new wing by clicking on the diamond icon in the upper right corner of the level select screen.
Allison Get all other trophies! Unlock all other trophies. Refer to the descriptions in this column for tips and tricks!
Michael Complete your shift at the Ward! Complete Levels 1 – 10
Chance Complete your shift at the Physiotherapy Department! Complete Levels 31 – 40
Daniel Buy all the upgrades! There are 62 total upgrades which span all hospital departments. Earn coins by completing day shifts in each department. Playing through all 60 Challenge levels once isn’t enough – You will need to play through levels multiple times in order to amass the number of coins needed. Coins are universal and can be used in any department, so upgrade whatever you feel like! Tip! Radiology is one of the most difficult Challenge departments. Try saving coins to upgrade this department sooner rather than later.
Sophia Complete your shift at the E.R.! Complete Levels 21 – 30
Robin Complete your shift at the Radiology Department! Complete Levels 41 – 50
Princess Cheer up 50 people with Princess! Princess the Dog first appears in the Physiotherapy Department in Level 33 and is available through Level 40. Click on Princess, followed by a station in the department to have her move to that station and cheer up patients. Do this a total of 50 times to unlock the achievement!
Joe Score 750 Quick Bonuses! Score Quick Bonuses by quickly moving patients to their stations, and/or fulfilling their needs before the color drains from their bubbles. It’s possible to unlock this achievement in a single playthrough of Levels 1 – 60.
Lisa Walk 40 miles! Move Allison until she’s walked a total of 40 miles! Work on playing through Levels 1 – 60 normally: this achievement will usually unlock during the course of your playthrough. If not, continue playing through the Bonus Challenges, moving Allison back and forth between two points or stations to rack up extra steps.
Mason Score 3 or more hearts in all minigames! Complete each minigame available with a score of 3 or more hearts. Refer to the Minigames section of our guide above for more detailed explanations on how to complete these quickly!


Video Walkthrough

Our gaming specialists are currently busy recording our Video Walkthrough! Be sure to check back soon!

Heart's Medicine - Time to Heal Walkthrough - Coming Soon!

Heart’s Medicine – Time to Heal Walkthrough – Coming Soon!


The Heart’s Medicine – Time to Heal Walkthrough is meant as a guide and does not contain cheats, hacks, or serials.

The post Heart’s Medicine – Time to Heal Official Walkthrough appeared first on GameHouse.


Final Cut – Encore QuickStart Guide

$
0
0

Welcome to the Final Cut – Encore QuickStart Guide! Final Cut – Encore is a Hidden Object game in which you must collect items and explore locations in order to progress. The last piece of the dangerous film projector has been found, and with it, the secrets of your father’s invention and mysterious death will be revealed! This game is a Platinum Edition title, as and such, includes an integrated walkthrough. The Final Cut – Encore walkthrough can be accessed by clicking the “Guide” button in the lower left corner of the screen.

Final Cut - Encore Walkthrough Location

Final Cut – Encore Walkthrough Location


How to Play

Are you new to hidden object titles? Have you simply forgotten some of the basics? Don’t worry! Here are a handful of helpful pointers to guide you in the right direction:


  • All items you collect throughout your adventure will be added to your Inventory. Your inventory is located at the bottom of your screen. When you want to use and item, select the item you’d like to use from your inventory, then click on the location where you’d like to use it.
  • When your cursor turns into a directional arrow, it means you can click to access a new area. Navigate by clicking when arrows appear to move between screens and locations.
  • Final Cut – Encore is a Hidden Object game, and as such, you will encounter Hidden Object Scenes! In these locations, a list of items you need to find will be displayed at the bottom of your screen. Locate all the items in this location in order to progress. Upon locating all the items successfully, a Key Item will be added to your Inventory!
  • Key Items are items which are necessary in order for you to progress in the game. These items are stored in your inventory, and will automatically be removed once they have been used correctly.
  • Feeling stuck? There’s a Hint button located in the bottom right corner of your screen. Hints tend to be unlimited, but often require time to recharge.


What is a QuickStart Guide?

Our QuickStart Guides are intended to provide you with all the essential information you need to access pre-existing walkthroughs. Many of our Platinum Edition games contain integrated strategy guides to help you when you’re feeling stuck, without having to exit the game. For more information on how to access Final Cut – Encore’s integrated walkthrough, scroll up to the top of this page.


The post Final Cut – Encore QuickStart Guide appeared first on GameHouse.

House of 1,000 Doors – Serpent Flame QuickStart Guide

$
0
0

Welcome to the House of 1,000 Doors – Serpent Flame QuickStart Guide! House of 1,000 Doors – Serpent Flame is a Hidden Object game in which you must collect items and explore locations in order to progress. Giant serpents have surfaced from the earth’s depths, and only the House of 1,000 Doors can lead you to the pasts needed to destroy them. This game is a Platinum Edition title, as and such, includes an integrated walkthrough. The House of 1,000 Doors – Serpent Flame walkthrough can be accessed by clicking the button marked “Strategy Guide” in the lower right corner of the screen.

House of 1000 Doors - Serpent Flame Walkthrough Location

House of 1000 Doors – Serpent Flame Walkthrough Location


How to Play

Are you new to hidden object titles? Have you simply forgotten some of the basics? Don’t worry! Here are a handful of helpful pointers to guide you in the right direction:


  • All items you collect throughout your adventure will be added to your Inventory. Your inventory is located at the bottom of your screen. When you want to use and item, select the item you’d like to use from your inventory, then click on the location where you’d like to use it.
  • When your cursor turns into a directional arrow, it means you can click to access a new area. Navigate by clicking when arrows appear to move between screens and locations.
  • House of 1,000 Doors – Serpent Flame is a Hidden Object game, and as such, you will encounter Hidden Object Scenes! In these locations, a list of items you need to find will be displayed at the bottom of your screen. Locate all the items in this location in order to progress. Upon locating all the items successfully, a Key Item will be added to your Inventory!
  • Key Items are items which are necessary in order for you to progress in the game. These items are stored in your inventory, and will automatically be removed once they have been used correctly.
  • Feeling stuck? There’s a Hint button located in the bottom right corner of your screen. Hints tend to be unlimited, but often require time to recharge.


What is a QuickStart Guide?

Our QuickStart Guides are intended to provide you with all the essential information you need to access pre-existing walkthroughs. Many of our Platinum Edition games contain integrated strategy guides to help you when you’re feeling stuck, without having to exit the game. For more information on how to access House of 1,000 Doors – Serpent Flame’s integrated walkthrough, scroll up to the top of this page.


The post House of 1,000 Doors – Serpent Flame QuickStart Guide appeared first on GameHouse.

Gnomes Garden 3 Walkthrough

$
0
0

The gnomes’ kingdom castle has vanished! Utilize your strategy and time management skills in Gnomes Garden 3 to traverse the kingdom of the warlock in search of the missing palace. Our Gnomes Garden 3 walkthrough provides tips, tricks, and strategies for each individual level.

Contents

General Tips & Tricks

It’s all about strategy and time management in Gnomes Garden 3. The following section will walk you through some of the simpler tips and tricks you can employ in each level.


Basic Gameplay

  • Four types of resources can be found in the game: Food, Wood, Stone, and Crystal. Use these resources to finish tasks displayed at the bottom of each level.
  • Buildings such as the Sawmill, Quarry, Mill, and Mine will provide you with a steady income of these resources. You can also swap or trade for resources at the Town Hall.
  • A bar on the left with three stars indicates how long you have to complete a level. Finish all objectives before the bar drops belong the first star to obtain the highest score.
  • Allies you will encounter on your adventure that inhabit buildings include the Workers, which complete basic labor tasks, the Sorceresses, your go-to for all things green and alive (plant and goblin alike!) and Firemen, who are capable of watering trees and chasing off troublemakers.
  • Boosts will appear at the bottom of the screen during most levels. These boosts include Speed Boosts, which will allow your workers to move faster, Working Boosts to increase their speed in completing tasks, and Time Freeze Boosts to temporarily halt the flow of time.


Additional Tips and Tricks

  • You can complete each level’s goals in any order.
  • You can give multiple tasks to workers at a time. A white checkmark background indicates this is a current task and your workers will complete this first. Click on a checkmark again to deselect it or remove it from the roster.
  • Click on any object to see whether or not you can currently reach it. If not, the path will highlight and reveal what’s blocking the way.
  • At the start of a level, take a moment during the “Click to Start” period to think over your strategy before starting.
  • If a building has put out a resource and it’s still sitting outside, it will not produce more until you gather that resource.
  • Boosts charge separate from each other and can be used individually or together.
  • Random resources are produced by altars. If you’re missing a resource that can’t be produced by a building on the map, look to an altar for help!
  • Marrymaker trolls may appear during the game and will hamper your workers if they cross paths.
  • You can upgrade a building when the arrow over it turns green. A grey arrow indicates it can be upgraded, but you do not currently have enough resources.


Gnomes Garden 3 Walkthrough

The Magic Forest: Level 1 – 13

The Thief of Castles has struck! It’s up to you to track him down and save both the kingdom and your family.


Level 1

The adventure is beginning! But you need to stock up on supplies before the big adventure!


Goals:

  • Restore the farm (1)
  • Stock up on food (15)


How to complete the level:

Collect the two food resources to the right of the tent. Click on the log down the path on the right to clear it, gaining additional wood resources. Clear the wood blocking the road on the lower right and collect the two food resources there. Click on the farm on the right to restore it, completing your first objective. Clear all remaining obstructions and collect food from the two farms until the level is complete.

Gnomes Garden 3 - Level 1

Gnomes Garden 3 – Level 1

Level 2

A recent hurricane destroyed the farm, the sawmill, and the bridge. You decide to help the local residents deal with the aftereffects of this natural disaster.


Goals:

  • Stock up on wood (15)
  • Restore the farm (2)
  • Build a lvl. 1 sawmill (2)
  • Build a lvl. 2 workers tent (1)


How to complete the level:

Collect the wood and food resources on the path next to the tent, then collect the wood resources down the road on the lower left. Build a level 2 worker’s tent right away to help with tasks. Collect food from the first farm and clear the path to the second, starting to collect food there as well. Continue collecting wood until you have enough to build the sawmill. Clear the large obstruction leading to the upper portion of the map. Here, make your way to the second sawmill sight and rebuild it. Repair the bridge leading to the right to access the last farm and restore it. Don’t forget to keep gathering wood throughout this process!

Gnomes Garden 3 - Level 2

Gnomes Garden 3 – Level 2

Level 3

Hm, I wonder if fish in the magic forest are edible? Let’s find out!


Goals:

  • Repair fish nets (1)
  • Build a lvl. 1 mill (1)
  • Build a lvl. 1 quarry (1)
  • Build a lvl. 1 sawmill (1)
  • Restore the farm (1)


How to complete the level:

Collect the food resources along the road. Clear the wood obstruction beneath the tent so that you can access the farm. Upgrade the worker’s tent right away to accomplish tasks faster. Gather all the wood resources around the farm, then clear the obstruction leading down to the quarry. Rebuild the quarry and clear the small stone roadblock on the right. Pick up the stone along the road and fill in the pothole to reach and the fishing nets. Now start clearing the way to the sawmill and second farm. Have one worker continue to collect resources from the farm and quarry. Rebuild the sawmill first, then the farm and the mill. Gather resources until you have enough to return to the fishing nets, repairing them and completing your objective.

Gnomes Garden 3 - Level 3

Gnomes Garden 3 – Level 3

Level 4

Looks like the local residents are starting to warm up to the gnomes. If only it could go both ways.


Goals:

  • Pave over the bog (1)
  • Build a lvl. 1 workers tent (1)
  • Build a lvl. 1 mill (1)
  • Build a lvl. 1 quarry (1)


How to complete the level:

Gather the food resources and wood resources along the road. Clear the wood and stone obstructions to gain access to additional resources. As soon as you have enough, pave over the bog in the upper portion of the map. Pick up the resources lying along the path. Clear the wood obstruction on the top path to gain additional wood resources, then rebuild the mill. Upgrade your worker’s tent. Continue clearing obstructions in order to reach the sawmill and the quarry. Rebuild the sawmill with one worker as the other clears the path to the quarry. Rebuild the quarry. Clear the last obstruction on the lower path, ignoring the pothole on the right. Build the worker’s tent to complete your objective.

Gnomes Garden 3 - Level 4

Gnomes Garden 3 – Level 4

Level 5

Sometimes bridges are the only path, and other times they’re just the shortest of several paths.


Goals:

  • Pave over the bog (5)
  • Restore a tree (2)
  • Build a lvl. 1 sawmill (1)
  • Build a lvl. 1 sorceress’s house (1)


How to complete the level:

Gather the wood resources right outside the tent and repair the bridge on the right. Continue by clearing the large wood obstruction, and the small wood obstruction after that to reach the sawmill. Gather the food resources along the road, then clear the last wood obstruction on the lower path and rebuild the sawmill. Repair the bridge on the upper path above the tent. Continue to gather wood resources until you have enough to rebuild the mill. Gather resources from the mill and the sawmill until you have enough to pave over the bog to the right of the mill, giving you access to the farm and additional food resources. Continue to gather wood and food resources, clearing the remaining wood obstructions for additional resources. Upgrade the worker’s tent and have one worker continue to gather resources as the other repaves the bog on the lower right. Rebuild the sorceress’s house on the far right. Pave over all remaining bogs and gather all remaining resources, including (and especially) the crystals. Select the withered trees to have the sorceress restore them, completing the level.

Gnomes Garden 3 - Level 5

Gnomes Garden 3 – Level 5

Level 6

Plants and animals always notice when magic is disappearing, and start to behave strangely. Take the bees, for example…


Goals:

  • Repair the hive (1)
  • Build a bridge (3)
  • Build a lvl. 1 quarry (1)
  • Build a marrymaker house lvl. 2 (1)
  • Build a lvl. 1 mill (1)


How to complete the level:

Immediately upgrade the worker’s tent. With two workers at your disposal, start gathering all the resources lying along the path. Clear the wood obstructions on the path. Rebuild the mill and clear the stone obstruction on the lower right. Clear the wood obstruction on the bottom path as soon as you have enough resources. As soon as you have enough food and wood, restore the beehive to gain access to the upper path. Gather all the free resources here and clear the wood obstruction leading to the second mill. Continue clearing obstructions and gathering resources until you reach the quarry. Repair the wood bridge and rebuild the quarry. Rebuild the stone bridges as soon as you have enough resources and gather the crystal resources lying on the path. Use these crystals to upgrade the marrymaker’s house.

Gnomes Garden 3 - Level 6

Gnomes Garden 3 – Level 6

Level 7

Plants aren’t just sentient here, they also love to joke at the expense of hapless wanderers.


Goals:

  • Drive away the giant troll (1)
  • Plant a tree (2)
  • Build a lvl. 1 sorceress’s house (1)
  • Build a lvl. 1 fireman’s house (1)


How to complete the level:

Gather the wood resource right outside the tent. Head down the path and clear the wood obstruction. Upgrade the worker’s tent right away. Gather resources with one worker and clear the bottom and right path obstructions with the other. As soon as you have enough resources, fill in the pothole leading to the sawmill. Clear the stone obstruction on the bottom path and rebuild the sawmill. Continue to collect resources until you have enough to pave over the bog on the lower right. Once done, rebuild the fireman’s house. Use the fireman to remove the barrier on the left, next to the farm. Continue to gather resources with one worker while the other removes path obstructions on the left. Pave over the bog on the upper right and rebuild the sorceress’s house. Plant a tree using the sorceress and banish the stone sleeper on the upper left, followed by the giant troll. Have the fireman water the tree as the sorceress plants the second. Water the last tree to complete your objective.

Gnomes Garden 3 - Level 7

Gnomes Garden 3 – Level 7

Level 8

About time to barter with these sentient mushrooms. When will a chance like this roll around again?


Goals:

  • Restore the farm (1)
  • Drive away the giant troll (3)
  • Build a lvl. 2 mill (1)
  • Pave over the bog (5)


How to complete the level:

Gather the food resource on the far right and clear the wood obstruction on the left. Exchange food for wood at the town hall. Rebuild the mill on the far right and gather food from the farm. Exchange food for wood at the town hall again and continue to do this until you have enough to pave over the bog on the left. Upgrade the tent during this time to make your gathering task faster. Clear the path leading down on the left once the bog has been paved. Remove the obstructions and pave over the large bog blocking the way to the sorceress’s house. Pave over the bog on the bottom path leading to the right. Clear the final wood obstruction on the lower path. Pave the last bog on the bottom path and remove the obstructions leading to the second town hall. Exchange resources at the second town hall and continue to gather until you have enough to fill in the pothole leading to the sorceress’s house. Rebuild the sorceress’s house. Use the sorceress to remove the giant trolls, starting with the one closest to the tent. Rebuild the farm, gather, and exchange resources until you have enough to banish the last two trolls and pave over the last bog. You can leave the final two potholes alone and still complete your objectives.

Gnomes Garden 3 - Level 8

Gnomes Garden 3 – Level 8

Level 9

That mushroom family warned you about the gremlins they spotted not far off. Wonder what they need?


Goals:

  • Build a lvl. 1 fireman’s house (1)
  • Build a lvl. 1 sawmill (1)
  • Pave over the bog (4)
  • Build a bridge (2)
  • Restore the farm (1)


How to complete the level:

Collect the wood outside the tent and clear the wood obstructions on the path. Upgrade your tent to acquire an additional worker. Pave over the bog leading to the beehive and repair it. Clear the stone obstruction from the path and rebuild the sawmill. Clear the stone obstruction on the far left path and gather the wood resources leading up to the bog on the upper left. As soon as you have enough resources, pave over this bog and repair the farm. Continue to clear the upper path, repairing the bridge leading across the water and make your way to the quarry, rebuilding it. Repair the path in front of the beehive on the upper right and then restore the beehive. Clear the path leading to the fireman’s house, paving over the bog to reach it. Gather all remaining resources, repairing the stone bridge at the bottom of the map and paving the remaining bog on the left side of the map.

Gnomes Garden 3 - Level 9

Gnomes Garden 3 – Level 9

Level 10

Late at night someone snuck into the settlement and broke the zipline. The guard couldn’t do a thing – they knocked him out.


Goals:

  • Restore the cableway (1)
  • Plant a tree (2)
  • Build a bridge (1)
  • Build a lvl. 1 fireman’s house (1)


How to complete the level:

Gather the resources around the tent and clear the obstruction leading toward the mill. Continue to gather resources along the path and clear obstructions on your way to the quarry. Upgrade the worker’s tent. Pave over the bog just past the quarry and rebuild the sawmill. Clear the last obstruction blocking the quarry and rebuild it. Next, restore the stone bridge at the top of the map. Gather enough resources to rebuild the sorceress’s house. Fill in the small pit at the bottom of the map and restore the cableway. You can now access the right side of the map. Gather the resources along the path here and clear all path obstructions. Plant the trees using the sorceress and rebuild the fireman’s house. Use the fireman to water the trees after the well is repaired.

Gnomes Garden 3 - Level 10

Gnomes Garden 3 – Level 10

Level 11

In the years of her travels, the princess has learned a lot. Now she’s privy to how giant magic trees are created.


Goals:

  • Plant a large tree (1)
  • Drive away the giant troll (2)
  • Build a lvl. 2 sorceress’s house (1)


How to complete the level:

Gather the resources along the path outside the tent. Clear the large stone obstruction on the upper path and fill in the small put on the lower. Harvest food from the farm and clear the obstruction blocking the way to the sawmill and rebuild it. Upgrade the tent and gather the resources on the upper path and rebuild the mill. Continue to gather resources and clear the wood obstruction below the tent. Rebuild the quarry and clear the stone obstruction on the upper path. Continue to clear obstructions all along the upper path and gather the resources as well. Fill in the holes in the road toward the right and pave over the right bog leading toward the sorceress’s house. Clear the final obstruction and rebuild the sorceress’s house. Once you have enough resources, use the sorceresses to banish the giant troll. Clear the stone obstruction blocking the way to the crystal mine and rebuild it. Now clear the obstructions blocking the way to the large tree planter in the center of the map. As soon as you have enough resources, upgrade the sorceress’s house. Click on the large planter to have the sorceresses plant the large tree.

Gnomes Garden 3 - Level 11

Gnomes Garden 3 – Level 11

Level 12

Look at all these dried-up magic trees! A real princess simply wouldn’t be able to cross!


Goals:

  • Build a bridge (3)
  • Restore a tree (5)
  • Build a lvl. 1 sorceress’s house (1)
  • Build a marrymaker house lvl. 1 (1)


How to complete the level:

Repair the bridge on the right. Gather the food resource and remove the wood obstructions on the lower and right paths. Harvest food resources from the farm and rebuild the sawmill on the right. Now repair the bridge below the tent. Clear the obstructions on the lower path and gather the resources here. Once you have enough resources, repair the bridge on the left. Clear the wood obstruction and gather all resources on the left leading to the bog. Pave over both bogs and remove the last obstructions here. Rebuild the quarry. Now you can focus on the lower right path. Fill in the pothole and clear all obstructions leading to the mine and the sorceress’s house. Rebuild the sorceress’s house, the mine, and the marrymaker’s house. Click on each of the trees to have the sorceress restore them as soon as you have enough crystal resources.

Gnomes Garden 3 - Level 12

Gnomes Garden 3 – Level 12

Level 13

Gnomes don’t like to run fast, but sometimes they make an exception to this rule.


Goals:

  • Build a bridge (3)
  • Repair fish nets (2)
  • Plant a tree (2)
  • Restore a tree (1)


How to complete the level:

Gather the resources around the tent and clear the wood obstructions on the lower path. Make your way to the sawmill and start gathering resources here, too. Upgrade the worker’s tent. Clear the path leading to the quarry and rebuild it. Pave over the bog on the top path and rebuild the sorceress’s house. Repair the wooded bridge right next to it to access the second half of the map. Continue to clear the obstructions on the right side of the map and rebuild the crystal mine. Restore the stone bridge at the bottom of the map and fill in the pit leading to the fireman’s house. Rebuild the fireman’s house and repair the fishing nets. Have the sorceresses plant trees in all the empty planters and have the fireman water them. Restore the final tree with the sorceress to complete your objective.

Gnomes Garden 3 - Level 13

Gnomes Garden 3 – Level 13

The Desert – Level 14 – 25

The green of the forest has given way to the harsh desert. Ahead, a ruined statue looms…


Level 14

A statue of the ancient king of the gnomes: How old is it, and who does it belong to?


Goals:

  • Restore the altar (1)
  • Restore the king’s statue (1)
  • Drive away the giant troll (1)
  • Repair the road (3)


How to complete the level:

Gather the resources along the path and clear the obstructions leading to the thornbush. Clear the obstructions leading into the upper path and upgrade the worker’s tent. Fill in the pit blocking the way to the farm and gather food resources. Rebuild the sawmill in the upper right corner and continue clearing the upper paths. When you have enough resources, fill in the put leading to the fireman’s house and rebuild it. Pave over the bog near the tent and rebuilds the sorceress’s house. Once rebuilt, use the sorceress to banish the giant troll and the stone sleeper. Rebuild the quarry and the portal once the troll has been banished. Fill in the large pit leading to the king’s statue and repair it to complete the level.

Gnomes Garden 3 - Level 14

Gnomes Garden 3 – Level 14

Level 15

There are legends about the workmanship of gnomes, and their ruler is inspiring them to new heights, sometimes with the help of magic.


Goals:

  • Plant a tree (4)
  • Grow a water lily (2)
  • Build a bridge (2)
  • Pave over the bog (2)
  • Build a lvl. 2 worker’s tent (1)


How to complete the level:

Clear the obstructions around the tent and gather the resources, too. Upgrade the worker’s tent after collecting from the farm. Repair the bridge on the left and rebuild the sawmill. Next, rebuild the sorceress’s house and the fireman’s house. Clear the obstructions on the upper path and rebuild the mine, followed by the marrymaker’s house. Rebuild the wood bridge on the right and repair the well near the farm. Click on the kraken’s tentacle on the lower left to have the fireman remove them. Use the sorceress to grow the lily pad and reach the planter. Have the sorceress plant trees and the fireman water them, paving over the bogs as soon as resources allow and repeating the process to complete the level. Don’t forget to grow the lily on the upper left to access the final planter!

Gnomes Garden 3 - Level 15

Gnomes Garden 3 – Level 15

Level 16

A holy circle in the dead center of the desert – it’s destroyed, but still holds its power.


Goals:

  • Build Stonehenge (4)
  • Repair the road (2)
  • Pave over the bog (1)
  • Build a bridge (1)
  • Build a lvl. 1 fireman’s house (1)


How to complete the level:

Gather the resources around the tent and clear the wood obstruction leading to the farm. Upgrade the tent and clear the obstructions leading south of the farm while your other worker gathers resources. Make your way to the sawmill and rebuild it. Make your way to the quarry and rebuild it. Gather all the resources along the road and take the lower path to the stone bridge and rebuild it. Clear obstructions and rebuild the mill and the fireman’s house. Pave over the bog on the lower path and fill in the large pit on the upper path. Restore each of stonehenge’s columns to complete the level.

Gnomes Garden 3 - Level 16

Gnomes Garden 3 – Level 16

Level 17

Each gnome has his own story about what he’s seen in a portal.


Goals:

  • Build a bridge (2)
  • Build a lvl. 1 sorceress’s house (1)
  • Restore an altar (2)
  • Activate the portal (1)


How to complete the level:

Gather the food resources around the tent and clear the wood obstruction. Continue to gather resources and start clearing the path leading upward. Upgrade the tent for a second worker. Have one harvest from the farm and clear the wood obstructions on the road leading to the sawmill and rebuild it. Clear the path leading to the wood bridge and restore it. Pave over the bog on the left to access the portal. Clear the obstructions leading to the crystal mine and sorceress’s house and rebuild them both. Use the sorceress to activate the portal once you have enough resources. Once you’ve reached the lower right corner of the map, continue to clear it and rebuild the quarry once you reach it. Next, make your way to and repair the first altar. Continue to clear the path, banishing the troll with the sorceress, and rebuild the final altar to complete the level.

Gnomes Garden 3 - Level 17

Gnomes Garden 3 – Level 17

Level 18

In the land of cat-people, crystals are the currency. You should stock up.


Goals:

  • Plant a tree (2)
  • Build a bridge (2)
  • Stock up on crystals (20)


How to complete the level:

Gather the resources around the tent and upgrade it right away. Clear the obstructions on the path leading down and to the left. Rebuild the mill and the quarry. Continue to clear the path on the way to the fireman’s house and rebuild it. Continue to clear the lower path and rebuild the sawmill. Make your way to the marrymaker’s house and rebuild it. Stop any goblins that show up on the lower path by clicking on them when they appear. Remove the thornbush on the upper path and fill in the pit on the way to the well. Restore the well and fill in the pit to the left, rebuilding the crystal mine. Continue to clear and restore the path on the way to the sorceress’s house and rebuild it. Restore the stone bridges at the bottom of the map. Plant the trees with the sorceress and water them with the fireman to complete the level once you’ve stocked up on enough crystals.

Gnomes Garden 3 - Level 18

Gnomes Garden 3 – Level 18

Level 19

The branches on some trees have dried out while other trees have withered completely.


Goals:

  • Restore a tree (4)
  • Build a marrymaker house lvl. 2 (1)


How to complete the level:

Gather the food and clear the stone obstruction to the right and for the upper path. Continue down the path in the upper left corner, gathering resources and clearing obstructions until you reach the quarry. Upgrade the tent and use the town hall to exchange resources. Continue clearing the paths on the bottom and to the right of the town hall, gathering additional roadside resources along the way. Make your way to the marrymaker house and rebuild the fireman’s house via the road on the right. Remove the thornbush with the fireman and rebuild the crystal mine. Continue down the far right path to the sorceress’s house and rebuild it. Once there, continue gathering and exchanging resources to pave over all the bogs. Restore the trees and upgrade the marrymaker house to complete the level.

Gnomes Garden 3 - Level 19

Gnomes Garden 3 – Level 19

Level 20

An earthquake split the plateau into two parts separated by a deep fissure. And you need to be on the other side!


Goals:

  • Build a bridge (2)
  • Build a lvl. 2 quarry (1)
  • Build a lvl. 1 mill (2)
  • Drive away the giant troll (5)


How to complete the level:

Gather the resources outside the tent and clear the obstruction leading to the mill. Rebuild the mill and continue clearing the paths. Make your way to the sawmill and clear the bog in front of it. Rebuild the sawmill and clear the lower path leading up to the quarry. Rebuild the quarry and continue clearing the path at the bottom of the map. Rebuild the stone bridge and restore the sorceress’s house. Use the sorceress to get rid of the giant trolls, starting with the top and bottommost pair. Make your way to the mill and the fireman’s house, rebuilding both. Banish the remaining trolls and repair the last bridge on the far right to complete the level.

Gnomes Garden 3 - Level 20

Gnomes Garden 3 – Level 20

Level 21

The warlock is all-powerful. To conquer him you need a lot of magic, which comes from big trees.


Goals:

  • Plant a large tree (1)
  • Build a bridge (2)
  • Build a lvl. 1 quarry (1)
  • Build a marrymaker house lvl. 3 (1)


How to complete the level:

Gather the food resource outside the tent and clear the obstructions leading down to the farm. Gather the food and upgrade the tent to gain an additional worker. Continue clearing obstructions on both the lower path and path leading up on the left. Rebuild the sawmill and fill in the pit in the upper left corner. Rebuild the quarry. Keep gathering resources and make your way toward the marrymaker’s house. Don’t rebuild it just yet – clear the large wood obstruction first. Fill in the pit in front of the sorceress’s house and rebuild it. Continue gathering resources and fill in the large pit in the lower right corner in front of the mine. Rebuild the mine. Pave over the bog on the way to the beacon. Keep one worker gathering resources while the other works on clearing the way to the planter in the upper left corner. Have the sorceress plant the large tree. Next, continue gathering resources in order to build and upgrade the marrymaker’s house until it reaches level 3.

Gnomes Garden 3 - Level 21

Gnomes Garden 3 – Level 21

Level 22

Your scouts have found some old mechanisms of the ancient tribe of gnomes that once lived here. Now is just the time to restore the mechanisms – they might come in handy.


Goals:

  • Stock up on food (30)
  • Stock up on crystals (10)
  • Build a lvl. 3 mine (1)
  • Restore the cableway (1)
  • Repair fish nets (1)
  • Build a lvl. 3 mill (1)


How to complete the level:

Gather the food outside the tent and start clearing the wood obstructions from the path. Gather from the mill and use the resources to upgrade the tent. Have one worker gather resources while the other works on clearing the path to the sawmill. Rebuild the sawmill. Clear the obstruction blocking the path to the cableway. Clear the stone blocking the way to the quarry and rebuild it. Upgrade the mill and the sawmill. Upgrade them again as soon as you have enough resources, focusing on the sawmill first. Next, work on upgrading the quarry. Rebuild the cableway to access the second part of the map. Once there, have one worker focus on gathering resources on the left side of the map while another clears the obstructions on the bottom right. Repair the fish net while you’re here. Make your way up to the stone bridge and repair it. When you reach the mine, rebuild it. Continue to upgrade the mine until it reaches level 3 and stock up on food and crystals to complete the level.

Gnomes Garden 3 - Level 22

Gnomes Garden 3 – Level 22

Level 23

If you restore dried up trees and plant a new one, you can bring life back to the desert.


Goals:

  • Restore a tree (3)
  • Plant a tree (2)
  • Build a lvl. 2 fireman’s house (1)


How to complete the level:

Gather the wood outside and start clearing the path in the center leading up first. Make your way to the mill and rebuild it. Now head down the path, clearing the way to the sawmill. Rebuild the sawmill. Continue gathering resources and clear obstructions from the path on the lower right. Upgrade the worker’s tent at this point. Rebuild the mine and the sorceress’s house. Start clearing the left paths. Beware the goblins wandering around! Keep gathering resources, clearing all paths before heading to the fireman’s house. Rebuild the fireman’s house. You will need to pave a bog first. Once build, upgrade the fireman’s house to level 2. Gather all remaining resources on the map and use the sorceress to restore trees and plant new ones. Water the new trees with the fireman after repairing the well on the lower left.

Gnomes Garden 3 - Level 23

Gnomes Garden 3 – Level 23

Level 24

There isn’t a single gnome that doesn’t know about magical trees. They’re so ancient. The tree, that is…


Goals:

  • Plant a large tree (1)
  • Build a lvl. 3 worker’s tent (1)
  • Build a lvl. 2 fireman’s house (1)


How to complete the level:

Gather the food resources outside the tent and clear the wood obstruction blocking the path leading up. Continue clearing the road, collecting from the altar and rebuilding the mill. Once rebuilt, upgrade the worker’s tent. Keep clearing obstructions leading up and toward the right. Make your way to the quarry and rebuild it. Once built, focus on clearing the bottom road. Repair the stone bridge and make your way to the sorceress’s house. Fill in the pit and rebuilt the sorceress’s house. When you have enough crystals as dropped by the altar, drive away the giant troll and rebuild the mine. Continue gathering resources along the rightmost path and grow the lily leading to the fireman’s house. Upgrade the worker’s tent again and upgrade the fireman’s house. Restore the path leading to the planter in the center and use the sorceress to plant the large tree.

Gnomes Garden 3 - Level 24

Gnomes Garden 3 – Level 24

Level 25

This wharf is long abandoned, but a horrifying kraken still abides. If the princess wants to reach the crystal caves, she’ll have to deal with it.


Goals:

  • Build a lvl. 3 sawmill (1)
  • Build a lvl. 3 mill (1)
  • Repair the wharf (1)


How to complete the level:

Clear the wood outside the tent and gather the food. Rebuild the mill and start clearing the stones on the left. Work your way up to the town hall where you can exchange resources. Continue working up this path until you real the sawmill and rebuild it. Keep gathering and exchanging until you can clear the obstruction on the path leading downward. Upgrade the worker’s tent at this point. Leave the pit for now and clear the upper path leading to the bridge. Restore the wooden bridge. Keep clearing the path on the way to the farm and gather resources here. Continue working your way around, clearing obstructions and filling in the pit so you can reach the sorceress’s house. Rebuild the sorceress’s house and fill in the large pit to gain access to the crystals. Fill in the pit in the lower left corner to reach the fireman’s house. Rebuild the fireman’s house. Clear the stones at the bottom of the screen and use the fireman to fight the kraken. Once gone, have the sorceress grow a lily pad here. Upgrade your mill and sawmill if you haven’t already until both are level 3. Clear the stone obstruction and the pit, then repair the wharf.

Gnomes Garden 3 - Level 25

Gnomes Garden 3 – Level 25

The Crystal Caves: Level 26 – 37

You’ve succeeded in making your way to the Crystal Caves, but will you be able to navigate the labyrinth to the other side?


Level 26

The Crystal Caves are enough to make your head spin.


Goals:

  • Restore an altar (2)
  • Build a bridge (1)
  • Restore the farm (2)
  • Build a lvl. 3 quarry (1)


How to complete the level:

Upgrade the worker’s tent right away. Rebuild the farm. Clear the wood obstructions and collect the wood resources. Gather from the farm while clearing the paths down and to the right. Rebuild the second farm. Clear the way to the quarry and rebuild it. Clear the obstructions remaining on the path. Rebuild the stone bridge on the right. Clear the last obstruction on the path to the sorceress’s house. Rebuild the sorceress’s house. Next, banish the stone sleeper. Clear the path to the fireman’s house and the mine. Rebuild the mine. Upgrade the quarry at this point. Rebuild the fireman’s house. Once you have enough resources, banish the kraken tentacles and have the sorceress grow the lily pads needed to reach the other shore. Clear the obstructions leading to the altars here and restore them to complete your objective.

Gnomes Garden 3 - Level 26

Gnomes Garden 3 – Level 26

Level 27

This place may be inhospitable, but cave fish live here we can feed the gnomes with. We just need to fix these old nets…


Goals:

  • Repair fish nets (3)
  • Build a bridge (3)
  • Restore an altar (1)
  • Build a lvl. 1 quarry (1)
  • Build a lvl. 1 mine (1)


How to complete the level:

Pick up the food resources outside and clear the wood obstructions on the path leading down. Rebuild the mill. Upgrade the tent. Clear the stone obstruction and gather resources until you have enough to remove the next stone obstructions. Rebuild the mine. Start clearing the obstructions past the town hall and leading the altar and the bridge. Make your way to the quarry. Rebuild the quarry. Clear the final obstruction on the left side of the map so you can now access both fishing nets. Rebuild the stone bridge. Gather resources until you have enough to repair both fishing nets. Upgrade the mine and clear the path leading to the wooden bridges. Repair both bridges and rebuild the fireman’s house. Restore the altar and repair the final fishing net beneath the fireman’s house to complete the level.

Gnomes Garden 3 - Level 27

Gnomes Garden 3 – Level 27

Level 28

Only sorceresses can know what to do when there’s no bridge.


Goals:

  • Restore the king’s statue (1)
  • Grow a water lily (4)
  • Restore an altar (2)
  • Build a marrymaker house lvl. 2 (1)
  • Build a lvl. 1 quarry (1)


How to complete the level:

Upgrade the tent as soon as you start. Gather the food resources and clear the wood obstruction. Gather from the farm and start clearing the path to the right. Make your way to the altar for resources and the quarry. Rebuild the quarry. Make your way to and rebuild the marrymaker’s house. Clear the path leading down to the fireman’s house and rebuild it. Continue to clear the path toward the sorceress’s house. Rebuild the sorceress’s house. Continue to gather resources. Have the fireman banish the kraken tentacles and the sorceress grow lily pads in their place. Clear the path in this new area and restore the altar. Use the sorceress to grow lily pads to access the remaining portions of the map. Clear the upper right portion first and restore the altar here. Access the rightmost portion and fill in the large pit to reach the king’s statue. Upgrade the marrymaker’s house at this point and gather resources until you have enough to restore the king’s statue.

Gnomes Garden 3 - Level 28

Gnomes Garden 3 – Level 28

Level 29

Giant trees can even grow underground.


Goals:

  • Build a lvl. 3 mill (1)
  • Build a lvl. 2 quarry (1)
  • Plant a large tree (1)
  • Build a bridge (3)


How to complete the level:

Clear the wood obstruction outside the tent first. Upgrade the worker’s tent. Pick up the resources lying along the road outside the tent. Clear the obstruction blocking the way to the mill. Clear the way to the quarry and rebuild it. Clear the paths leading down and to the right. Gather all resources along the road until you reach the bridges. Upgrade the mill. Upgrade the mill again. Repair the stone bridge on the right and fill in the pit. Rebuild the sorceress’s house. Restore the bridge leading down toward the mine. Restore the road, banish the stone sleeper with the sorceress and rebuild the mine.  Upgrade the quarry. Rebuild the bridge on the left and banish the stone sleeper. Fill in the large pit and use the sorceress to plant the large tree in the planter.

Gnomes Garden 3 - Level 29

Gnomes Garden 3 – Level 29

Level 30

If a troll eats well, he grows up to be huge. Only magic can take care of them.


Goals:

  • Activate the portal (2)
  • Build a lvl. 2 mill (1)
  • Stock up on food (45)
  • Light a signal fire (1)
  • Restore an altar (1)
  • Restore a tree (4)


How to complete the level:

Clear the wood obstructions outside. Rebuild the mill. Clear the path to the farm and harvest from it. Upgrade the worker’s tent. Pick up all resources along the path. Clear the large wood obstruction on the right and pick up the resources along the path. Make your way to the blue portal and clear the path to the altar. Continue clearing the path leading to the quarry. Clear the obstructions toward the top of the map leading to the sorceress’s house. Upgrade the quarry twice.  Upgrade the mill. Fill in the large pit blocking the way to the sorceress’s house. Rebuild the sorceress’s house. Send the sorceress through the green portal after activating it and banish the troll. Rebuild the mine. Have the sorceress activate the blue portal. Banish the troll on the upper left to access the signal fire. Restore all the trees with the sorceress. Continue to stock up on food. Light the signal fire to complete the level.

Gnomes Garden 3 - Level 30

Gnomes Garden 3 – Level 30

Level 31

Lots of monsters live underground. But our brave firemen could go up against the devil himself!


Goals:

  • Plant a tree (4)
  • Grow a water lily (2)
  • Build a well (1)
  • Build a lvl. 3 mill (1)


How to complete the level:

Collect the resources outside the tent and clear the wood obstructions on the nearby paths. Upgrade your tent as soon as you have enough resources. Make your way to the sawmill and rebuild it. Gather from the sawmill, mill, and altar until you have enough resources to build the bridge. Clear the stone obstruction across the river and pave over the bog. Rebuild the sorceress’s house. Continue clearing the path as you make your way up toward the quarry. Rebuild the wooden bridge on the lower right side. Fill in the pit in front of the quarry and rebuild it. Pave over the bog in the lower right corner to access and rebuild the fireman’s house. Use the fireman to get rid of the kraken. There are two of them: one on the upper left and one on the upper right. Once gone, use the sorceress to grow lily pads to access the other shores. Once accessed, have the sorceress plant trees. Repair the well near the mill to have the fireman water them. Upgrade the mill as you’re able during this time to complete your objectives.

Gnomes Garden 3 - Level 31

Gnomes Garden 3 – Level 31

Level 32

The journey continues, and there’s still lots to do!


Goals:

  • Drive away the giant troll (1)
  • Restore a tree (4)
  • Build a bridge (2)
  • Repair the road (3)


How to complete the level:

Collect the resources outside the tent and clear the wood obstruction. Continue to gather until you have enough resources to restore the farm. Once done, gather all remaining resources and clear the way to the sawmill. Rebuild the sawmill. Upgrade the tent. Clear the stone obstruction blocking the way to the quarry. Rebuild the quarry. Repair the bridge north of the farm. Clear the obstructions leading to the mill and the fireman’s house. Upgrade the quarry. Upgrade the mill. Rebuild the fireman’s house. Repair the stone bridge on the right and clear the way to the sorceress’s house. Restore the altar nearby. Rebuild the sorceress’s house. Banish the giant troll on the left and rebuild the mine. As soon as this is done, clear the remainder of the paths and use the sorceress to restore the trees.

Gnomes Garden 3 - Level 32

Gnomes Garden 3 – Level 32

Level 33

When there are many portals, you need to try not to get confused!


Goals:

  • Activate the portal (3)
  • Drive away the giant troll (1)
  • Restore the king’s statue (1)
  • Build a lvl. 2 mill (1)


How to complete the level:

Clear the wood obstruction and repair the bridge. Continue to clear the path leading to the mine. Rebuild the mill. Upgrade the tent. Rebuild the mine. Clear the way to the sorceress’s house and rebuild that, too. Pave over the bog and have the sorceress activate the green portal. Once activated, go through the portal and clear the path leading to the fireman’s house and the blue portal. Rebuild the fireman’s house. Remove the thornbush below the green portal with the fireman. Rebuild the quarry. Have the sorceress activate the blue portal. Go through the blue portal and clear the obstructions. The sorceress will need to remove the stone sleeper. Rebuild the sawmill. Upgrade the mill. Activate the purple portal and once through, banish the giant troll. Pave over the last remaining bog and restore the king’s statue.

Gnomes Garden 3 - Level 33

Gnomes Garden 3 – Level 33

Level 34

An ancient and long forgotten holy stone circle: You must restore it!


Goals:

  • Build a Stonehenge (4)
  • Restore an altar (2)
  • Build a lvl. 2 mill (1)
  • Build a lvl. 3 quarry (1)
  • Build a lvl. 3 worker’s tent (1)


How to complete the level:

Pick up the wood and clear the wood obstruction. Upgrade the tent. Harvest from the farm and pick up surrounding resources. Clear the path to the quarry and rebuild it. Rebuild the lower bridge and start clearing the road leading to the left. Make your way to the sawmill and rebuild it. Keep gathering resources and upgrade the sawmill. Fill in the pit in front of the fireman’s house and rebuild it. Upgrade the mill. Upgrade the sawmill again. Repair the stone bridge near the farm to the left. Restore both the altars, near the farm and near the mill. Continue to gather resources, upgrade the worker’s tent and the quarry until it reaches level 3. Rebuild the stone bridge on the lower left. Restore all of Stonehenge to complete the level.

Gnomes Garden 3 - Level 34

Gnomes Garden 3 – Level 34

Level 35

There’s a legend that the magical trees are the forebears of all the plants in the kingdom!


Goals:

  • Plant a large tree (1)
  • Activate the portal (2)
  • Build a bridge (2)
  • Build a lvl. 2 sorceress’s house (1)
  • Build a lvl. 3 mill (1)


How to complete the level:

Pick up the resources around the tent and clear the obstructions on the path leading south. Upgrade the worker’s tent. Clear the road to the mill and start gathering from there. Clear the obstructions on the path leading north and rebuild the bridge. Continue clearing the upper paths. Rebuild the sawmill. Make your way to the quarry and rebuild it. Continue to gather resources and upgrade the sawmill. Upgrade the quarry and mill as well. Rebuild the mine and the sorceress’s house. Fill in the pit blocking the green portal and activate it with the sorceress. Use the green portal to access the upper left corner of the map. Clear the path leading to the fireman’s house and rebuild it. Activate the blue portal and use it to access the bottom portion of the map. Banish the giant troll with the sorceress and rebuild the stone bridge. Upgrade the sorceress’s house and the mill. Pave over the bog and banish the last troll to access the planter needed for the sorceress to plant the large tree.

Gnomes Garden 3 - Level 35

Gnomes Garden 3 – Level 35

Level 36

Gnomes love to have fun, but they love to work even more.


Goals:

  • Build a lvl. 3 worker’s tent (1)
  • Build a marrymaker house lvl. 3 (1)
  • Restore an altar (1)
  • Build a lvl. 1 mine (1)
  • Stock up on food (30)
  • Stock up on wood (30)


How to complete the level:

Clear the wood obstruction and upgrade the worker’s tent. Gather the surrounding resources and clear the path to the farm. Harvest from the farm and clear the surrounding paths. Rebuild the mill. Pave over the bog in front of the town hall and use it to exchange resources as necessary. Clear the path to the altar and the marrymaker’s house. Restore the altar. Rebuild the marrymaker’s house. Rebuild the fireman’s house. Build the wooden bridge to the right of the town hall. Rebuild the sorceress’s house. Use the sorceress to banish the stone sleeper to the immediate right and activate the green portal. Once through the green portal, clear the surrounding paths until you reach the mine. Rebuild the mine and upgrade your worker’s tent. Activate the blue portal and banish the stone sleeper on the other side. Have the fireman remove the thornbush. Upgrade the marrymaker’s house and continue to gather resources until you have enough to complete all your objectives.

Gnomes Garden 3 - Level 36

Gnomes Garden 3 – Level 36

Level 37

The path to the Grey Wastelands is far. A long road full of danger lies ahead of you. You must stock up on provisions.


Goals:

  • Stock up on food (50)
  • Restore an altar (3)
  • Repair fish nets (3)
  • Grow a water lily (3)
  • Build a lvl. 1 mine (1)


How to complete the level:

Gather the surrounding resources and clear the wood obstruction. Upgrade the worker’s tent. Make your way to the farm and restore it. Clear the path leading up to the mill. Rebuild the mill. Continue to gather from the surrounding area. Make your way to the fireman’s house. Rebuild the nearby altars on the upper portion of the map. Rebuild the wooden bridge toward the upper right. Clear the path leading to the quarry and rebuild it. Restore the nearby altar. Now rebuild the sorceress’s house and the fireman’s house. Use the fireman and the sorceress to banish the kraken tentacles and grow lily pads in their place. You can now access the lower portions of the map. Start with the lower right side and clear the path to the mine. Rebuild the mine. Clear all remaining paths so that you can access the three fishing nets. Use the town hall to exchange resources as necessary. Repair all fishing nets and stock up on 50 food resources to complete the level.

Gnomes Garden 3 - Level 37

Gnomes Garden 3 – Level 37

The Grey Wastelands: Level 38 – 49

So here’s the Great Grey Wastelands. The only people who live here are despicable gremlins and the evil warlock that kidnapped the princess’s family. It’s about time to pay him a visit in his dwelling at the foot of an enormous volcano.


Level 38

Gnomes don’t like travelling great distances on foot.


Goals:

  • Restore the cableway (1)
  • Plant a tree (3)
  • Light a signal fire (1)


How to complete the level:

Upgrade the tent right away. Pick up the resources outside the tent and make your way toward the mill. Rebuild the mill once you have enough resources. Continue toward the sawmill, clearing the path until you reach it. Rebuild the sawmill. Clear the path leading toward the quarry. Once you reach it, rebuild it. Clear the remaining paths leading to the portal and the altar, then finally the cableway. Restore the cableway and make your way to the sorceress’s house. Rebuild the sorceress’s house. Collect the crystals available and use the sorceress to activate the green portal. Once activated, rebuild the fireman’s house. Clear the stone obstruction to reach the blue portal and the other altar. Restore it and activate the blue portal. Past the blue portal, fill in the large pit and finally light the signal fire. Don’t forget to plant the remaining trees in the planters on the left side of the map. Make sure the fireman can reach the well between the tent and the cableway in order to water these trees.

Gnomes Garden 3 - Level 38

Gnomes Garden 3 – Level 38

Level 39

The magical trees can endure any hardship. That’s why their seeds are so valuable.


Goals:

  • Build a lvl. 3 quarry (1)
  • Plant a large tree (1)
  • Build a lvl. 2 sorceress’s house (1)
  • Drive away the giant troll (1)


How to complete the level:

Clear the wood obstruction outside the tent and upgrade it. Pick up all the resources around the tent and harvest from the farm. Make your way to the altar so you can utilize it. Continue toward the sawmill and rebuild it. Rebuild the bridge. Continue to clear the path toward the quarry. Rebuild the quarry. Upgrade the quarry twice. Clear the path leading to the sorceress’s house and rebuild it. Rebuild the second bridge. Fill in the pit and use the sorceress to banish the stone sleeper. Rebuild the beehive between the first and second bridges to get rid of the bees blocking the path. Rebuild the mine. Upgrade the sorceress’s house and activate the purple portal. Banish the troll on the other side. Fill in the last pit and plant the large tree to complete the level.

Gnomes Garden 3 - Level 39

Gnomes Garden 3 – Level 39

Level 40

It’s just ash, lava and fire here. Unsurprising that the warlock is a little out of sorts.


Goals:

  • Build a bridge (2)
  • Plant a tree (5)
  • Build a well (1)
  • Repair the road (3)
  • Build a lvl. 3 worker’s tent (1)
  • Build a lvl. 3 quarry (1)


How to complete the level:

Pick up the resources outside the tent. Clear the obstructions leading to the mill. Rebuild the mill. Rebuild the sawmill. Upgrade the tent. Clear the path leading up toward the fireman’s house. Continue clearing it toward the mine and the farm. Harvest from the farm and rebuild the quarry. Rebuild the fireman’s house. Rebuild the mine. Upgrade the quarry twice. Continue clearing the path leading down to the sorceress’s house. Rebuild the sorceress’s house. Upgrade the worker’s tent. Rebuild the two stone bridges and pave over the bog on the left to reach the well. Repair the well. Use the sorceress to plant trees in the planters and the fireman to water them, thus completing the level.

Gnomes Garden 3 - Level 40

Gnomes Garden 3 – Level 40

Level 41

This location is a breeding ground for stone doormice.


Goals:

  • Restore an altar (2)
  • Build a marrymaker house lvl. 1 (1)
  • Build a lvl. 3 worker’s tent (1)
  • Build a lvl. 3 sorceress’s house (1)


How to complete the level:

Pick up the resources outside the tent and clear the road leading to the farm. Harvest from the farm. Upgrade the worker’s tent. Continue to clear the path leading to the altar and the sorceress’s house. Rebuild the sorceress’s house. Clear the road leading to the sawmill – remove the stone sleeper with the sorceress. Rebuild the sawmill. Clear the path leading down to another altar and the quarry. Once completely cleared, rebuild the quarry. Upgrade the tent and the sorceress’s house again. Clear the remaining paths on the left. Upgrade the sorceress’s house one last time and rebuild the marrymaker’s house. Finish repairing the altars to complete the objective.

Gnomes Garden 3 - Level 41

Gnomes Garden 3 – Level 41

Level 42

Even in volcanic valleys there are quiet, suitable spots to grow strawberries.


Goals:

  • Stock up on food (35)
  • Plant a tree (4)
  • Restore the farm (5)
  • Restore an altar (2)


How to complete the level:

Pick up the food resource and start clearing the obstructions leading to the first farm on the left and right. Rebuild the farm on the left, followed by the one on the right. Harvest from both, clearing the path to the farm in the bottom right corner. Restore it, then rebuild the sawmill. Upgrade the tent. Three of five farms should be restored at this point. Restore the fourth farm on the right and rebuild the quarry. Clear the path to the mine and rebuild it. Continue to gather food as you clear the path leading to the farm in the upper left corner. Restore it and continue to gather food resources for your objective. Clear the paths to the sorceress’s house and the fireman’s house and rebuild both. Have the sorceress plant trees in the four planters and have the fireman water them. The well the fireman will need to do this is located to the left of the tent. The altars that need restoration are to the right of the middle farm and in the bottom left corner of the map.

Gnomes Garden 3 - Level 42

Gnomes Garden 3 – Level 42

Level 43

The sparse fields here with flowers attract veritable legions of bees. Here everything fights just to exist!


Goals:

  • Build a lvl. 3 fireman’s house (1)
  • Build a lvl. 3 quarry (1)
  • Stock up on crystals (25)
  • Restore a tree (4)
  • Build a bridge (1)
  • Restore an altar (2)


How to complete the level:

Pick up the resources outside the tent and remove the wood obstructions. Upgrade the tent. Clear the obstacles leading to the farm and harvest it for food. Pave over the bog leading to the beehive and restore it to clear the path on the left. Clear the way to the sawmill and rebuild it. Continue clearing the lower path leading toward the quarry. Rebuild the quarry. Continue gathering resources and upgrade the sawmill. Upgrade the quarry. Upgrade the sawmill again. Upgrade the quarry again. Rebuild the mine in the upper right corner. Clear the lower path leading to the altars. Restore both altars. Clear the obstruction blocking the way to the sorceress’s house. Rebuild the sorceress’s house. Pave over the bog in the bottom right corner and restore the brown beehive here. You can now access the third beehive on the left. Restore this beehive, then rebuild the stone bridge on the right. Clear the path leading to the fireman’s house and rebuild it. Upgrade it twice. Click on each of the trees to have the sorceress restore them and complete the level.

Gnomes Garden 3 - Level 43

Gnomes Garden 3 – Level 43

Level 44

The warlock has a small army of troll giants. There must be some cowardly gremlins nearby.


Goals:

  • Activate the portal (1)
  • Plant a tree (4)
  • Drive away the giant troll (6)
  • Stock up on crystals (25)
  • Restore the farm (1)


How to complete the level:

Start by clearing the path leading to the farm. Upgrade the worker’s tent and harvest the food at the farm. Work your way to the sawmill and rebuild it. Clear the blockage in front of the sorceress’s house and rebuild it. Banish the large trolls to the left and right of the farm with the sorceress. Clear the path leading up to the second farm. Restore the farm. Remove the last giant troll on the left and clear the path to the quarry. Rebuild the quarry. Activate the green portal on the left side of the map to reach the right side. Once there, clear the paths leading both up and down, using the sorceress to banish the large trolls. Clear the path to the mine and rebuild it. Rebuild the fireman’s house. Plant trees with the sorceress and have the fireman water them. The well necessary for this action is to the immediate left of the green portal on the right. Stock up on crystals to complete the level.

Gnomes Garden 3 - Level 44

Gnomes Garden 3 – Level 44

Level 45

There’s lava and deep crags everywhere. You must build bridges and activate portals.


Goals:

  • Activate the portal (3)
  • Restore the king’s statue (1)
  • Stock up on wood (35)
  • Stock up on crystals (25)
  • Stock up on stone (35)
  • Build a bridge (4)


How to complete the level:

Clear the obstructions outside the tent and rebuild the wooden bridge on the right. Continue clearing obstructions until you reach the farm, then harvest from it. Upgrade the worker’s tent. Rebuild the sawmill. Clear the path leasing toward the sorceress’s house and upgrade the sawmill. Wait until you have enough resources, then rebuild the bridge on the right and clear the path leading to the quarry. Rebuild the quarry. Rebuild the sorceress’s house and activate the green portal. Use the green portal to reach the lower left corner of the map. Rebuild the stone bridge and fill in the large pit to reach the mine. Rebuild the mine. Upgrade both the mine and the quarry. Restore the altar beneath the farm and repair the stone bridge leading to the blue portal. Activate the blue portal and use it to reach the purple one in the lower right corner. Pave over the bog in the lower right corner to gain access to the purple portal. On the other side, pave over the final bog to reach the king’s statue. Restore it.

Gnomes Garden 3 - Level 45

Gnomes Garden 3 – Level 45

Level 46

A great place to plant a giant tree! Let the warlock see the power of gnomes right outside his palace window.


Goals:

  • Stock up on wood (20)
  • Stock up on food (30)
  • Light a signal fire (1)
  • Plant a large tree (1)


How to complete the level:

Pick up the resources outside the tent and clear the paths to the left and right. Upgrade the tent once you reach the mill. Continue clearing the paths leading up and down on the left. Head up to the sawmill and rebuild it. Upgrade the mill. Make your way down to the sorceress’s house and clear the path to the cableway. Restore the altars on the left side of the map to gain access to crystal resources. Rebuild the cableway. Rebuild the sorceress’s house. Move to the right side of the map and clear the path leading up to the fireman’s house and the quarry. Rebuild the quarry. Rebuild the fireman’s house. Clear the path leading down to the last altar and restore it. Repair both bridges and pave over the bog and the large pit. Plant the large tree with the sorceress in the lower right corner and water it via the fireman. Light the signal fire and stock up on wood and food to complete the level.

Gnomes Garden 3 - Level 46

Gnomes Garden 3 – Level 46

Level 47

There was once an oasis with magical trees here, but now there’s just dry land and wind. The sorcerers will fix this!


Goals:

  • Plant a tree (6)
  • Build a bridge (5)
  • Restore an altar (2)
  • Stock up on wood (45)
  • Stock up on stone (45)


How to complete the level:

Repair the wooden bridge and make your way to the farm. Harvest food resources. Clear the path leading to the bottom left corner of the map. Collect from the altar and head to the mill. Rebuild the mill. Upgrade the worker’s tent. Clear the path on the left leading to the quarry. Rebuild the quarry. Clear the path leading upward and repair the stone bridge. Restore the road leading to the sawmill and rebuild it. Focus on restoring the stone bridge below the worker’s tent and make your way toward the sorceress’s house. Rebuild the sorceress’s house. Restore the path and fix the bridge leading to the fireman’s house in the upper right corner and restore it. Rebuild the well to the left of the sorceress’s house. Clear all remaining paths and use the sorceress to plant trees. Water them with the fireman. Restore all remaining altars and gather resources until you’ve completed your goals.

Gnomes Garden 3 - Level 47

Gnomes Garden 3 – Level 47

Level 48

Just a little bit longer. Soon you’ll reach the warlock’s domain and save your family.


Goals:

  • Activate the portal (3)
  • Restore the king’s statue (1)
  • Build a lvl. 3 fireman’s house (1)
  • Build a lvl. 3 sorceress’s house (1)
  • Restore an altar (2)


How to complete the level:

Upgrade the worker’s tent right away. Collect all the resources around the tent and focus on reaching the mill. Once you’ve reached it, continue down the path on the right and repair the wooden bridge. Clear the path leading up to the sawmill and rebuild it. Clear the path to the right of the altar near the tent. Upgrade the sawmill. Rebuild the wooden bridge near the tent leading up and rebuild the quarry. Restore the altar on the right side of the map and clear the way to the sorceress’s house. Rebuild the sorceress’s house. Banish the giant troll on the upper left and rebuild the fireman’s house. Head to the green portal and activate it. Use it to reach the right portion of the map. Restore the stone bridge at the bottom of the map and fill in the pit to activate the blue portal. Through the blue portal, banish the troll and restore the altar before activating the purple portal. Banish the troll on the other side of the purple portal to access the signal beacon. Upgrade the fireman’s house and sorceress’s house to level 3 and rebuild the king’s statue on the upper right to complete the level.

Gnomes Garden 3 - Level 48

Gnomes Garden 3 – Level 48

Level 49

Look at all the glass snowglobes! Each has someone’s castle. But the princess can find hers, even amidst a million!


Goals:

  • Unenchant castle (1)


How to complete the level:

Clear one wood and one stone obstruction before upgrading the worker’s tent. Continue clearing the path to the farm and restore it, but not before reaching the mill. Once reached, you can restore the farm. Continue clearing the lower path and rebuild the sawmill. Upgrade the sawmill. Upgrade the mill. Continue to collect resources and make your way to the sorceress’s house. Restore the altar on the lower path. Rebuild the bridge in the upper right corner and make your way to the green portal. Rebuild the sorceress’s house. Make your way to the town hall so you can use it to trade for resources as needed. Activate the green portal and use it to access the lower right corner of the map. Clear the paths to the quarry, then the fireman’s house. Rebuild the quarry. Rebuild the fireman’s house. Activate the blue portal to reach the upper right corner of the map. Banish the stone sleeper and head for the purple portal. Once activated, clear the path past the purple portal and banish the giant troll here. Continue to clear all obstructions until you reach the enchanted castle. You will need to upgrade your sorceress’s house to level 3, as well as have 10 food and 15 crystal resources to disenchant it. Once completed, the kingdom will be saved!

Gnomes Garden 3 - Level 49

Gnomes Garden 3 – Level 49

Congratulations! You’ve completed Gnomes Garden 3! Be sure to check out our blog for more tips and tricks!


The Gnomes Garden 3 Walkthrough is meant as a guide and does not contain cheats, hacks, or serials.

The post Gnomes Garden 3 Walkthrough appeared first on GameHouse.

Surface – The Pantheon QuickStart Guide

$
0
0

Welcome to the Surface – The Pantheon QuickStart Guide! Surface – The Pantheon is a Hidden Object game in which you must collect items and explore locations in order to progress. The maiden journey of a prominent new locomotive ends abruptly when it vanished into thin air. One year later, a mysterious experiment offers insight – will you learn what happened? This game is a Platinum Edition title, as and such, includes an integrated walkthrough. The Surface – The Pantheon walkthrough can be accessed by clicking the “Strategy Guide” button in the lower right corner of your screen while playing. Alternatively, you can select the Strategy Guide button on the signpost on the left via the Main Menu when starting the game.

Surface - The Pantheon Walkthrough Location

Surface – The Pantheon Walkthrough Location

How to Play

Are you new to hidden object titles? Have you simply forgotten some of the basics? Don’t worry! Here are a handful of helpful pointers to guide you in the right direction:


  • All items you collect throughout your adventure will be added to your Inventory. Your inventory is located at the bottom of your screen. When you want to use and item, select the item you’d like to use from your inventory, then click on the location where you’d like to use it.
  • When your cursor turns into a directional arrow, it means you can click to access a new area. Navigate by clicking when arrows appear to move between screens and locations.
  • Surface – The Pantheon is a Hidden Object game, and as such, you will encounter Hidden Object Scenes! In these locations, a list of items you need to find will be displayed at the bottom of your screen. Locate all the items in this location in order to progress. Upon locating all the items successfully, a Key Item will be added to your Inventory!
  • Key Items are items which are necessary in order for you to progress in the game. These items are stored in your inventory, and will automatically be removed once they have been used correctly.
  • Feeling stuck? There’s a Hint button located in the bottom right corner of your screen. Hints tend to be unlimited, but often require time to recharge. Unable to solve a puzzle? The Hint button will become a Skip button during puzzles, but often requires time to charge up before use.


Surface Series by Elephant Games

Surface – The Pantheon is just one of a series of titles available in the series. If you enjoyed the game, or are looking for additional titles, you can find more available on our GameHouse website!


In Surface – The Noise She Couldn’t Make, you take on the role of a psychic. It’s up to you to recover the memories of a mysterious girl left unharmed, but in shock. Is she a victim, or a criminal? Actions speak louder than words as you traverse the winding passages of the mind in this hidden object title. A Surface – The Noise She Couldn’t Make Walkthrough is also available on our blog!


In Surface – The Soaring City your brother Jeremy, a wonderous inventor and discoverer of a mysterious city in the sky, goes missing. Can you uncover the circumstances behind his disappearance? Get started with our Surface – The Soaring City QuickStart Guide, available on our blog.


What is a QuickStart Guide?

Our QuickStart Guides are intended to provide you with all the essential information you need to access pre-existing walkthroughs. Many of our Platinum Edition games contain integrated strategy guides to help you when you’re feeling stuck, without having to exit the game. For more information on how to access Surface – The Pantheon’s integrated walkthrough, scroll up to the top of this page.


The post Surface – The Pantheon QuickStart Guide appeared first on GameHouse.

Moai IV – Terra Incognita QuickStart Guide

$
0
0

Welcome to the Moai IV – Terra Incognita QuickStart Guide! Moai IV – Terra Incognita is a Time Management/Strategy title in which you must complete levels in order to progress. New land appears just as the Hero and Bright Light are preparing to settle down. The islands are yours for the taking, you only need to explore them! This game is a Platinum Edition title, as and such, includes an integrated walkthrough. The Moai IV – Terra Incognita walkthrough can be accessed by clicking the Menu button in the upper left corner during gameplay, followed by the “Guide” button. Alternatively, you can access the integrated strategy guide by clicking the “Bonus” button in the lower left corner of the Main Menu, followed by the “Strategy Guide” option on the upper right.

Moai IV - Terra Incognita Walkthrough Location

Moai IV – Terra Incognita Walkthrough Location

How to Play

Are you new to strategy games? Have you simply forgotten some of the basics? Don’t worry! Here are a handful of helpful pointers to guide you in the right direction:


  • Click on an item or location during gameplay to select it. Once selected, click on the action you’d like to begin a task.
  • Each level features a number of tasks you must complete before the level will be finished. These tasks are displayed in the lower right corner of your screen.
  • A meter in the upper left corner of your screen indicates how much time you have left to complete the level. You need to complete the level before the bar empties, otherwise you will need to replay it.
  • You will need resources in order to accomplish various tasks. These resources and the number of you have are displayed at the top of your screen.
  • You can pause your game, replay a level, view the game’s guide or access the Map at any time by clicking the Menu button in the upper left corner of your screen.
  • Move your cursor over dropped resources in order to collect them. It’s that simple!
  • Feeling stuck? Access the guide by clicking the Menu button in the upper left corner during gameplay, followed by the “Guide” button. Alternatively, you can access the integrated strategy guide by clicking the “Bonus” button in the lower left corner of the Main Menu, followed by the “Strategy Guide” option on the upper right.


What is a QuickStart Guide?

Our QuickStart Guides are intended to provide you with all the essential information you need to access pre-existing walkthroughs. Many of our Platinum Edition games contain integrated strategy guides to help you when you’re feeling stuck, without having to exit the game. For more information on how to access Moai IV – Terra Incognita’s integrated walkthrough, scroll up to the top of this page.


The post Moai IV – Terra Incognita QuickStart Guide appeared first on GameHouse.

Empress of the Deep 3 – Legacy of the Phoenix QuickStart Guide

$
0
0

Welcome to the Empress of the Deep 3 – Legacy of the Phoenix QuickStart Guide! Empress of the Deep 3 – Legacy of the Phoenix is a Hidden Object game in which you must collect items and explore locations in order to progress. Join Empress Anna on a journey back to her home tribe after vanquishing her evil twin, Pandora. This game is a Platinum Edition title, as and such, includes an integrated walkthrough. The Empress of the Deep 3 – Legacy of the Phoenix walkthrough can be accessed by clicking on the “Strategy Guide” button in the upper left corner of the screen.

Empress of the Deep 3 - Legacy of the Phoenix Walkthrough Location

Empress of the Deep 3 – Legacy of the Phoenix Walkthrough Location

How to Play

Are you new to hidden object titles? Have you simply forgotten some of the basics? Don’t worry! Here are a handful of helpful pointers to guide you in the right direction:


  • All items you collect throughout your adventure will be added to your Inventory. Your inventory is located at the bottom of your screen. When you want to use and item, select the item you’d like to use from your inventory, then click on the location where you’d like to use it.
  • When your cursor turns into a directional arrow, it means you can click to access a new area. Navigate by clicking when arrows appear to move between screens and locations.
  • Empress of the Deep 3 – Legacy of the Phoenix is a Hidden Object game, and as such, you will encounter Hidden Object Scenes! In these locations, a list of items you need to find will be displayed at the bottom of your screen. Locate all the items in this location in order to progress. Upon locating all the items successfully, a Key Item will be added to your Inventory!
  • Key Items are items which are necessary in order for you to progress in the game. These items are stored in your inventory, and will automatically be removed once they have been used correctly.
  • Feeling stuck? There’s a Hint button located in the bottom right corner of your screen. Hints tend to be unlimited, but often require time to recharge. Unable to solve a puzzle? The Hint button will become a Skip button during puzzles, but often requires time to charge up before use.


Empress of the Deep Series by Silverback Productions

A thrilling hidden object adventure series, Empress of the Deep follows the journey of Anna, from awakening to fighting evil, to making her way back home. Each game further expands the saga of the Empress of the Deep.


Empress of the Deep – The Darkest Secret follows the awakening of Anna after a one hundred year slumber. Locked in a temple beneath the waves, Anna learns of the true identity of the Empress of the Deep, as well as the torment of the people living above the waves. Only Anna holds the key to defeating the evil sorceress that oppresses them. Witness the awakening of the Empress of the Deep in this, the first title of the series.


Empress of the Deep 2 – Song of the Blue Whale continues Anna’s story as she fights to save her kingdom from the grasp of the evil Pandora. Four Children of Light are missing from their home in the Temple of the Clouds. It’s only with their help that Anna will be able to combat her evil twin’s dark powers.


Play the Empress of the Deep series, available at GameHouse!


What is a QuickStart Guide?

Our QuickStart Guides are intended to provide you with all the essential information you need to access pre-existing walkthroughs. Many of our Platinum Edition games contain integrated strategy guides to help you when you’re feeling stuck, without having to exit the game. For more information on how to access Empress of the Deep 3 – Legacy of the Phoenix’s integrated walkthrough, scroll up to the top of this page.


The post Empress of the Deep 3 – Legacy of the Phoenix QuickStart Guide appeared first on GameHouse.

Cathy’s Crafts Official Walkthrough

$
0
0

Welcome to the Official Cathy’s Crafts Walkthrough! Follow the adventures of would-be artist Cathy as she struggles to establish her creative spirit within the community of Snuggford. This walkthrough features in-depth tips and tricks per day to help you obtain the highest scores. And of course, no official walkthrough would be complete without all hidden mouse locations! Simply scroll or click on a section below to get started.

Contents

General Tips & Tricks

Whether you’re looking for the basics of how the game works or familiarizing yourself with customers, this section contains all the general tips and tricks you need to get started.


Basic Gameplay

You will be playing the role of Cathy – a sweet resident of Snuggford with a kind heart and creative mind. Cathy will run a series of shops throughout the game. These specific shops are divided into chapters, and the days in these shops divided into levels. Each level plays out from shop opening to shop close. Customers will enter a shop looking for specific products. When a customer decides what they’d like, a bubble will pop up over their head displaying the item(s) of their choice. Click on the matching item in the shop, followed by the customer in order to give them their order. Once their order is complete, a customer will move to the cash register, and a money icon will appear. Click on the cash register to check them out.


Sometimes customers will need a little extra help if they become frustrated by their projects. When this happens, a bubble with Cathy’s face will pop up. Click on the customer to help them with their project. As always, the faster you help a customer, the happier they will be. The happier a customer is, the more they will tip, and the higher your score will be. Happiness is indicated by a series of hearts. When a customer loses hearts, the score they will give you lowers. If a customer loses all their hearts, or has nowhere to go within the shop, they will leave. Try to serve customers as quickly as possible while keeping them happy in order to obtain high scores!


Special Objectives

Some days will feature a special objective. Indicated by an icon in the upper right corner of the screen, special objectives are active throughout the course of a day in their given level. Complete these special objectives before the day’s end to achieve special bonuses.


Selecting Levels

After clicking “Play” on the opening screen of Cathy’s Crafts, you will be taken to a level select map. Navigate the map by clicking and holding your mouse button, moving your cursor left or right to scroll the map. A series of stars will indicate what your current score on any given level is. A checkmark indicates you’ve completed a special objective, and a mouse means you’ve found the secret mouse hidden in that location.


Customer Types

Cathy’s Crafts features several unique customer types, which may or may not change as you progress to new shop locations.

  • Customer Type – The name of the type of customer.
  • Chapter(s) Encountered – Locations where a type of customer may appear.
  • Patience Level – Indicates how quickly or slowly a customer will lose hearts.
  • Tip Rate – Indicates how much extra a customer will tip if you provide items they like.
  • Likes Cats – Indicates whether a customer will become happy or angry if Ming appears next to their table.


The following is a list of customers you will encounter while playing Cathy’s Crafts:


Customer Type Chapter(s) Encountered Patience Level Tip Rate Likes Cats
Students 1, 3, 6 Low Low No
Casuals 1, 3, 5, 6 High Average Yes
Seniors 1, 2, 4 Very High Low – Very Low Yes
Suburban Moms 2, 3, 4 Low High Yes
Hipsters 2, 4, 5, 6 Low – High Very High N/A
Bikers 3 Average Average Yes
Socialites 4 Low Very High N/A
Ming Fans 5, 6 High Average Yes
DIY Besties 5 Low Very High N/A


Tips & Upgrades

At the start of each level, you will be given the opportunity to select the products you would like to use for that level. If you choose a product that a specific type of customer likes, e.g. Seniors, then when you give that product to a Senior as per their request, they will tip extra. Items that will earn you extra tips display a small silver coin in the bottom right corner when a customer requests them. Choose these items carefully at the start of each level to make the most of your day and obtain the highest scores. The walkthrough below lists the ideal product line you’ll want to select per day to achieve the highest scores.


In addition to tips, you will also be able to choose whether or not to upgrade items at the start of each level. Each time you successfully complete a level, you will earn a certain amount of coins. You can then use these coins at the start of a level to choose whether or not to purchase upgrades. Upgrades, once purchased, are permanent and will be saved for each location.


Ming the Cat

Ming the cat will appear as a guest in some shops and locations. Ming is free-roaming and will wander to tables from time to time. Whether or not a customer type likes cats will indicate whether Ming increases or decreases a customer’s happiness. To refill Ming’s bar, or to remove Ming from a potentially bad customer combination, click on Ming’s bowl to feed Ming and draw the cat away. Ming does not appear in all locations, but can have a significant impact on boosting your score if used correctly.


Mice Locations

Each level contains a hidden mouse who will pop up from time to time. When you hear the squeak, keep an eye out for the elusive gray rodent. If you can’t find the mouse the first time, don’t worry – the mouse will pop up from time to time throughout the day, and always in the same location per level. If you can’t remember whether or not you found a mouse during the course of the level, simply look in the upper left corner of your screen: If there’s an empty mouse hole, you have not found the mouse yet. If a mouse appears, you have. Mouse locations are listed per level in the guide below. You can also click on Mice Locations to be taken directly to the section with a list of locations and screenshots showing where they’re hidden.


Cathy’s Crafts Walkthrough

Welcome to the Official Cathy’s Crafts Walkthrough! This guide is divided into sections according to chapter/location, further divided by level in order to provide you with tips, tricks, and mouse locations. If you’d like to view a mouse location, simply click on “Mouse Location” to be taken directly to a screenshot showing where you can find all mice per location. It’s that simple!


Furthermore, in addition to stating the forecast of customers per day, a number of products will also be listed, in addition to the type of customer they’re geared toward. These products have been carefully selected by our gaming experts as the best products to use on a given day to achieve the highest scores. Without further ado, it’s time to get creative with Cathy’s Crafts!


Chapter 1: Hardware Store

Cathy’s taking care of the family Hardware Store while her parents are away. With a haphazard boyfriend to follow, a stray cat occupying the shop, and the concerns of a best friend, Cathy’s sure to have her hands full!


Level 1 – 1

Mouse Location: At the corner of the raised curve in the floor, beneath the first table to the left of the door.


Forecast: 100% Casuals

Choose a Product!: Paint Can (Casuals), Regular Mason Jar (Casuals), Bakers Twine (Casuals), Circular Frame (Casuals)


Today acts as a sort of tutorial, introducing you to the basic mechanics of the game. To review the game’s basics, see the General Tips & Tricks section above. Throughout the day, customers will come in and place orders. Customers who sit at tables may become confused while crafting. When this happens, a “!” bubble will appear over their table. Click on the table to help them with their crafts!

Cathy's Crafts - Level 1 - 1

Cathy’s Crafts – Level 1 – 1

Level 1 – 2

Mouse Location: Beneath the first table from the right.


Forecast: 20% Casuals, 10% Seniors, 70% Students

Choose a Product!: Spray Paint (Students), Regular Mason Jar (Casuals), Bakers Twine (Casuals), Rectangular Frame (Students)


Uh-oh, there’s a fluffy cat loose in the shop! Use the help of Cathy’s boyfriend to catch the furry infiltrator! The cat will wander around the shop throughout the day. Whenever the cat has stopped moving, click on it quickly to have Mark pick it up. Do this 4 times before the end of the day to complete your goal.

Tip!: If the day is done and you haven’t caught the cat 4 times yet, you will need to replay the day to complete the goal.

Cathy's Crafts - Level 1 - 2

Cathy’s Crafts – Level 1 – 2

Level 1 – 3

Mouse Location: In the bottom left corner of the entrance doorway in the upper right corner.


Forecast: 66% Seniors, 33% Casuals

Choose a Product!: Paint Can (Casuals), Big Mason Jar (Seniors), Jute Twine (Seniors), Circular Frame (Casuals)


An additional crafting material will become available today. An additional jar of buttons/pile of seashells can be used to decorate frames as per customers’ requests. Today is also the first day the cat can help you around the shop. If the cat wanders near customers who like cats, their mood can improve. Similarly, the cat visiting customers who dislike cats will cause them to lose hearts. Click on the food bowl on the left to feed the cat and draw it away from customers as needed.


Level 1 – 4

Mouse Location: Peeking around the far left side of the checkout counter.


Forecast: 45% Students, 45% Seniors, 9% Casuals

Choose a Product!: Bow Frame Applique (Students), Spray Paint (Students), Big Mason Jar (Seniors), Jute Twine (Seniors), Rectangular Frame (Students)


The new applique counter at the top of the shop can now be used. Pick up the packages from the mailman throughout the day. Watch for the mailman in the upper right corner. When he walks in and declares he has a delivery, click on him to collect the package. Do this 4 times before the end of the day to complete your goal.

Cathy's Crafts - Level 1 - 4

Cathy’s Crafts – Level 1 – 4

Level 1 – 5

Mouse Location: In the first window to the left of the entrance door, just behind the picture frame.


Forecast: 33% Seniors, 66% Casuals

Choose a Product!: Circular Box (Casuals), Bella Frame Applique (Seniors), Flower Applique (Casuals), Paint Can (Casuals), Regular Mason Jar (Casuals), Bakers Twine (Casuals), Circular Frame (Casuals)


In addition to the new wrapping station opening today in the upper left corner, Jenny needs help making a gift. Click on the table on the lower right marked by the “!” bubble to help Jenny. A meter will appear displaying how far along you are on the project. Complete the project 100% before the last customer leaves the shop.

Cathy's Crafts - Level 1 - 5

Cathy’s Crafts – Level 1 – 5

Level 1 – 6

Mouse Location: On the right side of the table displaying the appliques.


Forecast: 50% Students, 50% Casuals

Choose a Product!: Circular Box (Casuals), Bow Frame Applique (Students), Flower Applique (Casuals), Paint Can (Casuals), Regular Mason Jar (Casuals), Bakers Twine (Casuals), Circular Frame (Casuals), Digital Printer (Students)


A new printer is available today. Located on a counter near the lower right corner, you will need to collect discs and/or memory cards from customers who want prints. Collect these by clicking on the customer, then take them to the printer. Once the image has been printed, take it to the customer to complete the transaction.


Level 1 – 7

Mouse Location: At the top of the cabinet in the bottom right corner.


Forecast: 70% Students, 10% Seniors, 20% Casuals

Choose a Product!: Regular Box (Students), Bow Frame Applique (Students), Floral Applique (Students), Satin Bow Applique (Casuals), Spray Paint (Students), Regular Mason Jar (Casuals), Bakers Twine (Casuals), Rectangular Frame (Students), Digital Printer (Students)


There are two file cabinets in the shop today. Click on a cabinet marked with a “!” bubble to begin searching. Search both cabinets 100% for receipts before the last customer has left for the day in order to complete the day’s objective.

Cathy's Crafts - Level 1 - 7

Cathy’s Crafts – Level 1 – 7

Level 1 – 8

Mouse Location: Outside the far left window, hanging upside-down in the upper right corner.


Forecast: 33% Students, 33% Seniors, 33% Casuals

Choose a Product!: Circular Box (Casuals), Bella Frame Applique (Seniors), Satin Bow Applique (Casuals), Paint Can (Casuals), Regular Mason Jar (Casuals), Bakers Twine (Casuals), Circular Frame (Casuals), Film Developer (Seniors)


Additional appliques are available to customers today via the applique counter. Be careful not to potentially confuse the appliques with the frame décor in the lower right corner of the shop.


Level 1 – 9

Mouse Location: Under the wrapping table in the upper left corner of the shop.


Forecast: 10% Students, 60% Seniors, 30% Casuals

Choose a Product!: Circular Box (Casuals), Bella Frame Applique (Seniors), Flower Applique (Casuals), Crochet Bow Applique (Seniors), Paint Can (Casuals), Big Mason Jar (Seniors), Jute Twine (Seniors), Circular Frame (Casuals), Film Developer (Seniors)


Cathy isn’t around to take care of the shop today, but Kendra’s there to cover the shift. Select products according to the selection listed above to breeze through the day without any worries.


Level 1 – 10

Mouse Location: Between the flowers and the jar of buttons in the lower right corner, beneath the printer.


Forecast: 10% Students, 10% Seniors, 80% Casuals

Choose a Product!: Circular Box (Casuals), Bella Frame Applique (Seniors), Flower Applique (Casuals), Satin Bow Applique (Casuals), Paint Can (Casuals), Regular Mason Jar (Casuals), Bakers Twine (Casuals), Circular Frame (Casuals), Digital Printer (Students)


Cathy’s parents are back, including her father, who will help around the shop today. Click on tables which need to be cleaned in order to have him complete the task for you, leaving Cathy to focus on the customers at hand.


Chapter 2: Arts and Crafts Fair

With Mrs. Bradford’s encouragement, Cathy decides to check out the arts and crafts fair. Addressing Ming’s destruction of the patio section will have to be left to someone else!


Level 2 – 1

Mouse Location: Around the right side of the stone shelving containing the threat, to the right of the kiln oven.


Forecast: 40% Hipsters, 20% Seniors, 40% Suburban Moms

Choose a Product!: Rose Clay Mold (Suburban Moms), Sewing Kit (Hipsters), Decorative Scissors (Hipsters), Beige Fabric (Suburban Moms)


Today’s Cathy’s first day at the arts and crafts fair. In addition to providing basic crafting materials to customers, Cathy will be able to fire clay in the kiln oven on the left. Click on the mold on the lower left, followed by a clay color in order to fire it in the oven. As soon as it’s fired, click on it to add it to your tray.


Level 2 – 2

Mouse Location: In the pottery booth at the top of the screen, to the immediate left of the girl.


Forecast: 20% Hipsters, 40% Seniors, 40% Suburban Moms

Choose a Product!: Rose Clay Mold (Suburban Moms), Crochet Kit (Seniors), Crafting Scissors (Seniors), Beige Fabric (Suburban Moms), Elephant Pattern (Hipsters)


Day 2 at the craft fair, and things could be going a bit better. That’s why today’s goal is to make a signboard for Cathy’s shop! Click on the signboard pieces in front of the fountain, indicated by a “!” bubble in order to begin assembly. Complete the sign before the last customer has left for the day in order to finish the objective.

Cathy's Crafts - Level 2 - 2

Cathy’s Crafts – Level 2 – 2

Level 2 – 3

Mouse Location: At the top of the brick shelving containing the molds in the lower left corner of the screen.


Forecast: 50% Suburban Moms, 20% Seniors, 30% Hipsters

Choose a Product!: Ming Head Mold (Suburban Moms), Rose Clay Mold (Suburban Moms), Sewing Kit (Hipsters), Decorative Scissors (Hipsters), Beige Fabric (Suburban Moms), Elephant Pattern (Hipsters)


With a new signboard comes new customers, and the addition of a new mold for your clay! Pay close attention to the clay orders customers give and make sure you select the correct one. Remember to select a mold, followed by the clay color. Once the polymer has been completely fired, click on it to add it to your tray, then hand it to the customer who ordered it.


Level 2 – 4

Mouse Location: In the window of the painting booth in the upper right corner, between Rohan and the purple picture frame.


Forecast: 20% Suburban Moms, 60% Seniors, 20% Hipsters

Choose a Product!: Ming Body Mold (Hipsters), Ribbon Clay Mold (Seniors), Sewing Kit (Hipsters), Crafting Scissors (Seniors), Beige Fabric (Suburban Moms), Black Ming Doll (Hipsters), Elephant Pattern (Hipsters)


A new Ming doll is available to customers today! Click on the cat doll on the counter toward the bottom right corner, followed by the accessories as per the customer’s request. Once completed, hand the item to the customer. Ming dolls can combine any of the accessories, so pay extra close attention to customers’ orders!


Level 2 – 5

Mouse Location: At the foot of the kiln oven in the lower left corner, next to the box of Ming Doll refills.


Forecast: 50% Suburban Moms, 50% Seniors

Choose a Product!: Ming Head Mold (Suburban Moms), Rose Clay Mold (Suburban Moms), Crochet Kit (Seniors), Crafting Scissors (Seniors), Beige Fabric (Suburban Moms), Green Fabric (Seniors), White Ming Doll (Suburban Moms), Owl Pattern (Suburban Moms)


Cathy’s busy helping take care of Rohann’s booth today, so it’s up to Kendra to run the shop. Ming dolls will slowly become more popular, so remember to restock them when supplies are low. The restocking box is located in the lower left corner, below the kiln.


Level 2 – 6

Mouse Location: Next to the brown vase at the lower right corner of the pottery cart.


Forecast: 50% Suburban Moms, 25% Seniors, 25% Hipsters

Choose a Product!: Ming Head Mold (Suburban Moms), Rose Clay Mold (Suburban Moms), Sewing Kit (Hipsters), Decorative Scissors (Hipsters), Beige Fabric (Suburban Moms), Orange Fabric (Hipsters), White Ming Doll (Suburban Moms), Owl Pattern (Suburban Moms)


Cathy’s back in charge today, and with her comes a new wave of customers. There will be a number of Suburban Moms as customers today, so customers will tend to be more impatient. Try to keep on top of orders and make sure to serve Seniors second, due to the fact they’re more patient. You will be able to line up combos with Hipsters and Suburban Moms in this way.


Level 2 – 7

Mouse Location: In the middle of the portion of lawn in the upper left corner.


Forecast: 20% Suburban Moms, 30% Seniors, 50% Hipsters

Choose a Product!: Ming Body Mold (Hipsters), Rose Clay Mold (Suburban Moms), Sewing Kit (Hipsters), Decorative Scissors (Hipsters), Beige Fabric (Suburban Moms), Orange Fabric (Hipsters), Violet Fabric (Hipsters), Black Ming Doll (Hipsters), Elephant Pattern (Hipsters)


Several fliers have gone missing! Locate all 6 before the day is done to complete the day’s objective. Their locations are shown in the screenshot pictured.

Cathy's Crafts - Level 2 - 7

Cathy’s Crafts – Level 2 – 7

Level 2 – 8

Mouse Location: Behind the top of the fountain, toward the upper right.


Forecast: 60% Suburban Moms, 10% Seniors, 30% Hipsters

Choose a Product!: Butterfly Clay Mold (Hipsters), Ming Head Mold (Suburban Moms), Rose Clay Mold (Suburban Moms), Sewing Kit (Hipsters), Decorative Scissors (Hipsters), Beige Fabric (Suburban Moms), Orange Fabric (Hipsters), Pink Fabric (Suburban Moms), White Ming Doll (Suburban Moms), Elephant Pattern (Hipsters)


Cathy is gone again today, so it will be up to Kendra to run the booth. In addition to this, she will also be responsible for cleaning all tables. Make sure to clean any dirty tables as soon as possible whenever you have a chance – don’t let things back up so that you start losing customers.


Level 2 – 9

Mouse Location: On the far left side of the counter with the cash register, beneath the balloons.


Forecast: 33% Suburban Moms, 33% Seniors, 33% Hipsters

Choose a Product!: Butterfly Clay Mold (Hipsters), Ming Body Mold (Hipsters), Rose Clay Mold (Suburban Moms), Sewing Kit (Hipsters), Decorative Scissors (Hipsters), Beige Fabric (Suburban Moms), Orange Fabric (Hipsters), Violet Fabric (Hipsters), Black Ming Doll (Hipsters), Elephant Pattern (Hipsters)


Make pots for Patty today by clicking on the box of pottery near the kiln in the lower left corner of the screen. A bar will pop up showing your progress. Complete preparations 100% before the end of the day in order to complete the objective. Kendra will be nearby to help clean tables as necessary.

Cathy's Crafts - Level 2 - 9

Cathy’s Crafts – Level 2 – 9

Level 2 – 10

Mouse Location: On the grass above the balloons and cash register, close to the circular stone pavement with the fountain.


Forecast: 40% Suburban Moms, 20% Seniors, 40% Hipsters

Choose a Product!: Butterfly Clay Mold (Hipsters), Ming Body Mold (Hipsters), Rose Clay Mold (Suburban Moms), Sewing Kit (Hipsters), Decorative Scissors (Hipsters), Beige Fabric (Suburban Moms), Orange Fabric (Hipsters), Violet Fabric (Hipsters), Black Ming Doll (Hipsters), Elephant Pattern (Hipsters)


It’s the final day at the craft fair, and as a result, it’s busier than ever! Make sure your kiln oven is upgraded today, as is your fountain to keep customers as happy as possible. There will be high demand for Ming dolls, so take care that they remain stocked at all times. Your place in the finals depends on it!


Chapter 3: Cathy’s Return

Cathy may not have placed first in the fair, but it’s the effort that matters. Things are back to normal in the Bradford’s hardware store. Or are they…?


Level 3 – 1

Mouse Location: In the middle of the raised floor, beneath the applique table.


Forecast: 20% Casuals, 40% Students, 40% Suburban Moms

Choose a Product!: Raccoon Applique (Students), Checkered Fabric (Suburban Moms), Heart Patch Applique (Suburban Moms), Sequins (Suburban Moms)


Today is very similar to the first day of Chapter 1. Mr. Bradford will be around to help clean tables this time. Click on the boxes in the far lower left corner to restock supplies as necessary. There is also a new sewing machine in the upper left corner you can use. Click on the stencil, followed by the sewing machine to stitch patterns as per customers’ requests. The rest is easy-going.


Level 3 – 2

Mouse Location: At the top of the 4-person table toward the left, beneath the first window from the left.


Forecast: 10% Casuals, 40% Students, 50% Suburban Moms

Choose a Product!: Raccoon Applique (Students), Checkered Fabric (Suburban Moms), Heart Patch Applique (Suburban Moms), Yarn (Suburban Moms), Sequins (Suburban Moms)


New yarn balls are available today. Customers will order these in groups of three – either all the same color, or one of each. You will need to click on three yarn balls consecutively in order to add them to your tray. There is also a large influx of Suburban Moms today, so be prepared to deal with impatient customers.


Level 3 – 3

Mouse Location: At the top right corner of the counter with the yarn on the right, next to Cathy’s father.


Forecast: 25% Casuals, 25% Students, 25% Suburban Moms, 25% Bikers

Choose a Product!: Rabbit Applique (Casuals), Zigzag Fabric (Bikers), Checkered Fabric (Suburban Moms), Heart Patch Applique (Suburban Moms), Tape Dispenser (Bikers), Yarn (Suburban Moms), Sequins (Suburban Moms)


There’s new fabrics and appliques available to customers, in addition to a tape dispenser and/or glue gun on the lower left. Click on the two components to combine them in order to assemble the item for customers. Ming and Mr. Bradford are also present in the shop today to help out and bolster the moods of customers.


Level 3 – 4

Mouse Location: Peeking around the right side of the counter with the cash register.


Forecast: 25% Casuals, 40% Students, 10% Suburban Moms, 25% Bikers

Choose a Product!: Ming Head Applique (Bikers), Rabbit Applique (Casuals), Zigzag Fabric (Bikers), Plain Silk Fabric (Casuals), Heart Patch Applique (Suburban Moms), Tape Dispenser (Bikers), Ming Notebook (Casuals), Yarn (Suburban Moms), Sequins (Suburban Moms)


Ming is becoming progressively more popular. A new sewing pattern and notebook are available for customers today. Click on the notebook at the bottom of the screen and combine it with the accessories customers ask for to complete the item for delivery. There are a number of Students in the shop today, who don’t like it when Ming visits their table, so be sure to keep Ming fed to prevent upsetting them.


Level 3 – 5

Mouse Location: Peeking around the left corner of the bottom right table, to the left of the Ming notebook.


Forecast: 25% Casuals, 50% Suburban Moms, 25% Bikers

Choose a Product!: Ming Head Applique (Bikers), Rabbit Applique (Casuals), Zigzag Fabric (Bikers), Checkered Fabric (Suburban Moms), Heart Patch Applique (Suburban Moms), Tape Dispenser (Bikers), Flower Frame (Suburban Moms), Ming Notebook (Casuals), Sequins (Suburban Moms), Yarn (Suburban Moms)


Ming’s popularity is still growing, and fans will stop by today asking for pictures. Take 5 pictures of Ming with fans before the end of the day to complete your objective. Exactly 5 fans will ask for this, so make sure you don’t miss any! Ming will pose and fans will have speech bubbles pop up when they’d like their picture taken. Click on them to take a photo – it’s that simple!

Cathy's Crafts - Level 3 - 5

Cathy’s Crafts – Level 3 – 5

Level 3 – 6

Mouse Location: In the entrance doorway, peeking around the bottom of the door on the right.


Forecast: 20% Casuals, 50% Students, 5% Suburban Moms, 25% Bikers

Choose a Product!: Ming Head Applique (Bikers), Raccoon Applique (Students), Zigzag Fabric (Bikers), Plain Silk Fabric (Casuals), Star Patch Applique (Students), Glue Gun (Students), Stripe Frame (Casuals), Ming Stationary (Bikers), Ming Shaped Buttons (Bikers), Glitter (Students), Cross Stitch Thread (Students)


There’s a lot of fixing up to do around the shop today. There are 4 areas in need of renovation, each marked with a “!” bubble. Click on the area to clean it. You will need to clear all 4 areas before the last customer leaves in order to complete today’s objective.

Tip!: It’s very unlikely you will be able to complete the objective before the shop closes, so focus on completing the job while your last customer waits to be checked out at the register.

Cathy's Crafts - Level 3 - 6

Cathy’s Crafts – Level 3 – 6

Level 3 – 7

Mouse Location: Upside-down beneath the light between the two windows at the top of the screen.


Forecast: 33% Casuals, 33% Students, 26% Suburban Moms, 6% Bikers

Choose a Product!: Ming Body Applique (Casuals), Rabbit Applique (Casuals), Polka Fabric (Casuals), Checkered Fabric (Suburban Moms), Heart Patch Applique (Suburban Moms), Glue Gun (Students), Flower Frame (Suburban Moms), Ming Notebook (Casuals), Ming Rhinestones (Suburban Moms), Sequins (Suburban Moms), Yarn (Suburban Moms)


Things are back to normal in the shop today, though Ming isn’t around today. Focus on customers as per usual, making sure to keep supplies stocked as needed so as not to run out.


Level 3 – 8

Mouse Location: Underneath the table with the sewing machine in the upper left corner of the shop.


Forecast: 25% Casuals, 25% Students, 25% Suburban Moms, 25% Bikers

Choose a Product!: Ming Body Applique (Casuals), Rabbit Applique (Casuals), Polka Fabric (Casuals), Checkered Fabric (Suburban Moms), Heart Patch Applique (Suburban Moms), Tape Dispenser (Bikers), Flower Frame (Suburban Moms), Ming Notebook (Casuals), Ming Rhinestones (Suburban Moms), Sequins (Suburban Moms), Yarn (Suburban Moms)


Cathy and Ming both return to the shop today, with Kendra hanging around as help to clear tables. Customers are fairly equal in ratio today. Remember that Students don’t like Ming, while Bikers love Ming. A lot of your performance today will rely on Ming visiting the right tables and keeping away from the wrong ones. Click on Ming’s bowl to lure Ming away from customers who may not appreciate the company.


Level 3 – 9

Mouse Location: At the top of Ming’s cat bed on the left.


Forecast: 50% Casuals, 25% Students, 15% Suburban Moms, 10% Bikers

Choose a Product!: Ming Body Applique (Casuals), Rabbit Applique (Casuals), Polka Fabric (Casuals), Plain Silk Fabric (Casuals), Heart Patch Applique (Suburban Moms), Glue Gun (Students), Stripe Frame (Casuals), Ming Notebook (Casuals), Ming Rhinestones (Suburban Moms), Sequins (Suburban Moms), Yarn (Suburban Moms)


Today will be fairly easy-going. Focus on keeping your products in stock and keeping Ming happy. The rest is fairly smooth-sailing. Select the products listed above to easily obtain your 3-star score goal.


Level 3 – 10

Mouse Location: In the right window, behind the red notebook with Ming on the cover.


Forecast: 25% Casuals, 25% Students, 25% Suburban Moms, 25% Bikers

Choose a Product!: Ming Body Applique (Casuals), Rabbit Applique (Casuals), Polka Fabric (Casuals), Checkered Fabric (Suburban Moms), Heart Patch Applique (Suburban Moms), Tape Dispenser (Bikers), Flower Frame (Suburban Moms), Ming Notebook (Casuals), Ming Rhinestones (Suburban Moms), Sequins (Suburban Moms), Yarn (Suburban Moms)


Cathy’s run out of the shop, but Kendra’s there to take her place. Mr. Bradford is there to clear tables, and Mrs. Bradford is nearby to feed Ming. This allows you to focus on serving customers as quickly and smoothly as possible. Don’t forget to keep your products stocked!


Chapter 4: Fancy Flower Design

Cathy decides to try her hand at flower design, but will she be able to discover her confidence?


Level 4 – 1

Mouse Location: At the left side of the table in the bottom right corner of the screen.


Forecast: 9% Suburban Moms, 45% Seniors, 45% Hipsters

Choose a Product!: Slender Vase (Hipsters), Heart Basket (Suburban Moms), Green Bouquet Wrap (Suburban Moms)


The mailman will show up with deliveries today. When he has a package for you, a speech bubble will pop up over his head. Click on him to collect the package. Collect 5 packages before the end of the day to complete the objective.

Cathy's Crafts - Level 4 - 1

Cathy’s Crafts – Level 4 – 1

Level 4 – 2

Mouse Location: Over the bottom portion of the silver drainage grating toward the right side of the screen.


Forecast: 10% Suburban Moms, 30% Seniors, 10% Hipsters, 50% Socialites

Choose a Product!: Classic Vase (Seniors), Teddy Basket (Socialites), Yellow Bouquet Wrap (Socialites), Violet Ribbon Lace (Socialites)


For today’s objective, in addition to wrapping flowers, you will need to design 2 flower arrangements. The arrangement part is already done – all you need to do is assemble them! Click on the “!” bubbles over the counters on the lower right. Complete both arrangements 100% before your last customer leaves the shop to complete the objective for the day.

Cathy's Crafts - Level 4 - 2

Cathy’s Crafts – Level 4 – 2

Level 4 – 3

Mouse Location: On the tile floor beneath the flower refill stand.


Forecast: 40% Suburban Moms, 20% Seniors, 40% Socialites

Choose a Product!: Classic Vase (Seniors), Teddy Basket (Socialites), Yellow Bouquet Wrap (Socialites), Violet Ribbon Lace (Socialites), Blue Pearl Beads (Socialites)


Today’s goal is to design a centerpiece. Similar to the previous day’s objective, click on the arrangement on the counter on the lower right to assemble it. Assemble it to 100% completion before your last customer leaves to complete the day’s objective.

Cathy's Crafts - Level 4 - 3

Cathy’s Crafts – Level 4 – 3

Level 4 – 4

Mouse Location: Behind the sign in the upper left corner of the screen.


Forecast: 10% Suburban Moms, 20% Seniors, 50% Hipsters, 20% Socialites

Choose a Product!: Slender Vase (Hipsters), Teddy Basket (Socialites), Yellow Bouquet Wrap (Socialites), Violet Ribbon Lace (Socialites), Blue Pearl Beads (Socialites), Outdoor Paint (Hipsters), White Clay (Hipsters), Brown Clay (Suburban Moms)


The tasks of the flower shop continue to expand, and today you’ll be checking flower inventory. There are 3 sheets you’ll need to fully check before your last customer leaves in order to complete your objective. Their locations are shown below.

Cathy's Crafts - Level 4 - 4

Cathy’s Crafts – Level 4 – 4

Level 4 – 5

Mouse Location: Behind the right side of the fountain in the middle of the shop.


Forecast: 20% Suburban Moms, 30% Seniors, 30% Hipsters, 20% Socialites

Choose a Product!: Slender Vase (Hipsters), Teddy Basket (Socialites), Wire Clay Cutter (Hipsters), Yellow Bouquet Wrapper (Socialites), Violet Ribbon Lace (Socialites), Blue Pearl Beads (Socialites), Outdoor Paint (Hipsters), White Clay (Hipsters), Brown Clay (Suburban Moms)


Cathy will be busy with another task today, but you will still need to assist her. Playing as the flower shop apprentice, click on Cathy’s station to help her with her task. Help her complete her assignment before the last customer leaves to achieve your goal.

Cathy's Crafts - Level 4 - 5

Cathy’s Crafts – Level 4 – 5

Level 4 – 6

Mouse Location: At the top of the main counter to the right of the cash register, between the first two green placemats.


Forecast: 30% Suburban Moms, 20% Seniors, 40% Hipsters, 10% Socialites

Choose a Product!: Slender Vase (Hipsters), Heart Basket (Suburban Moms), Ceramic Brush (Socialites), Wire Clay Cutter (Hipsters), Green Bouquet Wrap (Suburban Moms), Red Ribbon Lace (Suburban Moms), Pink Pearl Beads (Suburban Moms), Outdoor Paint (Hipsters), White Clay (Hipsters), Brown Clay (Suburban Moms), Short Pot (Hipsters)


Today will introduce the pottery oven. Located at the top of the screen, click on a pot on the shelf on the left, followed by the oven in order to bake it. Once the pottery is complete, you can take it to customers as per their request.

Tip!: Try preparing a pot in the oven, then leave it there once complete. You can leave one completed pot in the oven without it burning or being ruined, which will allow you to give pots to customers even faster.


Level 4 – 7

Mouse Location: Underneath the left side of the bottom right table – the first single-person table from the left.


Forecast: 30% Suburban Moms, 20% Seniors, 20% Hipsters, 30% Socialites

Choose a Product!: Tall Pot (Suburban Moms), Slender Vase (Hipsters), Teddy Basket (Socialites), Ceramic Brush (Socialites), Wire Clay Cutter (Hipsters), Yellow Bouquet Wrap (Socialites), Violet Ribbon Lace (Socialites), Blue Pearl Beads (Socialites), Craft Paint (Socialites), White Clay (Hipsters), Brown Clay (Suburban Moms)


There are no special objectives today, but today will be your first opportunity to upgrade the pottery oven. It’s highly recommended you upgrade this right away in order to provide pottery to customers even faster.


Level 4 – 8

Mouse Location: On the right side of the main counter to the right side of the cash register, behind the cart handle and wheel.


Forecast: 20% Suburban Moms, 30% Seniors, 30% Hipsters, 20% Socialites

Choose a Product!: Short Pot (Hipsters), Slender Vase (Hipsters), Teddy Basket (Socialites), Ceramic Brush (Socialites), Wire Clay Cutter (Hipsters), Yellow Bouquet Wrap (Socialites), Violet Ribbon Lace (Socialites), Blue Pearl Beads (Socialites), Outdoor Paint (Hipsters), White Clay (Hipsters), Brown Clay (Suburban Moms)


Share ideas with Chloe throughout the day. When a “!” bubble pops up over her, click on Chloe to swap ideas with her. Do this 5 times before the end of the day to complete your objective.

Cathy's Crafts - Level 4 - 8

Cathy’s Crafts – Level 4 – 8

Level 4 – 9

Mouse Location: At the bottom left corner of the pottery kiln at the top of the screen.


Forecast: 30% Suburban Moms, 30% Hipsters, 40% Socialites

Choose a Product!: Tall Pot (Suburban Moms), Slender Vase (Hipsters), Teddy Basket (Socialites), Ceramic Brush (Socialites), Wire Clay Cutter (Hipsters), Yellow Bouquet Wrap (Socialites), Violet Ribbon Lace (Socialites), Blue Pearl Beads (Socialites), Craft Paint (Socialites), White Clay (Hipsters), Brown Clay (Suburban Moms)


Today’s goal is to finish the centerpiece in the middle of the shop. Chloe will work on this while Cathy helps the daily customers, but will need Cathy’s help to finish it. Click on the centerpiece and finish it to 100% completion before the last customer leaves to complete the day’s goal. Use the pottery trick mentioned above to aid Cathy today – prepare a pot in the oven and leave it for the next customer in order to save time.

Cathy's Crafts - Level 4 - 9

Cathy’s Crafts – Level 4 – 9

Level 4 – 10

Mouse Location: Hanging upside-down underneath the right side of the large centerpiece bouquet of flowers.


Forecast: 25% Suburban Moms, 25% Seniors, 25% Hipsters, 25% Socialites

Choose a Product!: Tall Pot (Suburban Moms), Slender Vase (Hipsters), Teddy Basket (Socialites), Ceramic Brush (Socialites), Wire Clay Cutter (Hipsters), Yellow Bouquet Wrap (Socialites), Violet Ribbon Lace (Socialites), Blue Pearl Beads (Socialites), Craft Paint (Socialites), White Clay (Hipsters), Brown Clay (Suburban Moms)


Today pulls out all the stops, only Chloe will be helping Cathy by cleaning tables. Focus on serving customers and don’t forget to help them as needed. Today’s turnout is quite balanced, so be prepared to deal with a little bit of everything!


Chapter 5: Cathy’s Crafts

The hardware store has been converted into a craft shop. How will Cathy take to running her own store?


Level 5 – 1

Mouse Location: To the left of Cathy when she’s standing at the cash register, at the foot of the customer counter.


Forecast: 40% Casuals, 60% Ming Fans

Choose a Product!: Fancy Sketchpad (Casuals), Charcoal Stick (Ming Fans), Pastels (Ming Fans), Ming Figurine (Ming Fans)


Mrs. Bradford will pop up from time to time today, asking Cathy for ideas. She will show up in the upper left corner, a speech bubble cropping up asking for advice. When this happens, click on her to share ideas. Do this 5 times before the end of the day to complete your objective. Don’t worry about cleaning tables – that’s why Kendra’s here to help! Just click on a table as per normal and your best friend will do the rest.

Cathy's Crafts - Level 5 - 1

Cathy’s Crafts – Level 5 – 1

Level 5 – 2

Mouse Location: At the bottom of the shelf in the upper left corner of the shop.


Forecast: 50% Hipsters, 10% Casuals, 40% Ming Fans

Choose a Product!: Fancy Sketchpad (Casuals), Charcoal Pencil (Hipsters), Crayons (Hipsters), Corgi Figurine (Hipsters), Butterfly Stencil (Hipsters)


A number of seniors are in the shop today, and you’ll need to prepare stencils for their class. Next to the new stencil table on the lower right is a table on which you can prepare them. Click on the table marked with a “!” to assemble the stencils. Complete the assembly before you last customer leaves to complete today’s objective.

Cathy's Crafts - Level 5 - 2

Cathy’s Crafts – Level 5 – 2

Level 5 – 3

Mouse Location: Between the platter table and the flower pot beneath the window closest to the door at the top of the screen.


Forecast: 30% Hipsters, 20% Casuals, 50% Ming Fans

Choose a Product!: Fancy Sketchpad (Casuals), Charcoal Pencil (Hipsters), Crayons (Hipsters), Red Art Paper (Ming Fans), Corgi Figurine (Hipsters), Butterfly Stencil (Hipsters)


Today there’s a new kind of craft paper available. Located on the lower left, click on the paper twice to collect the two pieces needed when customers request it. Keep a sharp eye on dog-painting requests, too, since they can consist of any combination of colors.


Level 5 – 4

Mouse Location: On the left side of the bottom right table housing the corgi figurine.


Forecast: 40% Hipsters, 30% Casuals, 30% Ming Fans

Choose a Product!: Fancy Sketchpad (Casuals), Charcoal Pencil (Hipsters), Crayons (Hipsters), Red Art Paper (Ming Fans), Corgi Figurine (Hipsters), Elegant Frame (Hipsters), Butterfly Stencil (Hipsters)


Three deliveries will show up today. Keep an eye out for the mailman in the upper right corner near the door. When his speech bubble pops up, click on him to collect the package. Receive all deliveries before the end of the day to complete your goal.

Cathy's Crafts - Level 5 - 4

Cathy’s Crafts – Level 5 – 4

Level 5 – 5

Mouse Location: Behind the right side of the top shelf to the left of the entrance doorway.


Forecast: 10% Hipsters, 30% Casuals, 10% Ming Fans, 50% DIY Besties

Choose a Product!: Plain Sketchpad (DIY Besties), Charcoal Pencil (Hipsters), Crayons (Hipsters), Blue Art Paper (DIY Besties), Corgi Figurine (Hipsters), Elegant Frame (Hipsters), Flower Stencil (DIY Besties), Oil Paint (DIY Besties), Plastic Palette (DIY Besties)


Six art mannequins have gone missing. Locate all 6 before the end of the day. Their locations are shown below.

Cathy's Crafts - Level 5 - 5

Cathy’s Crafts – Level 5 – 5

Level 5 – 6

Mouse Location: Peeking out from the bottom left corner of the left couch where the seniors are sitting.


Forecast: 20% Hipsters, 30% Casuals, 20% Ming Fans, 30% DIY Besties

Choose a Product!: Plain Sketchpad (DIY Besties), Charcoal Pencil (Hipsters), Crayons (Hipsters), Blue Art Paper (DIY Besties), Corgi Figurine (Hipsters), Elegant Frame (Hipsters), Flower Stencil (DIY Besties), Oil Paint (DIY Besties), Plastic Palette (DIY Besties), Big Paint Brush (DIY Besties)


Today will see a near full spectrum of products, and a continued strong presence of DIY Besties customer types. These types are very impatient but tip extremely well, so place priority on helping them as quickly as possible. In addition, be careful to keep all canvas stations on the upper left clean! It’s possible for a customer to stand in front of the “!” bubble. If you notice a customer who appears stuck, try clicking on the canvas to see if it needs to be cleaned first.


Level 5 – 7

Mouse Location: At the top left corner behind the left couch where the seniors are sitting.


Forecast: 30% Hipsters, 10% Casuals, 10% Ming Fans, 50% DIY Besties

Choose a Product!: Plain Sketchpad (DIY Besties), Charcoal Pencil (Hipsters), Crayons (Hipsters), Blue Art Paper (DIY Besties), Corgi Figurine (Hipsters), Elegant Frame (Hipsters), Flower Stencil (DIY Besties), Oil Paint (DIY Besties), Plastic Palette (DIY Besties), Big Paint Brush (DIY Besties)


An additional type of crafting paper will become available today. Pay close attention to customer’s requests. If you accidentally make a mistake, click on the item you no longer need on your tray on the lower left to remove it.


Level 5 – 8

Mouse Location: In the bottom right corner of the first window from the left.


Forecast: 40% Hipsters, 40% Casuals, 20% DIY Besties

Choose a Product!: Plain Sketchpad (DIY Besties), Charcoal Pencil (Hipsters), Crayons (Hipsters), Blue Art Paper (DIY Besties), Corgi Figurine (Hipsters), Elegant Frame (Hipsters), Flower Stencil (DIY Besties), Oil Paint (DIY Besties), Plastic Palette (DIY Besties), Big Paint Brush (DIY Besties)


More customers will request a combination of crafting paper today. Customers can ask for either two of the same color paper, or a combination of all three types. Take your time clicking on pieces of paper – clicking too quickly can sometimes result in pieces being missed.


Level 5 – 9

Mouse Location: Behind the top right corner of the bottom right cabinet, behind the refill box of corgi figurines.


Forecast: 30% Hipsters, 50% Casuals, 10% Ming Fans, 10% DIY Besties

Choose a Product!: Fancy Sketchpad (Casuals), Charcoal Pencil (Hipsters), Crayons (Hipsters), Blue Art Paper (DIY Besties), Corgi Figurine (Hipsters), Vintage Frame (Casuals), Butterfly Stencil (Hipsters), Acrylic Paint (Casuals), Wood Palette (Casuals), Small Paint Brush (Casuals)


Today is smooth-sailing with easy customers and the help of Kendra on the tables. Use the tricks mentioned in the levels above to complete the day easily with a 3-star rating.


Level 5 – 10

Mouse Location: On the floor between the table holding the frame and the cart holding the stencils.


Forecast: 20% Hipsters, 30% Casuals, 20% Ming Fans, 30% DIY Besties

Choose a Product!: Plain Sketchpad (DIY Besties), Charcoal Pencil (Hipsters), Crayons (Hipsters), Blue Art Paper (DIY Besties), Corgi Figurine (Hipsters), Vintage Frame (Casuals), Flower Stencil (DIY Besties), Oil Paint (DIY Besties), Plastic Palette (DIY Besties), Big Paint Brush (DIY Besties)


A balanced variety of customers will be in the shop today. Keep your products stocked, keeping hard-to-reach items on your inventory tray as necessary to match demand. Put extra priority on keeping painting stations clean.


Chapter 6: Outdoor Fundraiser

Bad news awaits the seniors, but it won’t end badly if Cathy can help it!


Level 6 – 1

Mouse Location: In the doorway at the top of the screen, to the right of the doormat.


Forecast: 50% Casuals, 20% Ming Fans, 20% Students, 10% Hipsters

Choose a Product!: Green House Frame (Casuals), Blue Quilt (Casuals), Owl Applique (Casuals), Short Mug (Hipsters)


Ming will be a part of the shop from the start of the day, wandering to tables from time to time. A large number of your customers will enjoy Ming’s company, so allow Ming to wander without paying too much mind. Remember you can click on Ming’s food bowl to draw Ming away from a table of customers who may not want the company.


Level 6 – 2

Mouse Location: In the middle of the cobblestone pavement, to the left below the first table on the left.


Forecast: 36% Casuals, 27% Ming Fans, 27% Students, 9% Hipsters

Choose a Product!: Green House Frame (Casuals), Blue Quilt (Casuals), Owl Applique (Casuals), Rayon Thread (Casuals), Black Ming Pillow (Students), Tall Mug (Students)


There are two sets of boxes today which require unpacking. Click on the pile of boxes in the lower left and right corners to begin unpacking them. Unpack both to 100% completion before your last customer leaves to complete the day’s objectives.

Cathy's Crafts - Level 6 - 2

Cathy’s Crafts – Level 6 – 2

Level 6 – 3

Mouse Location: Around the right side of the main customer counter, to the immediate right of the cash register.


Forecast: 25% Casuals, 25% Ming Fans, 25% Students, 25% Hipsters

Choose a Product!: Red House Frame (Hipsters), Blue Quilt (Casuals), Owl Applique (Casuals), Cotton Thread (Casuals), White Ming Pillow (Hipsters), Short Mug (Hipsters), Choco Cookie Jar (Ming Fans)


A balanced variety of customers will be in the shop today. Kendra’s around to help, and you’ll need to keep an eye on Ming to make sure the cat’s not upsetting anyone. You will also be able to give customers new Ming dolls as per request by combining the doll base with a bow accessory in the lower right corner. You can also combine jars with a plate of cookies on the right to provide this type of product.


Level 6 – 4

Mouse Location: Hanging upside-down from the “welcome” banner in the doorway at the top of the screen.


Forecast: 22% Casuals, 11% Ming Fans, 44% Students, 22% Hipsters

Choose a Product!: Red House Frame (Hipsters), Blue Quilt (Casuals), Owl Applique (Casuals), Cotton Thread (Hipsters), White Ming Pillow (Hipsters), Vanilla Cookie Jar (Students), Short Mug (Hipsters)


The majority of your customers today will be Students, so prepare for low patience and small tips. Ming won’t be around, so you won’t have to worry about your furry companion upsetting today’s largest customer base. However, despite the fact Ming and the Students don’t always agree, Students will be eager to get their hands on the Ming doll and new heart accessory. Combine the heart with the Ming base just as you did the bow to complete the product.


Level 6 – 5

Mouse Location: Behind the fence in the upper left corner of the screen.


Forecast: 14% Casuals, 42% Ming Fans, 14% Students, 28% Hipsters

Choose a Product!: Red House Frame (Hipsters), Green Quilt (Ming Fans), Butterfly Applique (Ming Fans), Cotton Thread (Hipsters), White Ming Pillow (Hipsters), Heart Dog Plush (Ming Fans), Square Candle Mold (Hipsters), Short Mug (Hipsters), Choco Cookie Jar (Ming Fans)


Starting today, you will be able to make candles! Click on the candle mold, followed by the wax pot. Once the meter is fully filled, the candle will be ready. You can prepare one candle at a time, however, once prepared, you can safely leave the candle at the pot. A small candle icon will indicate a candle is ready here. Always have a candle prepared in order to serve customers quickest. Ming is also back to keep customers happy.


Level 6 – 6

Mouse Location: Behind the candle-making station, between the candle mold and the pot of wax.


Forecast: 33% Casuals, 11% Ming Fans, 11% Students, 44% Hipsters

Choose a Product!: Red House Frame (Hipsters), Blue Quilt (Casuals), Owl Applique (Casuals), Cotton Thread (Hipsters), White Ming Pillow (Hipsters), Heart Dog Plush (Ming Fans), Snow Cat Plush (Casuals), Square Candle Mold (Hipsters), Short Mug (Hipsters), Choco Cookie Jar (Ming Fans)


Today you can upgrade the candle wax pot so that candles take less time to make. In addition, you’ll be given an additional day-goal: start painting a concept. Click on the painting marked with a “!” in the upper right corner to begin painting. Complete your concept before your last customer leaves in order to complete the day’s objective.

Cathy's Crafts - Level 6 - 6

Cathy’s Crafts – Level 6 – 6

Level 6 – 7

Mouse Location: Peeking out from the right side of the doorway at the top of the screen, above the balloons.


Forecast: 66% Casuals, 16% Students, 16% Hipsters

Choose a Product!: Green House Frame (Casuals), Blue Quilt (Casuals), Owl Applique (Casuals), Rayon Thread (Casuals), White Ming Pillow (Hipsters), Brown Dog Plush (Students), Snow Cat Plush (Casuals), Square Candle Mold (Hipsters), Short Mug (Hipsters), Vanilla Cookie Jar (Students)


Find photos for inspiration in today’s objective. There are 7 photos scattered around the front of the shop area. Find all the photos before the day is done to complete your goal. The photo locations are shown below.

Cathy's Crafts - Level 6 - 7

Cathy’s Crafts – Level 6 – 7

Level 6 – 8

Mouse Location: In the top of the window, above the “C” in “Cathy’s Crafts” above Cathy’s canvas.


Forecast: 22% Casuals, 55% Students, 22% Hipsters

Choose a Product!: Red House Frame (Hipsters), Blue Quilt (Casuals), Owl Applique (Casuals), Cotton Thread (Hipsters), White Ming Pillow (Hipsters), Brown Dog Plush (Students), Snow Cat Plush (Casuals), Square Candle Mold (Hipsters), Short Mug (Hipsters), Vanilla Cookie Jar (Students)


A new day demands a new concept. Click on the easel in the upper right corner marked with a “!” to begin painting your concept. Finish it before the end of the day to complete your goal.

Cathy's Crafts - Level 6 - 8

Cathy’s Crafts – Level 6 – 8

Level 6 – 9

Mouse Location: In the middle of the cobblestone area, just below Cathy’s canvas.


Forecast: 25% Casuals, 25% Ming Fans, 25% Students, 25% Hipsters

Choose a Product!: Red House Frame (Hipsters), Blue Quilt (Casuals), Owl Applique (Casuals), Cotton Thread (Hipsters), White Ming Pillow (Hipsters), Heart Dog Plush (Ming Fans), Snow Cat Plush (Casuals), Square Candle Mold (Hipsters), Short Mug (Hipsters), Choco Cookie Jar (Ming Fans)


A balanced variety of customers will show today. Ming and Kendra are also available to help. While helping customers, you will also need to work on your painting. Click on the easel marked with a “!” to work on your painting. Make sure you complete it before the end of the day in order to achieve your objective.

Cathy's Crafts - Level 6 - 9

Cathy’s Crafts – Level 6 – 9

Level 6 – 10

Mouse Location: In the window above Ming’s cat house, between the balloons.


Forecast: 33% Casuals, 33% Ming Fans, 33% Hipsters

Choose a Product!: Red House Frame (Hipsters), Blue Quilt (Casuals), Owl Applique (Casuals), Cotton Thread (Hipsters), White Ming Pillow (Hipsters), Heart Dog Plush (Ming Fans), Snow Cat Plush (Casuals), Square Candle Mold (Hipsters), Short Mug (Hipsters), Choco Cookie Jar (Ming Fans)


It’s the last day of the fundraiser! You won’t have to worry about any Students today, so the only customers you will need to focus on keeping Ming away from are the Hipsters. In addition to this, today’s goal is to complete your painting! Click on the easel marked “!” to work on it. Complete it before the last customer leaves, and your goal will be achieved.

Cathy's Crafts - Level 6 - 10

Cathy’s Crafts – Level 6 – 10


Congratulations! You’ve completed all levels of Cathy’s Crafts!


Mouse Locations

Hidden in each of the game’s levels is a mouse. This section is divided into sub-sections per shop, listing all mice locations for each level.

Chapter 1: Hardware Store

Cathy's Crafts - Hardware Store Mice Locations

Cathy’s Crafts – Hardware Store Mice Locations

Level 1 – 1: At the corner of the raised curve in the floor, beneath the first table to the left of the door.

Level 1 – 2: Beneath the first table from the right.

Level 1 – 3: In the bottom left corner of the entrance doorway in the upper right corner.

Level 1 – 4: Peeking around the far left side of the checkout counter.

Level 1 – 5: In the first window to the left of the entrance door, just behind the picture frame.

Level 1 – 6: On the right side of the table displaying the appliques.

Level 1 – 7: At the top of the cabinet in the bottom right corner.

Level 1 – 8: Outside the far left window, hanging upside-down in the upper right corner.

Level 1 – 9: Under the wrapping table in the upper left corner of the shop.

Level 1 – 10: Between the flowers and the jar of buttons in the lower right corner, beneath the printer.


Chapter 2: Arts and Crafts Fair

Cathy's Crafts - Arts and Crafts Fair Mice Locations

Cathy’s Crafts – Arts and Crafts Fair Mice Locations

Level 2 – 1: Around the right side of the stone shelving containing the threat, to the right of the kiln oven.

Level 2 – 2: In the pottery booth at the top of the screen, to the immediate left of the girl.

Level 2 – 3: At the top of the brick shelving containing the molds in the lower left corner of the screen.

Level 2 – 4: In the window of the painting booth in the upper right corner, between Rohan and the purple picture frame.

Level 2 – 5: At the foot of the kiln oven in the lower left corner, next to the box of Ming Doll refills.

Level 2 – 6: Next to the brown vase at the lower right corner of the pottery cart.

Level 2 – 7: In the middle of the portion of lawn in the upper left corner.

Level 2 – 8: Behind the top of the fountain, toward the upper right.

Level 2 – 9: On the far left side of the counter with the cash register, beneath the balloons.

Level 2 – 10: On the grass above the balloons and cash register, close to the circular stone pavement with the fountain.


Chapter 3: Cathy’s Return

Cathy's Crafts - Cathy's Return Mice Locations

Cathy’s Crafts – Cathy’s Return Mice Locations

Level 3 – 1: In the middle of the raised floor, beneath the applique table.

Level 3 – 2: At the top of the 4-person table toward the left, beneath the first window from the left.

Level 3 – 3: At the top right corner of the counter with the yarn on the right, next to Cathy’s father.

Level 3 – 4: Peeking around the right side of the counter with the cash register.

Level 3 – 5: Peeking around the left corner of the bottom right table, to the left of the Ming notebook.

Level 3 – 6: In the entrance doorway, peeking around the bottom of the door on the right.

Level 3 – 7: Upside-down beneath the light between the two windows at the top of the screen.

Level 3 – 8: Underneath the table with the sewing machine in the upper left corner of the shop.

Level 3 – 9: At the top of Ming’s cat bed on the left.

Level 3 – 10: In the right window, behind the red notebook with Ming on the cover.


Chapter 4: Fancy Flower Design

Cathy's Crafts - Fancy Flower Design Mice Locations

Cathy’s Crafts – Fancy Flower Design Mice Locations

Level 4 – 1: At the left side of the table in the bottom right corner of the screen.

Level 4 – 2: Over the bottom portion of the silver drainage grating toward the right side of the screen.

Level 4 – 3: On the tile floor beneath the flower refill stand.

Level 4 – 4: Behind the sign in the upper left corner of the screen.

Level 4 – 5: Behind the right side of the fountain in the middle of the shop.

Level 4 – 6: At the top of the main counter to the right of the cash register, between the first two green placemats.

Level 4 – 7: Underneath the left side of the bottom right table – the first single-person table from the left.

Level 4 – 8: On the right side of the main counter to the right side of the cash register, behind the cart handle and wheel.

Level 4 – 9: At the bottom left corner of the pottery kiln at the top of the screen.

Level 4 – 10: Hanging upside-down underneath the right side of the large centerpiece bouquet of flowers.


Chapter 5: Cathy’s Crafts

Cathy's Crafts - Cathy's Crafts Mice Locations

Cathy’s Crafts – Cathy’s Crafts Mice Locations

Level 5 – 1: To the left of Cathy when she’s standing at the cash register, at the foot of the customer counter.

Level 5 – 2: At the bottom of the shelf in the upper left corner of the shop.

Level 5 – 3: Between the platter table and the flower pot beneath the window closest to the door at the top of the screen.

Level 5 – 4: On the left side of the bottom right table housing the corgi figurine.

Level 5 – 5: Behind the right side of the top shelf to the left of the entrance doorway.

Level 5 – 6: Peeking out from the bottom left corner of the left couch where the seniors are sitting.

Level 5 – 7: At the top left corner behind the left couch where the seniors are sitting.

Level 5 – 8: In the bottom right corner of the first window from the left.

Level 5 – 9: Behind the top right corner of the bottom right cabinet, behind the refill box of corgi figurines.

Level 5 – 10: On the floor between the table holding the frame and the cart holding the stencils.


Chapter 6: Outdoor Fundraiser

Cathy's Crafts - Outdoor Fundraiser Mice Locations

Cathy’s Crafts – Outdoor Fundraiser Mice Locations

Level 6 – 1: In the doorway at the top of the screen, to the right of the doormat.

Level 6 – 2: In the middle of the cobblestone pavement, to the left below the first table on the left.

Level 6 – 3: Around the right side of the main customer counter, to the immediate right of the cash register.

Level 6 – 4: Hanging upside-down from the “welcome” banner in the doorway at the top of the screen.

Level 6 – 5: Behind the fence in the upper left corner of the screen.

Level 6 – 6: Behind the candle-making station, between the candle mold and the pot of wax.

Level 6 – 7: Peeking out from the right side of the doorway at the top of the screen, above the balloons.

Level 6 – 8: In the top of the window, above the “C” in “Cathy’s Crafts” above Cathy’s canvas.

Level 6 – 9: In the middle of the cobblestone area, just below Cathy’s canvas.

Level 6 – 10: In the window above Ming’s cat house, between the balloons.


Trophies

There are seventeen trophies to be unlocked while playing through Cathy’s Crafts. The following table names each trophy, the levels during which it can be unlocked, and how to unlock it. You can access the Trophies section of the game by clicking on the trophy icon located in the lower right corner of the map level select.


Name Level How to Unlock
Home 1 – 10 Finish 10 levels.
Fair Lady 1 – 20 Finish 20 levels.
Crafty Cathy 1 – 30 Finish 30 levels.
Flower Fever 1 – 40 Finish 40 levels.
For the Love of Craft 1 – 50 Finish 50 levels.
Fundraising 1 – 60 Finish 60 levels.
Saving for the Future Any Earn 10,000 cash over your career. It’s possible to do this before completing all the game’s levels.
Shopaholic All Levels Buy every item for every store.
Take Three! Any Deliver items to three different customers from a single tray. You must complete their orders for this to count. This is best done for single customers looking for 2 items at the end of a shop’s levels, when you will have more space on your tray to work with.
What Should I Take? Any Complete a day having deleted 20 items from your tray. The easiest way to obtain this achievement is on one of the game’s earliest levels. Pick up and immediately remove the same item over and over until the achievement unlocks.
Best Teacher Any Give customers a helping hand 50 times. This specifically refers to customers sitting at tables with a bubble showing Cathy’s face over their head in need of assistance with their crafts.
Busy Bee Any Keep moving for 1 minute solid! Click between products that can be restocked to accomplish this if not unlocked during your main playthrough.
Ka-ching! Any Use the cash register a thousand times.
Neat Freak Any Clean all the tables before a shop closes. It’s best to only leave 1 table left to clean, if any, by the time your last customer is being checked out. This is easiest to accomplish in the first levels of the game.
Craft Expert All Levels Earn three stars on every level.
Cat Instincts All Levels Find all the mice on every level. See the Mice Locations section above.
Spoiled Ming Any level with Ming Feed Ming the cat 100 times.


Congratulations! You’ve completed our Cathy’s Crafts Official Walkthrough! Be sure to visit our blog for more great tips and tricks!


The Cathy’s Crafts Official Walkthrough is meant as a guide and does not contain cheats, hacks, or serials.

The post Cathy’s Crafts Official Walkthrough appeared first on GameHouse.


Cathy’s Crafts Update

$
0
0

Hi everyone!

Phew! It seems like we’re finally back on track! My team has finally picked out what we *hope* are the last bits of cat hair from the last update. Ming may be cute, but is also more than a little destructive, even when trying to help!

To play the updated version of my game, you will first have to uninstall the game. I know this sounds scary, but it’s kinda like cleaning a paintbrush before using a new color of paint. Once that’s done, you can head over to my Cathy’s Crafts page and redownload the game. Now when you run it, if you click on that little gear icon in the upper left corner and click “windowed”, you should be able to see that new shiny version number (It’s 1.0.2, by the way!). Um, here, I’ll show you what it looks like –

Cathy's Crafts Update Version 1.0.2

Cathy’s Crafts Update Version 1.0.2, yay!

We really hope you like the new update. I even helped polish it! We’re also busy updating the Cathy’s Crafts Official Walkthrough, which should be done soon- Ming! Stay away from the walkthrough!

Er, anyway… I’ll see you in Snuggford! <3Love, Cathy

The post Cathy’s Crafts Update appeared first on GameHouse.

Swan Walkthrough

$
0
0

Welcome to the Swan walkthrough. Also known as Black Swan, Swan is a hidden object adventure game by Space Monkey International Games. A ballet school’s children have gone missing and dark spirits seem to have taken over the school! Can you solve the mystery? Use this walkthrough for hints, tips and tricks as you work your way through the game.

Contents

Tips and Tricks

Opening Screen: Here you’ll find your main options.

  • Play: Starts a new game or continues where you last left off.
    • You will only be allowed to choose your difficulty when you start a new game. Your options are “Casual”, “Adventure” and “Challenge”.
  • Options: Go here to change your visual and sound settings.
  • Credits: Use this to see the hardworking people who worked on the game.
  • Change Player: Use this to select a player profile or to create a new one.


Inventory: Your inventory is located along the bottom of your screen. As you collect items they will be stored here. Click on them once to pick them up and click again to have them interact with objects on the screen.


Diary: As you progress in the game, information will be stored here. Click on the diary to review story you have already progressed through as well as goals.


Map/Quick Travel: Right above your Diary there is a tab that will allow you to see your maps. Use these maps to quickly travel from room to room without having to click through multiple screens. Use the buttons in the upper left corner to switch between maps as you collect new ones.


The Hint Button: Feeling stuck in-game? Use this to get a hint for what to do next. It can be used an unlimited amount of uses, but takes time to recharge.


Your Mirror: Early into the game you will be given a mirror that allows you to travel between the normal and a dark world. When you enter the dark world, you will see glowing symbols floating the air. Click on the matching grey symbols to break through the darkness and free objects from its curse. Here is an example:


Black Swan Dark World Puzzle 01

Black Swan Dark World Puzzle 01

Match 3: You have the option to play Match 3 puzzles instead of hidden object puzzles. To find an item, match 3 tiles together until you are able to move a feather chip to the bottom row. The mask chips will explode and can be used to clear more tiles. Start the Match 3 puzzles by clicking on the Match 3 icon beside your inventory. You can resume the hidden object puzzle at any time.


Swan Walkthrough

Chapter One: Entering the Grounds


Front Gate

  • Look closer at the poster hanging on the wall left of the archway.
    • Click on the poster to rip it. Read the note and collect the Scissors.
  • Go forward and watch the scene.


Front Pathway

  • Watch the scene before going forward again.


Front Door

  • Look closer at the swan flower pot beside the stairs to start a Hidden Object Scene. Collect all the objects on the list. Some items are changed by the darkness and you will have to wait for them to appear again. Some items will be randomized. When you are finished you will collect a Stone.
Black Swan Hidden Object Screen 01

Black Swan Hidden Object Screen 01

  • Move on to the right.


Swing Garden

  • Move forward.


Swan Dock

  • After watching the scene, look at the bread basket on the lower right. Collect the Bowl of Water from beside it, then look inside the basket.
    • Move the bread and collect the Wood Glue.


Front Door

  • The ghost of a Girl will speak to you and give you a Mirror. You can use your Mirror to switch from the Dark World to the Light World by clicking on it.
  • Click on the Mirror again to return to the Dark World
    • Click on the grey symbols that match the glowing symbols. You will collect two Pieces of Photos before being returned to the light world.


Swing Garden

  • Use your Mirror to enter the Dark World. Match the grey symbols with the glowing ones. You will collect two Pieces of Photos.
  • Look at the bench in the lower right corner to start a Hidden Object Scene. Collect all the objects on the list. Some items are changed by the darkness and you will have to wait for them to appear again. Some items will be randomized. You’ll collect a Branch when you are done.
Black Swan Hidden Object Screen 02

Black Swan Hidden Object Screen 02

Front Pathway

  • Use your Mirror here to enter the Dark World. Match the grey symbols with the glowing ones. You will collect two Pieces of Photos.
  • Look closer at the statue on the left’s hand.
    • Use the Branch to collect the hanging Key for Mailbox.


Front Gate

  • Use your Mirror to enter the Dark World. Match the grey symbols with the glowing ones. You will collect two Pieces of Photos.
  • Look closer at the mailbox that has been freed of darkness.
    • Use the Key for Mailbox on mailbox and collect the Sealed Letter.


Front Door

  • Look closer at the stool by the door.
    • Place the Sealed Letter here and cut it open with the Scissors. Collect the Mansion Key from inside the envelope and read the note.
  • Look closer at the front door.
    • Use the Pot of Water to cool the handles of the door. Open the door’s lock with the Mansion Key. Go inside.


Foyer

  • Look closer at the door on the right where there is black smoke.
    • Use the Stone to break the glass, then open the door through the hole. Watch the scene, then go through the door.


Recital Room

  • Look at the fireplace on the right to trigger a Hidden Object Scene. Some items are changed by the darkness and you will have to wait for them to appear again. Some items will be randomized. Collect all the items and you will collect the jeweled Insect 1/3.

    Black Swan Hidden Object Screen 03

    Black Swan Hidden Object Screen 03

  • Use your Mirror to enter the Dark World. Match the grey symbols with the glowing ones. This will finish the first set of memories and you will be told some of the story.


Foyer

  • Look closer at the staircase.
    • Collect the Valve from the hole in the stairs.
  • Look closer at the paintings on the wall above the staircase.
    • Collect the Rose 1/6 beside the picture.
  • Open the door on the far left and go inside.


Study

  • There is a Hidden Object Scene in the back right corner. Some items are changed by the darkness and you will have to wait for them to appear again. Some items will be randomized. Collect all the items and you will collect the Sun Stencil.
Black Swan Hidden Object Screen 04

Black Swan Hidden Object Screen 04

  • Look out the round window on the right.
    • Collect the Swan Figure from the lower left and note that the carousel is now working…!


Front Path

  • Look closer at the carousel top.
    • Place the Sun Stencil into the hole in the gate. Walk through.


Park

  • Watch the scene. Collect the Cake Knife from under the bench.


Front Door

  • Look closer at the flowers in the planter on the lower left side of the screen.
    • Use the Scissors to cut away some of the flowers before using the Cake Knife to dig into the dirt. Collect the Dirty Door Handle.
  • Look at the swan pot beside the stairs to start another Hidden Object Scene. Match the shadows to objects in the scene and use them as tools to solve the puzzle.
    • 1. Collect the saw from the left.
    • 2. Use the saw to loosen the brick. Collect the handle.
    • 3. Connect the handle to the scythe blade.
    • 4. Cut the bush with the scythe. Collect the figure.
    • 5. Look closer at the round box and place the figure on it. Collect the blade.
    • 6. Cut and collect the vine with the blade.
    • 7. Use the vine on the sticks to make a pair of makeshift tweezers.
    • 8. (a)Collect the stick and the rock. (b)Use the rock to smash in the tree trunk.
    • 9. Look in the hole. Use the stick to shoo away the spider and use the makeshift tweezers to collect the Candy.
Black Swan Hidden Object Puzzle 01

Black Swan Hidden Object Puzzle 01

Park

  • Look closer at the plate on the carousel.
    • Use the Candy on the indent in the plate. Collect the Tree Stencil.
    • Click on puzzle to focus on it. Then add the Swan Figure to the puzzle to start it. Move the swans as so to unlock the puzzle:
Black Swan Puzzle 01 Swans

Black Swan Puzzle 01 Swans

  • Collect the Insect 2/3.


Foyer

  • Use the Tree Stencil on the metal gate door. Go through.


Greenhouse

  • Use your Mirror to view the Dark World and click on the grey symbols that match the glowing ones.
  • Open the doors on the lower left to find a Hidden Object Screen. Some items are changed by the darkness and you will have to wait for them to appear again. Some items will be randomized. Find all the items on the list and you will collect a Floral Stencil.
Black Swan Hidden Object Screen 05

Black Swan Hidden Object Screen 05

  • Collect the Sunflower 1/2 from the middle of the room, then take a closer look at the pipe control in the lower right corner of the room.
    • Use the Valve here on the pipe. Turn it to shut off the steam, then read the note.


Study

  • Take a closer look at the green lamp to look at the desk.
    • Open the desk drawer and collect the Pointer. Read the book on the desk to see a set of names.
  • Look at the case in the back right of the room to start another Hidden Object Scene. Match the shadows to objects in the scene and use them as tools to solve the puzzle.
    • 1. Collect the two continent pieces and add them to the globe.
    • 2. Look in the drawer that opens and collect the first gryphon medal.
    • 3. (a)Collect the key from the box in the lower left corner, and (b)use it on the clock. Collect the second gryphon piece.
    • 4. Open the jewelry box on the shelf and take the lion head.
    • 5. Look at the closed drawer and place the two gryphon medals on the sides and the lion head in the middle. Take the trophy part from the drawer.
    • 6. Collect the second trophy part from the floor.
    • 7. Look at the lower shelves. Place the trophy parts on the stands. Collect the Insect 3/3.
Black Swan Hidden Object Puzzle 02

Black Swan Hidden Object Puzzle 02

Greenhouse

  • Take a closer look at the clock face.
    • Place the Insects on the clock face to trigger the puzzle. Position the clock hands and press the center to have insects switch places. Arrange them as so:
Black Swan Puzzle 02 Insect Clock

Black Swan Puzzle 02 Insect Clock

  • When you’re done, you’ll collect the Notes.


Swing Garden

  • Look at the bench again to start another Hidden Object Scene. Match the shadows to objects in the scene and use them as tools to solve the puzzle.
    • 1. (a)Use the broom to sweep away leaves and (b)find the shovel.
    • 2. Use the shovel to move away the brick and collect the key.
    • 3. Use the key to open the brown box on the bench. Collect the blue pin inside.
    • 4. Collect the seed pile from beside the brown box.
    • 5. Look closely at the hollow on the lower right, where there is a nest and bird. Place the pile of seed on the ground to the left. Collect the note from the nest.
    • 6. Look closer at the briefcase. Use the note on the case before entering the code: Turn the first dial to “1”, the second dial to “0”, the first dial to “5”, the second dial to “6”. Then turn the third dial to “9”, the fourth dial to “4”, the third dial to “9”, and the fourth dial to “3”. Collect the mirror from inside.
    • 7. Break the mirror on the cobblestones on the lower left. Collect the mirror shard.
    • 8. Use the mirror shard to cut open the lining of the briefcase.
    • 9. Open the folder with the pin, then collect the Picture with Fire.
Black Swan Hidden Object Puzzle 03

Black Swan Hidden Object Puzzle 03

Recital Room

  • Look closer at the girl trapped in the ring of fire.
    • Use the Picture with Fire on the fire symbol in the floor. Collect the Golden Ring.
  • Look closer at the piano.
    • Place the Notes on the piano to start a memory puzzle. Play these songs to complete it:
Black Swan Puzzle 03 Piano

Black Swan Puzzle 03 Piano

Black Swan Puzzle 04 Piano

Black Swan Puzzle 04 Piano

Black Swan Puzzle 05 Piano

Black Swan Puzzle 05 Piano

  • Collect the Colored Stone 1/2.
  • Take a look at the fireplace on the right side of the room again to start another Hidden Object Scene. Match the shadows to objects in the scene and use them as tools to solve the puzzle.
    • 1. Break a piece of termite wood off of the wall.
    • 2. Collect the wine bottle(b) and the matches(a).
    • 3. Use the termite wood on the back of the fireplace.
    • 4. Use the wine and the matches on the pile of sticks in the fireplace.
    • 5. Collect the poker and set it in the fire to heat it.
    • 6. Look at the back of the fireplace and use the heated poker to free the figure.
    • 7. (a)Pick up the prying tool and (b)use it on the wall. Pick up the key.
    • 8. Look closer at the doll house and place the figure in the left window. Use the key in the slot on the lower left of the outside of the house.
    • 9. Collect the lockpick sitting at in the front door of the house.
Black Swan Hidden Object Puzzle 04

Black Swan Hidden Object Puzzle 04

Foyer

  • Take a closer look at the locked doors in the back.
    • Use the lockpicks on the door lock. Go through the door.


Dining Room

  • Look closer at the mirror.
    • Try to move the mirror, you will be told it’s blocked.
  • Look closer at the flower vase on the right table.
    • Collect the Rose 2/6.
  • Look under the chair.
    • Use the Scissors to free and collect the Door Handle.


Greenhouse

  • Look at the open doors on the left to find another Hidden Object Scene. Match the shadows to objects in the scene and use them as tools to solve the puzzle.
    • 1. Pick up the dancer figure on the lower right and place it in the slot.
    • 2. Take the knife from the compartment that opens.
    • 3. Use the knife to break the wall behind the dancer figure and collect one of the beetles.
    • 4. Collect the matches and use them on the (a)bug covered in wax and the (b)bug hanging by a string. You will collect them.
    • 5. Place all three bugs in the box. Collect the Girls Profile.
Black Swan Hidden Object Puzzle 05

Black Swan Hidden Object Puzzle 05

  • Look closer at the doors to the left of the room.
    • Use the Door Handle to open the doors. Go through.


Rose Garden

  • Use your Mirror to enter the Dark World. Click on the grey symbols that match the glowing ones. You will collect two Pieces of Photos.
  • Collect the Boards from the path on the right.
  • Look at the table to find a Hidden Object Scene. Some items are changed by the darkness and you will have to wait for them to appear again. Some items will be randomized. Collect all the items and you will collect the Floral Stencils 2/3.
Black Swan Hidden Object Screen 06

Black Swan Hidden Object Screen 06

  • Move forward.


Pond Garden

  • There is a Hidden Object Scene beside the stairs and below the lily pad. Some items are changed by the darkness and you will have to wait for them to appear again. Some items will be randomized. Collect all the items and you will collect the Diamond.
Black Swan Hidden Object Screen 07

Black Swan Hidden Object Screen 07

  • Collect the Ladder from the back center of the room.


Rose Garden

  • Use the Ladder against the round window to the right.
  • There is another Hidden Object Scene on the table. Match the shadows to objects in the scene and use them as tools to solve the puzzle.
    • 1. Pick up first half of the pruners from the table(a) and add them to the second half(b).
    • 2. Use the pruners on the rose bush in the lower right corner to find and collect the knife.
    • 3. Look at the sack in the back. Collect the medallion from below it. Then place the plate down and use the knife to cut a hole in the bag. Collect the bird seed.
    • 4. Use the water pitcher to fill the vase halfway. Use the teapot to finish filling the vase. Collect the key part.
    • 5. Look at the back of the chair. Place the medallion in it to start a maze puzzle. Move the medallion along this path.
Black Swan Puzzle 06 Maze

Black Swan Puzzle 06 Maze

  • Place the first key part onto the second.
  • 6. Pull the tarp from the bird cage. Use the key in the slot to free the bird. Collect the Puzzle Pieces from the back of the cage.
Black Swan Hidden Object Puzzle 08b

Black Swan Hidden Object Puzzle 08b

Foyer

  • Look at the staircase closely.
    • Place the Boards on the staircase. You can now go up.


Chapter Two: Dark Forces


Upper Hallway

  • Careful of the glass! Use your Mirror to take a look at the Dark World and match the grey symbols with the glowing ones.
  • Use the Scissors to cut the rope beside the window on the left. This will drop the curtain and save you from the glass.
  • Open the door on the right. Go inside.


Dressing Room

  • Click on the tentacles waving around. You will automatically protect yourself with the mirror.
  • Look closer at what is going on behind the dressing curtain by clicking around the sitting stool.
    • Oh no! Collect the Key from Class from the fallen woman.
  • Go out the door.


Balcony

  • Collect the Part of Oar from the floor.
  • Look at the table area to start a Hidden Object Scene. Some items are changed by the darkness and you will have to wait for them to appear again. Some items will be randomized. Collect all the items and you will collect the Ultraviolet Bulb.
  • Look closer at the banister.
    • Collect the Rose 3/6 and the Can.
Black Swan Hidden Object Screen 09

Black Swan Hidden Object Screen 09

Front Pathway

  • Look closer at the stones at the base of the light.
    • Move the brick. Collect the Worms with the

Upper Hallway

  • Look closer at the second door back on the right.
    • Use the Pointer to undo the latch. Go inside.

Childs Room

  • Use your Mirror to look into the Dark World and match the grey symbols to the glowing ones. When you are done you will collect more Pieces of Photograph and unlock another piece of story.
  • Look closer at the wardrobe on the left.
    • Open the door and collect the Ballerina Figurine.
  • There is a Hidden Object Scene in the toy shelves on the right. Some items are changed by the darkness and you will have to wait for them to appear again. Some items will be randomized. Collect all the items and you will collect the Floral Stencils 3/3.
Black Swan Hidden Object Screen 10

Black Swan Hidden Object Screen 10

Dining Room

  • Go through the door in the back on the right.

Kitchen

  • Take a closer look at the cupboards in the back of the left side of the room.
    • Use the Ballerina Profile in the lock to open the doors.
  • The cupboards are now a Hidden Object Area. Some items are changed by the darkness and you will have to wait for them to appear again. Some items will be randomized. Collect all the items and you will collect the Vase.
Black Swan Hidden Object Screen 10b

Black Swan Hidden Object Screen 10b

  • Take a closer look at the sink.
    • Open the door under the sink and look inside to trigger a sliding puzzle. Move the pieces to get this image:
Black Swan Puzzle 06 Pipe

Black Swan Puzzle 06 Pipe

  • Turn the water on and fill up the Vase.


Upper Hallway

  • Go forward.

Far Upper Hallway

  • Use the Vase with Water on the fire, then take a closer look at the door on the right.
    • Use the Key from Class to open the door. Go inside.


Classroom

  • Collect the Hook from the front right of the classroom, then take a closer look at the roses in the far back left.
    • Collect another Rose 4/6
  • Take a closer look at the desk in the back.
    • Collect the Silver Plate from the bench and the Gears from inside the desk.


Balcony

  • Look at the table area again to find another Hidden Object Scene. Match the shadows to objects in the scene and use them as tools to solve the puzzle.
    • 1. Take the knife from the table.
    • 2. Use the knife to cut through the stitching in the chair. Collect the hammer.
    • 3. Use the hammer to break the teapot and collect a coin.
    • 4. (a)Collect the bottle of oil from the chair and (b)use it in the heater.
    • 5. (a)Collect the matches. (b)Use them to light the heater.
    • 6. (a)Take the pin from beside the chair and (b)place it in the mannequin body.
    • 7. (a)Collect the mannequin head from the floor. (b)Place it on the body and collect the key.
    • 8. Collect the piece of paper from beside the table on the ground.
    • 9. Use the coin in the robot monkey, then wind him up with the key.
    • 10. Hold the paper over the boiling water.
    • 11. Look closely at the center of the mannequin’s chest. Enter the code you found: 7413. You will collect Puzzle Pieces 2/5.
Black Swan Hidden Object Puzzle 06

Black Swan Hidden Object Puzzle 06

Child’s Room

  • There is another Hidden Object Scene in the toy shelves. Match the shadows to objects in the scene and use them as tools to solve the puzzle.
    • 1. Collect the Knight’s Lance(b) and the Dragon Head(a) from the shelf.
    • 2. Look closely at the toys on the bottom. Give the Knight his lance the dragon his head. Wind up the Knight and collect the coin.
    • 3. Look closely at the Jack in The Box. Use the coin and wind the handle. Collect the slingshot.
    • 4. Use the slingshot on its tether to get a working slingshot.
    • 5. Collect the knife. Use it to pry the stone loose.
    • 6. Use the slingshot on the glass bottle and collect Puzzle Pieces 3/5.
Black Swan Hidden Object Puzzle 07

Black Swan Hidden Object Puzzle 07

  • Use the Hook on the window curtain to open it. Take a closer look at the window.
    • Collect the Trowel.


Kitchen

  • Look closer at the sink again.
    • Wash the Dirty Door Handle to create a Rounded Door Handle.
  • Look at the cupboards on the back left again to trigger a Hidden Object Scene. Match the shadows to objects in the scene and use them as tools to solve the puzzle.
    • 1. (a)Collect the missing teacup and (b)place it on the empty plate in the set. The tea set will rotate so you can collect the key.
    • 2. Use the key on the box and collect the Baking Soda.
    • 3. (a)Collect the vinegar bottle and use both it and the baking soda on the bottle on the top shelf(b). You’ll get a corkscrew bolt.
    • 4. (a)Collect the bottle of glue and use both it and the corkscrew bolt on the shelf(b).
    • 5. (a)Collect the spoon and (b)use it to unscrew the hinge. Collect the string that falls out.
    • 6. (a)Collect the fuel and (b)the matches. (c)Use them both on the burner.
    • 7. (a)Collect the jar of sticky stuff. (b)Place it on the burner, then dip the string inside.
    • 8. Use the sticky string to collect the corkscrew top from the pitcher.
    • 9. Combine the corkscrew bolt with the corkscrew top. Collect the completed corkscrew.
Black Swan Hidden Object Puzzle 08

Black Swan Hidden Object Puzzle 08

  • Look closer at the refrigerator.
    • Use the Corkscrew to open the bottle. You’ll collect the Rose 5/6.


Upper Hallway

  • Look closer at the third door on the right.
    • Use the Rounded Door Handle with the slot. Go inside.


Flower Bedroom

  • Take a closer look at the mirror. A cutscene will trigger. Look at the mirror again.
    • Collect the Coin from the lower right corner of the mirror.
  • Take a closer look at the area with the flowers on the mirror to find a light switch.
    • Flip the switches.
  • Take a closer look under the stool.
    • Collect the Plafond from the floor. Then use the Trowel to lift up the floorboards and collect the Film Reel.
  • Look closer at the shoes in front of the bed.
    • Collect the Puzzle Pieces 4/5.
  • Look closer at the lap on the table.
    • Use the Ultra-Violet Bulb in the lamp, followed by the Ceiling Light.
  • Look at the picture in the frame above the lamp to trigger a puzzle.
    • Put all the pieces together to rebuild the image. Right click to rotate the pieces. You’ll be given a new map, but you cannot go there yet.
Black Swan Puzzle 07 Swan Puzzle

Black Swan Puzzle 07 Swan Puzzle

Pond Garden

  • Look beside the stairs and below the lily pad again to find another Hidden Object Scene. Match the shadows to objects in the scene and use them as tools to solve the puzzle.
    • 1. Collect the oil can and handle.
    • 2. Look closer at the pond. Collect the file.
    • 3. In the empty space, combine the file with the handle to create a filing tool.
    • 4. Use the filing tool to lift up the center plate. Oil the fish food container inside.
    • 5. Look at the pond again. Use the fish food on the water. Your fish friend will be so happy that he will bring you a Ring. Click on him to collect it.
    • 6. (a)Collect the scissors from the main screen. (b)Look at the pond again and cut the big leaf. The flower will bloom. Click on it to collect the Gold Chain.
    • 7. When you are done, the Diamond will combine with the Ring to make a completed Diamond Ring.
Black Swan Hidden Object Puzzle 09

Black Swan Hidden Object Puzzle 09

Rose Garden

  • Take a closer look at the round window.
    • Use the Diamond Ring on the glass to cut a hole. Climb through.


Window Room

  • There is a Hidden Object Scene in the tea set. Some items are changed by the darkness and you will have to wait for them to appear again. Some items will be randomized. Collect all the items and you will collect the Wooden Hand.
Black Swan Hidden Object Screen 11

Black Swan Hidden Object Screen 11

  • Look closer at the bookshelf on the left.
    • Pull the red book to open a secret compartment. Collect the Vinyl Record.
  • Look closer at the dresser on the upper right.
    • Use the Flower Stencils to unlock the drawer. Open it and collect the Apple 1/2.


Park

  • Look at the book sitting on the bench.
    • Use the Coin to open the lock. Look at the drawing pulled from the book, then look at the page to get the Picture with Ballerinas. Looking at this picture from your inventory will put it on the screen.
    • Use the Scissors to cut out both Ballerinas.


Swing Garden

  • Look closer at the golden box on the left on the path.
    • Place the Ballerinas in the box to unlock it. Collect the last of the Puzzle Pieces from inside the box.
  • Use the Can of Worms on the grass. The bird will fly down and drop a Medallion 1/2 you should collect.
  • Use the Wood Glue on the oar piece sitting in the lawn, then attach the Part of Oar to it. Collect the


Dressing Room

  • Use the Film Reel on the film projector on the left. Click on the projector again to collect the Zippo Lighter.


Balcony

  • Look closer at the desk.
    • Place the Puzzle Pieces on the board to trigger a puzzle. Move the “1” and “2” switch to the row and column you would like to rotate, then pull the lever. Your end goal in a picture that looks like this:
Black Swan Puzzle 08 Fountain Puzzle

Black Swan Puzzle 08 Fountain Puzzle

  • The lake fountains will turn off.

Swan Dock

  • Use the Oar on the boat, then climb inside.


Swan Boat

  • Use your Mirror to go to the Dark World. Match the grey symbols to the glowing ones.
  • Move forward. There will be a Hidden Object Area on the Swan Boat in front of you. Some items are changed by the darkness and you will have to wait for them to appear again. Some items will be randomized. Collect all the items and you will collect the
Black Swan Hidden Object Screen 12

Black Swan Hidden Object Screen 12

  • Take a closer look at the water to the left of the boat.
    • Use the Magnet to pull the Medallion 2/2 from the water.


Window Room

  • Look at the tea set again to trigger a Hidden Object Scene. Match the shadows to objects in the scene and use them as tools to solve the puzzle.
    • 1. (a)Collect the hot mitt and (b)use it to lift up the tea pot. It reveals a note: 4761.
    • 2. Use this code to open the black box on the back shelf. Collect the Lion Knocker and the Swan figure.
    • 3. (a)Collect another swan figure from the cup and the floor on the left, then (b)use the lion knocker on the drawer to open it. Collect the box of matches and sharpener from the drawer.
    • 4. Use the sharpener on the knife before collecting it.
    • 5. Cut the box in the back open with the knife to collect another swan figure.
    • 6. (a)Collect the candle and (b)place it in the holder. Light it with a match and collect it.
    • 7. Open up the cupboard in the back and use the candle to light it. Collect the swan figure.
    • 8. Flip over the cup to collect the key.
    • 9. Look at the box in the back. Use the swan figures and the key to open it. Collect the Curtain.
Black Swan Hidden Object Puzzle 10

Black Swan Hidden Object Puzzle 10

  • Use the Curtain with the hole in the floor to climb down.


Basement

  • Look in the globe and talk to the child.
  • Look closer at the record player.
    • Place the Vinyl Record on the record player, then turn the crank. Collect the Apple 2/2 from the secret compartment.


Pond Garden

  • Look closer at the fishing pole.
    • Use the Magnet on String on the pole to create a finished Fishing Pole.
  • Look closer at the pond.
    • Use the Fishing Pole to collect the Sunflower 2/2 from the pond.


Swan Boat

  • Move forward to go towards the other swan boat. There is a Hidden Object Scene here. Match the shadows to objects in the scene and use them as tools to solve the puzzle.
    • 1. (a)Take the hook. (b)Use it to grab the boat. You’ll collect the cork.
    • 2. Use the cork to plug the plate. Use the plate to bail out water from the boat.
    • 3. (a)Collect the handle and (b)add it to the rake to make a tool.
    • 4. Pull the moss off the chest.
    • 5. (a)Collect the pliers and (b)use it to break open the chest.
    • 6. (a)Collect the letters, (b)use the knife to pull the D up.
    • 7. Look at the lock. Use the letters in the slots. Collect the Mosaic Disc 2/2.
Black Swan Hidden Object Puzzle 11

Black Swan Hidden Object Puzzle 11

  • Returning with the swan boat takes you to a new location.


Island

  • Use your Mirror to enter the Dark World and match the grey symbols with the glowing ones to collect Pieces of Photos.
  • Collect the Boat Hook from underneath the tree.
  • Look closer at the lamp hanging above.
    • Open up the lantern. Use your Zippo Lighter to light inside.
  • There is now a Hidden Object Area in the opening of the statue. Some items are changed by the darkness and you will have to wait for them to appear again. Some items will be randomized. Collect all the items and you will collect the Gears 2/3.
Black Swan Hidden Object Screen 13

Black Swan Hidden Object Screen 13

Balcony

  • Look over the railing.
    • Use the Boat Hook to pull up the doll, then us the Scissors to free her of the tap. You’ll collect the Doll.

Basement

  • Look closer at the globe with the girl in it.
    • Use the Wooden Arm to break the glass and free the girl.
    • Give the Doll to the girl. She will realize she is a ghost and be freed.


Island

  • There is a Hidden Object Scene here at the base of the statue. Match the shadows to objects in the scene and use them as tools to solve the puzzle.
    • 1. (a)Collect the Cattail reed and (b)use it near the Statue’s head to get the water symbol.
    • 2. (a)Placing the Water Symbol into the slot will cause the statue to cry into the watering can. (b)Collect the watering can.
    • 3. (a)Water the wilted flower to attract lightening bugs. (b)Collect the jar and use it to collect the bugs.
    • 4. Collect the little bag on the right.
    • 5. (a)Pick up the handle and (b)use it on the rake head to collect a rake.
    • 6. Look inside the statue and use the Lightening Bug Jar to light the area. You woke somebody up!
    • 7. Use seed pouch to feed the swan, then use the rake to get the trowel from behind.
    • 8. Use the trowel to move the rock. Collect the Rose 6/6.
Black Swan Hidden Object Puzzle 12

Black Swan Hidden Object Puzzle 12

Dressing Room

  • Look closer at the portrait of the girl on the wall.
    • Place the Gold Chain, Medallion and Roses on the portrait. A clue will be shown of the letter “A”.
  • Look closer at the desk in the back of the room.
    • Use the Mosaic Disc 2/2 on the box to trigger a puzzle. Slide the puzzle pieces until they form this image:
Black Swan Puzzle 09 Letter Puzzle

Black Swan Puzzle 09 Letter Puzzle

  • Collect the Mold from inside the box.


Rose Garden

  • Look closer at the table.
    • Place the Silver Plate over the candle, then place the Gold Ring on the plate to melt it.
    • Place the Mold on the table. It will be filled with gold, creating the Gear 3/3.


Far Upper Hallway

  • Look closer at the lock.
    • Use the Gears to start the puzzle. Lift the lockpick and tap on the first, second and fourth slots to open it.

Storage Room

  • Use your Mirror to enter the Dark World. Match the gray symbols with the glowing ones. You’ll see another part of the story.
  • Look closer at the flower pot in the back window.
    • Click on the flower pot to knock it out of the window.


Greenhouse

  • Take a closer look at where the pot fell.
    • Collect the Beetle. It’s a key!
  • Look closer at the bottom of the clock.
    • Use the Beetle here on the lock. Collect the Sun Key.


Recital Room

  • Look closer at the sun on the floor in the back.
    • Use the Sun Key to find a puzzle. Use the Sunflowers to start it.
    • You need to place the flowers in the slots. Click on (1) until (2) falls into place. Then click on (3) until (4) falls into place. Then click on (2) until both remaining fall into place.
Black Swan Puzzle 10 Sunflower Puzzle

Black Swan Puzzle 10 Sunflower Puzzle

  • A door will open. Go through.


Chapter Three: The Mirror World


Mirror Rehearsal Room

  • What a strange place! Walk to the right.


Fish Hallway

  • There is a Hidden Object Scene here on the fish. Collect all the listed items to collect an Empty Whiskey Bottle.
Black Swan Hidden Object Screen 14

Black Swan Hidden Object Screen 14

  • Go forward.


Childs Room

  • Look closer at the book on the floor by the chair.
    • Collect the Paper from Album.


Fish Hallway

  • There is another Hidden Object Scene here on the fish. Match the shadows to objects in the scene and use them as tools to solve the puzzle.
    • 1. (a)Collect the brick. (b)Look closer at the mirror in the back and throw the brick at it. Collect the key.
    • 2. (a)Collect the piece of picture from the shelf, then (b)look at the picture on the wall. Add the piece to the picture and collect the first gem.
    • 3. (a)Open up the purse to find a needle. (b)Use the needle to pop the balloon and collect the walnut.
    • 4. Pull the rope to drop down a cage with a nutcracker in it. Use the key to unlock the door, then use the nutcracker to open the walnut. Collect the hook.
    • 5. (a)Use the hook on the line to make a hook on a line. (b)Collect the hammer.
    • 6. Look at the floor on the right. Smash the wood floor twice, then use the hook and line to collect the little bag. Collect the second hem from it.
    • 7. Place the gem in the fish’s eyes to collect the Dagger.
Black Swan Hidden Object Puzzle 13

Black Swan Hidden Object Puzzle 13

Office

  • Look at the bookshelf on the far right.
    • Move the black book and collect the Tablet from behind it.
  • Look closer at the desk.
    • Collect the Tabaco Pipe.


Fish Hallway

  • Go to the right.


Fan Room

  • Look closer at the painting on the wall.
    • Use the Dagger to cut through the painting and find a door. Go through the door.


Throne Room

  • There is a Hidden Object Scene on the throne. Collect all the items listed to get a fresh pair of Scissors.
Black Swan Hidden Object Screen 15

Black Swan Hidden Object Screen 15

  • Go to the right.


Theater Dressing Room

  • There is a Hidden Object Scene on the chair towards the front. Some items are changed by the darkness and you will have to wait for them to appear again. Some items will be randomized. Collect all the items and you will collect the lever.
Black Swan Hidden Object Screen 16

Black Swan Hidden Object Screen 16

  • Collect the Garland Ball 1/3 from the dressing table.


Throne Room

  • There is another Hidden Object Scene here on the throne. Match the shadows to objects in the scene and use them as tools to solve the puzzle.
    • 1. Tip over the boots to the find the blue token.
    • 2. (a)Collect the crown token. Now look closer at the table on the left(b). Use the blue token in the slot and the crown token on the board. Collect the key.
    • 3. Look at the box on the throne. Use the key to open it and collect the first coin.
    • 4. (a)Click on the cookie three times to eat it, then collect the napkin. (b)Use the napkin to wipe the blade of the knife and collect it.
    • 5. Use the knife to cut open the box. Collect the coin from the center.
    • 6. Put the coins in the penguin bank. It will break open. Collect the first note.
    • 7. Open the purse and take the box from it. Collect the cards with the box, then take the second part of the code.
    • 8. Use the code on the phone, then open the drawer in the throne. Collect the Ballerina.

      Black Swan Hidden Object Puzzle 14

      Black Swan Hidden Object Puzzle 14

Childs Room

  • Collect the Pillow from the corner.


Mirror Recital Room

  • Take a closer look at the living stool.
    • Give the living stool the Pillow to chew on while you collect the
  • Take a closer look at the mannequins.
    • Cut the dress with the Scissors and use the Corkscrew in the cork. Use the Empty Whiskey Bottle to collect the whiskey, creating the Whiskey Bottle.

Theater Dressing Room

  • Look closer at the stand with the ballerinas on it. Add the Ballerina you collected to it to trigger a puzzle. Use the switches to light the candles and move them around the board to match the photograph.
Black Swan Puzzle 11 Dancer Puzzle

Black Swan Puzzle 11 Dancer Puzzle

  • There is another Hidden Object Scene on the desk. Match the shadows to objects in the scene and use them as tools to solve the puzzle.
    • 1. (a)Collect the blade and (b)use it to cut open the seat and find a key.
    • 2. Look closer at the floor. Use the key in the slot, then turn the switch that is found.
    • 3. Take the gems from (a)the owl’s eye and (b)the doll. Use them in (c)the owl’s face to unlock a chamber with a key.
    • 4. Look closer at the lockbox on the wall. Use the key to unlock it and collect the lightbulb.
    • 5. Look at the vanity mirror. Use the lightbulb in the empty socket. Click on the lightbulbs to switch their places. Put them in order from “1” in the lower left corner to 12 in the lower right.
    • 6. Collect the tube from over the top of the mirror and then look inside the vanity. Add the tube to the slot. Now, press the tubes in this order: Blue, Green, Purple, Red, Orange, Yellow. Collect the key.
    • 7. Use the key on the box on the desk. Collect the Comb.
Black Swan Hidden Object Puzzle 15

Black Swan Hidden Object Puzzle 15

  • Go forward.


Staircase

  • Collect the Garland Ball 2/3 from the stairs, then use the Lever in the slot on the wall to make the dancers go away. Go downstairs.


Prop Room

  • Collect the Garland Ball 3/3 from the chair and hand all three Garland Balls on the tree.
  • Look closer at the tree’s right side.
    • Collect the Box Key by using the Scissors to cut the ribbon.
  • Look closely at the floor.
    • Use the Chalk on the floor to make a doorway. Go through.


Snow Room

  • Look closer at the tree with the snake.
    • Use your Apples on the tree to trigger a puzzle. Switch the apples around until you have this solution:
Black Swan Puzzle 12 Snake Puzzle

Black Swan Puzzle 12 Snake Puzzle

  • Collect the scroll from the snake.


Childs Room

  • Look closer at the box under the bed.
    • Use the Box Key on the box and take the Pencils.
  • Look closer at the doll.
    • Give the doll the Tablet, Paper, and Pencils. She will draw.
  • Look closer at the rocking horse.
    • Use the Comb on the horse’s mane. Collect the Necklace from his mouth.


Fireplace Room

  • Take a closer look at the fireplace.
    • Add the Scroll, Necklace, and Pipe to the bowl then pour your Bottle of Whiskey over them. Use the Zippo Lighter to burn the objects.
  • Your mission is almost done! Use the Ballerina Figure to shatter the darkness infected glass, causing the dark spirit to come out!


Congratulations! You’ve beaten Black Swan!


This Swan walkthrough is meant as a guide and does not contain cheats, hacks, or serials.


The post Swan Walkthrough appeared first on GameHouse.

Awakening – Moonfell Wood Walkthrough

$
0
0

There’s nothing like a nice long nap to put things in perspective. However, after Princess Sophia awakens from her century-long siesta, there’s no one in sight! Get the sleep out of your eyes, because it’s up to you to find your family, your friends, and your throne. This Awakening – Moonfell Wood Walkthrough will contain guides to the many levels, tips and hints for solving puzzles, and some additional hints to help you find your way through this mysterious landscape. Rise and shine, the woods say hello!

Contents

General Tips & Tricks

  • Mira, your fairy guide, can give you hints and even solve puzzles for you if you get stuck.
  • Notes and diagrams that can help you solve puzzles go in your Journal: check it if you get stuck.
  • Don’t be ashamed to turn the difficulty down to Casual if you’re having a tough time.

Awakening – Moonfell Wood Walkthrough

Part 1

Start by grabbing the Stick in front of you. Continue to the next screen and examine the bush to the right to uncover a Hidden Object Puzzle. You will receive a Rope: combine this with the oar piece on the stone with the Rope and you will create an Oar. Don’t forget to grab the four Painted Tiles nearby! Inside the nearby boat is four more Painted Tiles, which can be used on the nearby box to solve a puzzle. Refer to the screenshot below for the solution. Opening the box will reveal a Signet Ring and a Magic Card: The Forest. Locate the nine birds hidden on the Magic Card and it will be yours! Finally, use the oar on the boat to continue onto the next area.

Awakening - Moonfell Wood - Part 1 Puzzle

Awakening – Moonfell Wood – Part 1 Puzzle

Part 2

Grab the Wooden Stick, then pick up all six Purple Mushrooms on this screen. There are six more Purple Mushrooms inside the fallen log to the left, but you’ll need the Wooden Stick to grab one of them. Continue onward, hanging a left at the waterfall, and you’ll find yourself at the Cliffside pool. On the ground near you is a small stone lantern, with some nearby broken figurines. Rearrange the broken pieces into the shapes shown in the screenshot below to solve the first part of this puzzle. You will receive the Stone Lantern Figurines, which need to be arranged in a particular way according to the inscription on the stone lantern. The order they need to be placed are, from left to right, smallest to largest, in groups separated by color, light to dark.

Awakening - Moonfell Wood - Part 2 Puzzle

Awakening – Moonfell Wood – Part 2 Puzzle

Inside the stone lantern is a scroll with another puzzle. Cross out every item except for the purple mushroom and white flower in the middle. Your reward will be a Potion of Moondew, which you should take to the previous screen and use on the bush to your right in order to start another puzzle. You will receive some Mossflowers: Now, select the nearby tree stump and use the stick to goad out the tiny dragon. Then, feed it the Mossflowers and Mushrooms to add the Pocket Dragon to your inventory. Use it to open the lock on the gate to the right of the waterfall, one screen down.


Awakening - Moonfell Wood - Feeding Dragon Guide

Awakening – Moonfell Wood – Feeding Dragon Guide

Collect all the Acorns in this area: there are eight, with some in the stump to the left and a few in the rock pile to the right. Then, grab the Axe Handle in the next room and backtrack to the path leading up to the waterfall. Combine the Axe Handle with the axe head resting on the stump to construct the Axe, then use the Pocket Dragon to light the candle next to the tree on the left with the hole in it. Giving the squirrel your Acorns will trigger another Hidden Object Puzzle, and your reward will be the Claw Hammer. Head back up to the Cliffside pool and use the Axe to chop down the tree with the wooden boards nailed to it, blocking the waterfall in the process. Don’t forget to pry off the boards with the assistance of the Claw Hammer.

Back to the path previously blocked by the gate, use the Boards and Claw Hammer on the side of the tree to make a ladder. Climbing the ladder to the nest will yield you a Block of Tin and Gem Keystone. Use the Block of Tin on the anvil at the base of the stone centaur and heat it up four times with the Pocket Dragon. This will give you a Tin Rose, which is used to free the petrified centaur and receive the Sunstone. Going back to the waterfall, examine a stone near the right path: there should be a slot for your Gem Keystone, which will trigger a short puzzle. To solve, match the diamond shaped gems, then the square gems, the circle gems, and the heart gems. The final gem you’ll find is the Moonstone, which will allow you to open the door behind the waterfall along with the Sunstone.

In the next room, grab the three Candles and fill the nearby Silver Basin with water. Underneath the Silver Basin is the Magic Card: The Moon, which will be added to your inventory after finding the hidden butterflies. Place the now filled Silver Basin on its original spot to trigger another puzzle. The solution to this one is to press the buttons around the circle until the light pattern matches the one in your Journal. You will receive the Sun Medallion, which belongs in the center of the fresco at the end of the cave. First, place the broken pieces in the same position as the below screenshot. After placing the Sun Medallion in the center, swap the larger outside pieces around until the wings are formed and the door will open.

Awakening - Moonfell Wood - Fresco

Awakening – Moonfell Wood – Fresco

There are three more Candles to grab in this area. Place them on the Gate of Sun and Moon, then light them with the Pocket Dragon in this order: square, star, diamond, circle, triangle and heart. These shapes will also come in handy as a guide to which candles should be used to color which section of the diagram, similar to paint-by-numbers. When fully colored, the Gate will activate, allowing you to walk through to the next area…

Part 3

Take a step back and grab the Fairy Beads, including the one in the nest. The sunflowers hold the Magic Card: The Fairy Queen, which will be yours after finding the hidden hearts. Heading back to the waterfall, talk to the Fairy Queen and she will ask you to find 21 Fairy Beads. Three of them can be found on the path the right (one’s in the stump), and there are four more on the next screen, including one in the nest.

Back to the path before the waterfall, you’ll see a goblin woodsman who will challenge you to a game of Tripeaks. Don’t worry if you mess up: you can try as many times as you like. Your prize is a Cherry Berry Basket and first pickings of the stuff in his rucksack, which is another Hidden Object Puzzle. Get the Oil Tap from the rucksack, then grab the Wooden Pole.

Heading to the path on the left of the waterfall, there are four more Fairy Beads, one hidden in the stump. the next screen has 3 more, one hidden by a frog. Picking the matching berries in the bush will fill your Cherry Berry Basket, which you can bring back to the goblin in exchange for some paper. Rearrange the paper so it looks like the screenshot below and you will learn how to get Everlasting Oil.

Awakening - Moonfell Wood - Guide Puzzle

Awakening – Moonfell Wood – Guide Puzzle

Continue on the path right of the waterfall to the lake. Collect the three Fairy Beads and then use the Wooden Pole on the lantern to knock it over, letting you access the Brass Key after repairing the broken glass. The Brass Key can be used to open the nearby box, giving you the Fishing Line and Decorative Brick. combine the Fishing Line with the Wooden Pole to make the Flexible Pole with String. Placing the Decorative Brick with the others on the wall will trigger a matching game. Your rewards for completing it are an Empty Spider Jar, Empty Honey Pot, Empty Oil Flask and a Fishing Lure, which creates the Fishing Rod when combined with the Flexible Pole with String.

Walking down two screens, grab the 3 Fairy Beads and use the Oil Tap on the tree to fill the Empty Oil Flask. Then, go to the Cliffside pool and use the Fishing Rod to catch a Fish. Head back to the fallen lantern and fill it with the Oil Flask, lighting it with the Pocket Dragon. Hanging the lit lantern will give you a Copper Key, which will open the right side of the lockbox containing Glass Marbles and four Runes. In the next area, give the Fish to the cat and you will receive the Magic Card: The Moon. Then, grab the Glass Marbles in the fountain. Place the Glass Marbles in the nearby gate according to the screenshot below and enter the pavilion.

Awakening - Moonfell Wood - Pavilion

Awakening – Moonfell Wood – Pavilion

In the pavilion, grab the Incense Censer from the statue, and place the four Magic Cards you’ve collected on the center pedestal: the order from left to right is The Forest, The Sun, The Fairy Queen, and The Moon. collect the four Fairy Beads, then rearrange the tiles on the left to form three pictures of a bee, granting you a Wax Knife and some Smoky Incense. Exit the pavilion and go back three screens.

In this area, hang the Incense Censer on the tree, place the Smoky Incense inside, and light it with the Pocket Dragon. This will allow you to collect Beeswax using the Wax Knife and fill your Empty Honey Pot with some honey. Back at the waterfall, give the Fairy Beads to the Fairy Queen and she will give you a Letter to the Witch, which can be placed in the cat’s envelope, closed with Beeswax, and sealed with the Pocket Dragon and Signet Ring.

Placing the Sheet of Paper on the flat stone, rub it with the Burnt Branch to reveal a Rune. Back at the falls, the five Runes can be placed on the puzzle to get an Ornate Key and Stone Tile. The Ornate Key opens the gate. Enter the cave and collect all the spiders on the web to the right, filling your Empty Spider Jar, then burn the webs with the Pocket Dragon.

There are three frescos that need to be rearranged, granting three Wooden Discs. Arrange the Wooden Discs in the correct order on the stone portal, then arrange the color gems in kind. You can see the correct order in the screenshot below. Once you pass through the gate, arrange the symbols on the snake in order from 2 to 10, starting from the head. This will allow you to pass through to the next area.

Awakening - Moonfell Wood - Combination

Awakening – Moonfell Wood – Combination

Part 4

Walking down from the vista, play another round of Tripeaks with the goblin. He will give you a Potion of Rapid Growth. Head down the path to the right and rearrange the shapes on the nearby spider web so the like shapes are lined up, with the large ones on the outside and the small ones on the inside. Then, move the bricks so that they form the flower shapes, and your reward will be the Black Orb and Grappling Hook Head.

In the nearby storage box are some parts which can be assembled into Gardening Shears, which can be used to cut the Rope hanging on the tree. Combine the Rope with the Grappling Hook Head, then walk forward. The Gardening Shears can be used by the tree on the left to get the Pickaxe Handle, and then solve the flower puzzle above it to receive a Bouquet of Moonflowers.

Head into the pavilion and solve the matching tile puzzle on the stone slab: you will need the Signet Ring, and your reward is a map and crest for your Journal. Select the ivory chest and use the Bouquet of Moonflowers to open it by placing them in the correct position. In the chest are some scraps of the Magic Card: The Witch, which you should arrange and then collect after solving the puzzle. Solve the puzzle of the strings on the board to the left to get the Hemp Rope.

Exiting the pavilion, walk down one screen and combine the Pickaxe Handle with the head to get the Pickaxe, which is used to break the stone marked with an X. Use the Grappling Hook on the hole, tie the other end to the Hemp Rope and use the Potion of Rapid Growth to recover a chest. Form the crest to open the chest and collect the hidden objects to receive a White Orb and some Statue Fragments.

Head back to the front of the pavilion and use the Statue Fragments to reassemble the right statue. Check the screenshot if you get stuck. Place the White Orb in its hand and take the Moon Medallion, then reassemble the statue on the left and place the Black Orb in its hand, taking the Small Silver Key. In the pavilion, use the Moon Medallion to activate another tile matching puzzle, which will give you some glyphs for your Journal when solved. Place the Magic Card: The Witch on the stone table, getting the Small Gold Key and go back to the statues: using the glyphs in your Journal, solve the two puzzles and use the two keys to activate the bridge leading to the next area…

Awakening - Moonfell Wood - Statue Puzzle Solution

Awakening – Moonfell Wood – Statue Puzzle Solution

Parts 5 and 6

Collect three Pinecones, then play Tripeaks with the goblin. Get two more Pinecones on the next screen and light the lantern with the Pocket Dragon. Match the moths to get a Net Full of Moths, then light the candle by the alcove and solve the match-3 puzzle. Grab the Empty Snail Pot and fill it with the nearby snails, then head to the left for two more Pinecones. Match the moths to open the door, then match the gourds in the next room to get the Giant Gourd. You’ll find the Key Fragments by the pots on the shelf, which can be used to open the door and enter the tower.

Grab the Garden Trowel, then find the hidden objects on the desk to get the Botany Book. Reconstruct the broken pot and head up the stairs, where you can find a Doorknob next to the bitey plant. Place the Botany Book on the shelf and match the books to connect the vines: Check the screenshot if you get stuck. Get the Magic Beans and exit the tower, using the Doorknob to open the shed.

Awakening - Moonfell Wood - Books Solution

Awakening – Moonfell Wood – Books Solution

Solving the Hidden Object Puzzle will give you the Weedkiller Spray, which can kill the bitey plant in the tower, giving you the Pot of Dirt and the Magic Card: The Griffin. Place the pot on the bench with the others, add the dirt with the Garden Trowel and arrange the flowers according to the books, referring to your Journal. Take the gems and head back up the tower, placing them on the paintings after solving them, getting eight Rotary Dials.

Head back to the pavilion and place the Magic Card: The Griffin on the stone slab to get the Disc of Sun and Moon, which you can take to the middle of the tower to open the door and head up the stairs, where you can grab the Crowbar, Oil Can and Wire Brush. Place the Onyx on the grimoire and rearrange the rings, then complete the diagram to add it to your Journal.

Balance the scales on the back wall by swapping the tiles, and then go to the vent shaft. You can place the five Rotary Dials on the device behind the glass door and rotate the gems to open the chest. Arrange the jars and items into the same position as the screenshot below, and you’ll get the Jar of Eyeballs. Leave and climb up the ladder to obtain the Bird’s Egg and Packet of Seed, and use the Crowbar to pry off the boards.

Awakening - Moonfell Wood - Jars Solution

Awakening – Moonfell Wood – Jars Solution

Get the Twilight Gem from the goblin and drop the Giant Gourd over the edge because it’s funny. Go back down the ladder and use the Twilight Gem to open the alchemy chest after solving a puzzle. Take the steel weight and then repair the broken glass pieces of the Alchemical Flask to add it to your inventory. Exit the tower and take the Small Bronze Key out of the smashed Giant Gourd. Use the Birdseed to get rid of the bird and steal its three Bird’s Eggs, then go back in the tower and unlock the nightstand drawer with the Small Bronze Key. Match the keys until one is left to take, then go to the well and place the Steel Weights in the cage, tipping it with the Crowbar.

Using the Oil Can, the Wire Brush, and the Iron Key, grab the Lead Block from the other cage and head up the stairs. At the alchemy set, add the Jar of Spiders, Jar of Snails, and Jar of Eyeballs to the top, as well as the four Bird’s Eggs. Make a fire with the Pinecones and Pocket Dragon, and refer to your Journal to match the pointers to their correct position. Fill the Flask with the Philosopher’s Balm and grab the Crystal Gem as well, then exit the tower and backtrack to the crossroads.


For more great tips and tricks, visit our blog!


The Awakening – Moonfell Wood Walkthrough is meant as a guide and does not contain cheat codes, hacks or serials.

The post Awakening – Moonfell Wood Walkthrough appeared first on GameHouse.

Delicious – Emily’s Message in a Bottle Official Walkthrough

$
0
0

Welcome to the Delicious – Emily’s Message in a Bottle Official Walkthrough! Join Emily on a family adventure that spans 30 years – from the picturesque setting of Napoli, Italy, to her quiet home in Snuggford. It’s almost Paige’s birthday, and little does she and the family know that one small message in a bottle is about to make a big splash! This is the official game walkthrough, covering all levels, challenges, mice locations, photo memories, and trophies! Get started with tips and tricks, or see the game for yourself with our video walkthrough. Click on one of the headers in the table of contents below to get started!

Contents

General Tips & Tricks

Welcome to our general tips and tricks section! There’s plenty to learn in Delicious – Emily’s Message in a Bottle. Get started with tips and tricks and read essential how-to’s to help guide you on your journey.


How to Play

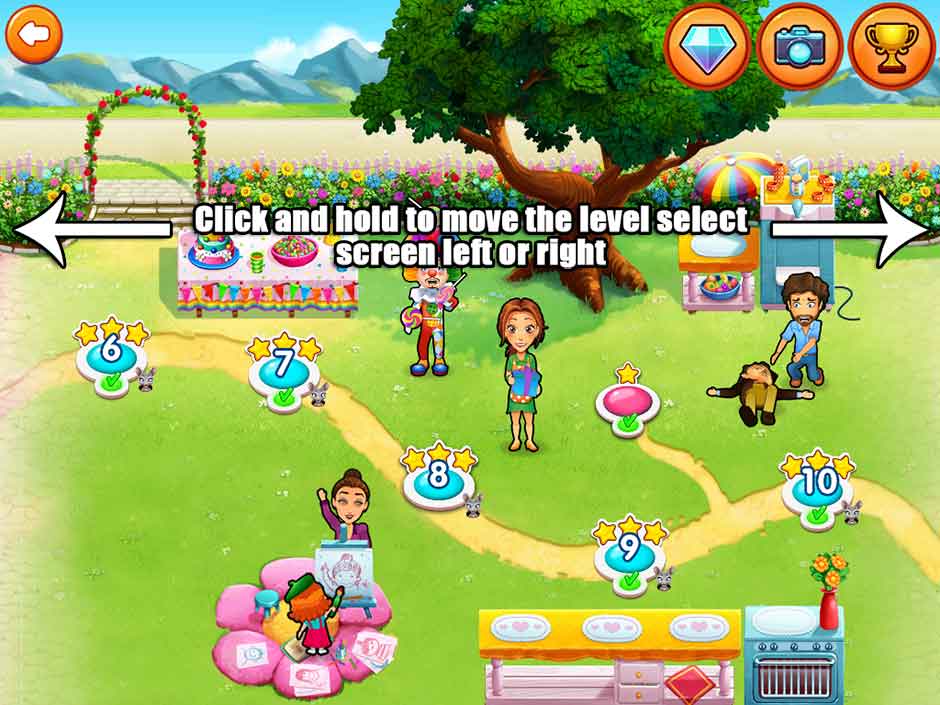
To get started, click “Play”! You will be taken to the level select screen. To navigate between levels, click and hold, moving your cursor left or right to move the level select screen. If you’re on a mobile device, tap and hold, moving your finger left or right to scroll the level screen.

Delicious - Emily's Message in a Bottle - Level Select

Delicious – Emily’s Message in a Bottle is a time management game. The goal is to serve all the customers that enter your restaurant before the end of the day. The happier the customer, the higher the score!


To serve a customer, click on the item(s) that a customer orders to put it on your tray. Your tray is located in the lower left corner of the screen. Bringing the item(s) to the customer in a timely manner will make them happy. When a customer is ready to leave, they will go to the cash register, and a money icon will pop up over their head. Click on the cash register to check them out, adding to your score total. If the customer was sitting at a table, a “!” bubble will indicate it needs to be cleaned once they’ve left. Click on it to clean it so that another customer can sit and dine. It’s that simple!


Scoring and Hearts

The happier the customer, the higher your score will be. Customer happiness is indicated by the number of hearts that appears over their head. If you serve customers quickly, and/or bring them the correct order, the number of hearts will increase. An ecstatic customer will have 5 hearts, and leaves the highest tip. If all of a customer’s hearts disappear, they will storm out of the restaurant without paying.


Keeping customers happy is an essential part of obtaining high scores. You can earn additional score bonuses by completing daily challenges or objectives, serving customers quickly, serving full orders, serving customers back-to-back, checking out several customers at once at the cash register, and finding mice. You can even unlock menu items and upgrades that will make customers tip more!


Mice Locations

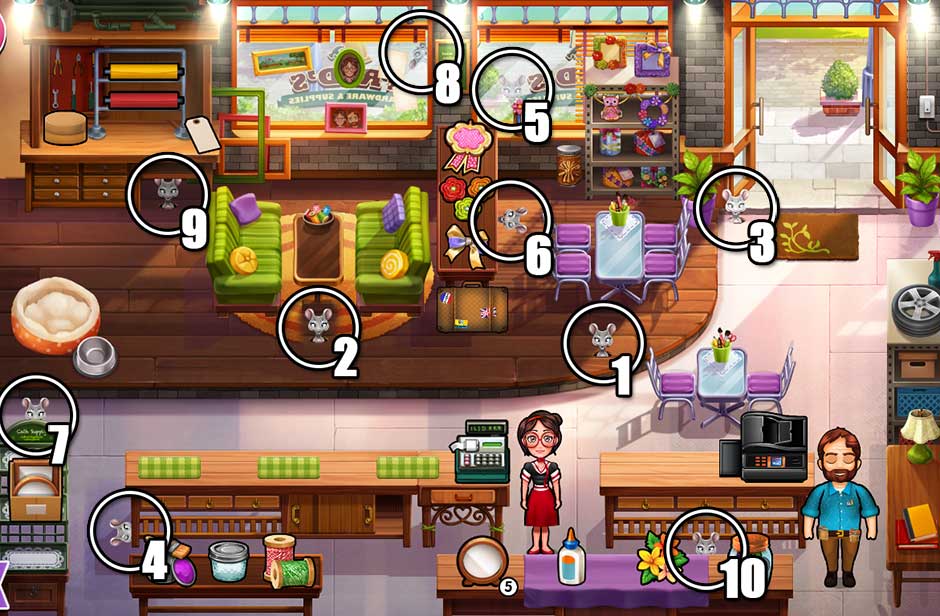
Throughout each of the game’s 65 levels, a mouse is hidden. Listen for the tell-tale squeak indicating one of the little gray rodents has appeared! Finding a mouse will add a bonus to your score. Find them all to unlock a special trophy! Mice are not hidden in challenge levels, and challenge levels containing mice do not count toward your trophy total. To view a complete list of mice, visit the Mouse Locations section of our walkthrough. You can also click on “Mouse Location” listed per level below to be taken straight to a screenshot of the mouse’s hiding spot!


Upgrades

As you play and complete levels, you will earn coins. Coins can be used to purchase restaurant upgrades. There are two types of upgrades you can access. Click on the shopping cart icon after selecting a level on the level select screen to get started!


  • Store – Click “Store” to view all available upgrades for your restaurant. The Store specifically features non-menu upgrades. Click on an object with a tag to view the upgrade and how much it costs. You can purchase upgrades to increase customer patience, increase tips, increase speed, and even prevent items from burning or spilling!
  • Menu – Click “Menu” to view all available upgrades for menu items. Click on a menu item to get started. An information bubble will appear, showing all menu options that can be used. As you play, you will unlock additional menu items that increase patience, tips, or both! Tap on a menu item with a lock to view the requirements needed to unlock it.


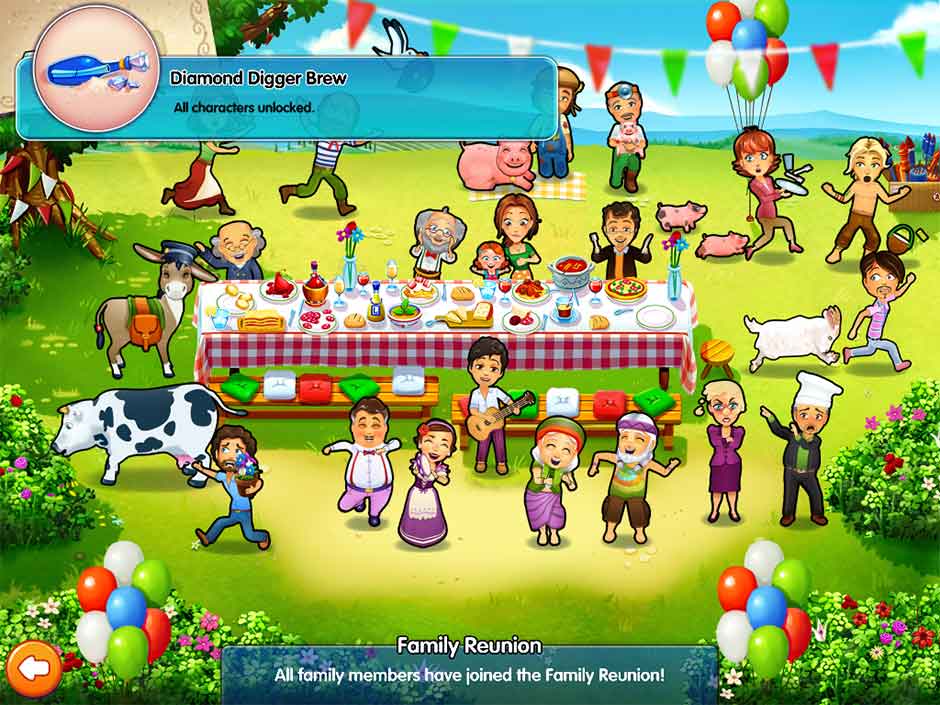
Family Reunion – Diamonds and Invitations

Completing challenges and level objectives will reward you with diamonds. Click on the diamond icon in the upper right corner of the level select screen to view the Family Reunion. Here, you can use diamonds you’ve earned to send invitations to friends and family members. Select a silhouette to unlock a guest. Click on unlocked guests to view the letters sent to them. Complete all challenges and level goals to complete the family reunion!

Delicious - Emily's Message in a Bottle - Diamonds


Memorable Photo Moments

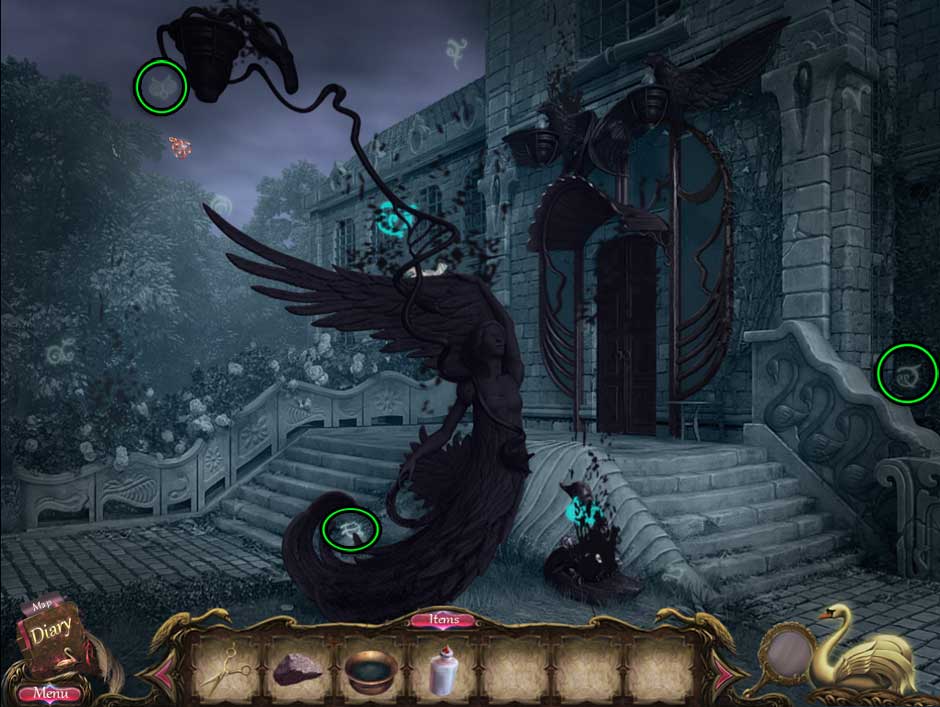
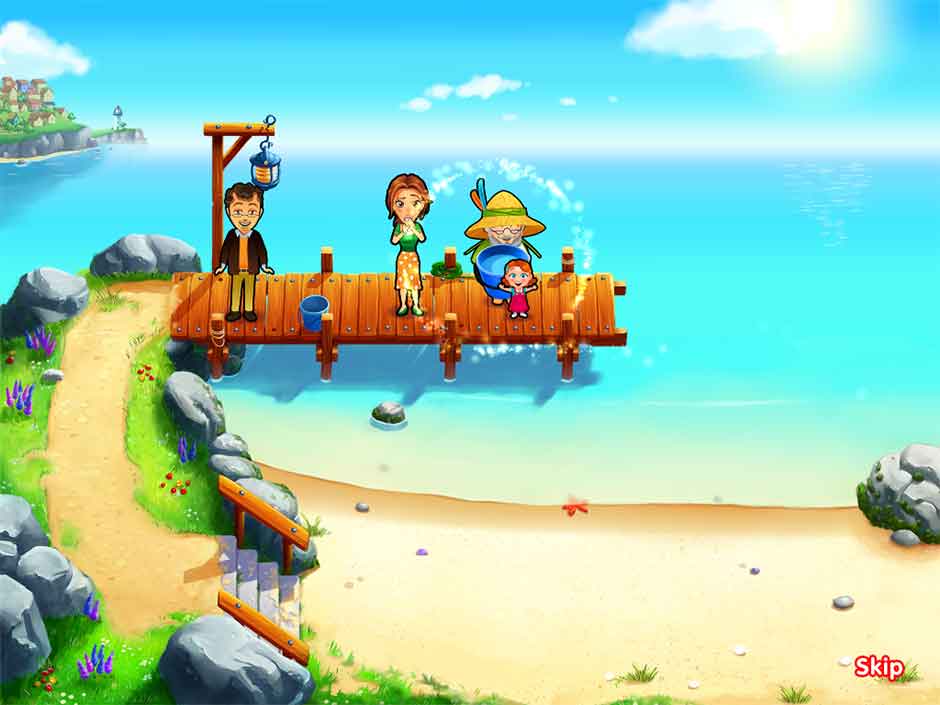
As you play, a number of memorable photo moments will occur. These are special moments Emily likes to document throughout the course of the game. Click on the camera icon in the upper right corner of the level select to view Emily’s photo album of memorable moments. Memorable moments happen during cutscenes, and will be outlined by a sparkling circle. Click on the camera icon when these appear to help document her memories!

Delicious - Emily's Message in a Bottle - Photo Memory


Additional Tips and Tricks

  • Stack your tasks! Don’t be afraid to click on multiple items and stack the number of tasks you need to do. Stacking tasks is an excellent way to keep moving quickly and keep customers happy as a result.
  • Restock at the start of the day! The start of the day is an excellent time to restock all items. Items often aren’t fully stocked when you start the day, so give yourself the advantage by restocking right away. Keeping items in stock throughout the day is an important part of keeping preparation times quick and easy.
  • Use the cash register to navigate the restaurant faster! You don’t have to wait tableside while customers are eating. Click on the cash register to quickly navigate back to the preparation area.
  • Check out multiple customers at once! Checking out multiple customers at the same time will give you score bonuses, and is an essential part of obtaining those high 3-star scores.
  • Serve full orders! Try to bring all the items a customer or tables order in one go. Doing so will earn you a nice tip and help your score.
  • Keep those tables clean! When customers are done eating, a “!” bubble will pop up over the table indicating it needs to be cleaned. If you don’t clean tables in a timely manner, customers who come in and go to sit down won’t have anywhere to sit, and may leave as a result.
  • Keep customers happy by using entertainers! Whether customers need a little extra mood boost, or you need a little extra time to prepare their order, using an entertainer is certain to improve a customer’s experience! Only table or sit-down customers can be entertained.
  • Customize your menu! As you play, you will unlock new menu items for your restaurant. Customize your menu to improve customer patience, tips, or both to boost your score!


Delicious – Emily’s Message in a Bottle Walkthrough

They say if you put a message in a bottle and throw it into the sea, it will always end up where it’s meant to go. Little does Emily know, one small message written 30 years ago is about to make a big splash in the Napoli family! Welcome to the Delicious – Emily’s Message in a Bottle Official Walkthrough!


Restaurant 1: Bittersweet Memories – Emilia’s Place

The sights and smells of Italy are warm and welcoming. There’s nothing like a family restaurant. But behind the restaurant’s success lies some growing family tensions. Relive Emily’s early childhood in the picturesque setting of Napoli!


Level 1 – Bittersweet Memories

Thirty years ago, in Napoli, Italy…

Mouse Location: On the cobblestones, just below the right chair of the leftmost table.


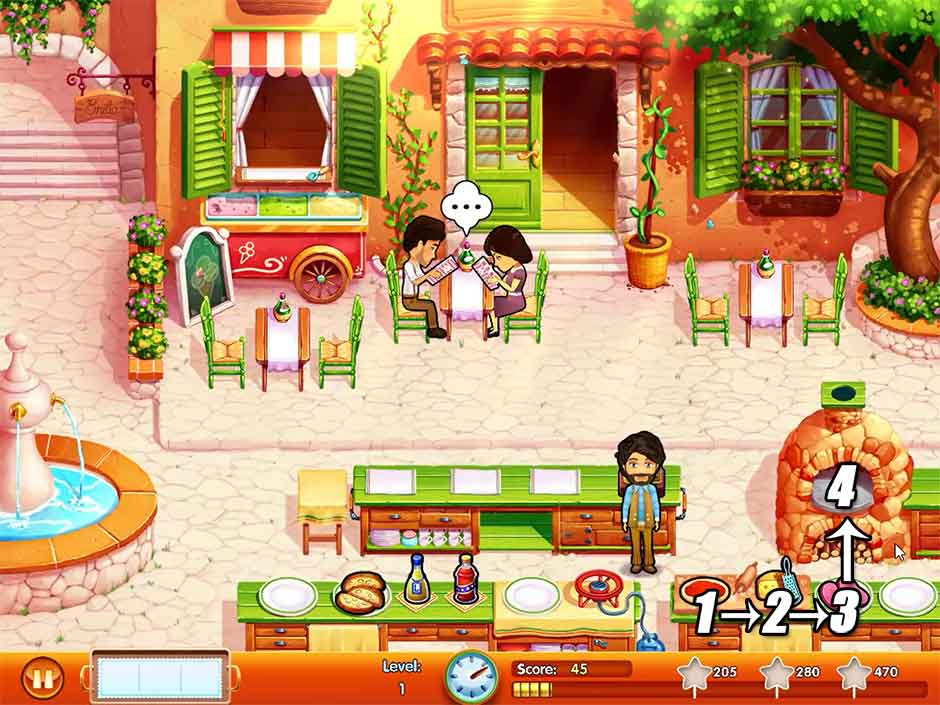
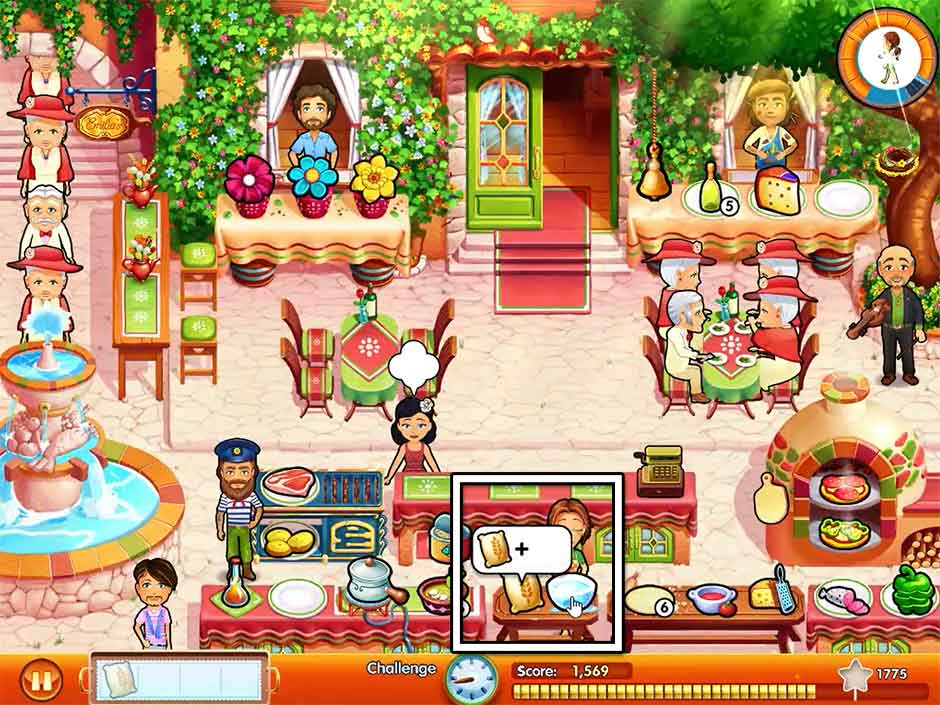
Today’s your first day in the restaurant, so it’s a perfect day to acquaint yourself with how the game works. When a customer is ready to order, a bubble will pop up over their head, showing what they’d like. Click on the corresponding items, then click on the customer(s) to take the item(s) to them. When a customer is ready to pay, they will go to the counter, and a bubble containing money will pop up over their head. Click on the cash register to check them out. All items are very straight-forward, with the exception of the pizza. To make a pizza, click on the dough in the lower right corner, followed by the cheese, and finally the pepperoni. The pizza will go into the oven. When finished, the pizza will blink. Click on the pizza to add it to your tray, then take it to the customer who ordered it.

Delicious - Emily's Message in a Bottle - Level 1

Delicious – Emily’s Message in a Bottle – Level 1

Level 2 – The Secret Ingredient

The secret ingredient… what could it be?

Mouse Location: Hanging down from the top of the open window on the left.


Seven secret ingredients are scattered throughout the area. Find them all before the day ends to complete the day’s objective! Their locations are pictured in the screenshot below.

Delicious - Emily's Message in a Bottle - Level 2

Delicious – Emily’s Message in a Bottle – Level 2

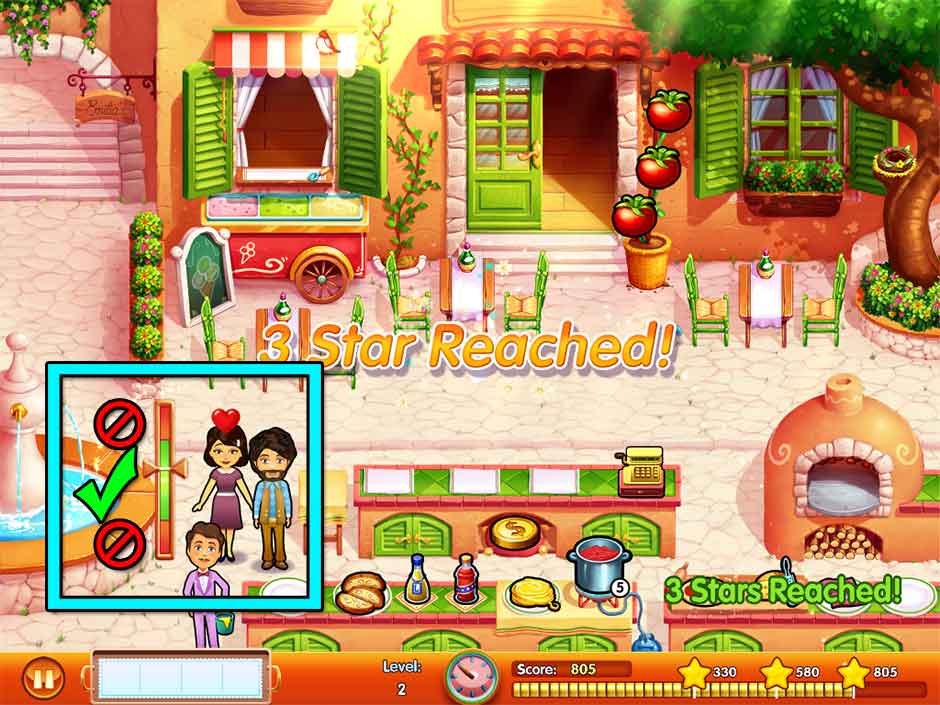
Tip! Pasta will be added to the menu today, and customers can toss coins into the nearby fountain. Click on the pasta, followed by the pot of sauce to make pasta for customers. When a customer goes to the fountain and the coin is shown in the bubble over their head, click on the coin beneath the counter, then click on the customer. A meter will appear. Click on the customer again while the needle is in the green zone to help them flip the coin into the fountain.

Delicious - Emily's Message in a Bottle - Coins in a Fountain

Delicious – Emily’s Message in a Bottle – Coins in a Fountain

Level 3 – Fishing For Something

The brothers will use any trick in the book to discover the ingredient.

Mouse Location: Behind the upper left portion of the pizza oven.


Tea, ice cream, and a new pizza topping will be added to the menu today. When a customer orders ice cream, click on the scoop of ice cream in the upper left corner 3 times in order to complete a cone. Now that there are two pizza toppings to choose from, it’s best to make pizza to-order. Hold off on making any pizzas until a customer orders one.


Level 4 – The Announcement

It’s Emily’s 3rd birthday! What will grandpa’s announcement be?

Mouse Location: Behind the upper left portion of the customer counter, near the tea table.


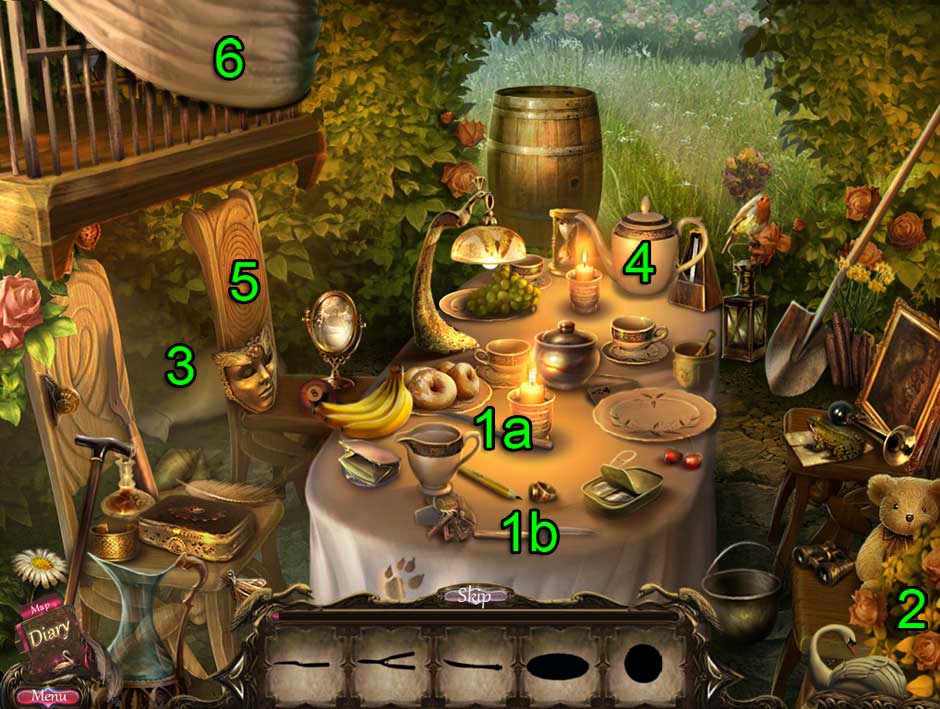
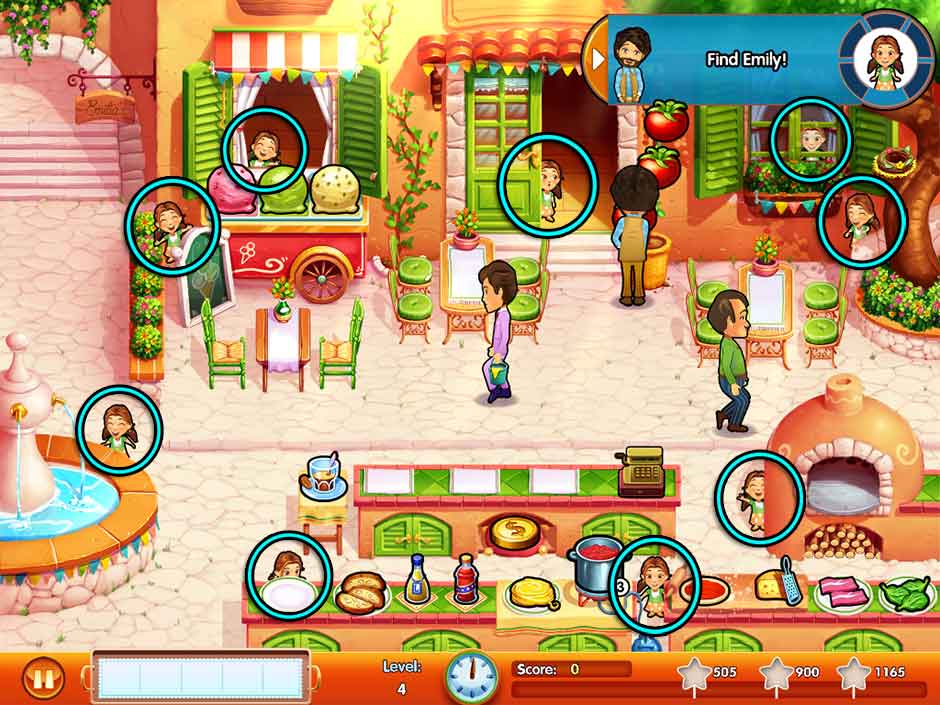
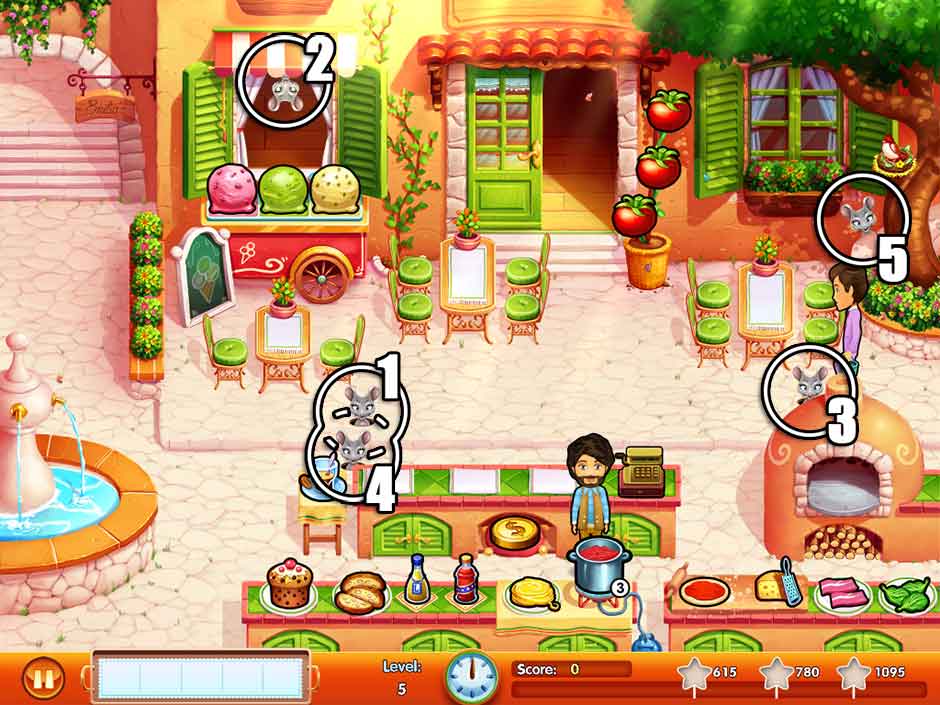
Little Emily is busy playing hide-and-seek around the restaurant. Find her 5 times before the end of the day to complete today’s goal. Emily can appear in several locations around the restaurant. Refer to the screenshot below to see where she likes to hide. Listen for her tell-tale giggle, then click on her before she disappears!


Tip! Two more flavors of ice cream are available today. Customers will either order a cone with three scoops of the same flavor, or a cone with all three. To make a cone of all three flavors, click on each flavor in order from left to right (pink, green, then white).

Delicious - Emily's Message in a Bottle - Level 4

Delicious – Emily’s Message in a Bottle – Level 4

Level 5 – Time To Leave

As Edward prepares to go back to Snuggford, Vittorio has other plans…

Mouse Location: Peeking out from behind the rock beneath the tree in the upper right corner of the screen.


The restaurant is fully stocked with items today, so it will be busier than the previous few days. If you find yourself having difficulty keeping up, try pre-making pizza. You have five slots on your tray today; try sparing one or two for pre-made pizzas (either pepperoni, spinach, or both!).


Restaurant 2: An Unexpected Birthday Present! – Emily’s Garden

It’s almost Paige’s birthday! The family’s all here and preparing for the celebration, but little do they know they’re about to receive a very unexpected gift!


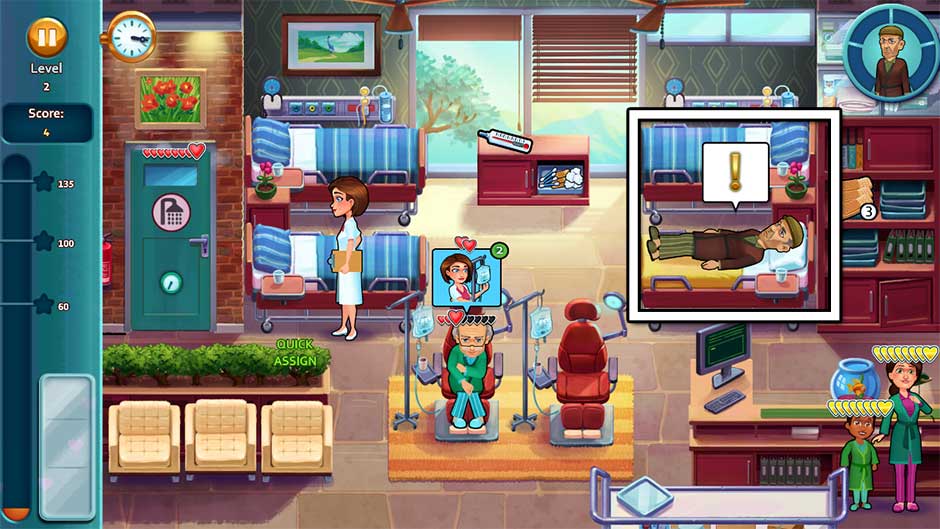
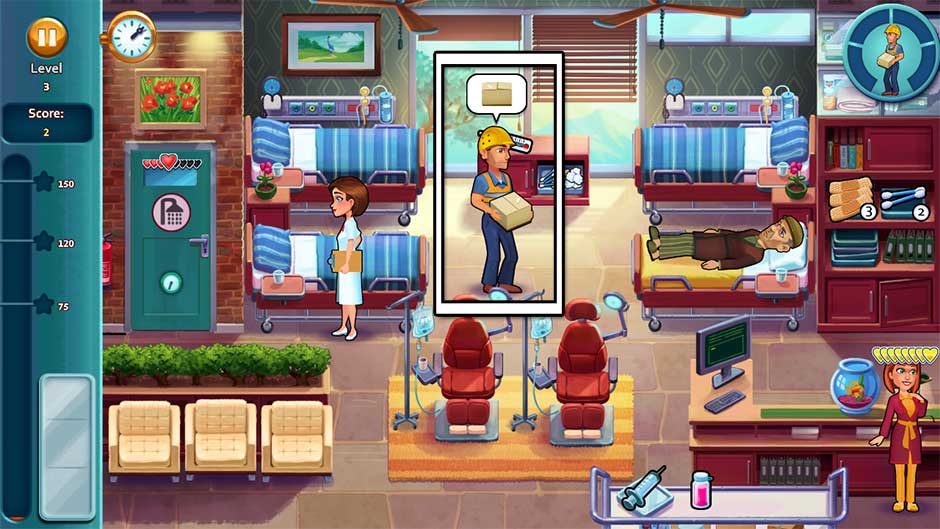
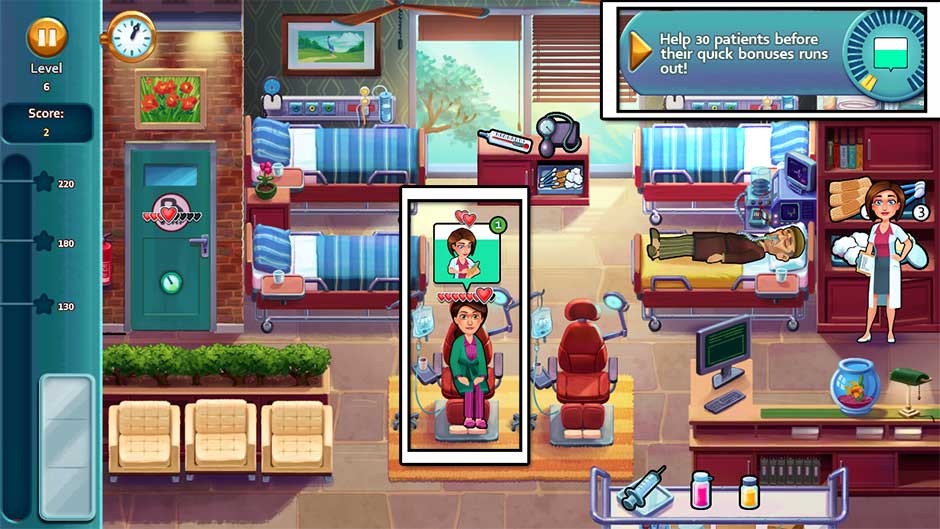
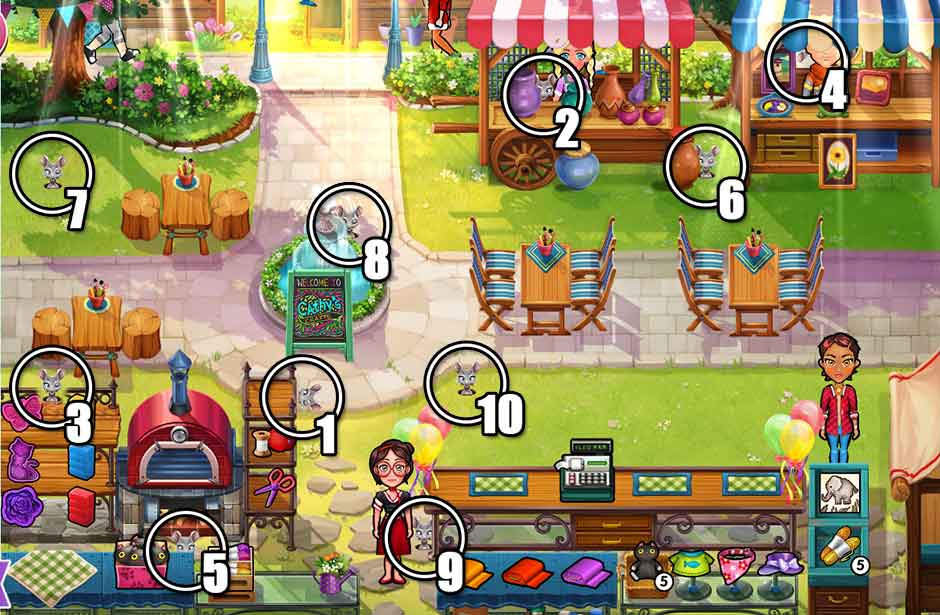
Level 6 – Birthday Preparations

It’s almost Paige’s 3rd birthday – receive the packages to prepare her party!

Mouse Location: To the right of the flower vase sitting next to the cash register.


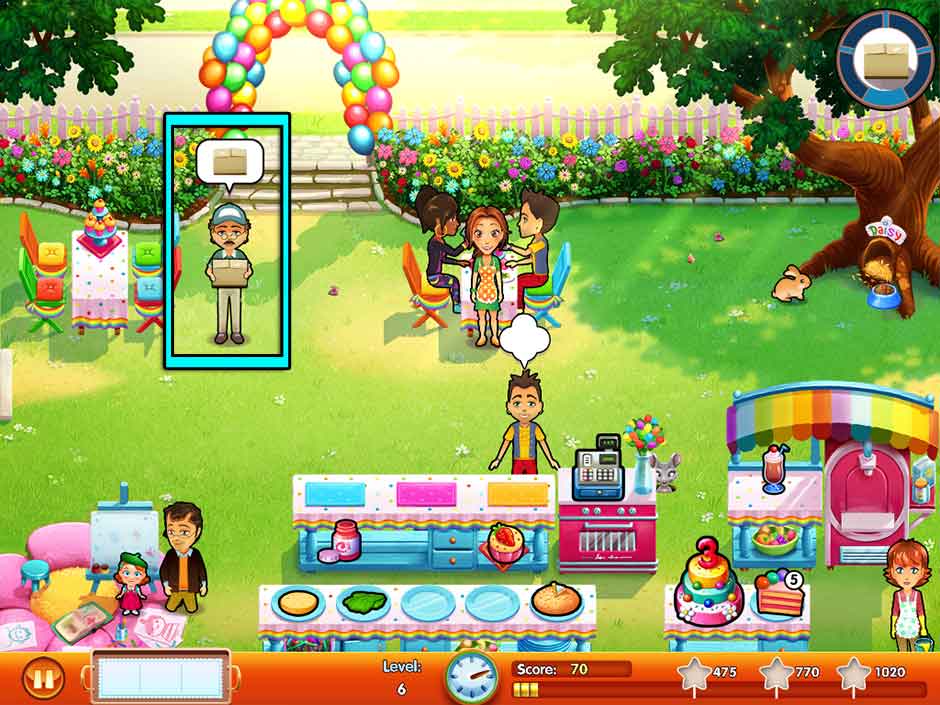
Throughout the day, the postman will show up carrying packages. When he shows up, a “!” bubble will appear over his head. Click on the postman to collect the package. You will need to do this 4 times before the end of the day to complete the day’s objective.


Tip! Click on the birthday cake to stock up more slices of cake for customers. Additionally, whenever a customer orders a cupcake, click on the cupcake beneath the counter. It will be popped into the oven beneath the cash register. Once finished, the cupcake will blink, indicating the delicious warm dessert is ready to be served!

Delicious - Emily's Message in a Bottle - Level 6

Delicious – Emily’s Message in a Bottle – Level 6

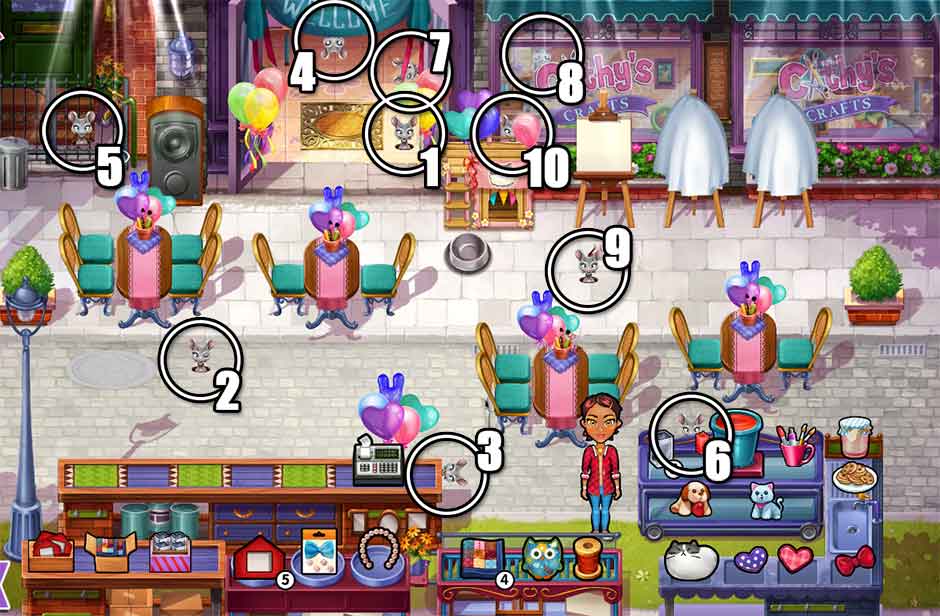
Level 7 – An Unexpected Birthday Present

The party had begun! Keep serving the family so they have a great time!

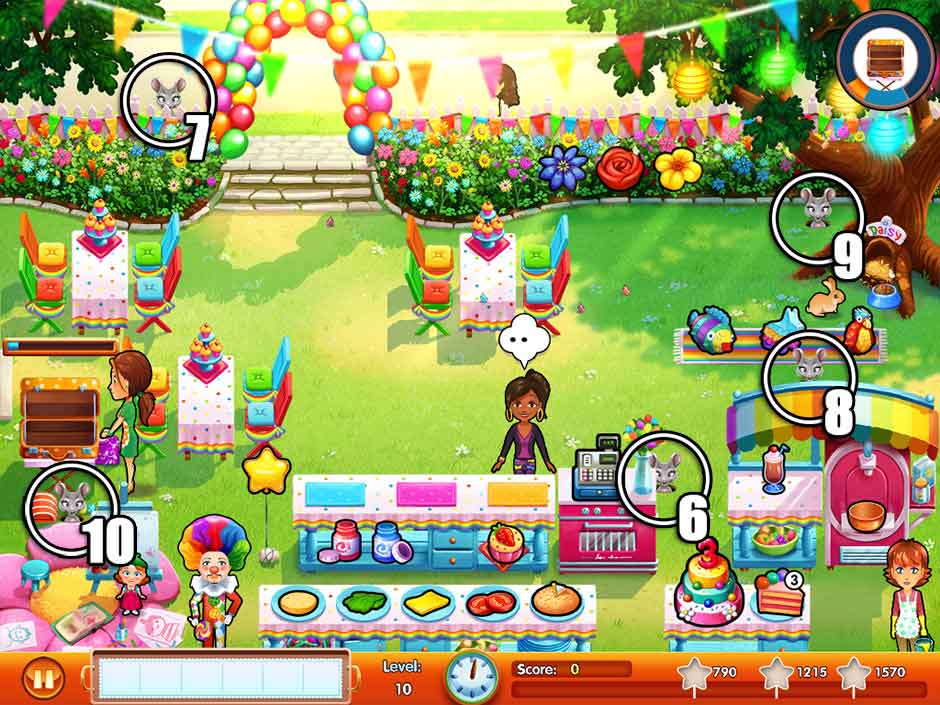
Mouse Location: Behind the fence in the upper left corner, to the left of the balloon archway.


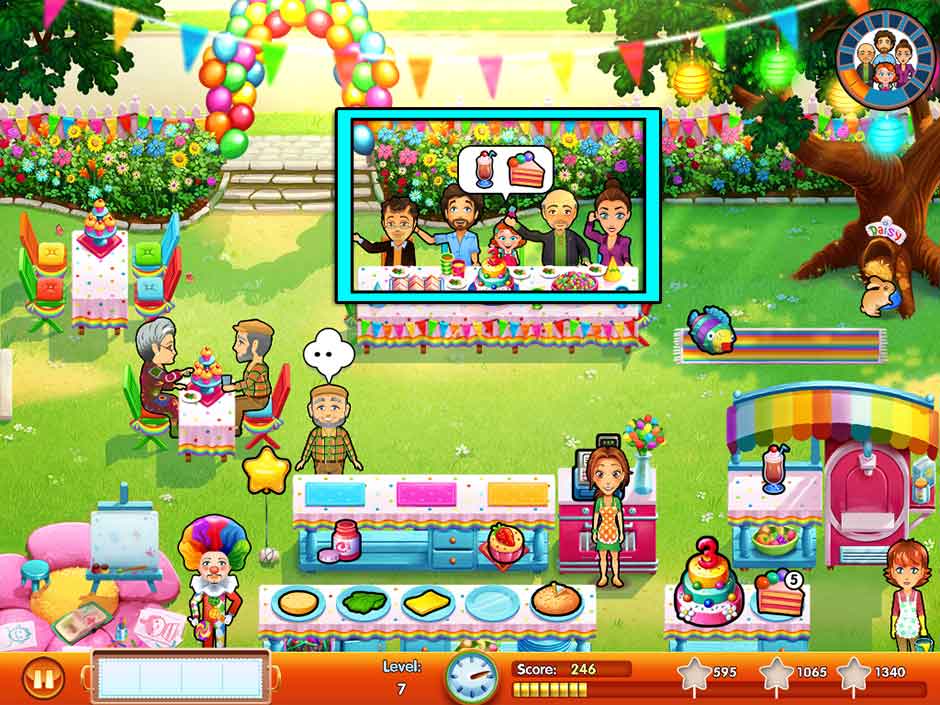
The party’s in full swing today, and the family’s hungry! At the family table, order bubbles will pop up from time to time. Make the item to-order, then click on the family party table to deliver it. You will need to do this 12 times before the end of the day to complete your objective.


Tip! There’s an extra topping available for the burgers today, so pay close attention to customers’ orders to see whether or not they want salad or cheese. Additionally, the piñata is available today! Children who want to take a swing at the piñata will go to the tree on the upper right. Pick up the piñata and hand it to them, then click on them multiple times until they successfully break it. Fiesta time!

Delicious - Emily's Message in a Bottle - Level 7

Delicious – Emily’s Message in a Bottle – Level 7

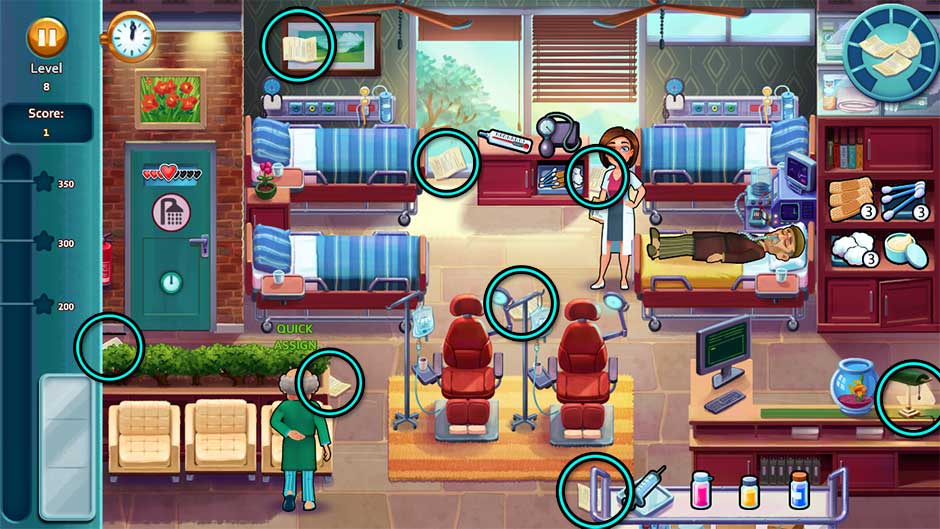
Level 8 – A Blast From The Past

Filippo has some very important news… if he can remember it!

Mouse Location: Behind the top of the covering above the ice cream and smoothie stand.


So many new products today! In addition to two new types of piñatas, balloons, and a second jar of paint, the soft serve ice cream machine is up and running today! Click on the soft serve cup at the machine on the lower right to fill it with ice cream. Paige will request paints for her art project from time to time on the lower left. Click on the paint color she wants, located underneath the counter, then click on Paige to take it to her. It’s just like serving any other customer, though Paige can be a little impatient, so try placing priority on the birthday girl!


Tip! Consider upgrading the soft serve ice cream machine before the day begins. Not only does it make things easier, but the new machine is spill-proof! Fill a soft serve cup and leave it at the station so it’s ready to go as soon as a customer orders, no wait needed.


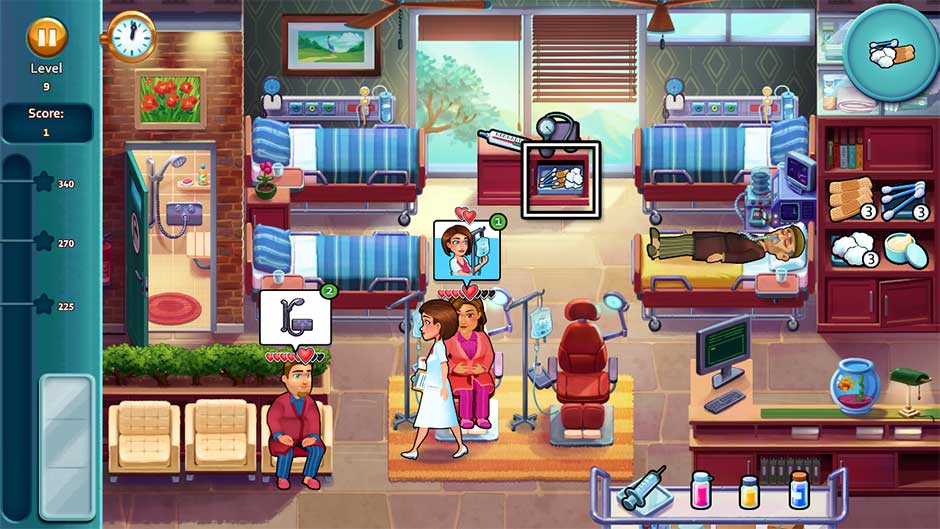
Level 9 – The Best Grandpa

Clean up the mess Edward made when he heard the astonishing news!

Mouse Location: To the left of the tree in the upper right corner.


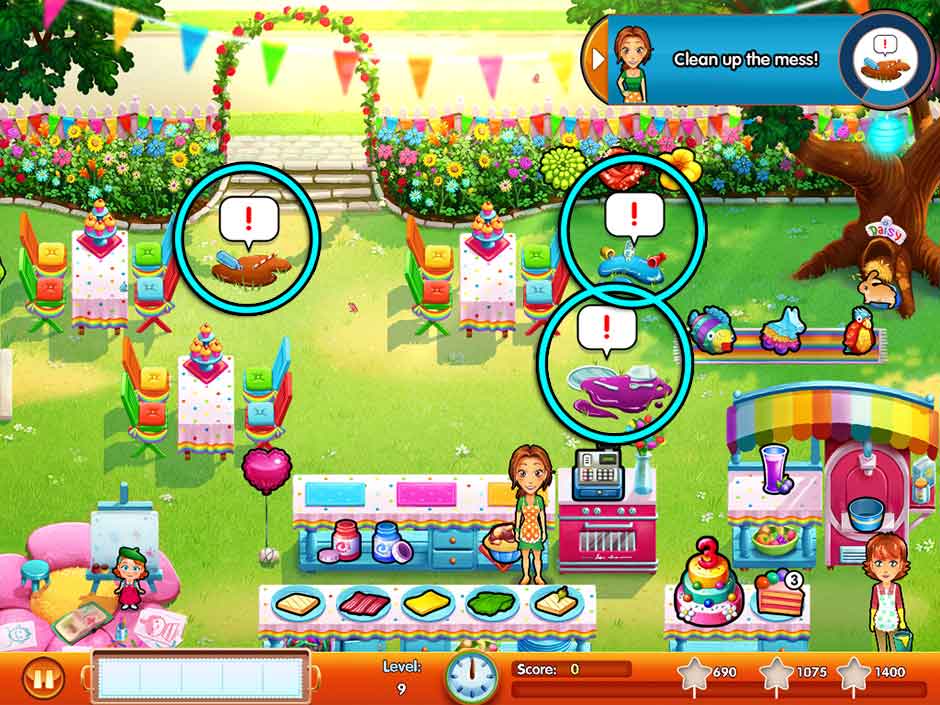
Emily’s Garden is a mess! Click on the areas marked with a “!” bubble to begin cleaning. Once you’ve begun, a meter will appear over the mess showing how far along you are in straightening up the area. Clean all 3 messes before the end of the day to complete today’s objective.


Tip! If the restaurant closes, but you’re still not done cleaning, there’s still time to complete your objective! As long as you successfully clean all the messes before the last customer leaves, completing the objective will still be marked as a success.

Delicious - Emily's Message in a Bottle - Level 9

Delicious – Emily’s Message in a Bottle – Level 9

Level 10 – Italy, Here We Come?

Help pack the suitcase, as everyone prepares to go to Italy… or not?

Mouse Location: In the upper left corner of Paige’s canvas, in the lower left corner below the suitcase.


In addition to serving customers, today you will need to focus on packing your suitcase for the trip to Italy. Click on the suitcase located on the left side of the screen to begin packing. A meter will appear showing your progress. Work on packing the suitcase every spare moment you have. Finish packing before the last customer leaves to complete your objective!


Tip! Keep your cake stocked and your ice cream full and ready to go to help save time for packing!

Delicious - Emily's Message in a Bottle - Level 10

Delicious – Emily’s Message in a Bottle – Level 10

Restaurant 3: Italy, Here We Come! – Old Family Restaurant

It may seem like only yesterday, but 30 years is a long time! Emily may have grown and Evelyn aged beautifully, but the family restaurant has certainly seen better days.


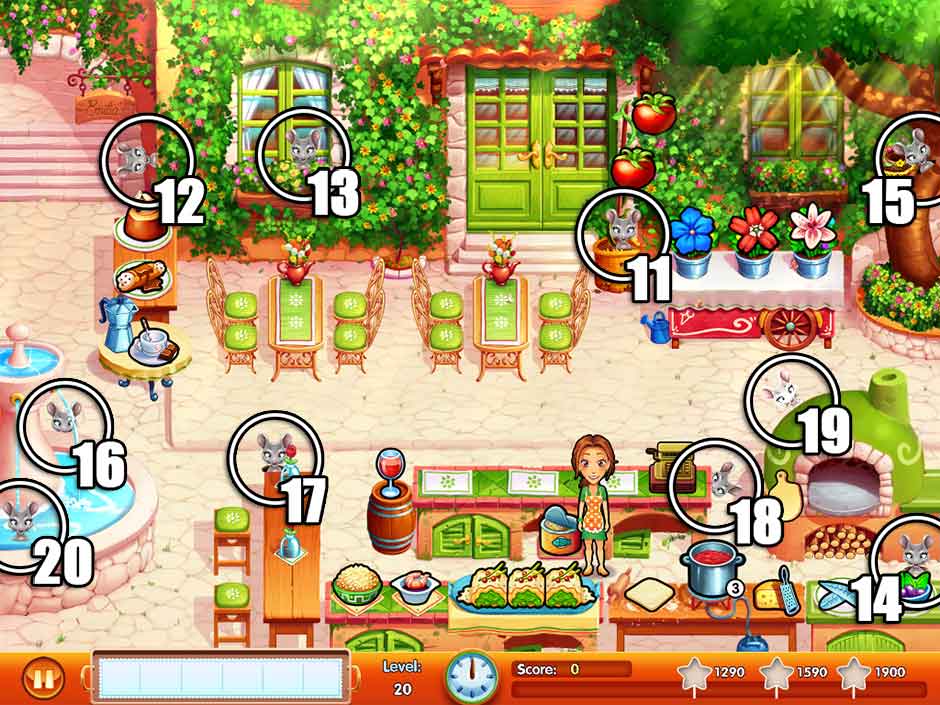
Level 11 – Italy, Here We Are!

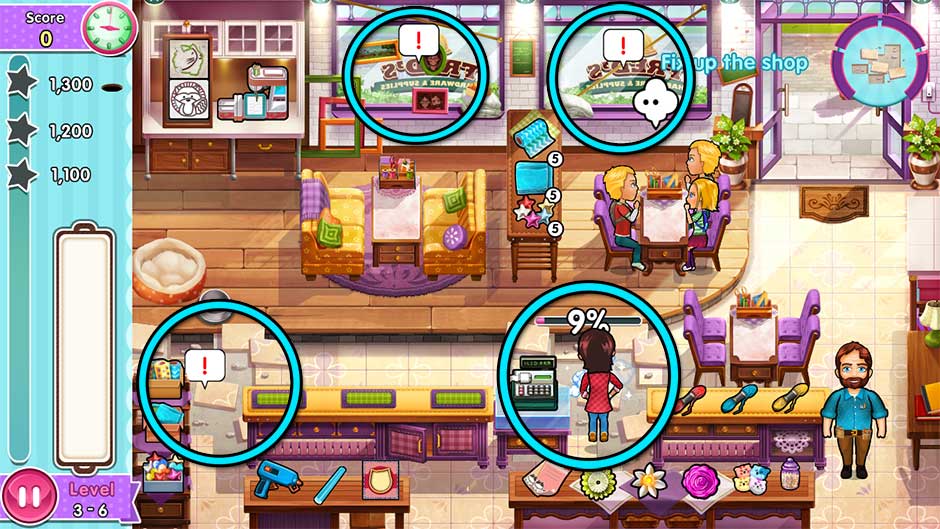
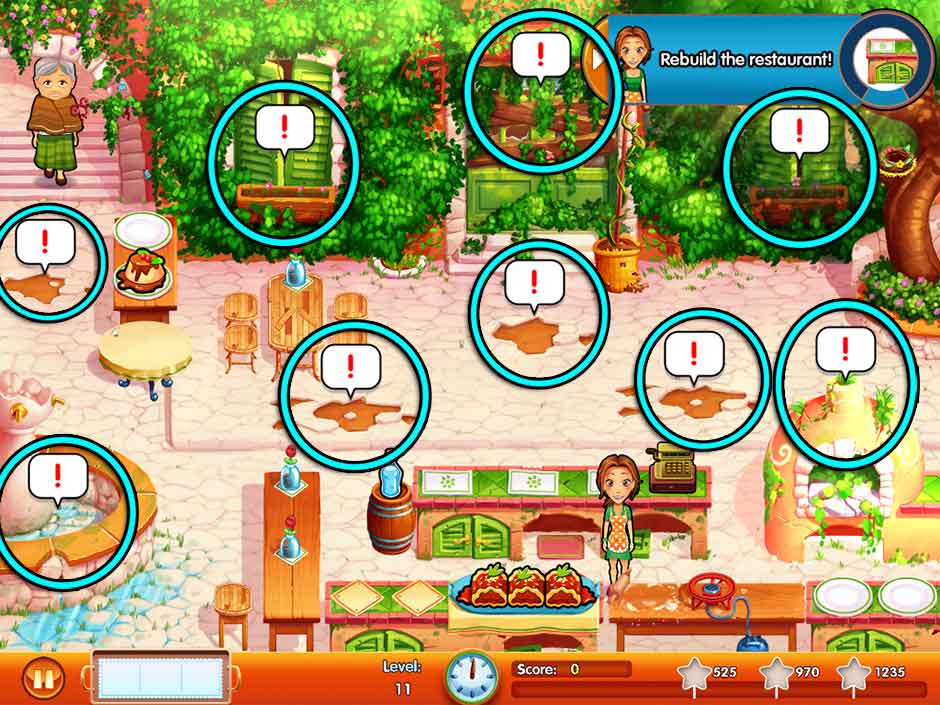
What happened to the restaurant over all those years? Let’s work together to fix it up!

Mouse Location: In the canvas bag at the foot of the steps in front of the restaurant doors, where the tomato vine is.


Mama mia! The restaurant looks a little different than Emily remembers! There are nine areas with “!” bubbles over them which need to be fixed up before the end of the day. Customers will show up throughout the day, but not to worry – there’s no complicated foods to prepare today. Focus on fixing up the restaurant every spare moment you have. Manage your time correctly, and you should be able to easily accomplish most of this before the day reaches the halfway point.

Delicious - Emily's Message in a Bottle - Level 11

Delicious – Emily’s Message in a Bottle – Level 11

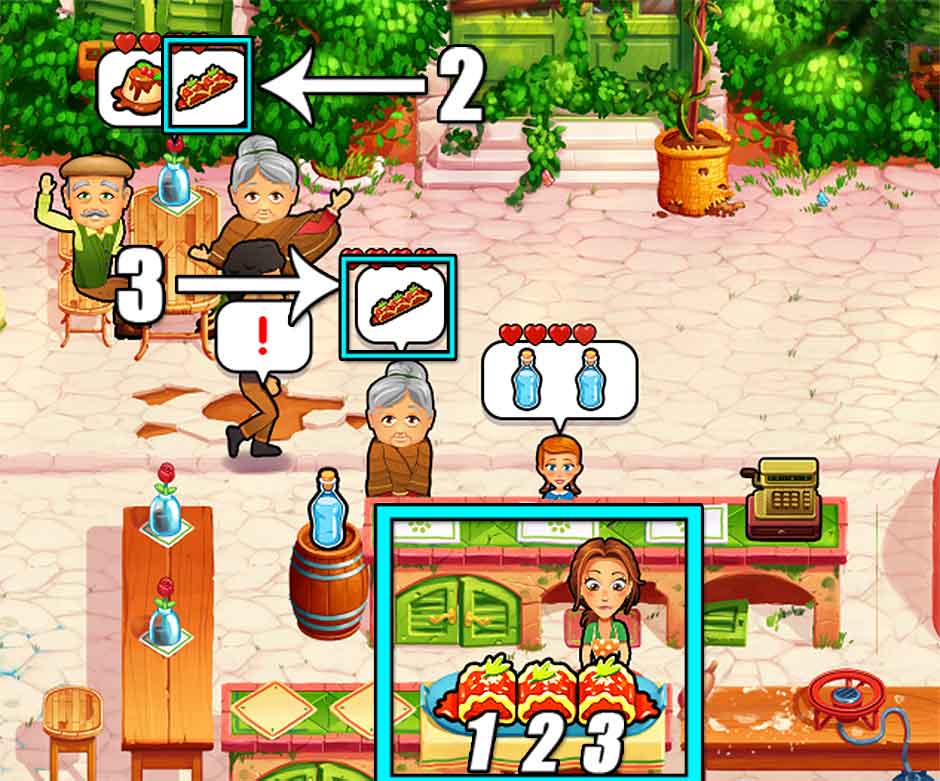
Tip! Ravioli is a menu item today. While it may look confusing on first impression, figurati! It’s really quite simple. If a customer orders one, click on the leftmost piece. If a customer orders two, click on the center piece. If a customer orders three, click on the rightmost piece. Refer to the screenshot below for portions.

Delicious - Emily's Message in a Bottle - Ravioli

Level 12 – Ti Vogliamo, Napoli!

There’s only one thing the family is sure about when it comes to Napoli: they love it!

Mouse Location: Below the “Emilia’s” sign in the upper left corner of the screen.


Pizzas are back in the oven at the old family restaurant! In order to make a pizza, click on the pizza dough, followed by the sauce, cheese, and finally the pepperoni topping in the lower right corner. The pizza will be thrown into the oven. When it blinks, it’s ready to serve! But be careful – Emily’s not as experienced as Edward when it comes to the old stone oven. Click on the wooden board, or pizza peel, hanging next to the oven, then click on the pizza to move it to your tray for serving. If you click on the pizza without using the peel, Emily will burn her hands!


Tip! Click on the tomato vine next to the restaurant doors to refill your sauce pot for the pizzas.


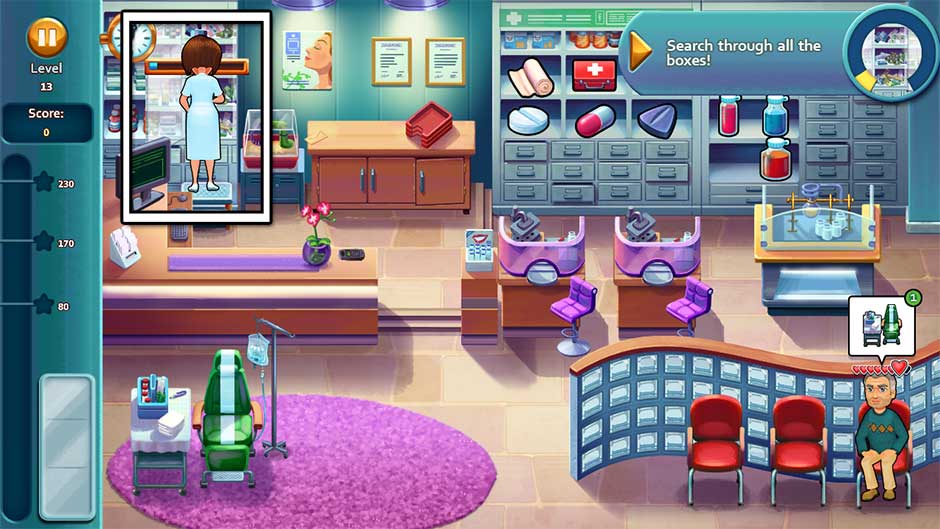
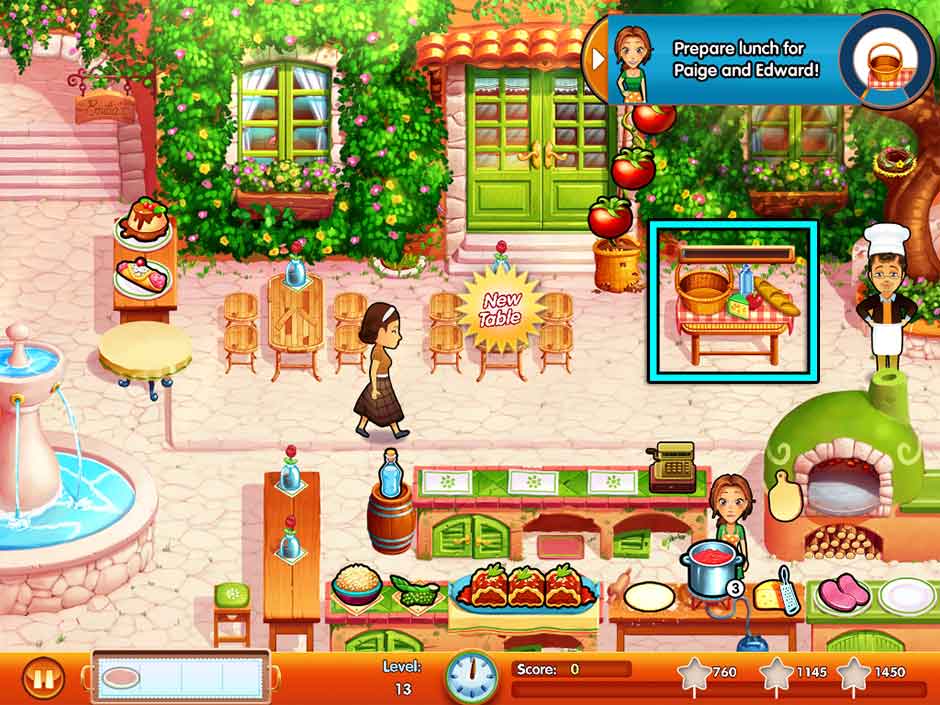
Level 13 – The Search Begins!

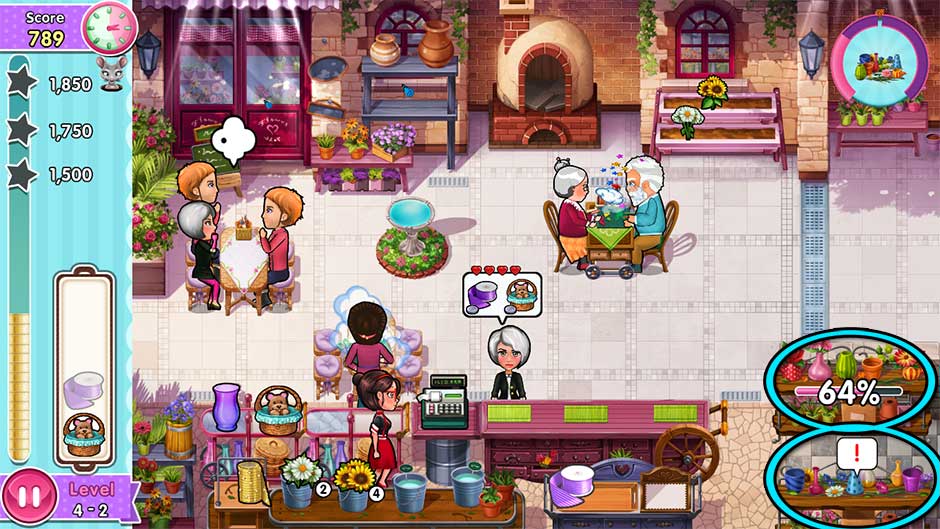
The search for Vittorio is on! Help Emily fix something for them to take with them.

Mouse Location: Popping out of the window box full of flowers in front of the left window.


A table with ingredients will show up toward the upper right corner of the restaurant today. Pack Paige and Edward a delicious lunch to take with them! Click on the table to begin packing the meal. You will need to stop from time to time to help customers coming into the restaurant. Finish packing the basket before the day is done to complete the objective.


Tip! Risotto is on the menu today! Click on the bowl, followed by the topping to the immediate right in order to prepare a bowl. The risotto is located to the left of the stuffed raviolis.

Delicious - Emily's Message in a Bottle - Level 13

Delicious – Emily’s Message in a Bottle – Level 13

Level 14 – A Stranger at the Docks

Hope, nostalgia, excitement… And a stranger at the docks!

Mouse Location: In the lower right corner, in front of the pizza oven.


There’s a spinach topping available on pizzas starting today, so pay close attention to customers’ orders! Making a spinach pizza is exactly the same as making a pepperoni pizza. The only difference is after clicking on the cheese, you will need to click on the spinach leaves. Don’t forget to use the pizza peel to remove pizzas from the oven once they’re finished!


Tip! Starting today, there are some scaly new residents in the restaurant in the form of fish! These aquatic neighbors live in the fountain and will need feeding from time to time. Listen for the watery “bloop” sound indicating when a fish is hungry. Similarly, if you notice a fish-shaped shadow in the water, it means a hungry fish is about to surface. Click on the fish food can beneath the fountain, followed by the hungry fish to feed it. Be aware that fish have relatively low patience, but at the same time, are perfect for lining up 2- and 3-in-a-row combos with other customers.


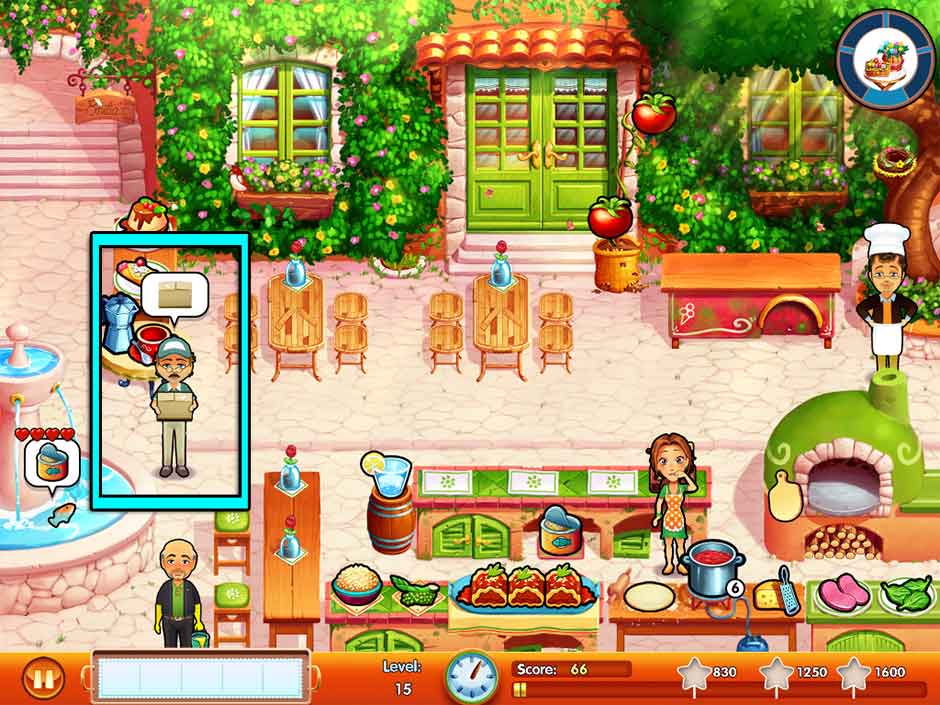
Level 15 – The Long Wait

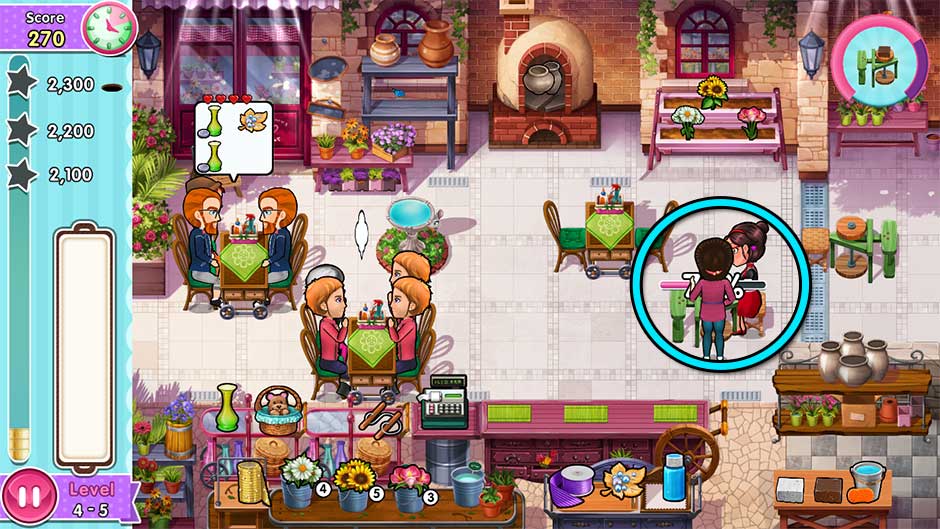
Patrick finally receives his flowers today. Unfortunately, they’re not the only thing that’s still missing…

Mouse Location: In the tree in the upper right corner, next to the bird’s nest.


Packages will be arriving throughout the day today. Keep an eye out for the postman, who will show up next to the fountain on the left. When the package icon appears over his head, click on him to collect Patrick’s boxes. Collect all 4 packages before the end of the day to complete the objective.


Tip! There’s a new beverage table beneath the dessert table on the upper left today. Click on the red cup to prepare the drink as per customers’ orders. Click on the cup when the needle reaches the green area to collect the perfect beverage. If you find yourself short on time, try preparing one of these and keeping it on your tray, ready to go when a customer orders.

Delicious - Emily's Message in a Bottle - Level 15

Delicious – Emily’s Message in a Bottle – Level 15

Level 16 – Old Quarrels

The arrival of the brothers was a surprise for everybody – and not exactly in a good way.

Mouse Location: Behind the back of the fountain in the lower left corner the screen.


Patrick’s lovely flower stand is open for business today. Customers will order bouquets consisting of either one type of flower, or a combination of all three varieties. Flowers work just like the ice cream stand at the old restaurant. Click on the flowers three times (either three of the same variety, or one of each from left to right) to gather a bouquet. Patrick will deliver them directly to you, so you don’t need to worry about Emily going out of her way to collect them before handing them to customers.


Level 17 – Surprise Wears Yellow

Time to meet Paige’s ‘other grandpa’. Could this possibly be…?

Mouse Location: Behind the top of the singles table, to the right of the fountain in the lower left corner.


The pace is picking up in the restaurant today, and pizzas will be especially popular. If you haven’t already, upgrade your pizza oven so that pizzas won’t burn. Doing this will allow you to pre-make pizzas and leave them in the oven for customers, without them taking up a spot on your tray. A good strategy to use if you find yourself struggling is to make one type of pizza and place it on your tray, then prepare the second type and leave it in the oven. Make new pizzas as necessary per order, or replenish your pizzas using the above strategy. You may also want to try preparing beverages early-on for your tray if you find yourself easily backlogged.


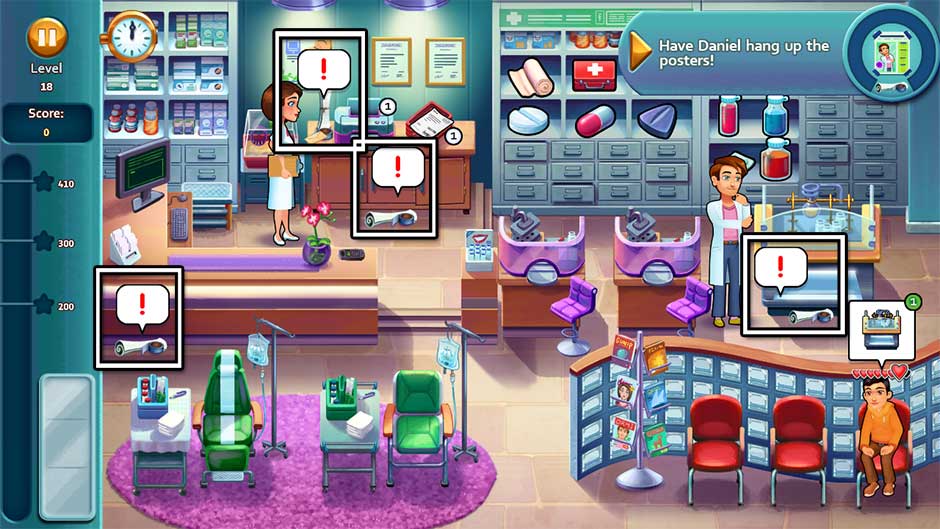
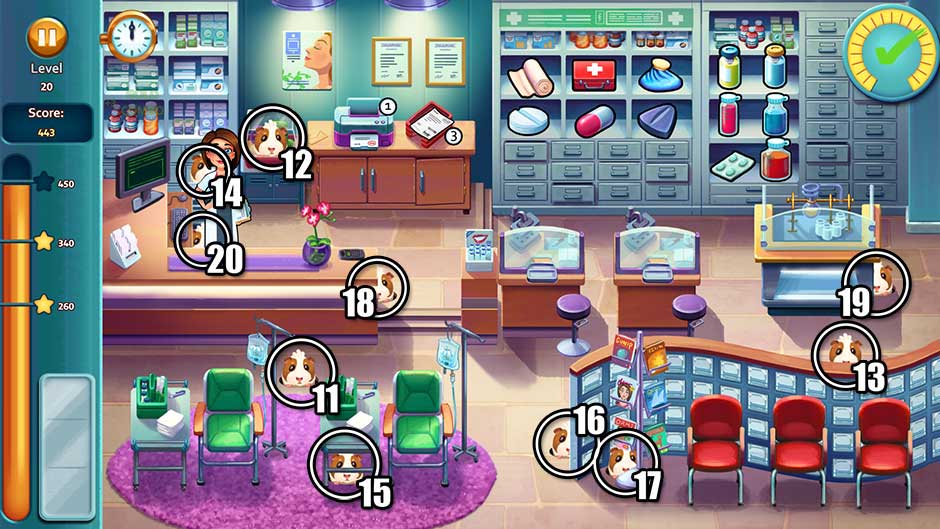
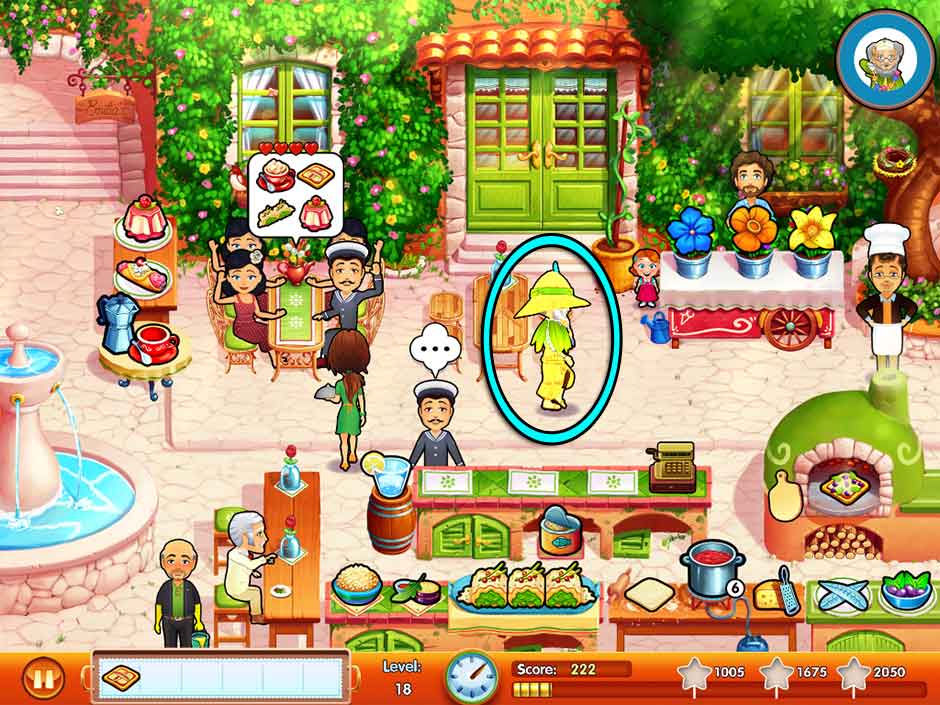
Level 18 – Lost Memories

Memories can be lost, but what about feelings? Keep an eye on Vittorio!

Mouse Location: Peeking around the right side of the counter, next to the cash register.


The restaurant is very busy today, and what’s more, you’ll need to keep an eye on Vittorio! Vito is standing on the right side of the restaurant, above the pizza oven. However, Vito will begin to wander away from time to time. He will make his way to the left side of the restaurant before heading out via the archway on the upper left. It’s very important he not wander off! Click on Vito to stop him from wandering away from the restaurant. It’s very easy to lose track of him amidst the bustle of the restaurant, so try to keep customers entertained with Edward’s help. It’s also a good idea to keep one of each type of pizza ready to go on your tray, in addition to an extra in the oven. Upgrades will prove very useful today, including any Menu items which can increase customer patience. Keep Vito in the restaurant until the end of the day to complete your objective!

Delicious - Emily's Message in a Bottle - Level 18

Delicious – Emily’s Message in a Bottle – Level 18

Level 19 – Remember Me?

The only person that knows Emilia’s secret ingredient is back, but…

Mouse Location: Peeking around the upper left side of the pizza oven.


The bustle of yesterday’s restaurant continues today, only this time, you don’t have to worry about Vito wandering off! Focus on keeping customers happy. Once again, pizzas will be a popular menu item, so try to keep one of each prepared and ready to go on your tray at all times to prevent customers from having to wait long for their orders.


Level 20 – One Big Happy Family

There’s only one way to bring Vito’s memories back!

Mouse Location: In the lower portion of the fountain in the lower left corner of the screen.


It’s the last day at the old family restaurant. Thankfully, you have a number of helpers on hand to keep things from becoming overwhelming. Utilize the tips outlined in the above levels, keep two pizzas on your tray and one in the oven, and the day should be smooth-sailing.


Restaurant 4: A Tough Catch! – Marco’s Fish Market

The sea is a cruel mistress, and it takes a certain amount of stubbornness to make a living from her treacherous waters. But crashing waves and howling winds are arguably more welcoming than a stubborn old sea dog like Marco!


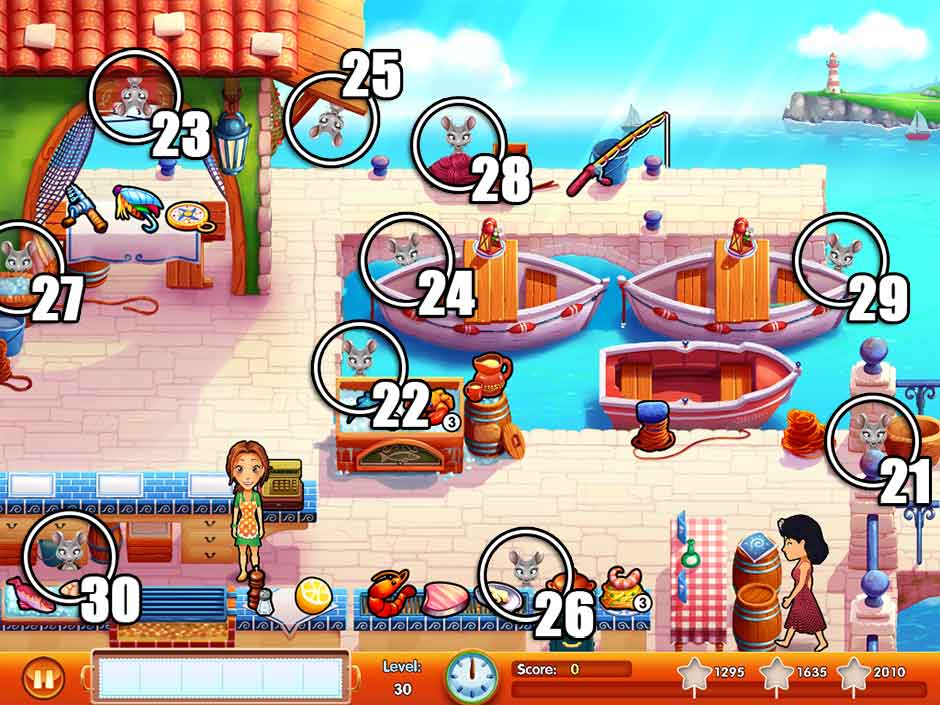
Level 21 – To Fish in Troubled Waters

Edward and Emily arrive with high hopes, but where is Marco?

Mouse Location: To the immediate left of the basket on the far right side of the screen, where the customers enter.


It’s the first day at Marco’s Fish Market, but Marco is nowhere to be found. It looks like Emily will have to take care of the customers. Being the first day here, things will remain relatively simple. To grill fish, click on the fish in the lower left corner to throw it on the grill. Once the fish blinks, it’s ready to serve! Click on the grilled fish, followed by the nearby salt and pepper to top it off and complete the dish. The nearby crab claws are also grilled, but always ready to serve. When a customer orders these, click on the claw three times to complete the dish for serving. To the right is a soup pot, which you can click on to refill your soup stock easily at any time.


Tip! Some customers will hop into the red boat and wish to be cast off. For these customers, click on the item they’d like and bring it to them, then click on the boat tie to release it from the dock. These customers will eventually return to pay for the excursion.


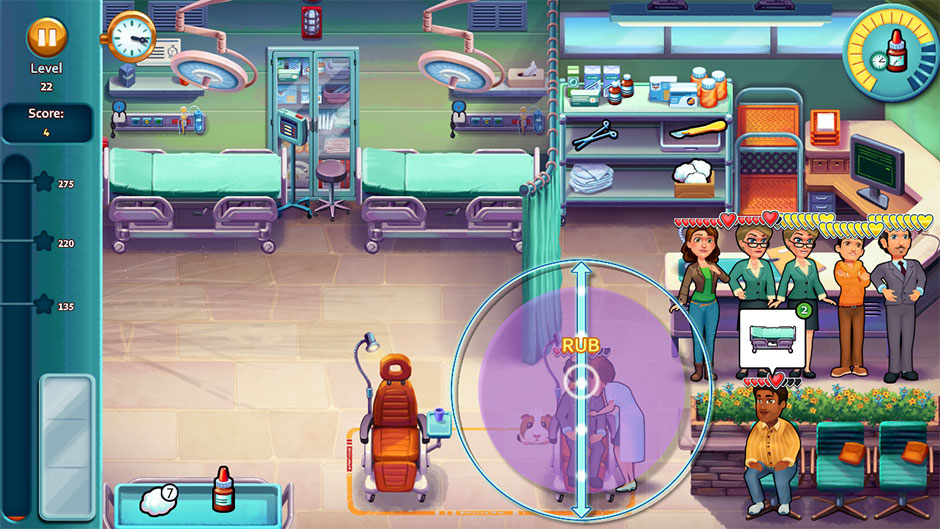
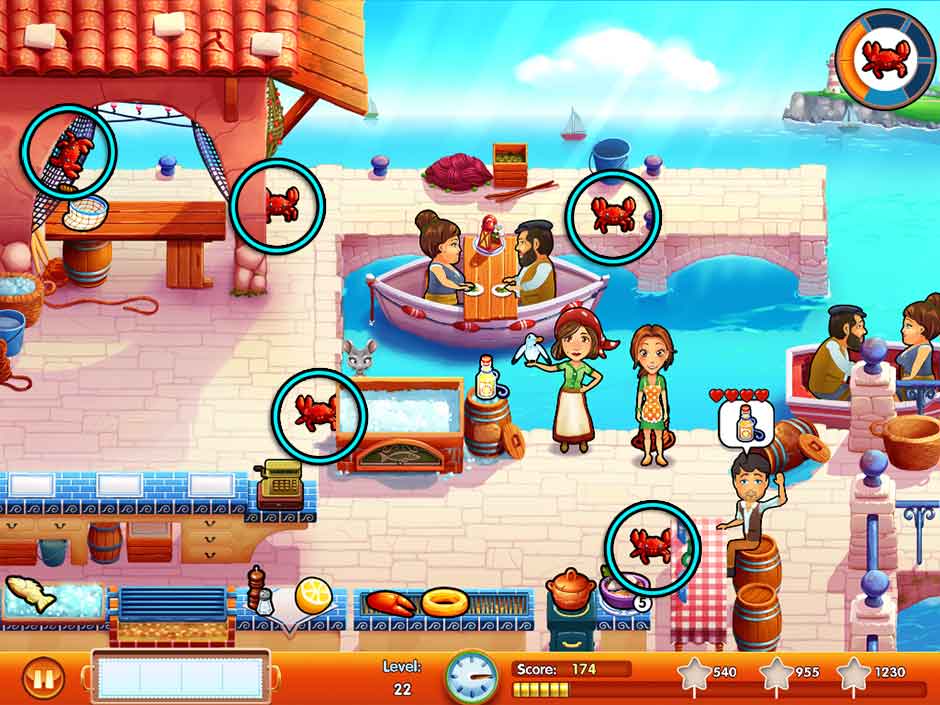
Level 22 – A Hasty Exit

Marco comes and goes in a flash, without a thought for what’s in his way. Find every crab!

Mouse Location: At the top left corner of the ice chest which holds fish in the middle of the restaurant.


In addition to an extra grill item today (calamari rings), there are a number of pesky crabs wandering the docks! Find all 5 crabs before the end of the day to complete the day’s objective. The crab locations are shown in the screenshot pictured here:

Delicious - Emily's Message in a Bottle - Level 22

Delicious – Emily’s Message in a Bottle – Level 22

Level 23 – Ghosts From The Past

Even a sea wolf like Marco has weaknesses and regrets.

Mouse Location: Hanging down from the center of the overhang roof in the upper left corner.


A third pre-made grill item is available today. Customers can order either three of one type of grill item, or a combination of all three. There is also a new lemon topping available in addition to the standard salt and pepper.


Tip! Customers may also order freshly-caught fish today as a new menu item. These are kept on the ice bed near the water, along with a new beverage. The fish stock is limited. If you find yourself running low, click on the fishing pole at the top of the screen to catch more!


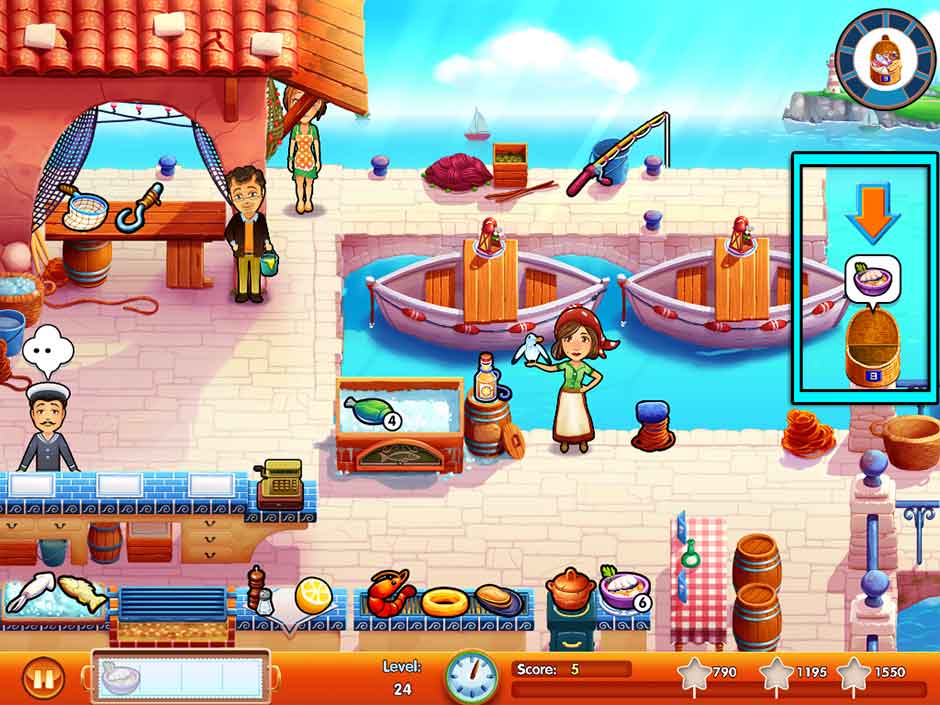
Level 24 – A Cruise For Two

What better place to talk things out than inside a boat? Prepare lunch for Edward and Marco.

Mouse Location: Peeking around the upper left corner of the upper left docked boat.


Today you will need to prepare lunch for Edward and Marco. A picnic basket will appear on the right side of the screen. Occasionally, a bubble will pop up over this basket displaying an item. When this happens, prepare the item shown above the basket, then click on the basket to place it inside. Prepare all 8 items shown above the basket before the end of the day to complete the day’s objective.


Tip! There’s a second fresh grill option which will appear on the lower left today. Pay close attention to customers’ orders since there’s more options to choose from!

Delicious - Emily's Message in a Bottle - Level 24

Delicious – Emily’s Message in a Bottle – Level 24

Level 25 – Weathering The Storm

The sea is so calm and endless, the brothers won’t have a choice but to open up.

Mouse Location: Hanging down from the bottom of the wood portion of roofing in the upper left corner.


There’s not much new at the docks today, but since Edward is out with Marco, you won’t have any help cleaning up the tables. Keep this in mind as you serve customers. Whenever customers leave a table or boat and a “!” appears, clicking on it will cause Emily herself to go clean the table. Remember to pay extra attention to your counter customers today and use Arabella’s help to keep boat customers happy as needed.


Level 26 – Take The Bait

Arabella opens her heart, but nothing is biting yet…

Mouse Location: Behind the upper right portion of the grill, between the mussels and the chowder pot.


Edward’s still out today, so Emily will need to continue cleaning tables on her own. Use Arabella’s help in keeping boat customers happy while Emily juggles the extra tasks. Additionally, clams are available as a freshly-caught option starting today. Much like the fish on ice, these are available in limited quantity. To replenish your stock, click on the fishing rod at the top of the screen. The type of catch you get is randomly split between the fish and clams, so keep fishing as needed if you’re low on stock of either.


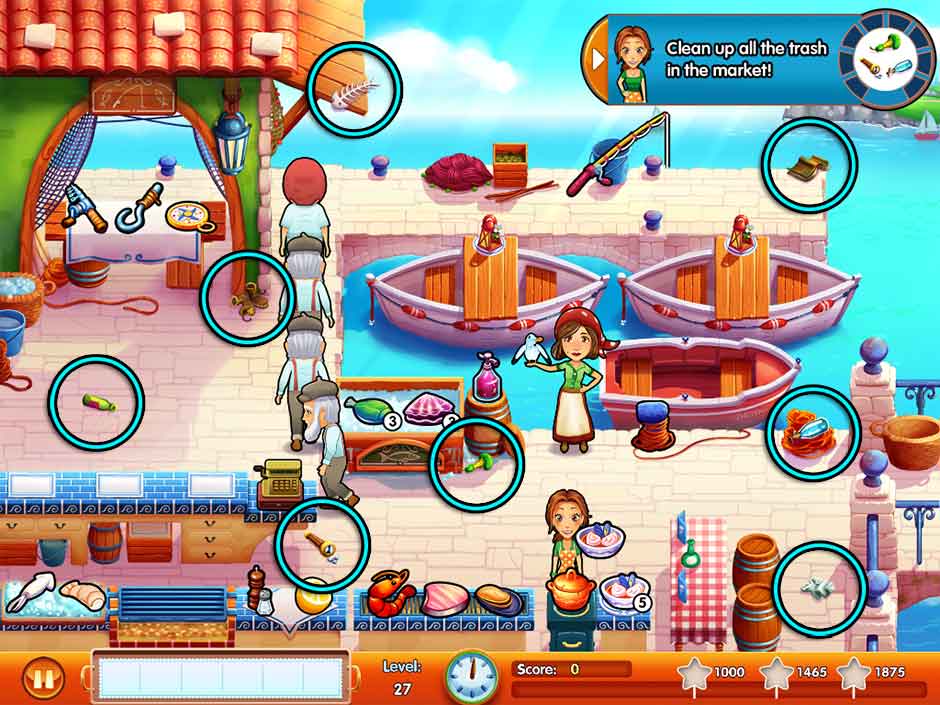
Level 27 – Message in a Bottle

Sometimes you find insight in the least expected places…

Mouse Location: Behind the basket of ice in the upper left corner, near the fishing supplies.


The market is a mess today! Find all 8 pieces of trash scattered around the area before the end of the day to complete the day’s objective. Their locations are shown below.

Delicious - Emily's Message in a Bottle - Level 27

Delicious – Emily’s Message in a Bottle – Level 27

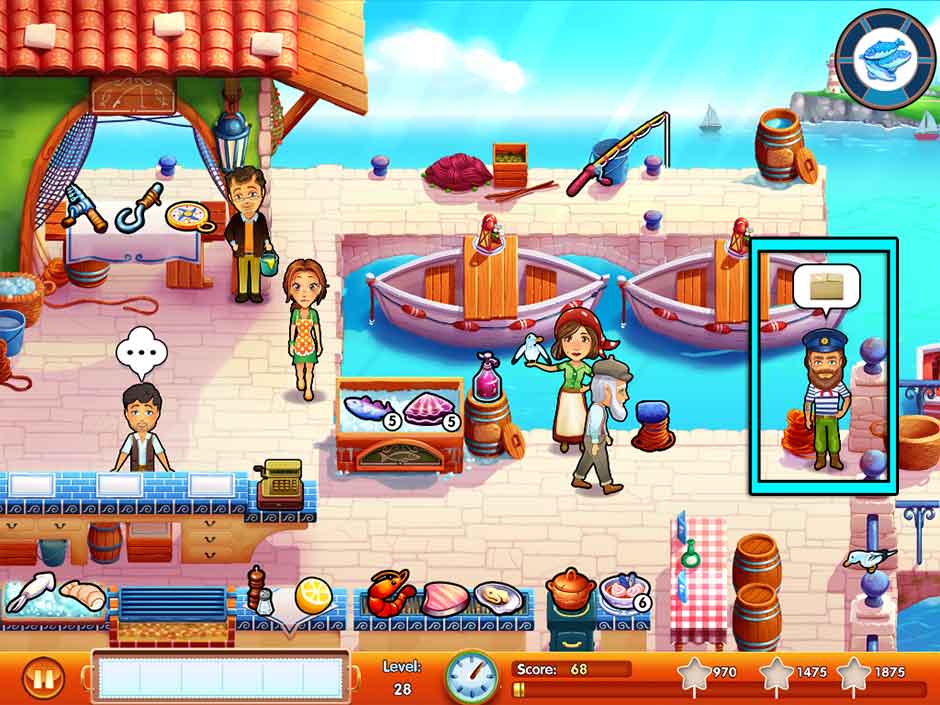
Level 28 – Two Nice Catches

The sea is full of fish, but not all of them are worth the same.

Mouse Location: Behind the red pile of netting at the center top of the screen.


Marco’s back from his fishing trip and has several deliveries for you to handle today. Marco will appear on the right side of the restaurant from time to time. When he appears, a package icon will pop up over his head. Click on Marco to collect the package. Collect all 5 deliveries before the end of the day to complete the day’s objective. Additionally, Edward is back to help with tables, allowing you to put more focus on customers today.

Delicious - Emily's Message in a Bottle - Level 28

Delicious – Emily’s Message in a Bottle – Level 28

Level 29 – The Secret To Success

What if the secret to happiness was easier and closer than we think?

Mouse Location: Peeking behind the upper right corner of the rightmost docked boat.


The restaurant is in full swing. Today will put your time management skills to the test as you balance grilling food and serving customers. Don’t forget to use Edward and Arabella’s help when it comes to cooking and entertaining.


Level 30 – Two To Go

Thank you, Marco and Arabella! Now – time to see what Gino’s been up to!

Mouse Location: Between the checkout counter and the ice bed holding the grill items, in the lower left corner of the screen.


The market’s busier than ever and the customers keep pouring in. Focus on restocking all your limited-stock items as soon as the day starts, putting special emphasis on the fresh catches brought in via the fishing pole! If you’re feeling confident, you can try preparing grilled items early and keeping them on your tray for future orders. The rest is smooth-sailing with the help of Arabella and Edward.


Restaurant 5: Welcome to the Family! – Gino’s Farm

Gino is even less enthusiastic about a family reunion than his mariner brother, Marco. Can you convince him to leave the home-sweet-home feeling of the farm?


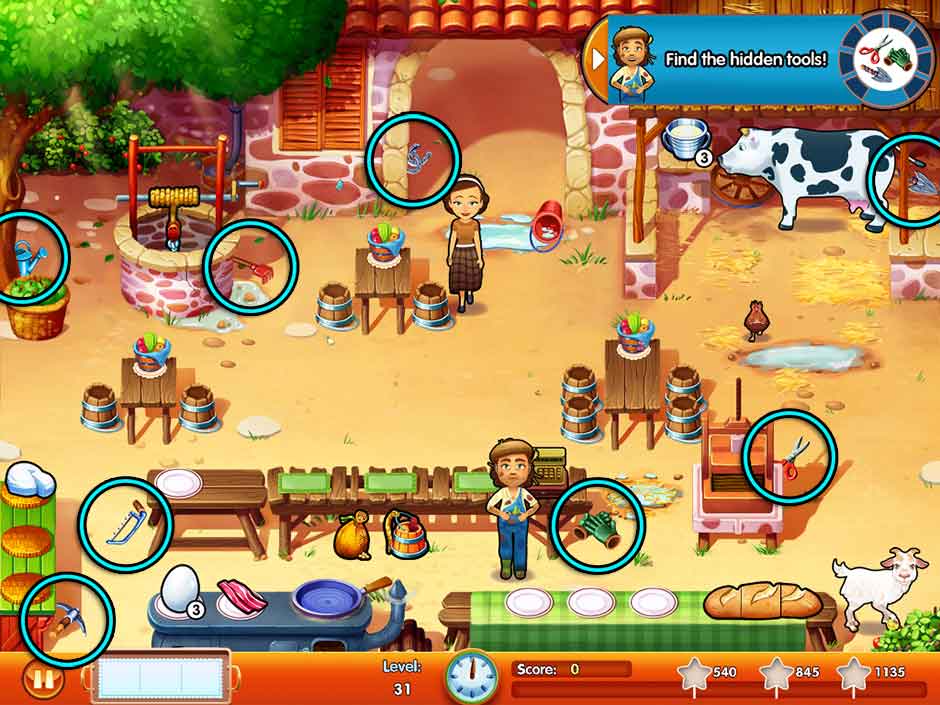
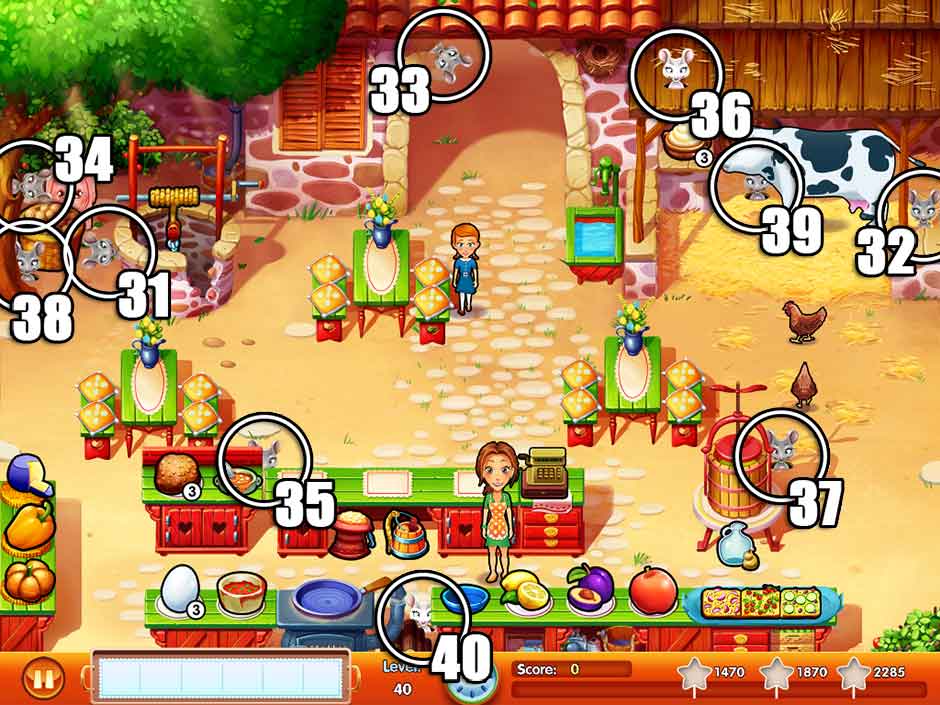
Level 31 – A Pig Pen Business

Forget what you know about idyllic Italian farms…

Mouse Location: Peeking around the left side of the well.


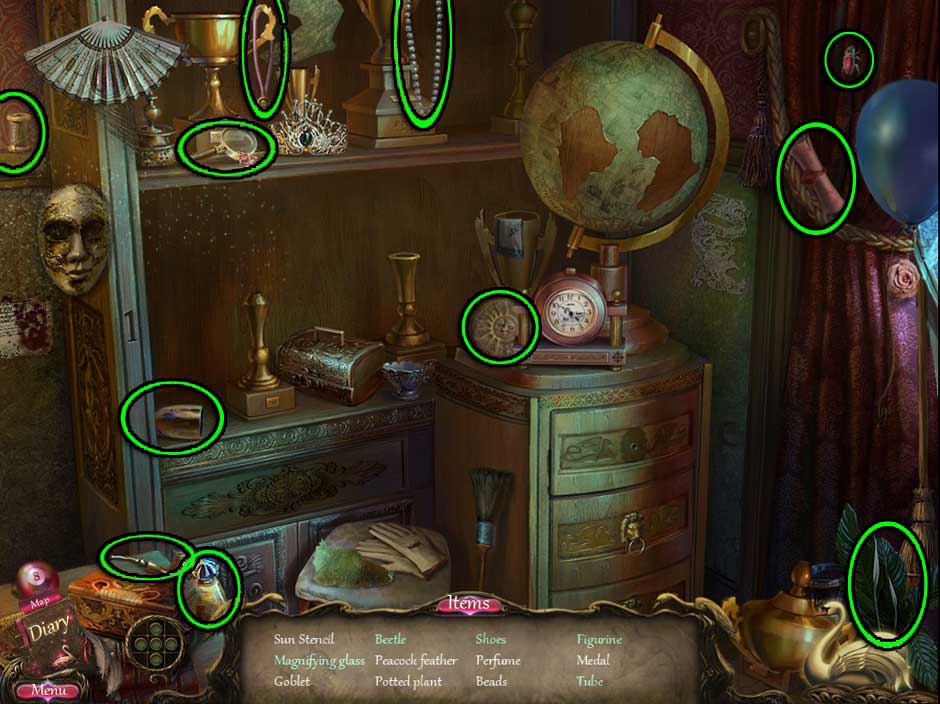
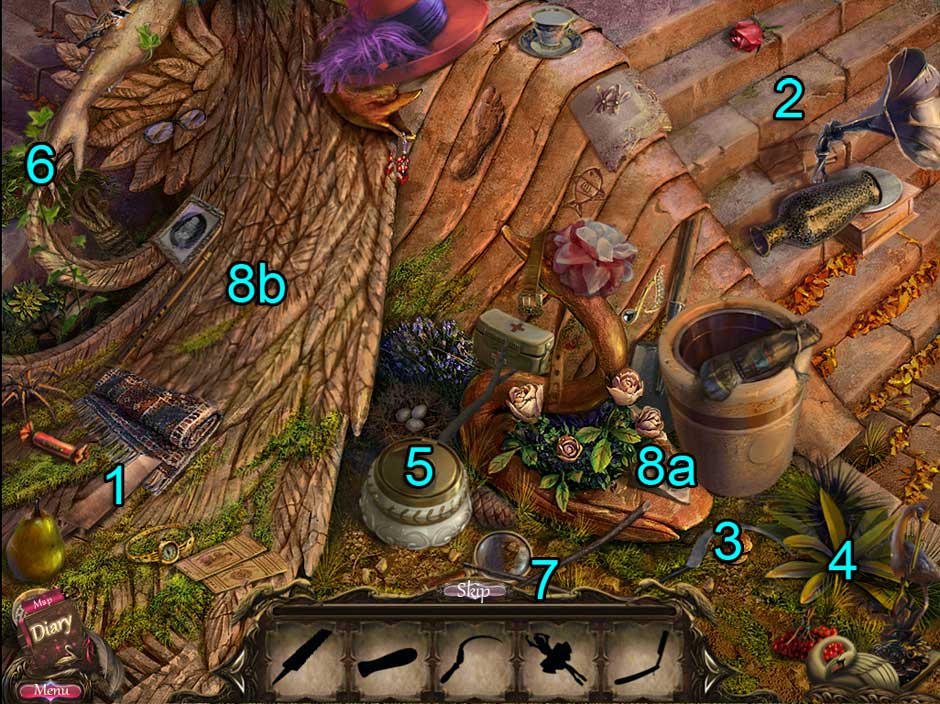
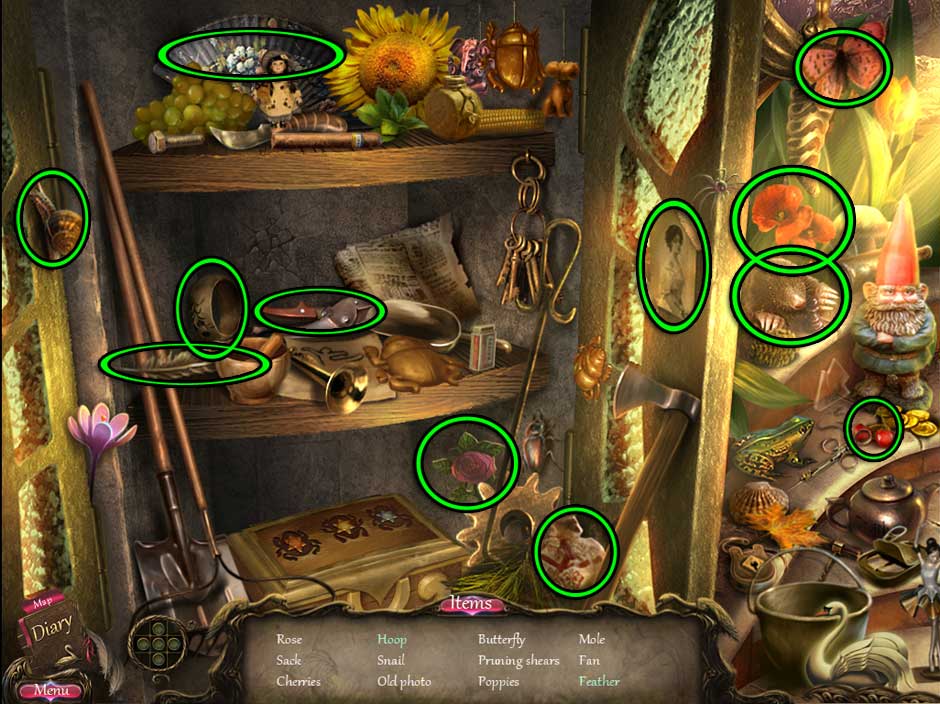
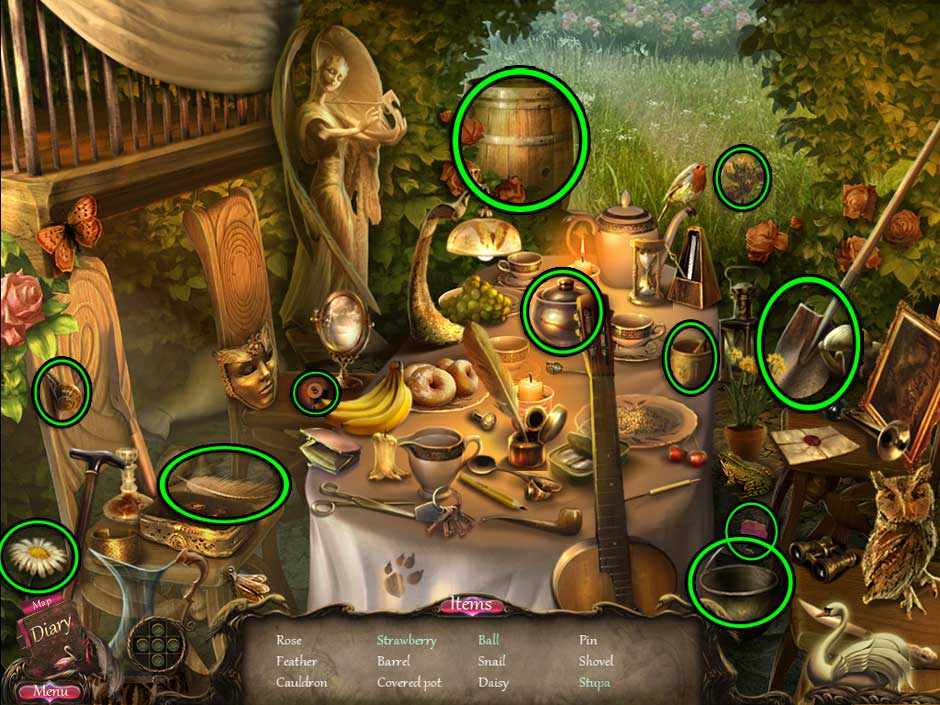
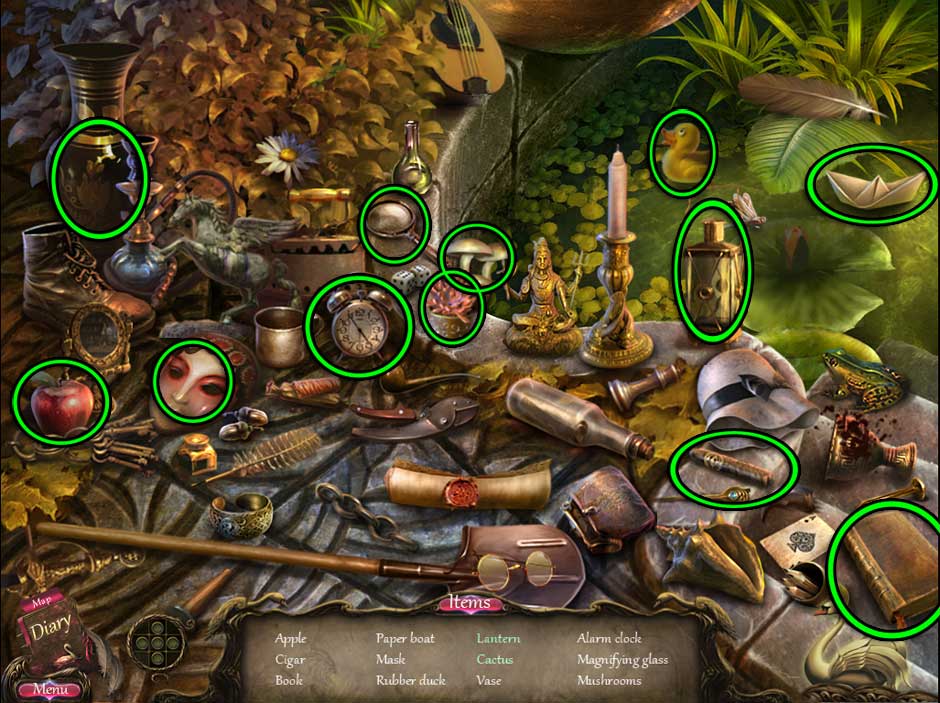
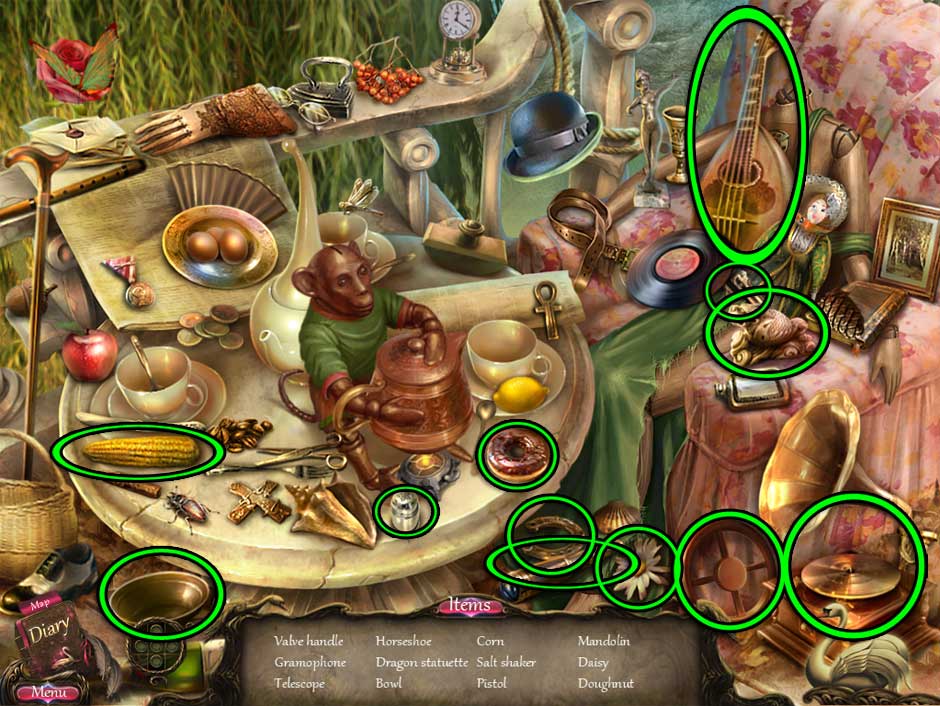
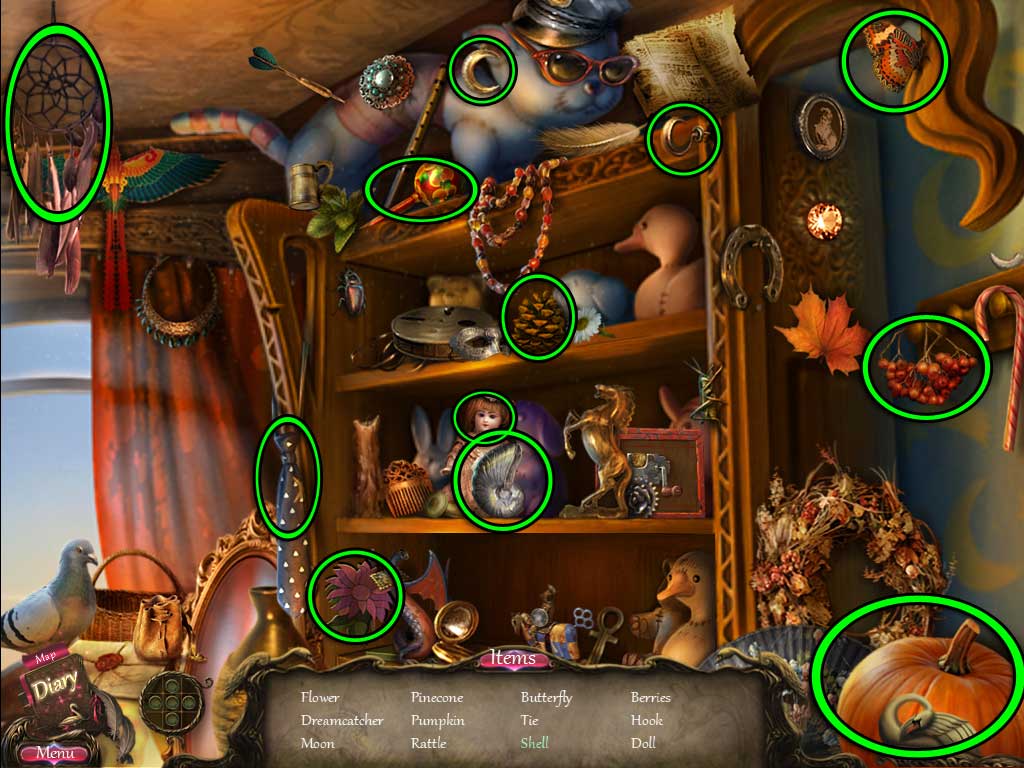
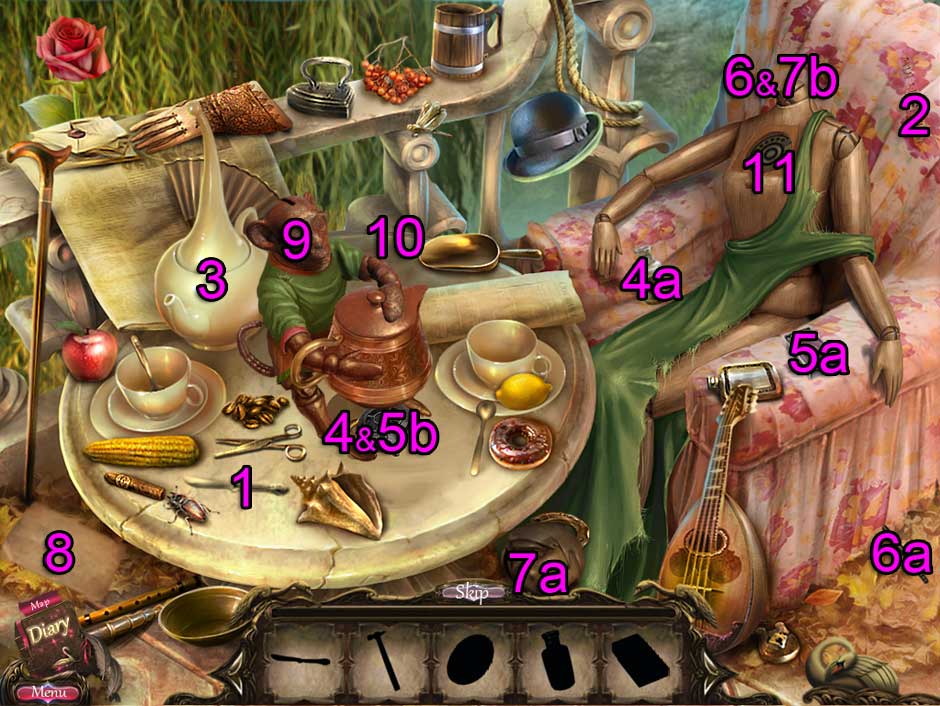
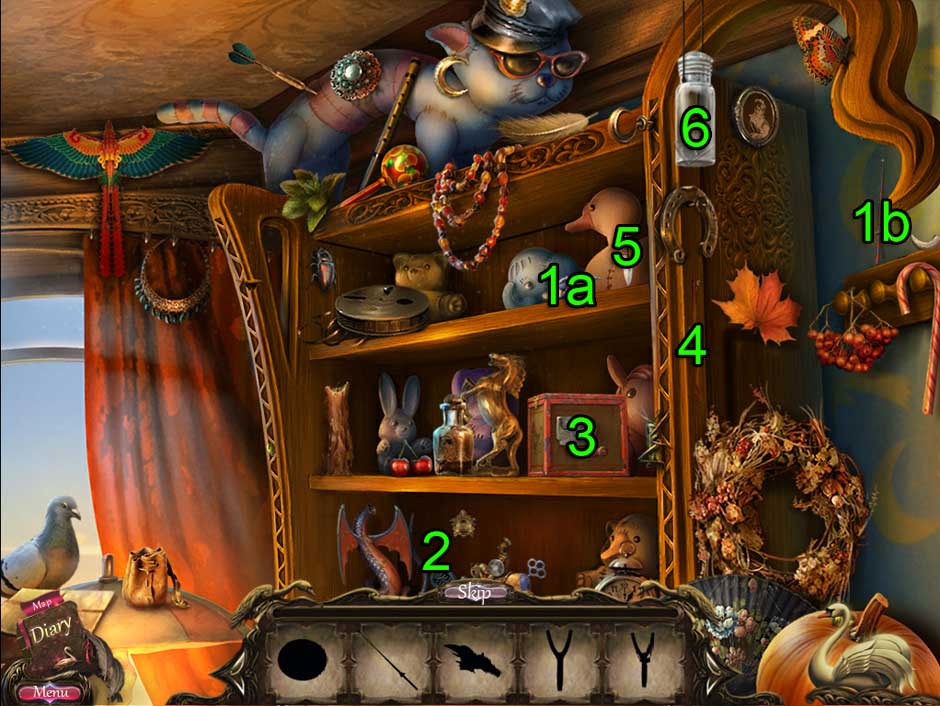
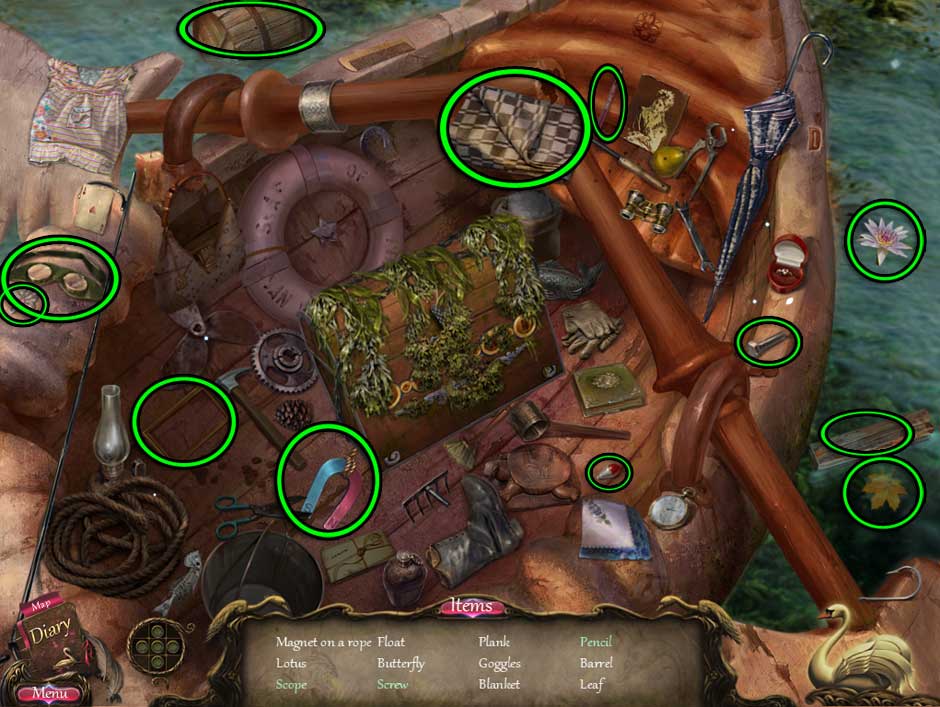
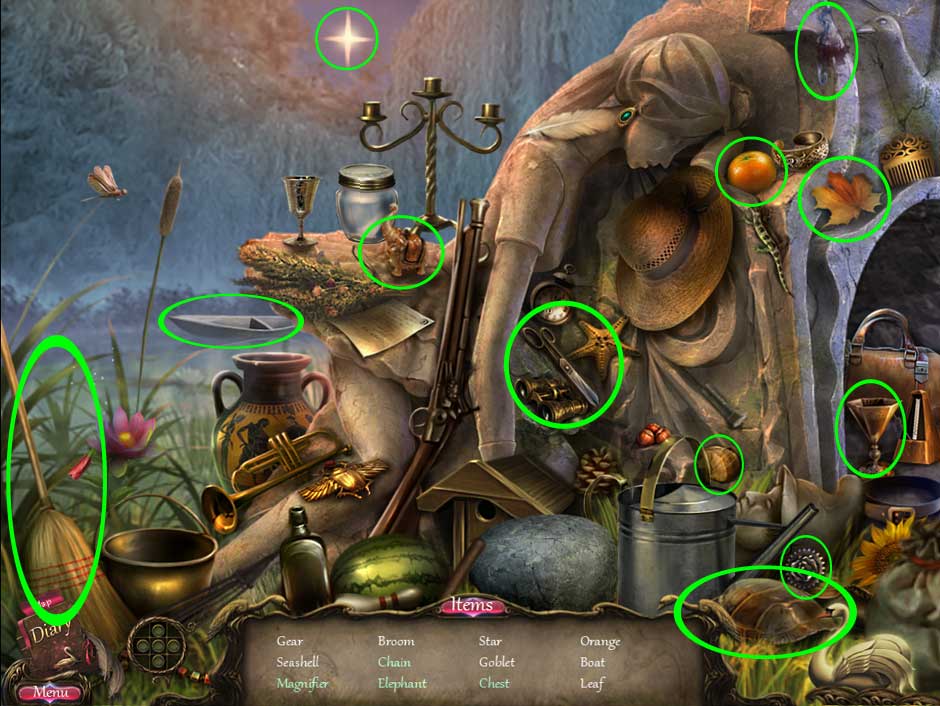
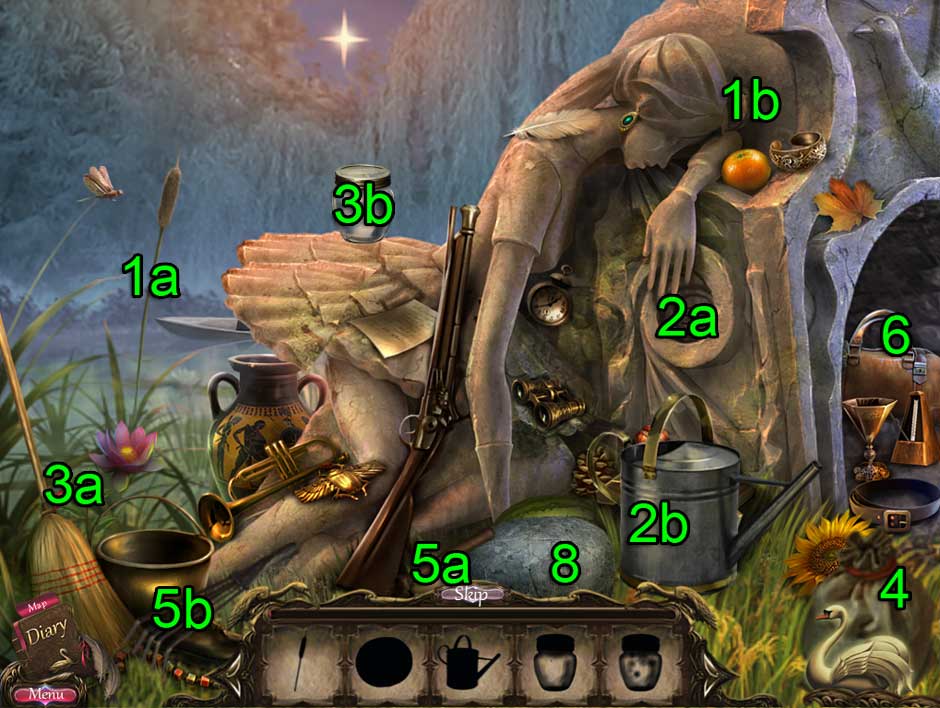
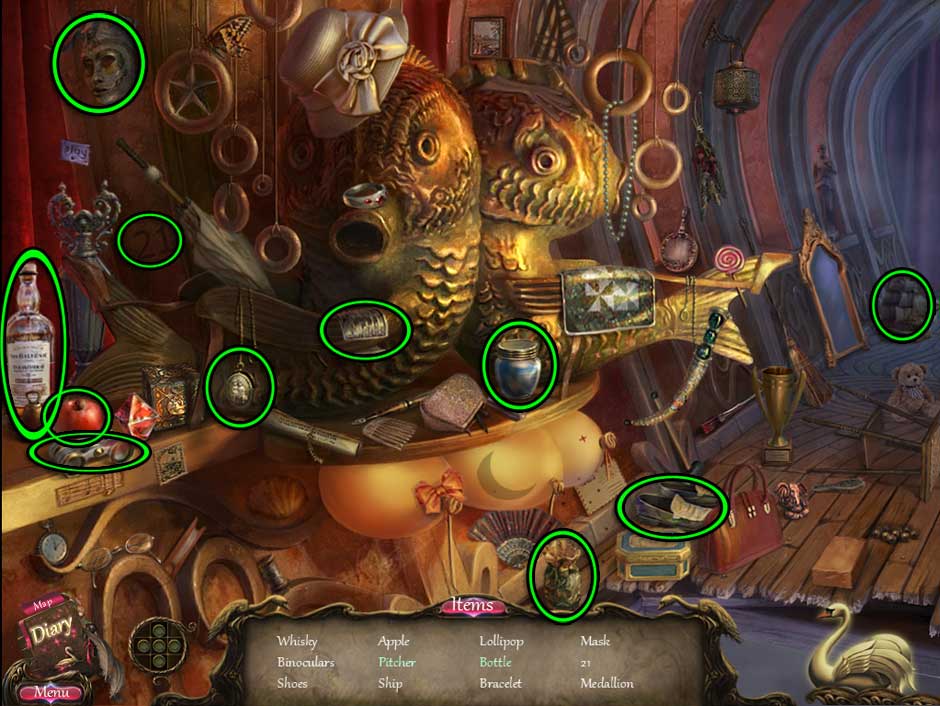
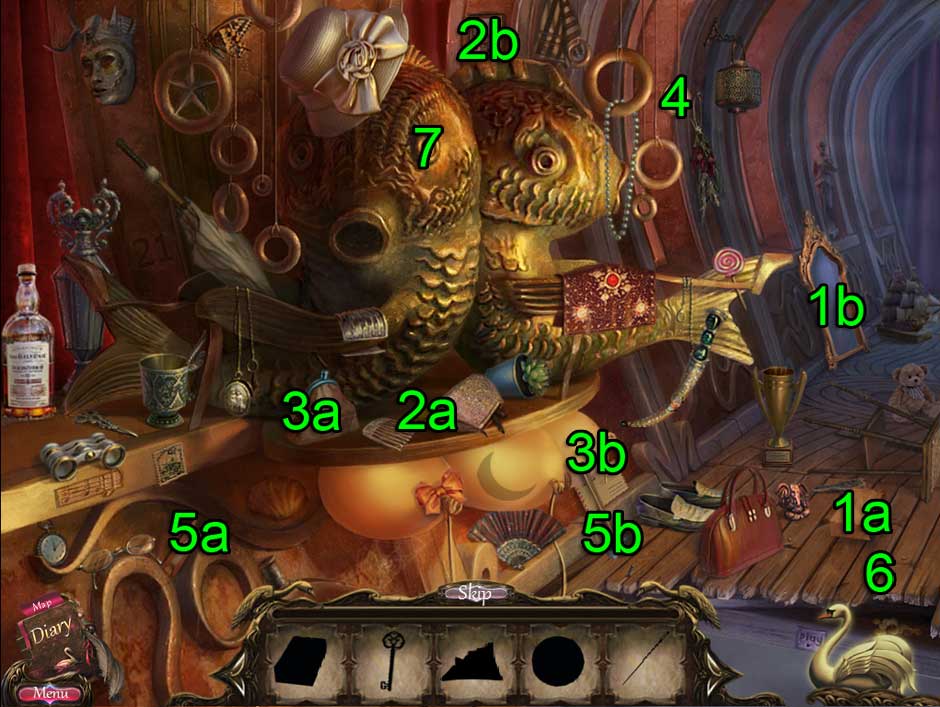
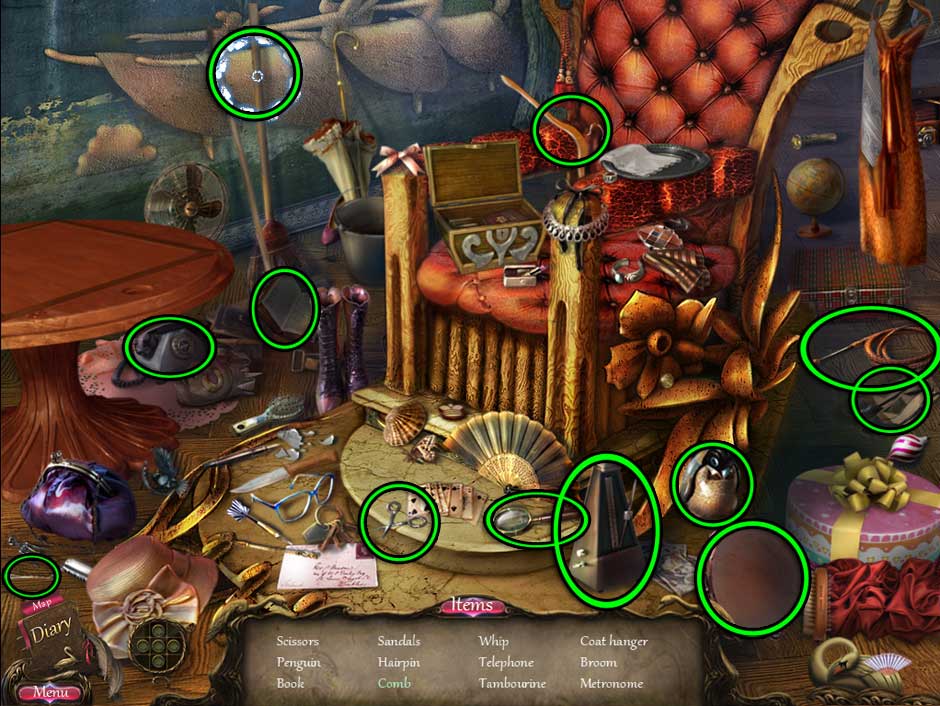
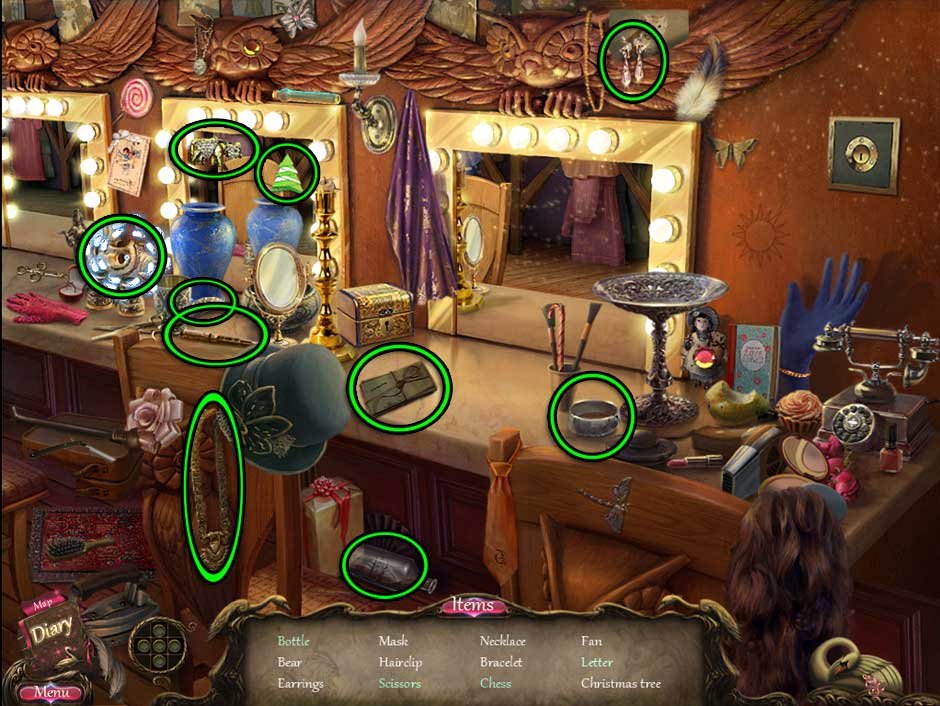
Gino isn’t used to having people around, and as such, the farm is a bit of a mess… Find the 8 tools hidden throughout the area. Locate them all before the end of the day to complete the day’s objective. Their locations are shown below. Omelets are a new menu item. To make an omelet, click on the egg in the lower left corner, followed by the bacon. Both ingredients will go into the nearby skillet. Once they blink, they’re ready to serve!


Customers may also ask for a bucket for the well. This is located under the counter. When this happens, click on the bucket, then take it to the customer. Click on them repeatedly until the meter that appears is full to help them retrieve water. Once finished, they will happily make their way to the checkout counter.


Tip! Struggling with bread portions? It’s just like the stuffed ravioli. Click on the leftmost piece to gather a single portion, the middle piece for a double, and the rightmost slice for a full portion.


Tip! The chickens wandering on the right will lay eggs from time to time. Click on eggs once they’re laid to add them to the stock of eggs for omelets. Similarly, click on the cow on the upper right to restock pails of milk.

Delicious - Emily's Message in a Bottle - Level 31

Delicious – Emily’s Message in a Bottle – Level 31

Level 32 – Animal Manners

It’s hard to believe, but in Gino’s farm even animals are more polite than people.

Mouse Location: To the right of the cow in the upper right corner of the screen.


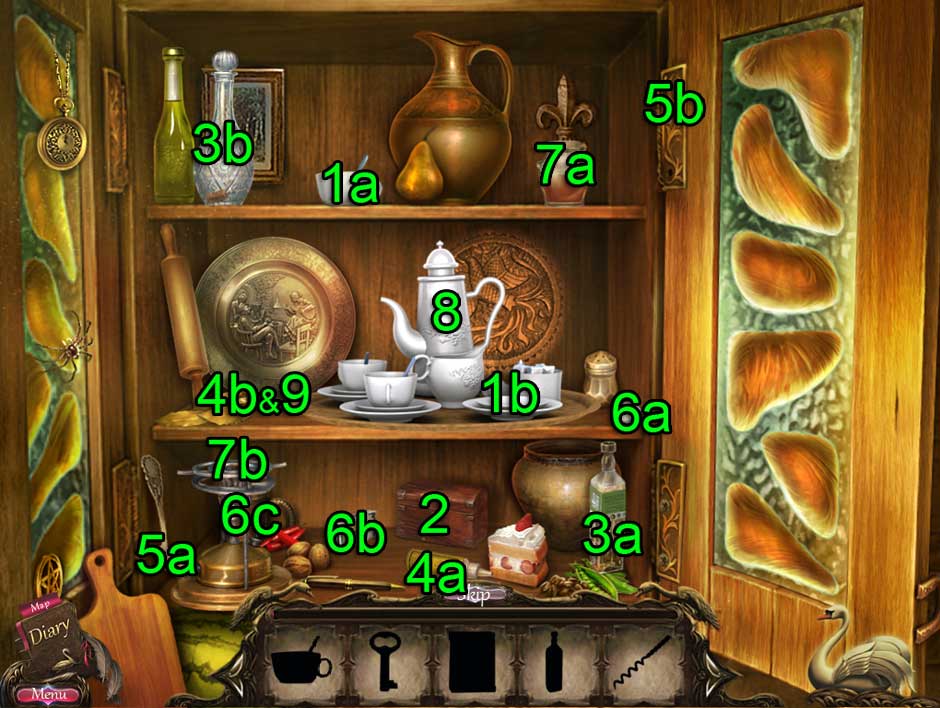
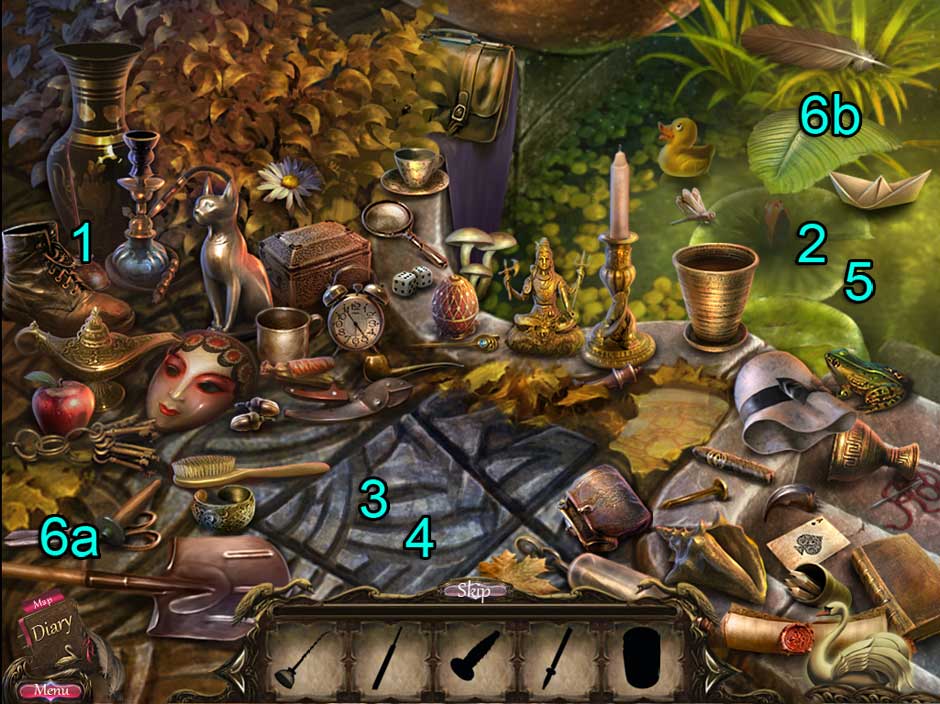
Fresh onions are a new menu item today, as are bowls of fruit. Serving onions requires no extra preparation, but if you want to prepare a fruit bowl, you’ll need to follow a simple series of steps. Click on the blue bowl at the bottom of the screen, followed by the orange, the strawberry, and finally the pear to top it off. Now it’s ready to serve!


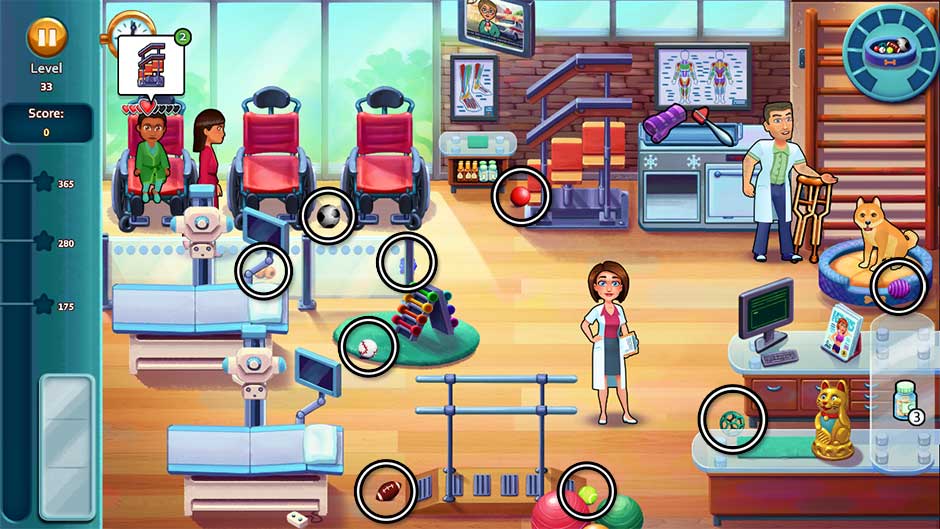
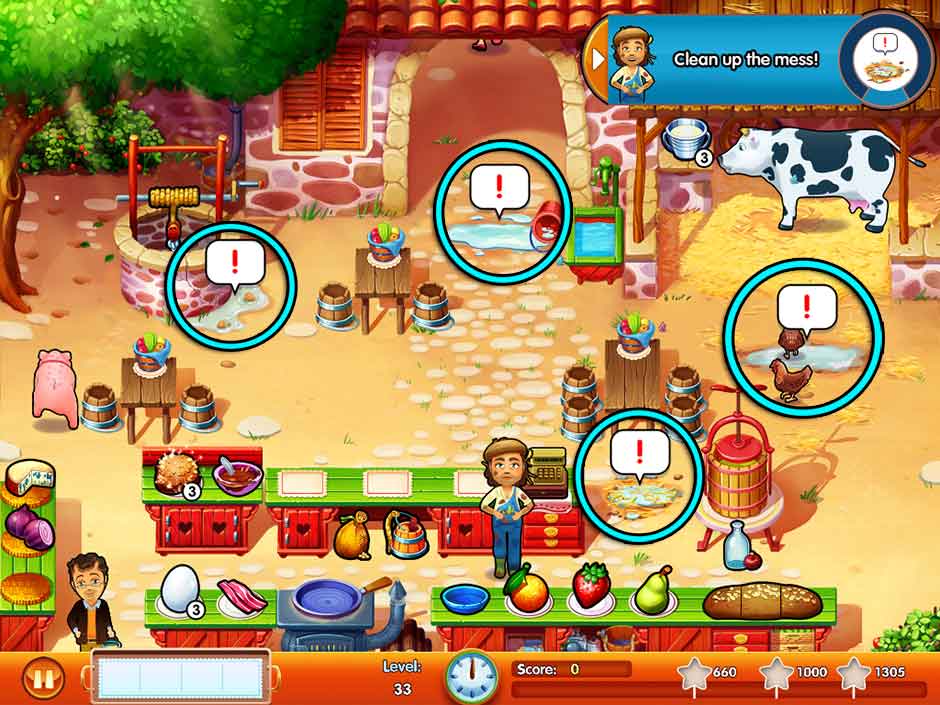
Level 33 – The Grumpy Napoli

Gino’s finally letting Emily help out at the farm. Let’s do some cleaning up!

Mouse Location: In the upper left corner of the entrance archway at the top of the screen.


The restaurant is still a mess, as marked by “!” bubbles throughout the area. Click on these areas to begin cleaning. A meter will appear showing your progress. Finish cleaning all areas before the end of the day to complete the day’s objective. If you’re running low on time, focus on cleaning before the last customer leaves, and you’ll still be able to achieve your goal.


Tip! Truffles are a new menu item today. To serve truffles, click on the truffle on the left side of the counter, followed by the dip. You may notice there’s a number on the truffles – as well as a certain pig named Truffles strolling around the upper left corner next to the well. Truffles, true to her name, will dig up truffles from time to time. When these appear, click on them to add them to the stock ready for serving.

Delicious - Emily's Message in a Bottle - Level 33

Delicious – Emily’s Message in a Bottle – Level 33

Level 34 – Deep Trouble

Paige learns that getting too close to the well is not a good idea. Others aren’t so lucky…

Mouse Location: Peeking out of the hole in the tree in the upper left corner of the screen.


The apple cider press is ready to serve today. Located to the right of the checkout register, click on the bottle beneath the press to fill it with apple cider. A meter will appear as it fills. Once the needle has reached the green, click on the bottle to stop the filling process before it overflows.


Tip! There are a number of useful upgrades to help you around the farm! Upgrade the chickens to double the number for double the eggs, or recruit little Paige to collect eggs for you when you click them. Truffles can even be upgraded to find truffles even faster. It’s also highly recommended you upgrade the cider press so that you never have to worry about a bottle overflowing! Click on a bottle to fill it, and the press will do the rest itself, leaving you with cider ready-to-go, without taking up a slot on your serving tray.


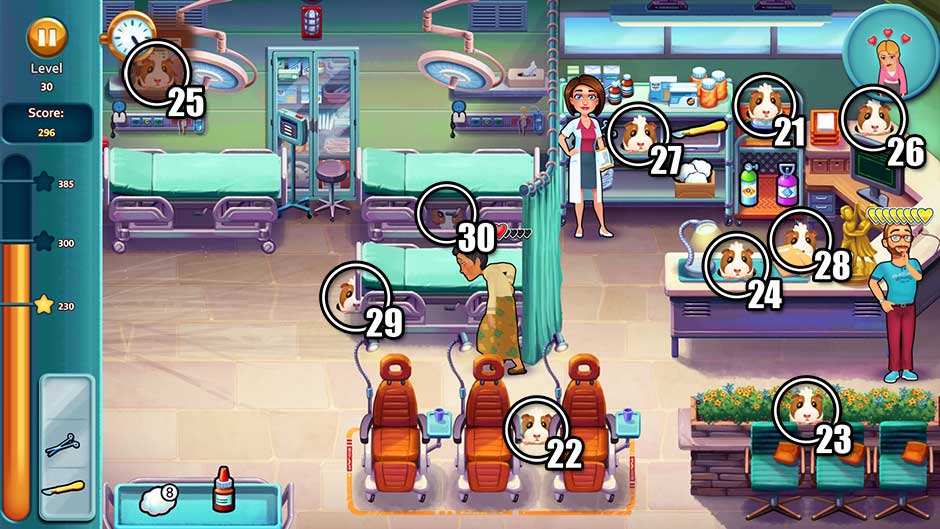
Level 35 – A Misunderstood Pig

Gino isn’t anywhere to be found, so Emily and Edward need to step in! If only pigs could speak…

Mouse Location: Behind the upper right corner of the truffle counter, to the left of the customer checkout counter.


The restaurant is fully stocked today. If you haven’t already focused on upgrades, today is an excellent day to upgrade various aspects of the farm to better serve your customers.


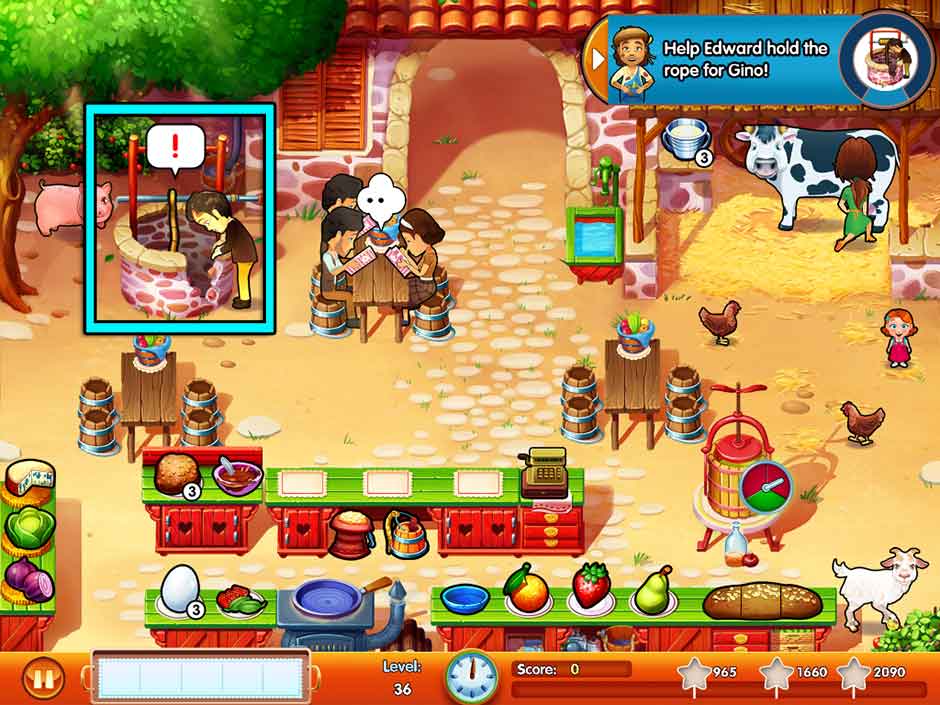
Level 36 – Someone Call a Vet!

Gino, hang in there just a little longer! Help Edward rescue him!

Mouse Location: On top of the wood overhang above the stable in the upper right corner of the screen, above the milk pail.


Gino’s in trouble! Click on Edward to have him work on helping Gino out of the well. You will need to click on Edward repeatedly in order to fill the meter that appears. Do this as quickly as possible, every spare moment you can between serving customers. Edward’s tasks are separate from Emily, so if Emily is busy walking someplace or serving customers, you can use this window of time to click on Edward repeatedly as you help Gino up out of the well.

Delicious - Emily's Message in a Bottle - Level 36

Delicious – Emily’s Message in a Bottle – Level 36

Level 37 – The Broken Leg Whim

Even mean and unfriendly farmers like being taken care of from time to time.

Mouse Location: Behind the upper right corner of the cider churn.


Gino is safe, though his leg is broken. Things are nearly back to normal service-wise today, with Edward on hand to help clean tables. Focus on keeping items in stock by milking the cow, collecting eggs from chickens, collecting truffles from Truffles, and filling cider so it’s ready to go for orders.


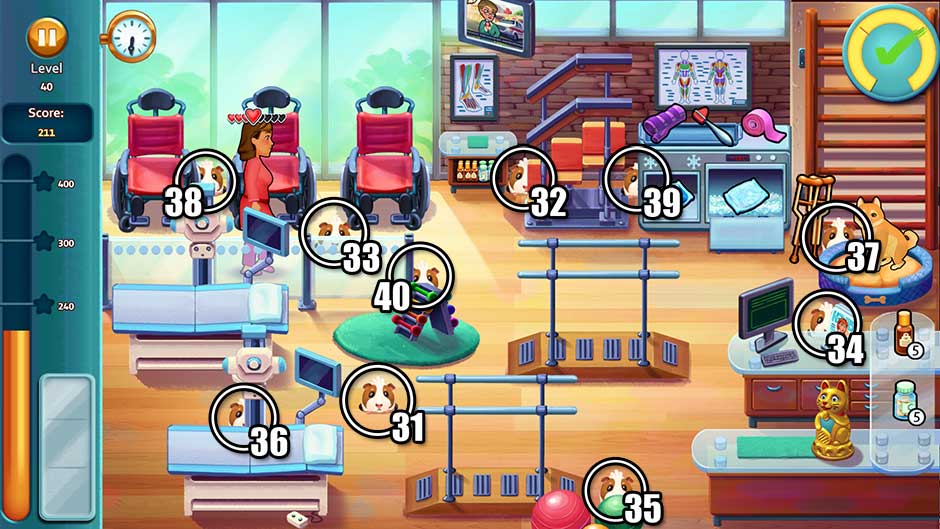
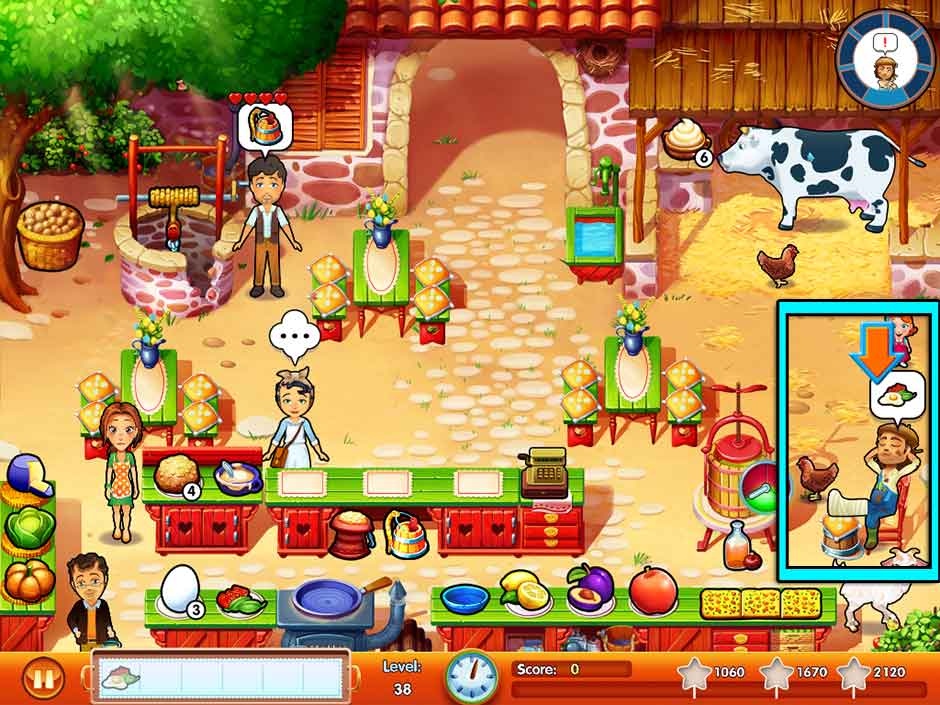
Level 38 – Nothing Like Family

Is there a way to make Gino realize there’s nothing like having the family around?

Mouse Location: At the foot of the tree in the upper left corner, in front of the truffle basket.


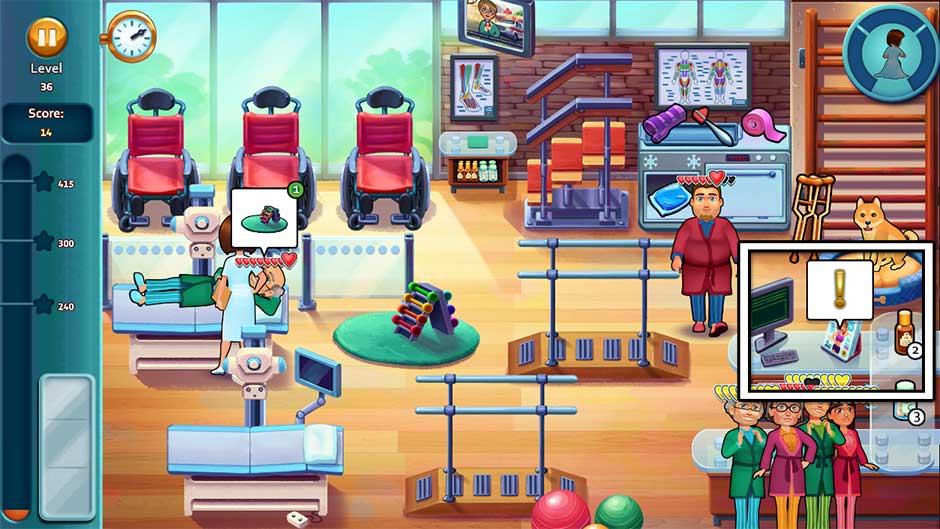
Gino will ask for different items throughout the day – 6 in total. A bubble displaying an item will pop up over Gino’s head from time to time. When this happens, prepare the item he asks for, then bring it to him. Do this successfully 6 times before the end of the day to complete the day’s objective.


Tip! Truffles doesn’t appear to be on the farm today, so click on the basket beneath the tree in the upper left corner to restock truffles as needed.

Delicious - Emily's Message in a Bottle - Level 38

Delicious – Emily’s Message in a Bottle – Level 38

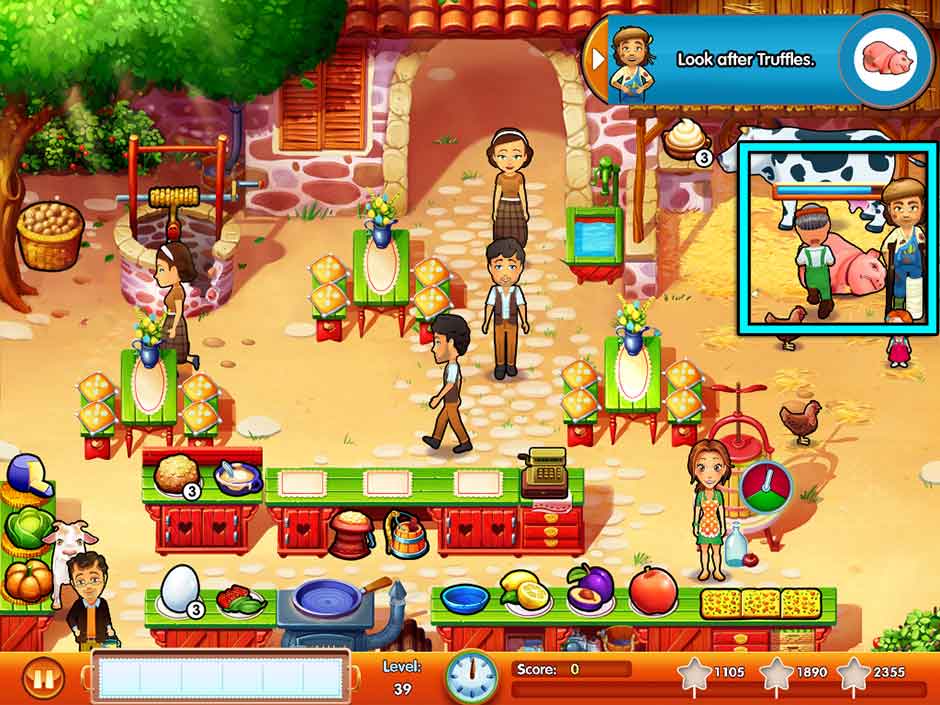
Level 39 – Truffles in Danger

Who said you can’t grow fond of pigs? Take care of Truffles so she can recover!

Mouse Location: Beneath the cow’s head, in the upper right corner of the screen.


Truffles isn’t doing very well, and requires near-constant care. A meter over Truffles will display how much time you have remaining before you need to check on her again. Clicking on Truffles counts as checking on her, and Emily does not have to move over to Truffles in order to do this. As such, click on Truffles between every single task you do to make sure you don’t lose track of caring for her. Example: Make cider, click on Truffles, restock milk, click on Truffles, prepare eggs, click on Truffles, serve eggs to customer, click on Truffles, etc. Complete the day without the bar above Truffles depleting completely to achieve your objective.

Delicious - Emily's Message in a Bottle - Level 39

Delicious – Emily’s Message in a Bottle – Level 39

Level 40 – A Matter Of Life And Death

Nothing left to do but hope for the best now… Will Truffles survive the night?

Mouse Location: At the bottom of the screen, between the stove and the fruit bowl.


It’s your last day on the farm, and all’s well that ends well. Utilize the tips and tricks outlined in the levels above to complete the day without issue. Remember to keep your items in stock!


Restaurant 6: A Taste of Fame – Vinicio’s Vineyard

Unlike the other brothers, Vinicio’s restaurant is far from quaint. Rolling hills, fine grapes, and romantic sunsets await!


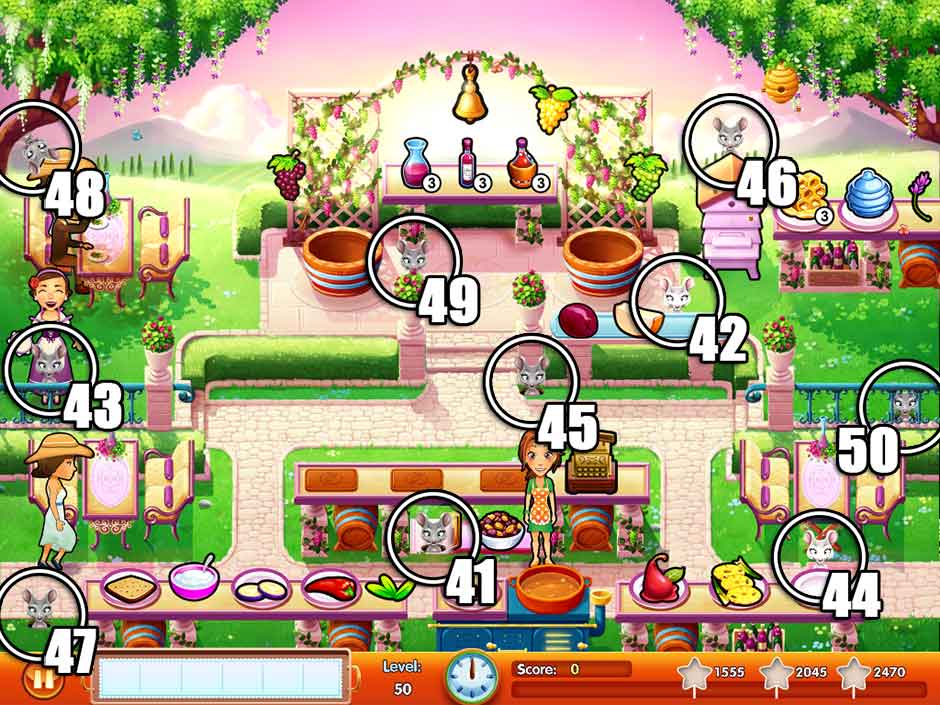
Level 41 – Welcome to the Vineyard!

After the mud and fleas at the farm, there’s nothing as refreshing as the vineyards.

Mouse Location: Below the checkout counter, on top of the blanket.


Welcome to the vineyard! The crème de la crème dine here, and with a few simple tricks, you’ll be a top-caliber server in no time. To start the day off, click on the batter ball above the bottom center of the screen to cook it. Click on the bell at the top center of the screen to restock your wines. When customers ask for appetizers, click on the bread in the lower left corner, followed by the chocolate, and finally the topping. Some customers may want to try making wine themselves. These customers will hop into the barrels at the top of the screen and ask for a specific variety of grapes. Bring the grapes to them and they’ll handle the rest. And just like that, you’re well on your way!


Tip! Emily does not have to go to the bell at the top of the screen to ring it and restock wine, so do this whenever and however often you like!


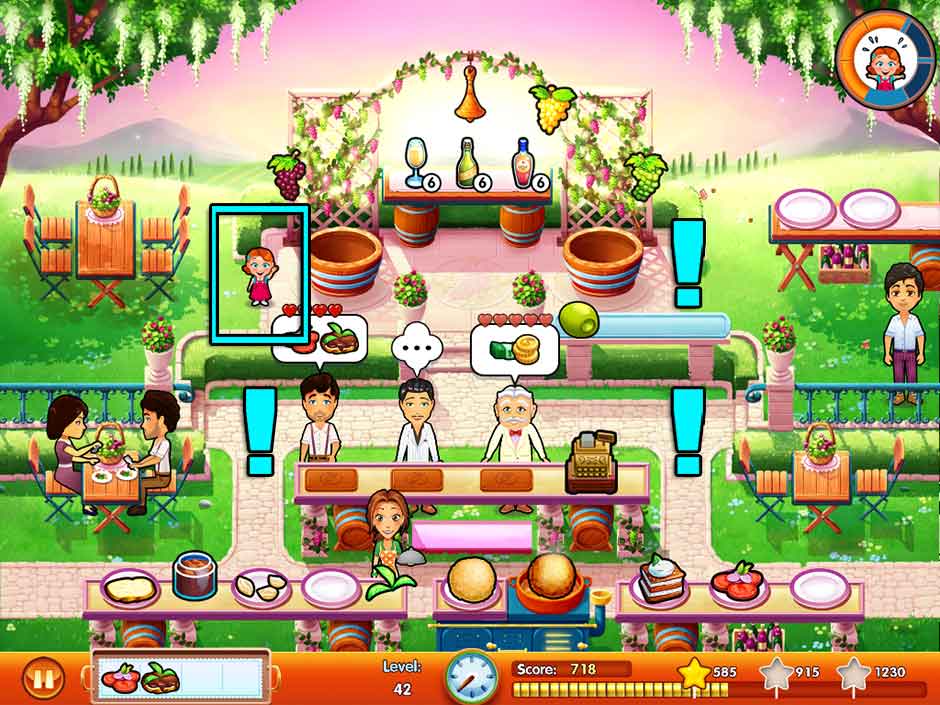
Level 42 – Faraway Offspring

Vinicio and Bianca stay together at the vineyard, but not for the same reasons…

Mouse Location: Behind the right side of the olive and cheese counter, toward the upper right corner of the screen.


In addition to managing the vineyard register, you’ll need to look after Paige today. Paige will appear from time to time with a playful giggle. When this happens, click on her to have Emily tend to her. You will need to do this successfully 5 times before the end of the day to complete the day’s objective. Paige tends to show up in the four plaza corners. Refer to the screenshot below for these locations.


Tip! Clicking on Paige will cause Emily to drop or delay all other tasks she’s currently got lined up. Keep this in mind as she rushes off to tend to her little one.

Delicious - Emily's Message in a Bottle - Level 42

Delicious – Emily’s Message in a Bottle – Level 42
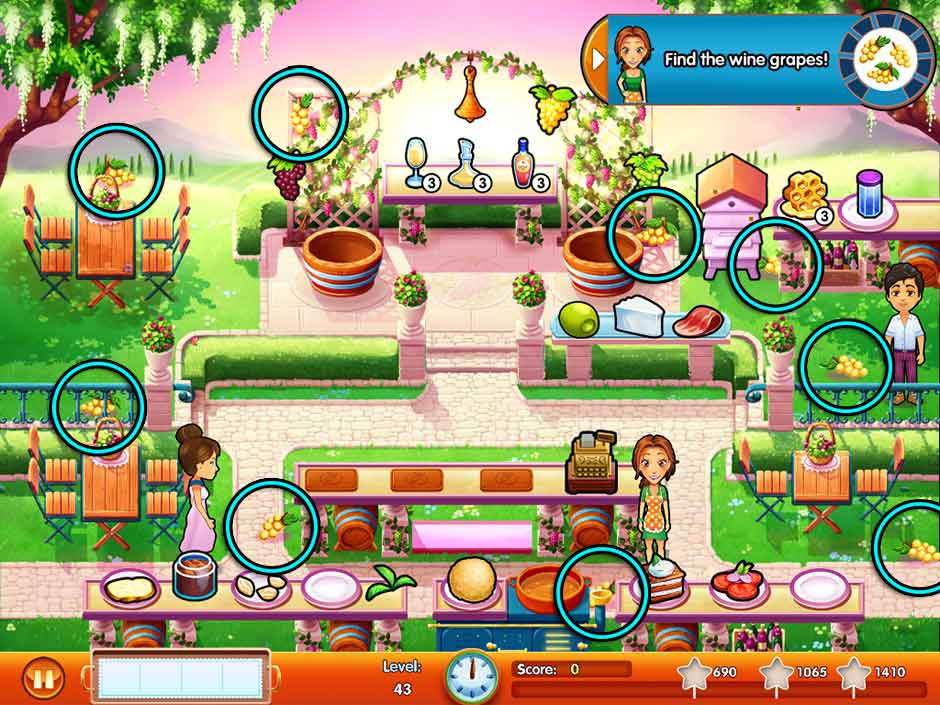
Level 43 – The Heir

Will Vinicio Jr. take over the vineyard? For now, let’s help him find some grapes!

Mouse Location: On top of the railing on the left, in front of Bianca the entertainer.


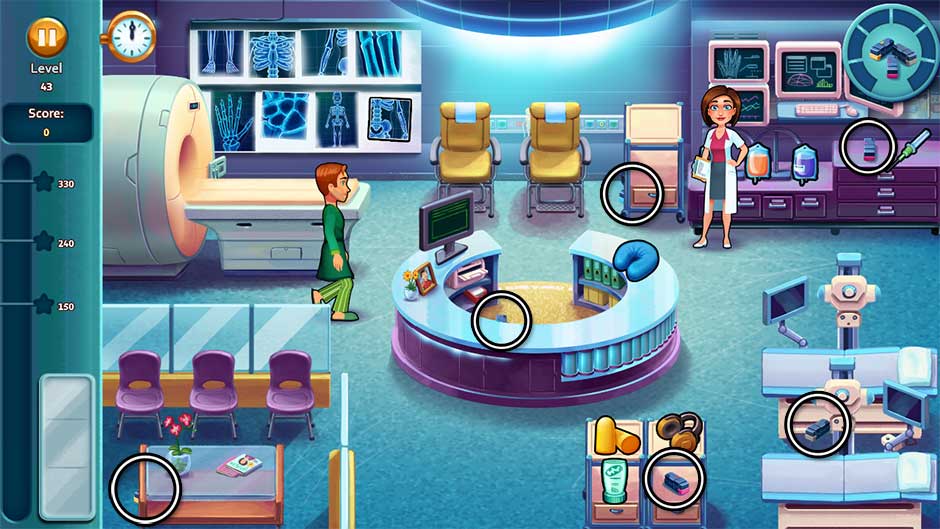
Find the white wine grapes scattered throughout the vineyard. Locate all 9 clusters of grapes before the end of the day in order to complete your objective. Their locations are shown in the screenshot below.


Tip! Honey is available in the vineyard today. To serve honey to customers, click on the honeycomb, followed by the container to the right. Click on the bee hive box to restock honeycombs.

Delicious - Emily's Message in a Bottle - Level 43

Delicious – Emily’s Message in a Bottle – Level 43

Level 44 – Liquid Gold

Wealth doesn’t come for free… does it?

Mouse Location: Behind the right side of the snack counter, above the last plate on the right in the lower right corner of the screen.


There’s a full range of toppings available for appetizers today on the lower left counter. Pay close attention to customers’ orders, as they may like few, many, or any combination of toppings! Remember to cook the batter ball and restock the wine as soon as the day begins, and keep these items stocked throughout the day.


Level 45 – A Thirsty Stranger

Can you tell the difference between a good wine and a bad one?

Mouse Location: Below the rightmost central column holding the pot of flowers, to the lower left of the olives.


A wider variety of menu items graces the vineyard today, but the bulk of today’s challenge lies in the multi-layer appetizers on the lower left. Pay close attention to these orders and the layers a customer wants. Remember to keep the wine, honey, and batter balls in stock and ready to serve.


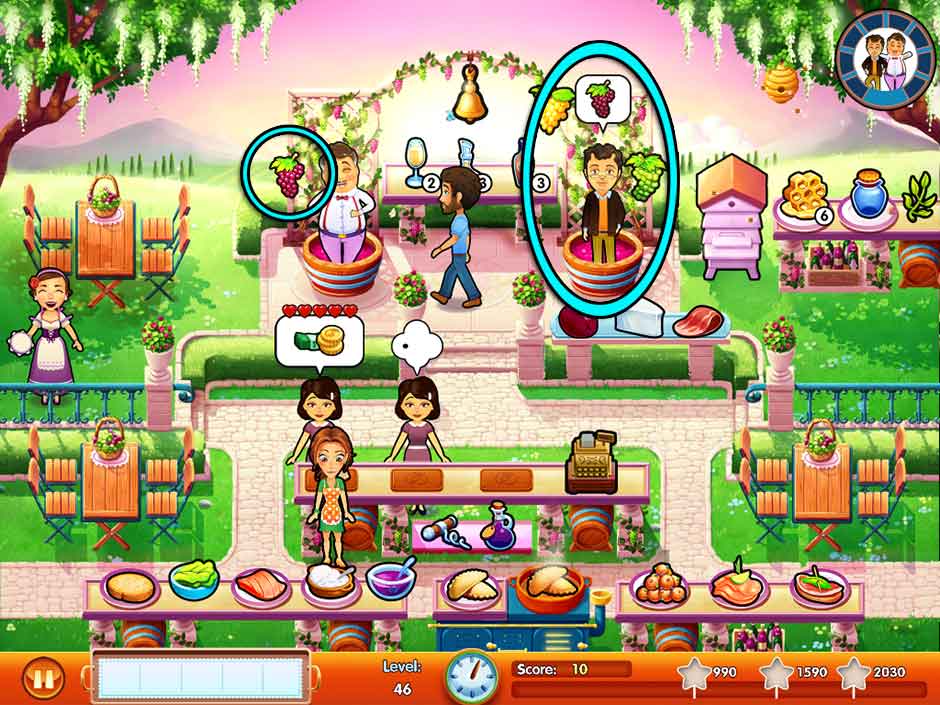
Level 46 – A Silver Lining

Help the brothers make good wine again, the old fashioned way… Will it make up for years of neglect?

Mouse Location: At the top of the beehive box in the upper right corner of the screen.


Edward and Vinicio are having quite a good time stomping grapes today. From time to time, they will ask for additional grape clusters. When this happens, click on the corresponding cluster of grapes, then take it to them. Fulfill these requests a total of 8 times throughout the day to complete the day’s objective.

Delicious - Emily's Message in a Bottle - Level 46

Delicious – Emily’s Message in a Bottle – Level 46

Level 47 – Property Value

Evelyn and Edward feel at home in Napoli. It will be hard to leave… but do they have to?

Mouse Location: In the bottom left corner, to the left of the sandwich counter.


The vineyard is fully stocked today, and it’s important to keep it that way. Keep items stocked throughout the day as you serve customers. There are no special objectives, but you will need to clean any tables on your own without help. Click on tables marked with “!” to have Emily clean them. Bianca is here to keep customers entertained, so use her talents as necessary to keep them happy while you focus on cleaning tables and serving customers.


Level 48 – Common Roots

Each generation is nothing but a reflection of what came before.

Mouse Location: Hanging down from the branch in the upper left corner of the screen.


Today is almost a mirror image of the previous day. Keep the restaurant running while Edward talks with Vinicio Jr. Will he follow his heart?


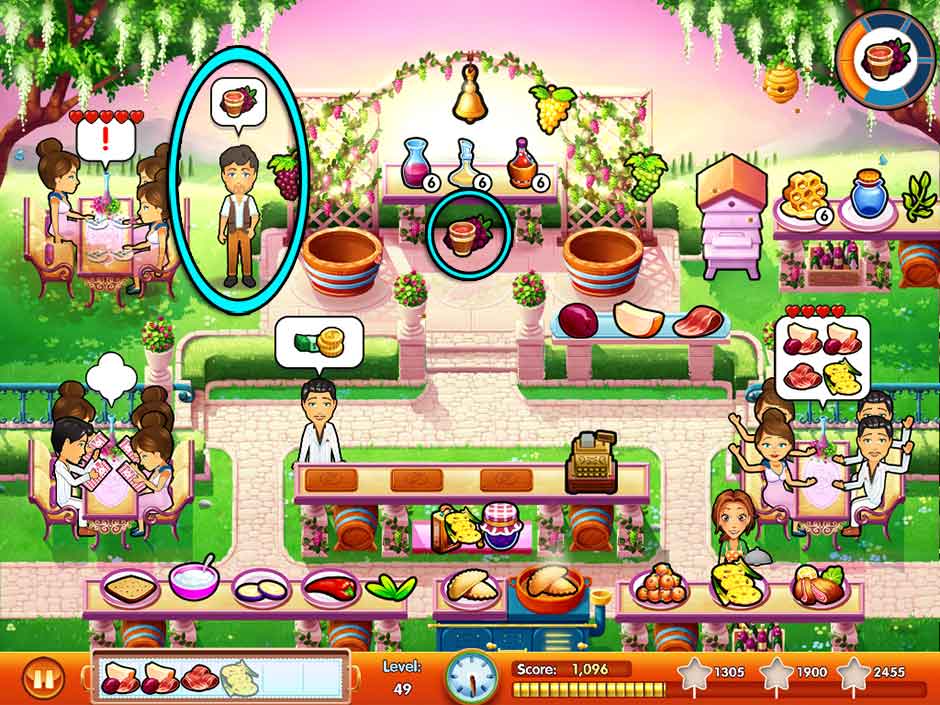
Level 49 – Back In Business!

There’s only one thing worse than a restaurant with too few customers… one with too many!

Mouse Location: Above the flowers on the leftmost center column, below the wine table.


Deliver quality wine to the customers today! Occasionally, a single customer will wander to the upper left corner of the screen, standing next to the leftmost wine barrel, and request a quality sample of wine. When this happens, click on the wine sample beneath the wine table at the top of the screen, then click on the customer to take it to them. Fulfill 5 of these requests before the end of the day to complete your objective.

Delicious - Emily's Message in a Bottle - Level 49

Delicious – Emily’s Message in a Bottle – Level 49

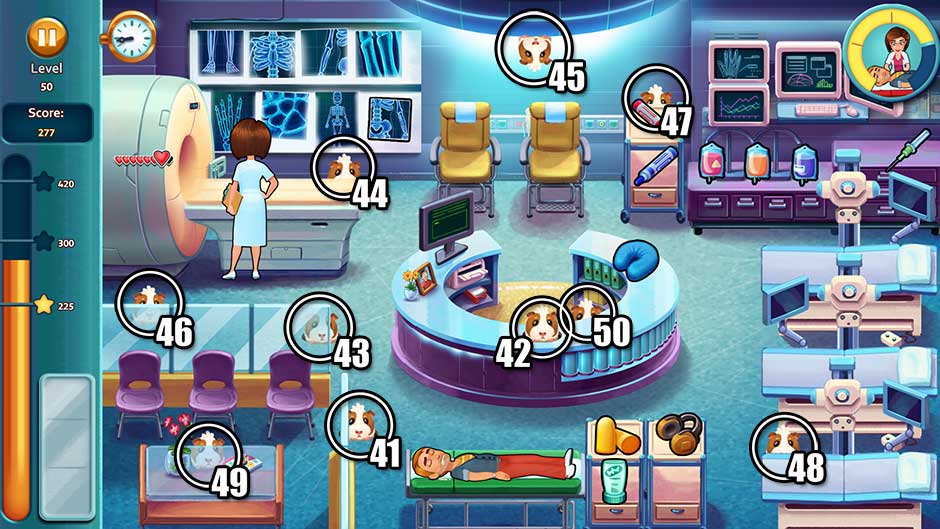
Level 50 – The Secret Of A Good Wine

Just as grapes take time to become good wine, family needs attention to prosper.

Mouse Location: Between the rightmost rails on the right side of the screen.


The Napoli family wine reputation has been restored, and customers are pouring in. Utilizing the tips from previous levels and upgrades you’ve purchased throughout, keep items stocked and customers happy. Bianca isn’t around to entertain, and Emily will have to clean tables herself, so your time management skills will be put to the test in this final day at the vineyard.


Restaurant 7: The Family Reunion – Family Restaurant

After a lot of hard work, the Napoli family is finally ready to give the family reunion one more chance. Vittorio’s relationship with his sons isn’t the only challenge this family has to face, however…


Level 51 – An Unpleasant Surprise

Edward is preparing something special, but Evelyn doesn’t like the looks of it.

Mouse Location: Below the left side of the flower table, in front of the barrel.


Back to the Family Restaurant, only this time, there’s a few changes awaiting you! Patrick will be nearby to man the flower stand as soon as the day begins. There is also a pot of soup at the bottom of the screen, which you can restock at any time by clicking on the cooking pot. Furthermore, the pizza oven has been expanded so that you can cook not just one, but two pizzas at a time. Don’t forget to use the pizza peel when removing pizzas from the oven so that Emily doesn’t burn her hands! To make additional pizza dough, click on the bag of flour, followed by the bowl of water.


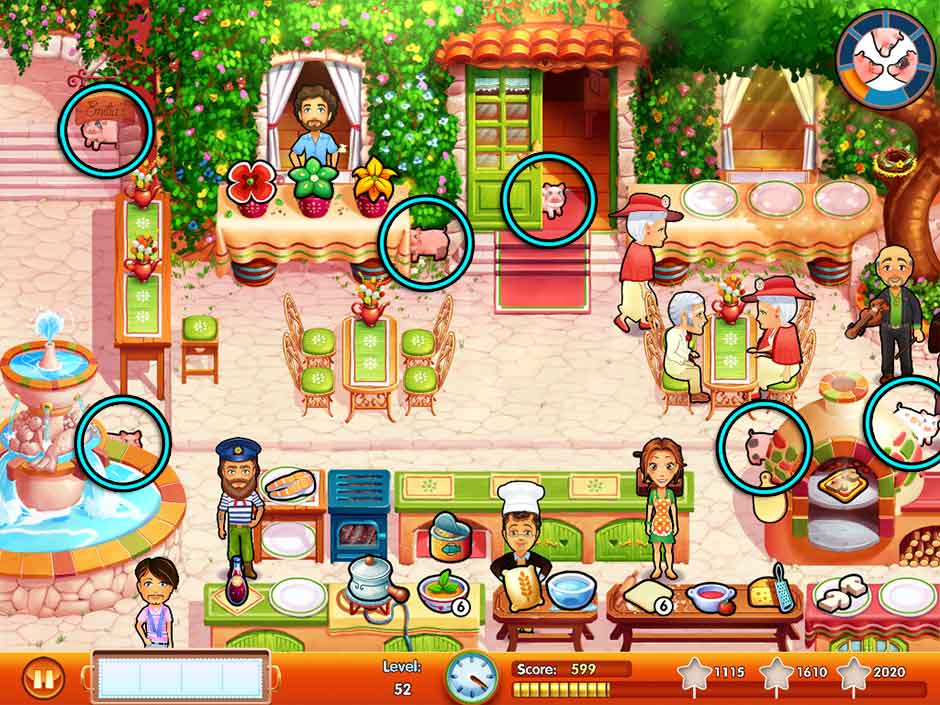
Level 52 – More Arrivals!

A father meeting his sons for the first time in decades… And a pig invasion in-between!

Mouse Location: Underneath the leftmost table legs, next to the fountain on the left.


Find the 6 piglets hiding around the restaurant before the end of the day. Listen for the oinks indicating they’ve appeared. Their locations are shown in the screenshot below. Edward will be behind the counter to help make pizza dough, so Emily can focus on finding the mischievous piglets.

Delicious - Emily's Message in a Bottle - Level 52

Delicious – Emily’s Message in a Bottle – Level 52

Level 53 – Real Estate

Some catching up for the brothers, and some bad news for Edward.

Mouse Location: Hanging down from the archway in the upper left corner of the screen, next to the “Emilia’s” sign.


The restaurant has plenty of helping hands, with Edward handling the pizzas, Marco manning the grill, and Gino setting up a fruit and wine stand in the upper right corner. Click on the bell near Gino’s table to restock the wines. Today’s challenge will be learning to manage multiple characters. Clicking on any character other than Emily will allow you to operate that character’s station, completely separate of Emily’s tasks. It’s an excellent day to learn to manage multiple facets of the restaurant without additional challenges.


Tip! Upgrade the pizza oven so that pizzas don’t burn! This way, you can cook one of each type of pizza and leave it in the oven, so they’re ready as soon as customers order, without taking up a spot on your tray!


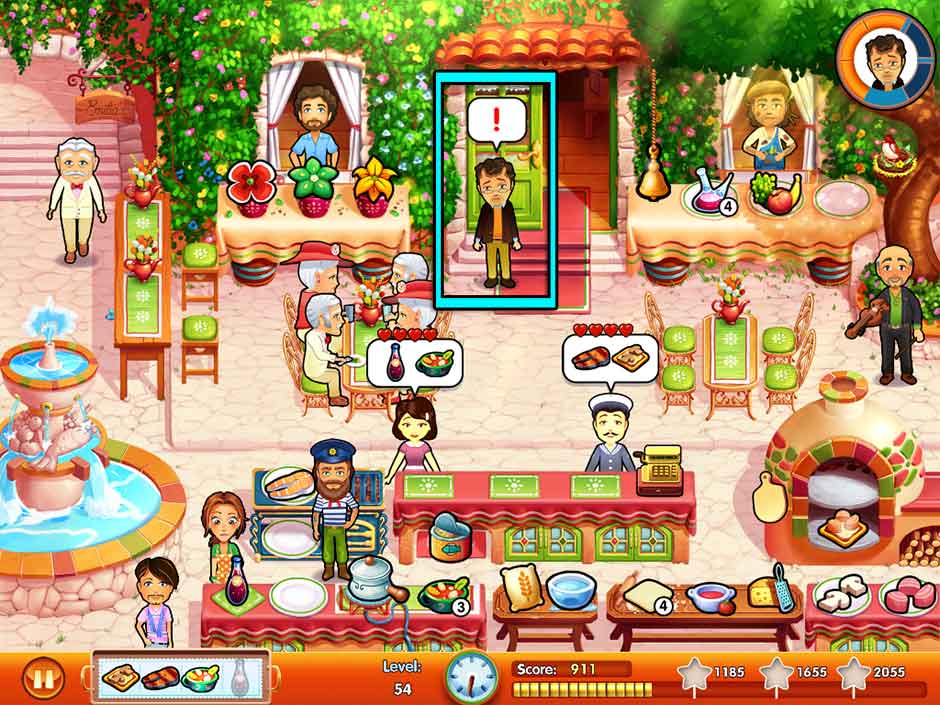
Level 54 – In Dire Straits

Everybody makes mistakes. Try to cheer Edward up!

Mouse Location: On top of the left side of the pizza oven.


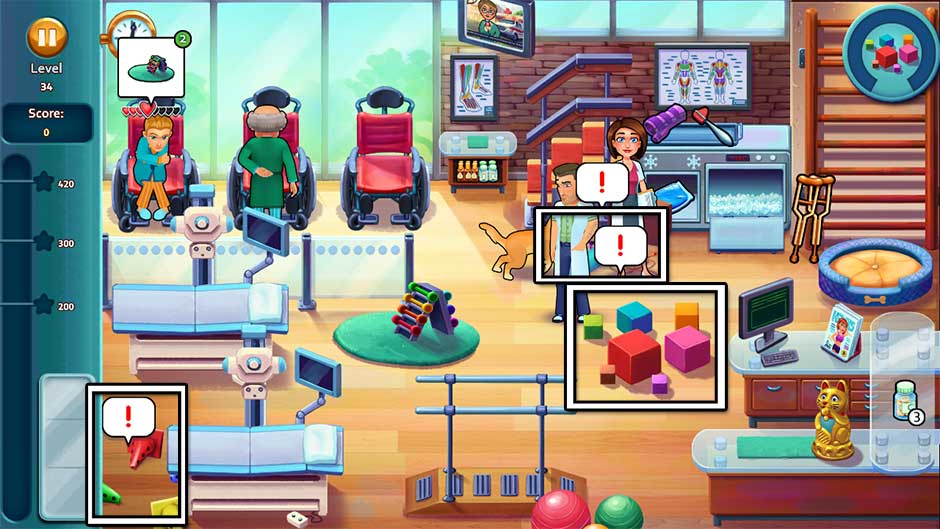
Today’s not going so well for Edward. The poor guy will sulk in front of the restaurant doors. From time to time, a “!” bubble will pop up over his head. When this happens, click on him to have Emily comfort him. Comfort him a total of 5 times before the end of the day to complete your objective.


Tip! Since Edward’s depressed, Emily will have to make pizza dough on her own today. Be aware that clicking on Edward will cause any and all actions Emily currently has lined up to cancel. So if you clicked on a customer to serve them, but clicked on Edward before they’re served, Emily will go to Edward and effectively “forget” to serve the customer, prompting you to click on them again. Additionally, customers’ hearts will continue to deplete while comforting Edward, so make sure you finish all your tasks before going to comfort him.

Delicious - Emily's Message in a Bottle - Level 54

Delicious – Emily’s Message in a Bottle – Level 54

Level 55 – Lost In Thought

Edward seems even more depressed than before. Maybe there’s only one way out…

Mouse Location: Behind the top of the fish grill.


Edward is gone, and traffic has picked up in the restaurant. Keep items stocked and pizzas cooked in the oven ready to go today. It’s a great day to practice your time management, especially with pizza orders. Once again, if you haven’t upgraded your oven already, it’s an excellent idea.


Level 56 – Disclosure on High Seas

Edward finds the solution to his torments right in the middle of the ocean!

Mouse Location: Hanging down from the left window where Patrick is standing.


Give food to the sailors searching for Edward! Sailors will appear on the left side of the restaurant throughout the day, asking for sack lunches. When this happens, click on the sack lunch next to the cash register to pick it up, then take it to the sailors. You will need to do this 5 times before the end of the day in order to complete your objective.


Tip! Marco has joined the ranks of sailors out searching for Edward, so in addition to making pizza dough, you will have to manage the seafood grill on your own today, too.

Delicious - Emily's Message in a Bottle - Level 56

Delicious – Emily’s Message in a Bottle – Level 56

Level 57 – Triumphant Return (On A Donkey)

Someone’s back, but the problems are far from over… Did Evelyn really leave Napoli?

Mouse Location: Hanging down from the tree branch in the upper right corner of the screen, above the bird’s nest.


Edward is back, the restaurant is fully stocked, and all hands are on deck! Focus your time management skills into keeping items stocked and pizzas ready to go for hungry customers.


Tip! Customers will order a lot of grilled potatoes today. Consider cooking some early and keeping them on your tray to save time.


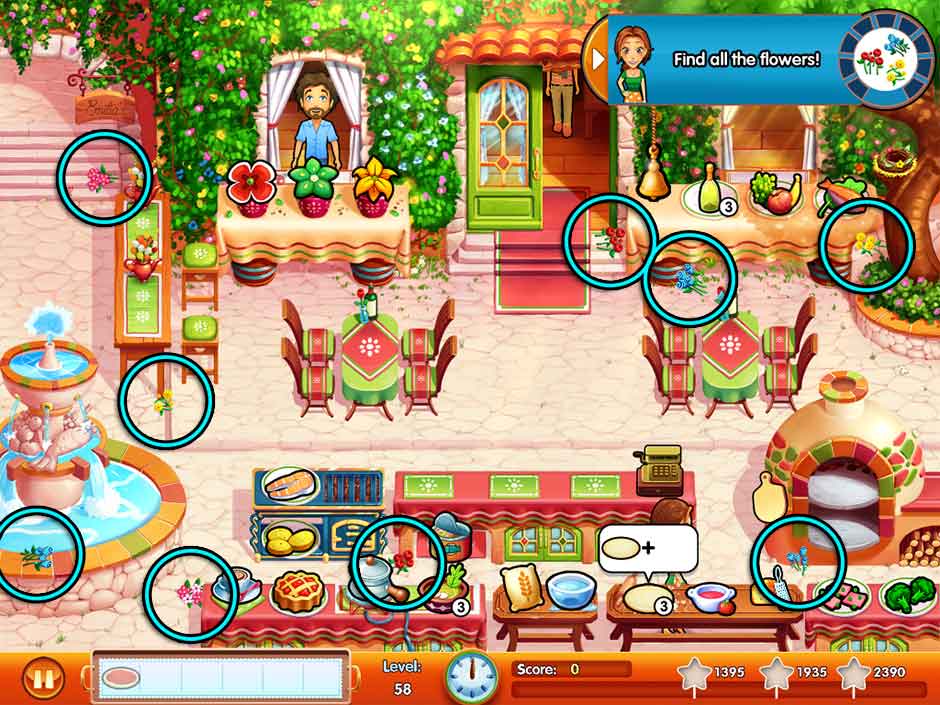
Level 58 – The Secret of Success

Can Edward have one last chance? Help clean the flowers so he can do what’s important!

Mouse Location: In the glass window of the restaurant door – the left center pane specifically.


Find all the flowers scattered throughout the restaurant. There are 9 little clusters to be found around the Family Restaurant. Their locations are shown below. Locate them all before the end of the day to complete the day’s objective.


Tip! There’s a second menu item at the seafood grill today. Consider keeping one cooked seafood item on your tray in order to reduce preparation time for orders.

Delicious - Emily's Message in a Bottle - Level 58

Delicious – Emily’s Message in a Bottle – Level 58

Level 59 – The Final Countdown

The family reunion is almost here… Will the secret ingredient finally be revealed?

Mouse Location: In the lower left corner, below Marco and near the fountain.


Customer traffic is picking up, and with it, customer patience is decreasing. Using your fine-tuned time management skills and the tips outlined above, serve all the customers while keeping items stocked, and without burning Emily’s hands!


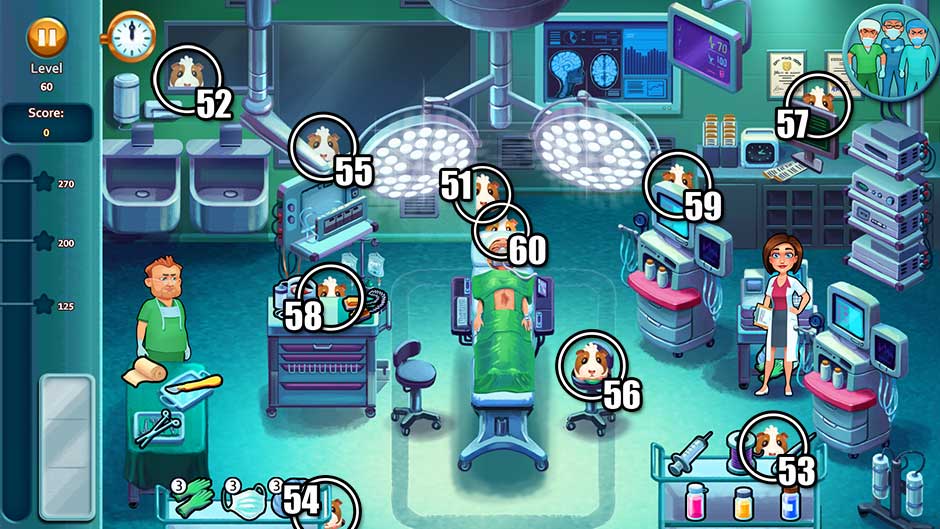
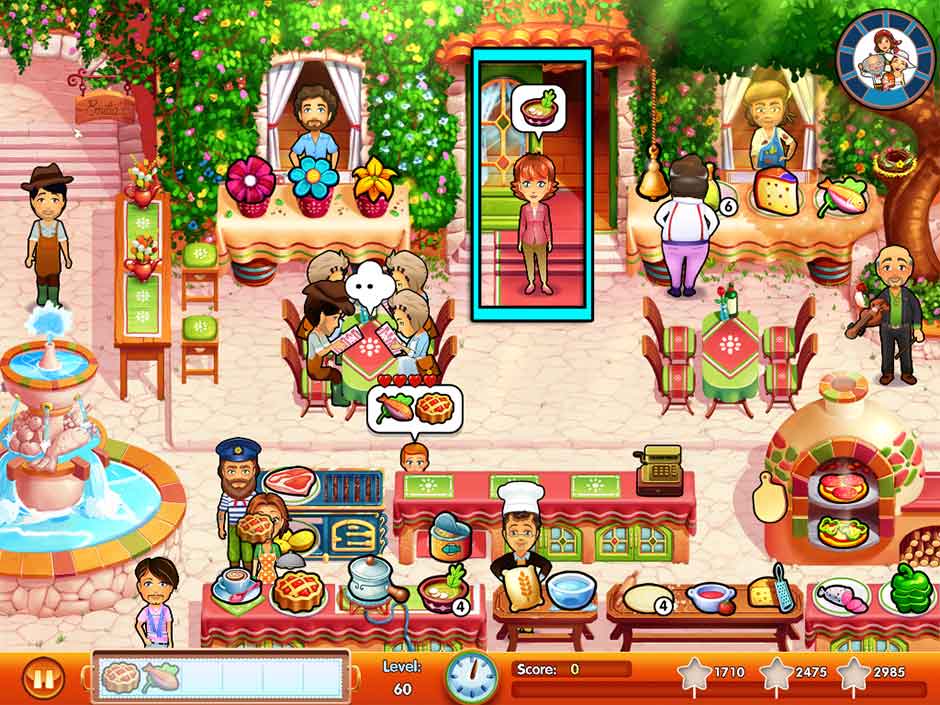
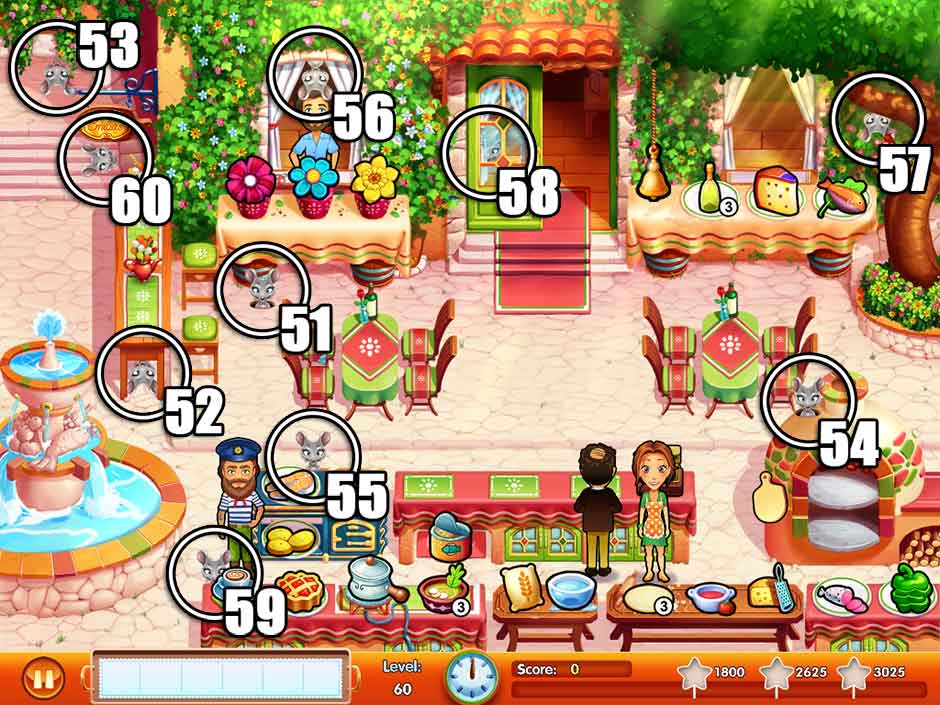
Level 60 – The Family Secret

Today’s the day! Help Emily prepare all the food for the reunion – everyone’s counting on her!

Mouse Location: Just below the “Emilia’s” sign in the upper left corner.


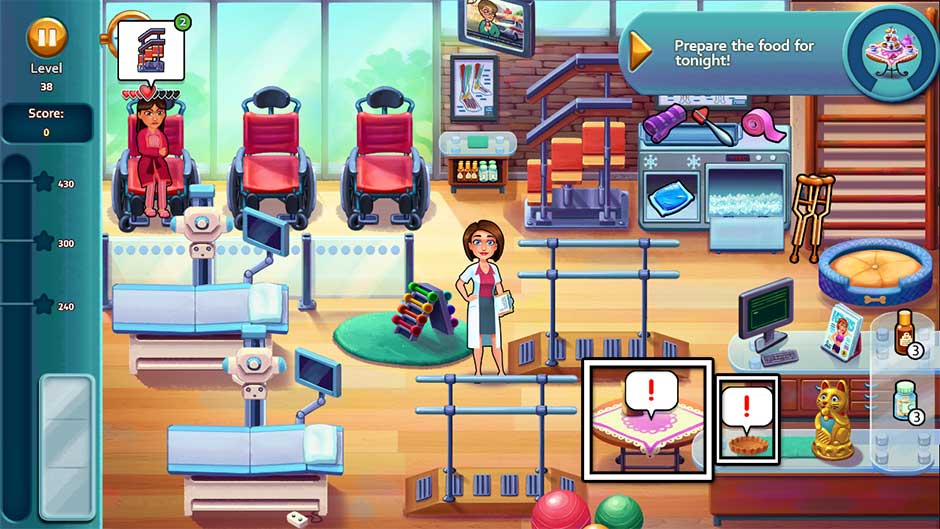
In addition to running the restaurant, prepare the food for the family reunion! Family members will come out of the Family Restaurant throughout the day, asking for specific menu items. When this happens, prepare the item requested, then take it to the family member. You will need to do this 8 times before the end of the day in order to complete your objective.

Delicious - Emily's Message in a Bottle - Level 60

Delicious – Emily’s Message in a Bottle – Level 60

Restaurant 8: Message in a Bottle – Hippie Island

Thirty years ago, Vittorio sailed far away from his family problems. But you can’t hide from your problems forever, as Vito is soon to find out!


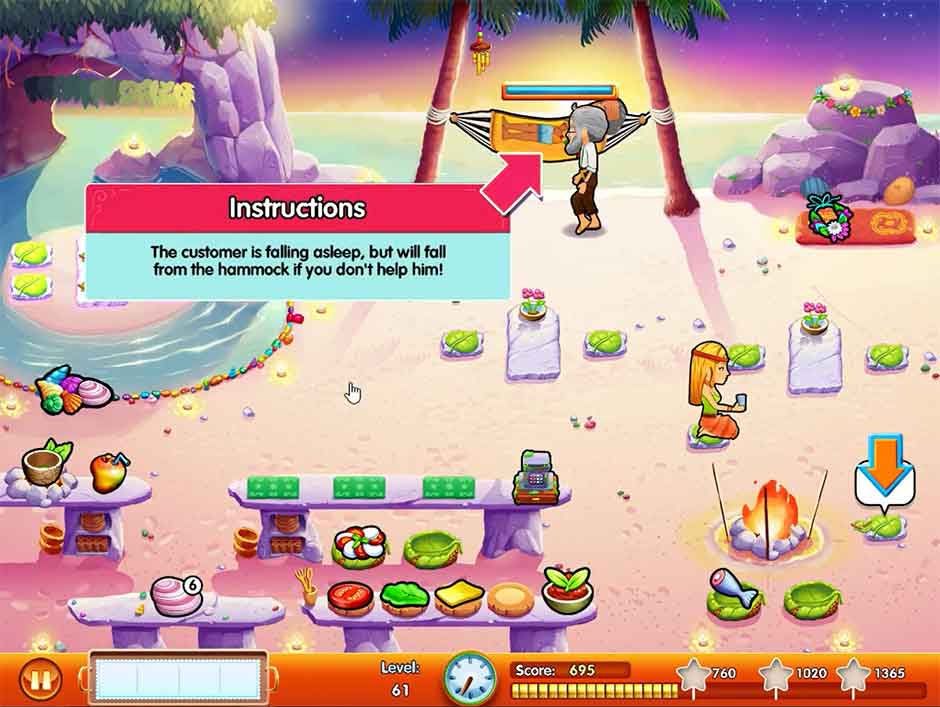
Level 61 – Some Time Ago…

The 30th anniversary of a certain someone’s arrival on the island draws near!

Mouse Location: At the top left side of the pile of boulders in the upper right corner of the screen.


Hippie Island introduces a new kind of challenge. Vittorio moves slower than Emily, so your precision will need to be impeccable in order to keep the carefree customers happy. Make sandwiches via the table at the bottom of the screen. Customers may request different toppings, so pay close attention! There is also a spit grill on the right. Items will burn if you leave them too long once cooked, so be careful! You can refill drinks on the left, or restock seashells via the pile on the left. If a customer wishes to sit in a hammock, they will move to the trees at the top of the screen. Click on the hammock to set it up for them. A meter will appear. It’s very important you click on the hammock again before the meter reaches the halfway point, or else the customer may fall out!

Delicious - Emily's Message in a Bottle - Level 61

Delicious – Emily’s Message in a Bottle – Level 61

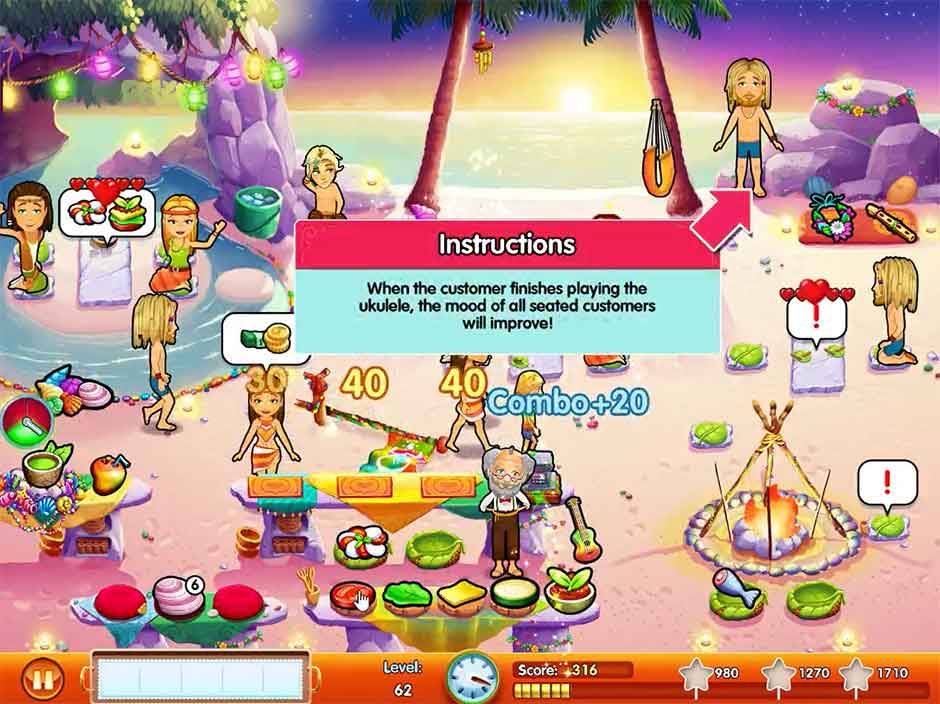
Level 62 – The Flag Incident

One way or another, Parsley always manages to be in the wrong place, at the wrong time.

Mouse Location: In the grove in the upper left corner of the screen, below the string of lights and to the right of the candle on the rock.


There’s more sandwich toppings available today. You will also have the option to upgrade to the ukulele. It’s highly recommended you purchase this upgrade right away. Customers who use the ukulele will bolster the mood of all other customers, increasing the numbers of hearts and tips!

Delicious - Emily's Message in a Bottle - Level 62

Delicious – Emily’s Message in a Bottle – Level 62

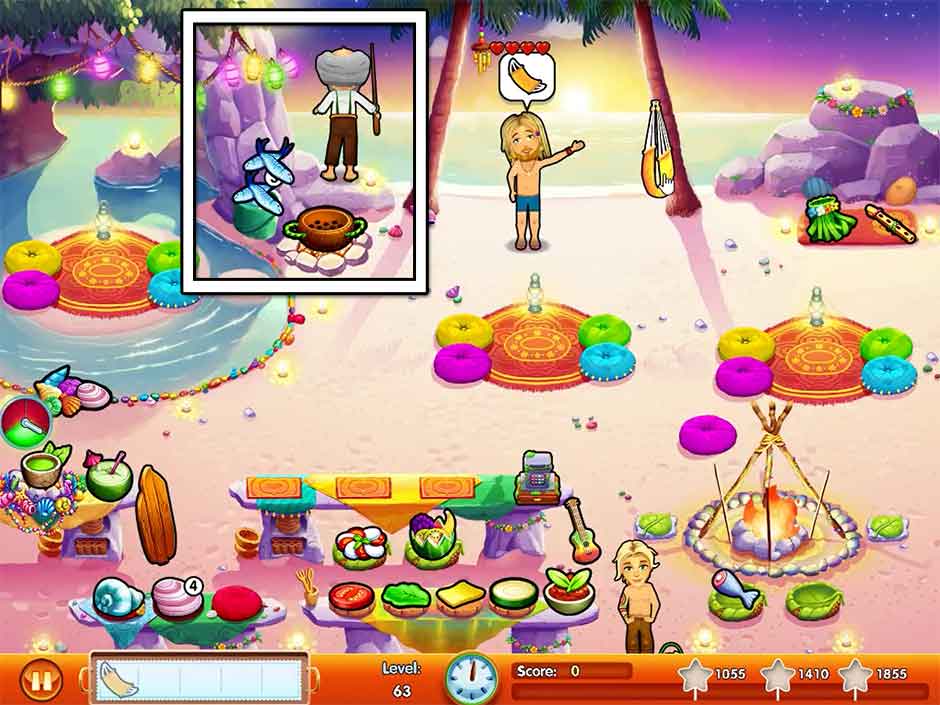
Level 63 – Get The Party Started!

Vittorio’s 30th anniversary party is so ‘far out’!

Mouse Location: Behind the pile of seashells on the left side of the screen.


Today there’s a new menu item – fresh fish, straight from the ocean! These fish aren’t cooked on the campfire spit like the other fish menu item. Instead, they’re kept near the grotto in the upper left corner of the screen. When customers order these fish, click on the fish to throw them on the nearby grill. Once they’re ready, they’ll blink, but make sure you grab them before they burn!

Delicious - Emily's Message in a Bottle - Level 63

Delicious – Emily’s Message in a Bottle – Level 63

Level 64 – A Delayed Message

Truth always finds a way, even through an ocean of time.

Mouse Location: Peeking around the left side of the left tree at the top of the screen.


There’s another barbeque item on the menu today – kebabs! Similar to the spit-roasted fish, click on the kebab in the lower right corner to cook it in the nearby fire. Once finished, the kebab will blink. Pick it up to put it on your tray and serve it to the customers before it burns!


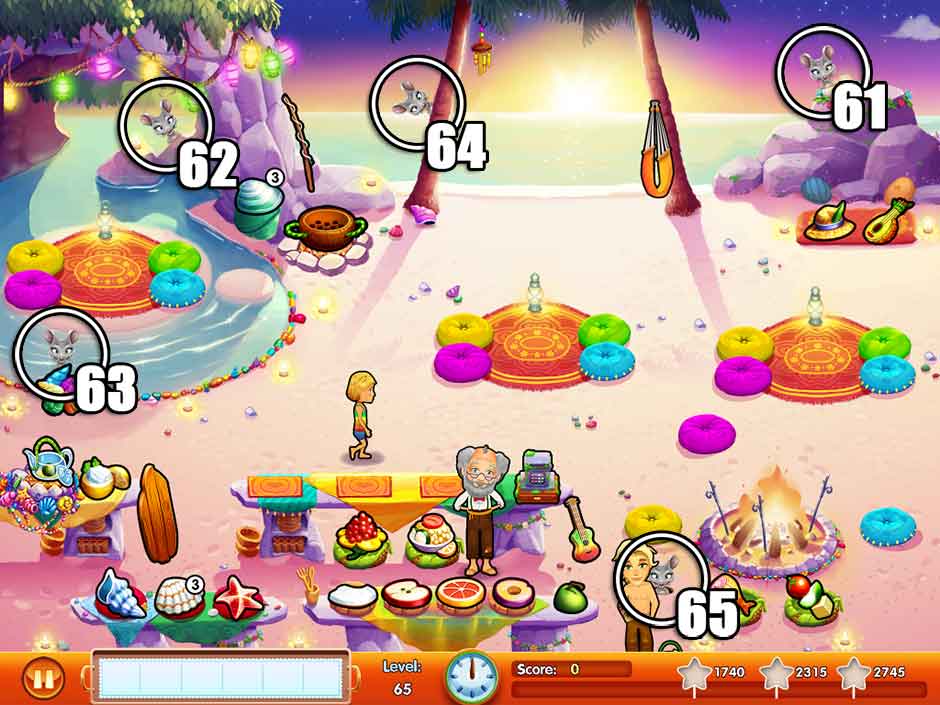
Level 65 – What Really Matters

It’s time for Vittorio to go where his heart belongs… He has a family to reunite.

Mouse Location: To the left of the fire pit in the lower right corner of the screen, between the kebabs and the register.


The beach is busy as can be, and today will be the ultimate time management test! It’s highly recommended you purchase each and every upgrade available for Hippie Island, and whip out the most delicious dishes you’ve unlocked to increase customer tips and patience!


Congratulations! You’ve completed Delicious – Emily’s Message in a Bottle!

Delicious - Emily's Message in a Bottle - Ending

Challenges

In addition to the game’s 65 story levels, there are 26 unique challenges awaiting you. Indicated by pink markers along the level select map, challenges will put all your skills to the test with unique goals and objectives. You do not have to play or beat every challenge as you progress, but completing challenges will reward you with diamonds, which can be used to unlock guests and invite people to the big family gathering! This section lists every challenge, as well as strategies on how to complete them.


Restaurant 1 – Emilia’s Place

No challenges here!


Restaurant 2 – Emily’s Garden

Challenge 1 – Mice Invasion – Part 1

There’s a mouse invasion in the garden! They can’t go to Italy and leave things like this!


Ack, they’re everywhere! Mice will pop up all over the restaurant today. You’ll need to catch a total of 25 before the end of the day while keeping customers happy in order to complete today’s challenge. Mice tend to pop up in the same locations as they appear in Levels 6 – 10 of the Mouse Locations section.


Restaurant 3 – Old Family Restaurant

Challenge 2 – Risk Prevention

Impatience is a cook’s worst enemy. Help Emily avoid burning herself when she cooks pizza.


Don’t let Emily burn her hands! Pizza will be a popular food item today. Click on the wooden pizza peel hanging next to the oven, then click on a pizza to remove it from the oven without burning Emily’s hands. Serve all of today’s customers without burning Emily’s hands once in order to complete today’s challenge.


Tip! Purchase the oven upgrade to prevent pizza from burning while sitting in the oven! This will reduce the rush when cooking and retrieving pizza for customers.


Challenge 3 – The Proper Way

Restore the family restaurant to its former glory! Serve only full orders, like in the good old days.


Serve full orders only today! To make today’s challenge easier, forget about 2-in-a-row combos and instead focus on serving full orders. A full order means that you bring every single item a customer or table has ordered in one go. Tables with full orders of four require every slot on your serving tray, so there’s no room for error! If you decide to cook pizza early in the oven, but it’s not the type a customer has ordered and you need the spot on your tray for another type, simply pick up the pizza, then click on it while it’s on your tray to remove it. Removing items from your tray does not count against you in today’s challenge. Most importantly, don’t panic! Edward is nearby to help keep customers entertained while you focus on fulfilling orders. Remember – one at a time!


Challenge 4 – Signs of Neglect

The restaurant was neglected in the hands of others. Even the trays are slowly falling apart!


Take it steady with a fragile tray! Throughout the course of the day, your tray in the lower left corner will slowly begin to fall apart. One by one, the number of slots will be reduced, until only one remains! Don’t keep items on your tray for later today. Instead, only serve customers as they place orders. Making several trips to fulfill an order is all part of today’s challenge. Utilize Edward’s help to keep customers happy.


Challenge 5 – Jet Lagged

Jet lag is exhausting! After a few nights of no sleep, will Emily be able to keep up the pace?


Emily is very tired today, and as such, she will move much slower than usual. Try to keep Emily’s back-and-forth to a minimum. Cook pizzas only as customers ask for them, and wait by the oven until they’re ready to pick them up. You should also consider picking up desserts all at once and serving them in one go, even if it requires you to split orders between tables. Don’t worry about the flowers, though – Patrick will toss them right to you. What a sweet guy! Edward is also on hand to keep customers entertained in the event it takes Emily longer to move from one location to another.


Restaurant 4 – Marco’s Fish Market

Challenge 6 – Contagious Impatience

The customers at the fish market seem to be as impatient as Marco. Serve 6 quick orders!


Get 6 quick orders today! In order to get a quick order, you will need to have a customer’s order ready almost immediately after a customer has asked for it. A very good way to do this is to keep a grilled fish with lemon or salt and pepper in your inventory at all times. If a nearby counter or table customer orders something pre-cooked off the grill, or pasta, focus on them immediately before any other customer. If you’re quick enough, you’ll receive a quick bonus! It’s best to focus on single customers when trying to complete today’s challenge. While groups are important, getting quick bonuses with them will be highly difficult. Instead, use the help of Arabella to keep them entertained while you serve the single customers for your quick bonuses!


Challenge 7 – Mediterranean Diet

The Italian cuisine is known for its balance and variety: never make the same product twice in a row!


Don’t make the same product twice in a row! Today’s challenge can prove very difficult, so it’s a good idea to quietly repeat whatever the last item you made was. Halfway through the day, the game will try to throw you your first double-order curveball. If a customer, or customers, order the same item, click on another item before making the second. You can immediately click on it on your tray in order to remove it. It’s important to do this in order to prevent orders from being made twice. Late in the day, you may have several duplicate orders. In the event this happens, you will either need to make different items in-between, or wait until another customer comes in and orders something different. Bear in mind that grilled fish, lobster, and shrimp are not considered complete items until the lemon or salt and pepper has been added.


Challenge 8 – Don’t Waste Anything

You don’t want to know what a flock of hungry seagulls would do should you burn or spill something…


Don’t spill or burn anything today. As long as you keep your cool, today’s challenge is relatively simple. Only make grilled items to-order. Even if you’re serving another customer on the other end of the restaurant, as long as you click on the grilled items before they burn, Emily will make her way to them, and they won’t burn in the meantime, so long as they’re clicked! The rest is plain and simple. As long as you keep an eye on the grill, you should be able to complete the challenge without a hitch.


Challenge 9 – Would You Leave Already?

It’s such a beautiful day, customers will need to be kindly ‘invited’ to leave or they will stay all day!


You will need to ask sitting customers to leave today in order to clear more room. Pay attention to sitting customers who have ordered their food. Once they’ve ordered, they won’t leave or go to the register until you’ve clicked on them. Customers who are ready to leave will have a “!” pop up over their heads. Click on them to have Emily shoo them off to the cash register. It’s very important to stay on top of this, or other table customers coming into the restaurant may not have a place to sit!


Tip! If you have the time, click again on the boat at which table customers are sitting immediately after shooing them off to the register. Edward isn’t around to help clean tables today, so the second “!” bubble indicates the table needs cleaning. If you have time, you can shoo a customer to the register, and preemptively clean a table for incoming customers while minimizing the back-and-forth.


Restaurant 5 – Gino’s Farm

Challenge 10 – Cleaning Up The Farm

Gino’s farm isn’t exactly the most hygienic. Clean 3 tables in a row two times to put this right!


Clean 3 tables in a row two times. The best way to accomplish this is to let table customers come in at will. Once a table customer has finished eating, don’t clean the table! Wait until all 3 tables have been dined at before clicking on all of them and cleaning them right after each other. You will have just enough time to accomplish this twice today, so don’t clean the tables until all three “!” bubbles appear, then clean them back-to-back!


Challenge 11 – Mice Invasion – Part 2

Oh, no! Mice invaded the farm and they’re everywhere!


Catch all the mice before the end of the day! You will need to catch approximately 25 mice while serving customers in order to complete today’s challenge. Mice tend to show up in the same locations as Levels 31 – 40 in the Mouse Locations section.


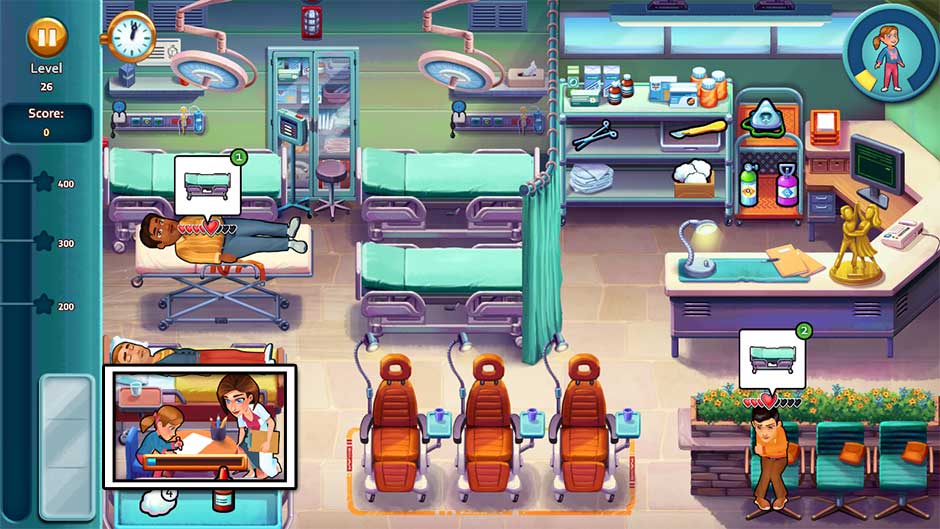
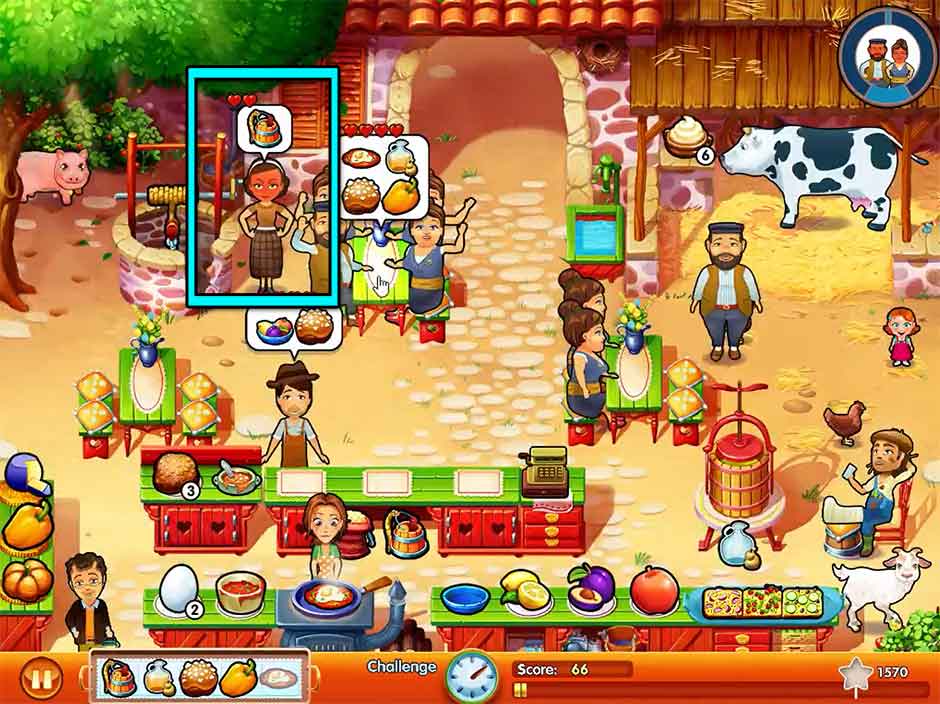
Challenge 12 – Misery Loves Company

The only thing that cheers up Gino is watching other customers get angry. Serve 2 angry customers and lift his spirits!


Serve 2 angry customers! The simplest way to accomplish today’s goal is to serve customers as per normal – all customers, except those at the well! Customers who go to the well and ask for a bucket should be left alone until they have two hearts and become angry. As soon as this happens, take the bucket to them, help them hoist the water, then check them out right away at the register. Doing it this way will allow you to keep high scores in the restaurant without upsetting other customers.

Delicious - Emily's Message in a Bottle - Challenge 12

Delicious – Emily’s Message in a Bottle – Challenge 12

Challenge 13 – All At Once

Today is a busy day. Don’t make distinctions and take care of all your customers at the same time!


Get 7 combos! Combos can be achieved a variety of ways. The best way to acquire combos is to serve two or more customers back-to-back. This is most easily done with counter customers. Bring full orders to two or more counter customers back-to-back. Checking out multiple customers at once at the cash register also counts toward today’s combo total.


Restaurant 6 – Vinicio’s Vineyard

Challenge 14 – No Rest For The Helpful

After the palaver at the farm, Emily is really tired. Come on, Emily, just one brother left to convince!


Emily is very tired, and as such, she’s moving slower than usual. Preparation is the key to today’s success. Keep the deep-fried snacks cooked and the wines stocked by clicking the bell. Try to make single trips to the wine counter, even if it means splitting orders and grabbing all the wine for separate tables or customers at once. Place priority on serving counter customers, utilizing the help of Bianca to keep table customers entertained while Emily keeps up.


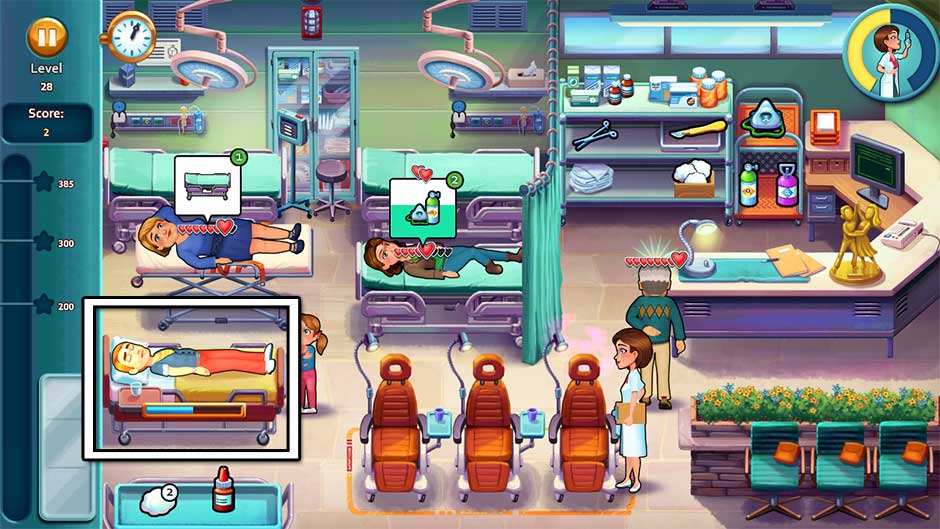
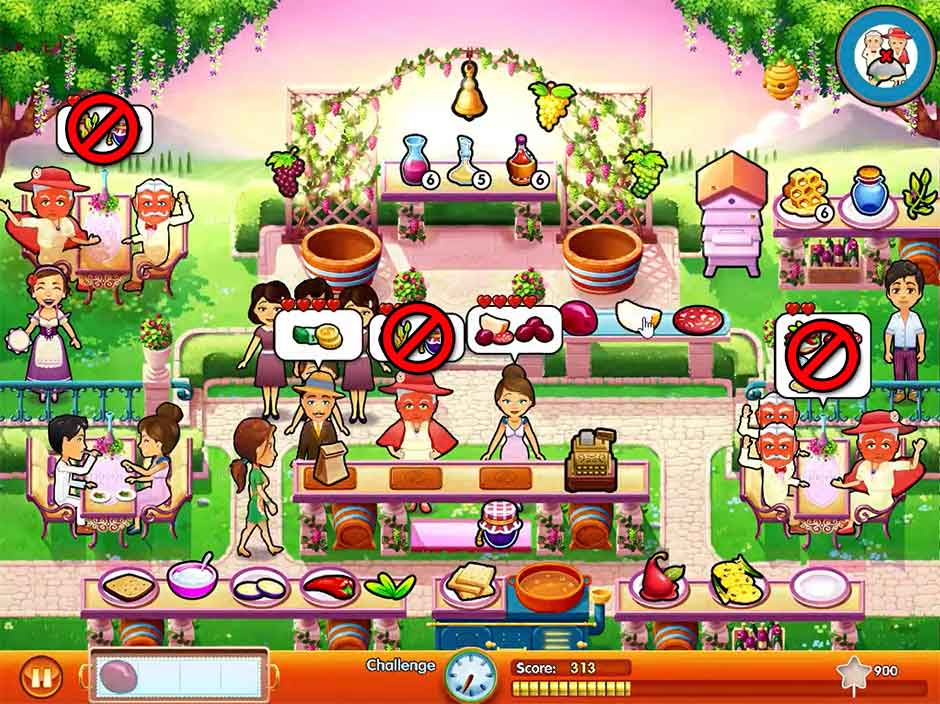
Challenge 15 – No Vineyard For Old Men

Vinicio and Bianca are organizing a wine tasting session today. But Vinicio finds that old people don’t tip well!


Don’t serve any older people! Old customers are denoted by their fancy white moustaches and luxurious red hats. No matter if these customers are standing at your counter or sitting at one of your tables – ignore them! They will eventually become angry enough they will go away on their own. Focus instead on serving anyone who doesn’t fit the above description. It may look like you won’t be able to meet today’s score goal without serving the old customers, but don’t be fooled! You can completely ignore any and all old customers and still have enough to complete today’s challenge.

Delicious - Emily's Message in a Bottle - Challenge 15

Delicious – Emily’s Message in a Bottle – Challenge 15

Challenge 16 – Free Takeaway!

Vinicio Jr. has secretly organized a free takeaway day, so only table customers will pay!


Only table customers will pay today. As such, your focus should be on serving these customers first and foremost, and keeping them very happy! Use Bianca’s help to keep them in high spirits. You can still serve counter customers, they just shouldn’t be as high of a priority on your list.


Tip! Tips and bonuses still count for non-table customers. If you serve them quickly enough, you can still eek out a few extra coins to go toward today’s goal!


Challenge 17 – Don’t Leave Just Yet!

Vinicio thinks Bianca will stay as long as there are customers to entertain – and he has the prove he’s changed!


Entertain 6 customers! Only table customers can be entertained. In order to entertain a customer, click on Bianca on the left, then click on the table you’d like her to entertain. Each table you entertain will only be counted once toward today’s goal. The best strategy to take is to have Bianca entertain each and every table that arrives until today’s objective is complete.


Restaurant 7 – Family Restaurant

Challenge 18 – Tip Hunting

What has Edward done with the money? Maybe it’s a good idea to earn as many tips as possible…


Get more than 500 coins in tips! In addition to combos and quick bonuses, remember that upgrading your menu and your restaurant can also contribute toward tips! Click on the shopping cart, then select either Store or Menu in order to view upgrades. Select all Menu items you can that improve your tip. Upgrading Store furniture to increase tips is highly recommended. With a highly upgraded restaurant and menu, and some quick service, you should be able to complete today’s challenge a little after the day is halfway done.


Challenge 19 – Keep Yourself Busy

Emily is worried sick about her parents. Keep her busy so she can put her mind at rest!


Don’t stand still for more than 10 seconds! The easiest way to complete today’s challenge is to select the flour station repeatedly, every spare moment that Emily isn’t doing another task. Click on the bag of flour, followed by the bowl of water at the bottom of the screen. Even if you’re stocked completely full of pizza dough, Emily will continue to move back and forth between the items, thus not standing still! Continue this action throughout the entire day when not otherwise preparing food or serving customers in order to easily fulfill the day’s challenge.

Delicious - Emily's Message in a Bottle - Challenge 19

Delicious – Emily’s Message in a Bottle – Challenge 19

Challenge 20 – Could You Repeat, Please?

Everyone is so worried about Edward and Evelyn, they’re having trouble remembering the orders!


Everyone forgets the customers’ orders! Focus on fulfilling customers’ orders as soon as they appear today. Even if you have to split up orders or reduce the number of 2+ customer combos in order to keep track, it’s worth it. After a brief amount of time, a customer’s order bubble will turn into a “?”. In the event you forget a customer’s order, click on the customer to have Emily go to them. If she has an item on her tray, correct or incorrect, the customer’s order will briefly show again. Keep in mind there’s some very simple tricks you can use to prevent yourself from becoming overwhelmed, such as having pizza pre-cooked in the oven and keeping in mind that fish will only ever want fish food as their order.


Challenge 21 – Happy Hour

The old restaurant is finally firing on all cylinders again – and a happy customer is a returning customer!


Serve 28 ecstatic customers! Bring full orders to customers and serve them quickly in order to increase their chances of being ecstatic. You can also use entertainment to increase their positive mood. Keep combo chains to a minimum in order to focus on making each and every customer as happy as possible. Really, don’t keep them waiting too long! There’s not much room for error today, so serving customers quickly is a must.


Tip! There is an upgrade you can purchase in the Store to bring in 1 bonus customer after the day has ended. If you find yourself coming up just short, purchase this upgrade to give yourself the little nudge needed to finish the challenge.


Restaurant 8 – Hippie Island

Challenge 22 – Leaf Tray

Leaves are ecological, but they don’t exactly make the best trays… As Vittorio learns the hard way.


Work with a tray that’s slowly falling apart! Throughout the day, the tray on the lower left will slowly decrease in size. Try to focus on bringing customers full orders per customer or per table as quickly as possible. About halfway through the day, you will only have two tray slots left. You may need to make multiple trips to bring full orders to customers. Keep in mind Vito tends to move a little slow, so don’t keep counter customers waiting too long while you fulfill orders with your mini-tray.


Challenge 23 – The Natural Order

According to the locals, serving people in the right order is the way to connect one’s spirit with the universe.


Serve people in the order they enter the restaurant! Today’s challenge can prove tricky, so it’s important you track people as they enter the restaurant. As they enter, track them visually until they order. Bring them their order right away, then move on to the next customer. Keep in mind table customers take longer to order than counter customers, so a counter customer’s order may appear before a table customer, even though the table customer came first. When in doubt, if a table and counter customer order at roughly the same time, chances are the table customer came in first. Try to keep items stocked to prevent becoming sidetracked during the course of today’s challenge, including keeping a barbequed ham or fish on your tray. Recruiting Parsley’s help via the Store to clean tables is essential in focusing on today’s goal.


Challenge 24 – Zen Moment

Vittorio has to finish his Yoga session. He’ll need some quiet time to get his Zen Moment.


Don’t serve anyone for a while! Vittorio needs to meditate. The flow of customers today is pretty high, however, so doing this early in the day isn’t such a good idea, since it can leave you playing catch-up. Instead, only focus on today’s goal once your restaurant has closed and you’re dealing with the last customer. Before checking them out, be completely still and don’t click on anything, so that Vito can meditate! Your last customer may leave angry, but done correctly, you should still be able to comfortably complete today’s challenge.

Delicious - Emily's Message in a Bottle - Challenge 24

Delicious – Emily’s Message in a Bottle – Challenge 24

Challenge 25 – Hot, So Hot

The island volcano is acting up again. Deliver products before the next shake, or they will fall from Vito’s tray!


Deliver the products before they fall from the tray! Every so-often, the local volcano will rumble, causing Vittorio to drop one of the items on his tray. There’s a very easy way to manage this. While the rumbling may happen without warning, you can always count on the fact that the first item on the tray will be the one that falls off. In order to prevent orders from becoming jumbled and customers from becoming impatient, try clicking on a placeholder item a customer didn’t order to put on your tray. Whenever the volcano rumbles, quickly serve all the remaining items on your tray, then pick up another! This way, you can minimize the disruption caused by the local volcano while you cruise your way toward completing today’s challenge.


Challenge 26 – Environmentally Conscious

On this beach, everybody is very green, so wasting food will earn Vittorio some angry looks!


Don’t remove or waste any products! This includes wrong orders, overflowing drinks, and any cooked items being burnt. Pay close attention to fruit or sandwich orders especially, since the layers on these can be easy to mix up. Keep in mind that even if you’re on the other end of the beach, clicking on a cooking item before it burns will prevent it from burning, no matter how long it takes Vittorio to make his way back over. If necessary, place a lower priority on customers who want to use the hammock in order to stay on top of today’s flawless service.


Tip! You can purchase an upgrade in the Shop that will prevent your drinks from overflowing, as well as an upgrade to lengthen the amount of time it takes before cooked items will burn.


Mouse Locations

There are sixty-five mice hidden throughout the game’s sixty-five story levels. Finding them all will reward you with the Mice Catcher Potion trophy. However, locating these sneaky rodents can prove difficult sometimes. This section of our walkthrough reveals every hiding spot of every single mouse in the game. Scroll down to get started, or click on a Mouse Location in the walkthrough above to get started!


Restaurant 1 – Emilia’s Place

Delicious - Emily's Message in a Bottle - Mice Locations - Restaurant 1

Delicious – Emily’s Message in a Bottle – Mice Locations – Restaurant 1

Level 1: On the cobblestones, just below the right chair of the leftmost table.

Level 2: Hanging down from the top of the open window on the left.

Level 3: Behind the upper left portion of the pizza oven.

Level 4: Behind the upper left portion of the customer counter, near the tea table.

Level 5: Peeking out from behind the rock beneath the tree in the upper right corner of the screen.


Restaurant 2 – Emily’s Garden

Delicious - Emily's Message in a Bottle - Mice Locations - Restaurant 2

Delicious – Emily’s Message in a Bottle – Mice Locations – Restaurant 2

Level 6: To the right of the flower vase sitting next to the cash register.

Level 7: Behind the fence in the upper left corner, to the left of the balloon archway.

Level 8: Behind the top of the covering above the ice cream and smoothie stand.

Level 9: To the left of the tree in the upper right corner.

Level 10: In the upper left corner of Paige’s canvas, in the lower left corner below the suitcase.


Restaurant 3 – Old Family Restaurant

Delicious - Emily's Message in a Bottle - Mice Locations - Restaurant 3

Delicious – Emily’s Message in a Bottle – Mice Locations – Restaurant 3

Level 11: In the canvas bag at the foot of the steps in front of the restaurant doors, where the tomato vine is.

Level 12: Below the “Emilia’s” sign in the upper left corner of the screen.

Level 13: Popping out of the window box full of flowers in front of the left window.

Level 14: In the lower right corner, in front of the pizza oven.

Level 15: In the tree in the upper right corner, next to the bird’s nest.

Level 16: Behind the back of the fountain in the lower left corner the screen.

Level 17: Behind the top of the singles table, to the right of the fountain in the lower left corner.

Level 18: Peeking around the right side of the counter, next to the cash register.

Level 19: Peeking around the upper left side of the pizza oven.

Level 20: In the lower portion of the fountain in the lower left corner of the screen.


Restaurant 4 – Marco’s Fish Market

Delicious - Emily's Message in a Bottle - Mice Locations - Restaurant 4

Delicious – Emily’s Message in a Bottle – Mice Locations – Restaurant 4

Level 21: To the immediate left of the basket on the far right side of the screen, where the customers enter.

Level 22: At the top left corner of the ice chest which holds fish in the middle of the restaurant.

Level 23: Hanging down from the center of the overhang roof in the upper left corner.

Level 24: Peeking around the upper left corner of the upper left docked boat.

Level 25: Hanging down from the bottom of the wood portion of roofing in the upper left corner.

Level 26: Behind the upper right portion of the grill, between the mussels and the chowder pot.

Level 27: Behind the basket of ice in the upper left corner, near the fishing supplies.

Level 28: Behind the red pile of netting at the center top of the screen.

Level 29: Peeking behind the upper right corner of the rightmost docked boat.

Level 30: Between the checkout counter and the ice bed holding the grill items, in the lower left corner of the screen.


Restaurant 5 – Gino’s Farm

Delicious - Emily's Message in a Bottle - Mice Locations - Restaurant 5

Delicious – Emily’s Message in a Bottle – Mice Locations – Restaurant 5

Level 31: Peeking around the left side of the well.

Level 32: To the right of the cow in the upper right corner of the screen.

Level 33: In the upper left corner of the entrance archway at the top of the screen.

Level 34: Peeking out of the hole in the tree in the upper left corner of the screen.

Level 35: Behind the upper right corner of the truffle counter, to the left of the customer checkout counter.

Level 36: On top of the wood overhang above the stable in the upper right corner of the screen, above the milk pail.

Level 37: Behind the upper right corner of the cider churn.

Level 38: At the foot of the tree in the upper left corner, in front of the truffle basket.

Level 39: Beneath the cow’s head, in the upper right corner of the screen.

Level 40: At the bottom of the screen, between the stove and the fruit bowl.


Restaurant 6 – Vinicio’s Vineyard

Delicious - Emily's Message in a Bottle - Mice Locations - Restaurant 6

Delicious – Emily’s Message in a Bottle – Mice Locations – Restaurant 6

Level 41: Below the checkout counter, on top of the blanket.

Level 42: Behind the right side of the olive and cheese counter, toward the upper right corner of the screen.

Level 43: On top of the railing on the left, in front of Bianca the entertainer.

Level 44: Behind the right side of the snack counter, above the last plate on the right in the lower right corner of the screen.

Level 45: Below the rightmost central column holding the pot of flowers, to the lower left of the olives.

Level 46: At the top of the beehive box in the upper right corner of the screen.

Level 47: In the bottom left corner, to the left of the sandwich counter.

Level 48: Hanging down from the branch in the upper left corner of the screen.

Level 49: Above the flowers on the leftmost center column, below the wine table.

Level 50: Between the rightmost rails on the right side of the screen.


Restaurant 7 – Family Restaurant

Delicious - Emily's Message in a Bottle - Mice Locations - Restaurant 7

Delicious – Emily’s Message in a Bottle – Mice Locations – Restaurant 7

Level 51: Below the left side of the flower table, in front of the barrel.

Level 52: Underneath the leftmost table legs, next to the fountain on the left.

Level 53: Hanging down from the archway in the upper left corner of the screen, next to the “Emilia’s” sign.

Level 54: On top of the left side of the pizza oven.

Level 55: Behind the top of the fish grill.

Level 56: Hanging down from the left window where Patrick is standing.

Level 57: Hanging down from the tree branch in the upper right corner of the screen, above the bird’s nest.

Level 58: In the glass window of the restaurant door – the left center pane specifically.

Level 59: In the lower left corner, below Marco and near the fountain.

Level 60: Just below the “Emilia’s” sign in the upper left corner.


Restaurant 8 – Hippie Island

Delicious - Emily's Message in a Bottle - Mice Locations - Restaurant 8

Delicious – Emily’s Message in a Bottle – Mice Locations – Restaurant 8

Level 61: At the top left side of the pile of boulders in the upper right corner of the screen.

Level 62: In the grove in the upper left corner of the screen, below the string of lights and to the right of the candle on the rock.

Level 63: Behind the pile of seashells on the left side of the screen.

Level 64: Peeking around the left side of the left tree at the top of the screen.

Level 65: To the left of the fire pit in the lower right corner of the screen, between the kebabs and the register.


Memorable Photo Moments

There’s nothing sweeter than a family memory. Fourteen memorable moments take place during the game’s cutscenes. This section reveals the location of each and every one, ensuring no memorable moment is left undocumented.


Level Memory Name Where to Find It
7 Paige’s 3rd Birthday Party! At the start of level 7, Paige and her family will sit together at a large table to celebrate her birthday.
9 Our little artist! At the start of level 9, Paige will cheer up her grandpa with a drawing.
11 Back in Napoli At the end of level 11, the family takes in their first impression of Napoli.
13 Fishies At the end of level 13, Paige talks with a local friendly fisherman.
17 An unusual pony At the end of level 17, Paige returns with an unexpected guest.
21 Seagull entertainment At the start of level 21, Arabella shows off her talented seagulls.
27 Fishing big At the start of level 27, Edward and Marco land a big catch.
31 Tug of war At the end of level 31, Paige and Truffles become fast friends.
40 Three little pigs At the start of level 40, three new members are welcomed to the family.
46 Making good wine again At the end of level 46, Vinicio remembers why he started his business.
49 A new wine recipe At the end of level 49, Edward and Paige playfully discuss a new wine recipe.
53 Catching up At the start of level 53, the five brothers reflect on past experiences.
56 Going back home At the end of level 56, Edward finds his way back home.
60 The family reunion At the end of level 60, the family gathers for the reunion.


Trophies

There are 14 unique trophies to unlock in Delicious – Emily’s Message in a Bottle. This section lists all trophies, what they are, and how you can earn them. Not sure where the trophies are? Click on the trophy icon in the upper right corner of the level select screen to get started!


Trophy Name Description How to Unlock
Timeless Napoli Spirits Finish the Emilia’s Place restaurant. Complete levels 1 – 5.
Birthday Soda Treat Finish the Emily’s Garden restaurant. Complete levels 6 – 10.
Lost Memories Drop Finish the Old Family restaurant. Complete levels 11 – 20.
Sea Moonshine Finish Marco’s Fish Market. Complete levels 21 – 30.
Liquor of the Countryside Finish Gino’s Farm. Complete levels 31 – 40.
Bittersweet Grape Juice Finish Vinicio’s Vineyard. Complete levels 41 – 50.
Family Surprise Fizz Finish the new Napoli Family Restaurant. Complete levels 51 – 60.
Happy Hippie Shake Finish Hippie Island. Complete levels 61 – 65.
Love Elixir Collect all memorable moments. Click on the camera icon that appears when a glistening circle appears during cutscenes. For a complete list of memorable moments, see the Memorable Photo Moments section of this walkthrough.
Mice Catcher Potion Find all mice in the game. A mouse is hidden in each level of the game, excluding challenges. For a complete list of mouse locations, see the Mouse Locations section of this walkthrough.
Stardust Tonic Achieve 3 stars for each day. Earn 3 stars during each level, excluding challenges. For help with specific days, see our in-depth level explanations in the walkthrough above. For a visual guide, see the Video Walkthrough section below!
Diamond Digger Brew Use all diamonds to unlock every family character. Earn diamonds by completing objectives during levels, or by completing challenges. There are 91 available diamonds for you to earn. You will need 90 diamonds to unlock all family characters. Click on the diamond icon in the upper right corner of the level select screen to unlock family characters using diamonds.
Shopper Shot Buy every product from every store. Click on a level, then select the shopping cart icon to be taken to the Store (if not selected, click on “Store” at the bottom of the screen). Click on an item with a price tag to view details and/or purchase it. Each restaurant has a number of upgrades available for purchase. Playing through the entire game once won’t yield quite enough money for you to purchase all upgrades. Play levels again by selecting them. Only numbered levels, not challenges, will reward you with money upon completion. Purchase all products across all restaurants to unlock this trophy.
The Chooser’s Champagne Unlock all the menu upgrades across all chapters. Click on a level, then select the shopping cart icon to be taken to the Menu (if not selected, click on “Menu” at the bottom of the screen). Click on a menu item to view all available information. If a menu item is still locked, a lock icon will appear over it. Click on the menu item to view the requirements needed to unlock it, e.g. how many more customers you need to serve. Unlock all items across all restaurants to earn this trophy.


Video Walkthrough

Welcome to the Delicious – Emily’s Message in a Bottle Video Walkthrough! Whether you’re a visual person, or just need a little nudge in the right direction, our video walkthrough features the entire game – start to finish – 100%! Get 3 star scores on all levels and breeze through challenges by using our video walkthrough as your guide. Click the Play button below to get started!

https://youtu.be/FJcN3EmeVt8?list=PLjS1ncg4_MZ0qY3z56hPxvpGPjPKSrnmd


The Delicious – Emily’s Message in a Bottle Official Walkthrough is meant as a guide and does not contain cheats, hacks, or serials.

The post Delicious – Emily’s Message in a Bottle Official Walkthrough appeared first on GameHouse.

Darkness and Flame – Born of Fire QuickStart Guide

$
0
0

Welcome to the Darkness and Flame – Born of Fire QuickStart Guide! Darkness and Flame – Born of Fire is a Hidden Object game in which you must collect items and explore locations in order to progress. When Alice discovers a mysterious egg that hatches into a fiery phoenix, she’s forced to flee her home and embark on a grand journey of fantastical discovery. This game is a Platinum Edition title, as and such, includes an integrated walkthrough. The Darkness and Flame – Born of Fire walkthrough can be accessed by first clicking on the golden phoenix in the lower left corner of the screen, marked Additional, then selecting the Strategy Guide tab at the bottom of the four options that appear.

Darkness and Flame - Born of Fire Walkthrough Location

How to Play

Are you new to hidden object titles? Have you simply forgotten some of the basics? Don’t worry! Here are a handful of helpful pointers to guide you in the right direction:


  • All items you collect throughout your adventure will be added to your Inventory. Your inventory is located at the bottom of your screen. When you want to use an item, select the item you’d like to use from your inventory, then click on the location where you’d like to use it.
  • When your cursor turns into a directional arrow, it means you can click to access a new area. Navigate by clicking when arrows appear to move between screens and locations.
  • Additionally, you can access the game’s Map by clicking on the compass in the lower right corner of the screen. You can use the map to fast travel between locations. Just click on the location where you’d like to go – it’s that simple!
  • Darkness and Flame – Born of Fire is a Hidden Object game, and as such, you will need to find items hidden throughout the game in order to progress. If you successfully locate an item, it will be added to your inventory.
  • Inventory Items are items which are necessary in order for you to progress in the game. These items are stored in your inventory, and will automatically be removed once they have been used correctly.
  • Inventory Items with a “+” icon indicate that they can be interacted with. Click on the item in your inventory to interact with it.
  • Feeling stuck? There’s a Hint button located in the bottom right corner of your screen. Hints tend to be unlimited, but often require time to recharge. Unable to solve a puzzle? The Hint button will become a Skip button during puzzles, but often requires time to charge up before use.
  • Click on the Diary in the lower left corner of your screen to view recent events.
  • Select the gold phoenix marked Additional in the lower left corner of the screen in order to access Tasks, Collections, Achievements, and the game’s integrated Strategy Guide.


What is a QuickStart Guide?

Our QuickStart Guides are intended to provide you with all the essential information you need to access pre-existing walkthroughs. Many of our Platinum Edition games contain integrated strategy guides to help you when you’re feeling stuck, without having to exit the game. For more information on how to access Darkness and Flame – Born of Fire’s integrated walkthrough, scroll up to the top of this page.


The post Darkness and Flame – Born of Fire QuickStart Guide appeared first on GameHouse.

Viewing all 192 articles
Browse latest View live