Delicious time management gameplay gives way to fabulous couture in Fabulous – Angela’s Fashion Fever. Join Emily’s sister Angela on an adventure that promises to take her out of her New York department store job and around the world! Does Angela have what it takes to be the next big name in fashion? Truly, the best of the best deserves a guide to match! Our Fabulous – Angela’s Fashion Fever walkthrough will guide you through each and every level with important tips and tricks, mice locations, trophy achievements, and even a deluxe video walkthrough.
Contents
General Tips & Tricks
Every great fashionista has their go-to tips and tricks, and you should be no exception! The following section covers all the basics you need to know, as well as advanced tips and tricks to help you obtain those shining 3-star scores.
How to Play
If you’re new to Fabulous Angela, don’t worry, the game is quite simple! Each level is called a “day”. Each day lasts for a certain amount of time. During that time, you want to serve as many customers as possible. Your goal by the end of the day is to have the highest score possible. This is obtained through a combination of happy customers, combos, and event completion per day. Here’s how it works:
- Welcome! A customer will enter the level.
- The customer will then decide what they’d like. A “…” bubble indicates they’re still thinking. When they’ve decided what they’d like, a bubble displaying the items will appear over their head.
- Locate the items the customer would like by clicking on them, then click on the customer to take those items to them. The faster you do this, the better!
- Once a customer has received all the items they’d like, they’ll proceed to the cash register. Click on the register to collect your cash and send them on their way.
- Sometimes a station or area will need to be cleaned after a customer has used it. A “!” will pop up over these areas. Click on them to clean them so that the next customer can use them!
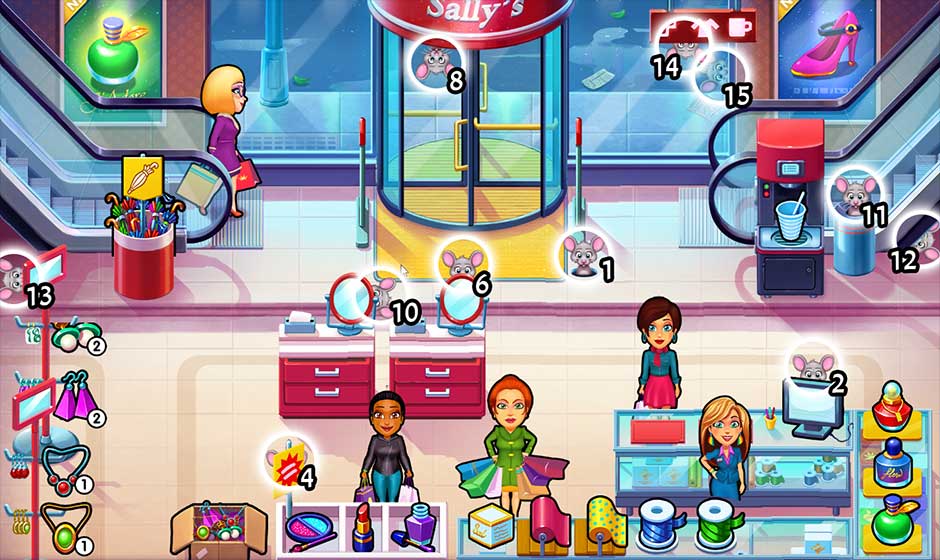
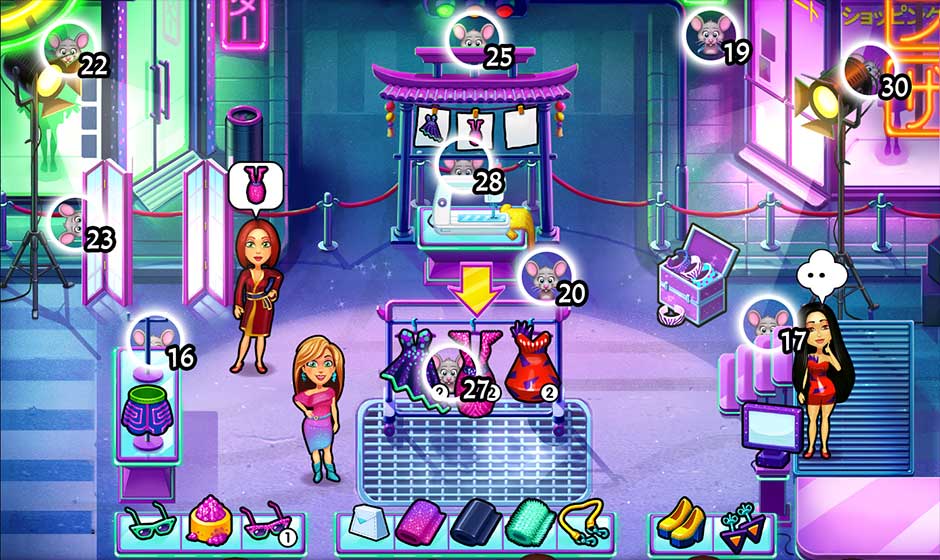
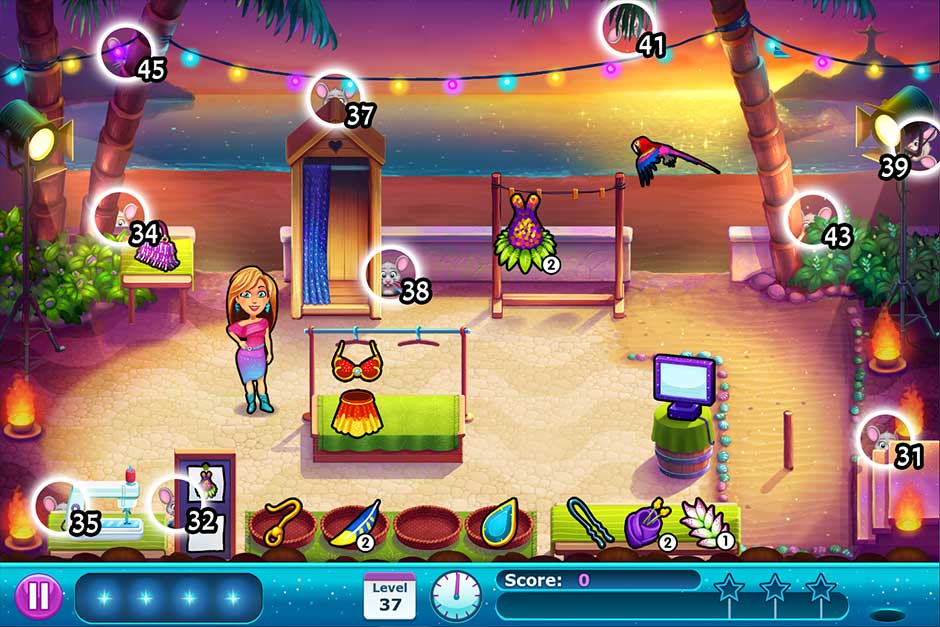
Mouse Locations
Hidden throughout the game are sixty-one mice. Mice locations are unique per day. Each level/day in the walkthrough below will indicate whether or not a mouse is present, and if so, will indicate its location. If you need a visual reference of mice locations, visit the Mice Locations section of our guide, or simply click on “Mouse Location” for that level to be taken directly to a screenshot!
Scores and Combinations
Fabulous – Angela’s Fashion Fever features a whole new scoring system. While similar to Delicious, there are some unique points which make Fabulous Angela very different from her sister’s Delicious franchise. All levels feature a star ranking system, with a maximum score of 3 stars. “Create Your Dress” levels act as challenge levels and only feature 1 star. Looking for ways to improve your score? Here’s how the scores work!
- Complete Dress level steps – Score +500 –
Awarded on Dress levels. You will receive +500 for each step of the event completed, and an additional +500 upon successful completion of the level.
- Complete Event level steps – Score +200 –
Awarded on Event levels. You will receive a +200 bonus for each step completed, as well as an additional +200 for completing the final event step of the level.
- Clean Store Bonus – Score +100 –
Make sure all areas and stations marked with a “!” are cleaned by the end of the day to receive this automatic score bonus!
- Mouse Found Bonus – Score +100 –
Find the level’s hidden mouse to gain this bonus. Dress levels do not contain mice.
Complete combinations for additional score boosts!
- Checkout multiple customers at once to gain +15 to your score per customer checked out.
- Clean stations back-to-back for a max combination of +30 to your score per combination.
- Give items to customers consecutively without picking up new items for a max combination of +30 to your score per combination. It should be noted these combinations will not be interrupted by events.
- Give a full order to a customer for a bonus of +10 per customer.
- Gain bonus points based on a customer’s mood. Neutral customers will award you with +10, a Happy customer with +20, and an Ecstatic customer with +30 points. Ecstatic customers will have hearts next to them indicating their happiness level.
Additional Tips and Tricks
You’ve got the hang of the basics, so how about some advanced tips and tricks to add to your repertoire?
- You can purchase upgrades at the beginning of each level. Upgrades with a pink tag are temporary and will only apply to that specific level or day, not subsequent levels. However, once that upgrade (e.g. Magic Max) has been purchased for that day, it will remain permanently for that day whenever you play. Upgrades without pink tags will apply per the entire chapter.
- If the day has ended and you haven’t completed an event or challenge yet, don’t panic! As long as you complete the challenge before checking out your final customer, you will oftentimes still receive the completion bonus.
- Unless otherwise stated in the Fabulous walkthrough below, spend the start of your day restocking any items which are capable of being restocked. Building up your stock early in the day can often weigh in your favor once things start to get busy, and you find you don’t have quite as much time to restock as you thought.
- Try and purchase the permanent upgrades per each chapter as soon as possible. If you want to get a head start on later levels, don’t purchase upgrades for Chapter 1 the first time through. Instead, save your money so you can immediately purchase all upgrades at the very beginning of all subsequent chapters.
- Magic Max is the golden boy when it comes to keeping your customers happy. Unlike entertainers in the Delicious franchise, Magic Max can improve the moods of customers in line. Not just that, he can use his magic to often make them instantly ecstatic! Use this trick to instantly improve a group’s mood and send them off in quick succession to obtain high score combinations.
- You should always hire Magic Max, and/or Cindy/Bob while doing events which require you to assemble or find something extra. These levels often won’t leave you with enough time to handle both the events and keep the customers moving quickly, and thus happy.
- The mouse hole at the bottom right corner of the screen will indicate whether or not the mouse for that particular day has been found. If the mouse has been found, the mouse will appear in the lower corner, too. If not, the hole will be empty. Mice can be found in every level, with the exception of [Create Your] Dress levels.
- Levels in which you must carry a box of supplies hold an extra challenge. Picking up a box will automatically throw away all items sitting on your tray. Make sure you deliver all the items on your tray to customers before you opt to carry the box!
- There are plenty of Fabulous Easter eggs in Fabulous – Angela’s Fashion Fever, and all of them have to do with lights and fire! Click on lights or fire effects throughout the various levels to turn them on and off. Best yet, try clicking on the traffic lights in Tokyo to turn them red. This will prevent pedestrians from crossing!
Fabulous – Angela’s Fashion Fever Walkthrough
Previously, Angela moved to the Big Apple with hopes of becoming a fashion designer. But when her husband Jimmy’s eyes started wandering toward her more sour-than-sweet boss, Yum-Mee, Angela decided to get sweet revenge! What has our glamorous girl been up to since then? Well…
Chapter 1: New York
The Big Apple is about to receive big news! Fashion icon Truly is hosting a competition to find the next great name in fashion, and the heir to her chic empire. Will small-time department store worker Angela’s dreams be realized?
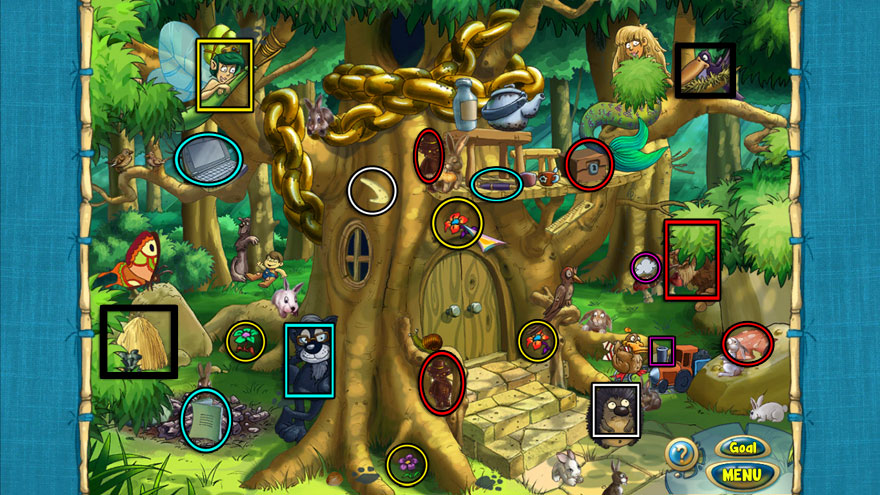
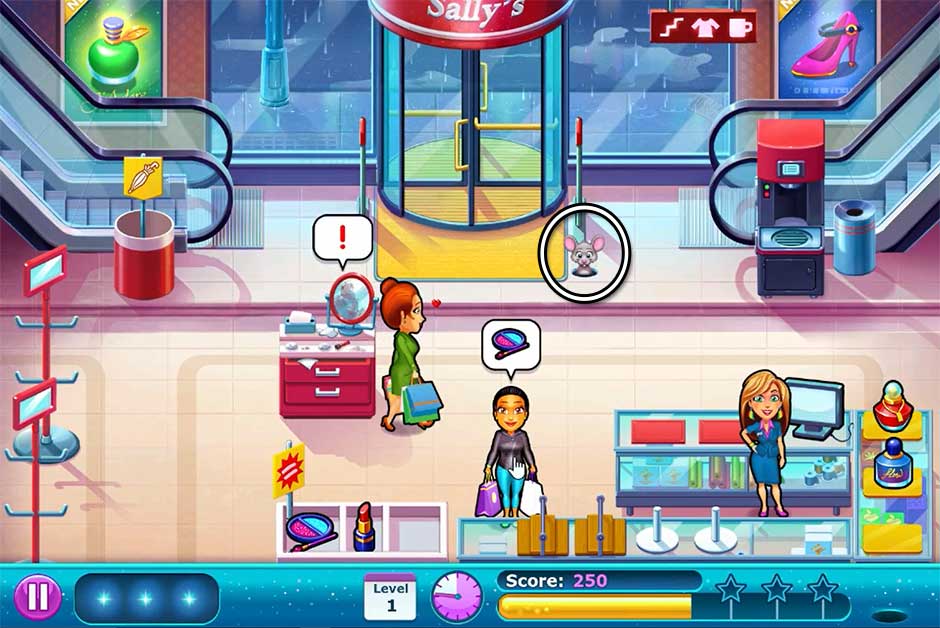
Level 1 – A Happy Accident
Objective: Complete the day.
Mouse location: At the bottom right corner of the entry carpet of the main door
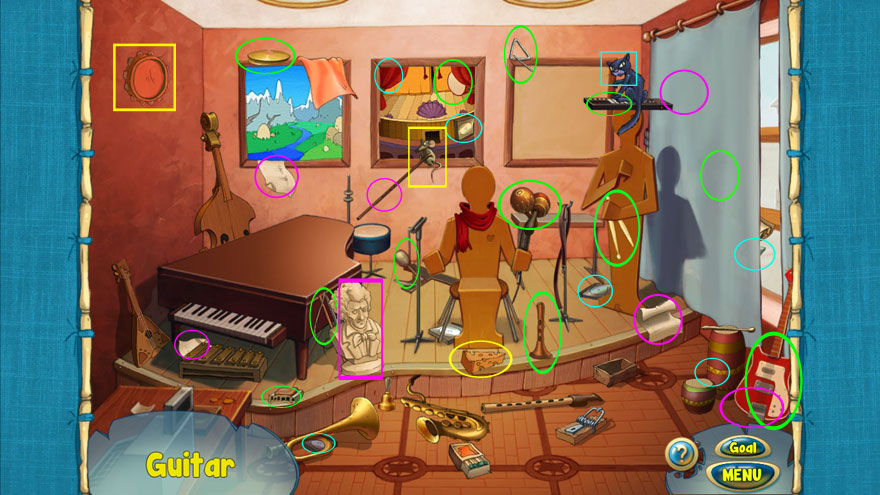
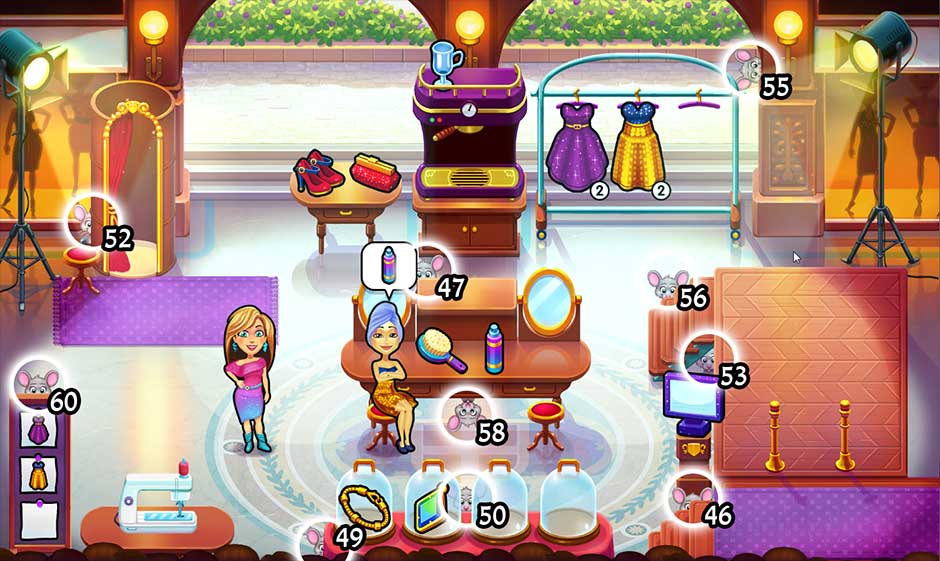
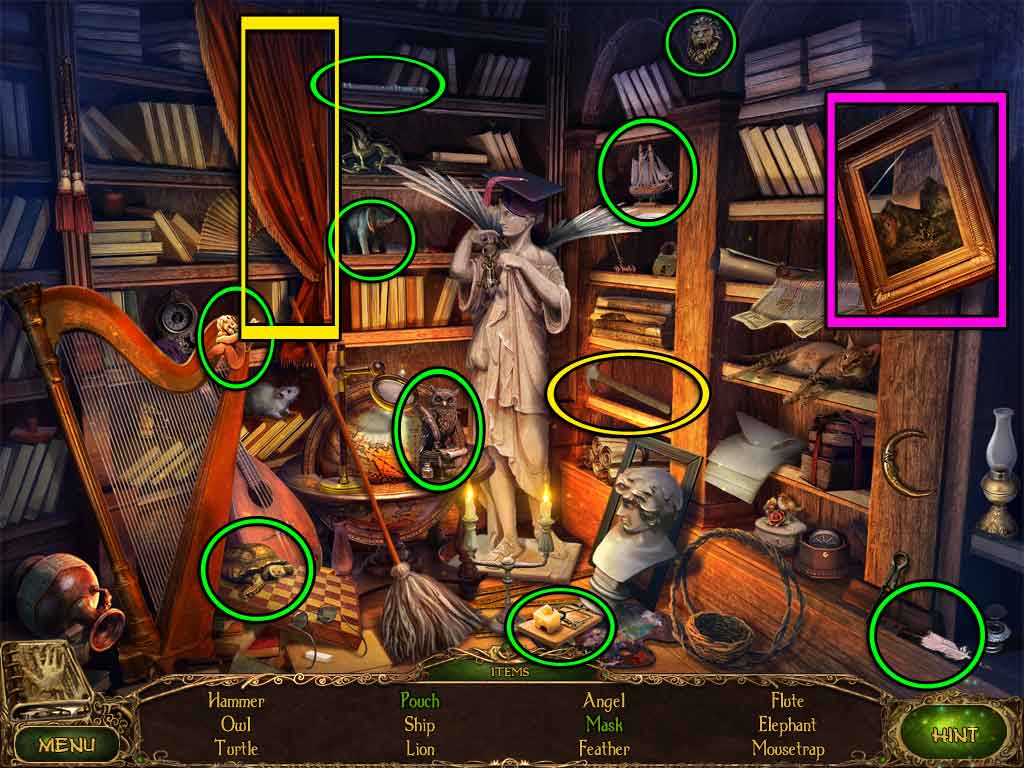
It’s your first day working at the boutique with Angela! Consider this the tutorial level. You may opt in or out of additional help from Angela’s boss. When a customer approaches and asks for something, click on the corresponding item they’re asking for, then click on the customer to give them that item. Ladies who use the makeup counter will want to try on their makeup before checking out. When the makeup counter is done being used, a “!” will appear. Click on the counter to clean it. If the counter is cleaned by the end of the day, you will receive an extra score bonus. Additionally, keep an ear out for the mouse that appears! When you spot it, click on it right away. You’ll want to catch all the mice in order to earn a special trophy!
![Fabulous - Angela's Fashion Fever - Level 1]()
Fabulous – Angela’s Fashion Fever – Level 1
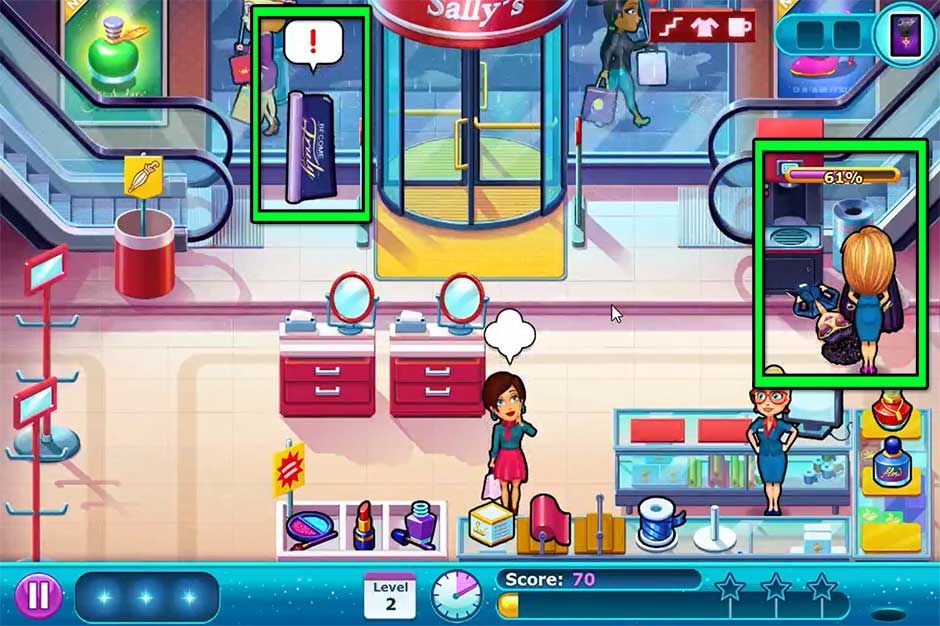
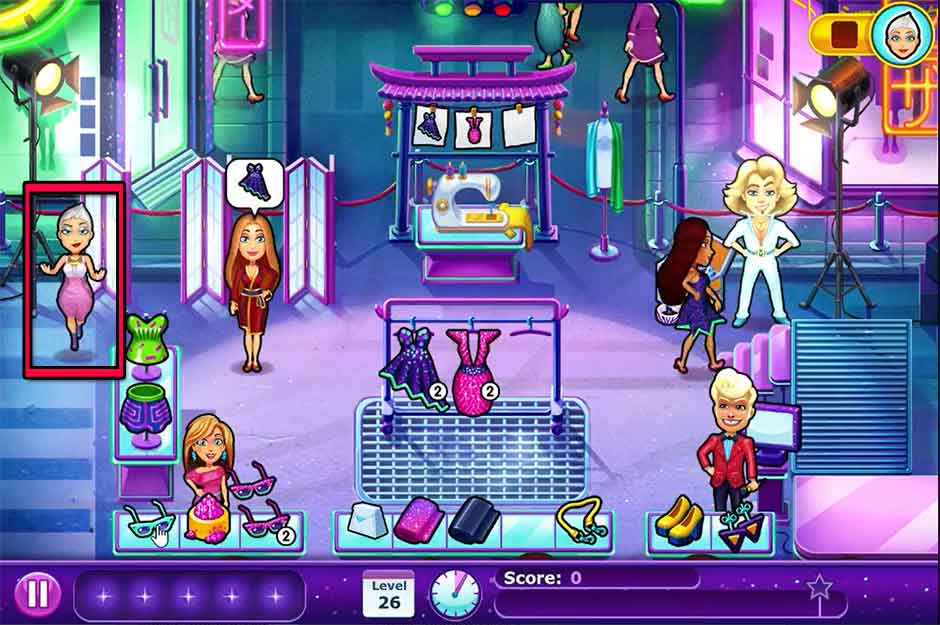
Level 2 – Become Truly?
Objective: Set up the displays for the exciting new show, “Become Truly”.
Mouse location: Behind the top of the check-out monitor
Two displays will show up today with a “!” over them. Click on the display to have Angela put it together. A bar with a percentage (%) of completion above each stand will show how close they are to being done. Complete these before the end of the day to receive a special bonus!
A new type of makeup, as well as a gift-wrapping station will appear. When a customer asks for a gift, click on the gift box, followed by the wrapping paper, and finally select the ribbon to complete a gift box.
![Fabulous - Angela's Fashion Fever - Level 2]()
Fabulous – Angela’s Fashion Fever – Level 2
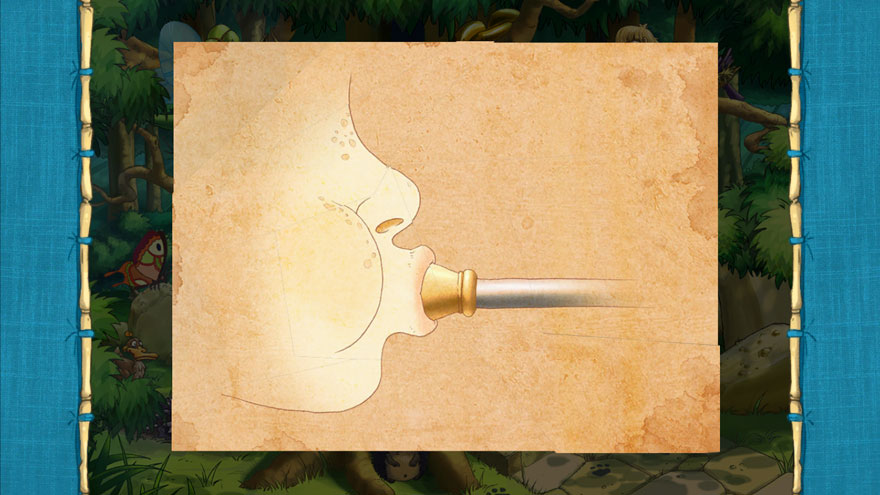
Level 3 – Create Your Dress – Part 1
Objective: Eureka! Time to sketch out Angela’s ideas for the dress.
Mouse location: No mouse today!
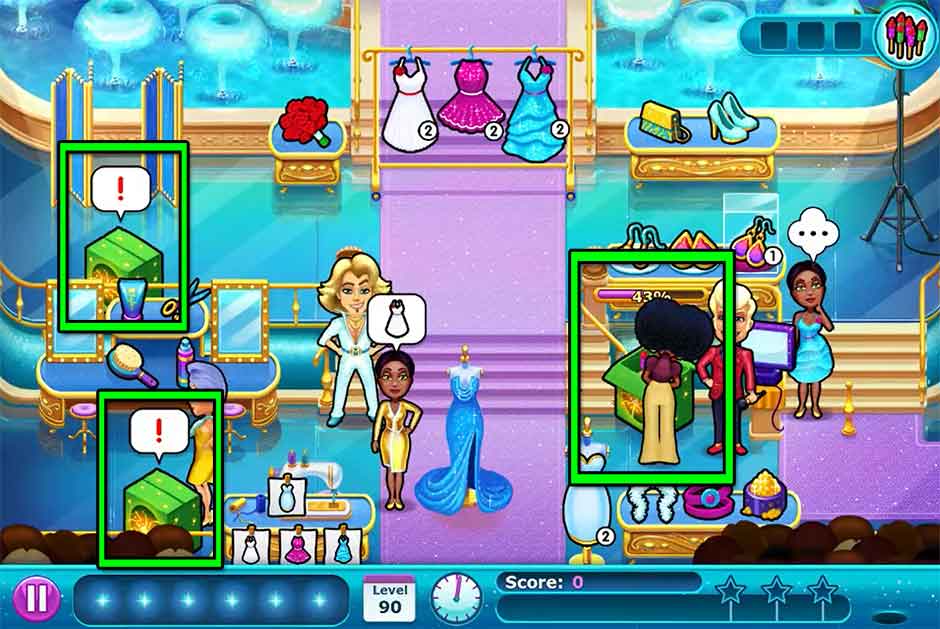
Before your day begins, you will get to choose from one of three dress designs to bring to life. The design you pick doesn’t impact any scores, so choose whichever dress you like the most! Throughout the day, every time Angela gets an idea for her dress, a chime will sound and a bubble with a “!” will pop up beneath the cash register. Click on the sketchbook before the green drains from the bubble to have Angela jot down her idea. Complete this four times before the end of the day to receive a special bonus!
![Fabulous - Angela's Fashion Fever - Level 3]()
Fabulous – Angela’s Fashion Fever – Level 3
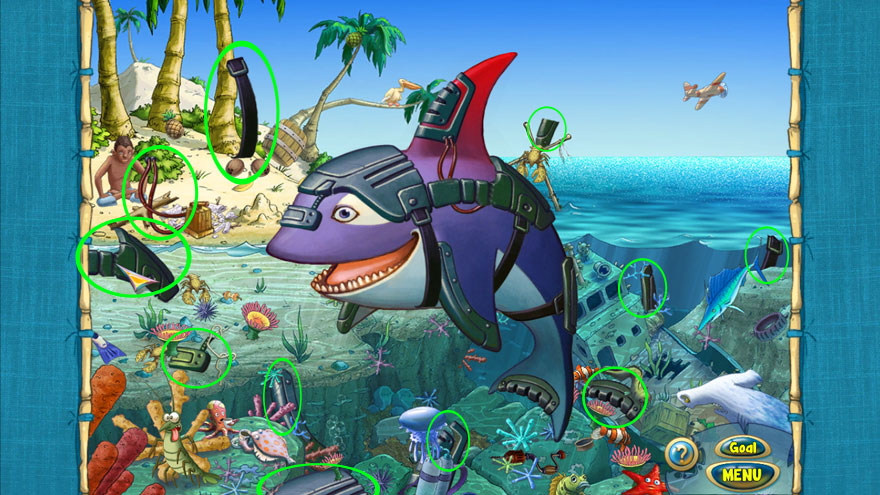
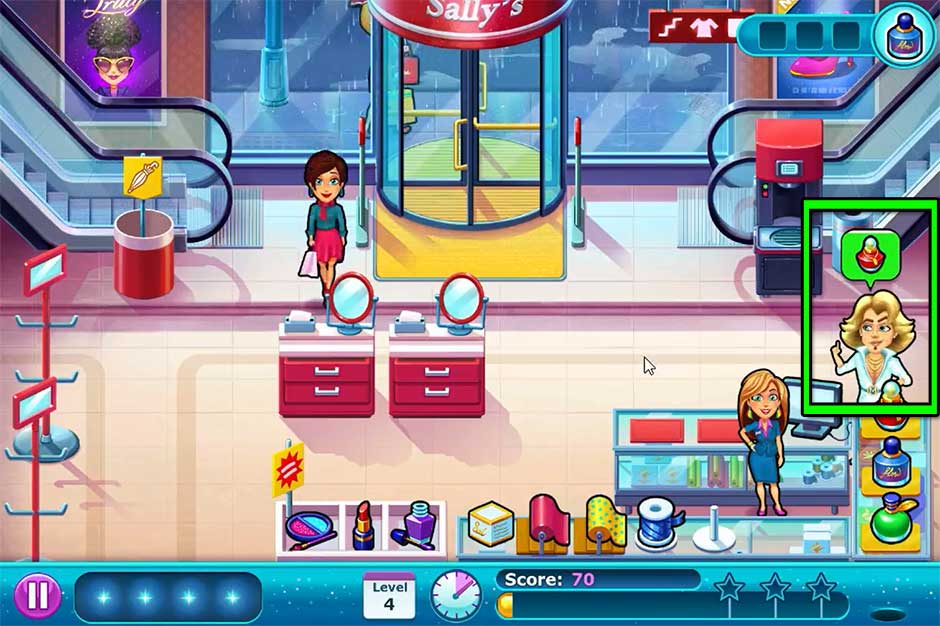
Level 4 – Everyone Wants Happiness
Objective: Find the perfect perfume for the mysterious Magic Max.
Mouse location: Behind the red and yellow sign on the left side of the makeup counter
The famed magician Magic Max will show up in the department store today! Help him find the perfect perfume for his date. While he wanders through the store throughout the day, each time he wants to try a new perfume, he will pause near the cash register. A bubble above his head will indicate which perfume he’d like. Select the perfume he asks for, then click on Magic Max before the green color drains from his speech bubble to hand him the perfume. Do this three times before the end of the day to complete the event!
Additionally, a third variety of perfume and an additional type of gift wrapping paper will become available today.
![Fabulous - Angela's Fashion Fever - Level 4]()
Fabulous – Angela’s Fashion Fever – Level 4
Level 5 – Create Your Dress – Part 2
Objective: A heavy box of fabric and tools has been delivered – but it’s in the wrong place! You’ll have to move it to the correct spot.
Mouse location: No mouse today!
A box will show up today with a “!” displayed above it. Click on the box to have Angela move it to the next location before taking a break. Angela won’t be able to help customers while moving the box, so today is a good day to hire Cindy to run the cash register and Magic Max to keep the customers happy. Click on the cash register to have Cindy checkout a customer. You can do this while Angela is moving. Move the box three times to its final location to receive a special bonus!
Tip: Starting today, you can hire Magic Max for 50 coins to help out in your store! Click on Magic Max to have him perform a magic trick that instantly makes all customers happy!
![Fabulous - Angela's Fashion Fever - Level 5]()
Fabulous – Angela’s Fashion Fever – Level 5
Level 6 – New Shoes “Heel” Your Blues
Objective: Lots of customers have been waiting for the store to open… Serve them all, quickly!
Mouse location: Behind the top of the mirror of the right makeover station
Uh-oh, there’s a crowd of customers at the door all waiting to be helped! Today is an excellent day to hire Cindy and Magic Max to help you out. Have Magic Max instantly improve the customers’ moods while Cindy runs the register. Focus on serving as many customers in combination as you can. Once you’ve served them all, the day’s event will automatically be completed.
The Sorted Box will also show up as a new item today. Click on the box to restock the jewelry hanging on the stands on the left: another new item. Clicking on the Sorted Box to restock jewelry will automatically refill all types of jewelry currently available by +1. Any time the jewelry on the stands reaches a stock of 1 left, it’s a good idea to use the Sorted Box to restock it right away. Don’t keep your customers waiting!
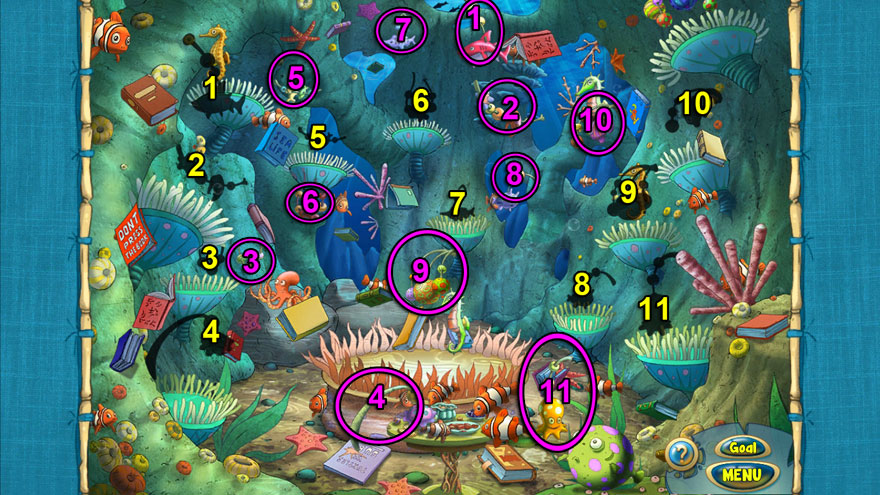
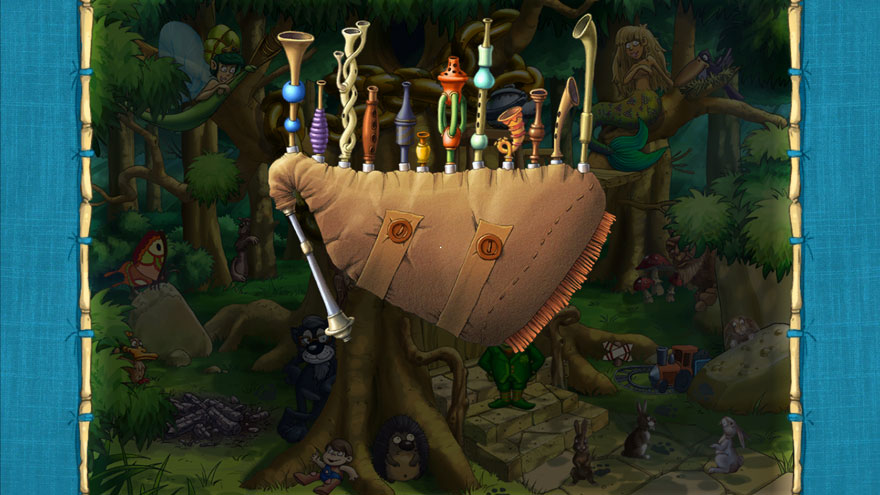
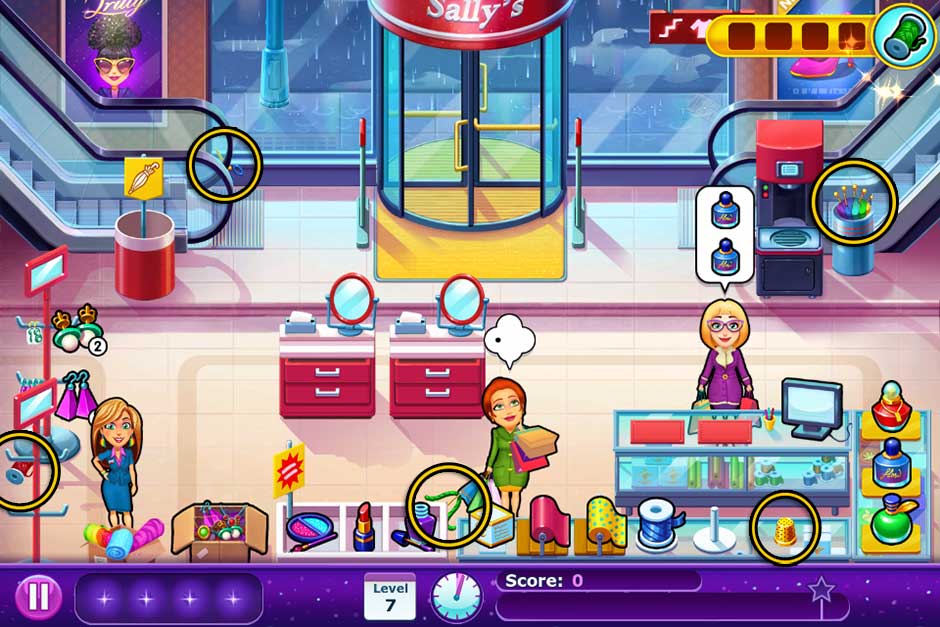
Level 7 – Create Your Dress – Part 3
Objective: Angela’s tools have been scattered. You’ll have to find them all again!
Mouse location: No mouse today!
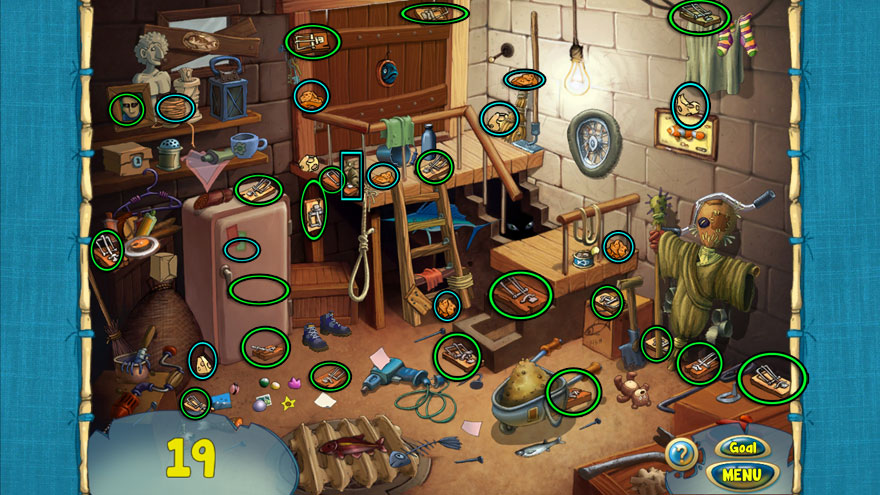
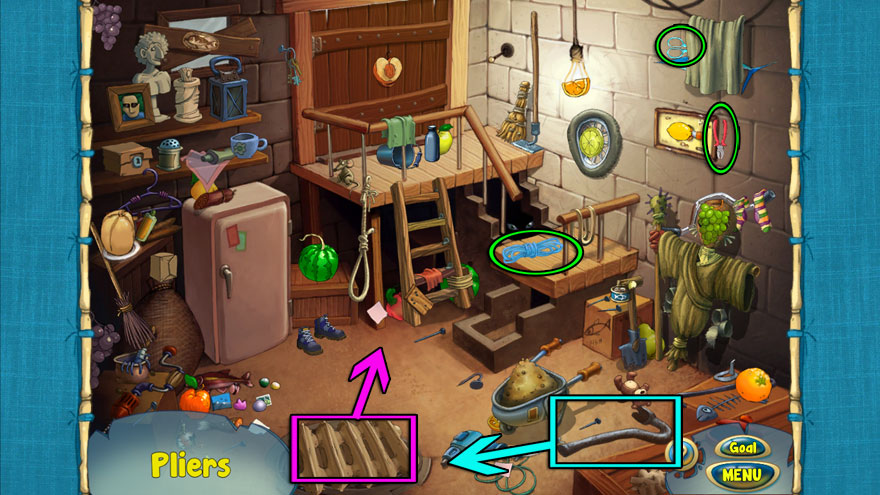
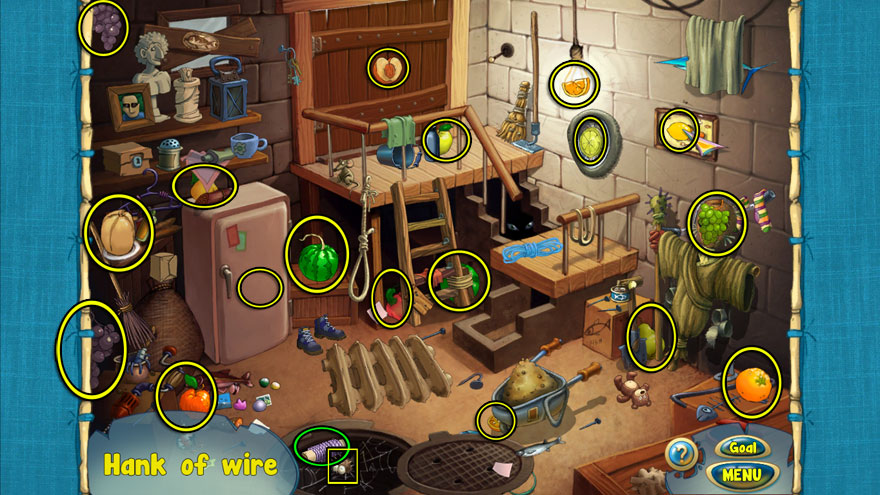
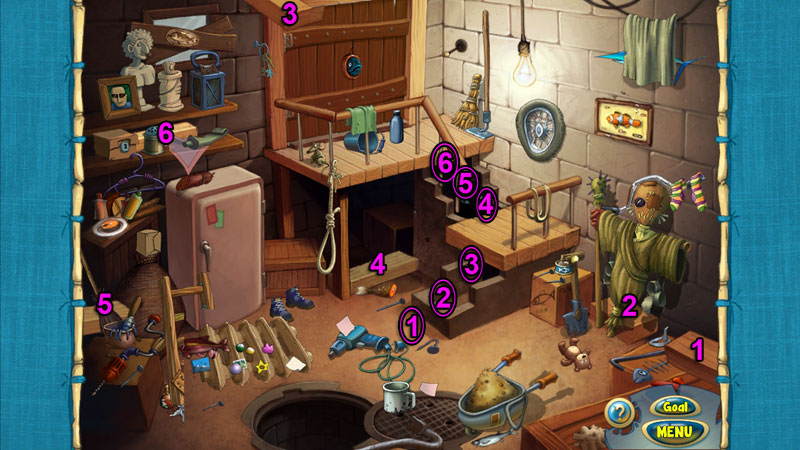
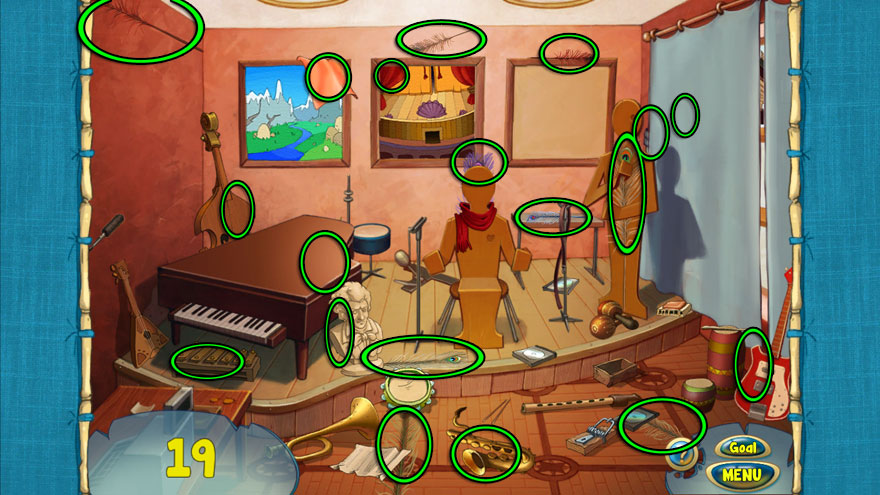
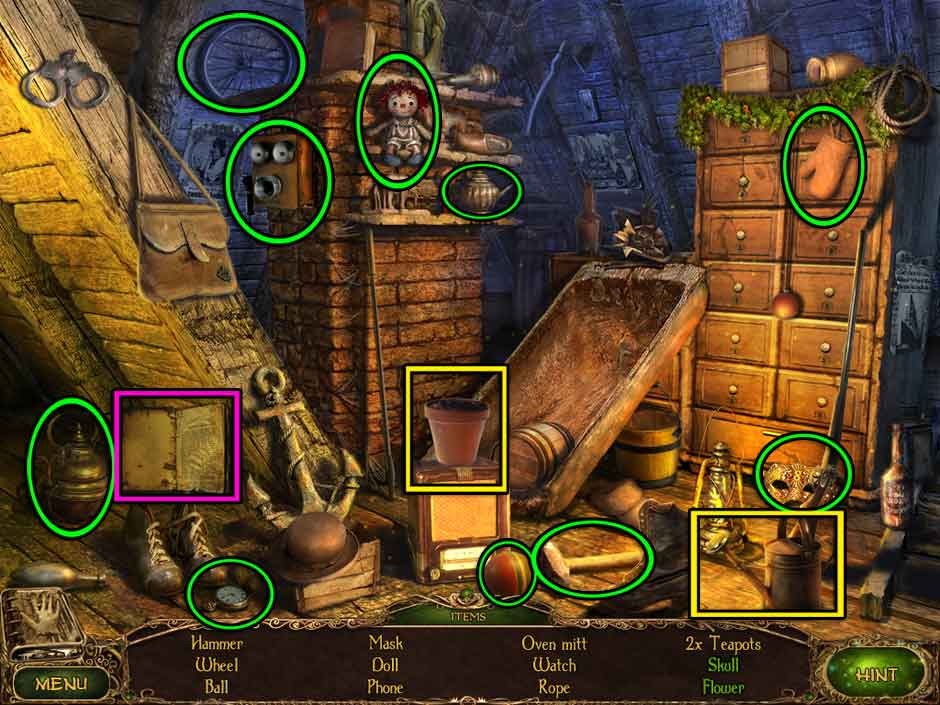
Click on the box marked with a “!” in the lower left corner as soon as the day starts. This will cause items to fly off in every direction! Throughout the day, bubbles with an image of one of Angela’s missing tools will pop up over the box in the lower left corner. Quickly locate the tool displayed and click to collect it, then click on the box to place it back inside. All item locations for the day are pictured in the screenshot below. Return the tools to the box successfully four times to complete the event. Keep in mind hiring Cindy can be a huge help today!
![Fabulous - Angela's Fashion Fever - Level 7]()
Fabulous – Angela’s Fashion Fever – Level 7
Level 8 – Speak of the Devil
Objective: Complete the day.
Mouse location: Beneath the Sally’s sign at the top of the screen
Today features a new product: umbrellas! Click on the umbrella stand on the upper left near the escalator to bring up a bubble. Once this bubble pops up, click on the corresponding umbrella color the customer is requesting. Click on the customer to bring their umbrella to them. The selection bubble will remain visible until you click on something else.
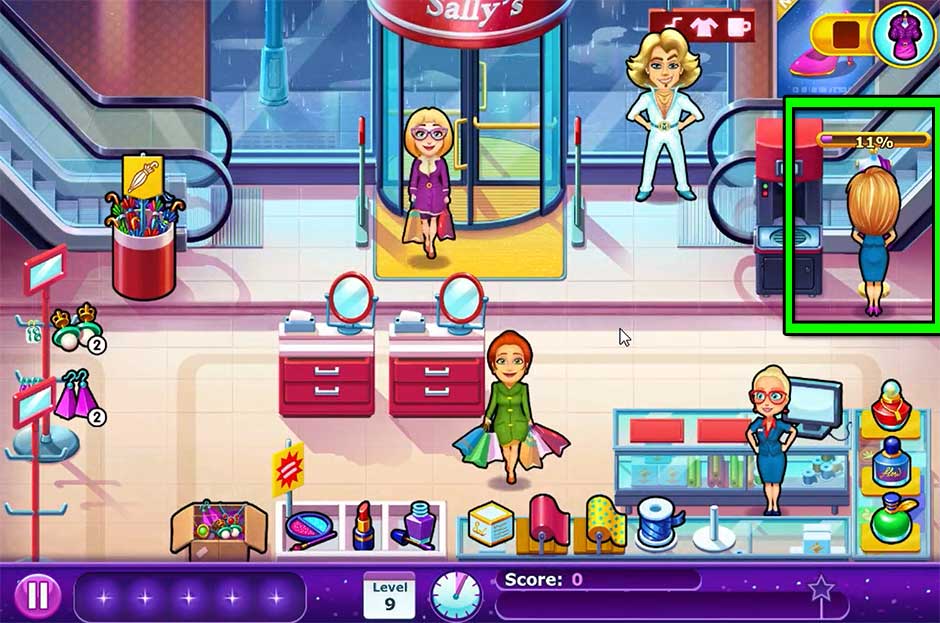
Level 9 – Create Your Dress – Part 4
Objective: Time to put the final touches on your dress!
Mouse location: No mouse today!
Angela’s dress is on a stand in the upper right corner near the escalator. The moment the day starts, immediately click on the dress to start working on it. A percentage bar will appear over the dress indicating how close it is to completion. If you click on the dress immediately, you should be able to complete nearly 20% of it by the time the first customer orders. Serve customers in waves, using the help of Cindy and Magic Max to keep them happy while you put the finishing touches on your dress. Keep an eye on the clock – you’ll want to make sure your dress is at least 50% done by the time the day is halfway through, so that you don’t keep your final customers waiting as you wrap up the objective.
![Fabulous - Angela's Fashion Fever - Level 9]()
Fabulous – Angela’s Fashion Fever – Level 9
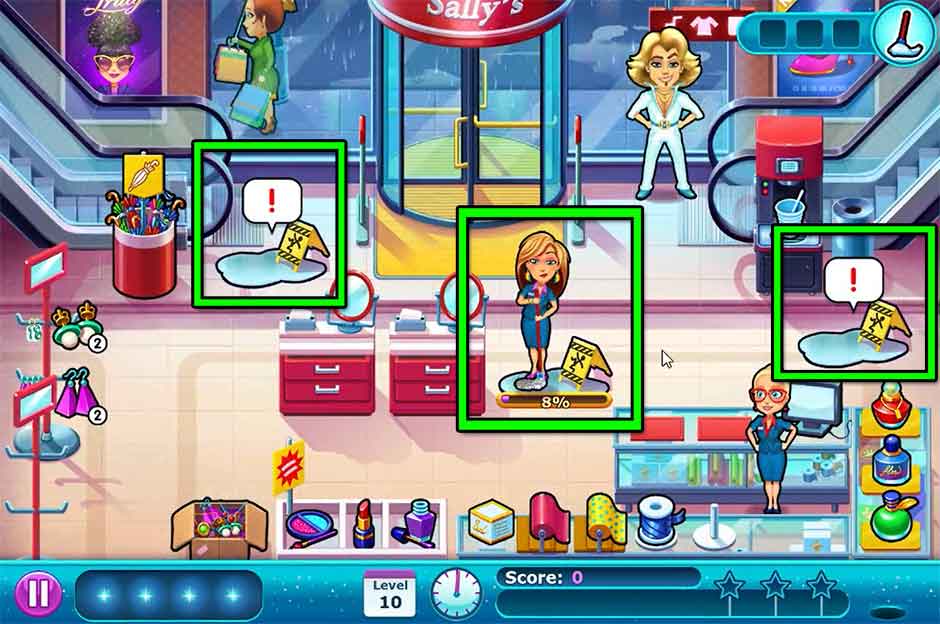
Level 10 – Oops!
Objective: It’s raining a lot… Wait, too much! The roof’s leaking! Clean up the puddles of water in the store.
Mouse location: Around the back of the right side of the mirror at the left makeover station
The moment the day starts, click on one of the rainwater puddles with a “!” over it to start cleaning up. A percentage bar will show up over each as you clean it, indicating how close you are to being finished. Focus on one spill at a time until all three are cleaned. Use the combined help of Cindy and Magic Max to keep customers happy while you’re cleaning. Clean all three leaks before the day is done to receive a special event bonus.
Additionally, a Coffee Machine will be added today. The coffee is located in the upper right corner near the escalator. Click on the machine when a customer orders coffee to brew it. Keep a sharp eye on the indicator: when it turns green, click on the machine again to collect the perfect brew! Failing to do so while the coffee is in the green zone will result in burnt coffee, and then you’ll have to start over again.
![Fabulous - Angela's Fashion Fever - Level 10]()
Fabulous – Angela’s Fashion Fever – Level 10
Level 11 – And the Winner Is…
Objective: Pulling an all-nighter has its downsides. Make sure Angela stays awake during her shift.
Mouse location: In the trash can to the right of the java station
Angela will have difficulty staying awake today, so the help of Magic Max and Cindy will go a long way! Every time Angela starts to nod off, a “!” will pop up over her head. Click on Angela to send her to the Coffee Machine. Once the coffee meter has landed in the green zone, click on the machine to collect the coffee and have Angela drink it. Good as new! Well… for a time, at least. Complete this task five times to complete the day’s event!
Necklaces will also be added as a new jewelry item today. Clicking on the Sorted Box to restock jewelry items (such as the earrings before) will automatically restock the necklaces +1 as well.
![Fabulous - Angela's Fashion Fever - Level 11]()
Fabulous – Angela’s Fashion Fever – Level 11
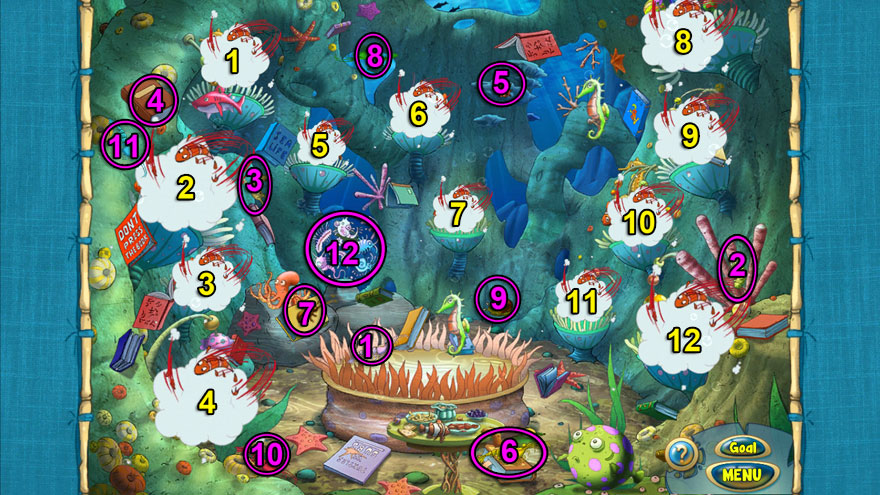
Level 12 – Lucky Number Seven?
Objective: The show’s over… Take down the “Become Truly” displays.
Mouse location: Underneath the bottom of the escalator toward the upper right
Your task today is to take down the Become Truly display in the upper left corner near the escalator. Click on the sign with the “!” above it to have Angela work on removing it. A percentage bar will pop up showing how far along you are in this task. Complete the task before the day is done to receive a special bonus. Both Magic Max and Cindy can prove useful today while you focus on this task.
A new ribbon will become available at the gift-wrapping station as well. Pay close attention to gift boxes customers order to make sure you assemble them correctly!
License and Registration, Please – Murray is sitting on top of the trash can toward the upper right. Click on the small figurine to unlock the achievement “License and Registration, Please”! Murray’s location is shown in orange in the screenshot pictured.
![Fabulous - Angela's Fashion Fever - Level 12]()
Fabulous – Angela’s Fashion Fever – Level 12
Level 13 – Look, A Rainbow!
Objective: OMG! Truly is coming! Her bodyguards are securing the area – be sure to help them out.
Mouse location: Behind the top left corner of the uppermost red jewelry stand on the left
Truly’s bodyguards will show up throughout the day asking to see various items. When an item pops up above their head, quickly grab that item, then select the bodyguard to bring that item to them. Complete this task four times during the course of the day to complete the event and receive a special bonus.
![Fabulous - Angela's Fashion Fever - Level 13]()
Fabulous – Angela’s Fashion Fever – Level 13
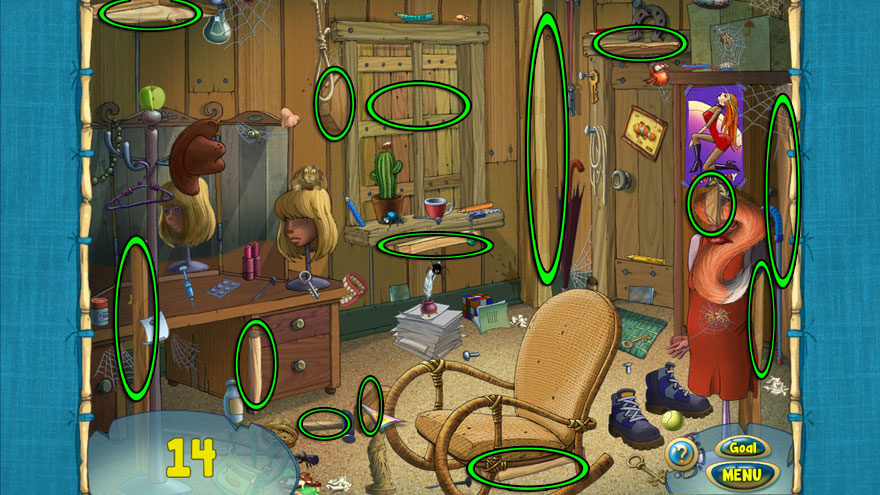
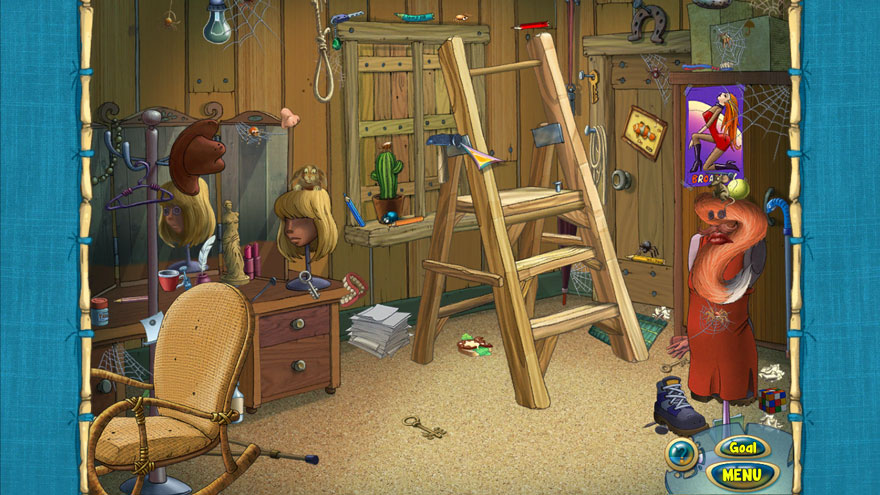
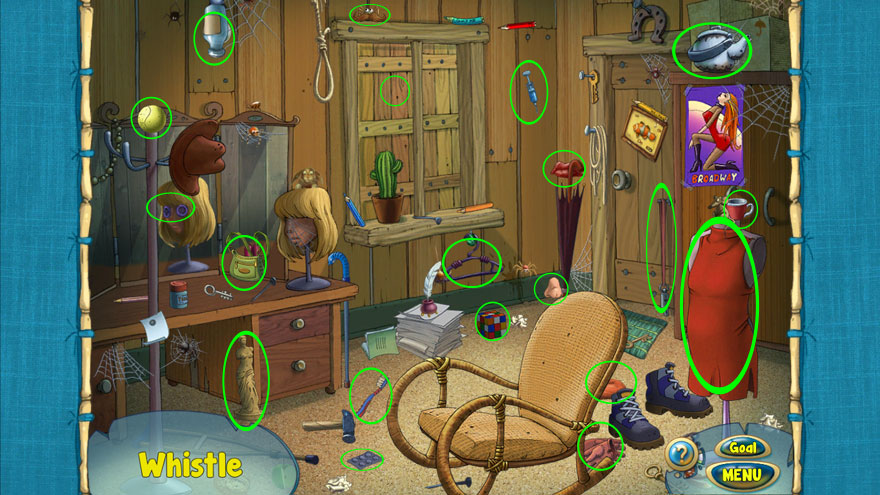
Level 14 – Your Roots (Are Showing)
Objective: We’re leaving for Tokyo soon… Best start prepping dresses before Angela leaves.
Mouse location: Beneath the red sign hanging above the escalator on the upper right
Work on Angela’s dress design by clicking on the “!” over the dress design below the cash register. Each time you click the dress design, Angela will be busy with sewing the dress until the meter above her head is completely filled. Use Magic Max and Cindy to keep customers happy and moving while working. You will need to complete sewing the design four times before the end of the day to complete the event goal.
![Fabulous - Angela's Fashion Fever - Level 14]()
Fabulous – Angela’s Fashion Fever – Level 14
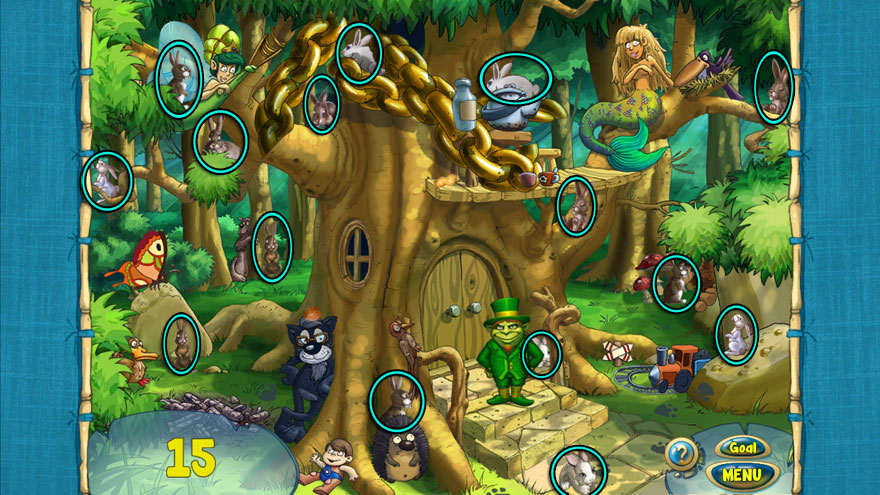
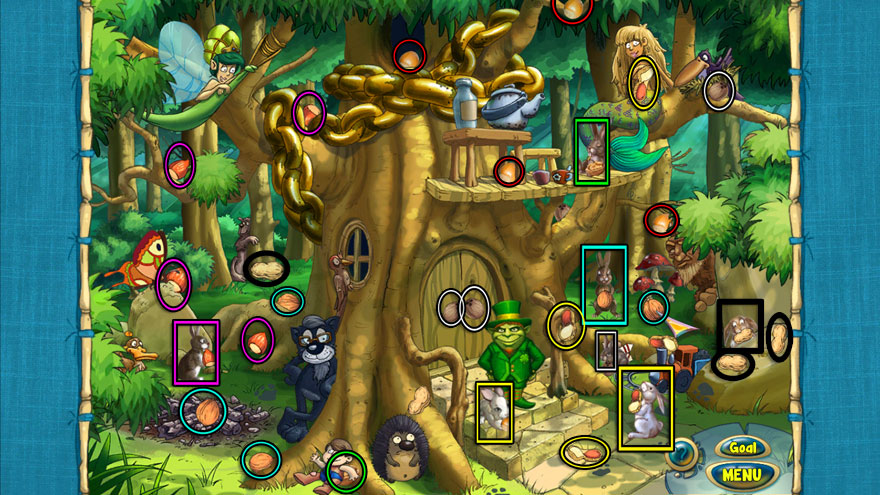
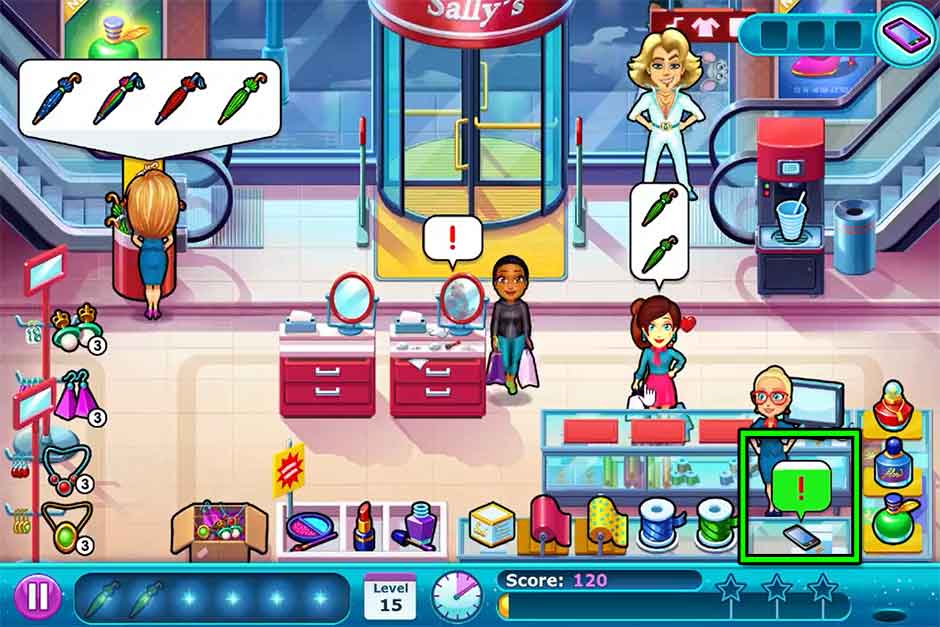
Level 15 – Destiny Calling!
Objective: Your friends have caught wind of what happened. Tons of messages to read!
Mouse location: Outside on the right edge of the rightmost window, just above the escalator on the upper right
Go about your day normally, paying attention to Angela’s phone, which is sitting on the counter beneath the cash register. Listen for the phone buzz and keep an eye out for the “!” bubble that pops up. Click on the bubble before the green color drains to have Angela check her phone. Do this three times before the end of the day to complete the event and receive a score bonus!
Tip: Be aware that the text messages that pop up can block the cash register for a brief period of time. It’s still possible to click the register screen. You will just need to be extra diligent.
![Fabulous - Angela's Fashion Fever - Level 15]()
Fabulous – Angela’s Fashion Fever – Level 15
Chapter 2: Tokyo
Off to Tokyo, where it’s time to meet not the six, but the seven lucky contestants vying for the throne to Truly’s fashion empire!
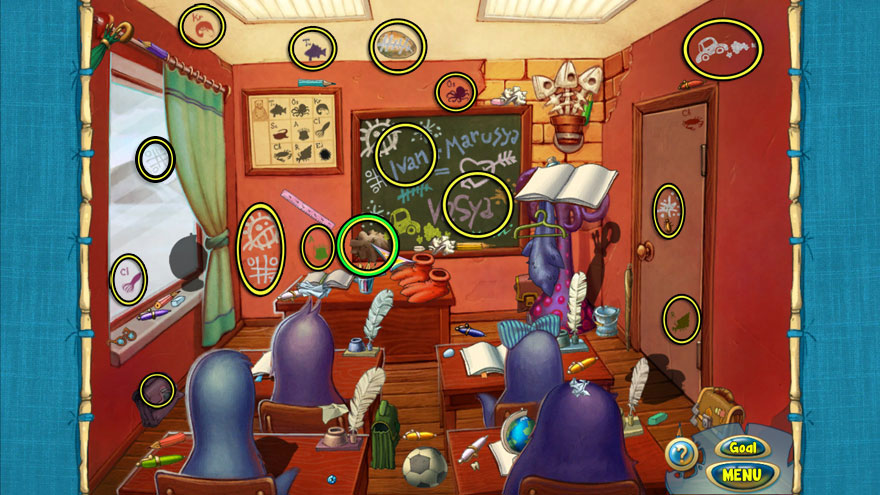
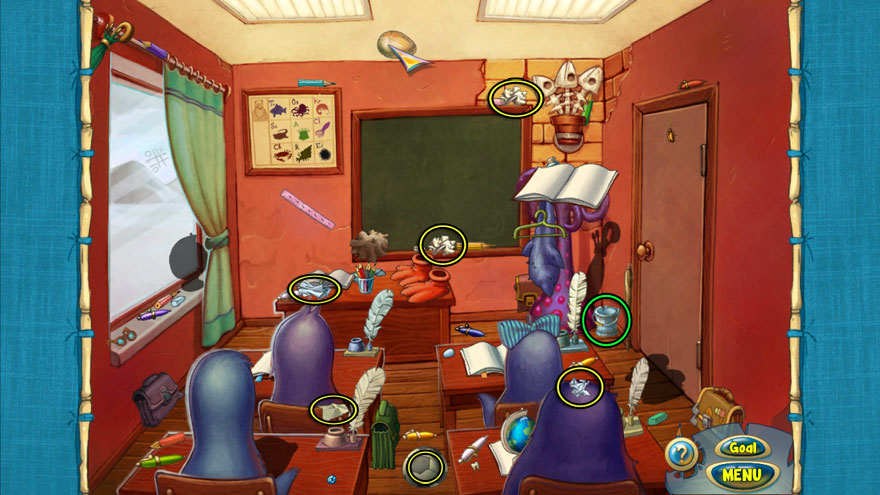
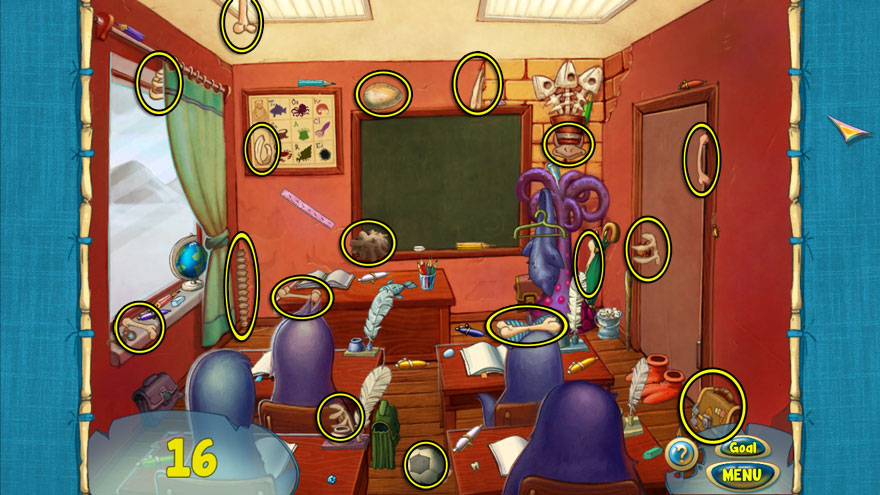
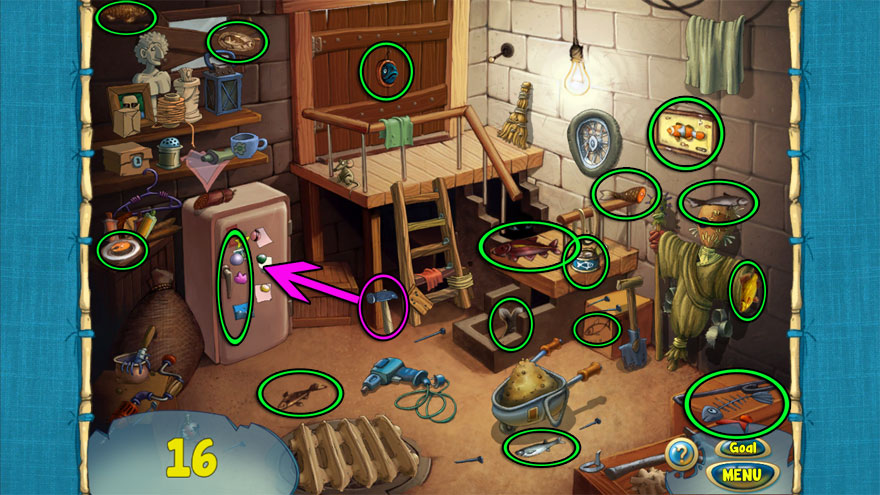
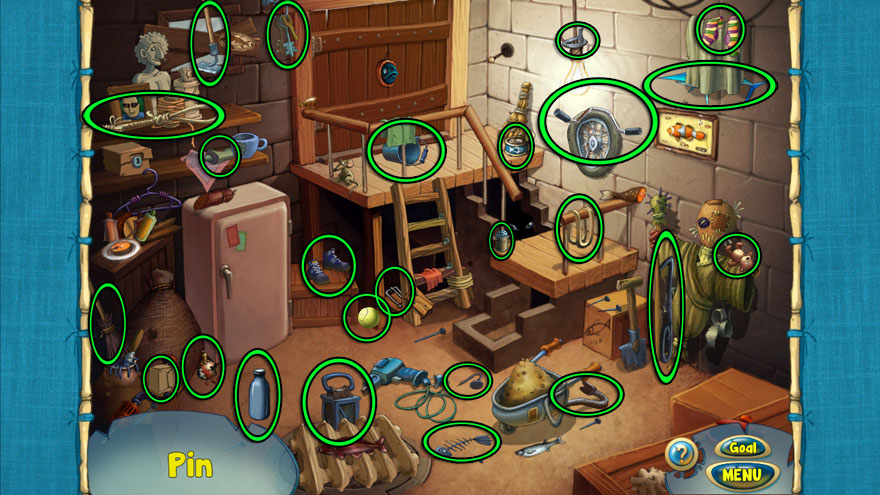
Level 16 – Lucky Number 7
Objective: Complete the day.
Mouse location: Behind the top of the clothing counter on the left
Today marks your first day in Tokyo! A few new mechanics will be introduced in this chapter. Dresses will be hanging on the dress rack in the center of the area with a number attached. The number indicates how many dresses there are. Click on a dress design hanging above the sewing machine at the top of the screen to have Angela sew another dress of that style. Whenever you see only one dress is remaining, it’s a good idea to start sewing new ones right away!
Handbags are also a new item. When a model asks for a handbag, click on the bag, followed by the material, and finally the straps in order to assemble a complete purse for the model. Complete the day as per normal to progress to the next level.
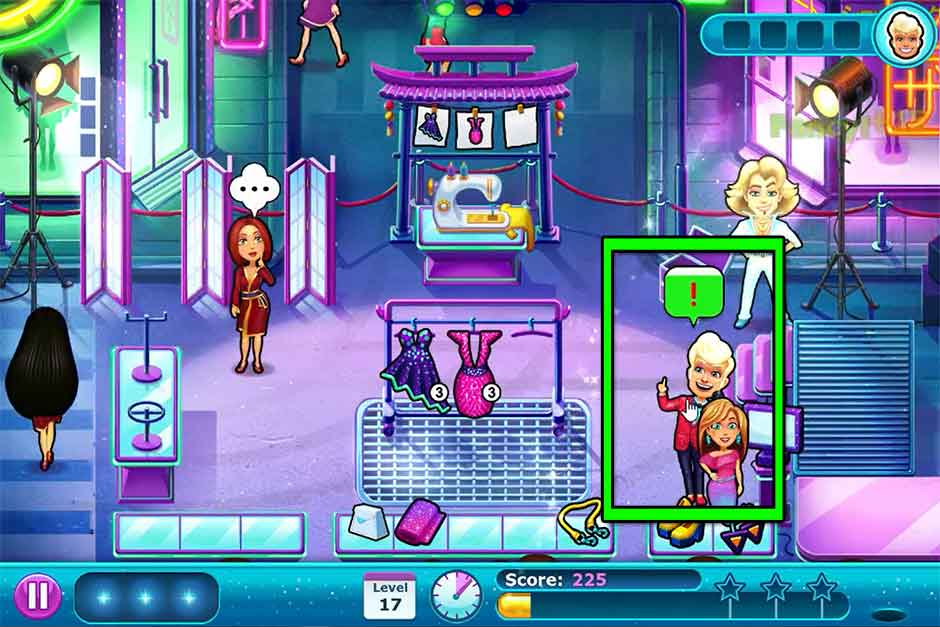
Level 17 – We Are Live!
Objective: The annoying host, Bob, has a few questions for Angela to answer.
Mouse location: Behind the top of the steps leading to the catwalk/checkout
Throughout the day, show host Bob will want to ask Angela questions. Click on Bob whenever the “!” appears over his head. Do this before the green drains from his bubble to successfully have Angela answer one of his questions. You will need to do this four times throughout the day to complete the event successfully. It’s a good idea to hire Magic Max to keep the models happy while they wait for Angela to complete her interviews.
Additionally, earrings will be added as a new item today. They will appear on the lower right next to the shoes, and require no additional assembly.
![Fabulous - Angela's Fashion Fever - Level 17]()
Fabulous – Angela’s Fashion Fever – Level 17
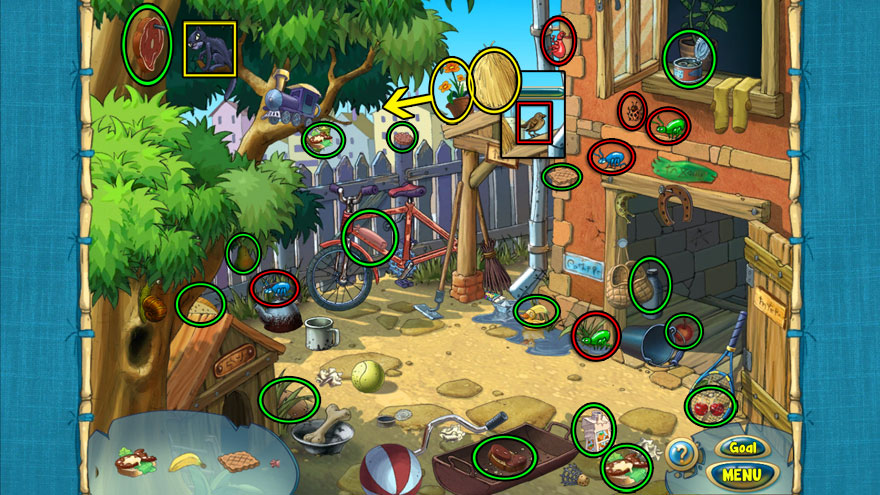
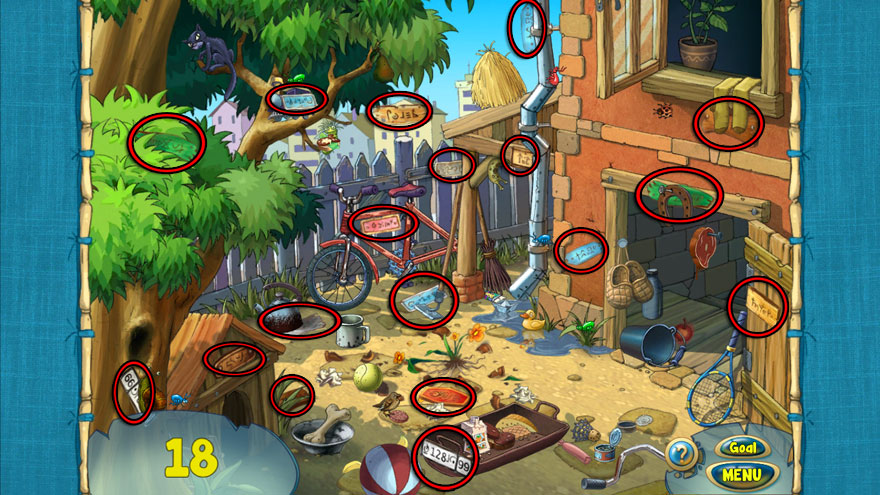
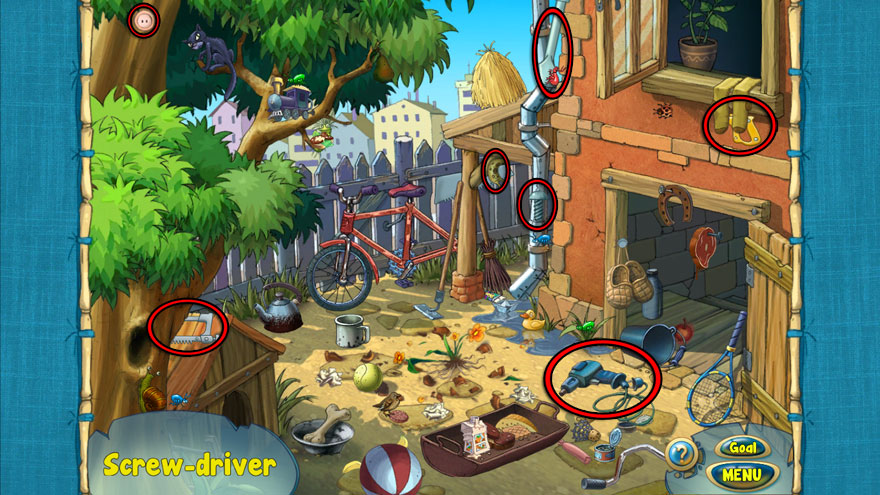
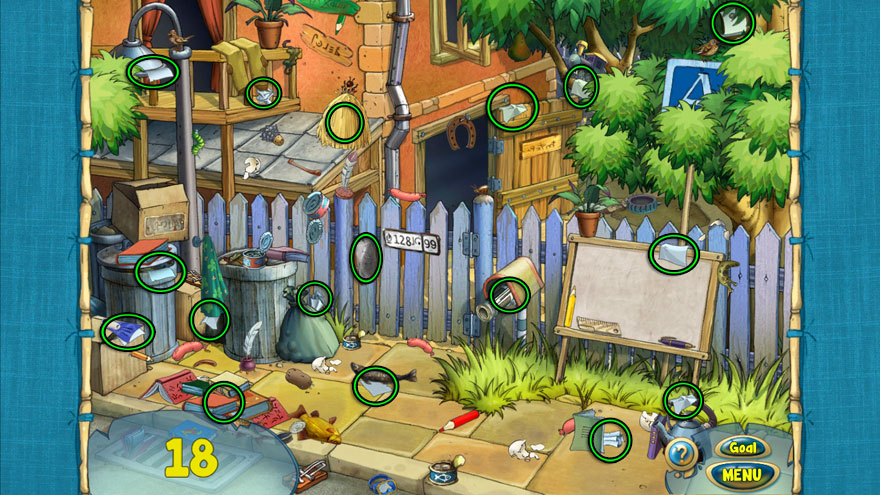
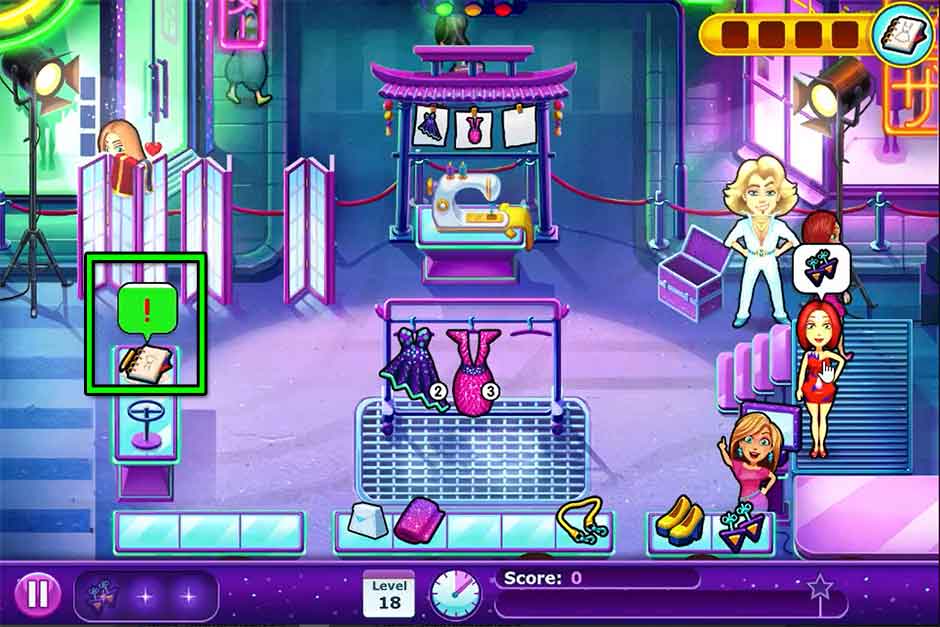
Level 18 – Create Your Dress – Part 1
Objective: Eureka! Time to sketch out Angela’s ideas for the dress.
Mouse location: No mouse today!
At the very start of the day, you will get to choose your dress design. Which design you choose doesn’t impact the game in any way score-wise, so choose whichever dress you like the most! Throughout the day, every time Angela gets an idea for her dress, a chime will sound and a bubble with a “!” will pop up above her sketchbook on the left. Click on the sketchbook before the green drains from the bubble to have Angela jot down her idea. Complete this four times before the end of the day to receive a special bonus!
Tip: You can now hire Bob to man the catwalk and checkout models. Utilize the help of both Magic Max and Bob during this level.
![Fabulous - Angela's Fashion Fever - Level 18]()
Fabulous – Angela’s Fashion Fever – Level 18
Level 19 – Truly’s Favorite
Objective: Complete the day.
Mouse location: At the top of the sidewalk on the upper right, to the left of the purple doorway
Progress through the day as normal, bearing in mind that a new purse material is now available: black leather. Pay close attention to the choice of handbag a model wants when ordering now that you have multiple materials to work with.
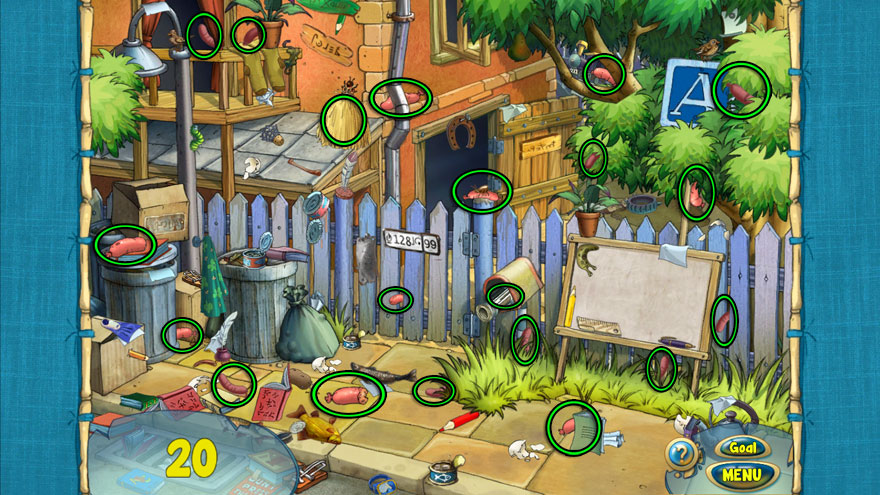
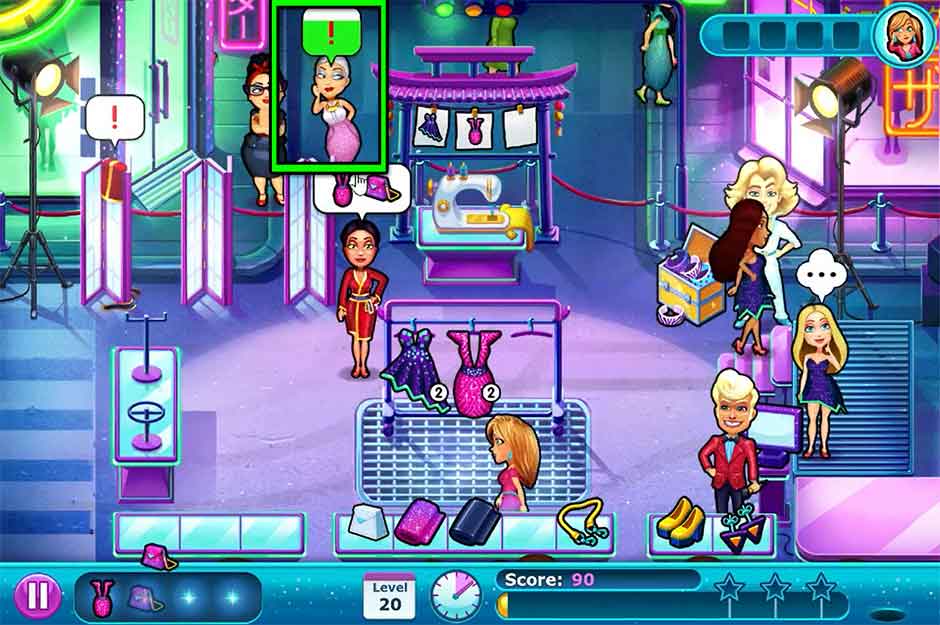
Level 20 – Italian Fashion
Objective: Sounds like gossip… What’s Lori talking about?
Mouse location: At the top right corner of the dress rack
The latest fashions aren’t the only things being talked about. Lori’s got a little gossip of her own! Watch Lori at the top of the screen. Each time a “!” pops up over her head, it indicates she’s about to gossip. Click on her before the green drains from the bubble to eavesdrop on her conversation. Do this four times before the end of the day to complete the event and receive a special bonus!
Bracelets will also become available for the models to wear today. Click on the trunk toward the upper right to select the bangle a model requests.
![Fabulous - Angela's Fashion Fever - Level 20]()
Fabulous – Angela’s Fashion Fever – Level 20
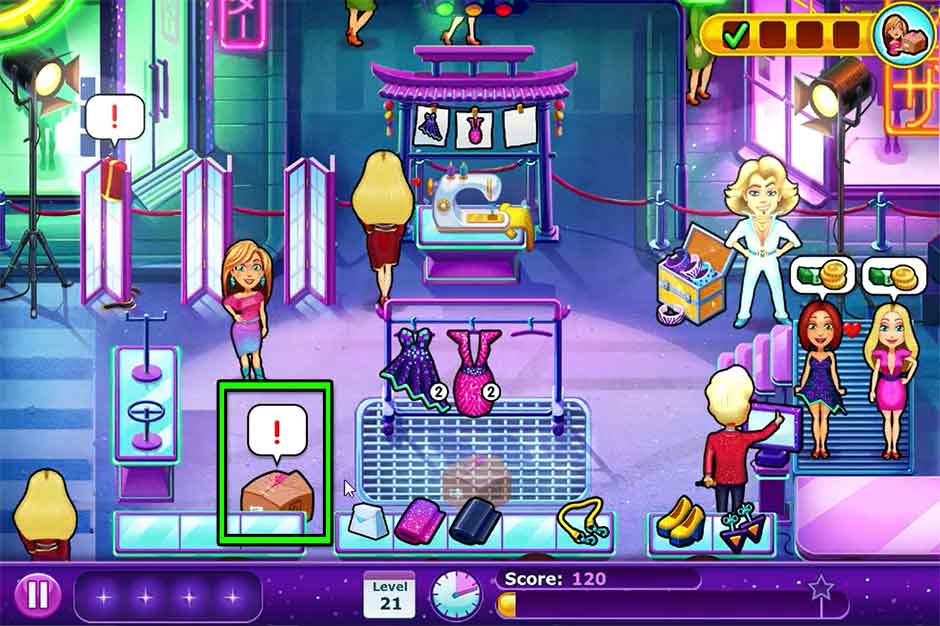
Level 21 – Create Your Dress – Part 2
Objective: A heavy box of fabric and tools has been delivered – but it’s in the wrong place! You’ll have to move it to the correct spot.
Mouse location: No mouse today!
A box will show up today with a “!” displayed above it. Click on the box to have Angela move it to the next location before taking a break. Angela won’t be able to help customers while moving the box, so today is a good day to hire Bob to run the catwalk and Magic Max to keep the models happy. Click on the cash register to have Bob checkout a customer. You can do this while Angela is moving. Move the box four times to its final location to receive a special bonus!
![Fabulous - Angela's Fashion Fever - Level 21]()
Fabulous – Angela’s Fashion Fever – Level 21
Level 22 – It’s Party Time!
Objective: Complete the day.
Mouse location: Behind the top of the set light on the upper left
Go about your day as per normal, keeping in mind that you have two new products for the models: a top and skirt to match. These new items will show up on the leftmost counter. Models tend to order the top and skirt together, so combine these orders to your advantage. These items do not need to be restocked.
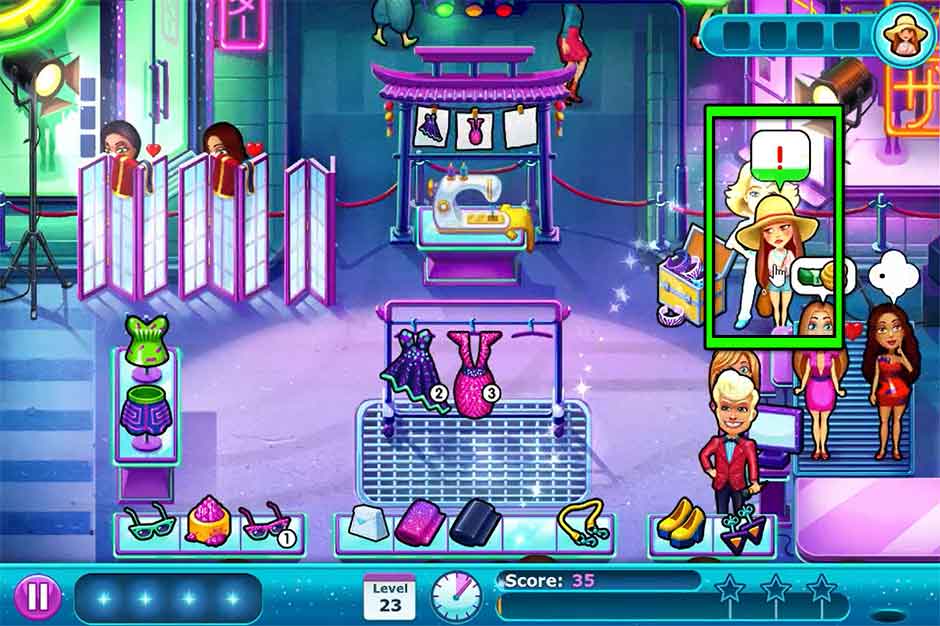
Level 23 – Family Is Everything
Objective: Viola is a little homesick. Let’s try and cheer her up!
Mouse location: Behind the left side of the leftmost changing screen
Viola is feeling homesick and will hang around the upper right corner of the set today. When she’s ready to talk, a “!” bubble will appear over her head. Click on her quickly before the green drains from the bubble to fulfill your task. Do this four times throughout the day to complete the objective and receive a score bonus. It’s highly recommended you keep a sharp eye on Viola at all times and keep your cursor close to her area of the screen as much as possible. Due to the fact that Viola’s bubble drains exceptionally quickly, you will need to be especially attentive as to when her “!” appears.
In addition, a new item has been added today: glasses. Click on the cyan glasses in the lower left corner, followed by the pink glitter dish next to them in order to assemble a pair of fashion-ready sunglasses for the models. Glasses are in limited stock, so you will need to make more from time to time. Try to never let your stock dip below one at any point in time, though given how difficult it is to click on Viola, your priority should be on talking with her over making more sunglasses today.
Tip: You may want to avoid hiring Magic Max today. Viola and Magic Max occupy nearly the exact same space, so having Magic Max around can make it more difficult to click on Viola.
![Fabulous - Angela's Fashion Fever - Level 23]()
Fabulous – Angela’s Fashion Fever – Level 23
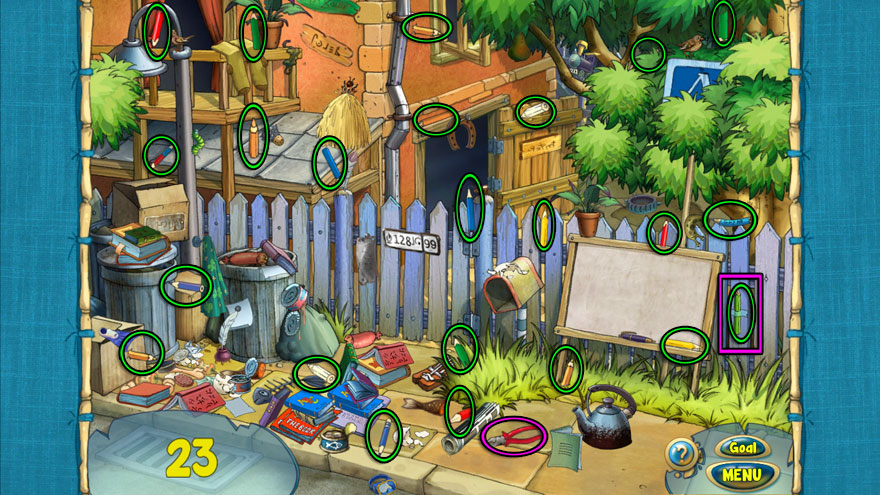
Level 24 – Create Your Dress – Part 3
Objective: Angela’s tools have been scattered. You’ll have to find them all again!
Mouse location: No mouse today!
Click on the box marked with a “!” next to the sewing machine as soon as the day starts. This will cause items to fly off in every direction! Throughout the day, bubbles with an image of one of Angela’s missing tools will pop up over dress mannequin. Quickly locate the tool displayed and click to collect it, then click on the dress form. All item locations for the day are pictured in the screenshot below. Return the tools successfully six times to complete the event. Keep in mind hiring Bob can be a huge help today!
![Fabulous - Angela's Fashion Fever - Level 24]()
Fabulous – Angela’s Fashion Fever – Level 24
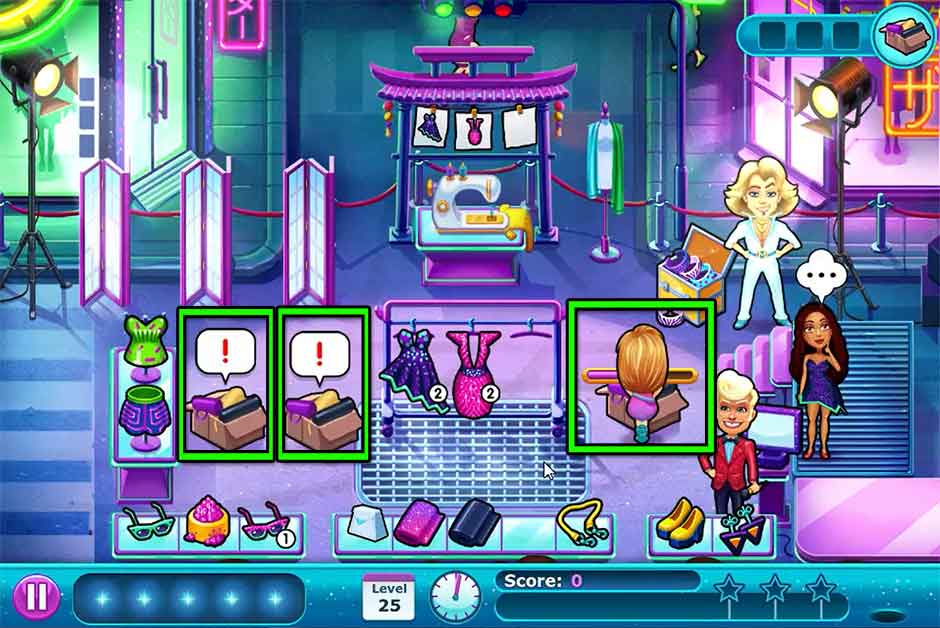
Level 25 – Take Two
Objective: Bruna left a mess behind… Better clean this place up!
Mouse location: At the very top of the roof above the sewing station
Click on one of the boxes marked with a “!” the moment the day begins. There are three boxes you will need to clear before the end of the day. A meter will appear over Angela’s head showing how far along the cleanup is. Focus on one at a time until all of them are cleared. It’s a good idea to hire Magic Max and Bob to help you today.
![Fabulous - Angela's Fashion Fever - Level 25]()
Fabulous – Angela’s Fashion Fever – Level 25
Level 26 – Create Your Dress – Part 4
Objective: Lori is trying to sabotage Angela’s dress! Keep her away or you’ll have to start over!
Mouse location: No mouse today!
Throughout the day, Lori will sneak onto set from the left side of the screen, slowly making her way toward your dress. Whenever you spot her, click on her as soon as possible to shoo her away. The closer she gets to your dress, the more likely she’ll successfully sabotage it. If Angela is working on other tasks, she will complete those tasks before shooing Lori, however keep in mind Lori can continue to move while she’s doing this. Keep Lori away successfully to complete the event and receive a bonus at the end of the day.
![Fabulous - Angela's Fashion Fever - Level 26]()
Fabulous – Angela’s Fashion Fever – Level 26
Level 27 – Forgotten Birthdays
Objective: Complete the day.
Mouse location: Between the purple and pink dresses on the dress rack
A third material type for the handbag will become available today: a shaggy teal. Keep a close eye on the purse types the models request so that you can make them correctly accordingly. Otherwise, go about your day as per normal, stringing together as many combos as possible. Hire Magic Max if you need that little extra boost to models’ happiness, or Bob if you need an extra set of hands to send models to the catwalk.
Level 28 – Angela! Angela!
Objective: Angela’s first taste of fame! Her fan club has arrived to get her autograph!
Mouse location: Behind the top of the sewing machine
Angela’s famous, and the demands of many outweigh the demands of a few! Cheering crowds will appear at the bottom of the screen asking for Angela’s autograph. Click on the “!” bubble of the cheering crowd before the green color drains to have Angela sign autographs. You will need to do this six times throughout the day to successfully complete your objective. Magic Max and Bob will be especially useful today, so hire them if you can!
A new dress design will become available today as well. You can find this new design on the right portion of the dress rack. Click on the dress design above the sewing machine as needed to restock the dress according to the models’ demands.
![Fabulous - Angela's Fashion Fever - Level 28]()
Fabulous – Angela’s Fashion Fever – Level 28
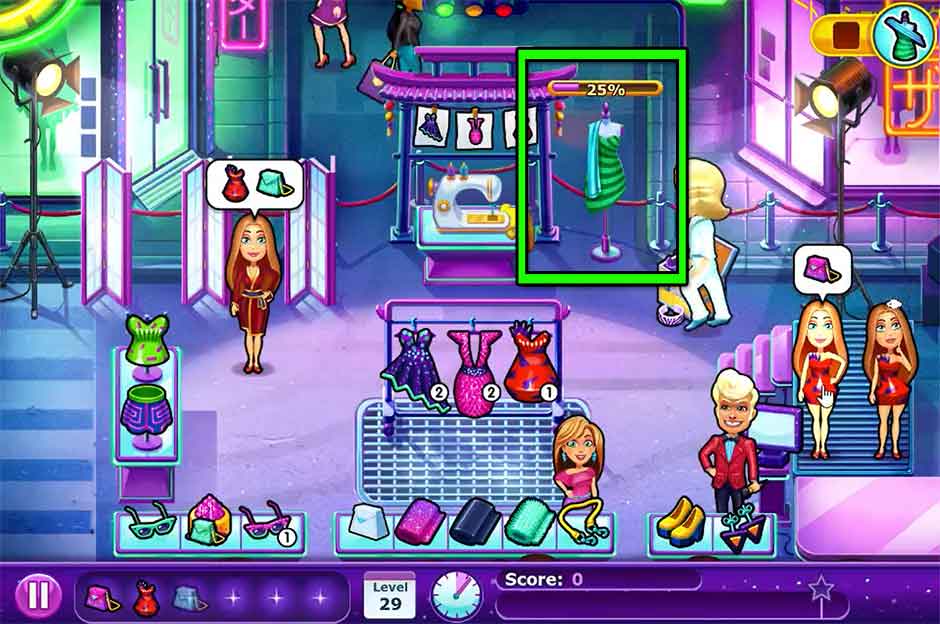
Level 29 – Create Your Dress – Part 5
Objective: Time to put the final touches on your dress!
Mouse location: No mouse today!
Angela’s dress is on a stand in the upper right corner near the sewing machine. The moment the day starts, immediately click on the dress to start working on it. A percentage bar will appear over the dress indicating how close it is to completion. If you click on the dress immediately, you should be able to complete nearly 20% of it by the time the first model orders. Serve models in waves, using the help of Bob and Magic Max to keep them happy while you put the finishing touches on your dress. Keep an eye on the clock – you’ll want to make sure your dress is at least 50% done by the time the day is halfway through, so that you don’t keep your final models waiting as you wrap up the objective.
![Fabulous - Angela's Fashion Fever - Level 29]()
Fabulous – Angela’s Fashion Fever – Level 29
Level 30 – The Plot Thickens!
Objective: Complete the day.
Mouse location: Behind the back of the set light on the upper right
It’s the final day in Tokyo, and the catwalk is busier than ever! Make sure all your stations are upgraded and both Bob and Magic Max are hired to make your life easier. The trick is to ensure that all the models are happy when Bob sends them off to the catwalk, so try to check them out in waves while keeping them happy with Magic Max’s charm. It’s better to wait a couple moments longer and have him make all the models happy than to checkout only moderately happy models.
Chapter 3: Rio
It’s time to turn up the heat in the illustrious Rio! But it’s not just the competition heating up – there’s also an undeniable chemistry between Angela and Eric. Can Angela manage both her fun and professional life while keeping them separate?
Level 31 – Welcome to Rio!
Objective: Complete the day.
Mouse location: Behind the top of the steps on the lower right
Welcome to Rio! The sunset sands reveal a whole new runway to work with. For your first day, you’ll notice the dress rack has moved toward the upper right, and your sewing machine to the lower left. Click on the dress design next to the sewing machine to restock the dress hanging on the rack. Additionally, there’s a handbag in the upper left, and earrings can be assembled by combining the hook with the jewel at the bottom of the screen. Use this day to familiarize yourself with the area.
Level 32 – Truly on the Floor!
Objective: Complete the day.
Mouse location: Behind the left side of the dress print stand, next to the sewing machine
A new item will be introduced today: hair clips! Click on the bobby pin on the lower right, followed by the flower, to assemble a hair clip. You will need to restock the flowers necessary for the hair clips from time to time. To do so, keep an eye on the bushes to the left of the table with the purse. Whenever a flower appears here, click on it to have Angela harvest it. Flowers take time to grow, so try to never let your flower stock drop below 1-2 at any point in time.
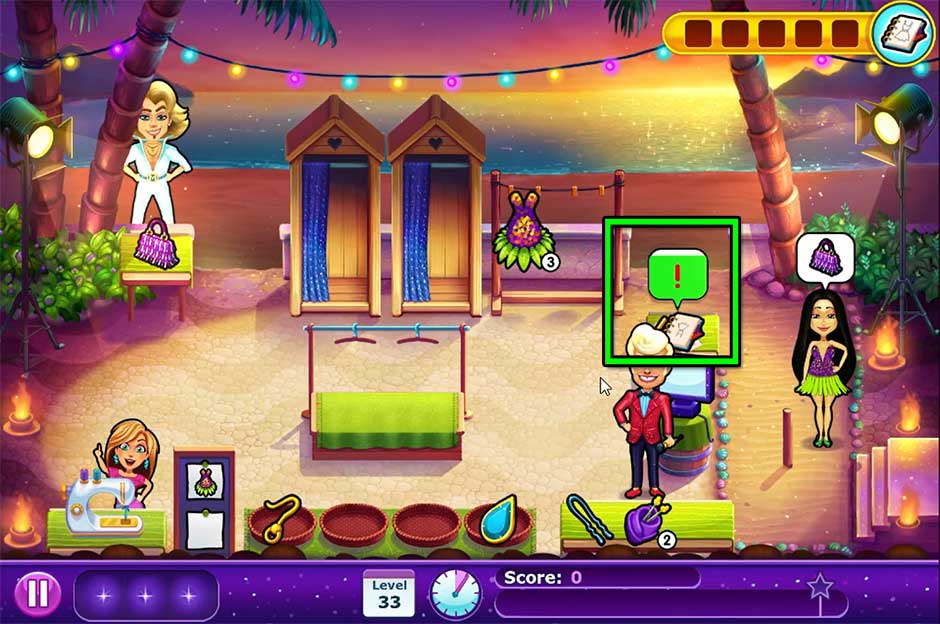
Level 33 – Create Your Dress – Part 1
Objective: Eureka! Time to sketch out Angela’s ideas for the dress.
Mouse location: No mouse today!
At the very start of the day, you will get to choose your dress design. The design you choose doesn’t impact the game in any way score-wise, so choose whichever dress design you like the most! Throughout the day, every time Angela gets an idea for her dress, a chime will sound and a bubble with a “!” will pop up above her sketchbook, just above the checkout. Click on the sketchbook before the green drains from the bubble to have Angela jot down her idea. Complete this five times before the end of the day to receive a special bonus!
![Fabulous - Angela's Fashion Fever - Level 33]()
Fabulous – Angela’s Fashion Fever – Level 33
Level 34 – How Do You Know?
Objective: Be smart, and give each model all the products they need in one go.
Mouse location: Behind the tree on the upper left, behind the top left corner of the purse table
A new bikini top and skirt will be added to the center rack today. Today’s goal requires that you fulfill each model’s order in full. You will need to pick up all the items which appear in a model’s order bubble and deliver them to that model in a single run in order to fulfill this requirement. Do this with all of the day’s models to complete your objective! Utilize the help of Magic Max and Bob to buy you any extra time you may need while fulfilling orders, and don’t forget to keep both dresses and flowers in stock.
Level 35 – Spinning Flax Into Gold
Objective: Complete the day.
Mouse location: Behind the upper left corner of the sewing machine
Today a new component to making earrings will appear: feathers! Pay attention to a model’s order to see whether or not the earrings they request have a feather attached. If so, click on the earring hook, the feather, and then finally the jewel to assemble an earring. Feathers are limited in quantity, and restocking them happens under special circumstances: fly-by parrots. Parrots will occasionally fly onto the set, dropping a feather after they’ve perched. Click on these feathers right away to collect them and add them to the stock of feathers kept at your jewelry counter. Parrots fly onto set only now and then, and feathers will disappear if they’re not collected shortly after falling from their bird. The moment your feather stock is at 2 or lower, make sure you keep an eye out for one of these colorful birds and collect the feather that drops!
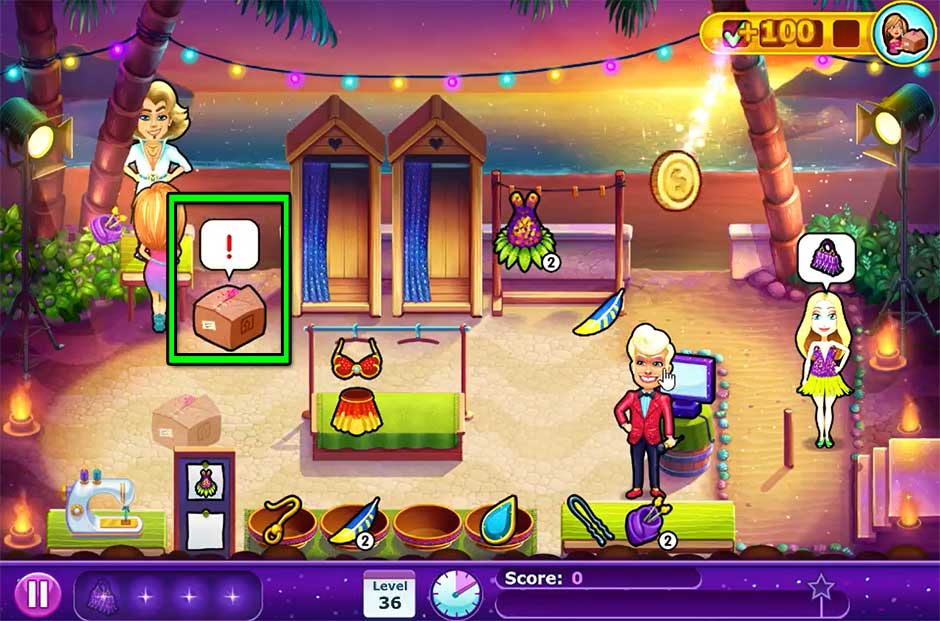
Level 36 – Create Your Dress – Part 2
Objective: A heavy box of fabric and tools has been delivered – but it’s in the wrong place! You’ll have to move it to the correct spot.
Mouse location: No mouse today!
A box will show up today next to the dress rack with a “!” displayed above it. Click on the box to have Angela move it to the next location before taking a break. Angela won’t be able to help customers while moving the box, so today is a good day to hire Bob to run the register and Magic Max to keep the ladies happy. Click on the cash register to have Bob send a model out to the catwalk. You can do this while Angela is moving. Move the box four times to its final location to receive a special bonus!
![Fabulous - Angela's Fashion Fever - Level 36]()
Fabulous – Angela’s Fashion Fever – Level 36
Level 37 – Don’t Bite the Hand that Feeds You
Objective: Bad Majestic, bad! Leave the models alone!
Mouse location: Behind the top of the first dressing room
Majestic is being a nuisance today! Truly’s little dog will run around the set, occasionally barking and causing a ruckus. Quickly click on her when the “!” bubble pops up over her head and before all the green drains from the bubble. Hush the little rascal five times before the end of the day to put a stop to her antics!
A new type of flower will become available as a hairclip accessory today. This new flower can be restocked by clicking on the pink and white flowers that appear on the bushes on the upper right. Try to make sure your stock never drops below 1-2 flowers. Don’t forget the purple flowers and feathers need restocking, too!
![Fabulous - Angela's Fashion Fever - Level 37]()
Fabulous – Angela’s Fashion Fever – Level 37
Level 38 – Oysters and Champagne
Objective: Complete the day.
Mouse location: Between the two dressing rooms
Your second full dress design, a lovely blue and yellow number, will become available today. Click on the dress on the dress rack on the upper right whenever a model requests it. Keep an eye on the stock and make sure it never drops below 1. If you’re running low on stock, click on the dress design displayed to the right of the sewing machine to make more.
Tip: It’s highly recommended you purchase the upgrades for both types of flowers before the day starts. Hair clips will become more popular, and purchasing these upgrades will allow a second of each flower to grow. This will make it much easier to keep hair clip flowers in stock for the increasing demand!
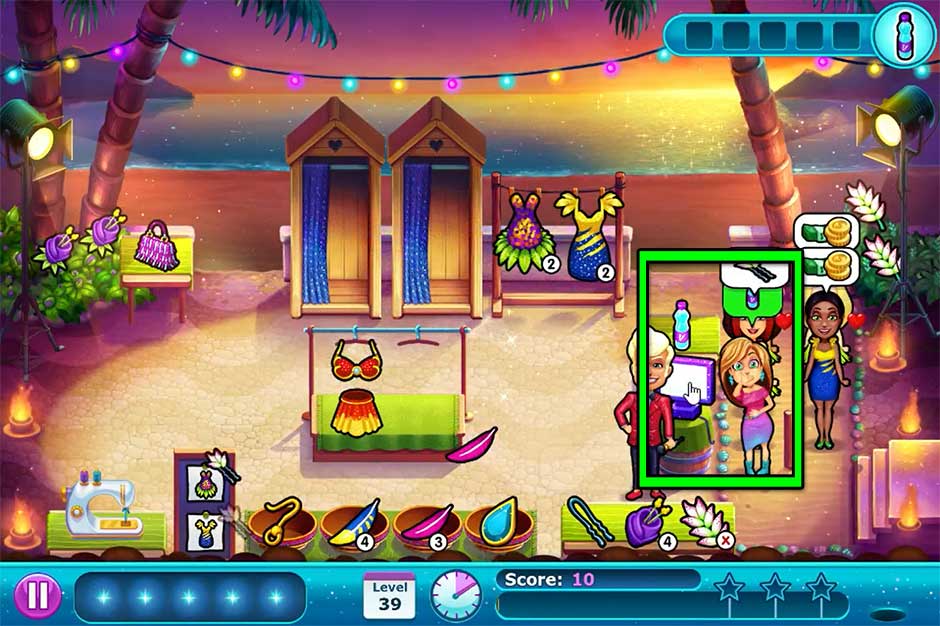
Level 39 – Feeling Better?
Objective: Ugh… Angela feels a little sick. Make sure she stays hydrated.
Mouse location: Behind the set light on the right, in the upper right corner
Ugh, those oysters aren’t sitting so well, leaving Angela feeling queasy throughout the day. Whenever Angela starts to feel sick, a “!” bubble will pop up over her head. Click on the water bottle sitting on the table above the register before all the green drains from her bubble. Help Angela re-hydrate herself five times to complete the day’s objective. Hire Magic Max and Bob to help you if you’re feeling overwhelmed!
A new color of feather will also become available today: pink! Now you will need to keep an eye out for both colors of parrots flying onto set and collect the feathers when they drop. Remember, try not to let the feather stock of either type drop below 1-2 at any point.
Tip: Upgrade the parrots in the upgrade menu prior to playing this level in order to enable the birds to appear on set more often. As you get busier, it’s much easier to miss picking up a feather once it’s fallen to the ground. This upgrade will give you more chances to do so at less risk of making customers unhappy should they have to wait.
![Fabulous - Angela's Fashion Fever - Level 39]()
Fabulous – Angela’s Fashion Fever – Level 39
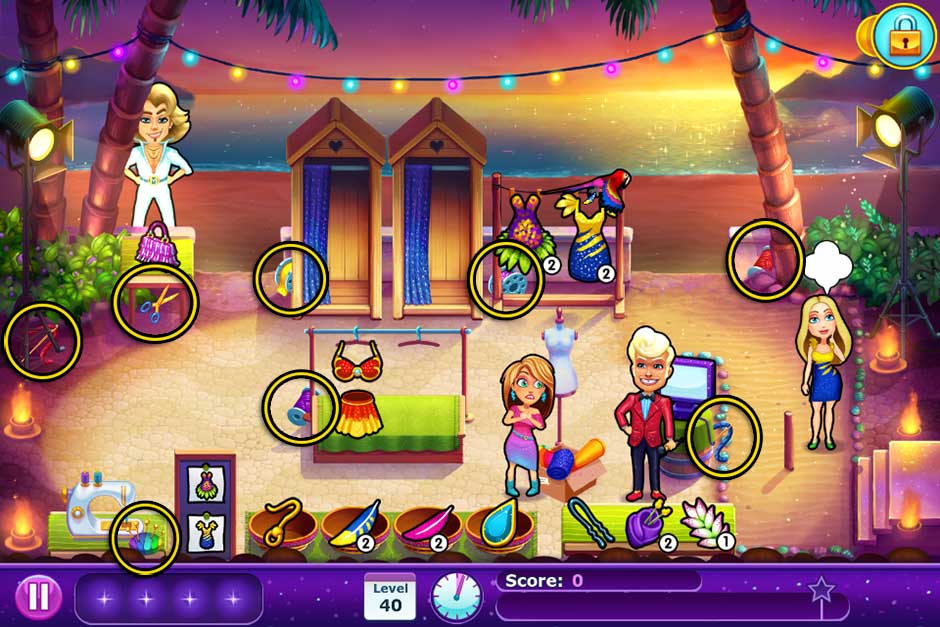
Level 40 – Create Your Dress – Part 3
Objective: Angela’s tools have been scattered. You’ll have to find them all again!
Mouse location: No mouse today!
Click on the box marked with a “!” to the left of the register as soon as the day starts. This will cause items to fly off in every direction! Throughout the day, bubbles with an image of one of Angela’s missing tools will pop up over the dress mannequin. Quickly locate the tool displayed and click to collect it, then click on the mannequin to work on your dress. All item locations for the day are pictured in the screenshot below. Utilize the tools successfully six times to complete the event. Keep in mind hiring Bob can be a huge help today.
![Fabulous - Angela's Fashion Fever - Level 40]()
Fabulous – Angela’s Fashion Fever – Level 40
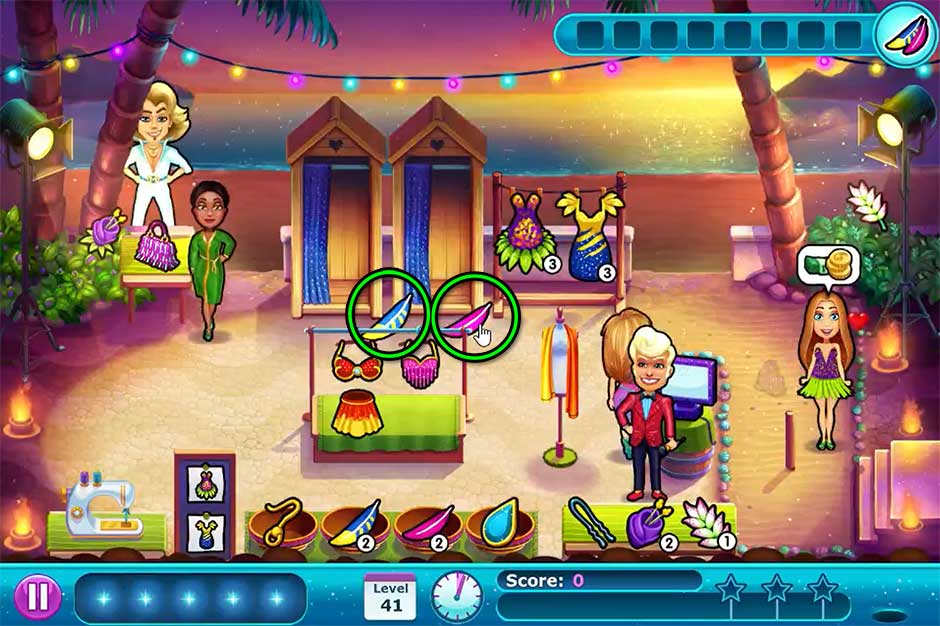
Level 41 – HOT! HOT! HOT!
Objective: Extra assignment for Angela: grab as many feathers as you can!
Mouse location: Behind the first palm frond on the left belonging to the only tree on the right, at the top of the screen
Tip: Before the day starts, make certain you’ve purchased the parrot upgrade. The ability for parrots to fly on set more often will make today much easier.
Feathers are all the rage and will be in high demand. Keep a sharp eye on parrots flying on set and make sure you gather as many feathers as possible. Magic Max and Bob will be essential today in order to keep things moving and models happy while you dash around to collect the colorful accessories. You will need to grab eight total before day’s end in order to complete your objective.
Additionally, a new pink tassel top will be hanging on the center rack. Models may want to mix and match their bikini tops with the bottoms, so pay close attention to make sure you don’t accidentally mix them up.
![Fabulous - Angela's Fashion Fever - Level 41]()
Fabulous – Angela’s Fashion Fever – Level 41
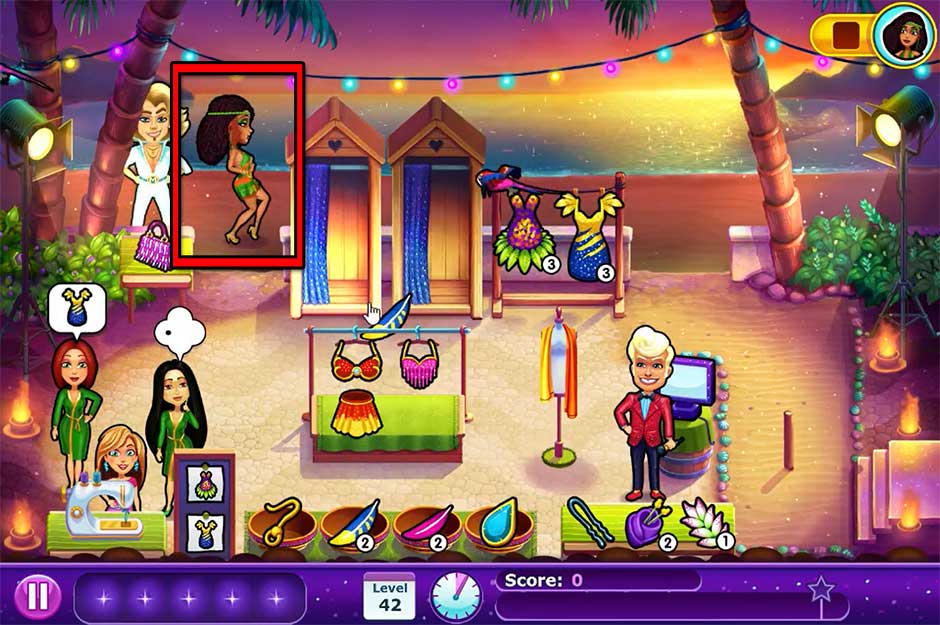
Level 42 – Create Your Dress – Part 4
Objective: Bruna is trying to sabotage Angela’s dress! Keep her away or you’ll have to start over!
Mouse location: No mouse today!
Throughout the day, Bruna will sneak onto set from the upper left corner, slowly making her way toward your dress. Whenever you spot her, click on her as soon as possible to shoo her away. The closer she gets to your dress, the more likely she’ll successfully sabotage it. If Angela is working on other tasks, she will complete those tasks before shooing Bruna away, however keep in mind Bruna can continue to move while she’s doing this. Bruna will always stop for a moment when moving from the upper left to the upper right corner, so this is often the best moment to catch her. Keep Bruna away successfully to complete the event and receive a bonus at the end of the day.
![Fabulous - Angela's Fashion Fever - Level 42]()
Fabulous – Angela’s Fashion Fever – Level 42
Level 43 – Don’t Trust Truly?
Objective: Get 3 “Fabulous” combos! Send 5 models to the catwalk to get one.
Mouse location: Behind the base of the palm tree on the right and the green plants next to it
Today is all about combos! Make sure you’ve hired Magic Max and Bob right from the get-go. You will need to line up a group of five models ready to pay and check them out at the register simultaneously in order to achieve a “Fabulous” combo. Models do not need to be in the same line in order to be included in the checkout process: you only need to make sure there are five or more ready to go. Use Magic Max to keep the models happy. Keeping them in line patiently in order for you to line up a combo is the key to completing today’s goal. Do this three times to receive a special bonus!
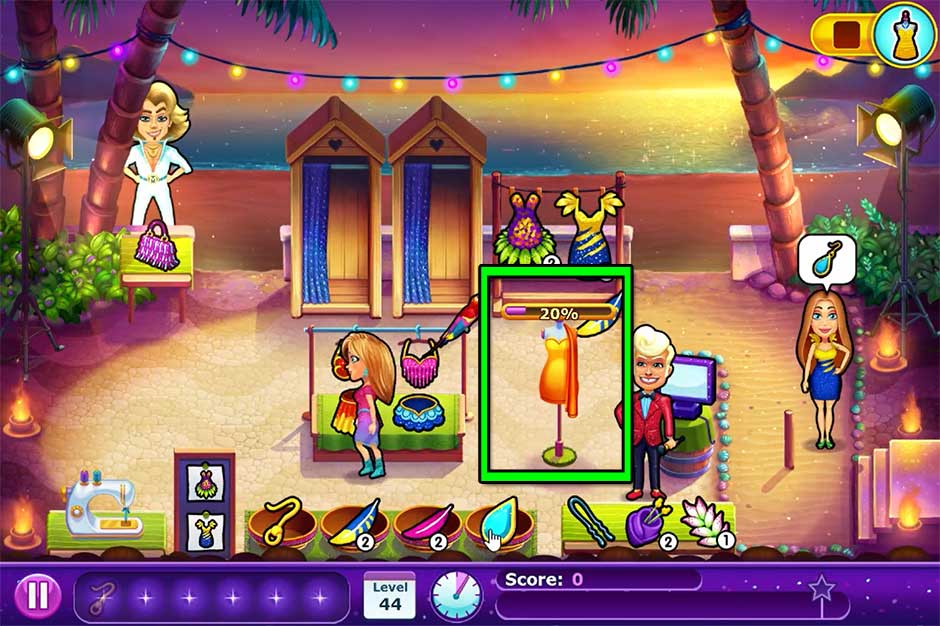
Level 44 – Create Your Dress – Part 5
Objective: Time to put the final touches on your dress!
Mouse location: No mouse today!
Angela’s dress is on a stand to the left of the register. The moment the day starts, immediately click on the dress to start working on it. A percentage bar will appear over the dress indicating how far along you are. If you click on the dress immediately, you should be able to complete about 15% of it by the time the first model orders. Serve customers in waves, using the help of Bob and Magic Max to keep them happy while you put the finishing touches on your dress. Keep an eye on the clock – you’ll want to make sure your dress is at least 50% done by the time the day is halfway through, so that you don’t keep the final models waiting as you wrap up the objective.
Furthermore, a new bottom is available today on the center rack: a cute little blue skirt. Models do love to mix and match, so pay extra close attention to their requests!
![Fabulous - Angela's Fashion Fever - Level 44]()
Fabulous – Angela’s Fashion Fever – Level 44
Level 45 – Woof! Woof!
Objective: Complete the day.
Mouse location: Behind the top of the second tree on the left, just behind the light string
The trick to today is using all the tips and tricks you picked up in this chapter and putting them to good use. Magic Max and Bob will be an important part of completing today with a high score. Make sure you glance over all your items with stock numbers at various points throughout the day. Remember that two types of flowers for the hair clips will need to be restocked, their locations in the upper left and right corners. You will also need to gather feathers from parrots and keep your dresses in stock. Use Magic Max to improve the mood when models are feeling impatient. Feathers are the most likely to blindside you today, so keep an ear out for those colorful parrots!
Chapter 4: Milan
Angela’s off to Italy in the next leg of the competition. How will her designs fare in the fashion-rich heart of Europe? New trials will surface Angela never expected as both old and new collide.
Level 46 – Welcome to Milan!
Objective: Complete the day.
Mouse location: Behind the steps in the lower right corner, below the checkout monitor
To start the day off, you will immediately have two dress designs available. The dress rack is located on the upper right. When your stock begins to run low, click on the corresponding design next to the sewing machine to restock. Additionally, there are also shoes (located on the upper left) and charm bracelets. When a model wants a charm bracelet, select the gold band, then select three diamond charms to complete it. Work on familiarizing yourself with the new set today.
Level 47 – Someone You Know Well
Objective: Complete the day.
Mouse location: Behind the top of the makeover station, toward the upper left
The new expresso machine is in service today! Located at the top of the screen, click on the glass above the machine whenever a model requests a coffee drink. Watch the meter that appears carefully; once green, click on the glass again to collect it. Green indicates the drink is ready to serve! If you take too long and the meter passes back into the red, you will need to start over.
Level 48 – Create Your Dress – Part 1
Objective: Eureka! Time to sketch out Angela’s ideas for the dress.
Mouse location: No mouse today!
Choose your dress design at the start of the day. Which design you choose doesn’t impact the game in any way score-wise, so choose whichever dress you like the most! Throughout the day, every time Angela gets an idea for her dress, a chime will sound and a bubble with a “!” will pop up above her sketchbook. The sketchbook will replace one of the glass domes at the bottom of the screen on the jewelry counter. Click on the sketchbook before the green drains from the bubble to have Angela jot down her idea. Complete this five times before the end of the day to receive a special bonus!
![Fabulous - Angela's Fashion Fever - Level 48]()
Fabulous – Angela’s Fashion Fever – Level 48
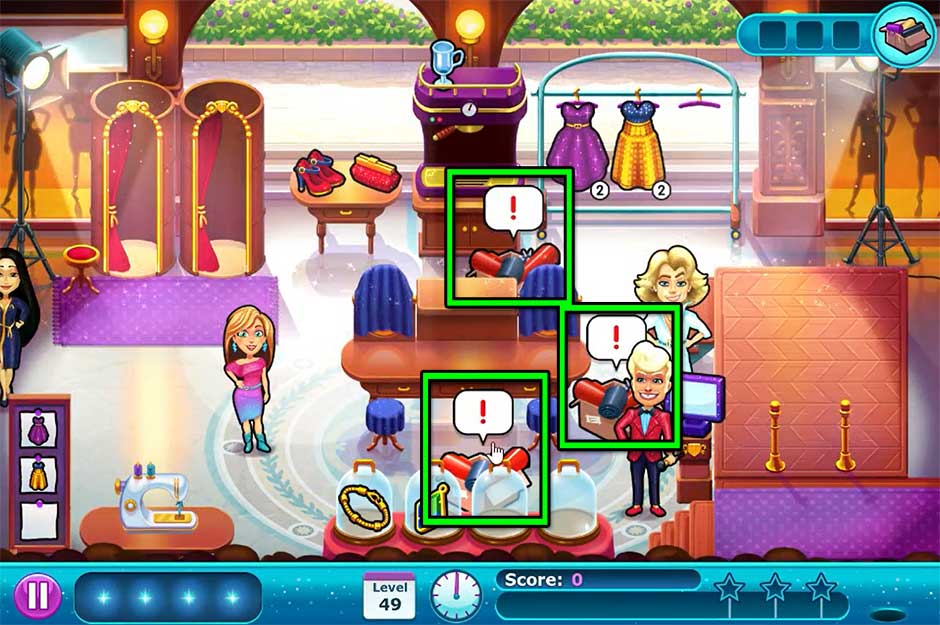
Level 49 – My Killer Dress
Objective: This time Celine’s left a mess behind… Clean up in aisle 3!
Mouse location: On the left side of the jewelry table at the bottom of the screen
Three boxes of supplies have been left behind for Angela to contend with. Each box has a “!” displayed above it. Select one of them to start cleaning the moment the day begins. A meter above the box will display how far along Angela is in clearing it away. Clear away all three boxes before the end of the day to receive a special bonus! Having Magic Max and Bob’s help will be very useful today, too.
The clutch purse will become available today as a new item! The clutch purse can be found next to the shoes, to the left of the coffee machine.
![Fabulous - Angela's Fashion Fever - Level 49]()
Fabulous – Angela’s Fashion Fever – Level 49
Level 50 – Ohhhhh, Boy
Objective: Complete the day.
Mouse location: Between the two center glass jewelry display domes at the bottom of the screen
Today marks the grand opening of the Hairdressing Table! Models with towels on their heads will walk in and immediately sit down at this station. Once they’ve made a decision on what they’d like done, click on the corresponding item (either the hairbrush or the hairspray for starters). Once the look is complete, the model will head straight for the catwalk checkout. Keep in mind that each time this station is used, you will need to clean the area at which the model was sitting. Hire Bob today so that he can sent models off to the catwalk while you focus on cleaning stations.
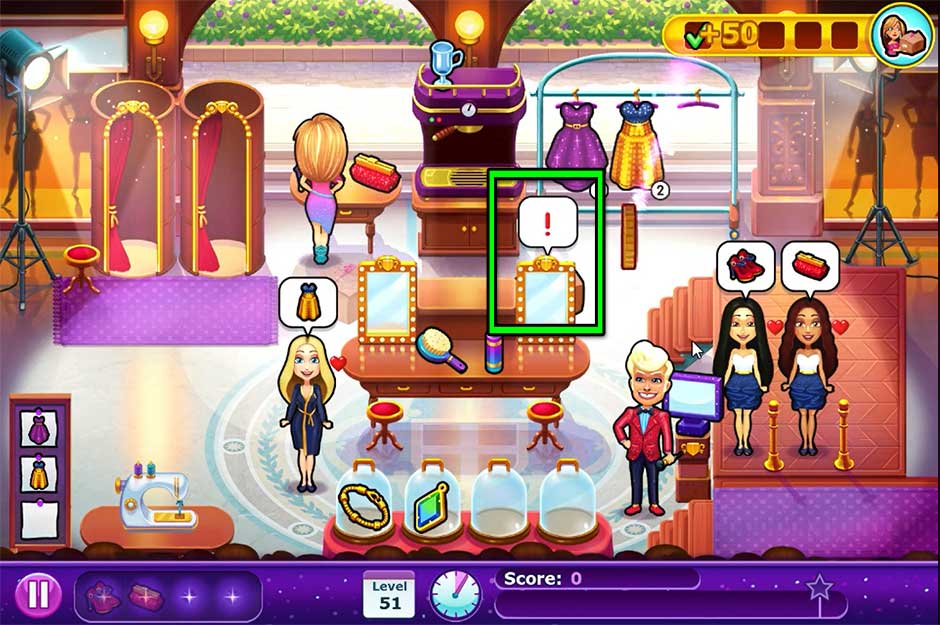
Level 51 – Create Your Dress – Part 2
Objective: A heavy box of fabric and tools has been delivered – but it’s in the wrong place! You’ll have to move it to the correct spot.
Mouse location: No mouse today!
A box will show up today with a “!” displayed above it. Click on the box to have Angela move it to the next location before taking a break. Angela won’t be able to help customers while moving the box, so today is a good day to hire Bob to run the cash register and Magic Max to keep the models happy. Click on the cash register to have Bob checkout a customer. You can do this while Angela is moving. Move the box five times to its final location to receive a special bonus!
Tip: If you hired Magic Max today, the starting location of the box is just behind him. There’s a very high chance that clicking on the box to start your objective will also trigger Magic Max into performing his routine.
![Fabulous - Angela's Fashion Fever - Level 51]()
Fabulous – Angela’s Fashion Fever – Level 51
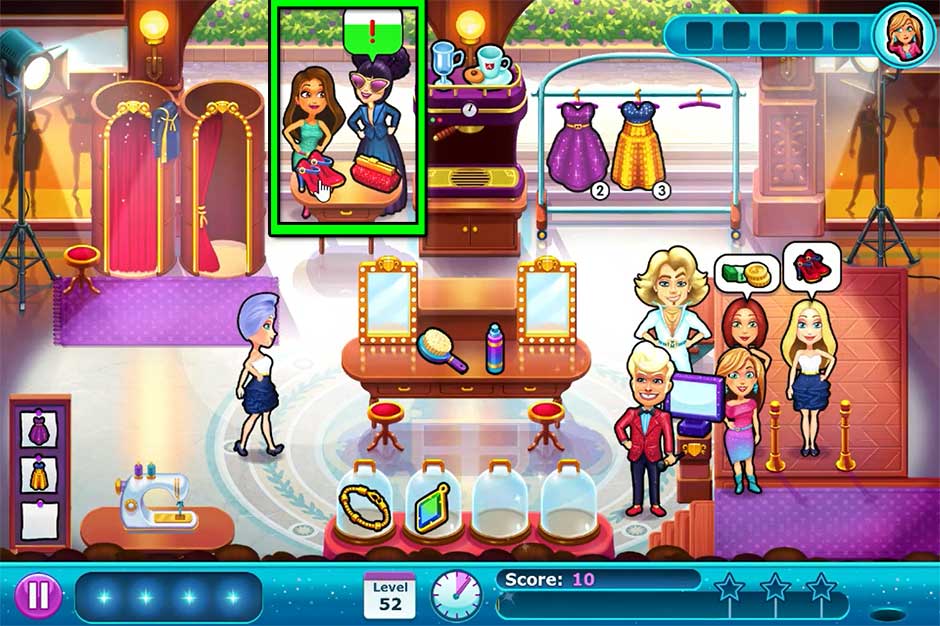
Level 52 – Simply Stunning
Objective: What’s Truly discussing with Jenny? Let’s have a listen…
Mouse location: Behind the dressing room on the left side, just above the stool
Truly and Jenny will be on set just behind the table with the shoes and clutch purse today. Keep an eye out for when the “!” bubble pops up over Truly’s head. Click on it before all the green color drains in order to walk over and eavesdrop on the conversation. Do this five times before the end of the day to complete your objective!
Additionally, the coffee machine will offer a second type of trick today: a classic cup of coffee on a saucer. Prepping any beverage at the coffee machine can take precious time, so it’s highly recommended you start hiring Magic Max and Bob daily to help you out from now on.
![Fabulous - Angela's Fashion Fever - Level 52]()
Fabulous – Angela’s Fashion Fever – Level 52
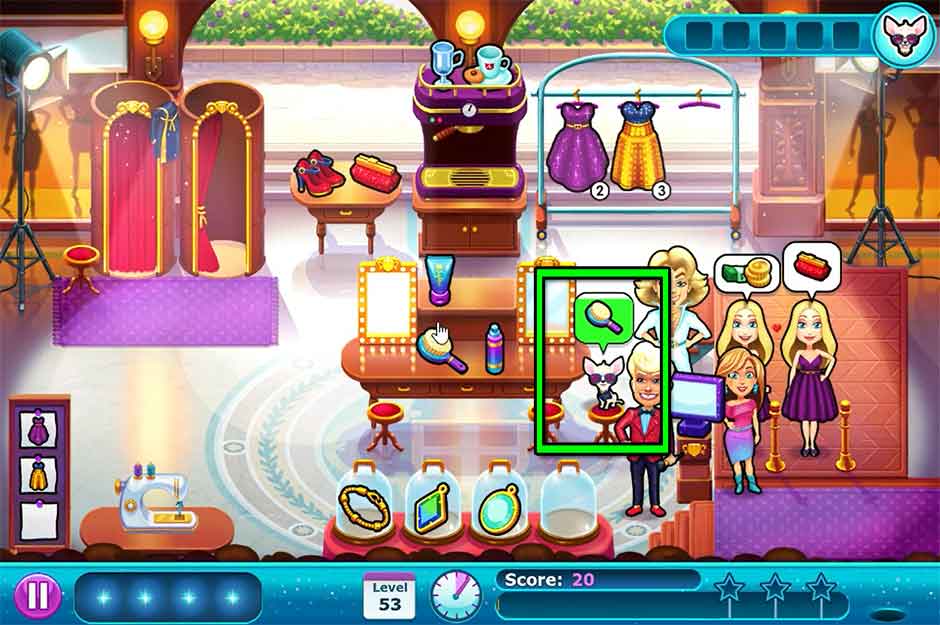
Level 53 – Friendly Competition
Objective: Majestic is a dog of high stature who needs a little grooming.
Mouse location: Beneath the steps leading up to the catwalk/checkout area
Scurrying around the set today will be Truly’s dog, Majestic. Every so often, Majestic will jump up on a stool at the Hairdressing Table and need grooming. When this happens, go to the Hairdressing Table and select the brush, then click on Majestic to fulfill her request before all the green color drains. Do this five times before the end of the day to complete your objective!
Furthermore, a new charm is available today at the jewelry counter: a beautiful round opalescent stone. Models who order charm bracelets at this point will want either only diamond stones, or only circular stones. Pay extra close attention to their requests. The Hairdressing Station will also see an additional item upgrade in the form of styling gel.
![Fabulous - Angela's Fashion Fever - Level 53]()
Fabulous – Angela’s Fashion Fever – Level 53
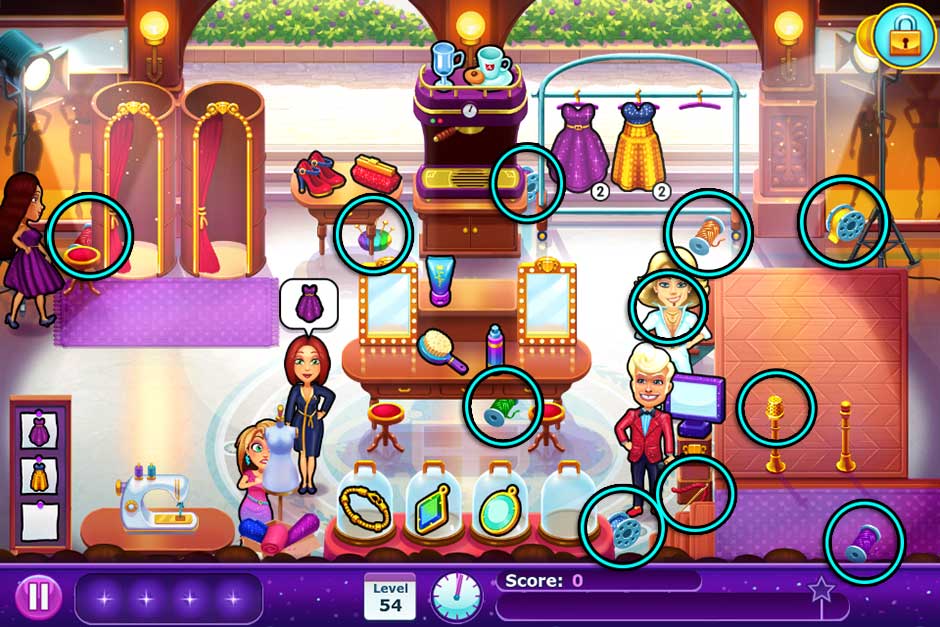
Level 54 – Create Your Dress – Part 3
Objective: Angela’s tools have been scattered. You’ll have to find them all again!
Mouse location: No mouse today!
Click on the box marked with a “!” in the lower left corner next to the sewing machine as soon as the day starts. This will cause items to fly off in every direction! Throughout the day, bubbles with an image of one of Angela’s missing tools will pop up over the dress body form. Quickly locate the tool displayed and click to collect it, then click on the body form to use it. All item locations for the day are pictured in the screenshot below. Use the tools successfully seven times to complete the event. You will want both Magic Max and Bob around today to help you.
Tip: Be careful if you’ve hired Magic Max. He will be standing in front of the blue needle and thread. As long as Magic Max is standing still and waiting to do his act, the needle and thread will remain covered. Be prepared if the blue needle and thread pop up to click on Magic Max to be able to reach it.
![Fabulous - Angela's Fashion Fever - Level 54]()
Fabulous – Angela’s Fashion Fever – Level 54
Level 55 – Have You Seen My Dress?
Objective: Complete the day.
Mouse location: In the upper right corner of the archway in the upper right corner of the screen
Your third dress design will become available today! Featured on the far right side of the dress rack, select the dress designs next to the sewing machine to restock. Use the first moments of your day to add an extra dress of each design to the rack before the first model orders. A new slot will open up on your tray today, allowing you to carry an additional item. Consider making one of the two coffee options at the coffee machine in order to save time later and keep the flow of models happy and on the move.
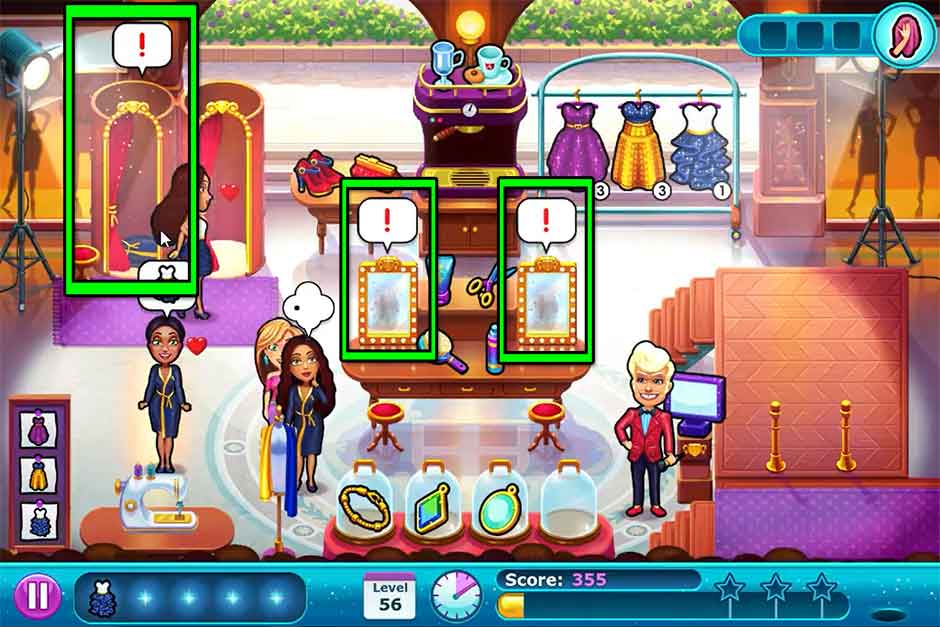
Level 56 – Here She Comes…
Objective: Get 3 “Sparkling” combos! Clean 3 things in a row to get one.
Mouse location: Behind the steps leading up to the catwalk/checkout area
The trick to today is letting things get fairly messy before you start cleaning. You will need to clean at least three dirty areas in a row to get the “Sparkling” cleaning combo. You can make this any type of combination between the dressing rooms and Hairdressing Table. Wait until three “!” bubbles are visible indicating an area needs to be cleaned, then have Angela clean them immediately one after the other for a 3x “Sparkling” combination! Use Magic Max and Bob to keep the models content while you wait for the mess to build up. You will need to achieve the “Sparkling” cleaning combo three times before the end of the day in order to complete your goal.
The Hairdressing Table will also see its final addition today: scissors. Keep an eye on the models that come and go from the station to make sure you’re choosing the right item for them.
Tip: If you haven’t purchased the additional dressing room yet, it’s an excellent idea to do today in order to aid in making your cleaning combos.
![Fabulous - Angela's Fashion Fever - Level 56]()
Fabulous – Angela’s Fashion Fever – Level 56
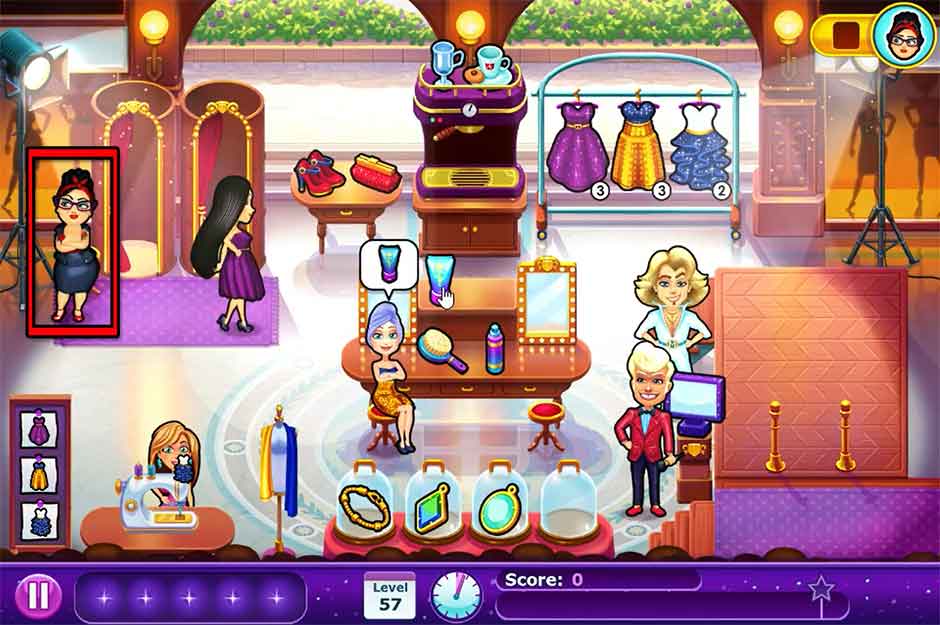
Level 57 – Create Your Dress – Part 4
Objective: Celine is trying to sabotage Angela’s dress! Keep her away or you’ll have to start over!
Mouse location: No mouse today!
Today, Celine will sneak onto set from the left side of the screen, slowly making her way toward your dress. Whenever you spot her, click on her as soon as possible to shoo her away. The closer she gets to your dress, the more likely she’ll successfully sabotage it. If Angela is working on other tasks, she will complete those tasks before shooing Celine away, however keep in mind that Celine can continue to move while she’s doing this. Keep Celine away successfully to complete the event and receive a bonus at the end of the day.
![Fabulous - Angela's Fashion Fever - Level 57]()
Fabulous – Angela’s Fashion Fever – Level 57
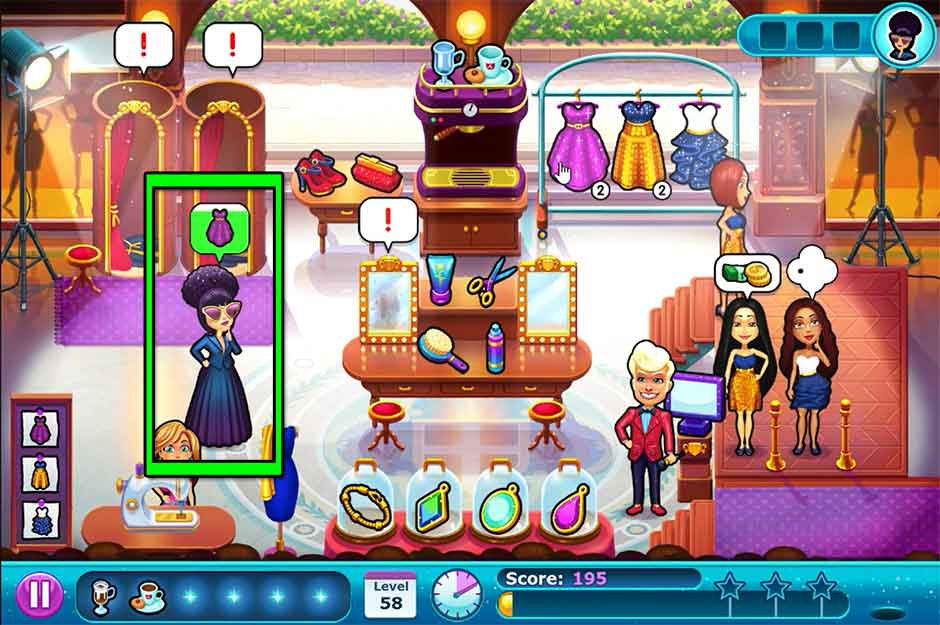
Level 58 – To the Airport
Objective: Truly’s curious to see your collection. Show her the dresses she asks for!
Mouse location: Underneath the center of the makeover station
Truly will walk on set today to have a look at your dresses. Whenever she shows up, a bubble will pop up over her head indicating which dress she’d like to see. Select the dress she asks for, then click on Truly to hand it to her. Do this before the green color drains from the bubble, and do this successfully three times before the end of the day to complete your objective.
A lovely new pear-shaped gem will also become available at the jewelry counter today. Models may now request charm bracelets with three of the same type of any gem available, or a combination of one of each.
Tip: Today also marks the day you now have six slots on your item tray to work with, meaning you can carry a maximum of six items at once. Starting today, prepare one of each type of coffee (coffee on coaster and expresso) and keep them on your tray at all times. Whenever a model asks for coffee, give them the one on your tray, then immediately get to work on making one to replace it. Following this tactic will allow you to keep the models moving fast, without risking their impatience if you’ve yet to prepare another coffee product. Every little bit helps – the only way to complete today with a 3-star ranking is to string together high score combinations.
![Fabulous - Angela's Fashion Fever - Level 58]()
Fabulous – Angela’s Fashion Fever – Level 58
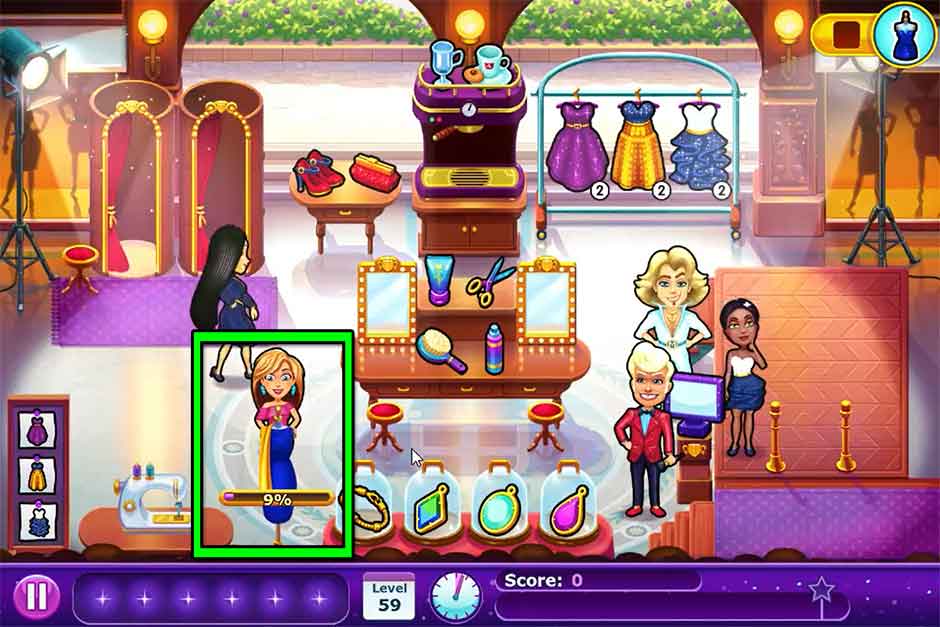
Level 59 – Create Your Dress – Part 5
Objective: Time to put the final touches on your dress!
Mouse location: No mouse today!
Angela’s dress is on a stand in the lower left corner near the sewing machine. The moment the day starts, immediately click on the dress to start working on it. A percentage bar will appear over the dress indicating how close it is to completion. If you click on the dress immediately, you should be able to complete nearly 15% of it by the time the first model orders. Serve customers in waves, using the help of Bob and Magic Max to keep them happy while you put the finishing touches on your dress. Keep an eye on the clock – you’ll want to make sure your dress is at least 50% done by the time the day is halfway through, so that you don’t keep your final customers waiting as you wrap up the objective.
Tip: If you’re able, try to have one of each type of coffee product ready and waiting on your tray to prevent models from waiting extra for coffee products to be made. But priority should be on finishing your dress.
![Fabulous - Angela's Fashion Fever - Level 59]()
Fabulous – Angela’s Fashion Fever – Level 59
Level 60 – Eric, Wait!
Objective: Complete the day.
Mouse location: At the top of the dress pattern board in the lower left corner of the screen
Immediately start off the day by starting on one of each type of coffee product to keep on your tray. While those are being prepared, use the sewing machine to add an extra of each type of dress to the dress rack stock. Use the aid of Magic Max and Bob to keep models happy and moving at a steady pace. Models are likely to order a lot of coffee products today, so stay on top of making sure you have the extra products on your tray in order to keep them from waiting. It’s your last day in Milan, so make it count!
Chapter 5: Paris
Ah, the City of Love. It positively glows and the promise of passion has never been so appealing! But a not-so-secret kiss could be Angela’s undoing. Will Truly keep her on the show, or will her stay in Paris end in heartbreak?
Level 61 – Turning a Blind Eye
Objective: Complete the day.
Mouse location: Behind the steps leading up to the catwalk/checkout
Welcome to Paris, the City of Love! Your first day will be relatively simple and straight-forward, so use it to acquaint yourself with the romantic setting. Two dresses will be available on the dress rack for starters. Click on the dress designs next to the sewing machine to restock them. A necklace is available to immediately give to models who request it as well. If a model requests a hat, click on the hat base (white hat), followed by the green material, and finally the black ribbon to finish it off.
Level 62 – Something Fishy
Objective: What are these tourists doing here? Hey, we’re filming here! Looks like you’ll have to chase them away from the set.
Mouse location: Behind the right side of the drawers to the right of the makeover station
Selfies? How selfish! We’re trying to film here! Click on the tourists when a “!” pops up over their head and before the green drains from their bubble. Angela will then shoo them off set. Do this six times throughout the day to complete the day’s goal.
The Hairdressing Table will also become available today. Models who are looking to use it can be spotted via the towels on their heads. Select the product a model asks for, then use it on said model. Once a model’s visit to the Hairdressing Table is complete, a “!” bubble will pop up indicating you need to clean said area before a new model can use it.
![Fabulous - Angela's Fashion Fever - Level 62]()
Fabulous – Angela’s Fashion Fever – Level 62
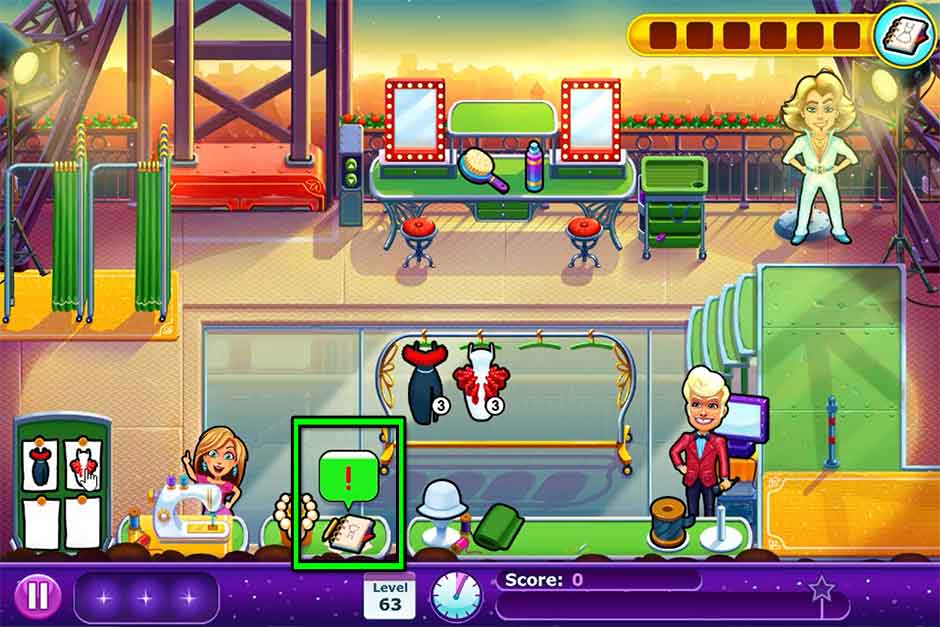
Level 63 – Create Your Dress – Part 1
Objective: Eureka! Time to sketch out Angela’s ideas for the dress.
Mouse location: No mouse today!
At the very start of the day, you will get to choose a new dress design inspired by Paris. The design you choose doesn’t impact the game in any way score-wise, so choose whichever dress you like the most! Throughout the day, every time Angela gets an idea for her dress, a chime will sound and a bubble with a “!” will pop up above her sketchbook near the sewing machine. Click on the sketchbook before the green drains from the bubble to have Angela jot down her idea. Complete this six times before the end of the day to receive a special bonus!
![Fabulous - Angela's Fashion Fever - Level 63]()
Fabulous – Angela’s Fashion Fever – Level 63
Level 64 – The Next Truly
Objective: Complete the day.
Mouse location: Underneath the makeover station on the left, behind the stool
A new hat material will become available today. Pay close attention to the models’ orders to ensure you don’t make a mistake. If you have the funds, this is an excellent day to invest in upgrades and practice on linking together combos.
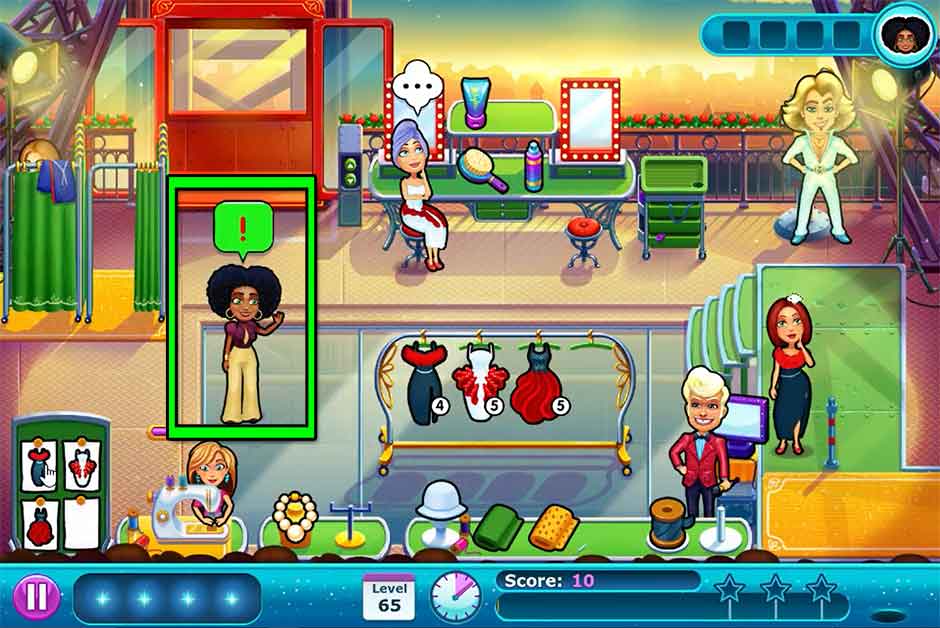
Level 65 – Say It!
Objective: Seems like Victoria has something to say, but Angela doesn’t have time right now!
Mouse location: To the right of the rightmost mirror of the makeover station, behind the floral railing
Keep an eye on Victoria throughout the day, she’s trying to tell you something! Click on Victoria when the green “!” bubble pops up over her head. Make sure you do it before the color drains completely! Accomplish this task four times before the end of the day to learn what she has to say. Magic Max and/or Bob can prove useful in keeping models happy and moving while Angela and Victoria talk.
Two new items will be added today: hair gel at the Hairdressing Table, and a new dress on the dress rack.
![Fabulous - Angela's Fashion Fever - Level 65]()
Fabulous – Angela’s Fashion Fever – Level 65
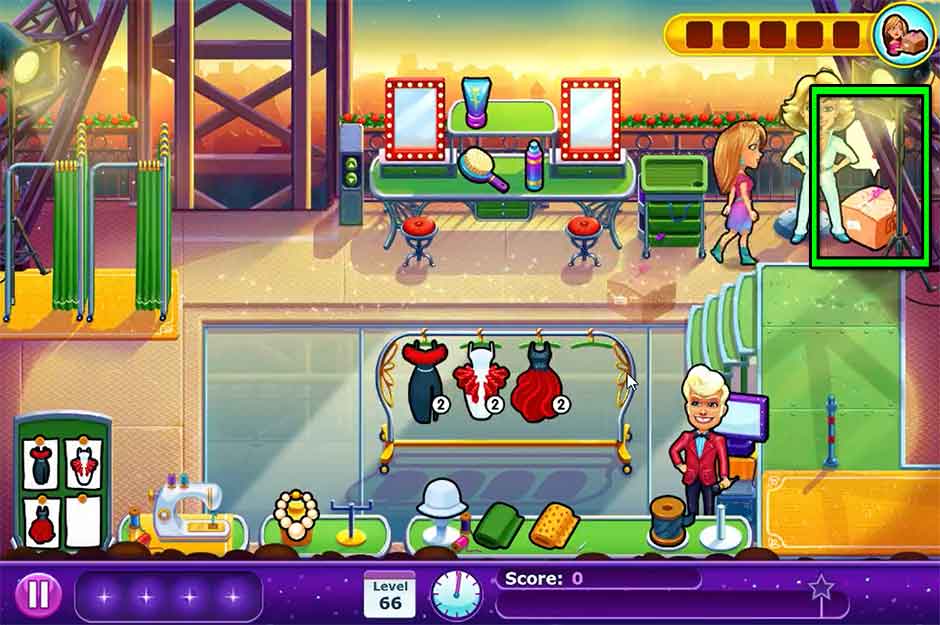
Level 66 – Create Your Dress – Part 2
Objective: A heavy box of fabric and tools has been delivered – but it’s in the wrong place! You’ll have to move it to the correct spot.
Mouse location: No mouse today!
A box will show up today with a “!” displayed above it. Click on the box in the upper right corner next to Magic Max to have Angela move it to the next location before taking a break. Angela won’t be able to help customers while moving the box, so today is a good day to hire Bob to run the cash register and Magic Max to keep the customers happy. Click on the cash monitor to have Bob checkout a customer. You can do this while Angela is moving. Move the box five times to its final location to receive a special bonus!
![Fabulous - Angela's Fashion Fever - Level 66]()
Fabulous – Angela’s Fashion Fever – Level 66
Level 67 – Players Play…
Objective: Complete the day.
Mouse location: On the left side of the sewing machine
Earrings will be added next to the necklace as a new product today. No preparation time is necessary, and stock is infinite. Use today to practice your skills in serving models quickly while making them happy.
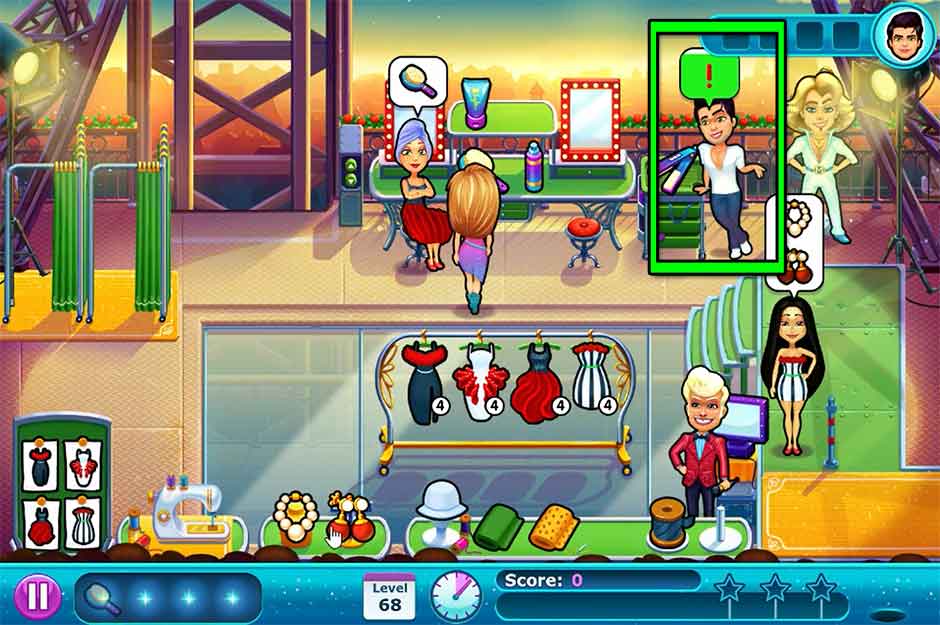
Level 68 – Players Play… or Don’t They?
Objective: Eric, what are you doing here? Let’s listen to what he has to say.
Mouse location: On the upper right side of the elevator beams, at the top of the screen
Eric will be hanging out in the upper right corner of the set today. Keep an eye on when the green “!” bubble pops up over his head – it means he wants to tell you something! Click on the bubble before all the color drains to listen to what he has to say. Do this four times before day’s end to complete the day’s goal. Magic Max and Bob may prove useful in keeping the models happy while Angela and Eric talk.
Two new items will be added today: a fourth dress design, and a hair straightener at the Hairdressing Table. The straightener works very similar to the coffee machine on the previous level. Click on the iron to heat it up. As soon as the meter is within the green zone, click on it to collect it and use it on the model requesting the service. If the meter slips past the green zone, you will need to reheat the iron from scratch.
![Fabulous - Angela's Fashion Fever - Level 68]()
Fabulous – Angela’s Fashion Fever – Level 68
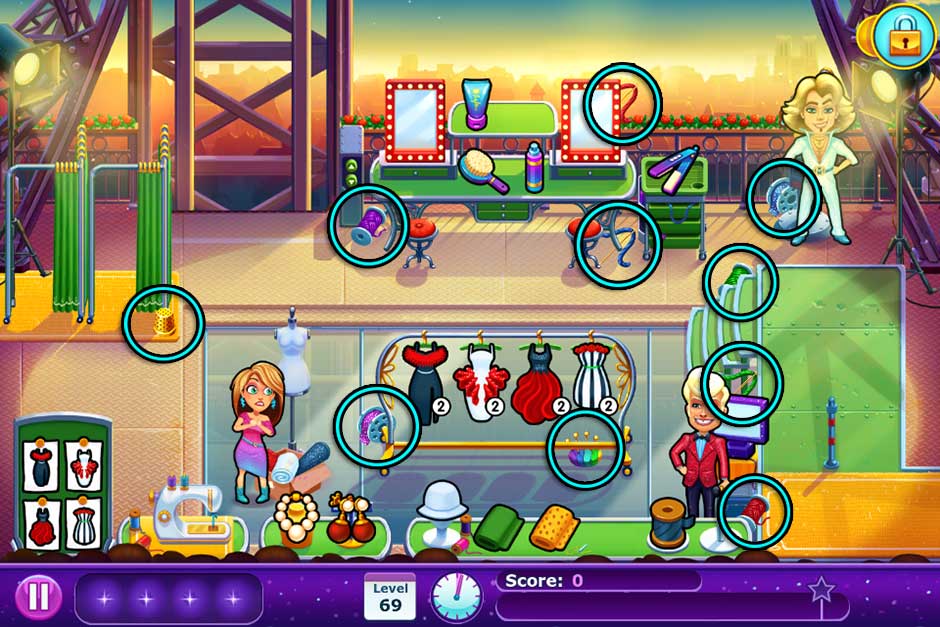
Level 69 – Create Your Dress – Part 3
Objective: Angela’s tools have been scattered. You’ll have to find them all again!
Mouse location: No mouse today!
Click on the box marked with a “!” in the lower left corner as soon as the day starts. This will cause items to fly off in every direction! Throughout the day, bubbles with an image of one of Angela’s missing tools will pop up over the body form. Quickly locate the tool displayed and click to collect it, then click on the body form to use it. All item locations for the day are pictured in the screenshot below. Use the tools on the body form successfully eight times to complete the event. Keep in mind hiring Bob and Magic Max can be a huge help today!
![Fabulous - Angela's Fashion Fever - Level 69]()
Fabulous – Angela’s Fashion Fever – Level 69
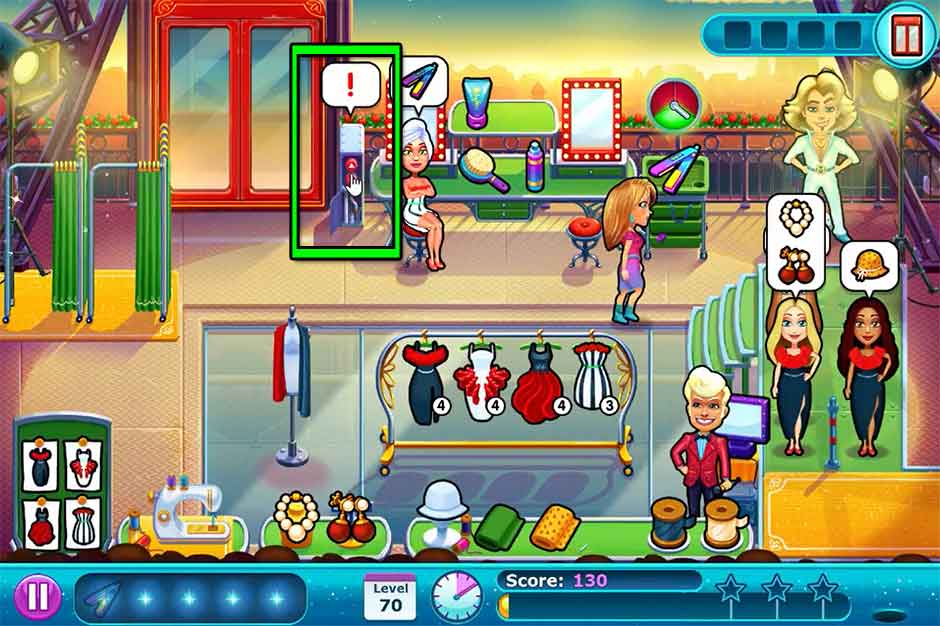
Level 70 – Love Can’t Be Scripted
Objective: That’s dangerous… Fix the elevator when it breaks down.
Mouse location: Inside the top of the black dress hanging on the left side of the dress rack
Go about your day as per normal, keeping an eye on the elevator. When sparks fly and the “!” appears over the control panel, go fix it as quickly as possible! Use Magic Max to keep the models happy while you’re busy. A broken elevator means delays in new models arriving, so you’ll want to place priority on fixing it as quickly as possible. Fix the elevator four times to complete your goal for the day.
A white ribbon option will be added to the hat-making counter today. Take note of whether a model requests a white or black ribbon on their hat when ordering, and choose the correct-colored ribbon accordingly.
![Fabulous - Angela's Fashion Fever - Level 70]()
Fabulous – Angela’s Fashion Fever – Level 70
Level 71 – Where is Angela?
Objective: Complete the day.
Mouse location: In the lower right corner, just above the orange carpet
Scissors will be added to the Hairdressing Table today. Models will gradually become more demanding and you’ll need to learn to manage your time between those who want to try on clothes, those who want makeovers, and those who order at the register. This is an excellent day to practice your tactics. Hire Magic Max and Bob as needed!
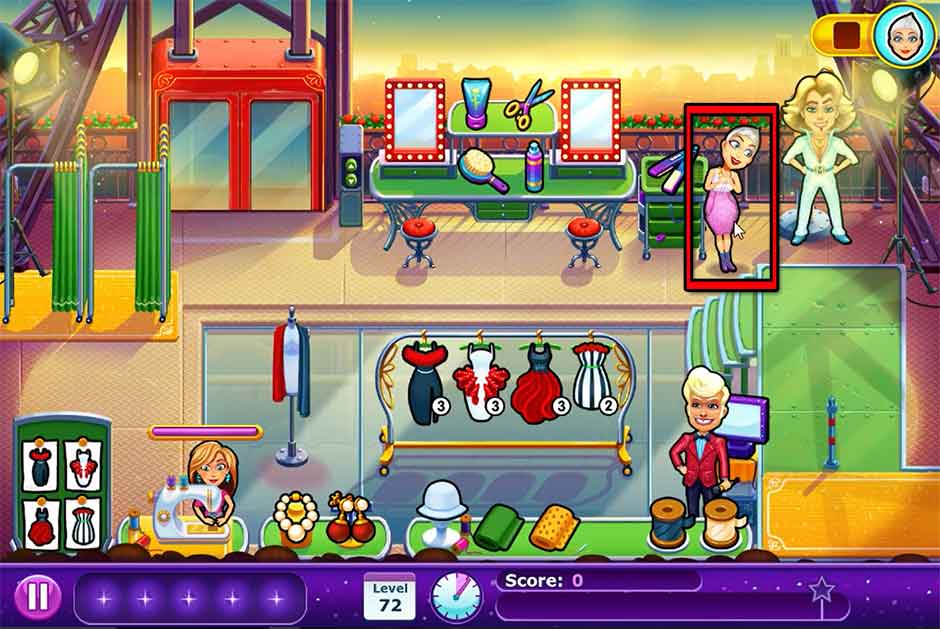
Level 72 – Create Your Dress – Part 4
Objective: Lori is trying to sabotage Angela’s dress! Keep her away or you’ll have to start over!
Mouse location: No mouse today!
She may look innocent, however she’s anything but! Throughout the day, Lori will sneak onto set from the upper right corner of the screen, slowly making her way toward your dress. Whenever you spot her, click on her as soon as possible to shoo her away. The closer she gets to your dress, the more likely she’ll successfully sabotage it. If Angela is working on other tasks, she will complete those tasks before shooing Lori, however keep in mind Lori can continue to move while she’s doing this. Keep Lori away successfully to complete the event and receive a bonus at the end of the day.
Tip: If you’ve hired Magic Max for the day, clicking on Lori as soon as she appears in the upper right corner can easily trigger Magic Max to start his routine. You may want to wait a moment until she’s more in the clear before selecting her.
![Fabulous - Angela's Fashion Fever - Level 72]()
Fabulous – Angela’s Fashion Fever – Level 72
Level 73 – Where is Eric?
Objective: It gets busier every day. Make sure none of the models leave angry!
Mouse location: Behind the small patch of floral railing to the left of the elevator
The magic lies with Magic Max today! Make sure none of the models leave angry by serving them quickly and using Magic Max to improve their mood otherwise. Keep in mind that Max’s magic is capable of making even moderately irritated models very happy. Balance your combos carefully. You don’t want to risk an angry model leaving and voiding your goal! But with the proper help from Magic Max, the day will be a breeze.
Roses have been added as an accessory to hats. Look at the hats that models request carefully to deduce whether or not that design includes a rose. Roses are in limited stock and will need to be replenished from time to time. If you’ve hired Magic Max today (which, by the way, you absolutely should!), new roses will grow just to his left. Click on these roses whenever they appear to restock whenever possible.
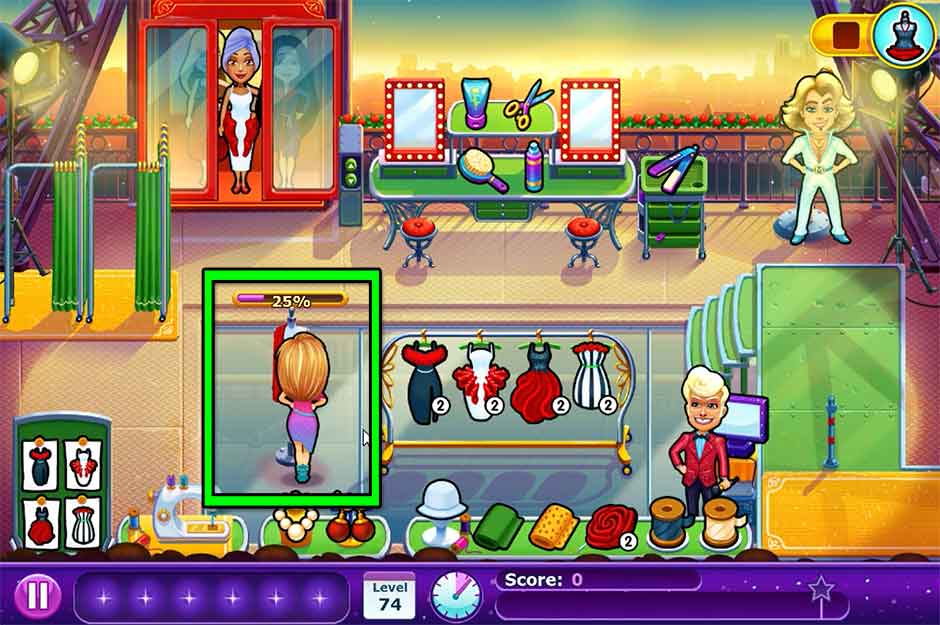
Level 74 – Create Your Dress – Part 5
Objective: Time to put the final touches on your dress!
Mouse location: No mouse today!
Angela’s dress is on the body form near the sewing machine. The moment the day starts, immediately click on the dress to start working on it. A percentage bar will appear over the dress indicating how close it is to completion. If you click on the dress immediately, you can complete over 40% of it by the time the first model orders. Serve models in waves, using the help of Bob and Magic Max to keep them happy while you put the finishing touches on your dress. Keep an eye on the clock – you’ll want to make sure your dress is at least 50% done by the time the day is halfway through, so that you don’t keep your final customers waiting as you wrap up the objective. However, if you follow the tips above, you’ll be just fine.
![Fabulous - Angela's Fashion Fever - Level 74]()
Fabulous – Angela’s Fashion Fever – Level 74
Level 75 – Now it’s Just You and Me
Objective: Complete the day.
Mouse location: Behind the set light and beams on the upper right, on level with the railing
It’s the last day in Paris, and your most difficult day yet! Start off by immediately restocking as many dresses on the dress rack as possible. Keep an eye out for growing roses and use Magic Max to keep the girls happy. Bob is key in keeping the score high so you can send models off to the catwalk while working on other tasks, particularly the hair straightener. This is very likely where the most time will be spent today, so try to keep yourself in close proximity at all times.
Chapter 6: Las Vegas
It all comes down to this! The dazzling lights of Vegas are known to reveal shocking twists and turns. Have Angela’s dreams come to an end, or will she sparkle in the spotlight once more?
Level 76 – A Very Special Surprise
Objective: Complete the day.
Mouse location: Behind the small ledge to the lower left of the checkout monitor
The lights and bravado of Las Vegas set the stage for your sixth and final location! Today starts off relatively simple. You will have two dress designs available, which you can restock by using the sewing machine, a bouquet of roses, a handbag, and the Hairdressing Table. Magic Max won’t be available as an upgrade today, so use today to affiliate yourself with the speed and flow of the Vegas runway.
Tip: If Bob’s on set while you’re looking for the mouse, be aware he’s standing in front of It, and as a result, makes it very difficult to see. Click on the mouse’s ear just behind Bob to catch it.
Level 77 – C’mere Majestic!
Objective: Feed Majestic biscuits to keep her on your side.
Mouse location: In the lower right corner, next to the dish of gold sequins
Majestic will have her own luxurious cushion to sit on next to the Hairdressing Table. Whenever the “!” appears over her head, click on it before the color drains to feed Majestic a biscuit. Do this successfully six times before the end of the day to complete your goal.
Additionally, a new dress design will show up at the sewing machine today. However, this dress isn’t for the dress rack. This new simple white form-fitting dress goes on a dress form on the lower right. When a model orders a sparkling gold sequin dress, click on this new dress, followed by the dish of sequins to the right of it. This will allow you to make the gold dresses requested.
Magic Max once again isn’t available today. If you can, go ahead and purchase all upgrades, including Bob to help manage the catwalk, since you’ll be busy with Majestic.
![Fabulous - Angela's Fashion Fever - Level 77]()
Fabulous – Angela’s Fashion Fever – Level 77
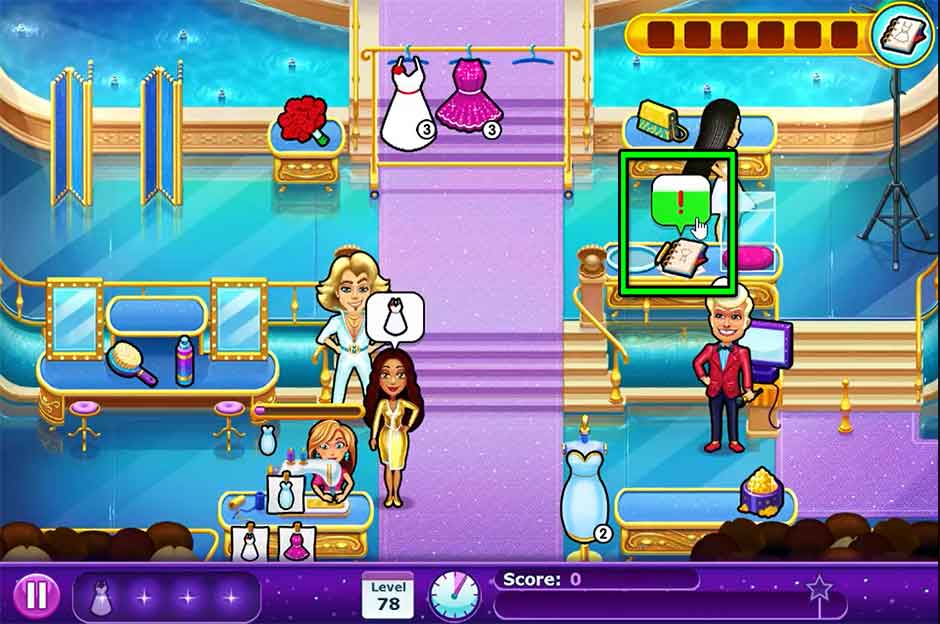
Level 78 – Create Your Dress – Part 1
Objective: Eureka! Time to sketch out Angela’s ideas for the dress.
Mouse location: No mouse today!
At the very start of the day, you will get to choose your sixth and final dress design. Which design you choose doesn’t impact the game, so choose whichever design you like the most! Throughout the day, every time Angela gets an idea for her dress, a chime will sound and a bubble with a “!” will pop up above her sketchbook on the counter above the register. Click on the sketchbook before the green drains from the bubble to have Angela jot down her idea. Complete this six times before the end of the day to receive a special bonus!
![Fabulous - Angela's Fashion Fever - Level 78]()
Fabulous – Angela’s Fashion Fever – Level 78
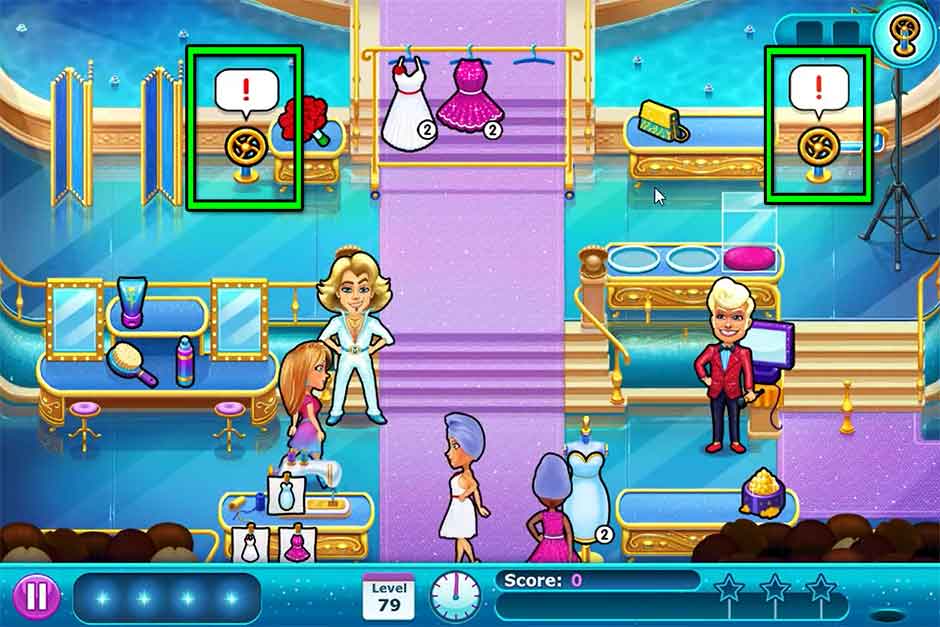
Level 79 – No Friends at the Top
Objective: It’s time to turn the fountains on. Make it spectacular!
Mouse location: On the left side of the leftmost changing room screen
There are two fountain valves located in the upper corners of your screen marked with a “!”. As soon as the day begins, select one of the valves to have Angela work on turning on the fountains. Each valve will display a percentage bar informing you how close you are to completing the task and turning on that set of fountains. Make sure at least one set is turned on before the day reaches its halfway point. Turn both on before the end of the day to receive a special bonus.
In addition, the Hairdressing Table has received a new product. Remember to pay attention and keep the models happy! Magic Max is available as an upgrade again today, so hire both Magic Max and Bob to keep the models happy while you work on your task.
![Fabulous - Angela's Fashion Fever - Level 79]()
Fabulous – Angela’s Fashion Fever – Level 79
Level 80 – The Angela Effect
Objective: Complete the day.
Mouse location: Underneath the center of the makeover station
Earrings will be added as a new item today. These can be found on the counter above the register. To make a set of earrings, click on the hooks, followed by the gems. Do this to replenish your stock of completed earrings. Magic Max and Bob are also available for hire today, so use them to help perfect your time management strategy. It’s only going to get more challenging from here!
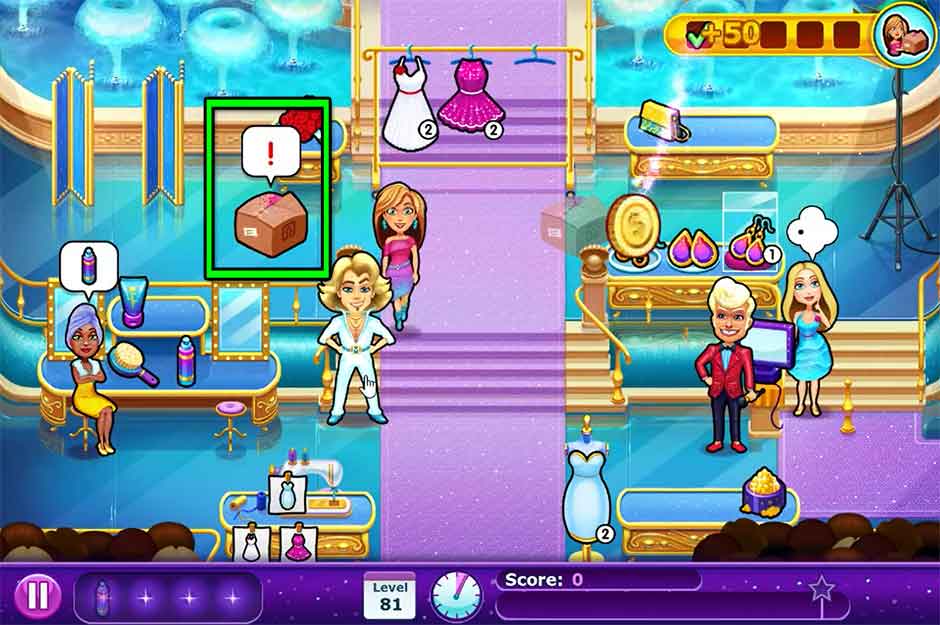
Level 81 – Create Your Dress – Part 2
Objective: A heavy box of fabric and tools has been delivered – but it’s in the wrong place! You’ll have to move it to the correct spot.
Mouse location: No mouse today!
A box will show up today with a “!” displayed above it on the left. Click on the box to have Angela move it to the next location before taking a break. Angela won’t be able to help customers while moving the box, so today is a good day to hire Bob to run the cash register and Magic Max to keep the customers happy. Click on the cash register to have Bob checkout a customer. You can do this while Angela is moving. Move the box five times to its final location to receive a special bonus!
![Fabulous - Angela's Fashion Fever - Level 81]()
Fabulous – Angela’s Fashion Fever – Level 81
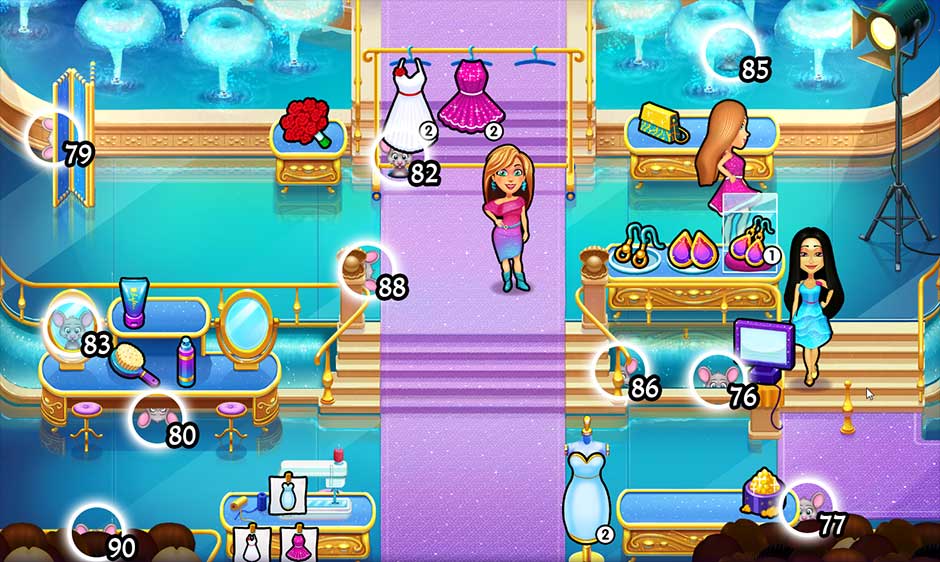
Level 82 – Truly’s Throne is Yours
Objective: Complete the day.
Mouse location: Underneath the white dress on the left side of the dress rack
Not much is new today, with the exception of a fabulous fur trim which can be added to the gold sequin dresses. Keep an eye out for the dresses models request. When they request the gold dress, make sure you notice whether or not it includes the white fur trim. Click on the dress, followed by the fur, and finally the gold to complete one of these lovely dresses for the models in waiting.
Level 83 – WE WANT ANGELA!
Objective: An extra assignment: no model can leave angry!
Mouse location: In the leftmost mirror of the makeover station
Today marks your first day playing as Victoria! You’ll find she’s every bit as fast and focused as Angela, so try to make her feel welcome! An extra challenge awaits you today: no customers can leave angry! Magic Max will be your best friend today as you aim to keep the models happy. Bob will also be very useful running the register. Try to send the models off to the catwalk in groups, but if they start to get impatient, wait for Magic Max to work his tricks! Today will be a balance of learning when to wait for Magic Max to boost the mood, and when to check out the models before they become too upset. See our video walkthrough below for tips and tricks on how to complete this day with a 3-star rating!
Tip: Combos are absolutely necessary to complete today with a 3-star ranking.
Level 84 – Create Your Dress – Part 3
Objective: Victoria’s tools have been scattered. You’ll have to find them all again.
Mouse location: No mouse today!
Click on the box marked with a “!” at the bottom of the screen as soon as the day starts. This will cause items to fly off in every direction! Throughout the day, bubbles with an image of one of Victoria’s missing tools will pop up over the dress form. Quickly locate the tool displayed and click to collect it, then click on form to use it. All item locations for the day are pictured in the screenshot below. Find and use all the tools successfully ten times to complete the event. Hiring Magic Max and Bob, while having all upgrades, is essential to completing today with a high rating.
![Fabulous - Angela's Fashion Fever - Level 84]()
Fabulous – Angela’s Fashion Fever – Level 84
Level 85 – Showtime or Showdown?
Objective: Complete the day.
Mouse location: In the pool of water, behind the second fountain in the upper right corner of the screen
A fabulous pair of high heels has been added to the list of accessories models can ask for today. The shoes can be located on the upper right and require no stocking nor additional preparation time. Try to combine orders for handbags and shoes together, due to their close proximity. You’ll also want to have all upgrades and the help of Magic Max and Bob to aid with the increasing difficulty.
Level 86 – And the Winner Is…
Objective: Truly? Angela? What’s going on? Talk with her to find out!
Mouse location: In the water to the right of the center staircase
Truly, er, Angela will show up on set numerous times today. When the green “!” bubble pops up over her head, be sure to click it before the color drains completely. Just what’s going on here? Talk with her five times before the end of the day to find out!
Scissors will become available as an extra option at the Hairstyling Table today. As the day starts, prepare as much stock of everything as possible – at least one extra of each dress, and two extra earrings, before the first large wave of models shows up. Magic Max and Bob are also necessary helpers to keep the set running smoothly.
![Fabulous - Angela's Fashion Fever - Level 86]()
Fabulous – Angela’s Fashion Fever – Level 86
Level 87 – Create Your Dress – Part 4
Objective: Lori is trying to sabotage Angela’s dress! Keep her away or you’ll have to start over!
Mouse location: No mouse today!
Throughout the day, Lori will sneak onto set from the upper right corner of the screen, slowly making her way toward your dress. Whenever you spot her, click on her as soon as possible to shoo her away. Her outfit blends quite closely with the set, so it’s easy to lose track of her in the crowds of models. The closer she gets to your dress, the more likely she’ll successfully sabotage it. If Victoria is working on other tasks, she will complete those tasks before shooing Lori, however keep in mind Lori can continue to move while she’s doing this. Keep Lori away successfully to complete the event and receive a bonus at the end of the day.
![Fabulous - Angela's Fashion Fever - Level 87]()
Fabulous – Angela’s Fashion Fever – Level 87
Level 88 – It’s Magic Max!
Objective: Complete the day.
Mouse location: Behind the top left banister of the center staircase
A belt accessory will be added to the table on the lower right. You now face the challenge of a fully stocked set that’s faster and more furious than ever. Utilize Magic Max to keep the models happy, and hire Bob to man the register. It’s best to have a number of models ready to pay at the register, then use Magic Max to improve their moods, and finally send them off via Bob. Stay true to this tactic and you’ll find yourself with a fabulous 3-star ranking in no time.
Level 89 – Create Your Dress – Part 5
Objective: Time to put the final touches on your dress!
Mouse location: No mouse today!
Victoria’s dress is on the dress form at the bottom of the screen. The moment the day starts, immediately click on the dress to start working on it. A percentage bar will appear over the dress indicating how close it is to completion. If you click on the dress immediately, you should be able to complete nearly 15% of it by the time the first model orders. Serve customers in waves, using the help of Bob and Magic Max to keep them happy while you put the finishing touches on your dress. Keep an eye on the clock – you’ll want to make sure your dress is at least 50% done by the time the day is halfway through, so that you don’t keep your final models waiting as you wrap up the objective.
![Fabulous - Angela's Fashion Fever - Level 89]()
Fabulous – Angela’s Fashion Fever – Level 89
Level 90 – Angela! OMG, It’s You!?
Objective: Prepare the fireworks for the grand finale!
Mouse location: In the audience in the lower left corner of the screen
The grand finale is here! In addition to managing the waves of models, Victoria will also need to prepare the fireworks on set. There are three boxes of fireworks marked with a “!”. Click on a box to have Victoria start preparing. A meter will pop up indicating how much progress she’s made. Focus on one box at a time. If you start immediately upon day start, you will be able to complete about 40% of the first box. These boxes can be finished quickly, so the best tactic is to focus on one box from start to finish before moving on to helping models in between. Use the help of Magic Max and Bob to carry you across the finish line in what promises to be a fabulous finale!
![Fabulous - Angela's Fashion Fever - Level 90]()
Fabulous – Angela’s Fashion Fever – Level 90
Congratulations! You’ve completed Fabulous – Angela’s Fashion Fever!
Mice Locations
Eek! Today, New York. Tomorrow, the world! Sixty-one mice are loose throughout the game’s six chapters. Find them all to unlock the Mouse Hunter trophy! Mice are listed per level, and their locations revealed per chapter in the section below.
Chapter 1: New York
![Fabulous - Angela's Fashion Fever - New York Mice Locations]()
Fabulous – Angela’s Fashion Fever – New York Mice Locations
Level 1: At the bottom right corner of the entry carpet of the main door
Level 2: Behind the top of the check-out monitor
Level 3: No mouse today!
Level 4: Behind the red and yellow sign on the left side of the makeup counter
Level 5: No mouse today!
Level 6: Behind the top of the mirror of the right makeover station
Level 7: No mouse today!
Level 8: Beneath the Sally’s sign at the top of the screen
Level 9: No mouse today!
Level 10: Around the back of the right side of the mirror at the left makeover station
Level 11: In the trash can to the right of the java station
Level 12: Underneath the bottom of the escalator toward the upper right
Level 13: Behind the top left corner of the uppermost red jewelry stand on the left
Level 14: Beneath the red sign hanging above the escalator on the upper right
Level 15: Outside on the right edge of the rightmost window, just above the escalator on the upper right
Chapter 2: Tokyo
![Fabulous - Angela's Fashion Fever - Tokyo Mice Locations]()
Fabulous – Angela’s Fashion Fever – Tokyo Mice Locations
Level 16: Behind the top of the clothing counter on the left
Level 17: Behind the top of the steps leading to the catwalk/checkout
Level 18: No mouse today!
Level 19: At the top of the sidewalk on the upper right, to the left of the purple doorway
Level 20: At the top right corner of the dress rack
Level 21: No mouse today!
Level 22: Behind the top of the set light on the upper left
Level 23: Behind the left side of the leftmost changing screen
Level 24: No mouse today!
Level 25: At the very top of the roof above the sewing station
Level 26: No mouse today!
Level 27: Between the purple and pink dresses on the dress rack
Level 28: Behind the top of the sewing machine
Level 29: No mouse today!
Level 30: Behind the back of the set light on the upper right
Chapter 3: Rio
![Fabulous - Angela's Fashion Fever - Rio Mice Locations]()
Fabulous – Angela’s Fashion Fever – Rio Mice Locations
Level 31: Behind the top of the steps on the lower right
Level 32: Behind the left side of the dress print stand, next to the sewing machine
Level 33: No mouse today!
Level 34: Behind the tree on the upper left, behind the top left corner of the purse table
Level 35: Behind the upper left corner of the sewing machine
Level 36: No mouse today!
Level 37: Behind the top of the first dressing room
Level 38: Between the two dressing rooms
Level 39: Behind the set light on the right, in the upper right corner
Level 40: No mouse today!
Level 41: Behind the first palm frond on the left belonging to the only tree on the right, at the top of the screen
Level 42: No mouse today!
Level 43: Behind the base of the palm tree on the right and the green plants next to it
Level 44: No mouse today!
Level 45: Behind the top of the second tree on the left, just behind the light string
Chapter 4: Milan
![Fabulous - Angela's Fashion Fever - Milan Mice Locations]()
Fabulous – Angela’s Fashion Fever – Milan Mice Locations
Level 46: Behind the steps in the lower right corner, below the checkout monitor
Level 47: Behind the top of the makeover station, toward the upper left
Level 48: No mouse today!
Level 49: On the left side of the jewelry table at the bottom of the screen
Level 50: Between the two center glass jewelry display domes at the bottom of the screen
Level 51: No mouse today!
Level 52: Behind the dressing room on the left side, just above the stool
Level 53: Beneath the steps leading up to the catwalk/checkout area
Level 54: No mouse today!
Level 55: In the upper right corner of the archway in the upper right corner of the screen
Level 56: Behind the steps leading up to the catwalk/checkout area
Level 57: No mouse today!
Level 58: Underneath the center of the makeover station
Level 59: No mouse today!
Level 60: At the top of the dress pattern board in the lower left corner of the screen
Chapter 5: Paris
![Fabulous - Angela's Fashion Fever - Paris Mice Locations]()
Fabulous – Angela’s Fashion Fever – Paris Mice Locations
Level 61: Behind the steps leading up to the catwalk/checkout
Level 62: Behind the right side of the drawers to the right of the makeover station
Level 63: No mouse today!
Level 64: Underneath the makeover station on the left, behind the stool
Level 65: To the right of the rightmost mirror of the makeover station, behind the floral railing
Level 66: No mouse today!
Level 67: On the left side of the sewing machine
Level 68: On the upper right side of the elevator beams, at the top of the screen
Level 69: No mouse today!
Level 70: Inside the top of the black dress hanging on the left side of the dress rack
Level 71: In the lower right corner, just above the orange carpet
Level 72: No mouse today!
Level 73: Behind the small patch of floral railing to the left of the elevator
Level 74: No mouse today!
Level 75: Behind the set light and beams on the upper right, on level with the railing
Chapter 6: Las Vegas
![Fabulous - Angela's Fashion Fever - Las Vegas Mice Locations]()
Fabulous – Angela’s Fashion Fever – Las Vegas Mice Locations
Level 76: Behind the small ledge to the lower left of the checkout monitor
Level 77: In the lower right corner, next to the dish of gold sequins
Level 78: No mouse today!
Level 79: On the left side of the leftmost changing room screen
Level 80: Underneath the center of the makeover station
Level 81: No mouse today!
Level 82: Underneath the white dress on the left side of the dress rack
Level 83: In the leftmost mirror of the makeover station
Level 84: No mouse today!
Level 85: In the pool of water, behind the second fountain in the upper right corner of the screen
Level 86: In the water to the right of the center staircase
Level 87: No mouse today!
Level 88: Behind the top left banister of the center staircase
Level 89: No mouse today!
Level 90: In the audience in the lower left corner of the screen
Trophies
There are winners, and then there are the best of the best. Unlock all of the Fabulous – Angela’s Fashion Fever achievements and earn both trophies and bragging rights. Click on the trophy icon in the upper right corner of the level select screen to view your trophies, or check the progress of ones you’ve yet to unlock.
| Trophy Name |
Level(s) |
How to Unlock |
| Complete Level 1 |
1 |
Complete the first level. |
| Escape from New York |
1 – 15 |
Complete the New York chapter. |
| Tokyo Drift |
16 – 30 |
Complete the Tokyo chapter. |
| January River |
31 – 45 |
Complete the Rio chapter. |
| Quadrilatero della Moda |
46 – 60 |
Complete the Milan chapter. |
| Midnight in Paris |
61 – 75 |
Complete the Paris chapter. |
| Truly Spectacular |
76 – 90 |
Complete the Las Vegas chapter. |
| Dressmaker |
9 |
Complete your first dress. |
| Fashion Designer |
1 – 90 |
Complete all Dress levels. There are 29 total throughout the game’s six chapters. See all levels entitled “Create Your Dress” in the walkthrough above. |
| Fabulous |
All except Dress levels |
Reach 3 stars on all levels. |
| Senior Manager |
1 – 90 (Excludes Dress and “Complete the Day” objective levels) |
Complete all events. There are 63 total throughout the game’s six chapters. Check for an event icon in the level select screen, including a green checkmark to indicate an event has been completed. |
| Mouse Hunter |
All except Dress levels |
Find all the mice in the game! See our Mice Locations section for complete guide. |
| Hey Big Spender |
1 – 90 |
Buy all the upgrades in the game. Upgrades are unique per chapter. Helpers such as Magic Max or Bob are hired on a daily basis and do not count! |
| Getting There |
Any |
Score a total of 100,000 points. |
| High Score |
Any |
Score a total of 500,000 points. |
| Seamstress |
Any |
Restock 300 dresses. |
| Mix and Match |
Any |
Create 250 products with multiple components. |
| Fashion Showoff |
Any, except 1 – 15 |
Send 100 ecstatic models to the catwalk. Ecstatic models will have a heart over their head. |
| Combo Queen |
Any |
Reach 25 “Fabulicious” combos. |
| The Devil Wears Prada |
Any |
Have 2,000 coins in your wallet. |
| Bird Watcher |
31 – 45 |
Pick up 100 feathers in Rio. |
| License and Registration, Please |
12 |
Find the hidden Murray. See Level 12 – Lucky Number Seven? in the walkthrough above. |
| Slacker |
Any |
Stand still and do nothing for 1 minute. |
| Extreme Focus |
Any “Create Your Dress” level. |
Finish a Dress level’s event before helping anyone and still finish the level. |
| Keep It Simple |
Any |
Complete a level without making a single combo. |
| GameHouse |
90 |
Watch the entire credits sequence. |
Video Walkthrough
Are you feeling stuck on a level? Is your playthrough falling short of that glamorous 3-Star ranking? Is that pesky mouse eluding you? Complete every level with a stunning 100% with our Fabulous – Angela’s Fashion Fever Video Walkthrough. Watch as GameHouse plays through each and every level, providing you with visual tips and tricks along the way. Click “Play” below to get started!
Congratulations! You’ve completed the Fabulous – Angela’s Fashion Fever Walkthrough! Be sure to visit our blog for more great tips and tricks! Can’t get enough of Angela and want to play more? Try one of our Delicious titles featuring her sister, Emily!
Hop on board with Delicious – Emily’s Honeymoon Cruise, where love is in the air, but the trip is anything but smooth-sailing! Things get choppy when the wedding bells stop ringing, and Emily’s required to apply her time management skills to the cruise ship Angela works on. Will Emily and her new husband sail off into the sunset, or are there nothing but high tides and storms ahead?
In Delicious – Emily’s Hopes and Fears, Angela’s young niece Paige falls suddenly and mysteriously ill. Emily must manage things at home during the hottest summer of the century while Paige’s father sets off on an epic journey around the world to find a magical cure. Family bonds are more important than ever as they fight to save their little girl.
Looking for even more? Download our Delicious Super Pack and join Emily and family on the adventure of a lifetime with thirteen full Delicious time management titles!
We hope to see you soon!
The Fabulous – Angela’s Fashion Fever Walkthrough is meant as a guide and does not contain cheats, hacks, or serials.
The post Fabulous – Angela’s Fashion Fever Walkthrough appeared first on GameHouse.