Kiera Vale’s escape from The Witch’s Prison was short lived. In this sequel, Nightmare Adventures – The Turning Thorn, Kiera is once again pulled into the dark mysteries of the agency knows as A.R.C.A.N.E. This guide will help you discover the secrets of the Blackwater witch. Find the hints to uncover all the extras this game holds. Read on to learn how each clue unlocks the hidden truths Dr. Thorn is hiding.
Contents
General Tips & Tricks
Nightmare Adventures – The Turning Thorn is a hidden object puzzle game. You will encounter puzzles and Hidden Object Scenes. Your cursor will change based on what action you can perform:
• Eye: Clicking when your cursor shows an eye can do one of two things. If object or area you click on is interactive, it will activate a pop-up screen. Alternatively, you will be given information at top of screen about object or area.
• Hand: This indicates that you can take item.
• Arrow with Text Box: This indicates an area that you can move to.
If Item you look at is important, a Photo is taken automatically. When solving puzzles, click on Photo button on bottom Menu to bring up these clues.
The Story button gives you a review of story so far. To follow story closely, click on Story button every time you see the Story Image pop up.
Clicking on the Menu button will pause your game. At this point, you can Resume Game, enter Options Menu, access Instructions, or Quit to Main Menu.
Nightmare Adventures – The Turning Thorn Walkthrough
This guide will take you through the game step by step to help you maximize your achievements. You will find help for solving puzzles, but if you ever get stuck you can always Skip a puzzle.
Chapter One: Home
First, look beside the TV. Collect a pack of gum and study the Driver’s License. Examine the nightstand and collect my handkerchief. In the closet, collect my trusty baseball bat before looking in the mirror. You’ll have to clean it four times with my handkerchief. Now collect the world’s smallest key, it seems before going into the living room.
Go ahead and take a look at the photos on the camera. Examine the magazine and collect it’s a paperclip. Ah, look, it’s your horoscope. You’re a Pisces. Examine the jewelry box and collect the family amulet… ‘W’ for “Wystwick”. Now read over the letter and look at the big number on the wall before going to the bedroom on the left.
In the bedroom, turn on the TV and change the channel to 37 by adjusting the nobs. A commercial will play. Watch it through to the end, when a phone number pops up. Now head back to the living room then go to the right and into the kitchen.
Here you can collect an old clock’s minute hand from the clock. There is also a steak knife and a stylish oven mitt to pick up. On the table is a fishbowl where you can use the world’s smallest key, it seems on the chest. Collect a weird little wooden coin.
Now it is time to make a phone call. Pick up your cell phone and dial the number from the commercial: 1-800-555-1313. Now press the green call button.
Head back to the living room. The package will come and you can use a steak knife to get inside it and remove the weird thing I ordered from Spend. Examine the screen again and use the weird thing I ordered from Spend in the center. This will start the first puzzle.
![nightmare adventures - the turning thorn -puzzle 1]()
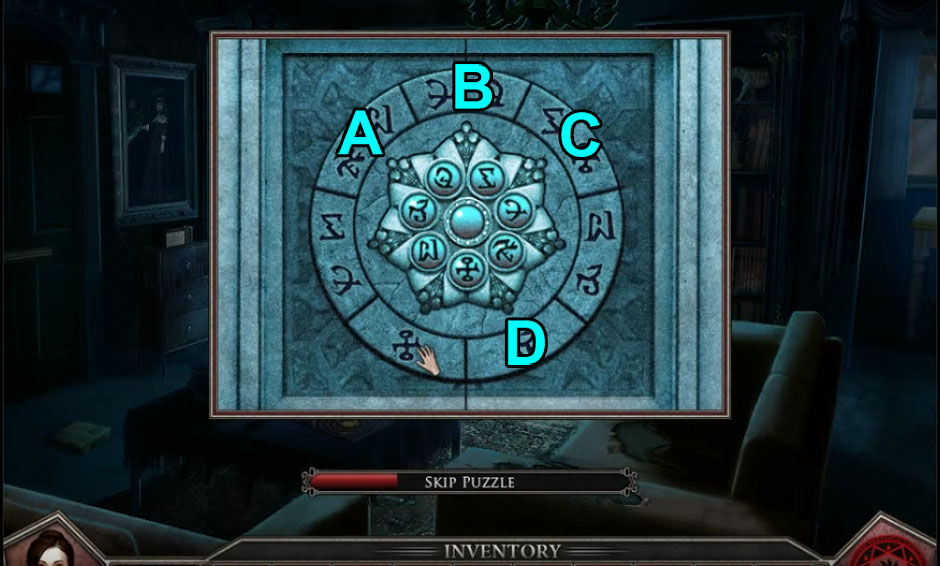
nightmare adventures – the turning thorn -puzzle 1
Press all the symbols on the outer ring that match the inner ring of circles. This will light them up. Once they are lit up, refer to the image an press A, B, C, and D. Now use my trusty baseball bat on the screen to break it. Dr. Phillips will appear and speak to you. Proceed through the screen and examine the candles in the corner of the room. You can collect a chunk of hardened candle wax.
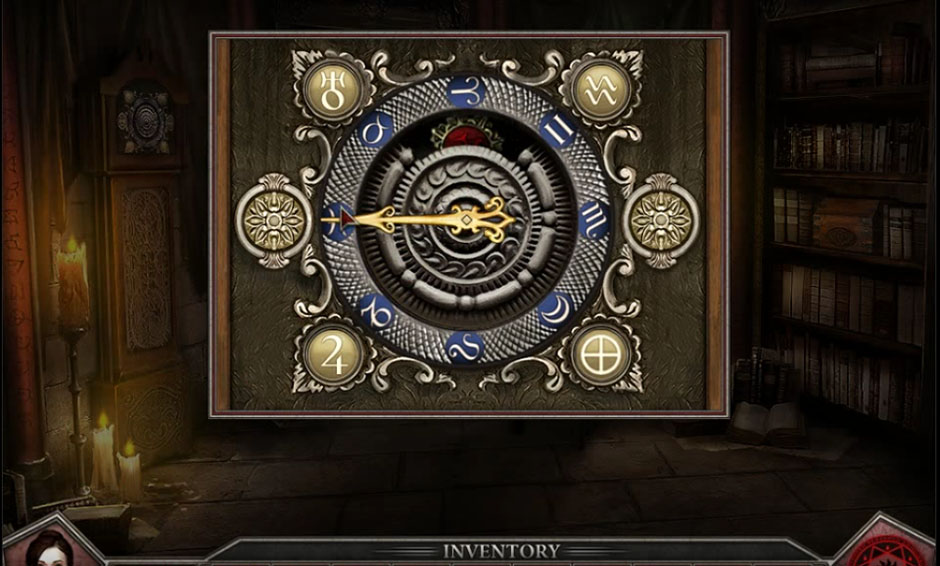
Look to the grandfather clock and use a weird little wooden coin in the slot along with an old clock’s minute hand on the face. On the clock face, use the circle button on the right to move the crescent moon symbol to the lower right corner, beside the symbol of earth. Use the button on the left to move the minute hand to overlap the sign for Pisces. Refer to the image for the solution. You will be able to collect a half of an amulet stone.
![nightmare adventures - the turning thorn -puzzle 02]()
nightmare adventures – the turning thorn -puzzle 02
Now open the chest by using it’s a paperclip on the lock. You can now collect the first some kind of amulet stone. On the floor there are books you can look at. Collect the second half of an amulet. Now use a pack of gum on the first and second half of an amulet. Congratulations, the amulet is complete now and will be added to your inventory.
Go back to the apartment and back into the kitchen. Open up the microwave and place a chunk of hardened candle wax inside. Warm it up by pressing the cook button, then open it and use a stylish oven mitt to take the second some kind of amulet stone.
Go back into the living room, then forward into the chamber. When you look at the statue on the bookcase, you’ll find the next puzzle. Move both of the statue’s bottom arm up so the correct slots open. Now place the Family Amulet… ‘W’ for Wystwick in the upper right. The amulet is complete now is placed in the upper left. The first some kind of amulet stone is placed in the lower right and the second some kind of amulet stone goes into the lower left.
Now you need to go back to the kitchen. Pick up your phone and answer it. After you select the red colored dialog choices, you’ll move onto chapter 2.
Chapter Two: The Elevator
Collect a match form the control panel and a piece of electrical tape from the center of the “No Trespassing” sign. Now move forward, which takes you to the rear gate. On the left side of the gate there are wires that need to be repaired with a piece of electrical tape. Collect a matchbook before looking inside the dumpster and collecting a cup from Bucket O’ Tacos. Walk back to the previous area.
There is a leaking barrel in the back. Examine it and then collect the green liquid with the cup from Bucket O’ Tacos. This will give you a cup full of flammable poison. You can use this on the bushes before taking a match from a matchbook, using them together to create a burning match. Now go ahead and use it on the bushes to catch them on fire and clear them.
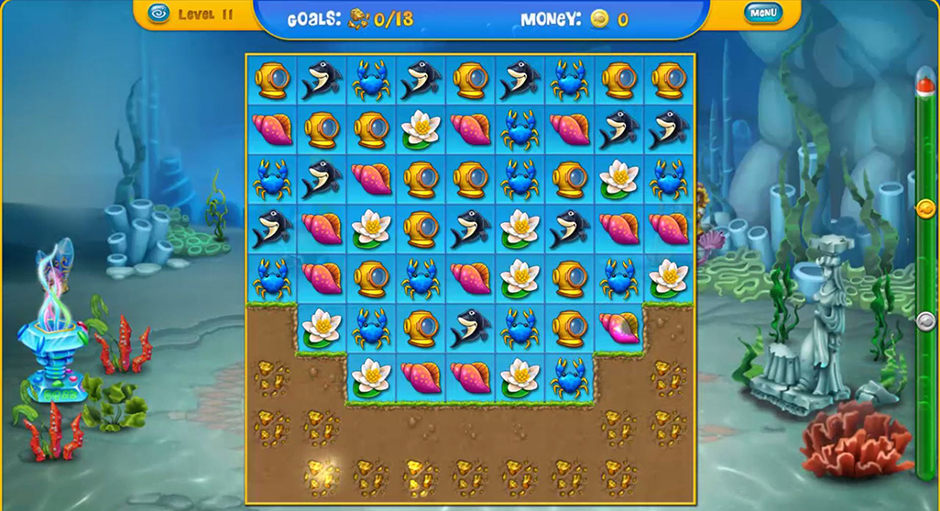
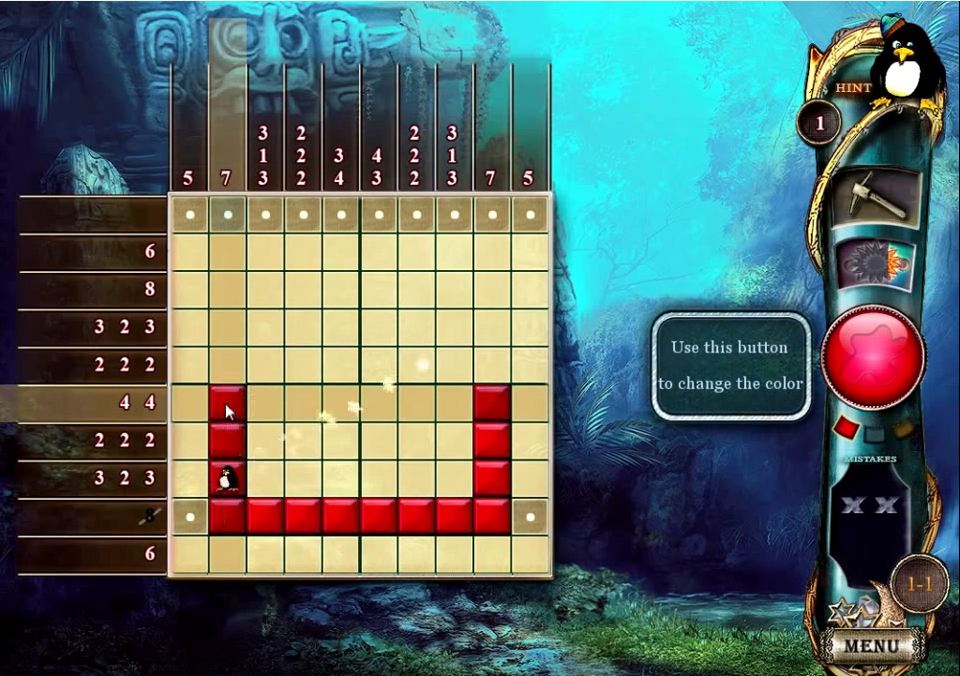
You can look at the roof now. After looking over the note, collect some kind of electrical box. Go back to the control panel and use some kind of electrical box here. This will start a puzzle. You need to rearrange the numbers so that the total on a line matches the number of the line. (Only 1 dot on line one, only two dots on line 2, etc) To undo the lock, enter 1-4-3-2. Press the red button. After the conversation is finished, go inside the elevator.
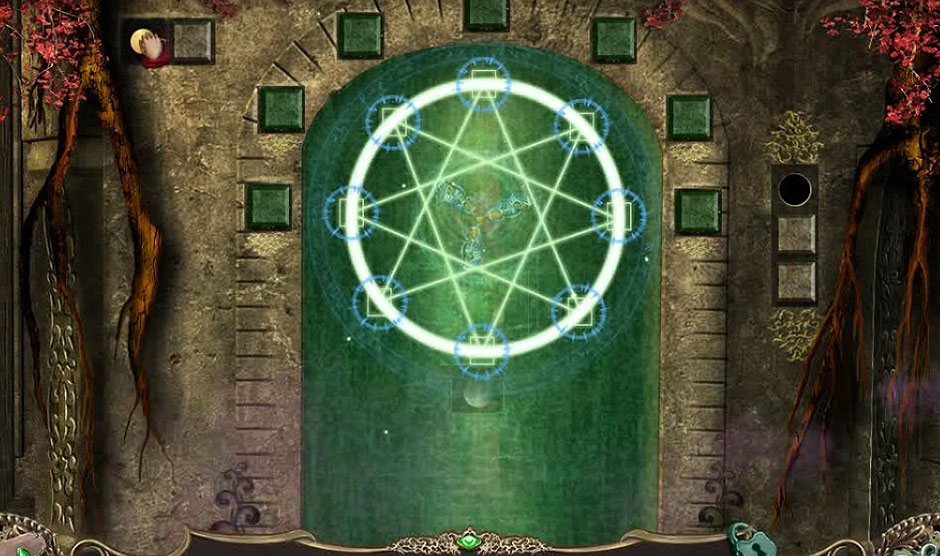
Talk to Jillian again before opening the case and collecting a fire extinguisher to use in the elevator doors. Jillian will now give you my ARCANE badge when you talk to her. Now go through the doors. Match the symbols on the elevator doors to the windows on the dollhouse on the left. You’ll be able to collect the safety scissors… not too sharp.
![nightmare adventures - the turning thorn -puzzle 03]()
nightmare adventures – the turning thorn -puzzle 03
Examine the controls on the case in front of you to the left and use my ARCANE badge here. Use the left and right buttons to turn all the lights green. This is the solution: Right, Left, Left, Right, Right, Right, Left. Collect my ARCANE badge and leave the screen. Open the top part of the case and collect a large meteorite. Now go forward and you will come to a security checkpoint.
There is a teddy bear sitting in the corner. Use the safety scissors… not too sharp to cut off a button with an ‘E’ on it from the bear. Collect a button with an ‘A’ on it from the clipboard. There is a button with a ‘C’ on it on the containment door. Collect it. Now examine the keypad and add all the keys you just collected to it. Slide my ARCANE badge into the slot and use the code A, D, E, B, C before going inside the office.
Examine the call box and use the round dial to turn it on. Collect a small battery from beside it. Look at the soda on the floor and examine it, collecting a tab from a soda can. Collect a circuit board from the wall on the right and then study the computer screen. Close down the email with the “X” button in the corner. Open the email from Jackson titled “RE: ELEVATOR TROUBLES”. Click on the “download attachment” and you will see repair instructions and then excite the computer.
Inside the drawer you can collect a powerless flashlight and some kind of strong acid. You can use a small battery with a powerless flashlight which will create a working flashlight. before walking forward and then right, using a working flashlight to light up the darkness. Examine the controls to start another puzzle.
First, use a tab from a soda can to remove the screws from the middle circuit board on the top left. Remove the broken board and replace it with a circuit board. On the panel with the green lights, press the upper left button two times, the bottom left button one time, and the bottom right button twice. The red and black dials need to be clicked to 30, 25, 90, 50, and 55.
You can now go back to the elevator, entering through the small hole. Speak with Jillian before opening the break release panel on the lower right and pressing the red button inside. Speak with Jillian once more to finish this chapter.
Chapter Three: Through the Portal
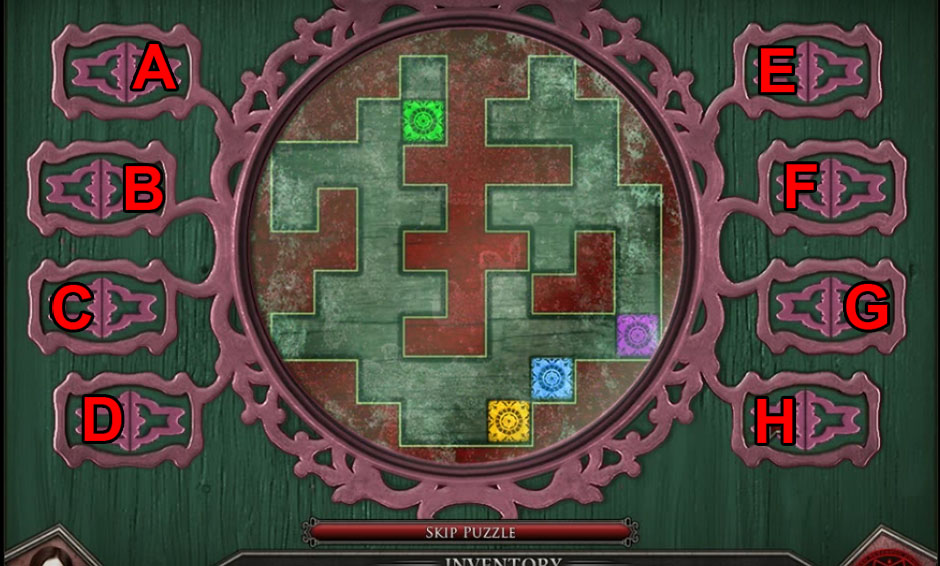
After speaking with Jillian, go into the room on the left. Speak with Dr. Phillips before clicking on the mouth of the artifact. This opens up a puzzle. You need to shift the pieces into the pattern shown below. Careful! The direction the piece will move is dependent on which roman numeral is lit.
Once the puzzle is done and you’ve moved onto the next scene, collect the very sharp arrow from the left of the door. Now take a closer look at the statue on the right. A puzzle will open up. The solution is as follows: Press “III”, “V”,”V”, “III”, “IV”. Collect a dagger. Now head up the stairs.
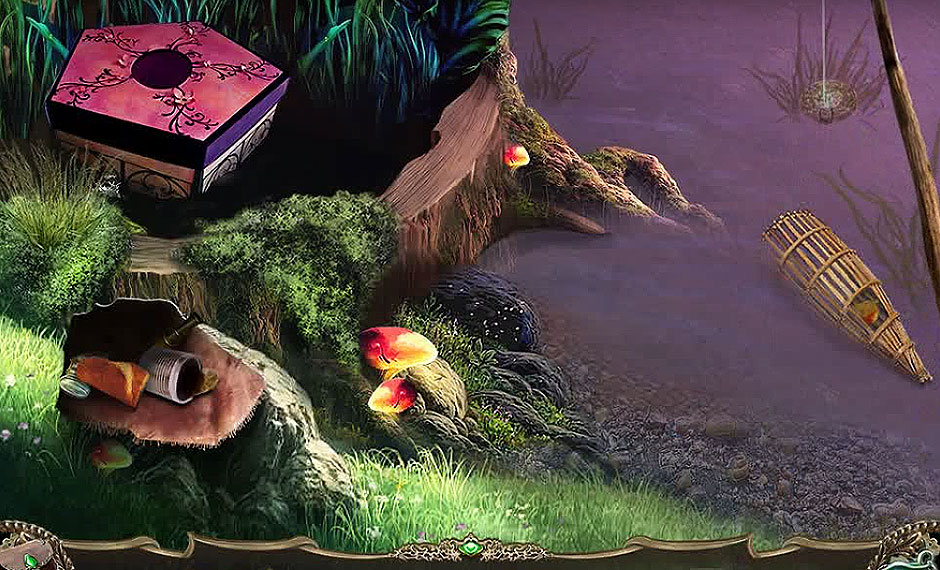
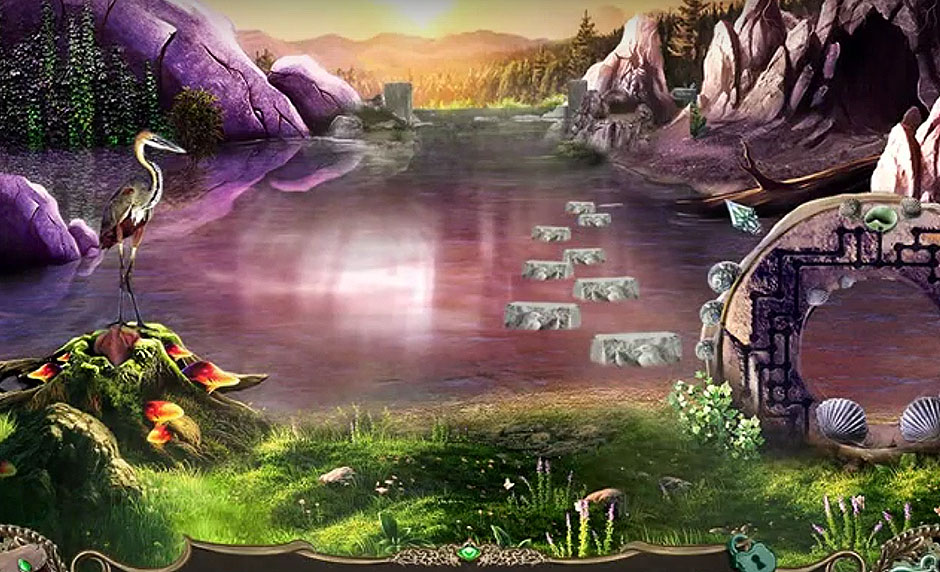
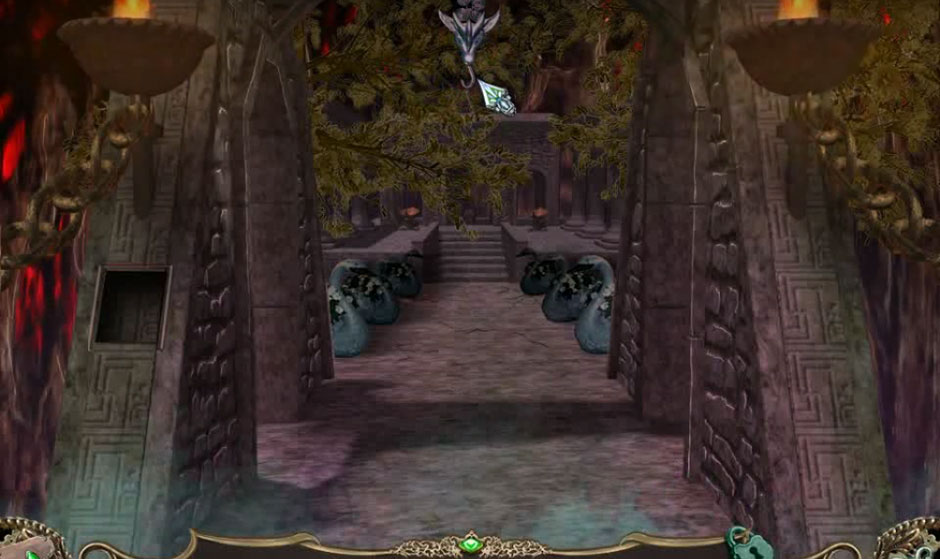
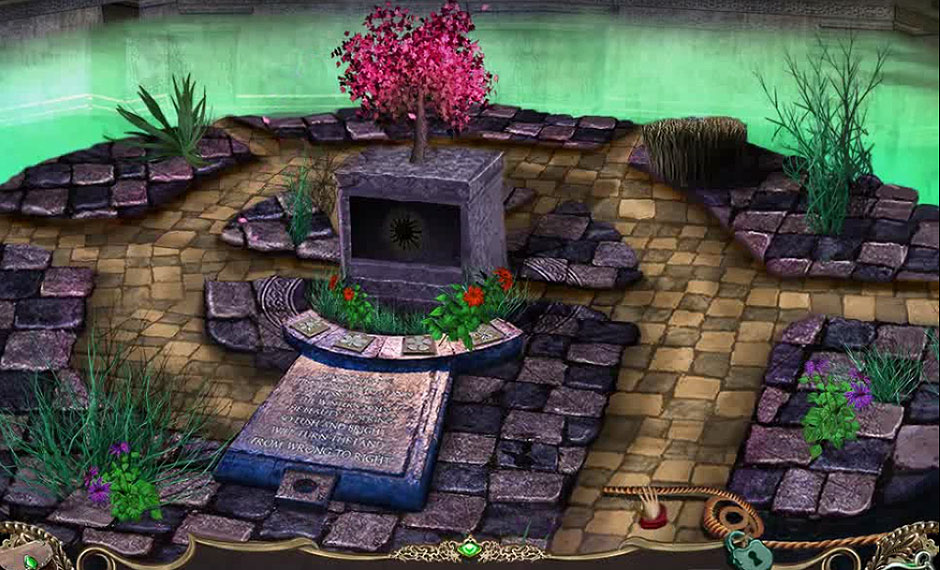
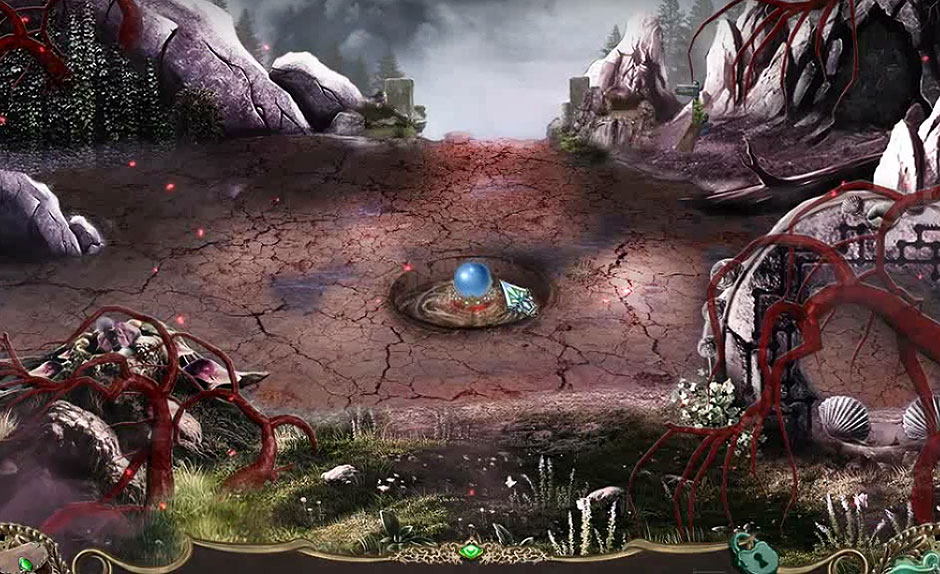
In this chamber, you can find a clue beside the left fountain and the collect an old skull off the floor on the right. There is a green glass eye to collect in the closed gate. Now go through the central door. Collect an empty bucket from the floor on the left, then look closer at the statue holding up his arms. You’ll find and collect a red box at his feet. Examine the candles before taking a lit candle and a red glass eye. In the bookcase, collect an hourglass and a red glass eye. Go back into the last room, then go to through the door on the left.
Collect a length of rope from the statue on the left and a very heavy axe from the foot of the statue on the right. In the wall of skulls you can find a red glass eye. Go out on to the balcony and collect a green box from the rail. You’ll find a clue on the rail and you can collect a small coin with an 11 on it. Walk back inside and go through the green lit door and into the study.
Collect a blue box from the floor and on the shelves you’ll find an urn, perhaps. On the desk you can find a green glass eye and an orange book. After reading the letter you can collect a very odd necklace. Leave the room and go back to the main chamber again. You can use a very odd necklace here in the gate where you got the green eye. Go inside.
In the pile on the left you can collect an old sword before examining the wall. Use an old dagger on the bricks to get to a secret compartment. Use a lit candle here to light it, then collect a red book. Now examine the clock on the wall and collect a blue eye from the slot, replacing the empty spot with a small coin with an 11 on it. Move the minute hand to the green symbol in the “6” position and the hour hand to “XI”. Back out and collect a purple book from the statue on the right. There is a green glass eye in the grate on the floor to collect.
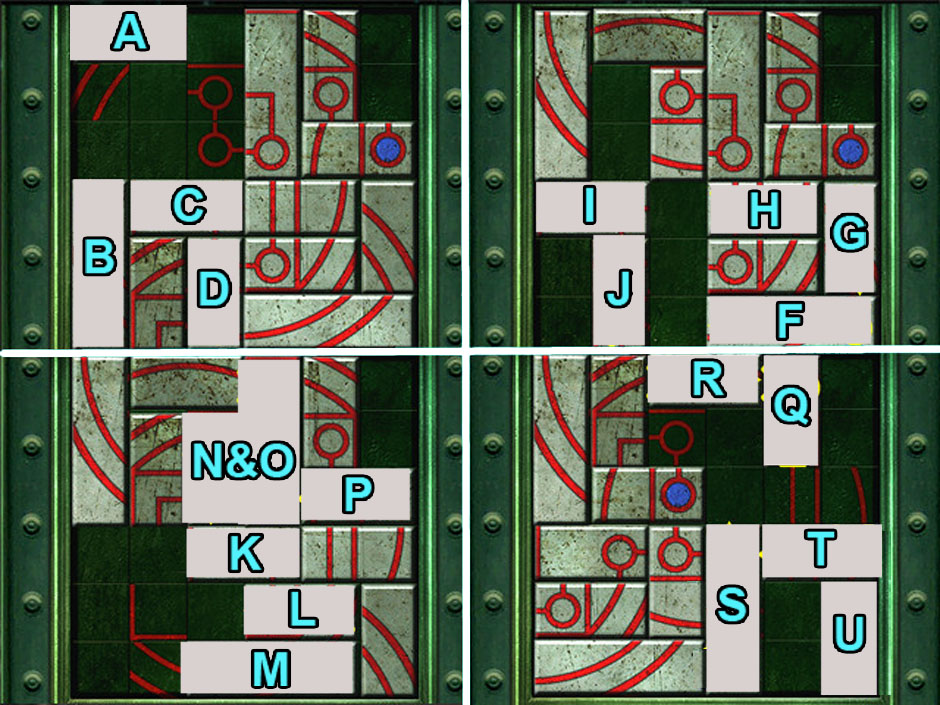
The grate holds another puzzle. Follow these movements to complete it: Slide A right. Slide B up. Slide C left. Slide D up. Slide F left. Slide G down. Slide H right. Slide I right. Slide J up. Slide K left. Slide L left. Slide M left. Slide N and O down. Slide P left. Slide Q down. Slide R right. Slide S up. Slide T right. Slide U up.
![nightmare adventures - the turning thorn -puzzle 05]()
nightmare adventures – the turning thorn -puzzle 05
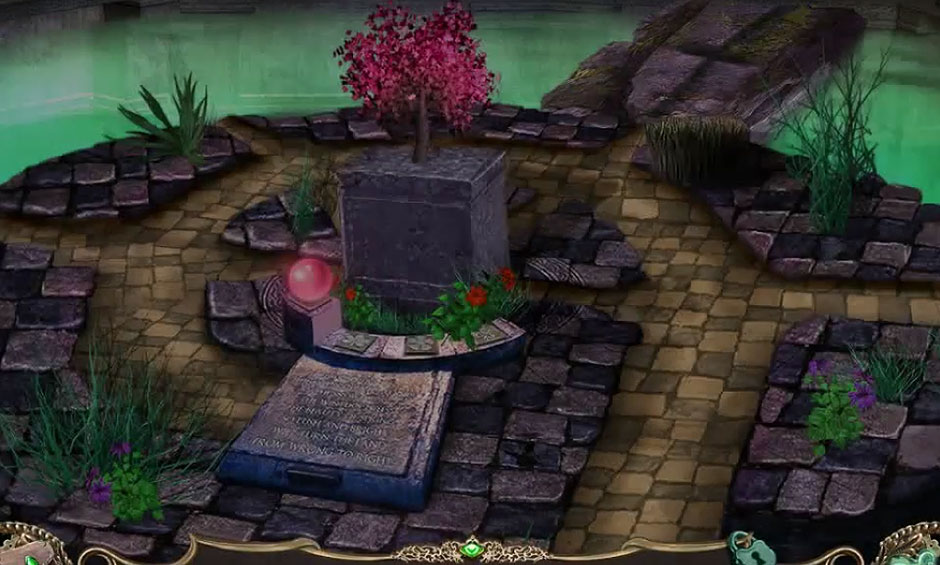
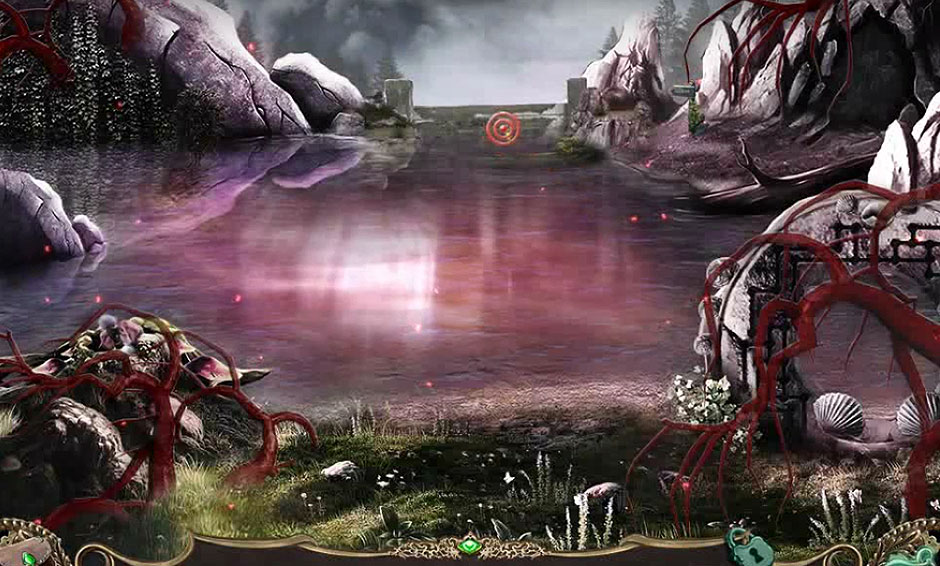
Now that the grate is open, you’ll want to combine an empty bucket with a length of rope. This creates a bucket on a rope. Examine the well and use a bucket on a rope in the water to fill it, creating a bucket full of water. Go back a room and head back into the center chamber again so you can use a bucket full of water to put the fire out. Collect a marked stone tumbler and go back twice.
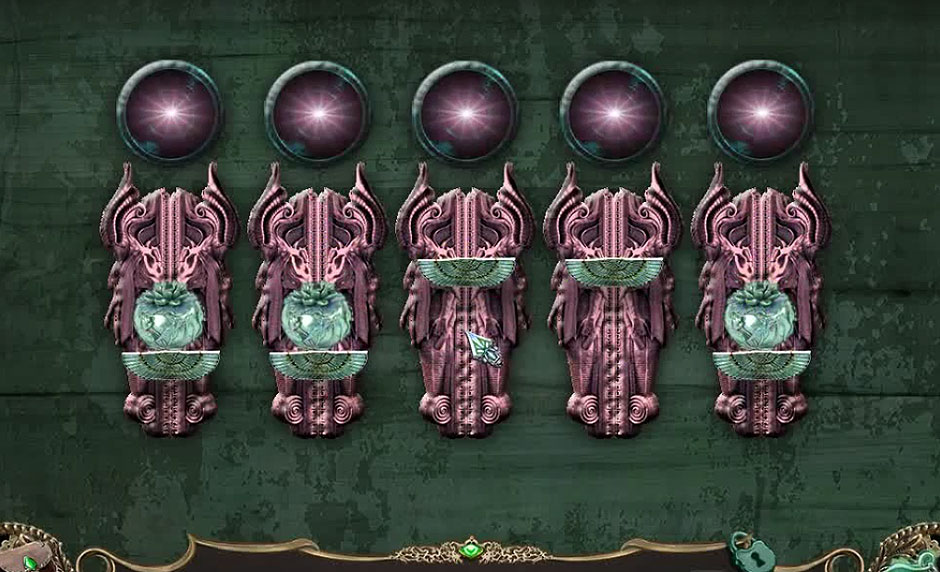
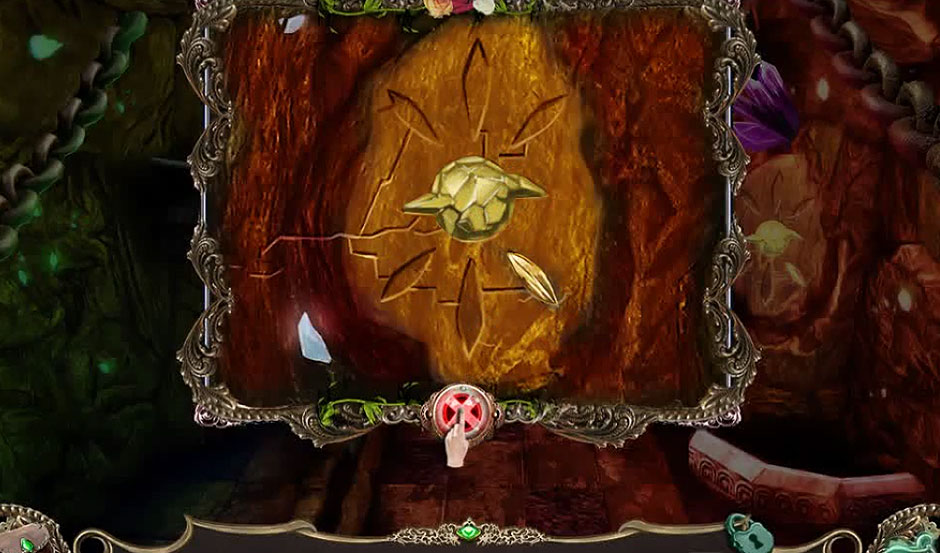
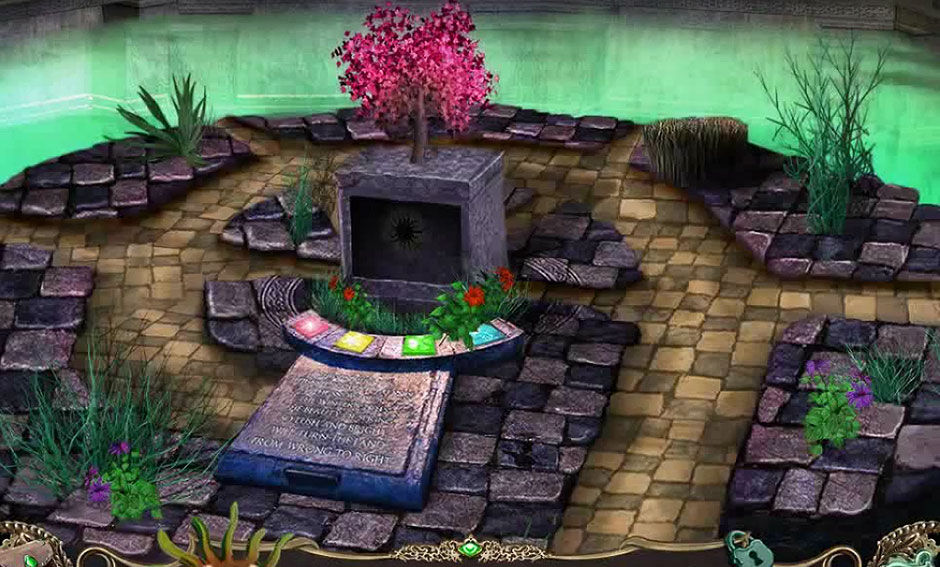
The statue on the end needs a closer look to start a puzzle. A marked stone tumbler can be placed into the hole at the bottom of the book. Change all the bottom row symbols to match this:
![nightmare adventures - the turning thorn -puzzle 06]()
nightmare adventures – the turning thorn -puzzle 06
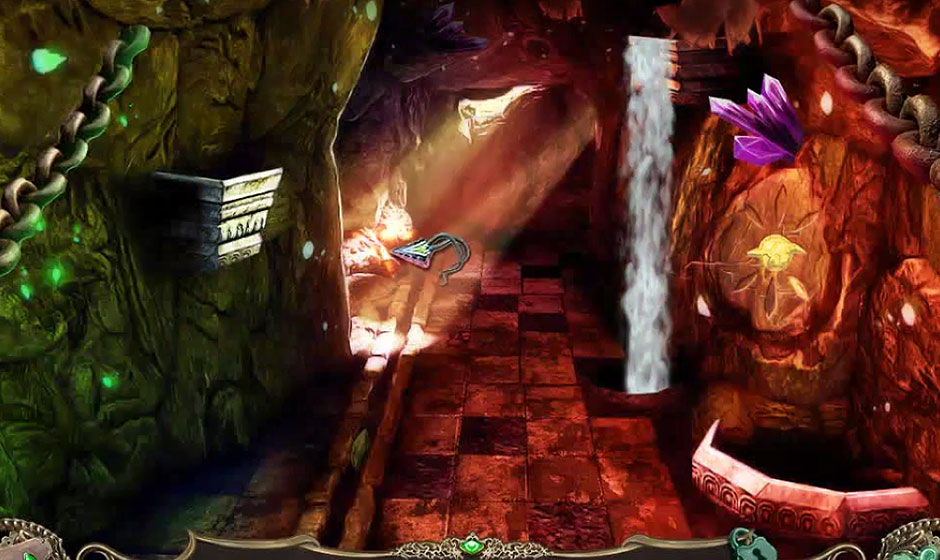
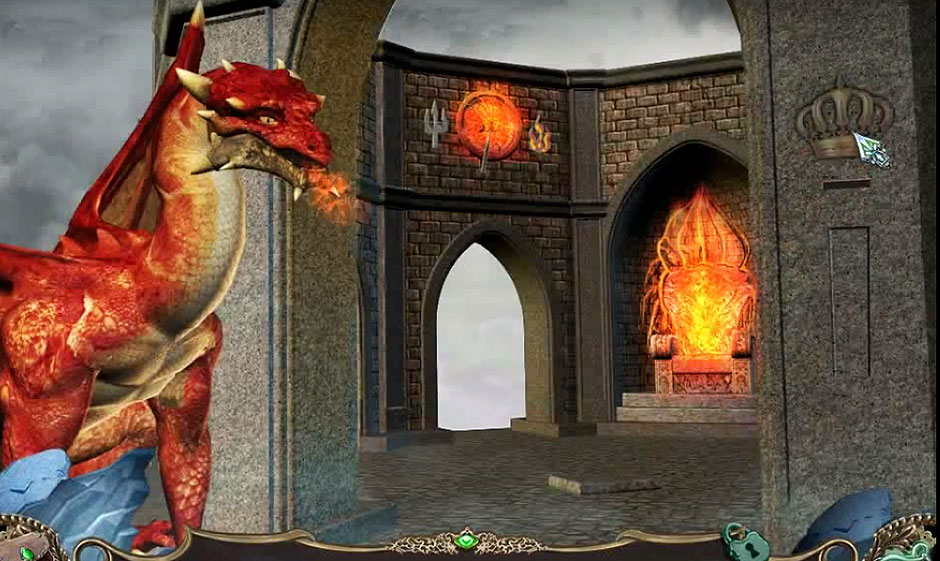
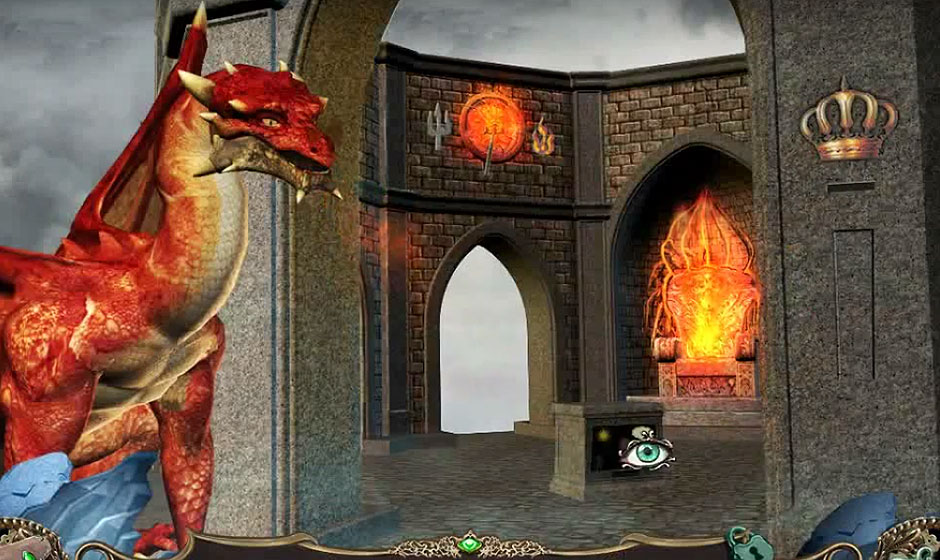
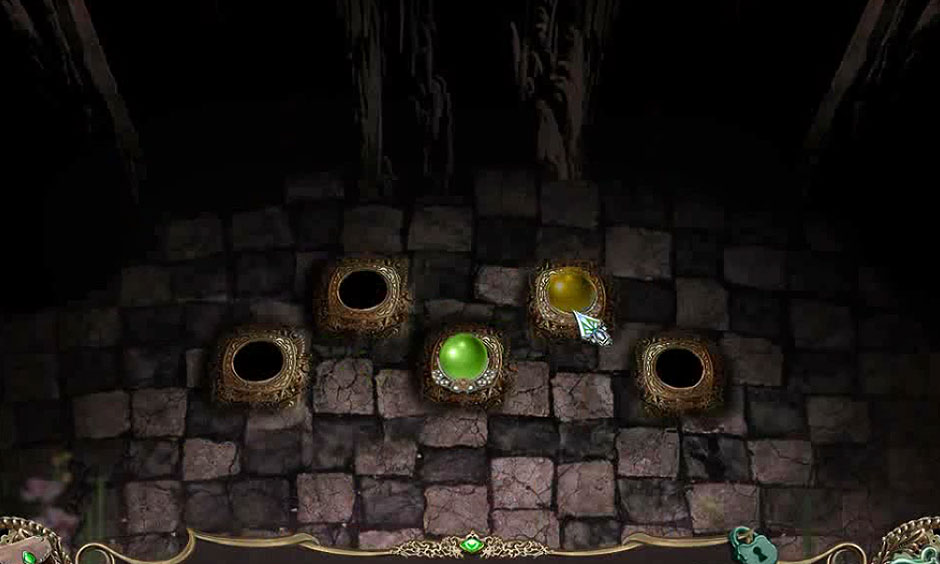
Collect a yellow box before going into the next room on the right. There is another puzzle here at the left statue. Place the following into his left hand: A green box and a red box. Place the following in his right hand: A blue box, a yellow box, and a black box. Collect a blue glass eye from the statue’s mouth. Go back on room and then go out onto the balcony.
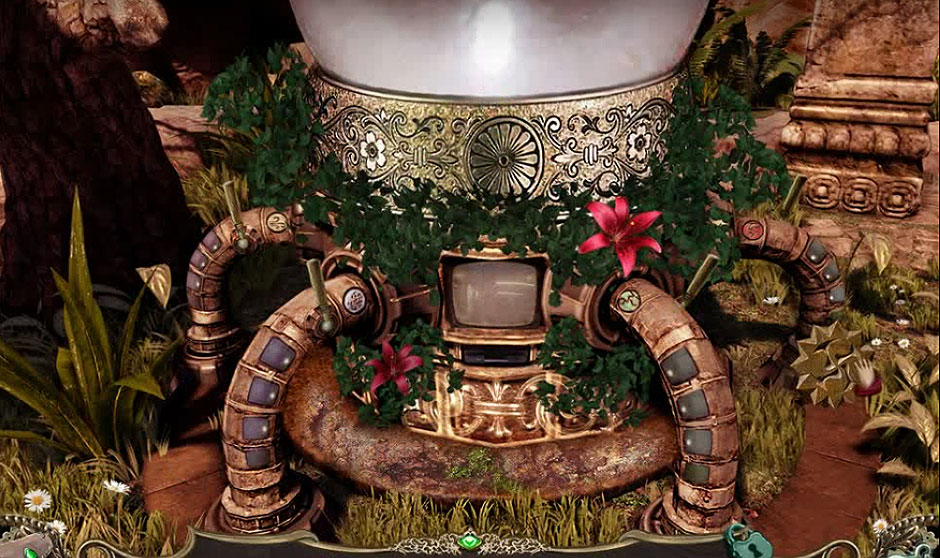
Examine the moon and then the rail. You can collect a wooden rod from here. Return to main chamber and use a wooden rod in the slot on the right fountain. Push the lever up to turn the fountain on and then collect some kind of stone panel. Go back to the green lit study.
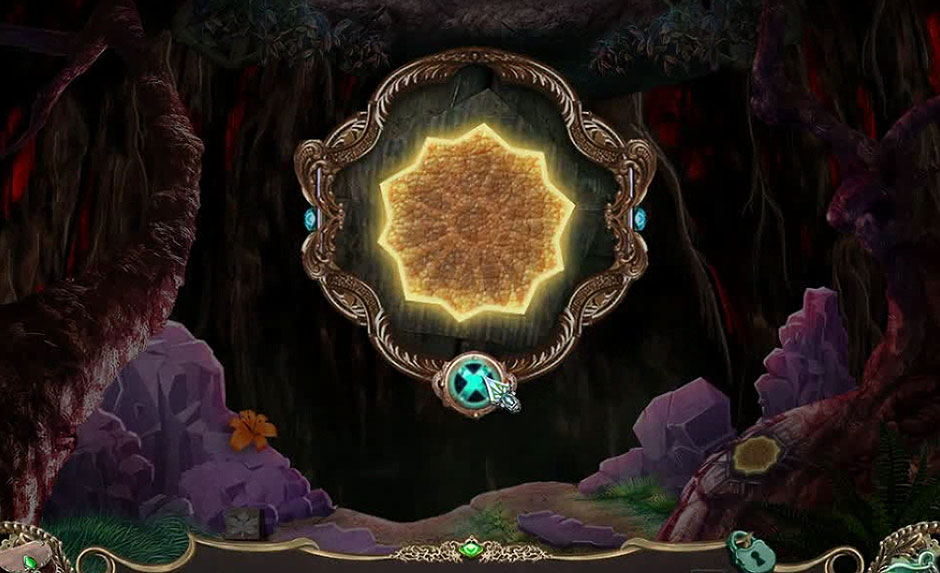
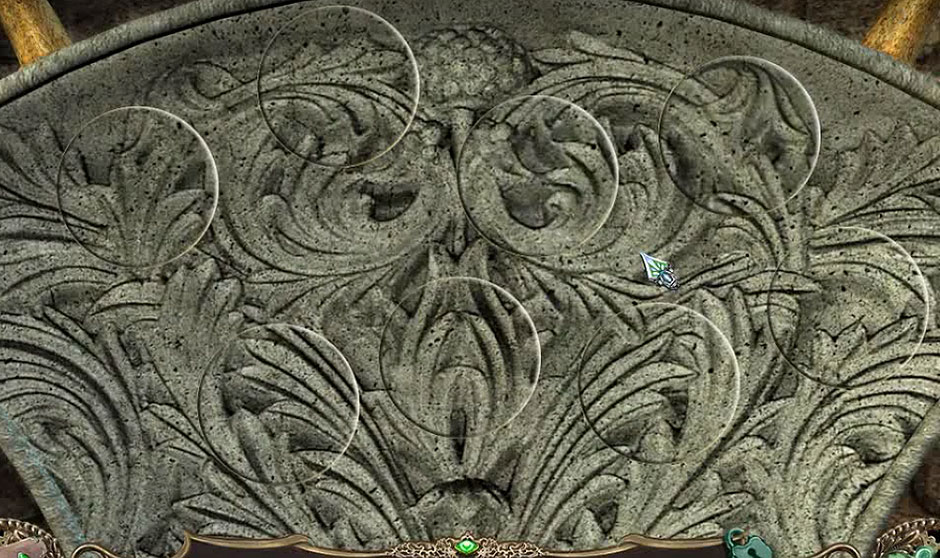
Examine the painting and use some kind of stone panel on the bottom. Push the following buttons to find the solution: I two times, II one time, I two times, II one time, I one time, II one time, III one time, II one time, III three times, I three times, II one time, I one time, III one time, II one time, III one time, I one time, II one time, I one time, II one time, I three times, II one time, I four times!
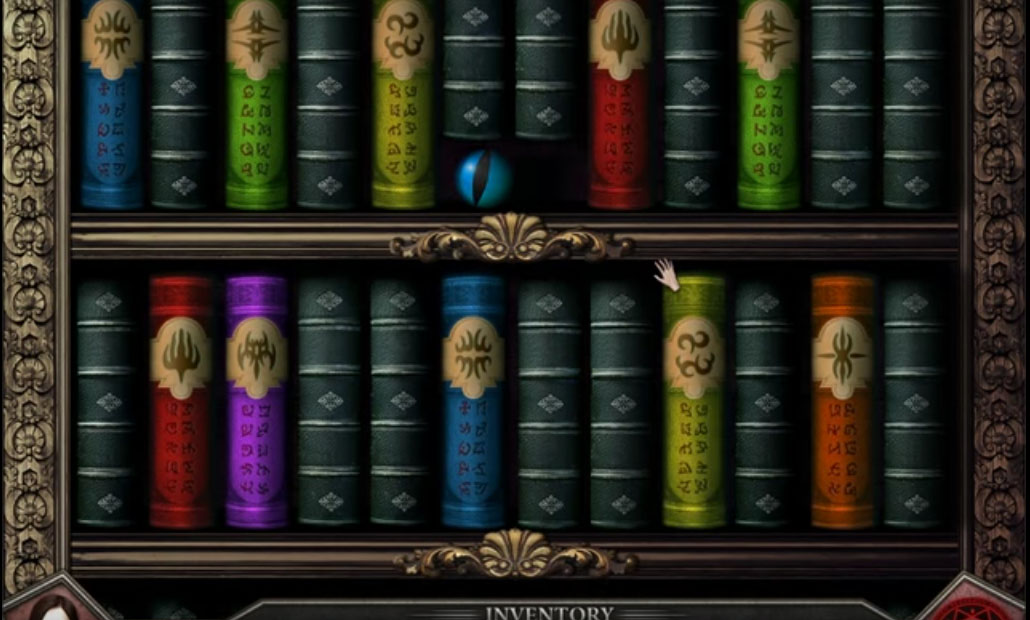
You can now collect a blue book. Go to the bookcase on the right for another puzzle. You need to use a red book, an orange book, a purple book, and a blue book in the shelf. Place them in the following locations:
![nightmare adventures - the turning thorn -puzzle 07]()
nightmare adventures – the turning thorn -puzzle 07
Collect a blue glass eye before going back the the room with the three statues. This is the last puzzle of this chapter. Examine them closer and start to fix them up as follows:
Give the Left Statue a very heavy axe, an urn, perhaps, and 3 blue glass eyes.
Give the Center Statue an old sword, an old skull, and 3 red glass eyes.
Give the Right Statue a very sharp arrow, an hourglass, and 3 green glass eyes.
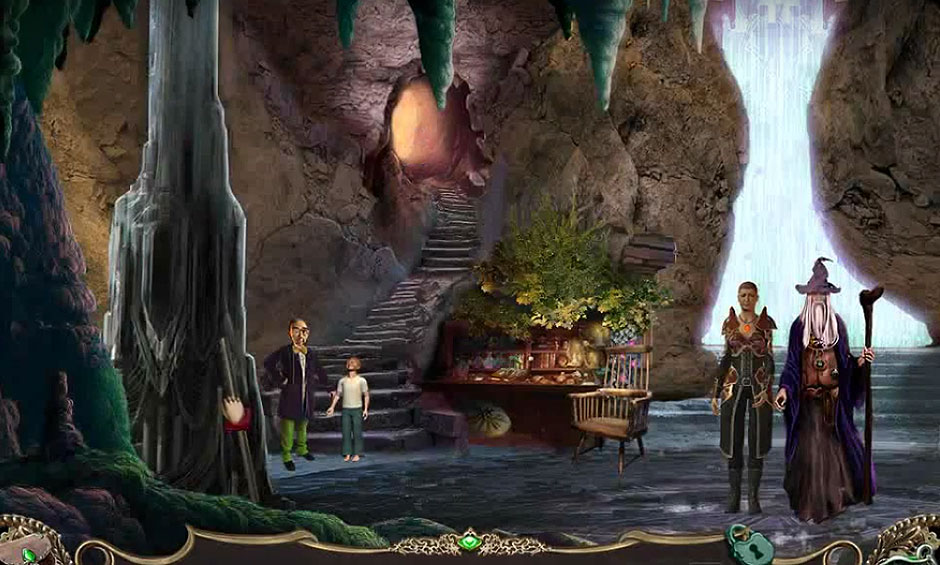
Chapter Four: Level Three
Start by talking to Jillian. Now examine the clipboard and collect a fishing hook. Examine the tray to collect a sharp chisel. Examine the body bag, open it via the zipper, and take a small hammer. Use a sharp chisel on the vent, using a small hammer to pry off the cover. Go forward through here.
AHHH! It’s a witch! Talk to her! Then read the memos on the wall before going left and up the stairs, then to the left and into an armory. Examine the counter and collect a shoelace before zooming in on the clue. Combine a fishing hook with a shoelace to create my homebrew fishing assembly. You’re done here now, so down twice. There is a grate on the floor. Use my homebrew fishing assembly there to get a small key. Examine the panel on the door to start a puzzle.
Press the buttons in this order: B, D, C, A, A, B, C, D
![nightmare adventures - the turning thorn -puzzle 08]()
nightmare adventures – the turning thorn -puzzle 08
Now you can go inside. Examine the coffee cup in the dead man’s hand before going back upstairs to the armory. Examine the locker keypad that belongs to “Lewis, Ryan”. Type in “RAVENS” to open it. Collect a computer game disk from inside and then unlock the padlock using a small key. Collect a few 9mm bullets then backtrack four screens to where you started. Use a computer game disk on the computer on the desk and press the “okay” button”
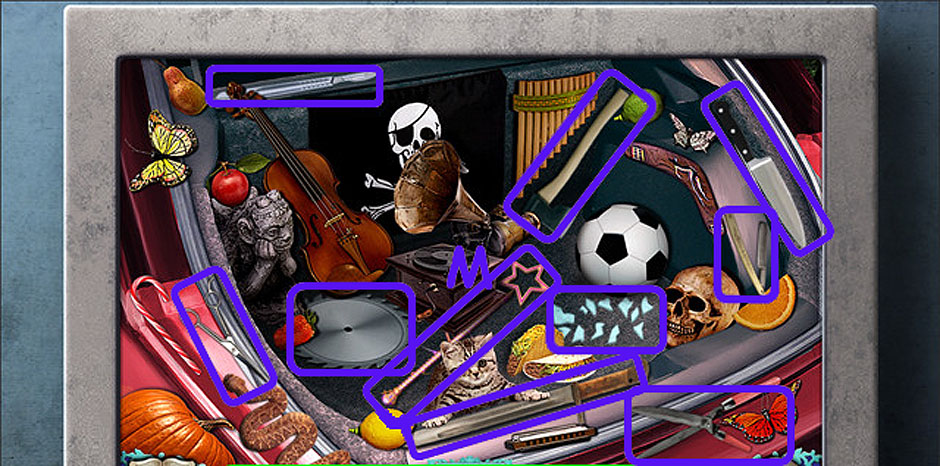
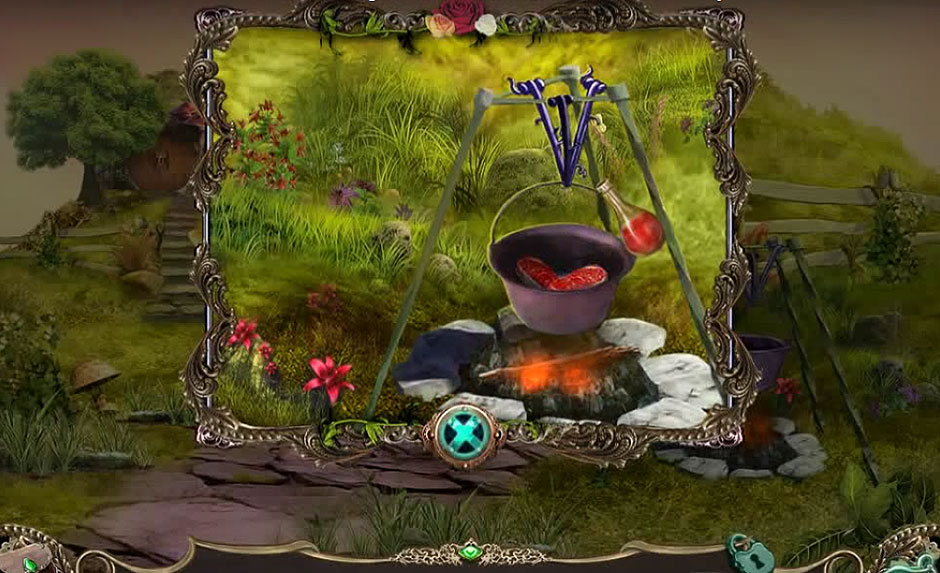
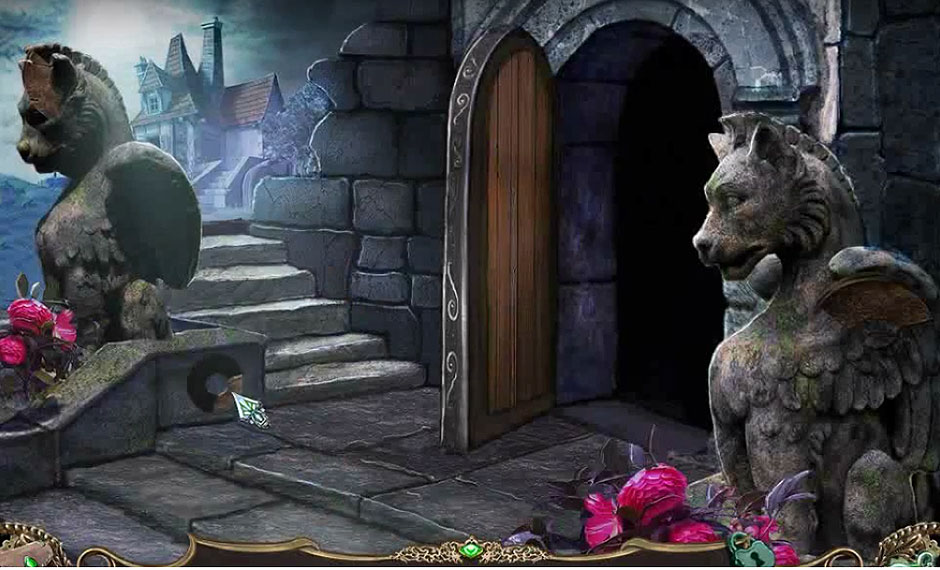
Now you’re playing “Return to Unicorn Wedding Mysteries”! Go ahead and examine the fountain to find car keys. You can use these car keys to open the trunk of the car on the left. There is a hidden object screen here. Collect the following objects:
![nightmare adventures - the turning thorn -puzzle 09]()
nightmare adventures – the turning thorn -puzzle 09
You will collect a magic wand. You can use this magic wand on the mouse sitting on the box by the gate. Collect the weed killer and add it to the water before turning the red valve. Now go ahead and press the intercom button.
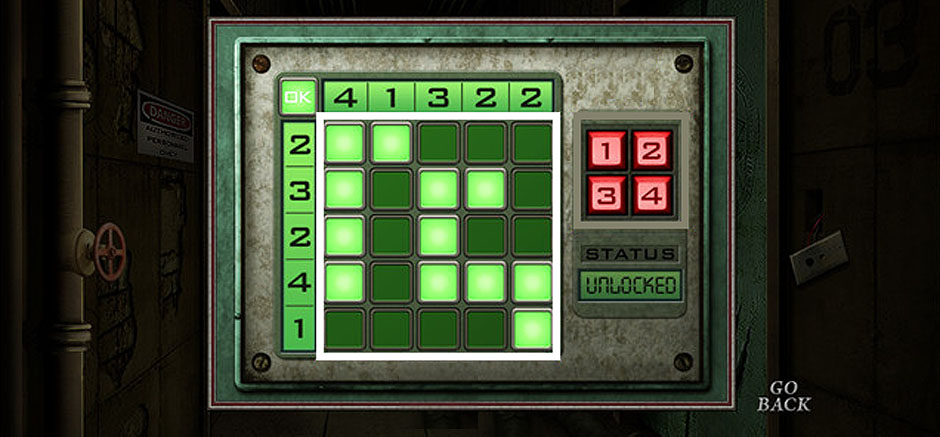
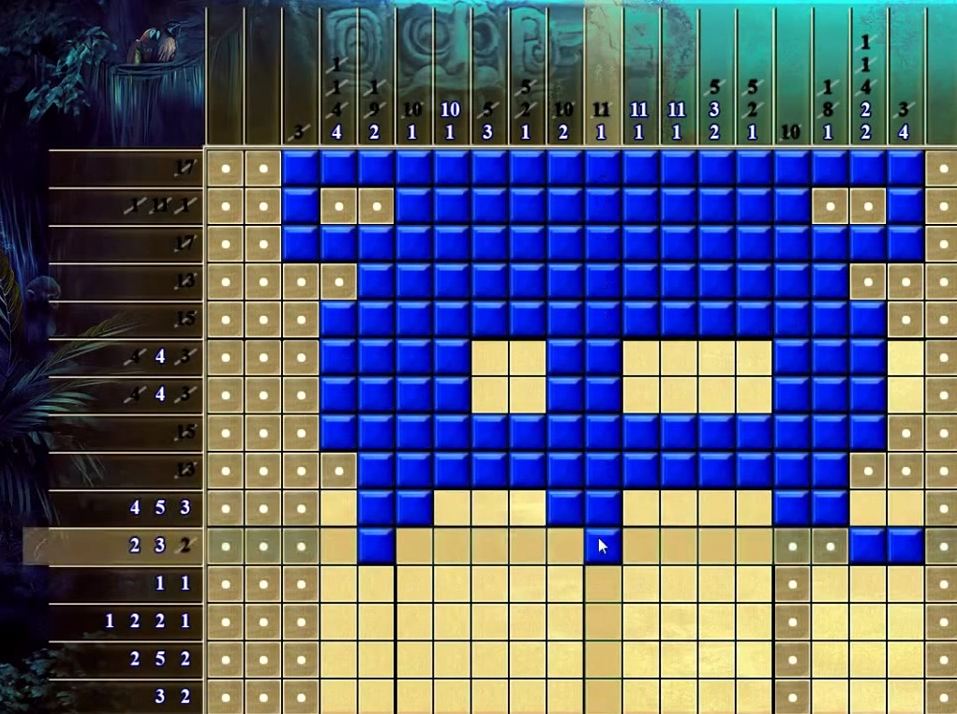
All too soon you hidden object game fun is over because an important e-mail has come in. Click the “OK” button and select the “Email” button. Read both e-mails before crawling back out the vent. Examine the lab door to trigger a puzzle. Type in the solution as follows: 4, 1, 3, 2, 2, 2, 3, 2, 4, 1. Then light the keys as shown below:
![nightmare adventures - the turning thorn -puzzle 10]()
nightmare adventures – the turning thorn -puzzle 10
Go inside the lab. Here you can examine the phone and listen to the voice mail. Collect an empty syringe. Open the cover of the answering machine and collect the tape with Thorn’s voice on it. Examine the cabinet and then leave the lab and go back to the armory. Examine the keypad on the door and enter the code: 8232. Now peek inside the bathroom and collect a heavy wrench. Go back out to the hallway where you saw the witch.
Take a sample of Gomez’s blood by using an empty syringe on her hand. Now use a heavy wrench on the valve so you can collect a valve handle. Go forward and back into the lab. Examine the ventilation controls and use a valve handle on the peg and turn it. Now go back down, left and up the stairs. Collect an unloaded 9mm pistol from the body and use a few 9mm bullets on it. This will give you a loaded pistol. Walk back down ad go left into the control room. Look at the lock down override panel and use a loaded pistol on the glass to break it. Flip the top right switch before walking back down and going up the stairs. You can go into the Psy-Link door. Jillian! Take a look at her and collect an empty tape recorder from her hand. Use the tape with Thorn’s voice on it with an empty tape recorder. It will create a recorder with Thorn’s voice on it. Now go back to the lab.
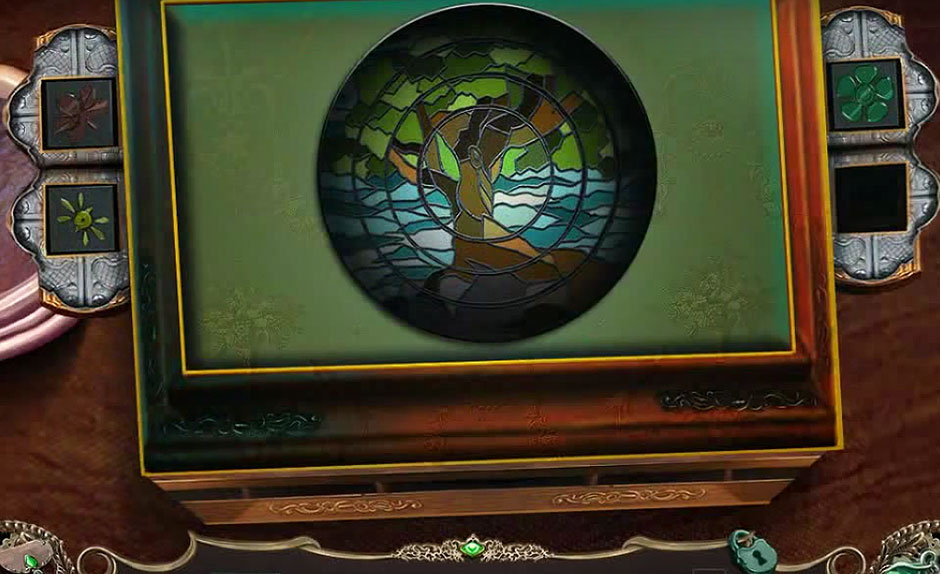
Examine the case. Use a recorder with Thorn’s voice on it to start the puzzle. The solution is as follows: M, A, N, F, S, Outer Ring Button three times, O, Outer Ring Button, S, Outer Ring Button two times, D, Outer Ring Button, F, Outer Ring Button, A, Outer Ring Button, A, Outer Ring Button, N, Outer Ring Button, L, Outer Ring Button, A, Outer Ring Button, I, M.
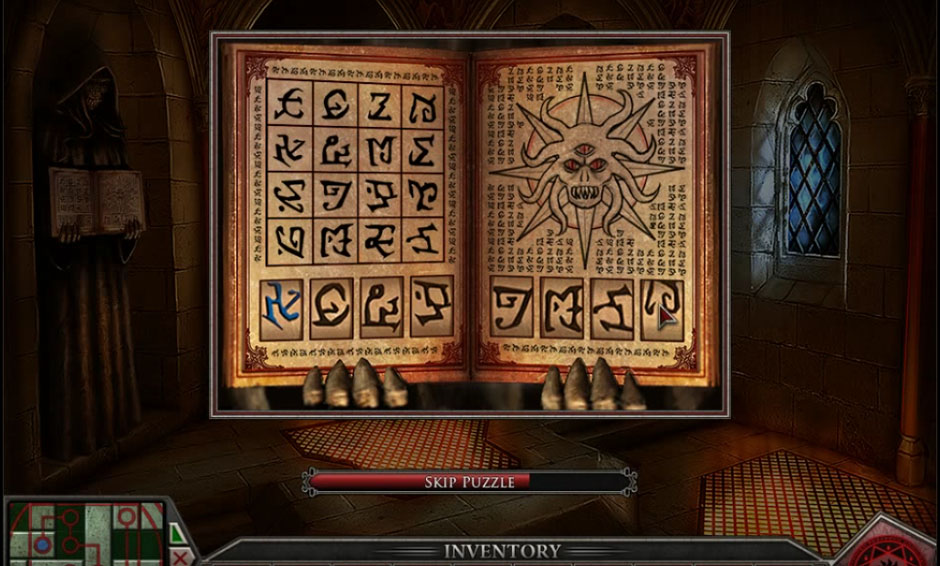
Collect a blank slide and then combine it with a sample of Gomez’s blood to create a prepared slide of Gomez’s blood. Go back to the Psy-Link room and place a prepared slide of Gomez’s blood into the port. This triggers a puzzle. Match the symbol lines on the right with the symbol grid, just like a crossword puzzle to finish the chapter.
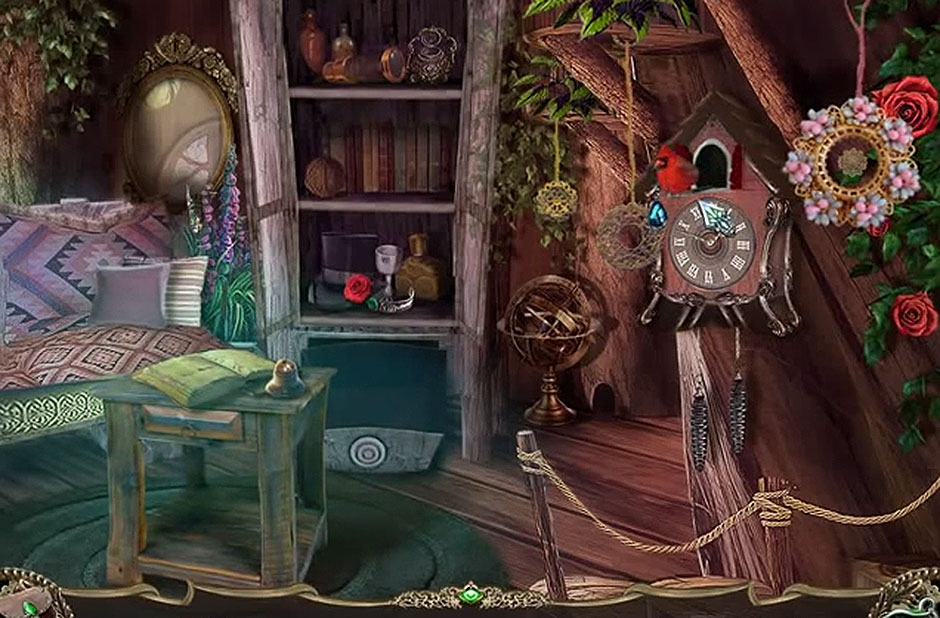
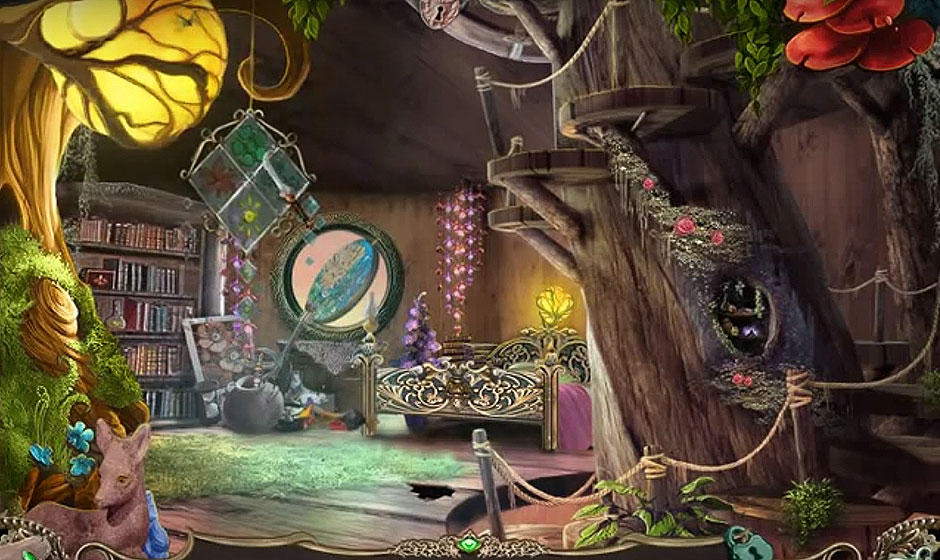
Chapter Five: Gomez’ Mind
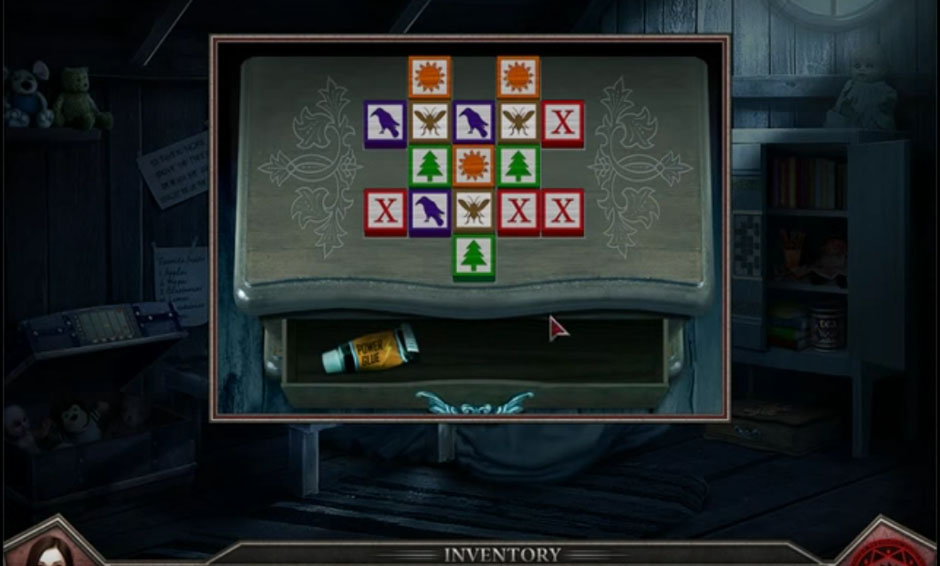
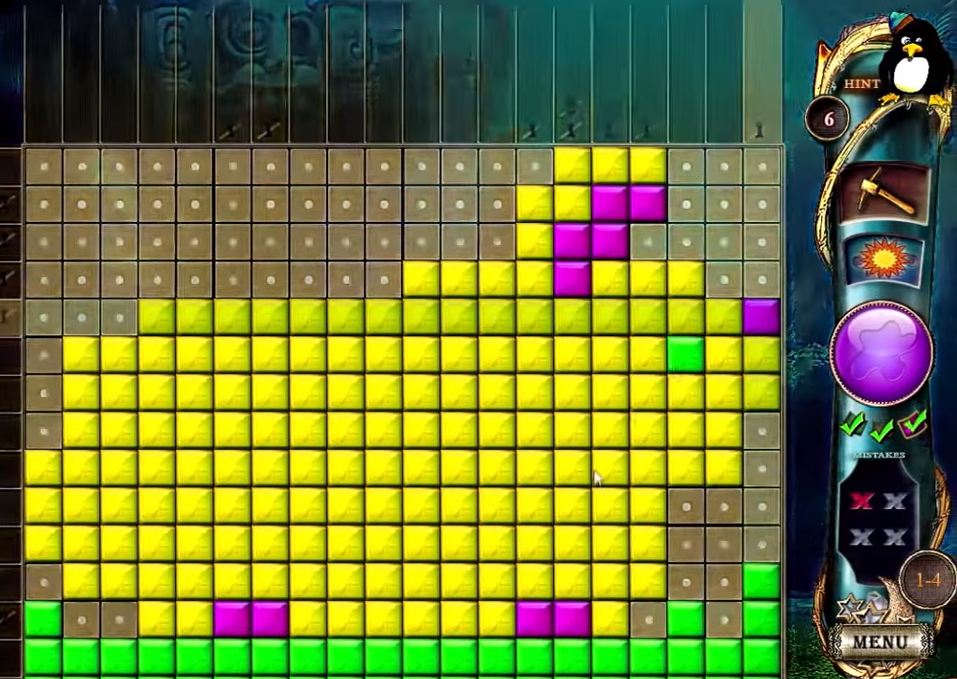
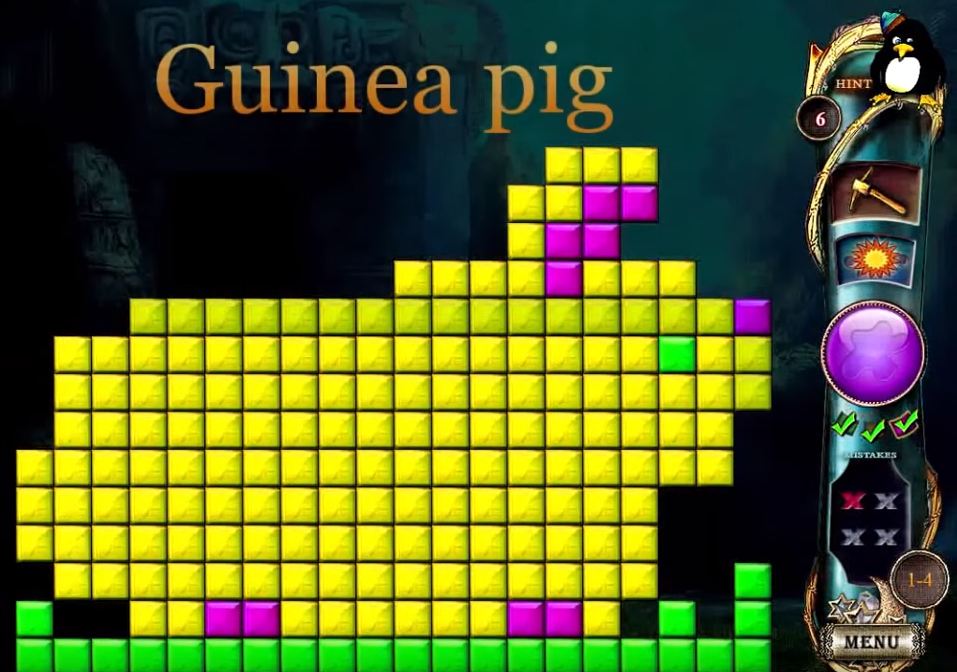
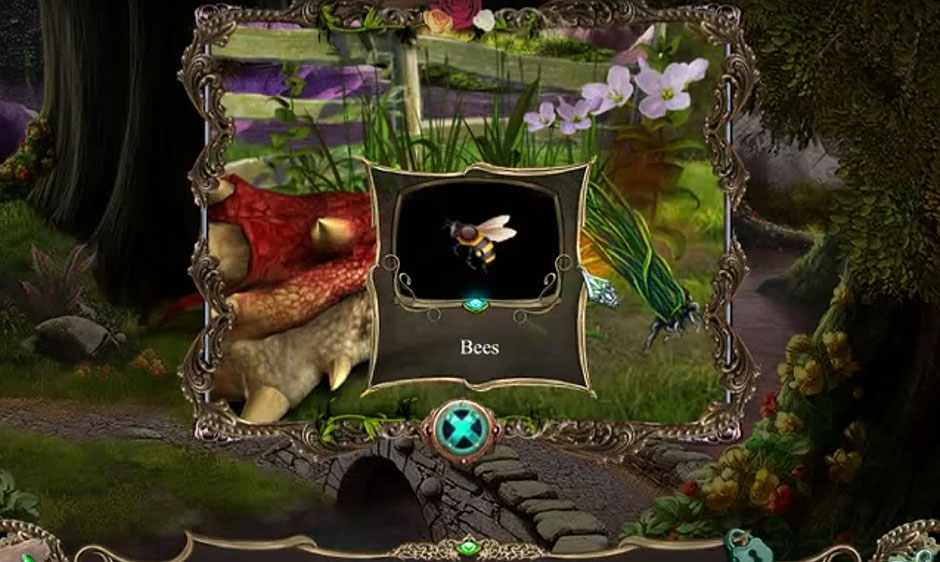
Examine the tire swing and collect a broken tea cup. Examine the sand box and collect a coin with a rabbit on it. Now climb into the tree house. Gomez is here. Collect a coin with a pig on it from the shelf and take a look at the list on the wall before you talk to her. Now collect a piece from a small cup and find a block with a bee on the table. Examine the chest on the left to start a puzzle. Each row needs one color heart on it. From top to bottom the colors are: Red, Purple, Blue, Yellow, Red, Orange. Collect a coin with a monkey on it. Now examine the monkey in the box to collect a screwdriver. Examine the cabinet for another puzzle.
You need to place the coins as follows: Monkey in the lower left. Pig in the upper right. Rabbit in the lower right. Now press the letters to spell out each of their names. They are: Ralph, Circe, Balin, and Lapin. Now that the cabinet is open, collect a tea bag, jasmine it seems. Read the paper on the wall and collect a block with a tree on it. Exit the tree house and read the plaque on the trunk before using a screwdriver to remove the screws. Collect a gardening spade from the hole in the trunk. Examine the sand box. You want to use a gardening spade on the X there to collect a block with a raven on it. Go back inside of the tree house.
Examine the box under the cabinet and use all the blocks you’ve collected with it. This triggers a puzzle. Lay out the blocks as follows:
![nightmare adventures - the turning thorn -puzzle 11]()
nightmare adventures – the turning thorn -puzzle 11
Collect some all purpose glue. Leave the treehouse again. Use some all purpose glue and a piece from a small cup before using a piece from a small cup on a broken teacup to create a completed teacup. There is a faucet on the right side of the screen. Examine it and use a completed teacup here to collect a cup of water. Go back up into the tree house.
Make some tea by combining a tea bag – jasmine, it seems with a cup of water. This will give you a cold but functional cup of tea that you can give to Gomez. Talk with her.
You’ll be pulled back to reality. Go back down to the hallway when Gomez’s body was. Examine her, now just a skeleton, and open her locket. Collect a button with an ‘R’ on it. Go back to the armory. Here, examine the keypad on the far right. Use a button with an ‘R’ on it then put the code in: JAVIER. Collect a blue level access card then go to the lab once more. You can use a blue level access card on the door here and go up the stairs to finish the chapter.
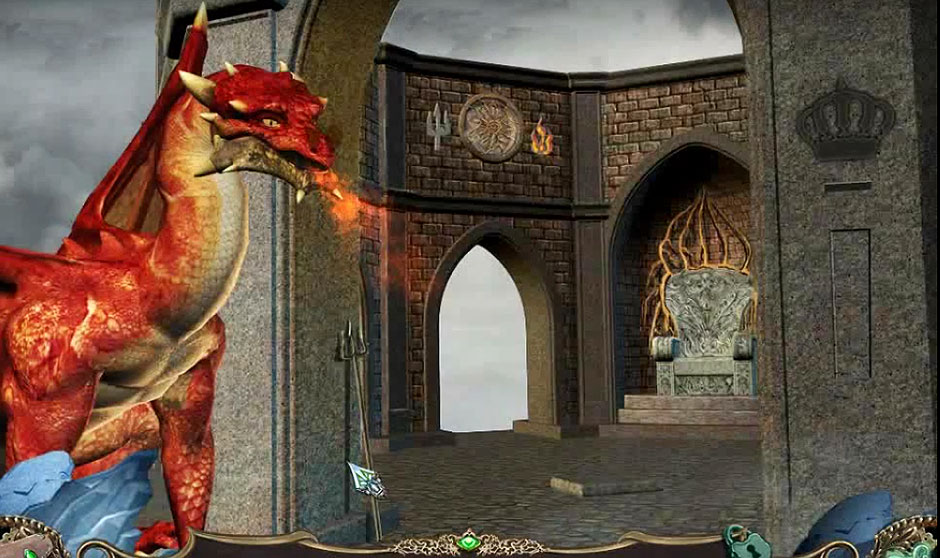
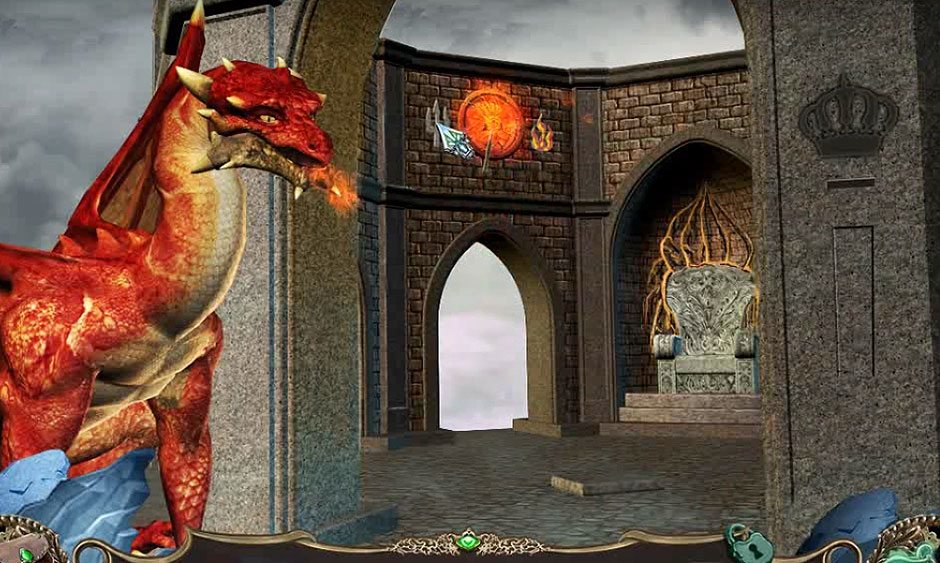
Chapter Six: Containment
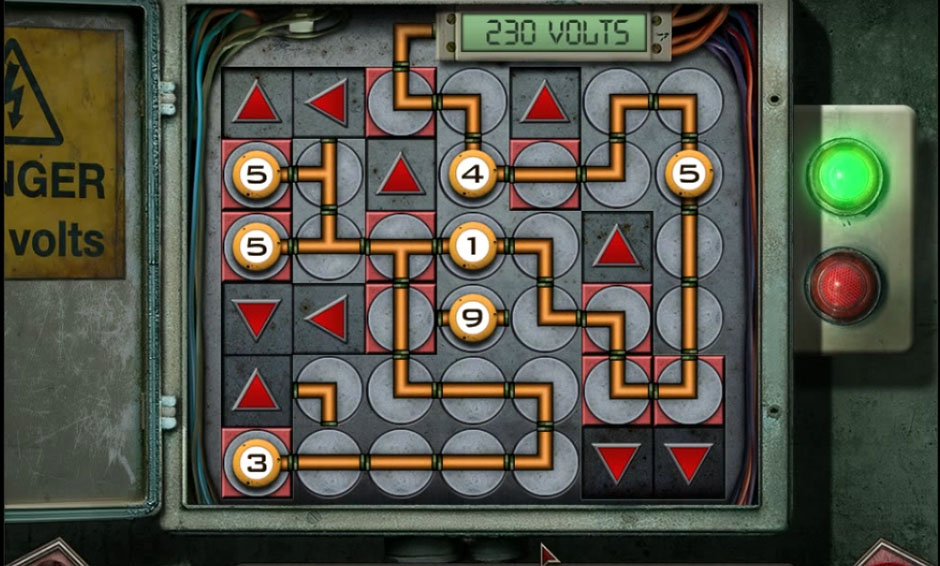
Go through the open door and into the interrogation room. Examine the coffee cup and collect a small plastic butterfly. Then examine the folder and collect a spinner for a board game. On the bulletin board, collect a claw from one of the creatures. Also collect a folding chair. Go back out into the hall. Use a folding chair under the control box. Examine the control panel to start a puzzle. Connect them as follows to reach 230 volts:
![nightmare adventures - the turning thorn -puzzle 12]()
nightmare adventures – the turning thorn -puzzle 12
You can now go through the door and into the magic lab on the right. Examine the machine and collect a green plastic pig. There is a book on the bookshelf to read. Examine the left door… It’s the witch! Walk down, go up the ladder, and go left into the security office. Here you can collect a vial of substance A7083. Now look at Abby’s drawing on the wall. On the computer, check the emails and read the one with the subject “Abby”. Selecting the ABBY icon will start another puzzle. To complete it, press the following buttons: Click the second button from the bottom on the right five times. Click the top button on the right two times. Click the second to the top button on the left once. Click the top left button four times. You can leave the computer now. There is another puzzle on the containment door. Match the symbols to the one in your notes.
Abby is here. Talk to her. The examine her calendar and dresser, where you can collect some eye makeup. The box here starts another puzzle. Place a small plastic butterfly on the empty spot. Clicking the butterflies changes their color. Change them to match the drawing (going counter-clockwise) Green, Yellow, Red, Blue, Red, Purple. Collect a pink plastic pig. On the right, the guard against the wall has a ring full of keys for you to collect. Look at the chest for another puzzle. Press the keys in this order:
![nightmare adventures - the turning thorn -puzzle 13]()
nightmare adventures – the turning thorn -puzzle 13
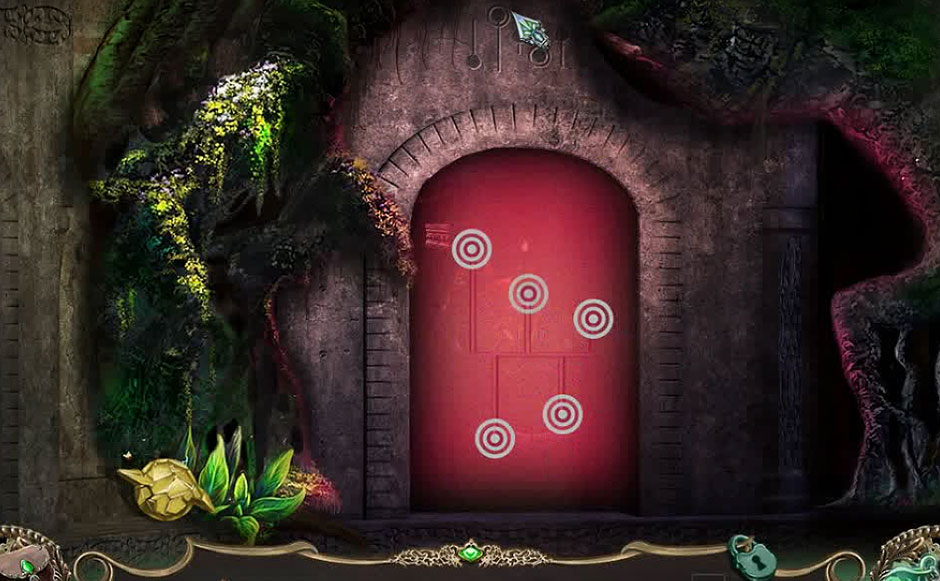
Collect a dry paintbrush from the chest. Read the notebook before leaving the room. Use a ring full of keys on the lock under the case with the sword. Use your photo clue to move the stars on the keypad so they match. Press the button on the top of the case so you can collect the Sage’s Blade. Go back into the security office. Use a ring full of keys on the locked drawer under the computer and collect a bar of chocolate from inside. There is also a letter to read with a drawing to look at. On the floor, use the Sage’s Blade to chop off a piece of meteorite. Look at the panel on the wall for the next puzzle. The solution is to press the buttons in the following order: Red circle, black X, black triangle, and red square.
Inside the vault, collect a board game: ‘Piggy Princess’. Go back to Abby’s room. Examine Abby and give her both a bar of chocolate and a board game: ‘Piggy Princess’. Examine the board game and add a green plastic pig, a pink plastic pig, and a spinner for a board game to start the game with Abby. Abby will go first. Once her turn is done, spin the spinner, choose a card and give any answer, the spin again. Abby will take a turn and win the game. Speak with her again and she will give you some kind of microchip. Leave the room and go to the right. Place some kind of microchip into the black and yellow slot that reads EMERGENCY ACCESS ONLY. Press the open button and collect a bottle of ‘Sage Blood’. Go left, go down the ladder and go right into the Magick lab again.
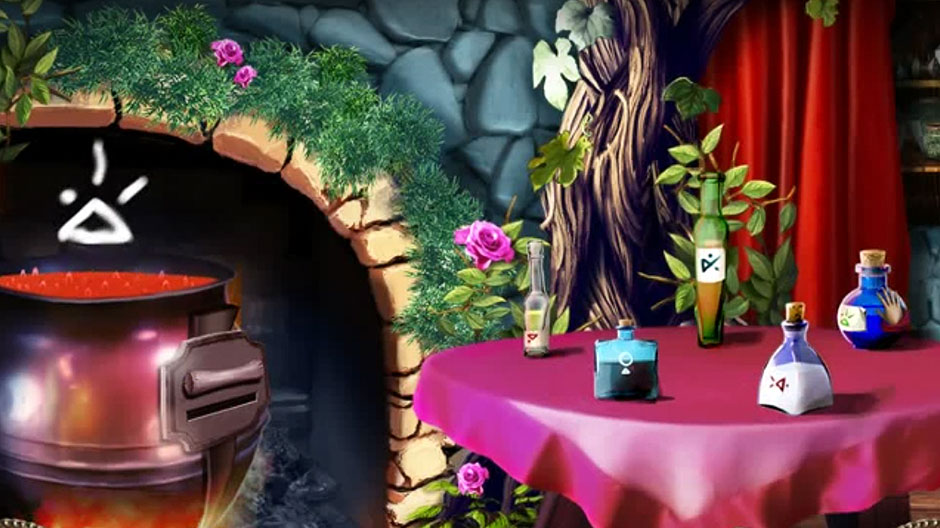
Use a dry paintbrush with a bottle of ‘Sage Blood’ to create a paintbrush dipped in sage blood. Use this on the window of the office door four times. Now, if you dare, go inside the office! You can talk to Griselda, then use a vial of substance A7083 on her. Read the letter on the computer before collecting a roll of clear tape and Dr. Phillip’s Saliva-Covered Donut. Examine the safe to start another puzzle. Press the center, left and right buttons to unlock the safe: Left once, Center twelve times, Right once, Center four times, Right once, Center four times, Right once, Center three times, Right one, Left once, Center twelve times, Right once, Center nine times, Left once.
After you read the book, collect the disk from Dr. Phillip’s safe. Walk back to the interrogation room. Use some eye makeup on the sida e of the mug, then use a roll of clear tape to collect the fingerprint I lifted off the mug. Use this one the yellow square in the control panel and go into containment room one. Examine Dr. Phillips, then at the control panel. Collect a gemstone of some kind. Walk down once and look at the computer. Use a gemstone of some kind in the center to start another puzzle. Press the following symbols in an unbroken chain:
Now use Dr. Phillip’s Saliva-Covered Donut on the left, a piece of Meteorite at the top, and a claw from one of the creatures on the right. In the end you’ll collect a gemstone infused with a spell of transposition. Walk back to the containment area and look at the control panel to use that gemstone. Press the left button. Once Dr. Phillips is free, talk to him to get the code. Examine the creature, then the control, put in the code (5236) and press the red button. Talk again with Phillips and collect the pencil I borrowed from Dr. Phillips. Go back to his office.
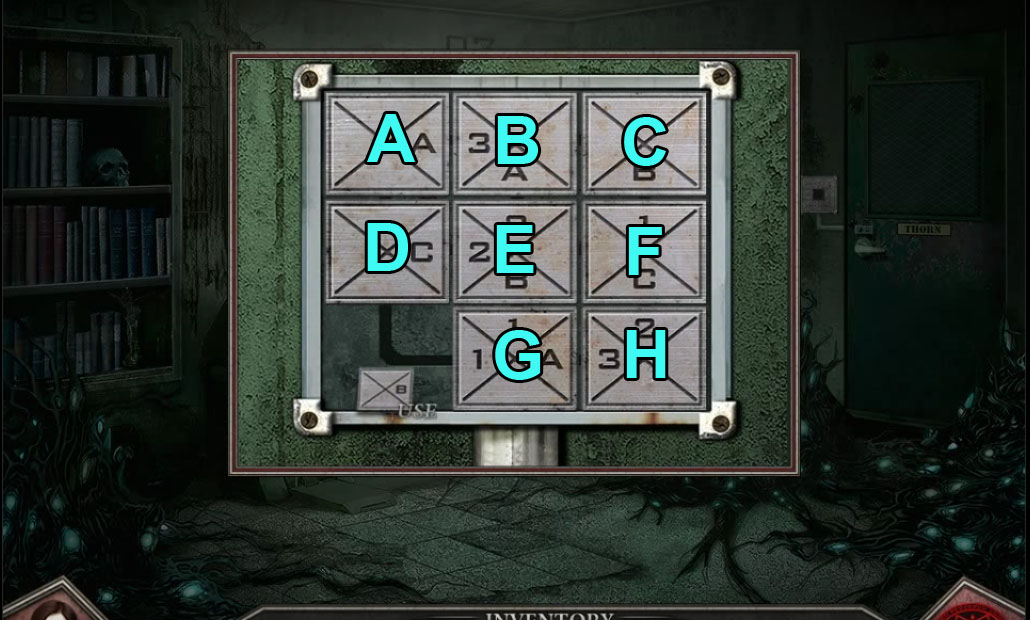
Use the pencil I borrowed for Dr. Phillips to make a rubbing of the code from the notepad. Under the paper you will find a tile with a ‘B’ on it. Go back one room and examine the keypad to Dr. Thorn’s office. This starts another puzzle where you have to slide the tiles.
![nightmare adventures - the turning thorn -puzzle 15]()
nightmare adventures – the turning thorn -puzzle 15
The solution is as follows: H, G, D, A, B, E, H, G, D, A, B, D, E, A, B, C, F, E, B, A, D, E, H, I, F, E, H, G. Then use a title with a ‘B’ on it into the lower left space. Go inside Dr. Thorn’s office.
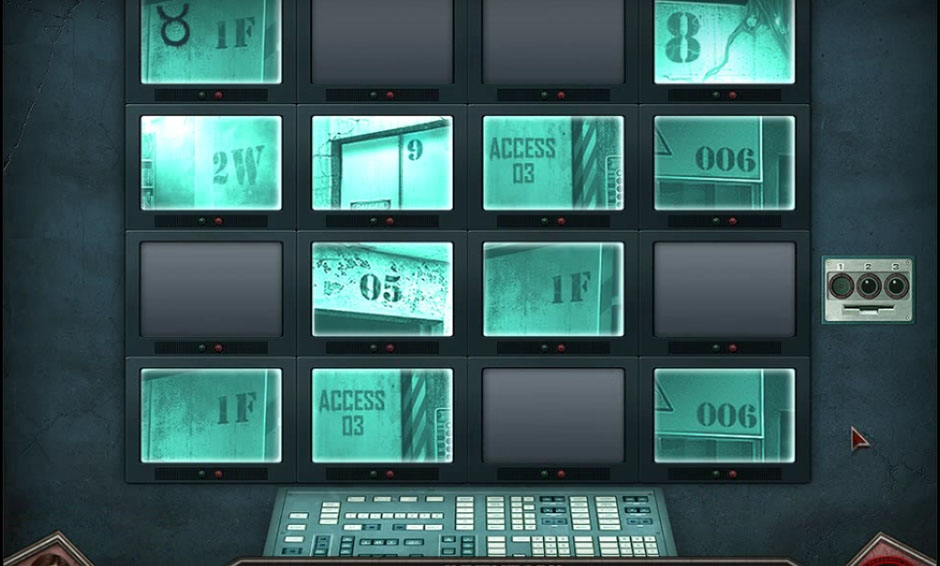
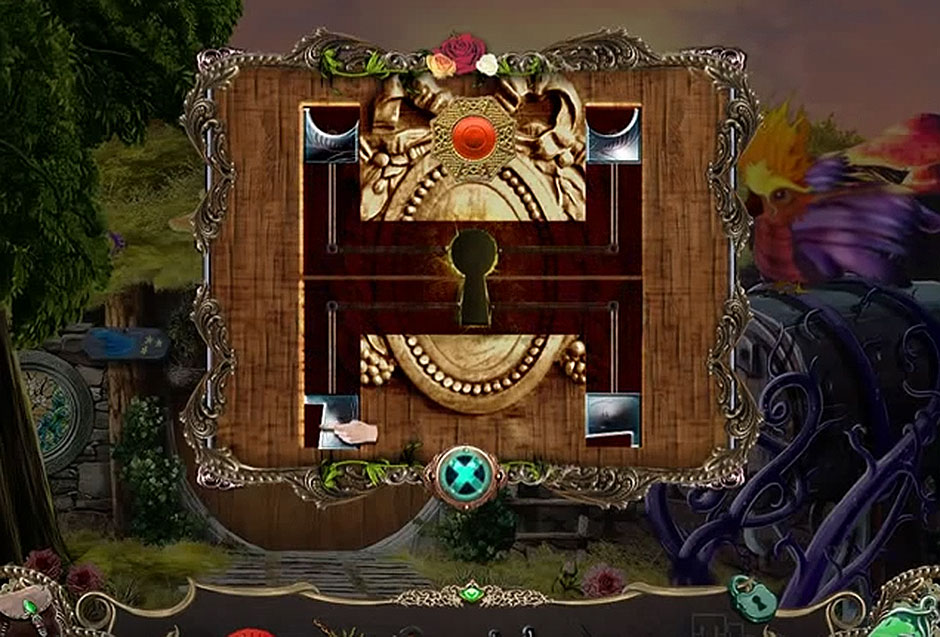
Examine the photo on the bookshelf and then read the letter on the desk. Examine the chessboard. Examine the seal on the wall and take some kind of knob or dial. There is another puzzle triggered when you look at the security screens. Use the disk from Dr. Phillp’s safe in the slot to the right. Use some kind of knob or dial in the 1 slot. Match the red marks with the photo clue. Then match up the screens as so:
![nightmare adventures - the turning thorn -puzzle 16]()
nightmare adventures – the turning thorn -puzzle 16
Go to the safe and collect Dr. Thorn’s Black Level Security Card. Now go down twice, up the ladder, and walk to the right. Use Dr. Thorn’s Black Level Security Card with the card slot and enter the elevator to finish Chapter 6.
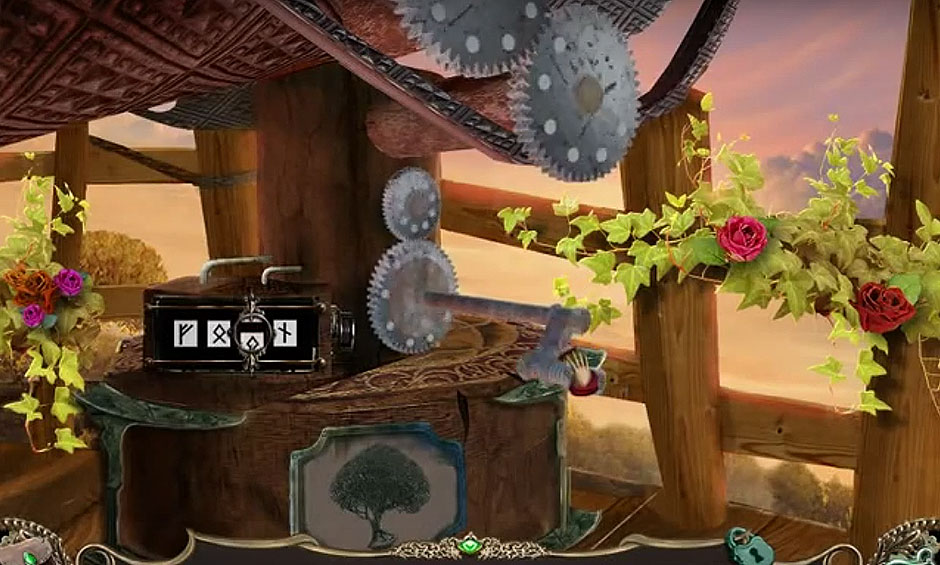
Chapter Seven: The Island
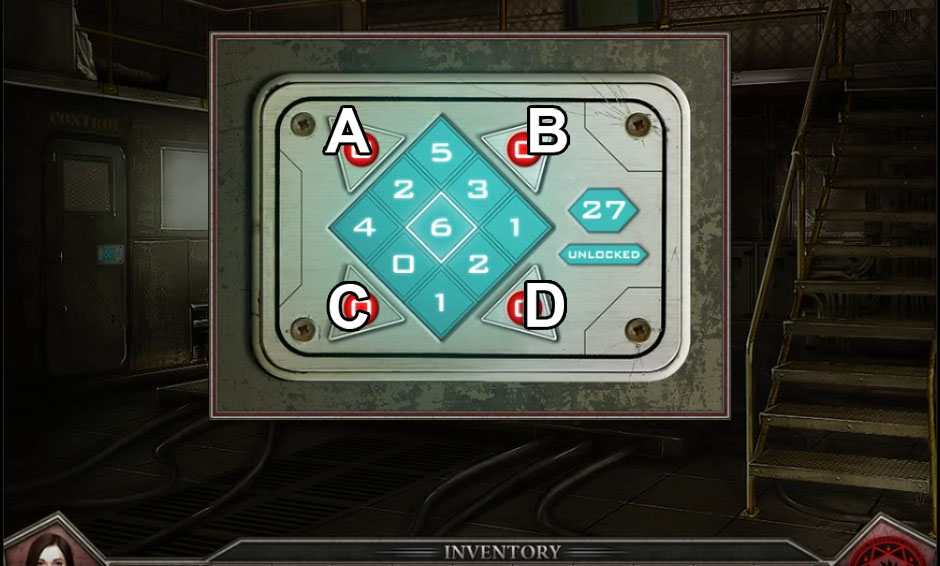
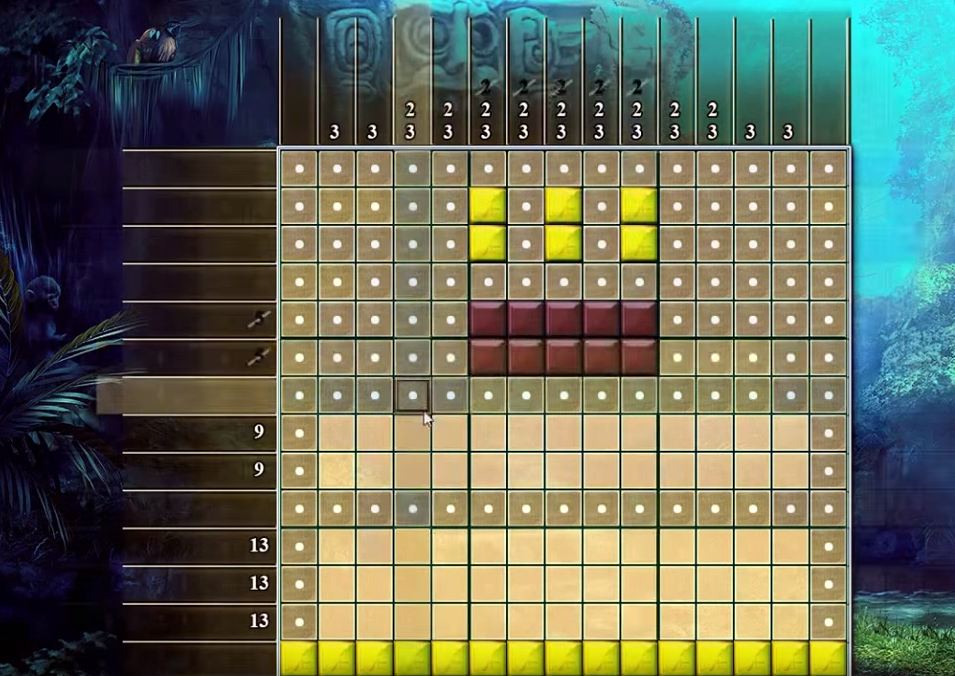
Examine the elevator control and press the red button. The witch will appear. Talk to her. Exit the elevator and walk forward again to go to the rear gate. Examine the control panel to start another puzzle. Cover up numbers so that the solution equals the numbers on the right for that row. This puzzle is randomized. Now use a ring of keys on the lock and go through the gate. There is a boat here. Climb inside and go across the lake. Inside of the boat, collect an emergency flare before going inside the house.
There is a box to the left. Collect a ball of grey yarn from inside. Read the book, and then examine the banister. Collect a scrap of cloth… from something that went upstairs. Then go into the living room. There is a message in a bottle on the mantle to read and an old piece of parchment in the fireplace to collect. In the basket, collect access card A and read the note. Go to the piano to start another puzzle. You’ll see the keys are marked with letters. Use these as a guide to play the phrase “LOST SOS XW” then collect an old compass. Walk back to the first room and examine the mirror. Use an old compass in the slot. Adjust the compasses so they point in this order: Up, Down, Left. Now you can go into the basement. Collect a sharp piece of broken glass from the stand and a screwdriver from the desk drawer.
Read over the papers and collect Access Card B. Use an old piece of parchment with the scrap on the bulletin board. Examine it, talk to the witch again, then walk down. It’s time to go up the stairs! On the table, collect some glue. Walk to the left and onto the porch. Examine the telescope and use a screwdriver on the screws and remove the cover. Collect a telescope lens. Then collect green spray paint leaning against the wall before looking in the window. Go back to the living room and examine the chair. Read the book sitting there before using a sharp piece of glass to cut and collect two red buttons. Go back to the backyard.
In the leaves there is a doll. Spray it with green spray paint then use some glue on her head. Add two red buttons, a ball of gray yarn and a scrap of cloth… from something the went upstairs to the doll. This creates my effigial poppet.… likeness of the witch. Talk to Abby and then go into the basement. Use the a telescope lens in the center of the stand. Examine the containment control and use both Access Card A and Access Card B in the slots. Touch the spell on the bulletin board. Talk to the witch and then examine the furnace. Put my effigial poppet…. likeness of the witch inside of it, crank the valve and use an emergency flare.
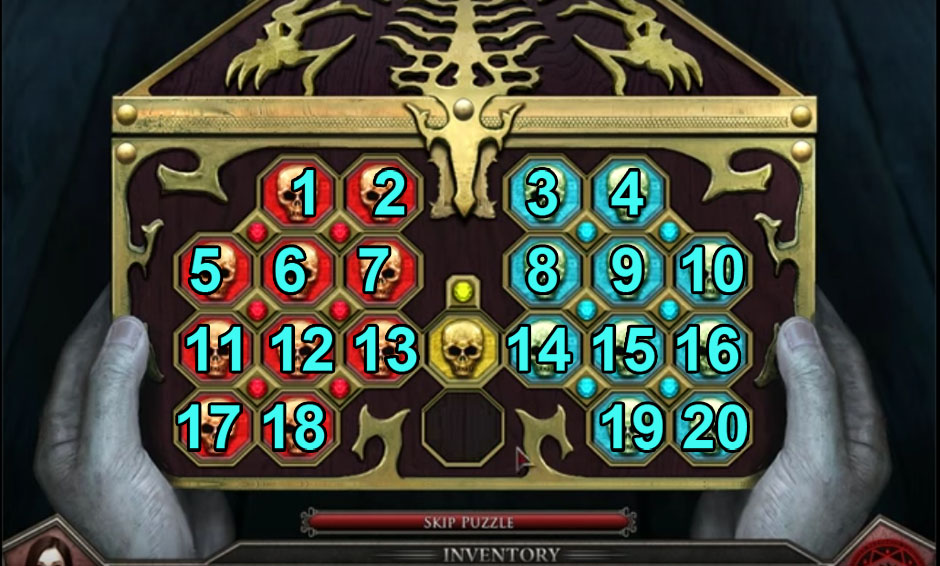
Go back up to the top floor and go forward into the room. Dr. Thorn is there. Talk to him and he will give you the last puzzle of the game in the form of a box. You need to move all the blue skulls to the right side and the reds to the left. Follow this solution:
19, 7, 15, 22, 9, 14, 2, 12, 20, 16, 3, 14, 2, 12, 20, 16, 3, 14, 19, 5, 13, 8, 17, 4, 15, 22, 9, 14, 6, 18, 13, 8, 17, 4, 15, 10, 3, 14, 6, 18, 13, 5, 2, 12, 20, 16, 3, 14, 21, 10, 3, 16, 20, 12, 2, 5, 19, 7, 15, 4, 17, 8, 13, 1, 11, 7, 15, 4, 17, 8, 13, 1, 11, 7, 15, 4, 17, 8, 13, 5, 2, 14, 19, 5, 2, 14, 19, 7, 15, 7, 11, 1, 13, 18, 6, 14, 19, 7, 11, 1, 13, 18, 6, 14, 19, 7, 15, 7, 11, 1, 13, 5, 2, 12, 20, 16, 3, 16, 20, 12, 2, 14, 19, 7, 11, 1, 13, 18, 6, 14, 19, 7, 15, 4, 17, 8, 13, 5, 19, 5, 2, 12, 20, 16, 3, 14, 21, 10, 3, 16, 20, 16, 3, 14, 9, 22, 15, 10, 3, 14, 21, 8, 17, 4, 15, 10, 3, 14, 21, 8, 17, 4, 15, 10, 3, 16, 20.
![nightmare adventures - the turning thorn -puzzle 17]()
nightmare adventures – the turning thorn -puzzle 17
Congratulations! You’ve beaten The Nightmare Adventures – The Turning Thorn!
For more great tips and tricks, visit our blog!
The Nightmare Adventures – The Turning Thorn Walkthrough is meant as a guide and does not contain cheats, hacks or serials.
The post Nightmare Adventures – The Turning Thorn Walkthrough appeared first on GameHouse.