Gardening gurus Mike and Jill have become renowned celebrities in the world of gardening. When they’re approached with the opportunity to star in their own reality TV show, they jump at the chance, but this worldwide adventure may not be the smooth-sailing they had hoped for! Our Gardens Inc. 4 – Blooming Stars walkthrough offers step-by-step strategies for each episode, as well as all treasure chest and mole locations.
Contents
General Tips & Tricks
Whether you’re playing Gardens Inc. 4 – Blooming Stars for the first time or simply need a refresher, this section will provide you with all the tips and tricks you need to affiliate yourself with the game.
Treasure Chests & Mole Locations
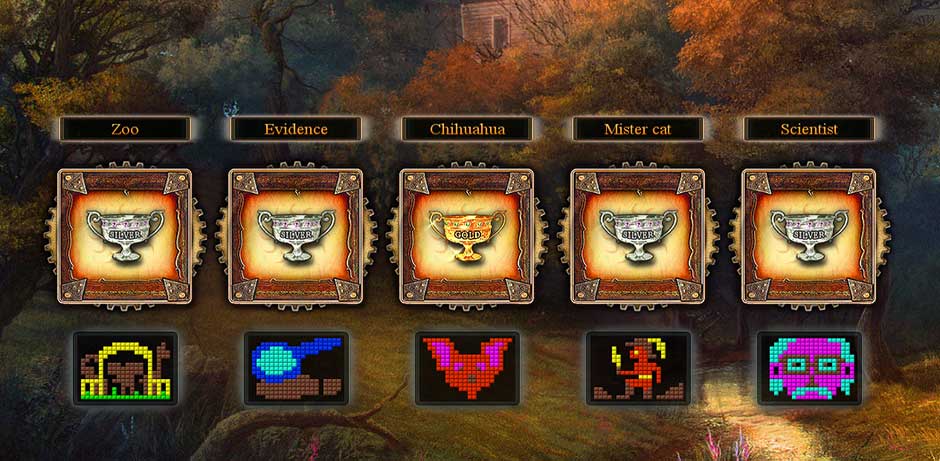
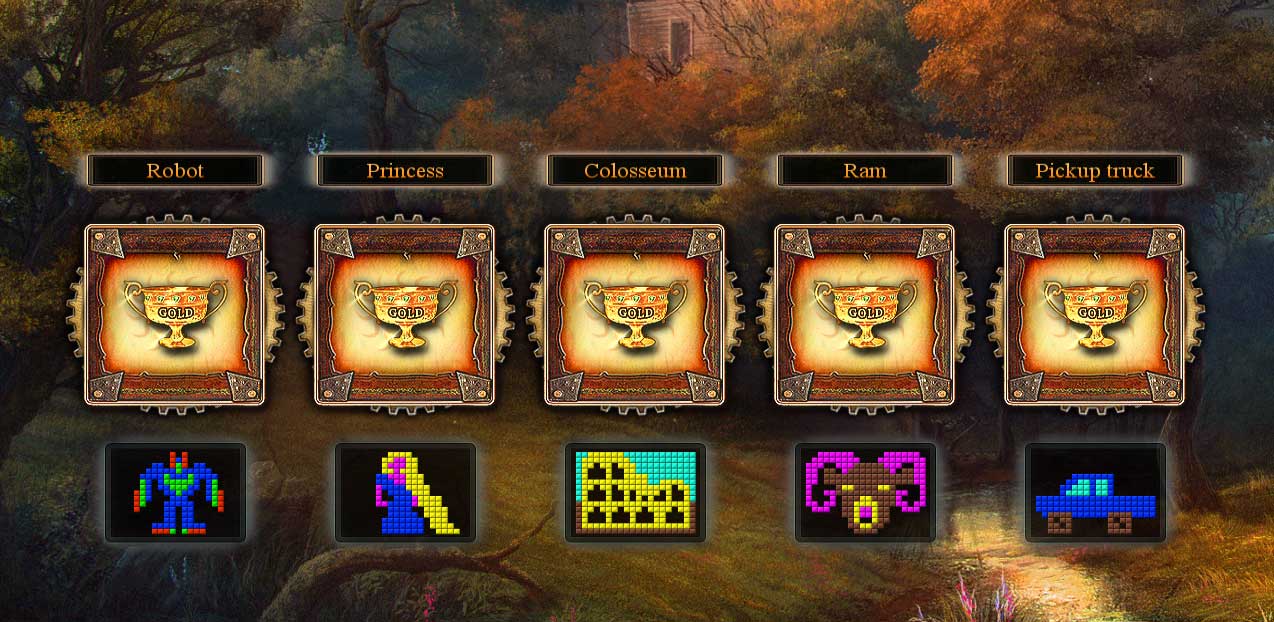
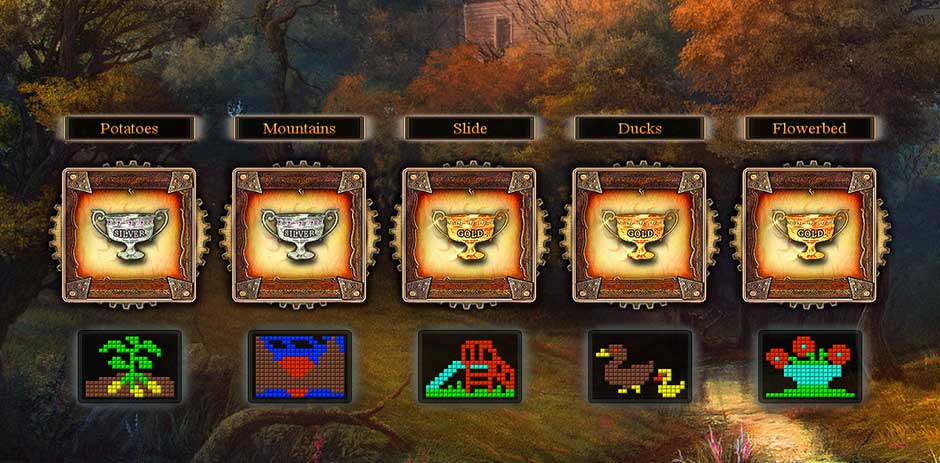
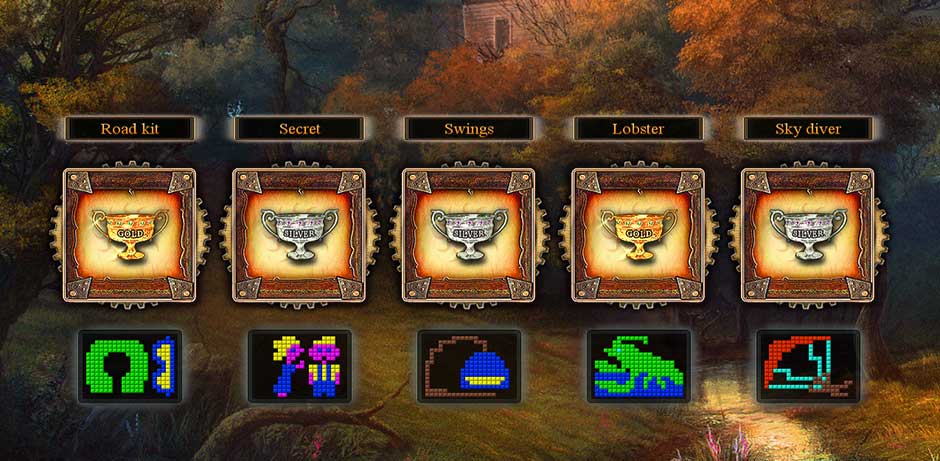
This walkthrough contains the locations of all treasure chests, as well as showing where moles will appear per episode, specials included! Refer to the screenshot under each episode for these locations. Treasure chests are circled in both silver and gold, depending on whether a gold or silver chest is in that level. Known mole locations are marked with a square. Keep in mind that moles appear at random. Listen for the squeak and keep a sharp eye out. Scan the locations outlined in our screenshots to find them easier. You only need to find 1 mole per level to unlock their trophy.
Getting Started – The Basics
- Three difficulty modes are available when starting the game. You can change difficulty at any time via the Main Menu.
- Relaxed – Play without a timer. Completing any level will automatically award you a gold-level completion.
- Timed – Play with a timer. Your reward rank is determined by your completion time. Even if time runs out, you can still complete an episode and progress forward.
- Expert – Play with a timer. Your reward rank is determined by your completion time. You will have less time to complete episodes, and running out of time will cause the episode to end.
- Click on an object to assign a task. Once a task has been assigned for a worker to do, a green check mark will appear over that object. The mark will disappear once the task has been completed.
- To undo a task, click on the check mark again to remove it.
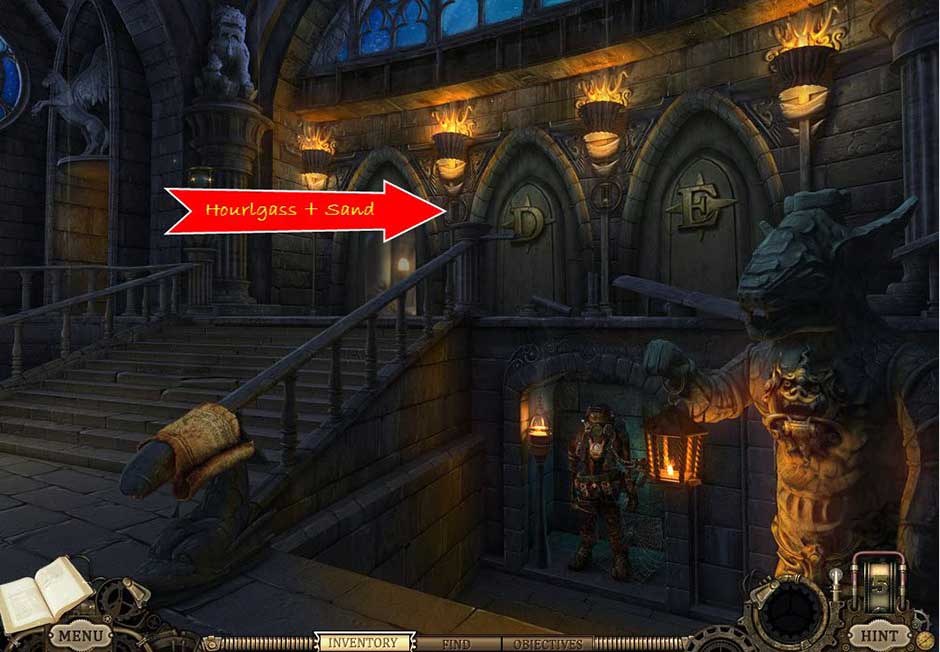
- Tasks can be stacked, but only if they are immediately accessible. For example, if there’s sand blocking the road that a worker can reach, you can click on it to stack the task and have them clear it away. If they worker can’t reach the sand yet, the task cannot yet be assigned. Stacked tasks will happen in the order you clicked them, but do not display numbers showing that order.
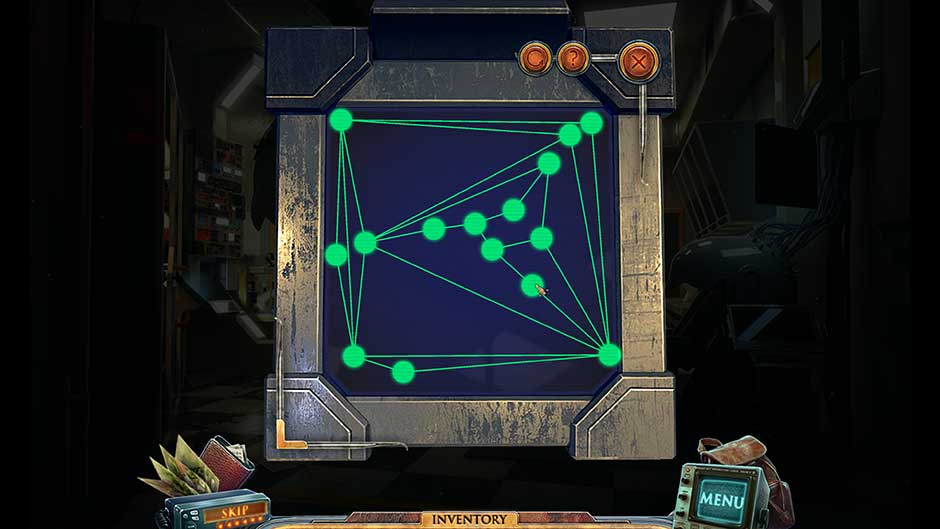
- If a worker’s path is blocked, a path will be shown from the worker’s location to the location you clicked, showing you what is clear and what is blocking your path from assigning a task.
![Gardens Inc 4 – Blooming Stars Path]()
Gardens Inc 4 – Blooming Stars Path
- When you’ve completed all the objectives in a level, a check mark will appear over the truck. Click on it to complete the level. The level will not be marked as finished until you click this!
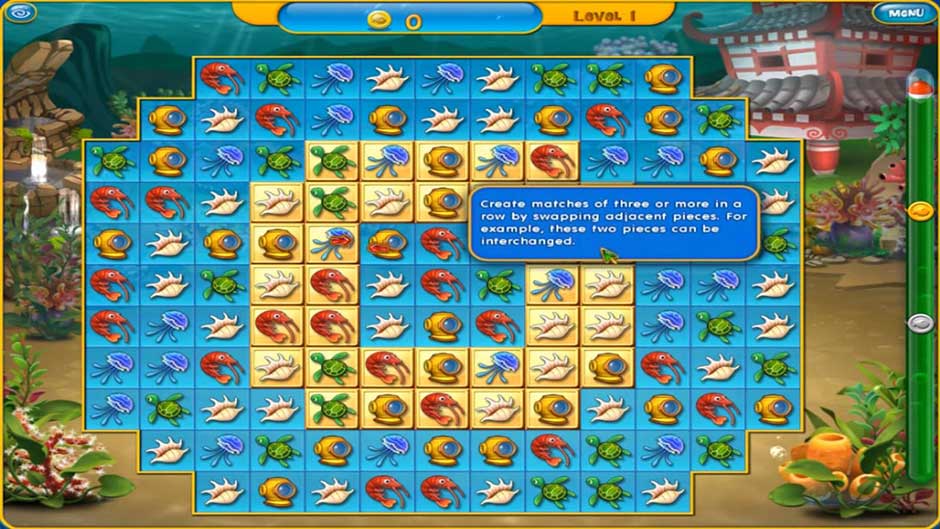
- Nearly every level has a bonus goal. These goals are explained per episode in the walkthrough below. A hint regarding this goal will be displayed in the bottom right corner of your screen. If done correctly, the box will turn green. If done incorrectly, it will turn red. Refer to the screenshots in the guide below to see solutions depicting the successful completion of each of these goals.
- Bonus Tip! – Each bonus goal has something to do with planting flowers. If you make a mistake, don’t worry! Once a flower has been planted, you can re-plant it and change the variety of flower by simply clicking on it. You do not have to restart the level or restart the planting process, even if the flower is a topiary!
- Special episodes will be unlocked per continent once you’ve completed all the numbered episodes there, so don’t forget to check back once you’ve completed everything!
Workers, Shacks, and other Buildings
- There are several types of workers you will encounter when playing the game. They are:
- [Default/Standard] Workers – Normal workers who wear red overalls, Jill and Mike included! Workers clear obstructions, build shacks, and plant seeds.
- Gardeners – Workers who specialize in watering flowers and repairing pumps.
- Animal Catchers – Able to remove wandering animals from the level.
- Security Workers – Able to remove wandering thieves from the level.
- Demolition Workers – Able to remove rubble which requires use of TNT. These are the only workers who can collect TNT.
- Divers – Able to remove water-based obstructions and plant water flowers. These are the only workers who can collect oxygen.
- There are numerous shacks, buildings, and other locations you will utilize throughout your journey. They are as follows:
- Truck – The default location for workers.
- Worker Shack – A secondary location for workers.
- Tool Shack – Produces tools.
- Wood Shack – Produces wood.
- Stone Shack – Produces stone.
- Seed Shack – Produces seed.
- Workbenches – Comes in tools, wood, stone, seed, and universal varieties.
- Switchable Shack – Allows you to alternate between resource types.
- Switchable Worker Shack – Allows you to alternate between worker types.
- Exchange Outpost – Allows you to trade one resource for another.
- Supplier Shack – Will provide you with shipments of resources. This shack requires a resource refill to function.
- Helicopter Pad – Will provide you with extra resources of your choice.
- Altar – Will recharge bonuses.
- Water Shack – Default location for gardeners and water source.
- Pump – An alternate water source that can be used by gardeners.
- Divers’ Shack – Default location for divers.
- Oxygen Shack – Produces oxygen which can be gathered by divers.
- Demolition Shack – Default location for demolition workers.
- TNT Pit – Produces TNT which can be gathered by demolition workers.
- Animal Catcher Shack – Default location of the animal catcher, who can remove wandering animals.
- Expert Animal Catcher Shack – A fixed location for an animal catcher who will remove incoming animals on their own. This shack requires resource refills to function.
- Security Shack – Default location of security workers, who can remove wandering thieves.
- Expert Security Shack – A fixed location for a security worker who will remove incoming thieves on their own. This shack requires resource refills to function.
- Boat Shack – Provides use of a boat to move from one location to another.
- Hang Glider Shack – Provides use of a hang glider to move from one location to another.
- Buildings displaying an arrow pointing up can be upgraded to produce more resources or workers.
- Default buildings (wood shack, tools shack, etc) will only provide one resource at a time. That resource must be collected before more will be produced.
- Some locations will need to be rebuilt before they can be used.
Resources and Bonuses
- There are several types of resources available in Gardens Inc. 4. Their types are as follows:
- Tools – Used as “energy” for workers to complete tasks.
- Seed – Necessary component for planting flowers.
- Wood – Material used to build buildings, roads, and bridges.
- Stone – Material used to build buildings, roads, and bridges.
- Coins – While they won’t be displayed at the top of your screen, coins can be gathered to increase your spending money in the Nursery, and can often be found in levels.
- Additionally, there are a few other resources which can only be gathered by specialized workers. These resources are not displayed at the top of your screen. Instead, a number over the applicable shack will show how many you have. You cannot exceed 5 of these resources at any given time. They are:
- Oxygen – Used by the diver. Necessary for removing buoys, oil spills, and planting water flowers.
- TNT – Use by the demolition worker. Necessary for removing rubble.
- Some levels also feature a watch which can be picked up. The watch will grant you extra time when collected.
- Numerous bonuses can be used throughout each level:
- Fast Work – All workers work twice as fast. This bonus also extends to workbenches and helicopters.
- Fast Run – All workers run twice as fast.
- Fast Shack – All shacks produce resources twice as fast. This bonus extends to the supplier, too, but does not include workbenches.
- +1 Resource – An extra resource is generated for every one you gather.
- +1 Worker – Gain an extra [default/standard] worker for 30 seconds.
- Half Price – All tasks and work cost half their normal price.
- Time Halt – Pauses the game timer for 15 seconds.
- Bonuses are pre-determined per episode.
- Bonuses can be recharged using the altar.
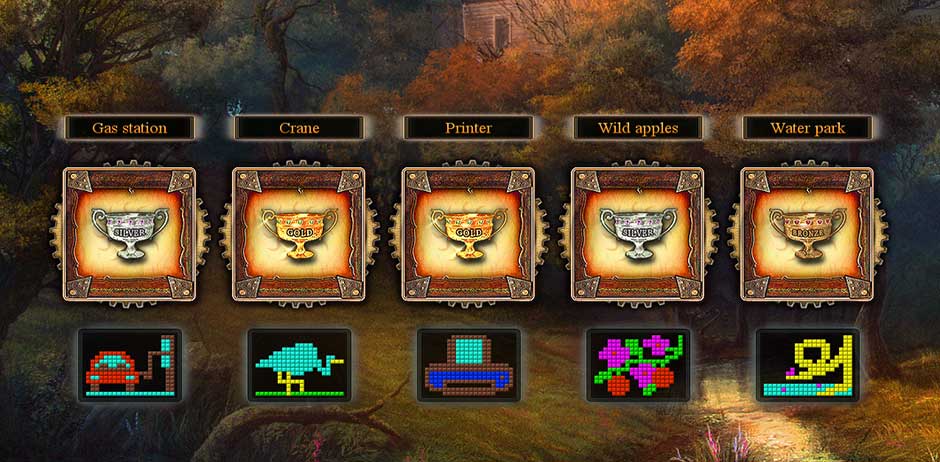
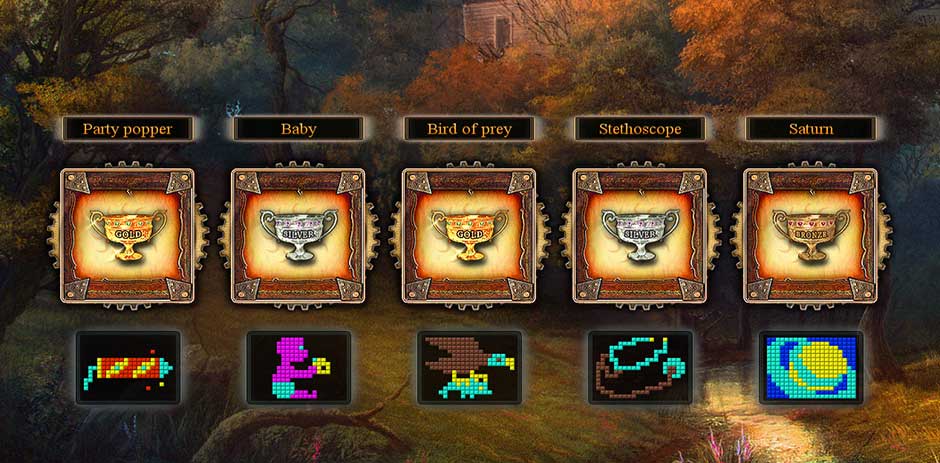
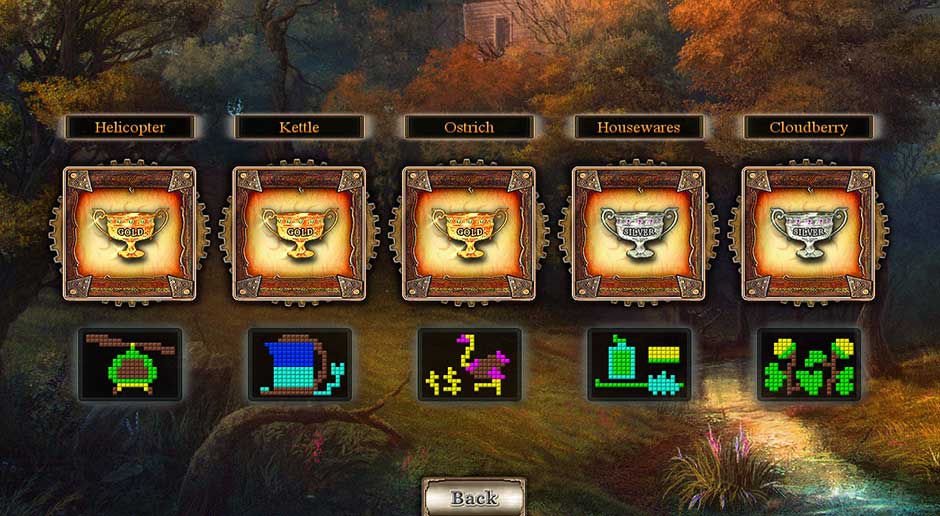
Trophies
Click on the trophy icon after clicking “Start” in the Main Menu to view your collection of trophies. Trophies can be awarded for a variety of accomplishments. Different colored trophies reflect different tiers of completion. Any trophies or achievements you earn while playing will display a notification. Follow our walkthrough and collect them all!
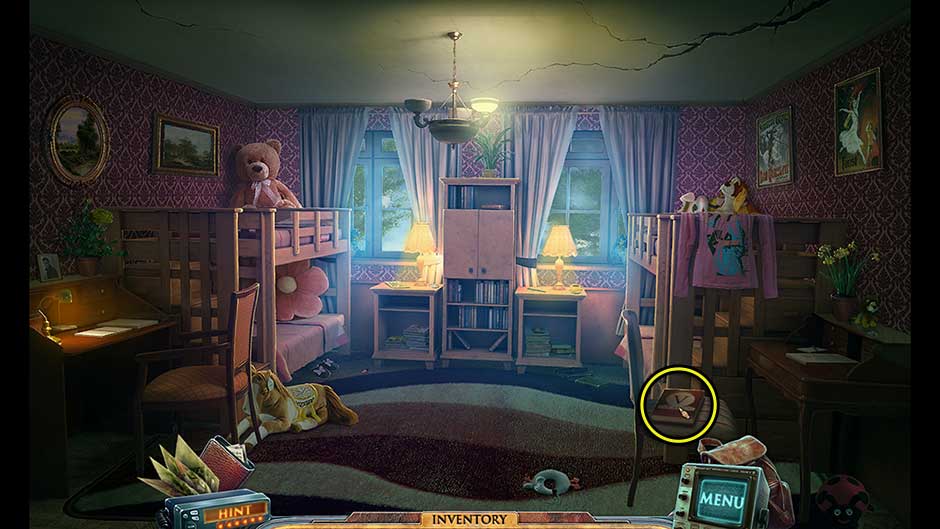
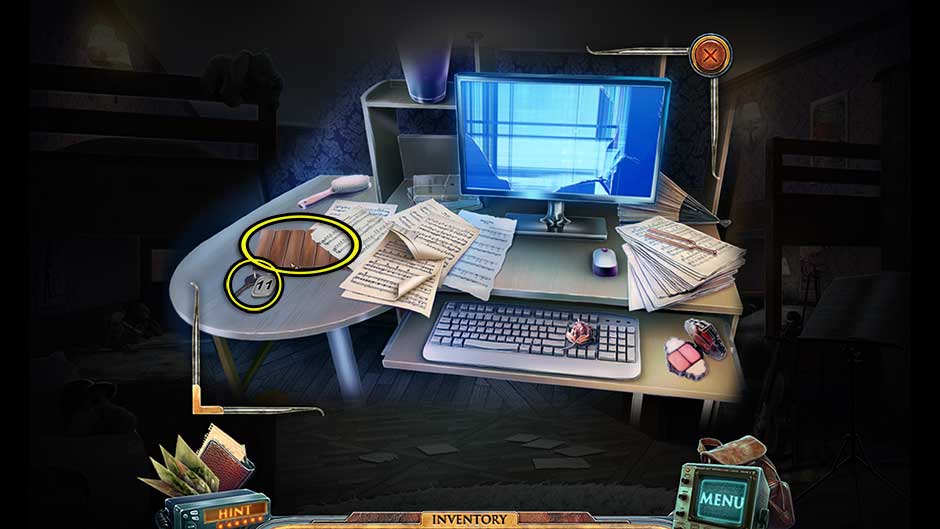
Kids Room
Click on the crossed hammer and wrench in the lower right corner of the Map after clicking “Start” in the Main Menu to access the nursery. Spend coins you’ve earned here to upgrade the kids’ room and customize it however you like! The more you customize, the more you’ll unlock for further decorating.
![Gardens Inc 4 – Blooming Stars Nursery]()
Gardens Inc 4 – Blooming Stars Nursery
Gardens Inc. 4 – Blooming Stars Walkthrough
A large TV network has approached Mike and Jill with a unique opportunity – to star in their own reality TV show! This venture will take them all across the globe. But fame and gardens aren’t the only thing growing; Mike and Jill are expecting, too!
Chapter 1: Asia
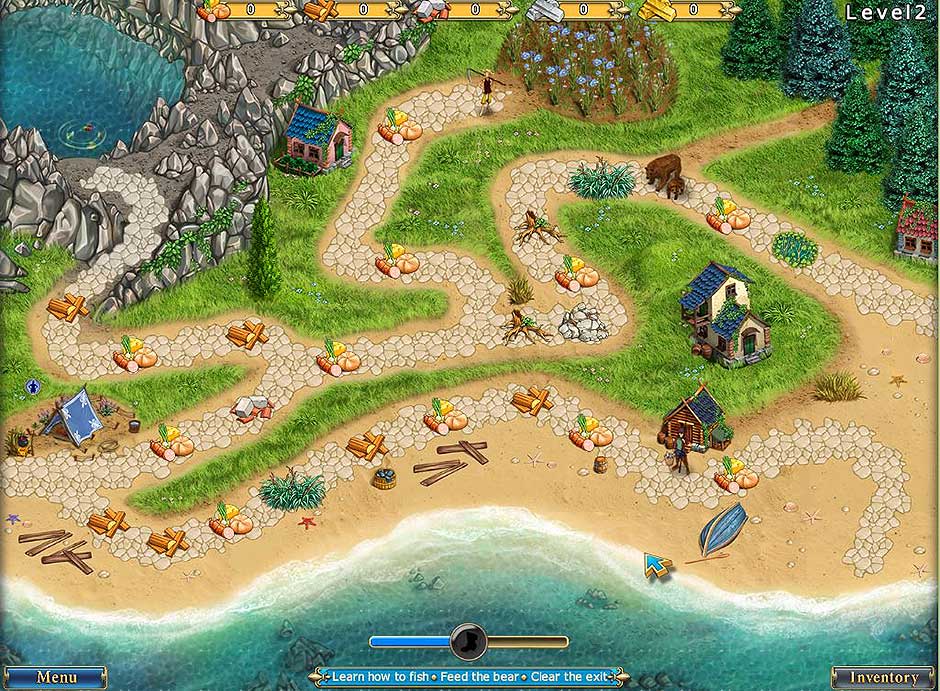
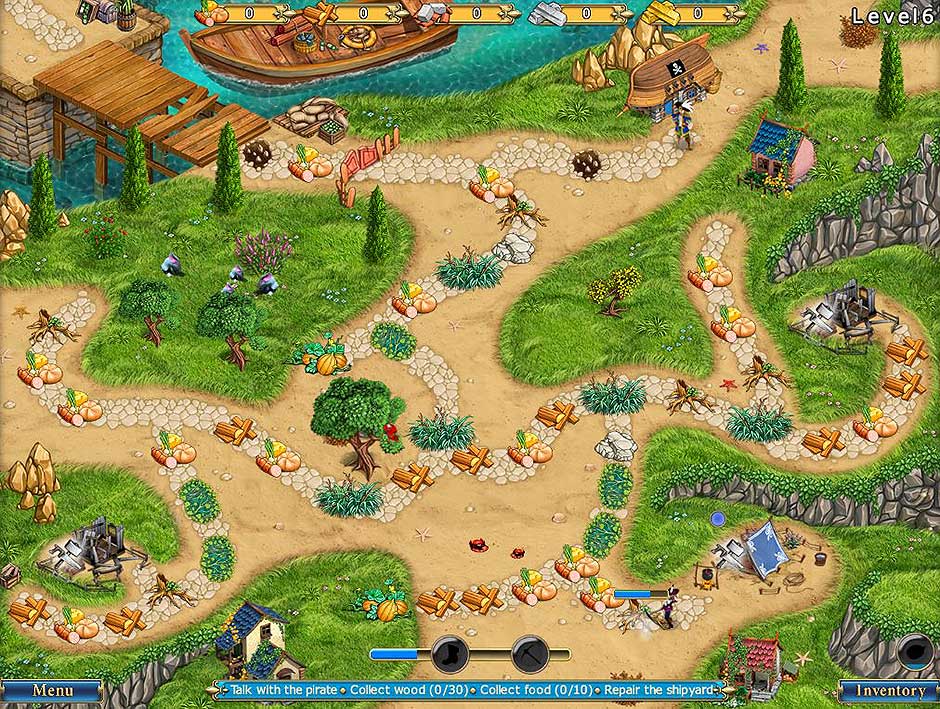
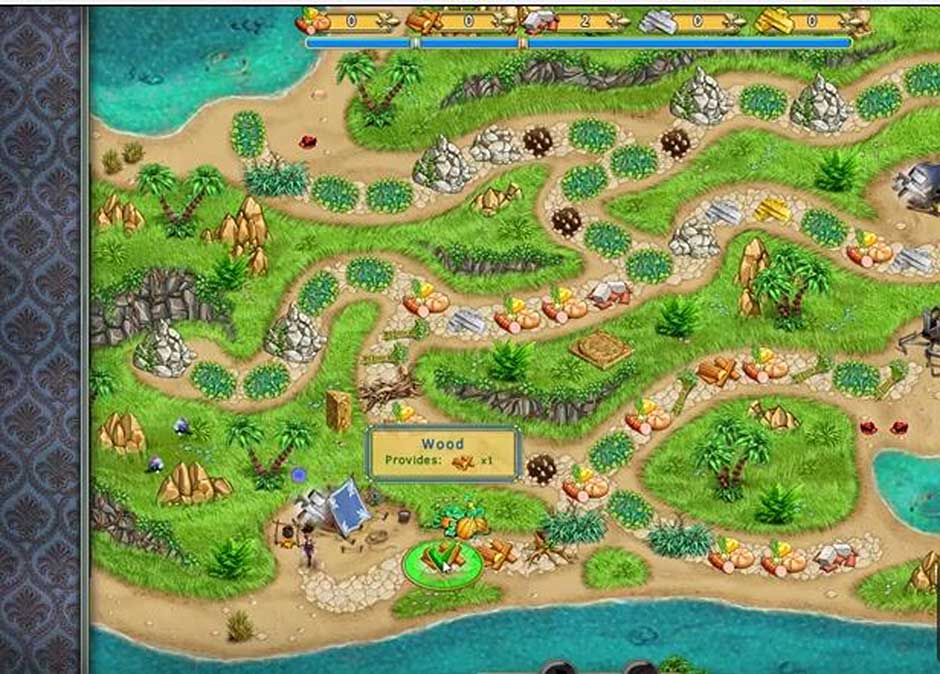
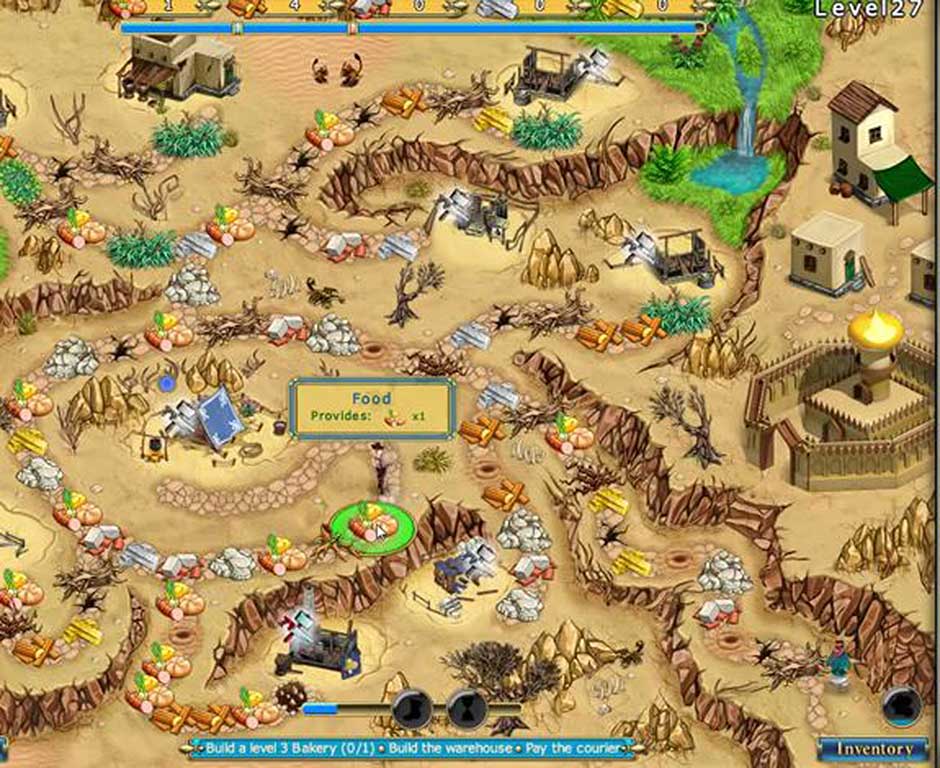
Episode 1 – Series Premiere
In the series premiere of “Gardens Inc.”, Jill and Mike begin their trip around the world. Their first job takes place at a marketplace in Bombay.
Objectives:
- Gather packs of seeds (0/2)
- Remove all weeds (0/4)
- Plant flowers (0/3)
- Bonus Goal: Plant every flower in the same color
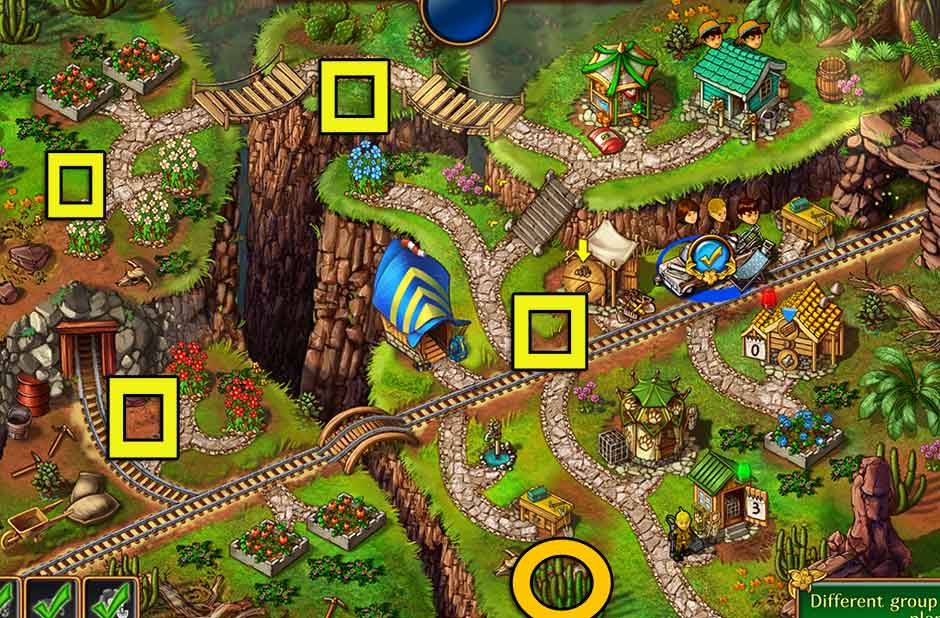
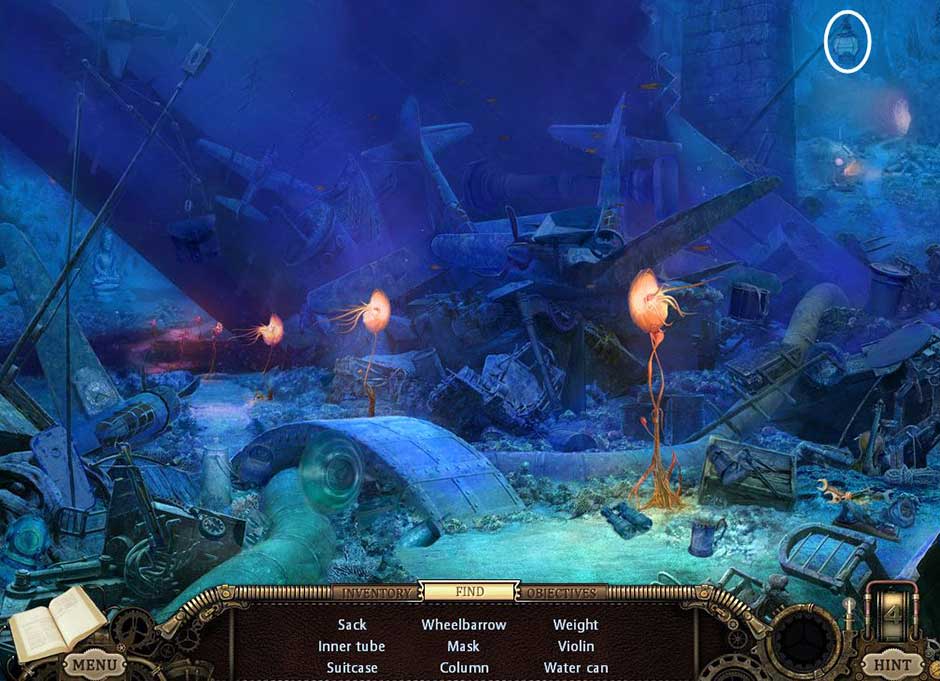
![Gardens Inc 4 – Blooming Stars Episode 1]()
Gardens Inc 4 – Blooming Stars Episode 1
How to beat the level:
- Grab the tools and seeds on the path branching up near the truck.
- Remove the weed blocking the path on the right, followed by the weed at the top of the path forking up toward the plaza.
- Collect the tools in front of the tool shack on the right.
- Remove the weed on the upper left and collect the seeds.
- Remove the last remaining weed on the right, followed by the hay pile.
- Collect the coins at the end of the path.
- Collect another set of tools from the tool shack.
- Plant flowers in the pots starting from the upper left or upper right.
Tip: Make sure all the flowers are the same color!
- Click on the check mark over the truck to finish the level.
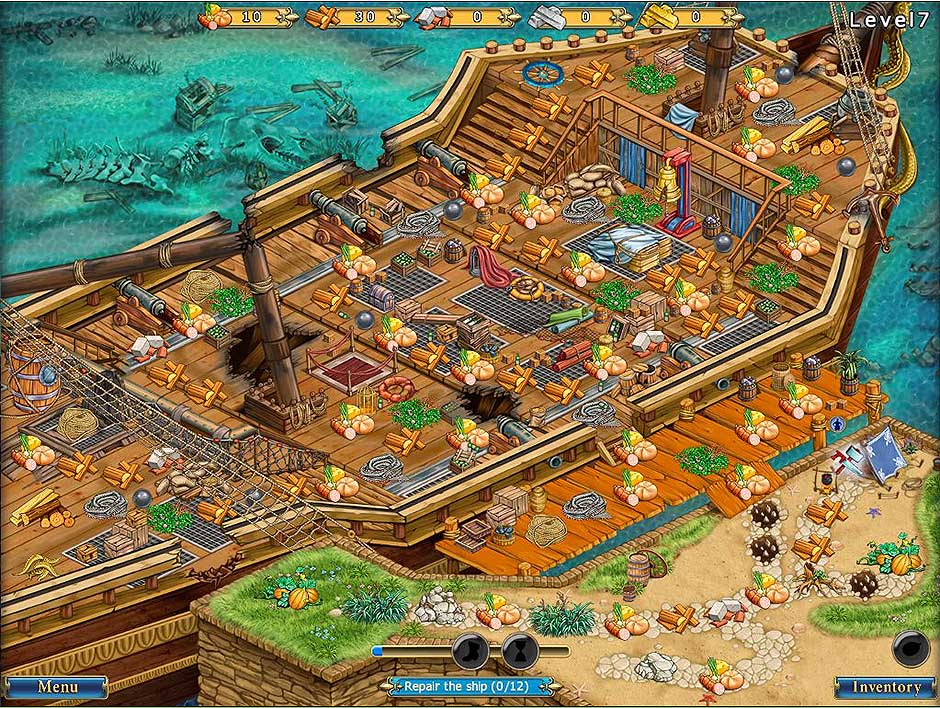
Episode 2 – The One with the Tiger
Jill and Mike continue their trip across Asia. In a great temple, a new challenge awaits them: the renovation of a damaged tiger statue! At the end of the day, an old friend visits.
Objectives:
- Upgrade the truck
- Build a tool shack
- Build a water shack
- Fix the tiger statue
- Plant and water all plants (0/4)
- Bonus Goal: Plant two flowers of each color
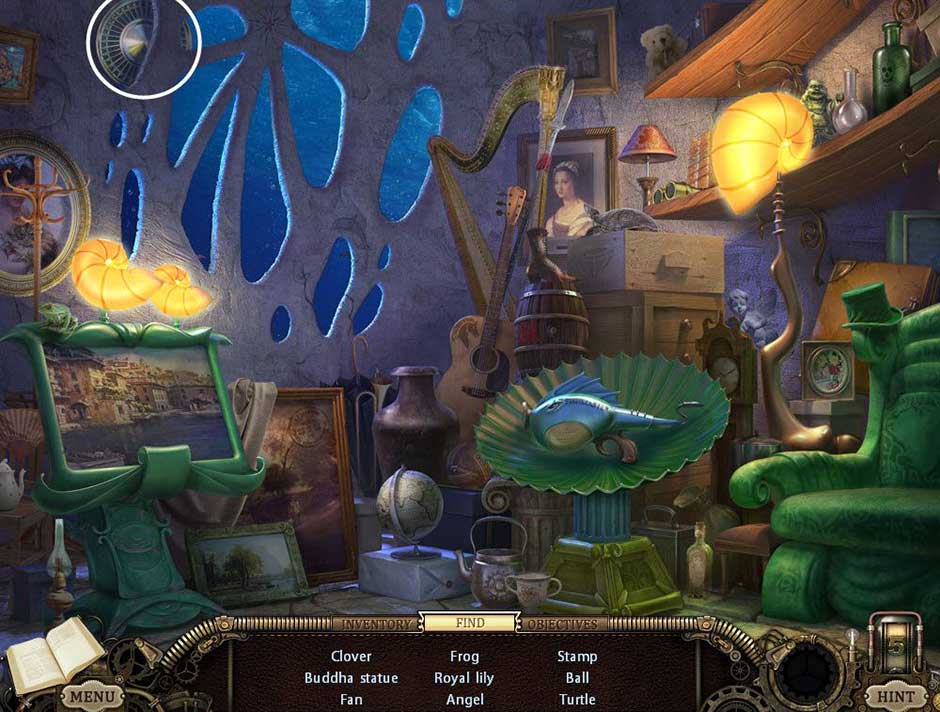
![Gardens Inc 4 – Blooming Stars Episode 2]()
Gardens Inc 4 – Blooming Stars Episode 2
How to beat the level:
- Collect one set of tools.
- Upgrade the truck. Use the “Fast Work” bonus button on the right side of your screen to complete the task faster.
- Grab the remaining tools and wood in front of the tool shack.
- Have one worker repair the tool shack while the other removes the stone blocking the left set of stairs.
- Remove all the garbage blocking the paths, followed by the stone on the right.
- Collect one more set of tools from the left and one pile of wood on the right.
- Repair the seed shack.
- Have both workers focus on clearing the remaining paths. Don’t forget to collect seed and tool resources from the shacks as they pop up!
- Repair the water shack.
- Once you have 8 seeds in your inventory, plant flowers in the left planters while collecting the coins down the right path.
Tip: Make sure these two flowers are planted in the same color.
- Click on the flowers to have the gardener water them.
- Remove any remaining stone blocking the path toward the ruined tiger statue, then click on the staircase to repair it. Continue to remove the stones blocking the path once the stairs have been rebuilt.
- Plant the flowers in the planters on the right. Click on the flowers once planted to have the gardener water them.
Tip: Make sure these flowers are a different color than the two you planted earlier!
- Grab any remaining tools as needed and click on the ruined tiger statue to repair it.
Tip: Use the “Fast Work” bonus if it’s available.
- Click on the check mark over the truck to complete the episode.
Episode 3 – A View to a Glide
The “Gardens Inc.” team visits a Chinese restaurant with a stunning view. In the past, Jill and Mike have done gardening on both land and sea, but today, for the first time, they’ll conquer the sky!
Objectives:
- Build a seed shack
- Build a switchable shack
- Build a hang glider shack
- Plant and water all plants (0/6)
- Bonus Goal: Adjacent flowers must be different colors
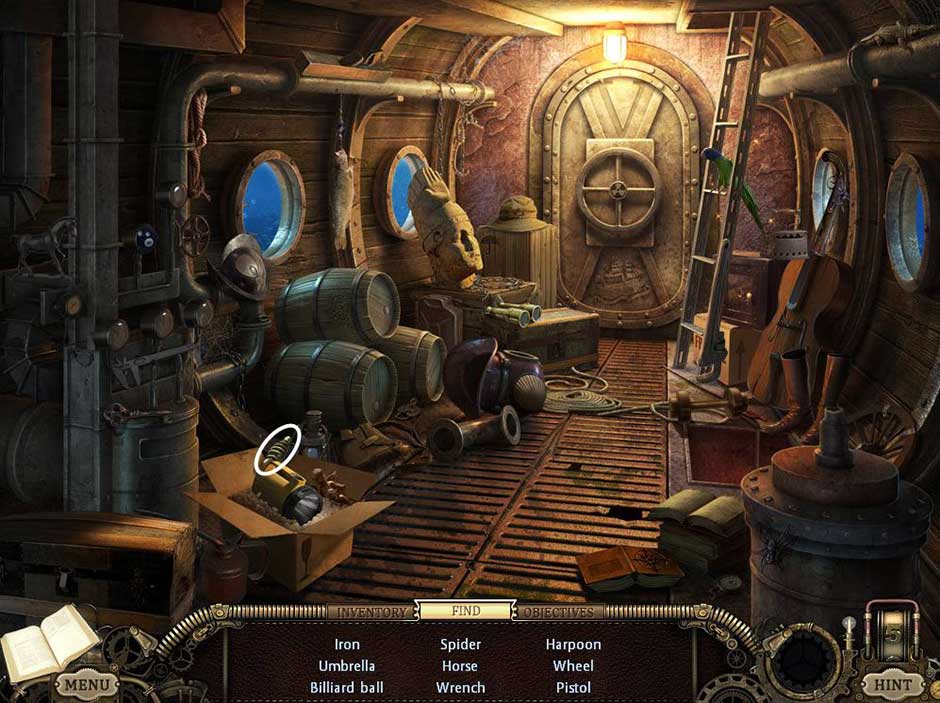
![Gardens Inc 4 – Blooming Stars Episode 3]()
Gardens Inc 4 – Blooming Stars Episode 3
How to beat the level:
- Remove the stone blocking the path above the truck.
Tip: Use the “Fast Work” bonus.
- Collect the tools from the tool shack.
- Upgrade the truck.
- Remove the branches in front of the bridge on the left.
- Collect the remaining tools in the immediate area.
Tip: Continue to collect tools from the tool shack as they become available.
- Clear the paths leading up to the stairs, the glider shack, and the bridge.
- Repair the glider shack and the bridge.
- Build the switchable shack and select the seeds output option.
- Repair the stairs on the right.
- Clear the path leading to the seed shack.
- Build the seed shack. Once it’s finished, select the switchable shack and change the resource output to tools.
- Use the glider to travel across the chasm. Clear the paths on the upper half of the level to allow access to the water shack and broken bridge.
Tip: Click on any of the immediate obstructions on the other side of the chasm to have your workers travel there automatically once the glider shack is built.
- Repair the water shack.
- Clear the path on the lower left, across the first bridge.
- Repair the upper bridge near the water shack and clear the weed obstructions in this area.
- Repair the bridge on the upper right near the seed shack and collect the coins on the other side.
- Plant the flowers in the lower area first. Click on the flowers once planted to have the gardener water them.
Tip: Plant the flowers in alternating colors, e.g. red, yellow, red.
- Plant the flowers in the upper area. Make sure they match the color pattern of the flowers directly across from them in the lower area! E.g. red, yellow, red.
- Click on the check mark over the truck to complete the episode.
Episode 4 – Electronic Skyhold
Jill and Mike venture high into the Chinese mountains to renovate a garden for a wealthy electronics tycoon.
Objectives:
- Build a rock shack
- Fix the broken stairs and bridges (0/3)
- Renovate the damaged pagoda
- Plant and water all plants (0/6)
- Bonus Goal: Make the two gardens identical to each other
![Gardens Inc 4 – Blooming Stars Episode 4]()
Gardens Inc 4 – Blooming Stars Episode 4
How to beat the level:
- Collect the tools in front of the tool shack.
Tip: Use bonuses as often as you can throughout the level.
- Remove the weeds collect the stone leading up to the rock shack.
- Upgrade the truck.
- Repair the rock shack.
- Remove the branches blocking the path to the switchable shack. Collect the tools along the path as you go.
- Build the switchable shack and select seeds as your resource.
Tip: You will need 18 seeds total. A total of 6 seeds can be collected from the paths in the immediate area.
- Continue to work on clearing the paths as you wait for your seed total to reach 18. Continue to collect other resources during this period as well.
- Once you’ve acquired 18 seeds, click on the switchable shack and switch the resource output to tools.
- Rebuild the staircase on the left. Collect the wood resources on the right if you haven’t done so already.
- Upgrade the tool shack.
- Clear any remaining obstructions along the path up past the staircase and leading to the broken bridge on the right.
- Build the second set of stairs on the left and repair the bridge on the right.
- Clear the obstructions past the rebuilt bridge to reach the water shack.
- Repair the water shack.
- Clear any remaining obstructions blocking your way to the flower beds.
- Plant flowers in the square flower beds, followed by the pots. Click on the flowers in the square beds again to have the gardener water them.
Tip: Make sure the two gardens mirror each other, e.g. if all the flowers in the upper garden are red, make sure all the flowers in the lower garden are red, too.
- Repair the glider shack.
- Collect any remaining stone and tool resources you need to complete the final two steps.
- Open the silver chest.
- Rebuild the ancient pagoda.
Tip: Use the “Fast Work” bonus to do this quickly. You will need both workers to rebuild it!
- Click on the check mark over the truck to complete the level.
Episode 5 – Supplies, Supplies!
Working on a TV show takes a lot of time and effort. Gardening takes even more! At a bamboo park, Jill and Mike decide to hire a resource supplier to boost efficiency.
Objectives:
- Build a supplier shack
- Fix all stone benches (0/8)
- Plant all plants (0/8)
- Bonus Goal: Plant different colored flowers on each island to make them unique
![Gardens Inc 4 – Blooming Stars Episode 5]()
Gardens Inc 4 – Blooming Stars Episode 5
How to beat the level:
- Remove the branches blocking the path to the tool shack.
- Collect the tools in front of the tool shack.
- Repair the switchable shack. Select tools as the resource output.
- Upgrade the truck to acquire an additional worker.
- Collect the tools and stones from the small path just past the switchable shack.
- Continue to clear all the branches and hay piles blocking the paths in the upper area.
- Repair the supplier shack. It will supply you with seed resources.
Tip: Keep an eye on the number on the side of the shack. Once it’s down to 0, you’ll need to click on it again to have another wave of resources ready to be delivered directly to your vehicle. You will need to refill the supplier twice in order to acquire all the seeds you’ll need.
- Rebuild the staircase leading down toward the rock shack.
- Clear the path leading up to the rock shack.
- Repair the rock shack.
- Upgrade the tool shack.
- Repair the glider shack by gliding down to the lower and upper left islands.
- Clear the paths on the leftmost islands. Collect the gold coins once cleared.
- Plant the flowers in the flower beds.
Tip: Make sure the flowers on each island are a unique color! E.g. Upper left island has blue flowers, lower left island has yellow flowers, and the main island has red flowers.
- Repair the stone benches on each of the islands.
Tip: Repair all the benches on a single island at a time to maximize the use of your time. This is also an excellent time to use your “Fast Work” bonus.
- Click on the check mark over the truck to complete the level.
Episode 6 – The Van Der Mann Incursion
It’s the crew’s final day in Japan and the Global Broadcasting Network representative, Mr. Sidney Van Der Mann, arrives on the set of the show. Meanwhile, Jill and Mike renovate a Zen Garden.
Objectives:
- Remove boulders (0/2)
- Fix all broken paths (0/11)
- Fix the damaged pond
- Plant and water all plants (0/12)
- Bonus Goal: Use every variety of plant you have available
![Gardens Inc 4 – Blooming Stars Episode 6]()
Gardens Inc 4 – Blooming Stars Episode 6
How to beat the level:
- Collect at least 1 set of tools.
- Remove the stone blocking the path to the switchable shack.
Tip: Continue to collect tools resources from this shack whenever available.
- Upgrade the truck.
- Collect the remaining tools and wood resources in the immediate area.
- Repair the rock paths on the way to the tool shack.
- Remove the weeds blocking access to the supplier shack.
- Repair the tool shack and the supplier shack. Select seeds as the resource output for the latter.
Tip: Use the “Fast Shack” bonus on the right, then change the resource output on the switchable shack from tools to stone.
- Remove the obstructions along the path leading down to the water shack.
Tip: Collect the wood resources once you reach the area.
- Repair the water shack.
- Continue clearing obstructions blocking your path to reach the seed shack on the upper left.
- Repair the seed shack.
Tip: Once the seed shack is rebuilt, select the supplier and change the resource output to stone. Select the switchable shack to change the resource output back to tools.
- Upgrade the truck and the tool shack.
- Remove the two large stone obstructions. You will need two workers each.
Tip: Use the “Fast Work” bonus to clear these large obstructions faster!
- Upgrade the seed shack.
- Remove obstructions and repair any and all remaining paths.
- Open the silver chest.
- Plant flowers in the square flower beds first. Click on the flowers again to have the gardener water them.
Tip: When planting flowers, make sure you use all the colors and varieties you have available!
- Plant the remaining flowers in the circular flower beds keeping the above tip in mind.
- Collect any remaining stone and tools resources needed, then click on the pond to repair it.
Tip: Repairing the pond requires 1 worker, as well as the gardener. Make sure any flowers in need of watering are addressed before repairing the pond.
- Click on the check mark over the truck to complete the episode.
Special 1 – Park X-Treme
“Hey, Jill! Hey, Mike! If you have some spare time, maybe you could take care of one more assignment? The newly-opened ‘X-Treme’ theme park needs a nice garden!”
Objectives:
- Build all glider shacks (0/4)
- Plant all plants (0/12)
- Bonus Goal: Make sure all peaks mirror each other
![Gardens Inc 4 – Blooming Stars Special 1]()
Gardens Inc 4 – Blooming Stars Special 1
How to beat the level:
- Pick up the tools next to the truck.
- Clear away the branches blocking the path to the tool shack.
- Upgrade the tool shack.
Tip: Don’t forget to pick up the tools here, too.
- Upgrade the truck.
- Use the glider to access the bottom left island. Clear the pathway leading to the supplier shack.
- Rebuild the supplier shack. Once built, select seeds as your resource output.
Tip: You will need 24 seeds in total.
- Rebuild the glider shack on the lower right peak.
- Clear the pathway leading up to the second tool shack.
- Rebuild the second tool shack.
Tip: While working on this, continue clearing any obstructions blocking your way to the flower beds on the lower left peak.
- Upgrade the second tool shack.
- Upgrade the truck again.
- Rebuild the glider shacks on the upper left and upper right peaks.
- Clear the paths on the upper left and upper right peaks.
- Begin planting flowers in the flower beds.
Tip: You can start wherever you like. Just make sure the flower types and patterns are identical on each peak!
- Rebuild the glider shack on the top center peak.
- Clear away the large stones on the upper paths and collect the coins behind them.
- Rebuild the staircase leading up to the silver chest.
- Open the silver chest.
- Plant any remaining flowers.
- Click on the check mark over the truck to complete the level.
Chapter 2: South America
Episode 7 – A Dire Predicament
Jill and Mike visit a Wild Animal Medical Center in South America. They must face off against a pack of wolves who are terrorizing the peaceful garden. Then, the couple learns of a change to the show’s format.
Objectives:
- Build an animal catcher shack
- Catch all wolves (0/4)
- Renovate the living bridge
- Plant all plants (0/7)
- Bonus Goal: Make sure single flower pots and their contents differ from the pairs of flower pots
![Gardens Inc 4 – Blooming Stars Episode 7]()
Gardens Inc 4 – Blooming Stars Episode 7
How to beat the level:
- Remove the weeds blocking the path to the tool shack.
- Pick up the tools in front of the tool shack.
- Clear the path to reach the wood shack.
- Rebuild the wood shack.
- Upgrade the truck.
- Pick up any remaining tools in the area and clear the branches in front of the lower bridge.
- Upgrade the truck.
- Remove the trunk in front of the silver chest.
Tip: Use the “Fast Work” bonus to accomplish this faster. Do not open the silver chest just yet.
- Rebuild the wooden ivy bridge.
- Clear the lower path leading to the animal catcher shack.
- Rebuild the animal catcher shack.
- Upgrade the tool shack.
- Clear the path past the upper bridge leading to the seed shack.
- Rebuild the seed shack.
- Click on the wolves to have the animal catcher remove them.
- Open the silver chest.
- Clear the path leading to the second wooden ivy bridge leading to the upper left portion of the map.
- Rebuild the second wooden ivy bridge.
Tip: You can do this as soon as you collect the first seeds given by the seed shack.
- Upgrade the seed shack.
- Clear all the remaining paths.
- Plant seeds in the planters.
Tip: Make sure what you plant in single flower pots is different than what’s planted in pairs of flower pots.
- Collect the coins.
Tip: Continue collecting any and all resources necessary for the final task, e.g. tools, seeds, and wood.
- Rebuild the living bridge.
Tip: You will need 3 workers to accomplish this task.
- Click on the check mark over the truck to complete the episode.
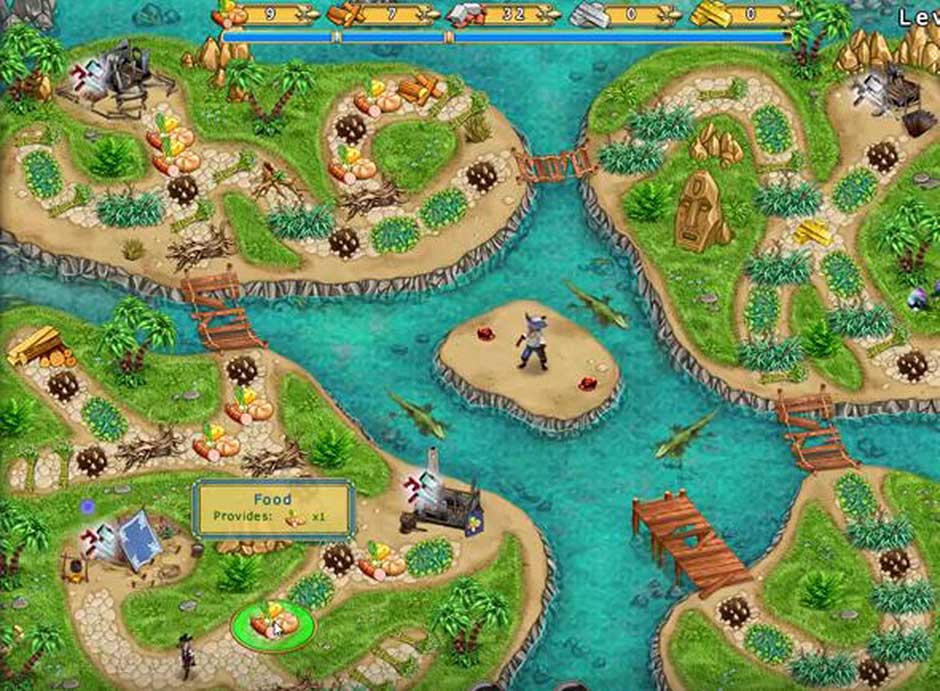
Episode 8 – Gardening Wild
The “Gardens Inc.” team visits a survival school, led by the one and only Geoff Brylls. Jill and Mike learn how to survive in the wilderness, and in return they teach Geoff a thing or two about gardening.
Objectives:
- Build all boat shack (0/3)
- Catch all wolves (0/4)
- Plant and water all plants (0/6)
- Bonus Goal: Create three different and unique gardens
![Gardens Inc 4 – Blooming Stars Episode 8]()
Gardens Inc 4 – Blooming Stars Episode 8
How to beat the level:
- Clear the sand blocking the path to the tool shack and collect the tools out front.
- Upgrade the truck.
- Use the wood workbench.
Tip: Collect the tools and stone in front of the truck with the other worker while you do this.
- Continue to clear sand and obstructions from the path. Collect the tools you pass as you do this.
- Upgrade the tool shack.
- Clear all the obstructions and repair the road leading to the supplier.
- Travel to the upper center island. Collect the seeds and clear the sand to gain access to the rock workbench.
- Use the rock workbench.
Tip: Rebuild the supplier shack as soon as you receive the stone from the rock workbench.
- Rebuild the animal catcher shack.
- Rebuild the supplier shack (see above) and select seeds as your resource output.
- Upgrade the truck again.
Tip: Continue using the wood workbench and the rock workbench to gain resources.
- Travel to the lower right island and restore the paths.
- Rebuild the boat shack on the bottom center island.
- Clear all the paths on the bottom center island.
- Use the animal catcher to remove all the wolves.
- Rebuild the tools workbench.
Tip: Use this frequently to keep adding to your tools resource.
- Rebuild the boat shack on the upper right island.
- Clear all obstructions and repair the path on the upper right island.
Tip: Remember to refill the supplier shack!
- Rebuild the water shack.
- Plant flowers in the square flower beds first, followed by the round ones.
Tip: Make sure the flower beds on each island are unique!
- Click on the flowers in the square flower beds to water them.
- Upgrade the water shack.
- Collect all coins on the map and plant any remaining flowers, keeping the above tip in mind.
- Click on the check mark over the truck to complete the level.
Episode 9 – Ancient Secrets
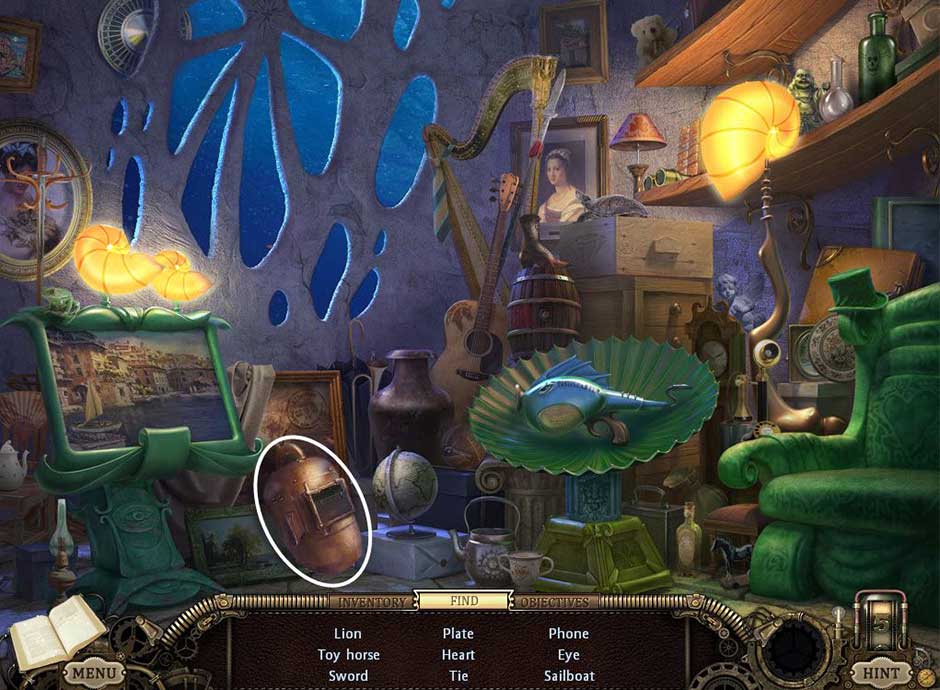
At the Museum of Ancient Secrets, Jill and Mike venture underwater on their gardening quest to raise money for children in need. Later, Vincent has important news.
Objectives:
- Fix the drinking fountains (0/2)
- Build a divers’ shack
- Fix all broken paths (0/8)
- Plant all plants (0/9)
- Bonus Goal: Neighboring plants cannot be identical
![Gardens Inc 4 – Blooming Stars Episode 9]()
Gardens Inc 4 – Blooming Stars Episode 9
How to beat the level:
- Pick up the tools on the left.
- Clear away the first weed blocking the path.
- Go to the switchable shack and change the resource output to wood.
Tip: Pick up the tools here as well.
- Clear the obstructions on the path leading to the wood shack.
- Clear the path leading to the rock workbench.
Tip: Use the “Fast Shacks” bonus while clearing the path.
- Rebuild the rock workbench.
Tip: Once built, use the rock workbench on a regular basis.
- Upgrade the tool shack.
- Upgrade the truck.
- Clear all obstructions remaining on the paths in this area and repair any areas necessary.
- Build the boat shack.
- Upgrade the tool shack again.
Tip: Use the “Fast Shacks” bonus again as soon as it becomes available. Once the bonus period finishes, click on the switchable shack and change the resource output to tools.
- Open the golden chest hidden on the right, between the oxygen station and the rock workbench.
- Rebuild the boat shacks on the left and right.
Tip: As soon as you have enough wood and tool resources, rebuild the boat shack up top as well.
- Clear the paths on the left and right so you can reach the seed workbenches.
- Rebuild the seed workbenches.
Tip: Use the seed workbenches until you have 27 seed resources.
- Clear and repair the paths on the upper island.
- Rebuild the divers’ shack.
Tip: You can perform this step and the next step earlier if resources allow.
- Rebuild the oxygen shack.
Tip: If you haven’t done so already, change the switchable shack resource output to tools.
- Plant flowers in each of the planters, including those in the water. You will need the diver to do this.
Tip: Make sure you alternate plant types and that no two plants next to each other are the same.
- Repair the drinking fountains on the left and right islands.
- Click on the check mark over the truck to complete the episode.
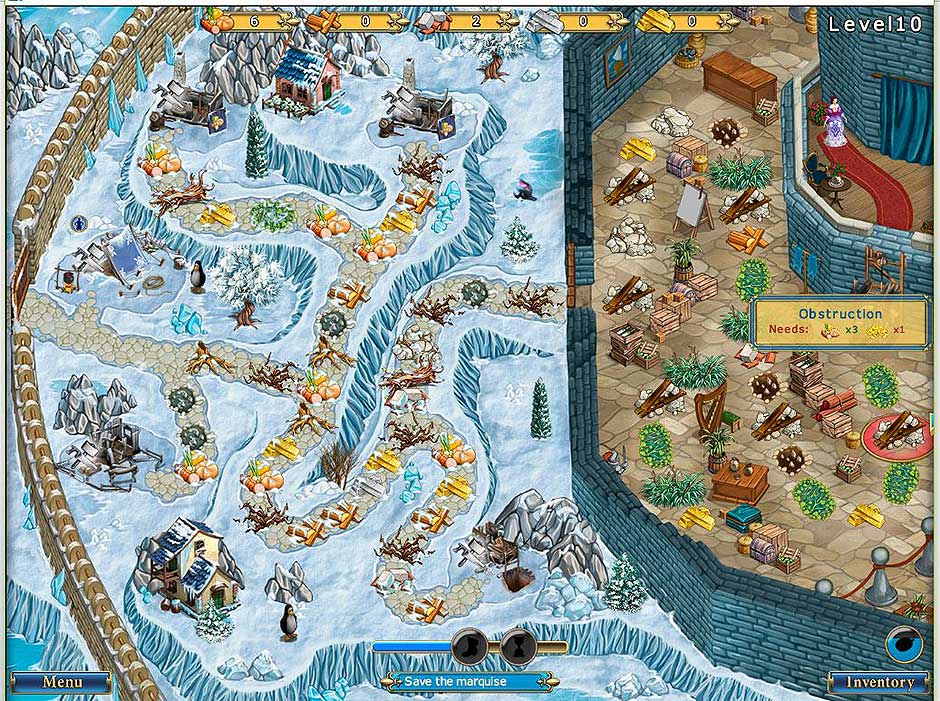
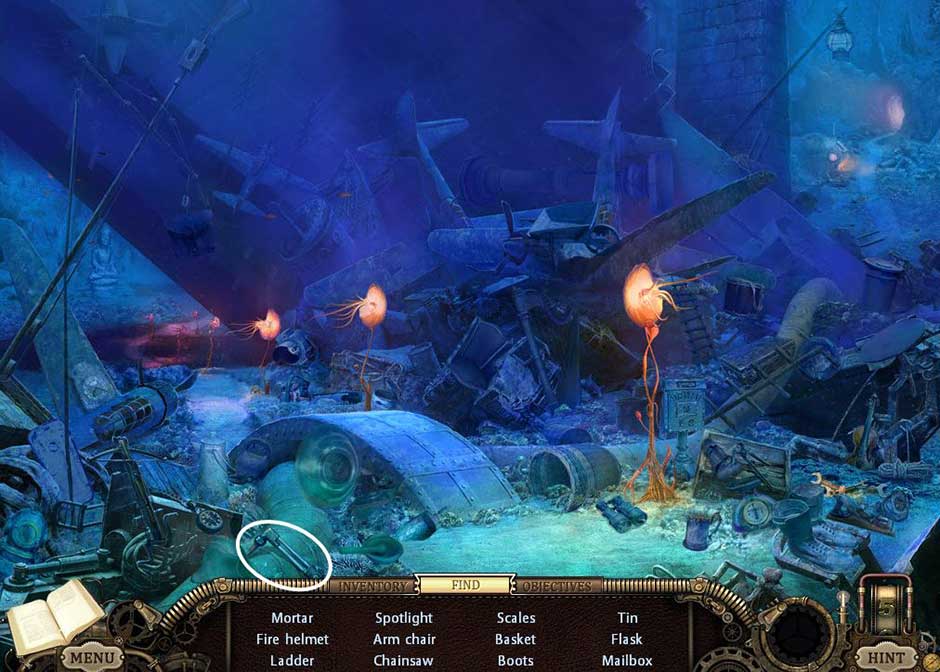
Episode 10 – Five Stars
Jill and Mike are tasked with the renovation of a garden belonging to a five-star tourist resort, which is often visited by movie stars.
Objectives:
- Remove all water weeds (0/4)
- Fix the pump
- Catch all wolves (0/4)
- Plant and water all plants (0/7)
- Bonus Goal: Plant 3 unique varieties of flower in the planters on the land. Plant only 1 variety of flower in the planters in the water.
![Gardens Inc 4 – Blooming Stars Episode 10]()
Gardens Inc 4 – Blooming Stars Episode 10
How to beat the level:
- Use the tool workbench twice.
Tip: Use the “Fast Work” bonus while doing this.
- Upgrade the truck.
Tip: Continue using the tool workbench.
- Clear the path leading to the tool shack and the supplier shack.
- Rebuild the supplier shack. Select wood as the resource output.
- Rebuild the tool shack.
- Clear the branches in front of the steps and clear the path leading to the animal catcher shack.
- Rebuild the animal catcher shack.
- Upgrade the truck again.
Tip: Assign one worker to always work at the tool workbench.
- Scare away the wolf next to the tool shack using the animal catcher.
- Rebuild the staircase.
- Click on the supplier shack and select stone as the resource output.
- Clear the paths on the lower side of the island.
- Rebuild the divers’ shack.
- Rebuild the boat shack.
- Select the supplier shack. Alternate resource production between wood and stone.
Tip: Better yet, have the supplier bring you wood resources twice, then stone.
- Remove the stump blocking the path.
- Repair the staircase on the left.
- Upgrade the tool shack.
- Clear the path to the seed shack.
- Rebuild the seed shack.
- Rebuild the water shack.
- Upgrade the seed shack.
- Upgrade the tool shack a second time.
- Use the diver to collect from the oxygen station 5 times.
- Rebuild the second boat shack.
Tip: Once rebuilt, collect the coins on the lower island.
- Select the supplier shack and change the resource output type back to wood.
- Remove the waterweed using the diver.
- Repair the staircase on the upper left.
- Use the animal catcher to remove the wolf.
- Clear the remaining paths.
- Repair the pump using the gardener.
- Plant flowers in the planters starting with those on the upper left.
- Click on the square flower beds to have the gardener water them.
Tip: Upgrade the water shack as this is happening. You will need to water the topiaries multiple times before they are completely grown.
- Collect more oxygen from the oxygen station, then plant the remaining water flowers.
- Click on the check mark over the truck to complete the level.
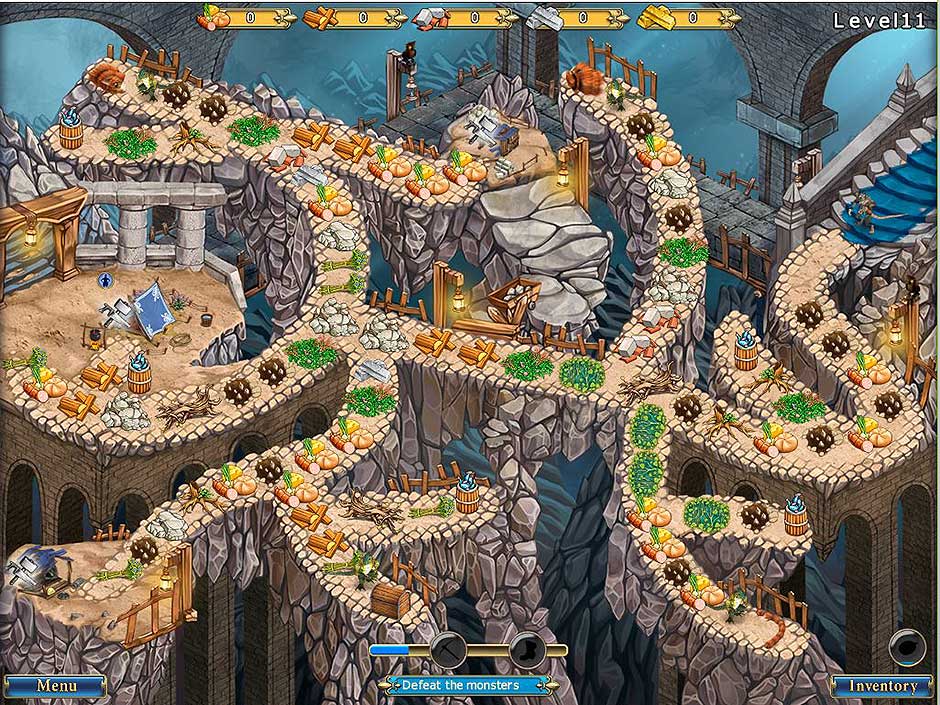
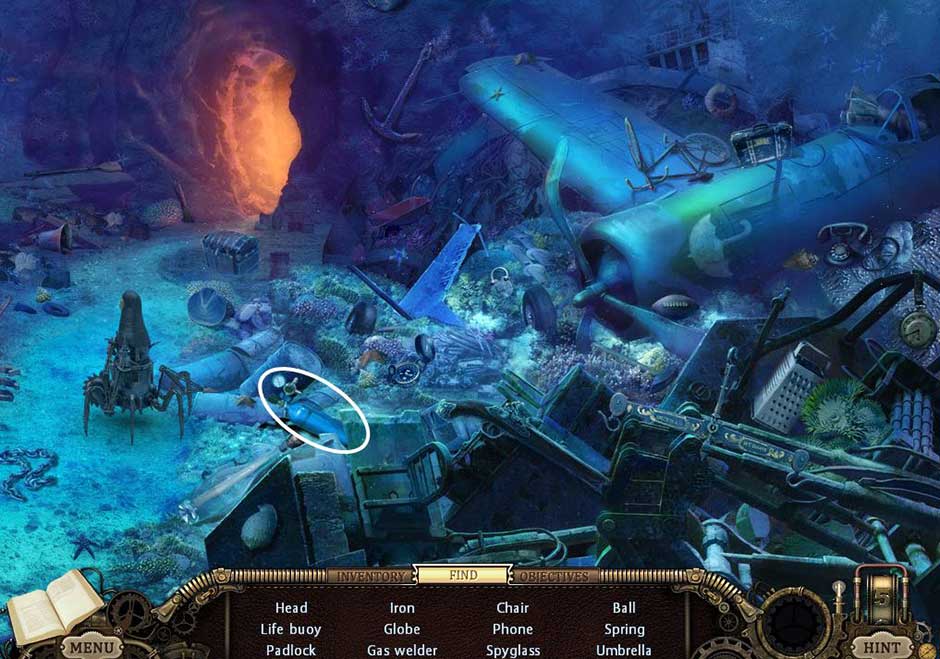
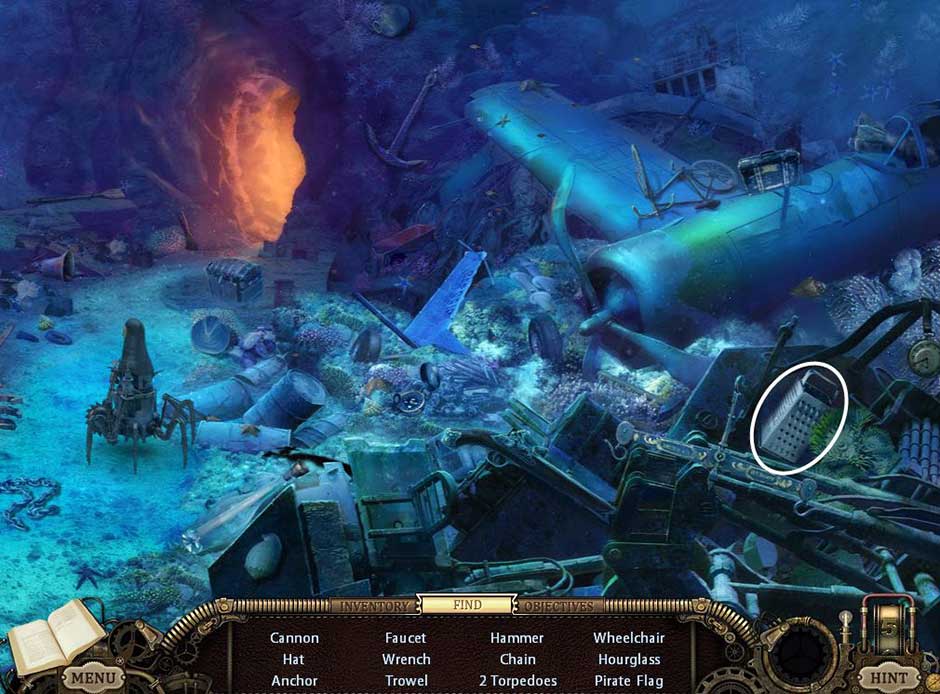
Episode 11 – The First Defense
Garden Defense! As the team prepare to leave the tourist resort, they receive news that a pack of angry wolves is damaging another part of the establishment. They decide to stay behind and help.
Objective:
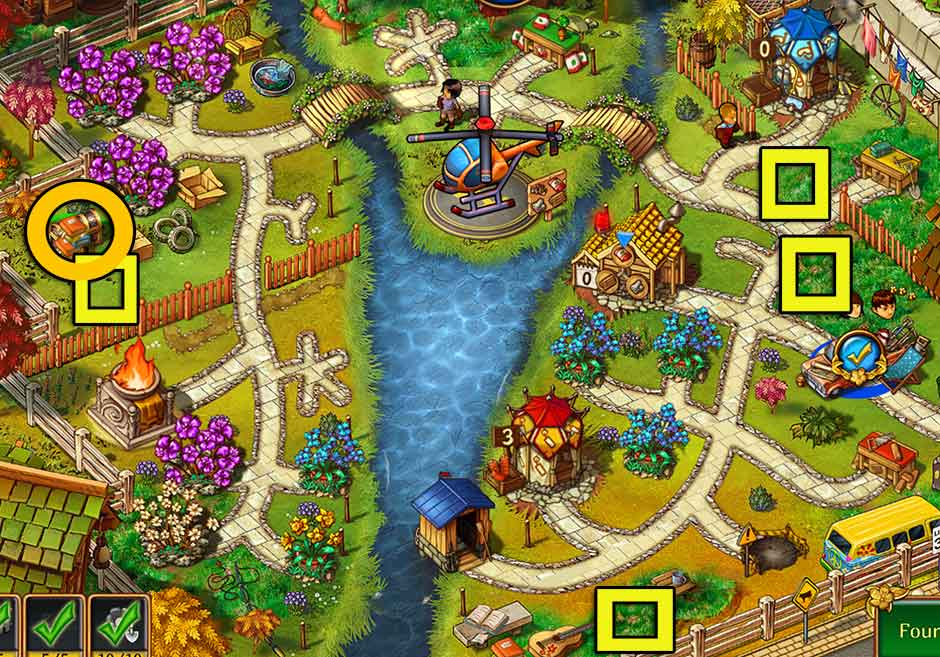
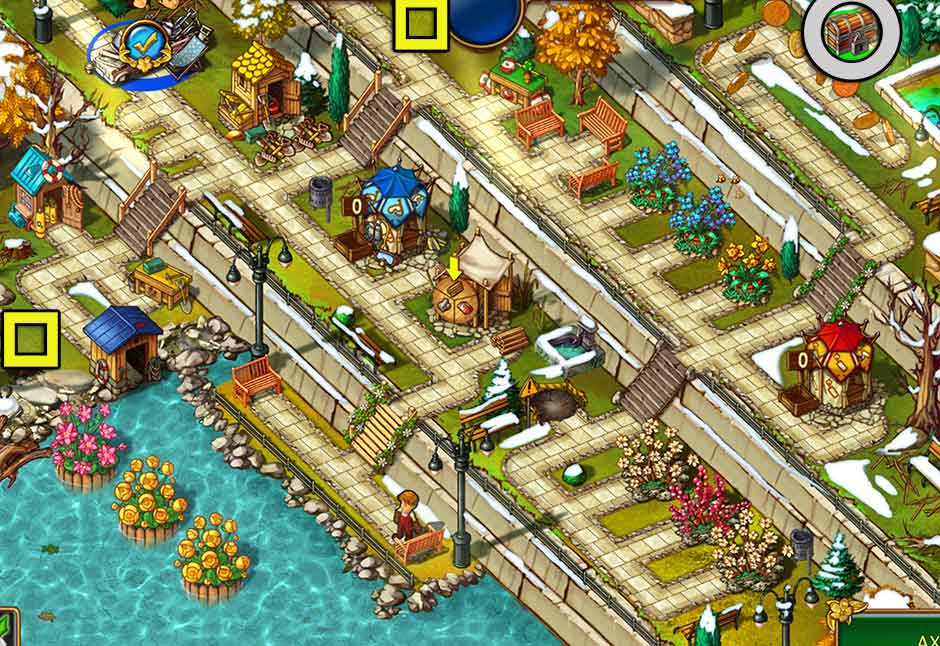
![Gardens Inc 4 – Blooming Stars Episode 11]()
Gardens Inc 4 – Blooming Stars Episode 11
How to beat the level:
- The goal of this level is to collect coins while keeping the wolves from destroying the garden. The garden will count as destroyed when the wolves ruin all 4 flower beds.
- This level is optional, and can be ended at any time.
- Completing this level will always result in a gold ranking as long as at least 1 flower bed is intact.
- Tools can be collected from the tool shack in the garden.
- Gold cat statues will drop coins from time to time. Collect these as you are able.
- The silver chest is located on the left in front of the large statue head. You will need to upgrade the truck to acquire an extra worker in order to remove the large weed blocking your path.
Tip: In order to repair the holes in front of the large weed, you will need to collect the stone resource in the upper right corner.
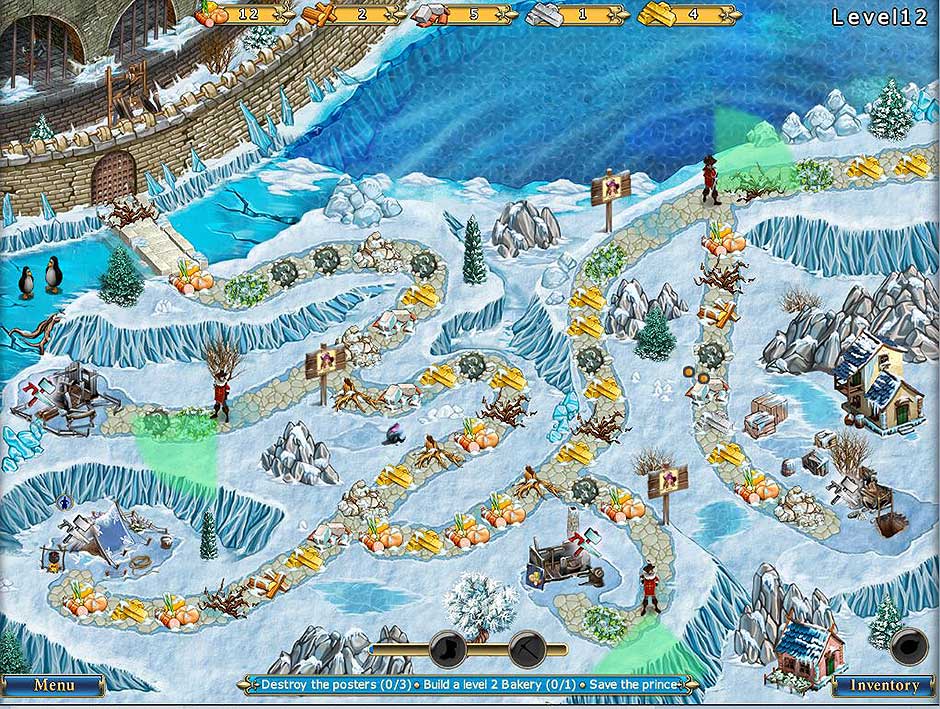
Episode 12 – Jill and Mike Meet the Director
In a marvelous adventure rope park, Jill and Mike finally meet the Director of the Global Broadcasting Network, Diane Powers. She seems nice and friendly, but will she be a friend or an enemy of the show?
Objectives:
- Build the workers’ shack
- Fix rope bridges (0/2)
- Catch all wolves (0/5)
- Gather wood (0/20)
- Plant and water all plants (0/8)
- Bonus Goal: In each cluster of 4 planters, the top and bottom planters must match each other, and the left and right planters must match each other.
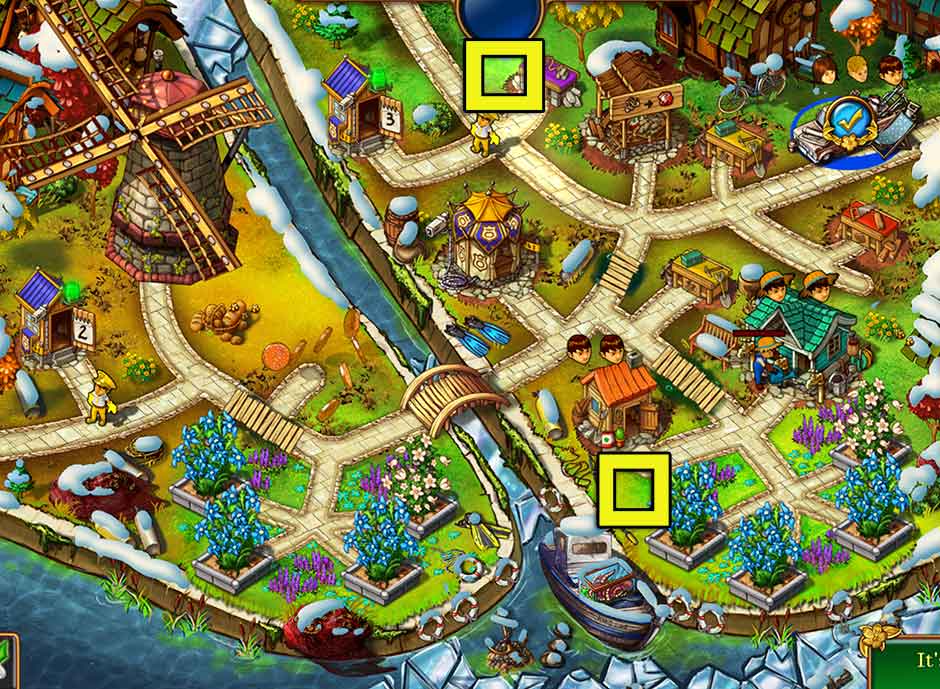
![Gardens Inc 4 – Blooming Stars Episode 12]()
Gardens Inc 4 – Blooming Stars Episode 12
How to beat the level:
- Pick up the tools in front of the tool shack.
- Upgrade the truck.
- Rebuild the rock workbench.
Tip: Use this right away once built.
- Clear the obstructions along the path leading to the worker shack.
Tip: The worker shack is located next to the exchange outpost.
- Rebuild the worker shack.
Tip: Have 1 worker using the rock workbench at all times.
- Clear the path leading to the exchange outpost.
- Use the exchange outpost to exchange stone for wood resources.
Tip: Continue doing this at regular intervals.
- Upgrade the truck again.
- Upgrade the tool shack.
- Clear the path leading to the animal catcher shack.
- Rebuild the wooden bridge.
- Rebuild the animal catcher shack.
- Rebuild the glider shack.
- Clear the path leading to the seed shack.
- Remove the wolves using the animal catcher.
- Rebuild the seed shack.
- Open the golden chest.
Tip: The chest is hidden behind the barrel to the left of the stairs.
- Clear the path leading to the wood shack.
- Clear the path leading up to the water shack.
- Rebuild the wood shack.
Tip: Continue using the rock workbench and exchange stone resources for wood resources at the exchange outpost.
- Upgrade the tool shack again.
- Upgrade the wood shack, the water shack, and the seed shack.
- Plant flowers in the square planters and use the gardener to water them first.
- Plant all remaining flowers.
- Collect tools and wood resources for your final task.
- Rebuild the big rope bridge.
Tip: You will need 20 additional wood resources.
- Click on the check mark over the truck to complete the level.
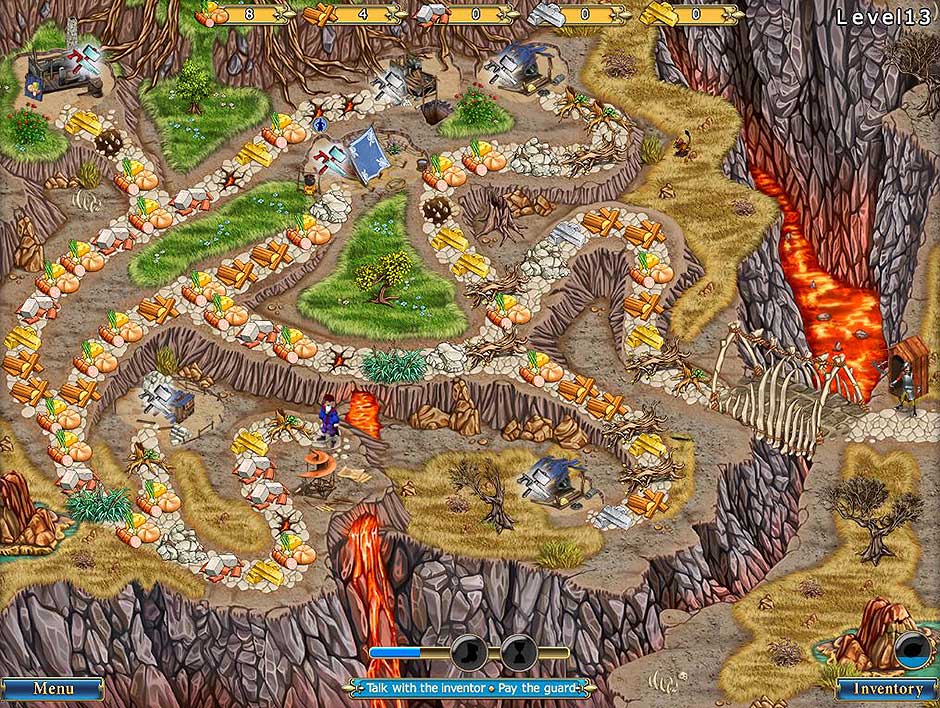
Episode 13 – The Beans of Alertness
It’s day 20 and Jill and Mike’s 13th job: creating a garden at a coffee plantation. To win 10 million dollars for a children’s charity, the couple need to finish 33 more jobs within the 100-day time limit!
Objectives:
- Remove all waterweeds (0/4)
- Fix all fence parts (0/7)
- Fix the bridges (0/2)
- Plant and water all plants (0/8)
- Bonus Goal: Make both banks symmetrical in which flower types and colors are planted
![Gardens Inc 4 – Blooming Stars Episode 13]()
Gardens Inc 4 – Blooming Stars Episode 13
How to beat the level:
- Clear the leaves blocking the path.
- Pick up the tools lying along the path.
- Upgrade the truck.
- Clear the path leading to the supplier shack and the tool workbench.
- Rebuild the supplier shack and select wood as the resource output.
Tip: Have wood selected as the resource output for the first two waves, then select seeds as the new resource output until you’ve collected 28 seeds in total. Once you’ve collected 28 seeds, switch the resource output back to wood.
- Clear the path leading toward the bridge.
- Rebuild the bridge.
- Rebuild the wood workbench.
Tip: Use both the tool workbench and the wood workbench at regular intervals.
- Upgrade the truck again.
- Clear the path leading to the exchange outpost.
- Use the exchange outpost to exchange wood for stone resources.
- Rebuild the divers’ shack.
- Collect 4 oxygen from the oxygen station using the diver.
- Clear the waterweeds.
Tip: Once this is done, the diver will need to gather 4 oxygen again before he can move on to the next task.
- Plant the water plants.
Tip: Keep in mind that both banks, including planters in the water, need to be symmetrical, i.e. they should mirror each other.
- Upgrade the tool shack.
- Clear the path leading to the worker shack.
- Rebuild the worker shack.
- Rebuild the boat shack.
- Collect the coins throughout the area.
- Continue clearing and repairing the path on the right bank until all paths are restored.
- Rebuild the water shack.
- Plant seeds in the planters on land. Have the gardener water each.
- Open the golden chest.
Tip: The golden chest is hidden behind a bush between the divers’ shack and the tool shack.
- Rebuild the bridge at the bottom of the screen.
- Repair the fences that each path leads in to on the left.
- Click on the check mark over the truck to complete the level.
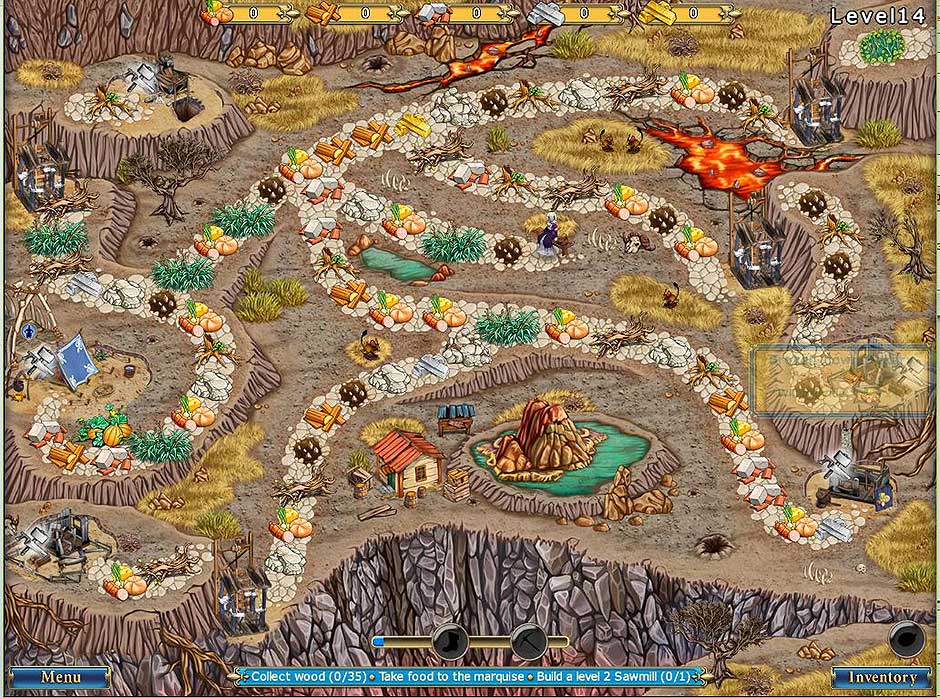
Episode 14 – All That Glitters
The wolf problem is getting out of hand, so the team hires a new expert animal catcher. At the gold digger camp, Jill and Mike search for gold on land – and high in the sky!
Objectives:
- Build an expert animal catcher shack
- Collect all coin balloons (0/4)
- Clear the mine’s entrance
- Catch all wolves (0/5)
- Plant all plants (0/11)
- Bonus Goal: Use different plants per plant group size
![Gardens Inc 4 – Blooming Stars Episode 14]()
Gardens Inc 4 – Blooming Stars Episode 14
How to beat the level:
- Collect the tools in front of the switchable shack.
- Use the tool workbench 3 times.
Tip: Use the “Fast Work” bonus while doing this and collect new tool resources from the shack between tasks.
- Upgrade the truck.
Tip: Have one worker continue to use the tool workbench.
- Clear the path leading to the supplier shack.
- Rebuild the supplier shack and select wood as the resource output.
- Clear and repair the path leading to the animal catcher shack.
Tip: Remove only the first stone obstructing the path, otherwise you will fall victim to packs of patrolling wolves, which can disrupt your workflow.
- Upgrade the truck again.
- Continue clearing the paths.
- Rebuild the expert animal catcher shack.
- Clear and restore the path leading up to the water shack and the seed shack.
- Clear the path leading to the second tool workbench.
- Rebuild the second tool workbench.
Tip: Have a worker start using this right away.
- Open the golden chest hidden behind the cacti beneath the second tool workbench.
- Remove the wolves using the animal catcher.
- Repair the rail bridge.
- Collect wood from the supplier shack until you have enough to rebuild the rope bridges.
Tip: You will need 12 wood resources to repair both bridges.
- Fix the broken rails.
- Repair the hang glider shack.
Tip: You can repair the shack and fix the broken rails at the same time.
Additional Tip: Once all the stationary wolves in the area have been scared away, you no longer have to worry about restocking the animal catcher shack.
- Collect the coin balloons.
- Rebuild the seed shack.
- Rebuild the water shack.
- Upgrade the seed shack.
- Plant seeds starting with the square flower beds. Water these using the gardener.
- Collect stone, tools, and wood resources in order to repair the mine entrance.
Tip: You will need 10 tools, 10 wood, 20 stone, and 2 workers to complete this task.
- Repair the mine entrance.
- Click on the check mark over the truck to complete the level.
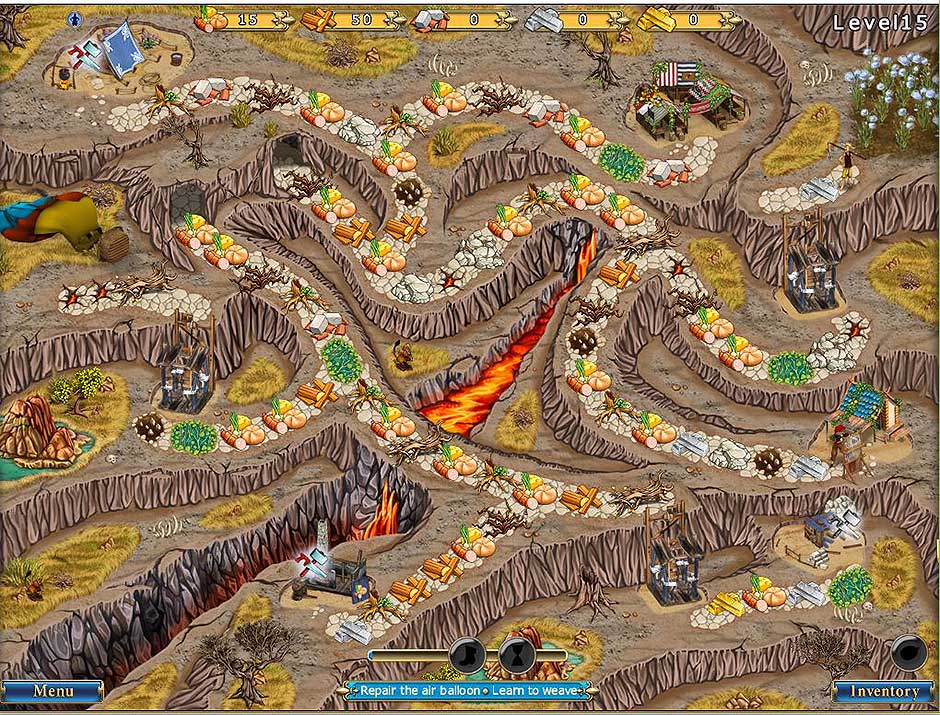
Episode 15 – A Day Off
Coin Frenzy! The cast and crew of the “Gardens Inc.” show takes a day off to celebrate the end of the first month of production. They visit a sunny beach to have some well-deserved R&R!
Objective:
- Collect as many coins as you can!
![Gardens Inc 4 – Blooming Stars Episode 15]()
Gardens Inc 4 – Blooming Stars Episode 15
How to beat the level:
- Collect as many coins as possible.
- This level is optional. You do not have to finish it to progress.
- Free the second worker in order to remove the large stone and gain access to the golden chest on the far right.
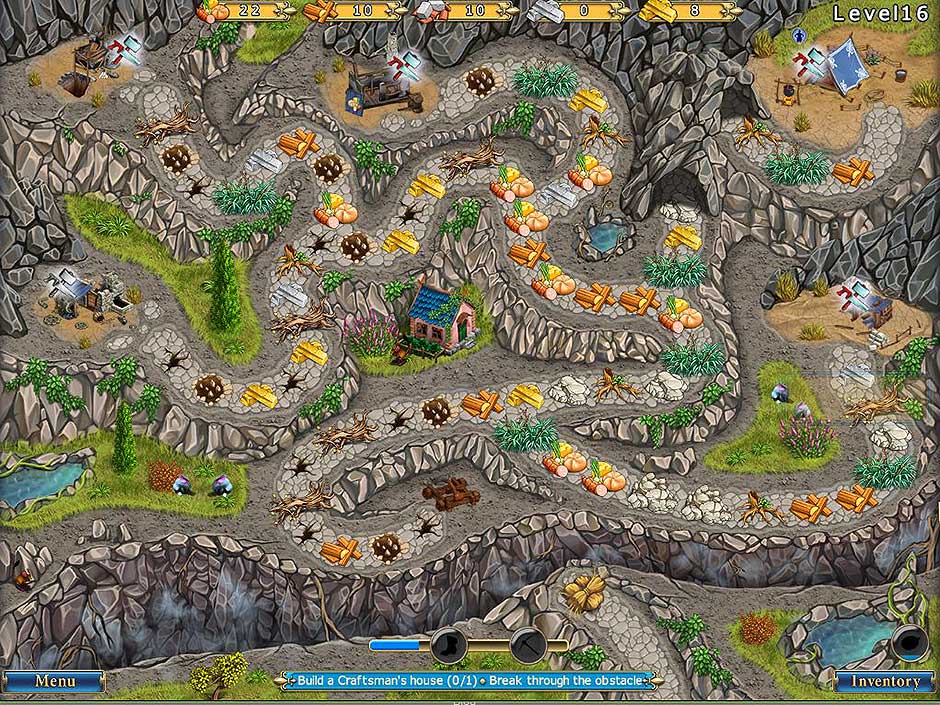
Episode 16 – Goodbyes
It’s the final day of Director Powers’ visit to the show’s set. The team have one last chance to convince Director Powers to pick up the show for a full season.
Objectives:
- Fix all lamps (0/5)
- Collect all seed buoys (0/6)
- Plant all plants (0/6)
- Bonus Goal: The 1st and 3rd planters in the set of three (the leftmost and rightmost) must have the same flower type planted in them. The center planter must be different/unique.
![Gardens Inc 4 – Blooming Stars Episode 16]()
Gardens Inc 4 – Blooming Stars Episode 16
How to beat the level:
- Clear the leaves blocking the path to the tool shack.
- Pick up the tools in front of the tool shack.
- Clear the path to the tool workbench.
Tip: Do not remove the leaves blocking the path to the expert animal catcher shack yet!
- Rebuild the tool workbench.
Tip: Continue to collect tools from the tool shack.
- Upgrade the truck.
- Rebuild the wood workbench.
- Rebuild the rock workbench.
- Upgrade the truck again.
Tip: Use the “Fast Work” bonus while doing this, using the workbenches at the same time.
- Upgrade the tool shack.
- Clear the path leading to the expert animal catcher shack.
Tip: Only remove this pile of leaves when there is no wolf patrolling the path. This will allow you to build the expert animal catcher shack without being caught by the wolf.
- Rebuild the expert animal catcher shack.
- Clear the path leading to the divers’ shack.
- Rebuild the divers’ shack.
- Clear the path below the truck leading to the broken staircase.
- Repair the stone staircase.
- Rebuild the animal catcher shack.
- Rebuild both boat shacks on either side of the river.
- Use the animal catcher to remove the wolves.
Tip: Clear any paths necessary to reach any remaining wolves and do the same.
- Rebuild the worker shack.
- Use the diver to retrieve oxygen from the oxygen station.
Tip: Do not stop using the workbenches during this period of time.
- Clear and repair the paths on the upper right in order to reach the flower beds and a second tool workbench.
Tip: Use the second tool workbench as soon as you reach it.
- Retrieve the seed buoys using the diver.
- Rebuild the hang glider shack.
- Collect the coin balloons.
- Upgrade the tool shack again.
- Plant the flowers in the planters.
Tip: While doing this, have the diver retrieve more oxygen.
- Rebuild all remaining hang glider shacks.
- Plant the remaining flowers in the water using the diver.
- Collect any remaining coins.
- Repair the lamps on the center land mass.
- Click on the check mark over the truck to complete the level.
Special 2 – The Secret Garden
“Jill, Mike, I have another job for you if you’ve got a moment! A certain movie star has asked if you’d be willing to renovate their garden in a very secluded, but beautiful location. What do you say?”
Objectives:
- Remove garbage from the water (0/6)
- Plant all plants (0/9)
- Fix the tiger statue
- Bonus Goal: Make sure there is no more and no less than 4 of a specific type and color of flower planted in the water planters.
![Gardens Inc 4 – Blooming Stars Special 2]()
Gardens Inc 4 – Blooming Stars Special 2
How to beat the level:
- Pick up the tools in front of the tool shack.
- Clear the path leading up to the tool workbench.
- Use the tool workbench 3 times.
- Upgrade the truck.
- Clear the path leading up to the wood workbench.
Tip: Have one worker continue using the tool workbench during this time.
- Use the wood workbench.
Tip: Collect any remaining tools in the area while doing this.
- Clear the path leading to the boat shack and the bridge.
- Upgrade the truck again.
- Rebuild the boat shack.
- Repair the bridge.
- Upgrade the tool shack.
Tip: Continue using the workbenches during this time.
- Clear the path leading to the divers’ shack.
- Rebuild the divers’ shack.
- Remove the garbage from the water.
- Collect oxygen from the oxygen station using the diver.
- Clear the path leading to the switchable shack.
- Rebuild the switchable shack and select stone as the resource output.
- Repair the remaining 2 wooden bridges.
- Rebuild the second boat shack.
- Repair the stone workbench.
Tip: Use this as soon as it’s repaired.
- Remove the garbage located in the upper body of water.
- Collect the seed buoys using the diver.
- Plant the flowers in the planters in the water.
Tip: Make sure exactly 4 of these planters have the same type of lower; no more, no less.
- Clear the lower path leading to the statue.
- Rebuild the tiger statue.
- Plant the remaining flowers in the planters along the path leading to the tiger statue.
- Clear the large weed on the small lower left island.
- Rebuild the rock ivy bridge to reach the island on the lower left.
- Open the silver chest and collect the coins.
- Click on the check mark over the truck to complete the level.
Chapter 3: Europe
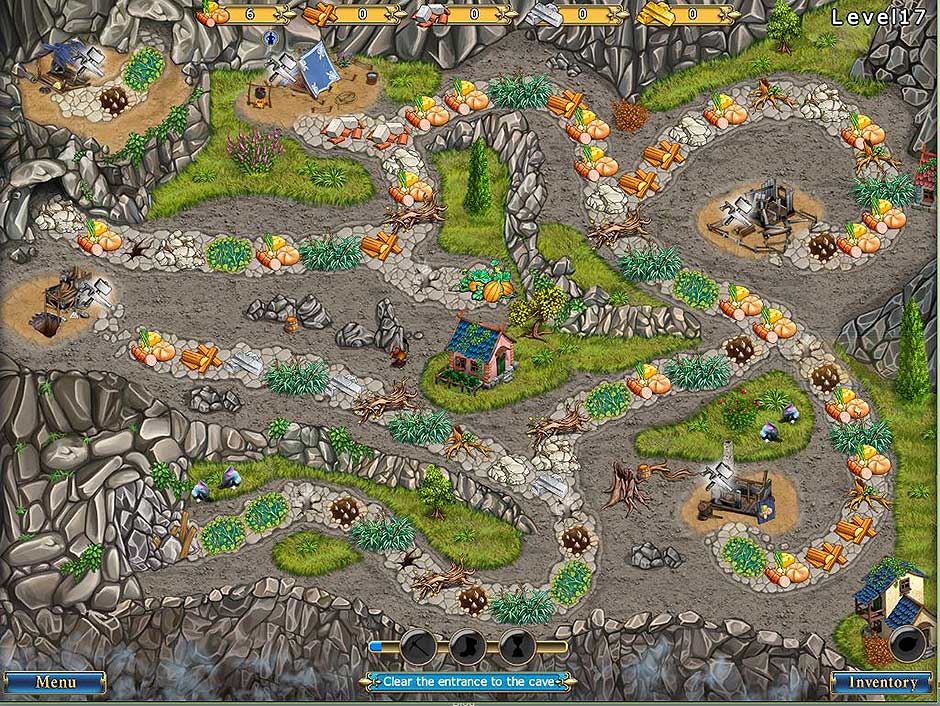
Episode 17 – Hit or Miss
Jill and Mike are reunited with an old friend at a tulip plantation in the Netherlands. Meanwhile, the “Gardens Inc.” show’s first episode premieres on TV. Will it be a success?
Objectives:
- Fix the landing pad
- Fix all wells (0/3)
- Build the altar
- Plant all plants (0/8)
- Bonus Goal: All flowers must be equal/the same type
![Gardens Inc 4 – Blooming Stars Episode 17]()
Gardens Inc 4 – Blooming Stars Episode 17
How to beat the level:
- Clear the branch in front of the truck.
Tip: Once cleared, collect the wood in front of the wood shack.
- Collect the tools resources in the area.
- Upgrade the truck.
- Use the exchange outpost to exchange wood for tools at regular intervals.
- Clear the stumps blocking the path, but not the stumps in front of the landing pad or the altar.
- Rebuild the supplier shack and select stone as the resource output.
- Upgrade the truck again.
- Clear the path leading to the seed shack.
Tip: Continue to exchange wood for tools.
- Remove the stumps in front of the altar and landing pad once the “Fast Work” bonus is available and active.
- Rebuild the altar.
Tip: Use the altar for all your bonus needs.
- Rebuild the landing pad.
Tip: Send the helicopter to retrieve stone resources on a regular basis.
- Clear all paths.
- Rebuild the seed shack.
- Upgrade the seed shack.
- You will need 15 stone to repair the wells.
Tip: Once you’ve acquired 15 stone, change the supplier shack so that it provides wood. Have the helicopter start to retrieve tools.
- Plant all flowers.
Tip: Plant the same type of flower in the 4 upper planters, and the same type of flower in the planter pairs on the left and right.
- Collect the coins.
- Repair the 3 wells.
Tip: Continue to collect wood and tools to do this. Use the “Fast Work” bonus to do this quickly.
- Click on the check mark over the truck to complete the level.
Episode 18 – A Festive Job
Jill, Mike, and Nicole are asked to prepare a garden for a national folk festival. There will be singing and there will be dancing, but only if the “Gardens Inc.” team can finish the job on time!
Objectives:
- Remove garbage from the paths (0/17)
- Fix all broken paths (0/6)
- Plant and water all plants (0/10)
- Bonus Goal: Each type of flower may only be planted on the inside, or the outside of the ring. If a flower is planted in the inner ring, it cannot be planted on the outer ring and vice versa.
![Gardens Inc 4 – Blooming Stars Episode 18]()
Gardens Inc 4 – Blooming Stars Episode 18
How to beat the level:
- Clear the weeds in front of the truck.
- Use the tools workbench 2 times with the “Fast Work” bonus active.
Tip: Continue using the workbench after upgrading the truck to acquire enough resources to build the switchable shack.
- Upgrade the truck.
- Clear the path leading to the switchable shack.
- Open the 2 crates near the switchable shack.
Tip: They contain stone and wood resources.
- Rebuild the switchable shack and select wood as the resource output.
- Clear the path to the right.
Tip: Open the 2 crates along the path to gather additional stone and wood resources.
- Rebuild the worker shack.
Tip: Continue using the tool workbench during this time.
- Repair the seed workbench.
Tip: Use this often. You will need 40 seeds in total.
- Clear the path leading to the rock shack.
- Rebuild the rock shack.
- Upgrade the truck again.
- Open the silver chest.
Tip: The silver chest is hidden on the left behind a barrel of hay, to the upper left of the stone shack.
- Clear the path to the landing pad.
- Upgrade the rock shack.
- Clear away the garbage pile in front of the second tool workbench.
Tip: You will need 2 workers in order to complete this task.
- Rebuild the landing pad.
- Use the helicopter to retrieve both tools and wood.
Tip: Alternate resources the helicopter brings, e.g. tools, wood, tools, wood, etc.
- Clear the path leading to the water shack.
- Rebuild the water shack.
- Upgrade the rock shack again.
- Clear the obstructions on the lower paths.
- Repair the altar.
- Upgrade the water shack.
- Collect the coins.
- Clear all remaining paths.
- Upgrade the water shack to its maximum level.
Tip: Once fully upgraded, change the resource output of the switchable shack to tools. Have the helicopter retrieve tools, too.
- Repair the pump at the bottom of the screen using the gardener.
- Plant flowers, starting with the square flower beds.
Tip: Click on the flowers in the square flower beds to have the gardener water them.
- Plant all remaining flowers.
- Click on the check mark over the truck to complete the level.
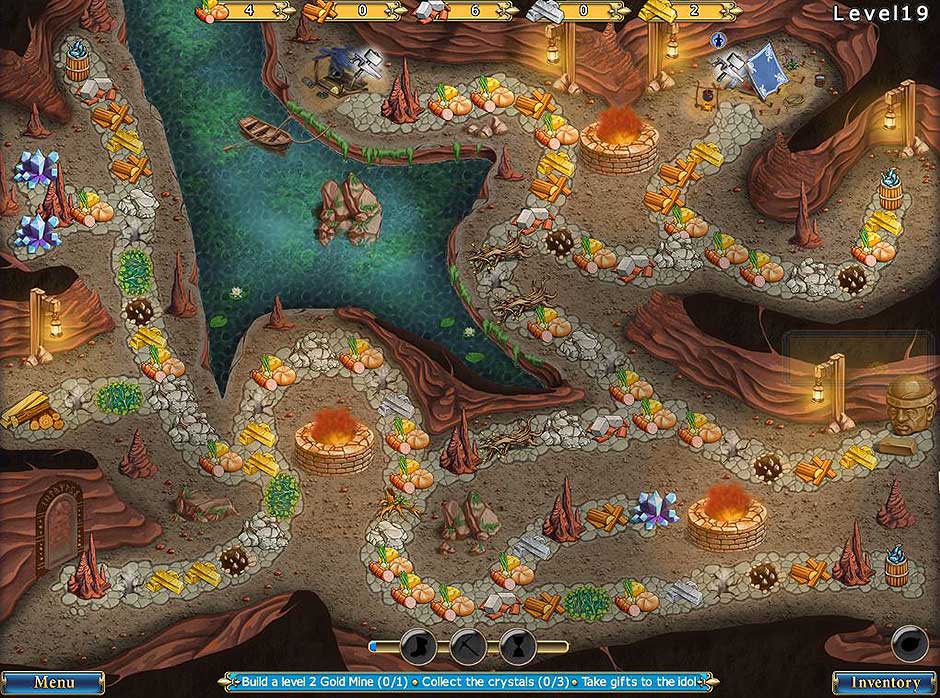
Episode 19 – Stylish Security
After the premiere’s success, the “Gardens Inc.” crew faces an onslaught of scoop-thirsty paparazzi and other seedy, thieving individuals. Jill and Mike must learn how to deal with on-set security issues.
Objectives:
- Build the security shack
- Build expert security shacks (0/2)
- Renovate all spherical bushes (0/6)
- Heal an ancient tree
- Plant and water all plants (0/8)
- Bonus Goal: Make the upper and lower portions of the map mirror each other
![Gardens Inc 4 – Blooming Stars Episode 19]()
Gardens Inc 4 – Blooming Stars Episode 19
How to beat the level:
- Pick up the tools nearby.
- Start clearing the path, starting with the weeds.
- Pick up 1 pile of stone on the right.
- Clear the path to the tool workbench.
- Rebuild the tool workbench.
Tip: Collect tools from the tool workbench right away so that you can upgrade the truck.
- Upgrade the truck.
Tip: Once upgraded, have one worker continuously work on gathering tools from the tool workbench.
- Go to the switchable shack and select wood as the resource output.
- Upgrade the truck again.
- Clear the path leading to the left.
Tip: Collect the crate filled with stone.
- Clear the path leading to the security shack.
- Rebuild the security shack.
- Clear the path leading to the worker shack.
- Rebuild the worker shack.
- Clear and restore the path leading down to the expert security shack in the lower right corner.
Tip: Collect all the stone you come across as you do this. Do not rebuild this expert security shack just yet.
- Clear the path to the upper left.
- Rebuild the expert security shack.
- Rebuild the seed shack.
- Rebuild the second switchable shack and select stone as the resource output.
- Clear the path leading to the tree on the lower left.
- Rebuild the water shack.
- Rebuild the expert security shack on the lower right.
Tip: Stop providing the security shack and expert security shack on the upper left with tools once this is built.
- Upon gaining 10 wood resources, change the resource output of both switchable shacks to tools.
- Upgrade the water shack to the maximum level.
- Upgrade the seed shack to the maximum level.
- Clear all remaining paths.
- Restore all the spherical bushes.
- Plant flowers in the square flower beds and have the gardener water them.
- Restore the ancient tree.
- Plant the remaining flowers.
Tip: Collect any extra tools as necessary to complete this task.
- Click on the check mark over the truck to complete the level.
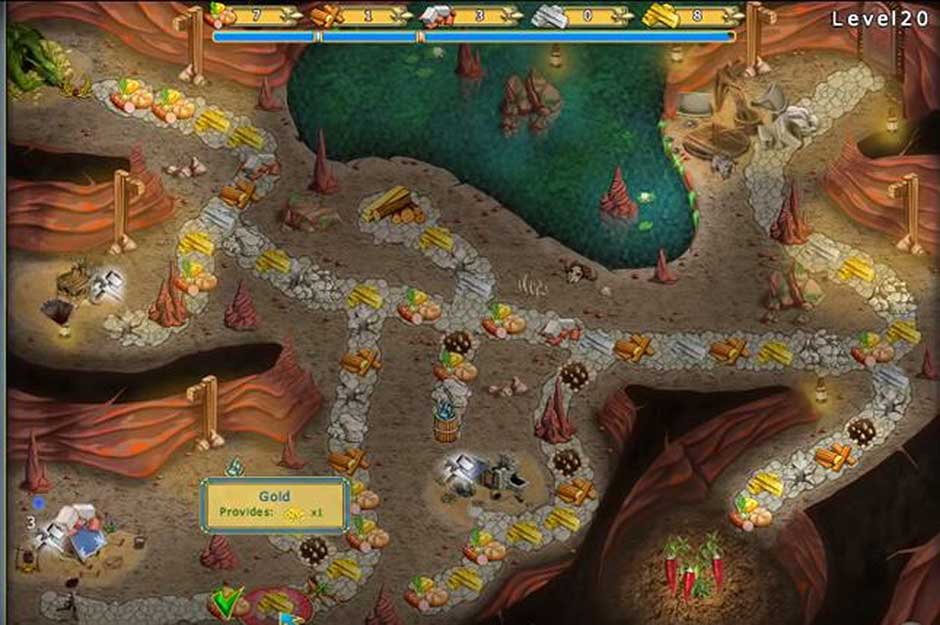
Episode 20 – Contamination
In Denmark, Jill and Mike visit an organic farm. An oil spill has damaged the farm’s garden and contaminated the nearby river. Can Jill and Mike help avert disaster?
Objectives:
- Build the security shack
- Build expert security shacks (0/3)
- Remove all oil spills (0/6)
- Plant and water all plants (0/6)
- Bonus Goal: Make each area of the farm unique
![Gardens Inc 4 – Blooming Stars Episode 20]()
Gardens Inc 4 – Blooming Stars Episode 20
How to beat the level:
- Rebuild the security shack.
Tip: Collect all tools in the area.
- Upgrade the truck.
- Clear and restore the paths leading to the rock shack and exchange outpost.
- Clear the stump near the exchange outpost.
Tip: Use the “Fast Shacks” bonus to gather extra tools prior to completing this task.
- Upgrade the tool shack.
- Upgrade the rock shack.
- Clear the path leading to the wood shack.
- Rebuild the wood shack.
- Rebuild the security shack.
- Clear the path leading to the lower left.
Tip: Do not build the expert security shack yet. The security shack on its own will be enough to handle things for now.
- Upgrade the wood shack.
- Upgrade the tool shack again.
Tip: Use the “Fast Shacks” bonus again.
- Rebuild the boat shack.
- Upgrade the truck again.
- Rebuild the second boat shack.
- Clear the path leading to the divers’ shack.
- Rebuild the divers’ shack.
Tip: Have the diver start gathering oxygen as soon as this is complete.
- Clear the oil spills.
- Clear all remaining paths.
- Use the exchange outpost to exchange wood for seed resources. Exchange resources until you have 30 seeds.
- Rebuild the water shack.
- Upgrade the water shack to maximum level.
- Restore the pump on the left beneath the truck using the gardener.
- Rebuild all 3 expert security shacks.
- Plant flowers in the planters.
- Remove the coin buoys with the diver.
Tip: Collect any remaining oxygen you need to do this.
- Open the golden chest.
Tip: The golden chest is located in the bottom right corner, to the right of the divers’ shack.
- Click on the check mark over the truck to complete the level.
Episode 21 – Bad Neighborhood
Garden Defense! A neighboring farm is being attacked by a local gang of vandals. Jill and Mike decide to help the locals restore order in the community!
Objective:
![Gardens Inc 4 – Blooming Stars Episode 21]()
Gardens Inc 4 – Blooming Stars Episode 21
How to beat the level:
- The goal of this level is to protect the garden. The garden is considered lost once all the flower beds are destroyed.
- This level is optional and can be stopped at any time. You do not need to finish it to progress.
- Reach the silver chest in the center of the level by clearing the garbage blocking the path.
Tip: You will need 2 workers and 5 tools to remove the final garbage pile blocking your way.
Episode 22 – Things That Go Boom
A man claiming to be a time traveler, who decided to settle down in the 21st century, asks Jill and Mike to build him a wonderful garden. The problem? Heavy rubble that needs to be blown up!
Objectives:
- Build a demolition worker shack
- Remove all piles of rubble (0/5)
- Fix all fence parts (0/5)
- Remove all oil spills (0/5)
- Plant all plants (0/10)
- Bonus Goal: Plant 4 identical plants and 1 unique plant in one set of planters. Plant 4 of the unique plant and 1 of the 4-set from the first set of planters in the second set of planters.
![Gardens Inc 4 – Blooming Stars Episode 22]()
Gardens Inc 4 – Blooming Stars Episode 22
How to beat the level:
- Use the tool workbench 2 times to collect tools.
Tip: Use the “Fast Work” bonus.
- Upgrade the truck.
- Clear the path leading to the wood workbench below the truck.
Tip: Have 1 worker continue to use the tool workbench during this time.
- Clear away the garbage pile in front of the supplier shack.
Tip: Collect the wood in this area.
- Rebuild the supplier shack and select stone as the resource output.
- Repair the wood workbench.
Tip: Have a worker start using this right away.
- Upgrade the truck again.
- Clear the paths leading to the divers’ shack and demolition shack.
- Refill the supplier shack, if needed. Have the workers continue using the tool and wood workbenches.
- Rebuild the boat shack at the bottom of the area.
- Repair the bridge.
- Rebuild the seed workbench.
Tip: Use it right away.
- Have the demolition worker pick up TNT in front of the demolition shack.
- Collect oxygen with the diver.
- Clear the oil spills.
- Collect the coin buoys.
- Rebuild the landing pad and have the helicopter retrieve seed resources.
- Remove the rubble on the left using the demolition worker.
- Open the golden chest.
Tip: The chest is hidden behind a pile of books on the upper left, next to the lower flower bed.
- Continue collecting seed resources with the helicopter until you have a total of 45. Once you’ve obtained 45 seed resources, change the helicopter’s resource output to tools.
Tip: Additionally, stop using the seed workbench at this time.
- Rebuild the altar.
Tip: Use this for all your bonus needs.
- Plant all flowers.
- Fix all the fences.
- Click on the check mark over the truck to complete the level.
Episode 23 – Space Battles
The “Gardens Inc.” team ventures further north, to Sweden. They’re tasked with assisting a movie crew in preparing a garden set for the eighth episode of the “Space Battles” saga.
Objectives:
- Fix all stone benches (0/7)
- Build the security shack
- Build expert security shacks (0/3)
- Plant and water all plants (0/8)
- Bonus Goal: Plant warm-colored (e.g. red, pink) flowers in the upper set of planters. Plant cool-colored (e.g. blue, purple) flowers in the lower set of planters.
![Gardens Inc 4 – Blooming Stars Episode 23]()
Gardens Inc 4 – Blooming Stars Episode 23
How to beat the level:
- Remove the snow directly below the truck.
Tip: Collect the 2 tools lying nearby.
- Upgrade the truck.
- Clear the stump beneath the truck. Continue clearing the path and remove the second stump you encounter, too.
- Clear the path leading to the switchable shack. Select stone as the resource output.
- Clear the path leading to the worker shack.
Tip: Beware of bandits! Try to avoid them to prevent them from stealing anything.
- Rebuild the worker shack.
- Clear the path leading across the top of the map.
- Rebuild the expert security shack.
- Upgrade the worker shack.
- Clear the remaining paths.
- Rebuild the expert security shack at the bottom of the area.
- Upgrade the tool shack.
- Rebuild the switchable shack along the upper path and select seeds as the resource output.
Tip: Switch the resource of the first switchable shack from stone to wood.
- Repair the stairs connecting the upper and lower portions of the map.
- Rebuild the demolition shack.
- Clear the stump on the top left (if you haven’t already).
- Rebuild the expert security shack on the far left.
- Repair the staircase between the expert security shack and the demolition shack.
- Rebuild the security shack on the middle left, next to the middle staircase.
Tip: Stop providing the expert security shacks with tools at this point.
- Change the resource output of the upper switchable shack from seeds to tools as soon as you acquire 32 seeds.
- Rebuild the altar.
Tip: Use this as needed to best utilize your time.
- Collect 2 TNT using the demolition worker.
- Rebuild the water shack.
- Upgrade the water shack to the maximum level.
- Change the resource output of the switchable shack on the right from wood to back to stone.
- Plant the flowers in the square flower beds first.
Tip: Water the flowers using the gardener.
- Plant the remaining flowers.
- Fix the stone benches.
- Click on the check mark over the truck to complete the level.
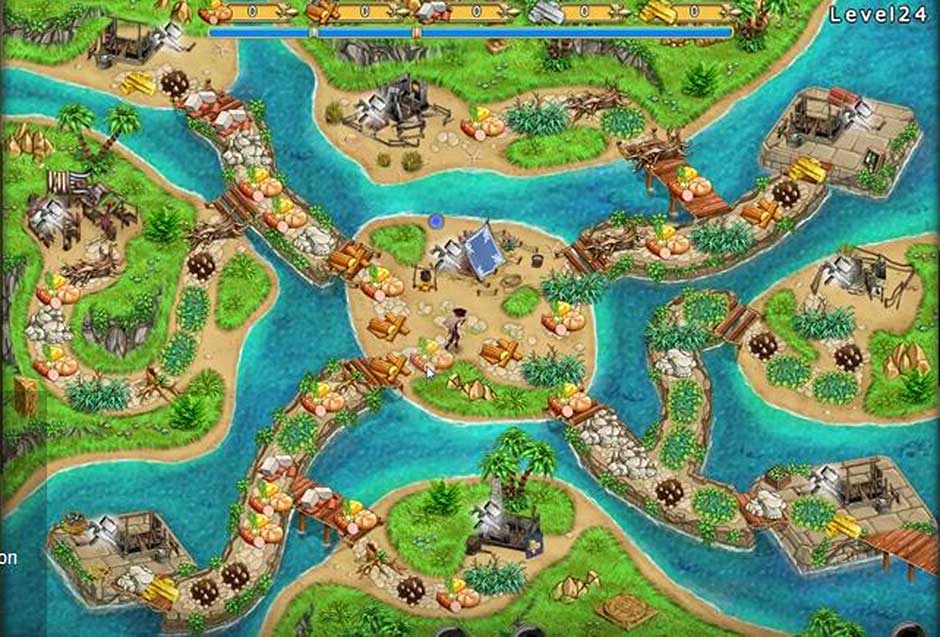
Episode 24 – The Rotten Batch
Jill and Mike face a tough challenge: their flower seeds are rotten, so to complete the next job they’ll need to barter with the people working in the fishing port.
Objectives:
- Fix the windmill
- Remove the boulders (0/5)
- Plant and water all plants (0/8)
- Bonus Goal: Of each set of 4 planters, 3 must share the same type of flower, and 1 must be unique. You may repeat the flower type and pattern between the two sets of 4 planters.
![Gardens Inc 4 – Blooming Stars Episode 24]()
Gardens Inc 4 – Blooming Stars Episode 24
How to beat the level:
- Clear away the tall grass blocking the way to the tool workbench.
- Use the tool workbench.
Tip: Use the “Fast Work” bonus to collect 2 tools from the workbench.
- Upgrade the truck.
Tip: Have 1 worker continue using the tool workbench.
- Clear the path leading to the wood workbench.
- Use the wood workbench.
- Upgrade the truck again.
- Clear the path leading to the second tool workbench.
- Rebuild the second tool workbench.
Tip: Use the workbenches often, especially the tool workbenches.
- Restore the path leading to the worker shack.
- Rebuild the worker shack.
Tip: Use the “Fast Work” bonus to remove the large stone on the bottom right once completed.
- Clear the path leading to the security shack.
- Rebuild the security shack.
- Remove the large stone blocking access to the rock workbench.
- Rebuild the rock workbench.
Tip: Use this as soon as you rebuild it.
- Upgrade the worker shack.
- Clear the path leading to the windmill.
- Remove all obstructions blocking the paths to the flower beds.
- Rebuild the water shack.
- Upgrade the water shack to the maximum level.
- Rebuild the exchange outpost.
Tip: Immediately start exchanging tools for seeds until you’ve acquired 32 seed resources.
- Rebuild both expert security shacks.
- Repair the windmill.
- Plant all flowers. Water them using the gardeners.
- Click on the check mark over the truck to complete the level.
Episode 25 – The Eve
Coin Frenzy! On the eve of Halloween, the “Gardens Inc.” crew prepares for the final gardening job in Europe!
Objective:
- Collect as many coins as you can!
![Gardens Inc 4 – Blooming Stars Episode 25]()
Gardens Inc 4 – Blooming Stars Episode 25
How to beat the level:
- Collect as many coins as you can before time runs out.
- Clear the paths in order to reach the rafts holding the coins.
- This level is optional. You do not have to complete it to progress.
- Rescue all workers in order to gain the best score!
- The silver chest is located on the upper right.
Tip: You will need 2 workers and 3 tools in order to remove the final stump blocking your path.
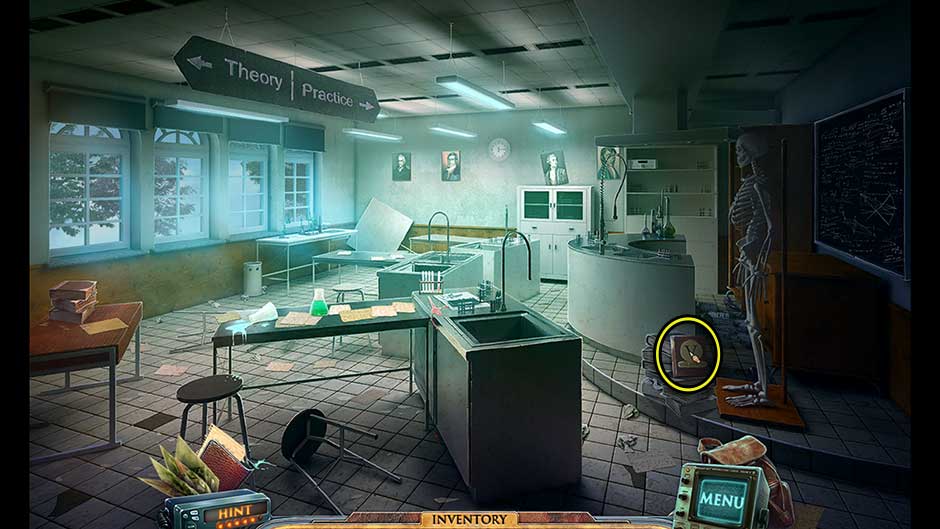
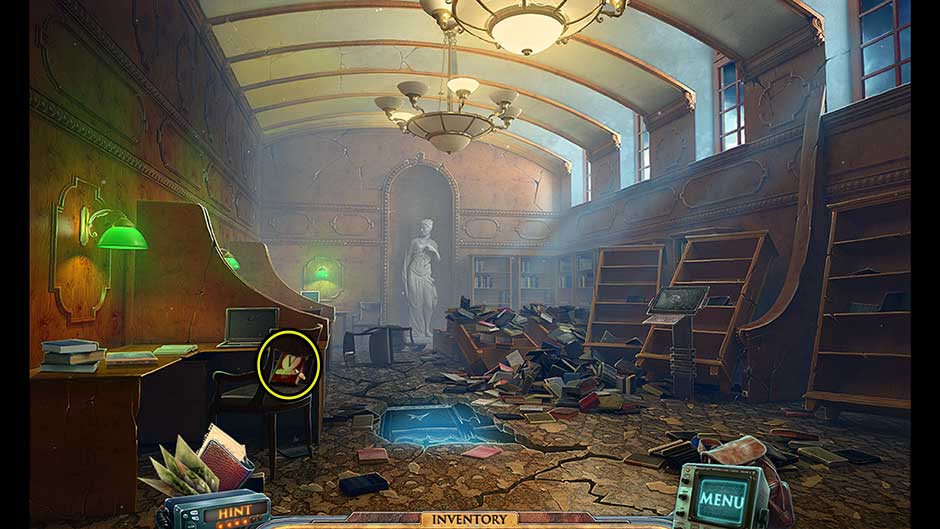
Episode 26 – Shocking Cliffhanger
It’s the crew’s final day in Europe. Jill and Mike prepare a garden for the town’s Halloween party, but celebration soon turns to horror, as events take a turn for the worst…
Objectives:
- Remove all piles of rubble (0/5)
- Remove water obstacles (0/10)
- Plant and water all plants (0/9)
- Bonus Goal: Each planter must have a unique flower. No two planters can share the same type.
![Gardens Inc 4 – Blooming Stars Episode 26]()
Gardens Inc 4 – Blooming Stars Episode 26
How to beat the level:
- Pick up the tools in front of the tool shack.
- Clear the path leading to the tool workbench.
- Rebuild the tool workbench.
Tip: Use the workbench once upon repairing it.
- Upgrade the truck.
Tip: Continue using the tool workbench until you have enough resources to upgrade the truck again.
- Upgrade the truck again.
- Clear the path leading to the rock workbench.
- Clear the path leading to the supplier shack and wood workbench.
- Rebuild the rock workbench.
Tip: Continue using both the tool workbench and rock workbench during this time.
- Rebuild the wood workbench.
Tip: Use this right away upon repairing it.
- Rebuild the supplier shack and select seed as the resource output.
- Rebuild the demolition shack.
- Rebuild the seed workbench.
- Rebuild the divers’ shack.
- Collect oxygen with the diver.
- Collect TNT with the demolition worker.
- Clear the path leading to the landing pad.
Tip: Have the helicopter retrieve tools upon reaching the area.
- Open the golden chest.
Tip: The golden chest is hidden behind the wheat to the right of the landing pad.
- Rebuild the boat shack on the upper left.
- Remove the water garbage from the water on the upper left.
- Remove the oil spills and collect the coin buoys with the diver.
- Upgrade the tool shack to the maximum level.
- Clear all remaining paths.
Tip: Use the demolition worker as necessary to complete this task.
- Rebuild the boat shack on the bottom right.
Tip: Collect additional oxygen with the diver at this point.
- Rebuild the water shack.
- Upgrade the water shack to the maximum level.
- Remove the water garbage on the lower right.
- Remove the oil spills and collect the coin buoys on the lower right using the diver.
- Rebuild the altar.
Tip: Use as needed to increase the speed of your work.
- Plant all plants and water them with the gardeners.
- Click on the check mark over the truck to complete the level.
Special 3 – Shore Quest
“Jill, Mike, I have another job for you! The town’s coastline has been damaged by a storm, and volunteers are being recruited to help restore it to its previous glory.”
Objectives:
- Fix all benches (0/5)
- Remove garbage from the water (0/4)
- Plant and water all plants (0/9)
- Bonus Goal: Plant two types of flowers (example- flower A and flower B) using the following pattern per set of 3 planters: ABB, BAB, BBA
![Gardens Inc 4 – Blooming Stars Special 3]()
Gardens Inc 4 – Blooming Stars Special 3
How to beat the level:
- Remove the branches blocking the way to the tool shack.
- Collect the tools lying around the path in this area.
- Upgrade the truck.
- Remove the stone and the branches blocking the path.
- Repair the stairs.
- Clear the path on the upper landing leading to the tool workbench.
- Repair the tool workbench.
Tip: Once built, use this right away.
- Clear the mid and upper paths.
- Rebuild the divers’ shack.
- Change the resource output on the switchable shack to stone.
- Upgrade the truck again.
- Upgrade the tool shack.
Tip: Use the tool workbench again at this point.
- Rebuild the seed workbench.
- Collect oxygen from the oxygen station using the diver.
Tip: Repair the stairs to reach this area if you haven’t done so already.
- Clear the path leading to the boat shack.
- Change the resource output of the switchable shack from stone to wood once you’ve acquired 10 stone resources.
- Upgrade the tool shack to the maximum level.
- Rebuild the demolition shack.
- Repair any remaining staircases.
- Remove the water garbage.
- Repair the wooden benches near the seed workbench.
- Remove any remaining rubble.
- Clear any remaining paths.
- Collect the coins and open the silver chest.
- Repair the wooden benches at the bottom of the area.
- Plant the water flowers with the diver.
- Plant all remaining flowers on land.
- Click on the check mark over the truck to complete the level.
Chapter 4: Africa
Episode 27 – One Week Later
After an unexpected scare and news of their twins, Jill and Mike are back on set. Now expecting both a boy and a girl, a new set of adventures awaits them in Africa.
Objectives:
- Fix all lamps (0/14)
- Fix all stairs (0/3)
- Plant all plants (0/10)
- Bonus Goal: Sets of 2 planters must have unique types of flowers per planter. Sets of 3 planters must have the same type of flower in all planters of that trio.
![Gardens Inc 4 – Blooming Stars Episode 27]()
Gardens Inc 4 – Blooming Stars Episode 27
How to beat the level:
- Remove the pile of leaves blocking the path to the tool shack.
Tip: Collect the piles of tools in the immediate area.
- Upgrade the truck.
- Clear the path leading to the universal workbench.
- Use the universal workbench to acquire tools.
- Upgrade the truck again.
- Use the universal workbench to acquire stone.
- Repair the stone staircase.
- Clear the path leading to the left and collect the wood.
- Upgrade the tool shack.
- Use the universal workbench, switching between stone and wood for resource output.
- Clear the path leading left and repair the wooden staircases.
- Clear the huge weed above the stairs.
Tip: When you’ve acquired enough tools to remove the stones on the upper right, use the “Extra Resource” bonus.
- Continue using the universal workbench, switching between tools and wood.
- Upgrade the tool shack again.
- Rebuild the hang glider shack.
- Collect the green seed balloons.
- Rebuild the second hang glider shack.
- Clear the remaining portion of the upper left path.
Tip: When removing the stones, use the “Extra Resource” bonus.
- Rebuild the supplier shack and choose wood as the resource output.
- Rebuild the exchange outpost on the upper right.
Tip: Exchange wood for seeds.
- Plant seeds in the planters.
- Repair the lamps.
- Click on the check mark over the truck to complete the level.
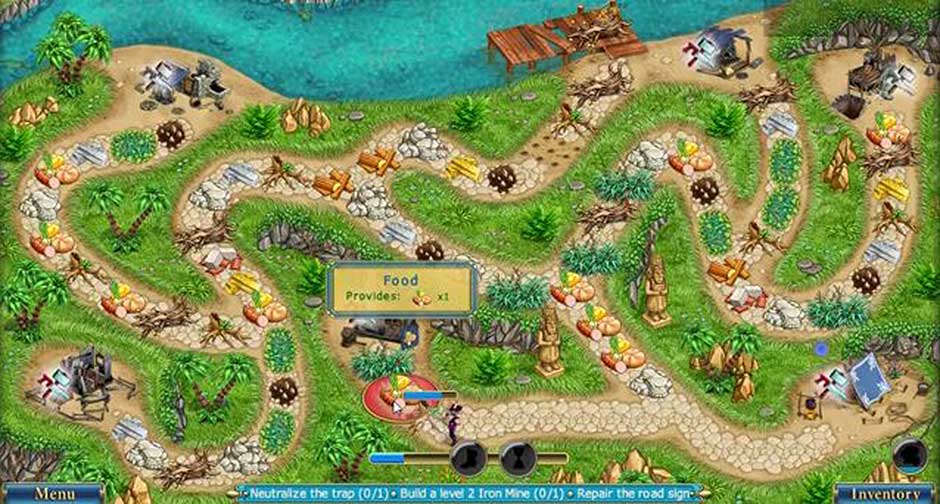
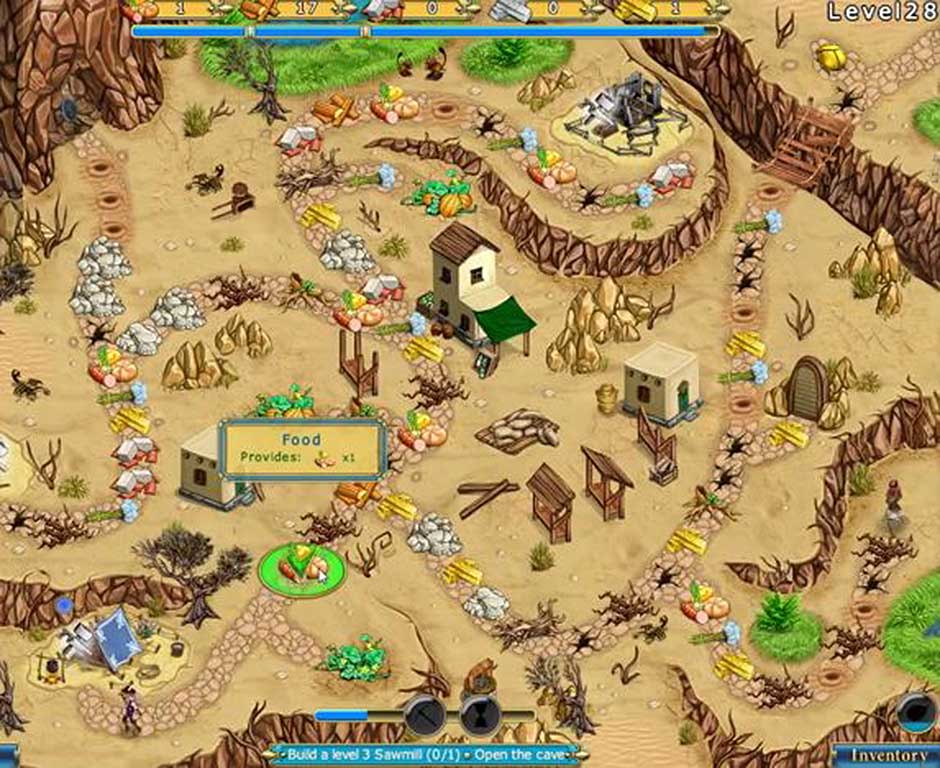
Episode 28 – Ancient History
Jill and Mike visit a museum of Egypt’s history. Its director asks Jill and Mike to build a small garden on the museum’s premises.
Objectives:
- Fix all wooden benches (0/10)
- Remove all piles of rubble (0/6)
- Plant and water all plants (0/8)
- Bonus Goal: The left and right circles of planters must share the same color flower.
![Gardens Inc 4 – Blooming Stars Episode 28]()
Gardens Inc 4 – Blooming Stars Episode 28
How to beat the level:
- Clear the sand on the path leading to the universal workbench.
- Use the universal workbench to make tools.
Tip: Use the “Fast Work” bonus to double the output of tools made.
- Upgrade the truck.
- Clear the path leading to the tool shack.
Tip: Continue making tools at the universal workbench during this time.
- Upgrade the truck again.
- Clear the path leading to the landing pad and around the circle.
- Upgrade the tool shack.
- Use the universal workbench to make stone.
- Clear the stump near the altar.
- Upgrade the tool shack again.
- Use the universal workbench again, alternating between wood and stone resource output.
- Rebuild the demolition shack.
- Rebuild the landing pad.
Tip: Have the helicopter deliver seeds.
- Collect 2 TNT with the demolition worker.
Tip: Once you’ve acquired more seeds, have the demolition worker collect more TNT.
- Clear the path leading up to the bridge.
- Upgrade the tool shack to the maximum level.
- Restore the path near the top of the area to reach the broken benches.
- Clear the path on the left side of the map, working your way upward.
- Rebuild the seed workbench.
Tip: At this point, change the helicopter resource delivery so that it alternates between stone and wood.
- Use the seed workbench.
- Remove any remaining rubble.
- Rebuild the worker shack.
- Rebuild the water shack.
- Upgrade the worker shack.
- Upgrade the water shack.
- Restore the sandy path on the lower left, next to the canal.
- Open the golden chest.
Tip: The golden chest is located behind pillar on the lower left, beneath the left circular path.
- Rebuild the altar.
- Upgrade the water shack to the maximum level.
- Repair the pump beneath the bridge on the right with a gardener.
- Plant seeds in the planters, using the gardeners to water them.
- Repair all remaining benches.
- Click on the check mark over the truck to complete the level.
Episode 29 – Bloodsuckers
The “Gardens Inc.” crew makes a stop at a tourist spot in the middle of nowhere. Unfortunately, the area is overrun by bloodthirsty mosquitoes. Jill and Mike must find a way to get rid of them – and fast!
Objectives:
- Build an insect catcher shack
- Catch all mosquito swarms (0/5)
- Plant and water all plants (0/12)
- Bonus Goal: Make sure all gardens match
![Gardens Inc 4 – Blooming Stars Episode 29]()
Gardens Inc 4 – Blooming Stars Episode 29
How to beat the level:
- Pick up all the wood and clear the tall grass from the path.
- Use the exchange outpost to trade wood for 2 tools.
- Upgrade the truck.
- Upgrade the wood shack.
- Clear the path leading to the insect catcher shack.
- Rebuild the insect catcher shack.
- Restore the paths leading right and up toward the universal workbench.
- Upgrade the truck again.
- Repair the universal workbench.
- Rebuild the demolition shack.
- Clear the path leading to the TNT pit.
- Use the universal workbench 2 times to produce stone.
Tip: Use the universal workbench to produce wood afterward.
- Clear the path leading to the hang glider shack.
- Rebuild the hang glider shack.
- Collect the orange wood balloons.
- Clear the path leading to the seed shack.
- Rebuild the seed shack.
- Upgrade the seed shack.
- Clear the path leading to the right, collecting TNT with the demolition worker to destroy the rubble as you go.
- Repair the stairs.
- Rebuild the water shack.
- Collect the coins.
- Open the silver chest.
Tip: The silver chest is located on the rocky outcrop on the upper left.
- Rebuild the 2 hang glider shacks toward the top of the area.
- Clear the paths on the upper right portion of the map.
- Plant seeds in the square flower beds first.
- Upgrade the water shack to the maximum level.
- Water the plants with the gardeners.
Tip: Have 1 gardener repair the pump at the top of the map.
- Plant the remaining flowers in the flower beds.
- Click on the check mark over the truck to complete the level.
Episode 30 – Commitments
An old train station is due to be reopened, but is still in need of some serious repairs. Jill and Mike are tasked with both renovating the garden, and repairing the station. Later, Vincent has some unexpected news.
Objectives:
- Fix the railway (0/12)
- Remove all piles of rubble (0/5)
- Plant and water all plants (0/12)
- Bonus Goal: Make your gardens on each side of the railroad track symmetrical
![Gardens Inc 4 – Blooming Stars Episode 30]()
Gardens Inc 4 – Blooming Stars Episode 30
How to beat the level:
- Pick up the tools in front of the tool shack, as well as the tools near the truck.
- Clear the path leading to the wood workbench.
- Upgrade the truck.
- Use the wood workbench.
- Clear the path leading to the universal workbench.
- Upgrade the tool shack.
Tip: Collect any remaining tools in the area.
- Rebuild the universal workbench.
Tip: Start using the universal workbench right away, and select stone as the resource output.
- Rebuild the demolition shack.
- Upgrade the truck again.
- Upgrade the tool shack again.
- Rebuild the landing pad.
Tip: Have the helicopter bring in seeds until you have 72 seeds total.
- Begin clearing away any obstructions over the tracks.
Tip: Don’t stop using the wood workbench yet.
- Repair the bridge.
- Clear the path leading to the hang glider shack.
- Collect TNT with the demolition worker.
- Repair the stairs.
- Rebuild the insect catcher shack.
- Rebuild the hang glider shack toward the bottom of the map.
- Collect the seed balloons.
- Rebuild the water shack.
- Upgrade the water shack.
- Repair the pump at the top of the map using a gardener.
- Plant seeds in the square flower beds first.
- Rebuild the hang glider shack and clear the big rubble behind it.
- Clear all remaining paths.
- Upgrade the water shack again.
- Rebuild the seed workbench.
Tip: Have the helicopter start bringing you tools instead of seeds at this point.
- Collect all coins along the tracks.
- Plant all remaining flowers.
- Click on the check mark over the truck to complete the level.
Episode 31 – Creatures of the Desert
Garden Defense! A local newspaper writer asks Jill and Mike to help him protect his garden from a pincer attack by wolves and scorpions.
Objective:
![Gardens Inc 4 – Blooming Stars Episode 31]()
Gardens Inc 4 – Blooming Stars Episode 31
How to beat the level:
- The level will be lost as soon as the lions and/or scorpions destroy the garden.
- This level is optional. You do not have to complete it to progress.
- Free all workers in order to open the silver chest and obtain the highest score.
- The silver chest is located on the left between 2 gold cat statues.
Tip: You will need to clear garbage blocking the path in order to reach the silver chest. The final garbage pile requires 2 workers and 5 tools to remove.
Episode 32 – Gardening on the Nile
The “Gardens Inc.” crew need to cross the Nile to get to their next destination. The ferry tickets cost a fortune, but if Jill and Mike can renovate the port’s garden, they can earn a big discount!
Objectives:
- Remove debris (0/2)
- Remove water obstacles (0/6)
- Catch all snakes (0/5)
- Plant and water all plants (0/12)
- Bonus Goal: Make dry planters symmetrical and wet planters asymmetrical
![Gardens Inc 4 – Blooming Stars Episode 32]()
Gardens Inc 4 – Blooming Stars Episode 32
How to beat the level:
- Pick up the tools.
- Remove the tall grass blocking the path to the universal workbench.
- Use the universal workbench to produce 2 tools.
- Upgrade the truck.
- Use the universal workbench to produce 1 wood.
- Clear the path leading to the second universal workbench.
- Use the universal workbench to produce stone.
- Upgrade the truck again.
- Rebuild the second universal workbench.
Tip: Use both universal workbenches to produce tools at this time.
- Clear the path leading to the worker shack.
- Rebuild the worker shack.
- Use the universal workbenches to produce tools, stone, and wood in alternating shifts.
- Clear the path leading to the altar.
- Rebuild the altar.
Tip: Use the altar often during this level, particularly the “Fast Work” and “Time Halt” bonuses. Use these throughout the entire level.
- Clear the path leading to the animal catcher shack.
- Rebuild the animal catcher shack.
- Repair the third universal workbench.
- Remove the snakes using the animal catcher.
- Rebuild the fourth universal workbench.
- Rebuild the divers’ shack.
- Upgrade the truck again.
- Clear the path leading to the boat shacks.
Tip: Use the universal workbenches to provide yourself with tools, seed, wood, and stone as needed.
- Collect oxygen using the diver.
- Remove the branches from the water.
Tip: Stop producing wood and stone at this point and instead focus on producing tools and seed.
- Clear the paths on the left and right.
- Plant water flowers using the diver.
- Collect the coins.
- Open the silver chest.
Tip: The silver chest is located on the lower right.
- Plant all remaining flowers.
- Collect the 2 coin buoys.
- Click on the check mark over the truck to complete the level.
Episode 33 – Digging in the Dirt
Jill and Mike are tasking with preparing a birthday party for a distinguished archaeologist at the site of a dig. Later, the team faces another crisis.
Objectives:
- Catch all animals (0/10)
- Renovate all spherical bushes (0/10)
- Fix all benches (0/10)
- Plant and water all plants (0/6)
- Bonus Goal: One, two, three; one, two three – the 1st and 4th planters must match, the 2nd and 5th planters must match, and the 3rd and 6th planters must match.
![Gardens Inc 4 – Blooming Stars Episode 33]()
Gardens Inc 4 – Blooming Stars Episode 33
How to beat the level:
- Collect the stone.
- Use the exchange outpost to exchange the stone for tools.
Tip: Use the “Half Price” bonus often, but don’t wait around to use it, particularly when you have larger tasks or projects to attend to. This bonus is particularly useful when used while exchanging resources or planting seeds.
- Clear the path leading to the second exchange outpost.
- Clear the path leading to the animal catcher shack.
- Exchange stone for wood at the second exchange outpost.
Tip: Continue to exchange these resources throughout the level as needed.
- Rebuild the animal catcher shack.
- Rebuild the rock workbench.
Tip: Use this right away once repaired.
- Upgrade the rock shack.
- Upgrade the truck.
- Clear the path leading to the hang glider shack.
- Clear the path leading to the flower beds toward the bottom left.
- Rebuild the third exchange outpost.
Tip: Exchange stone for seeds until you have a total of 60 seeds. Use the “Half Price” bonus as able.
- Rebuild both hang glider shacks.
- Collect the coin balloons.
- Clear the path behind the hang glider shack.
- Rebuild the second rock workbench.
- Upgrade the rock shack to maximum level.
- Upgrade the truck to maximum level.
- Clear all remaining paths.
- Rebuild the water shack.
- Upgrade the water shack.
- Collect the coins.
- Plant the flowers.
- Upgrade the water shack again.
- Repair the pump on the left with the gardener.
- Exchange stone for wood and tools.
Tip: Use the “Half Price” bonus to repair the benches and water the flowers.
- Water all remaining flowers.
- Click on the check mark over the truck to complete the level.
Episode 34 – Oasis
Jill and Mike arrive at an oasis. There, the gardening couple must save a dying pond and restore a garden to its former glory! Later, the team discovers their final destination in Africa.
Objectives:
- Catch all animals (0/6)
- Fix the damaged pond
- Plant and water all plants (0/12)
- Bonus Goal: Each ring of the circular path must have a unique type of flower. All flowers within a ring must be the same.
![Gardens Inc 4 – Blooming Stars Episode 34]()
Gardens Inc 4 – Blooming Stars Episode 34
How to beat the level:
- Remove the tall grass and pick up the tool lying in front of the switchable shack.
- Clear the path to the tool shack.
- Rebuild the tool shack.
Tip: Use the “Half Price” bonus while doing this and the next task.
- Upgrade the truck.
- Change the resource output of the switchable shack to stone.
- Clear the path leading to the wood workbench.
- Rebuild the wood workbench.
Tip: As soon as this is built, start using it right away.
- Upgrade the truck again.
- Clear the path leading to the animal catcher shack.
Tip: Be careful of the snakes hiding in the tall grass!
- Rebuild the animal catcher shack.
- Upgrade the tool shack.
- Upgrade the truck again.
- Clear the path leading to the rock shack.
- Rebuild the rock shack.
- Change the resource output on the switchable shack to tools.
- Clear the path to the divers’ shack.
- Rebuild the divers’ shack.
- Upgrade the tool shack again.
- Upgrade the rock shack.
- Rebuild the water shack.
- Collect oxygen with the diver.
- Clear the path leading to the right.
- Collect the coin buoys.
- Upgrade the water shack.
- Repair the pumps near the water and on the right.
- Repair the pond as soon as you have enough resources.
- Upgrade the tool shack to the maximum level.
Tip: Continue using the wood workbenches to produce wood.
- Clear the path to the second exchange outpost.
- Rebuild the second exchange outpost.
Tip: As soon as it’s built, exchange tools and wood for seed.
- Open the golden chest.
Tip: The golden chest is hidden behind a cactus in the upper right corner.
- Plant flowers in the square flower beds first and water them.
Tip: Use the “Half Price” bonus while doing this.
- Plant all remaining flowers.
- Click on the check mark over the truck to complete the level.
Episode 35 – Party on the Nile
Coin Frenzy! The cast and crew take a day off from the show’s production. Jill and Mike decide to spend the day by the River Nile.
Objective:
- Collect as many coins as you can!
![Gardens Inc 4 – Blooming Stars Episode 35]()
Gardens Inc 4 – Blooming Stars Episode 35
How to beat the level:
- Collect as many coins as you can before time runs out.
- This level is optional. You do not have to complete it to progress.
- Free all the workers in order to reach the silver chest and obtain the highest score.
- The silver chest is located above the path on the lower left.
Tip: You will need 2 workers and 6 tools in order to remove the large stone blocking the bottom left path leading to the silver chest. In order to remove the small rubble in front of the chest, you will need 2 tools and 1 TNT each.
Episode 36 – Unexpected Destination
The crew followed the coordinates the network gave them, but ended up in a dead end. Jill and Mike decide to repair a damaged road, but their final destination is not what they expected!
Objectives:
- Remove all piles of rubble (0/4)
- Remove debris (0/2)
- Fix the big bridge
![Gardens Inc 4 – Blooming Stars Episode 36]()
Gardens Inc 4 – Blooming Stars Episode 36
How to beat the level:
- Use the universal workbench to produce tools.
Tip: Use the “Fast Work” bonus to produce twice as many.
- Upgrade the truck.
- Use the universal workbench to produce 1 wood, followed by tools.
- Clear the path leading to the wood workbench.
- Upgrade the truck again.
- Clear the path to the stairs and repair them.
- Rebuild the demolition shack.
Tip: Continue producing wood and tools at the wood and universal workbenches respectively.
- Clear the path leading to the wood workbench on the upper right.
- Collect TNT with the demolition worker.
- Repair the first set of stairs heading down and clear the path until you collect the stone.
- Remove the big rubble at the bottom of the screen with the demolition worker.
- Rebuild the animal catcher shack.
- Clear the path leading to the insect catcher shack.
- Rebuild the insect catcher shack.
- Repair the wood workbench.
Tip: Use it right away once repaired.
- Use the universal workbench to produce seeds.
- Repair the bridge leading across the stream at the bottom of the map. Continue clearing the path until you reach the TNT pit.
Tip: Now the demolition worker can gather from here.
- Upgrade the truck again.
- Open the golden chest.
Tip: The golden chest is hidden behind some shrubs at the bottom left of the screen, just under the TNT pit.
- Repair the stairs on the lower left leading back up to the road and clear the debris on the road.
- Repair the stairs on the upper left.
- Clear the path leading to the exchange outpost and seed workbench.
- Rebuild the exchange outpost.
- Rebuild the seed workbench.
- Exchange wood and seed resources until you have enough stone to build the bridge and TNT pit.
- Continue producing resources. You will need 30 wood, 30 tools, and 20 stone.
- Repair the big bridge on the left.
- Click on the check mark over the truck to complete the level.
Special 4 – The Desert Hotel
“Jill, Mike, I have another job for you! A nearby hotel construction site has requested your help in designing and building the hotel’s garden.”
Objectives:
- Fix the sprinklers (0/3)
- Plant and water all plants (0/8)
- Bonus Goal: Plant at least 4 types of plants in 3 different colors
![Gardens Inc 4 – Blooming Stars Special 4]()
Gardens Inc 4 – Blooming Stars Special 4
How to beat the level:
- Pick up the tools in the immediate area.
- Upgrade the truck.
- Clear the paths leading to the wood workbench and the stone workbench.
- Upgrade the truck again.
- Change the resource output of the switchable shack to stone.
- Use the wood workbench and stone workbench.
- Rebuild the rock shack.
- Upgrade the rock shack.
- Rebuild the exchange outpost.
Tip: Exchange stone for tools on a regular basis.
- Clear the path leading to the wood shack.
- Rebuild the wood shack.
- Upgrade the wood shack.
- Upgrade the truck again.
- Upgrade the wood shack to the maximum.
- Upgrade the rock shack to the maximum.
- Repair the path on the right while clearing the path on the left.
- Rebuild the demolition shack.
- Rebuild the water shack.
- Rebuild the second exchange outpost.
Tip: Exchange for seeds here on a regular basis.
- Collect from the TNT pit using the demolition worker.
- Remove all the rubble.
Tip: Once removed, you will need 44 seeds in total to plant all the flowers.
- Upgrade the water shack to the maximum level.
- Clear all remaining paths.
- Repair the sprinklers.
Tip: Use the “Half Price” bonus while doing this.
- Plant flowers in the square flower beds first, then call in the gardeners to water them.
- Collect the coins.
- Open the silver chest.
Tip: The silver chest is located on the right.
- Plant the remaining flowers.
- Click on the check mark over the truck to complete the level.
Chapter 5: North America
Episode 37 – Home Sweet Home
“Jill, Mike, welcome home. I’m so sorry about the cancellation of the show, but I’m glad you’re safe now. If you’d be up for it, I actually have a job for you! Your help is needed in rebuilding a local farm and its garden!”
Objectives:
- Fix the windmill
- Fix the waterwheel
- Plant and water all plants (0/6)
- Bonus Goal: Make sure the center of each group of planters is unique from the flowers around it and the centers of the other planter groups
![Gardens Inc 4 – Blooming Stars Episode 37]()
Gardens Inc 4 – Blooming Stars Episode 37
How to beat the level:
- Use the universal workbench 2 times to produce tools.
- Upgrade the truck.
- Pick up the tools and clear the path leading to the tool workbench.
- Use the universal workbench to produce 1 wood and 1 stone resource.
- Rebuild the switchable shack. Select animal catcher as your option.
- Rebuild the tool workbench.
Tip: Once repaired, use it right away.
- Upgrade the truck again.
- Use the universal workbench to produce 2 wood, 2 stone, followed by tools.
- Clear the path leading to the seed workbench.
- Rebuild the seed workbench.
Tip: Once repaired, use it right away.
- Upgrade the truck again.
Tip: Use all workbenches frequently.
- Clear the path leading to the altar.
- Rebuild the altar.
- Clear the path leading to the next 2 workbenches.
- Rebuild the second switchable shack. Select standard worker for now.
- Rebuild the stone and wood workbenches.
Tip: Once rebuilt, use them right away.
- Use the altar as needed for bonuses.
- Rebuild the expert animal catcher shack.
- Repair the two bridges.
- Clear all remaining paths.
- Plant seeds in the planters.
- Change all switchable worker shacks into gardeners.
Tip: Continue collecting and producing stone, wood, and tools resources.
- Rebuild the windmill and the water wheel.
Tip: Use the “Half Price” bonus while doing this.
- Click on the check mark over the truck to complete the level.
Episode 38 – Lady Haha
“I really wish the show hadn’t been cancelled before the big finale. We could’ve helped the children! Now, it’s back to business as usual – but our next client is an ex-pop star!”
Objectives:
- Fix all benches (0/8)
- Remove all ice cubes (0/4)
- Plant and water all plants (0/6)
- Bonus Goal: The flowers you plant on the lower level must be different from those you plant on the upper level (up the stairs)
![Gardens Inc 4 – Blooming Stars Episode 38]()
Gardens Inc 4 – Blooming Stars Episode 38
How to beat the level:
- Pick up the wood in front of the wood shack.
- Exchange the wood for tools at the exchange outpost.
- Upgrade the truck.
- Clear away the stone on the left, then open the crates and gather the resources inside.
Tip: Exchange these resources for tools at the exchange outpost.
- Clear the path leading to the bridge.
- Repair the bridge.
- Clear the path leading to the right and remove the stone blocking the path.
- Rebuild the supplier shack.
- Remove the large stone on the left.
Tip: Use the “Half Price” bonus when clearing this away.
- Upgrade the wood shack.
- Upgrade the truck.
- Pick up the watch.
- Clear the path leading to the second exchange outpost.
- Rebuild the second exchange outpost.
- Clear the path leading to the altar.
- Upgrade the truck.
Tip: Use the “Half Price” bonus while working on this and the next 2 tasks.
- Upgrade the wood shack.
- Remove the large stone blocking the path further down the path on the right.
- Rebuild the altar.
Tip: Use the altar to restore the “Half Price” and “Fast Work” bonuses.
- Rebuild the switchable workers’ shack.
Tip: Once rebuilt, select the default worker.
- Rebuild the third exchange outpost.
Tip: Use all outposts to exchange for resources on a regular basis.
- Clear the path on the right leading to the second watch.
- Pick up the second watch.
- Rebuild the second switchable workers’ shack.
Tip: Select the standard worker again.
- Rebuild the wood workbench.
Tip: Use this right away upon restoring it.
- Clear the paths leading to the flower beds.
- Plant the flowers.
Tip: Switch both switchable workers’ shacks from default workers to gardeners.
- Repair the pump located in the lower portion of the level.
- Collect all coins.
- Clear all remaining paths.
- Repair all the wooden benches.
- Click on the check mark over the truck to complete the level.
Episode 39 – Secret Plans
“Time for a short trip to Canada! A famous golfer has asked us to assist him in renovating his golfing garden! After that, we have an interesting meeting to attend to. I’m actually pretty excited!”
Objectives:
- Build all general shacks (0/2)
- Remove all piles of rubble (0/3)
- Plant all plants (0/6)
- Bonus Goal: The two small upper planters must have the same type of flower. The two small lower planters must also have the same type of flower. The two large planters must also share the same type of flower. Each of these sets cannot share between each other. Each set of two must be unique.
![Gardens Inc 4 – Blooming Stars Episode 39]()
Gardens Inc 4 – Blooming Stars Episode 39
How to beat the level:
- Pick up the tools in front of the switchable shack.
- Upgrade the truck.
- Clear the path leading to the general shack.
- Rebuild the general shack.
- Clear the path leading to the second general shack and switchable workers’ shack.
- Rebuild the switchable workers’ shack.
Tip: Select the animal catcher for your worker type.
- Rebuild the second switchable shack and select seeds as your resource output.
- Rebuild the second general shack.
- Rebuild the demolition shack.
- Switch the resource output of the second switchable shack to stone.
- Thaw the TNT and collect it with the demolition worker.
Tip: Once collected, have the demolition worker remove the small rubble toward the lower right.
- Change the resource outpost of the second switchable shack back to seeds.
Tip: Keep the resource output on seeds until you’ve collected 32 total. Once you’ve collected 32 seeds, switch the resource output to tools.
- Open the golden chest.
Tip: The golden chest is hidden behind a bush at the bottom of the level, below the first switchable shack.
- Rebuild the expert animal catcher shack near the top left of the level.
- Change the worker type on the switchable workers’ shack from animal catcher to standard worker.
- Upgrade the truck again.
- Rebuild all 3 hang glider shacks.
- Clear the paths leading to the watches on the two rightmost islands.
- Collect the 2 watches.
- Collect all balloons.
- Blast away the 2 big rubbles on the rightmost islands and clear the remainder of the paths.
- Plant all flowers.
- Click on the check mark over the truck to complete the level.
Episode 40 – Making Deals
“The Sunnydale Sports Centre is planning to open a new outdoor section, and your gardening expertise is required! You’ll be pleased to know I’ve also set up a meeting with Diane Powers – good luck!”
Objectives:
- Remove all obstacles from the water (0/13)
- Remove traps (0/6)
- Plant and water all plants (0/6)
- Bonus Goal: Collect every single item available and clear every single obstacle on the level
![Gardens Inc 4 – Blooming Stars Episode 40]()
Gardens Inc 4 – Blooming Stars Episode 40
How to beat the level:
- Use the universal workbench to acquire 2 tools.
- Upgrade the truck.
- Use the universal workbench to acquire 1 wood.
- Clear the path leading to the seed shack.
- Rebuild the seed shack.
- Clear the path leading to the left.
- Upgrade the seed shack.
Tip: Use the “Half Price” bonus while performing this and the following 2 tasks.
- Upgrade the truck again.
- Rebuild the exchange outpost.
- Use the universal workbench to acquire more wood.
- Exchange seeds for tools at the exchange outpost.
- Clear the path leading up to the wood workbench.
Tip: Once you reach the wood workbench, continue using it throughout the remainder of the level.
- Begin using the universal workbench to acquire tools.
- Rebuild the supplier shack. Select stone as the resource output.
- Repair the first set of bridges.
- Upgrade the truck again.
- Rebuild the divers’ shack.
Tip: Use the diver to collect oxygen.
- Clear the paths on the lower left and repair the last bridge.
- Rebuild the second exchange outpost.
Tip: Once rebuilt, use this right away.
- Rebuild the boat shack.
- Clear the branches from the water.
- Remove any oil spills, reeds, and buoys in the water using the diver.
Tip: Make sure the diver clears away everything!
- Plant flowers in the planters.
- Rebuild the water shack.
- Upgrade the water shack.
- Repair the pump next to the boat shack using the gardener.
- Upgrade the water shack.
- Upgrade the seed shack.
- Exchange wood for tools using the exchange outpost.
- Finish any remaining plant tasks with the gardener.
- Click on the check mark over the truck to complete the level.
Episode 41 – Park Security
Garden Defense! We’ve been asked by the Sunnydale City Council to help find a way to protect the Sunnydale Central Park’s gardens against vandals.
Objective:
![Gardens Inc 4 – Blooming Stars Episode 41]()
Gardens Inc 4 – Blooming Stars Episode 41
How to beat the level:
- Protect the garden and keep it intact until the timer runs out. The garden is considered lost once the vandals destroy all the flowers.
- This level is optional. You do not have to complete it to progress.
- Free all the workers in order to reach the silver chest and obtain the highest score.
- The silver chest is located on the upper left.
Tip: You will need to have at least 3 workers at your disposal in order to clear all the obstacles standing between you and the silver chest.
Episode 42 – Architects of Justice
The crew of the “Gardens Inc.” show is finally reunited! Jill and Mike have to renovate a garden belonging to an architect, and the plan to unmask the saboteur behind the show’s cancellation is put to action!
Objectives:
- Fix all walls (0/8)
- Fix the landing pad
- Plant all plants (0/14)
- Bonus Goal: Make sure all even-numbered sets of planters have the same type of flower as each other. Make sure all the odd-numbered sets of planters have the same type of flower as each other. The even and odd-numbered planters cannot share the same type of flower.
![Gardens Inc 4 – Blooming Stars Episode 42]()
Gardens Inc 4 – Blooming Stars Episode 42
How to beat the level:
- Pick up the tools in front of the tool shack.
- Rebuild the expert security shack on the left.
- Upgrade the truck.
- Pick up the tools near the truck.
- Clear the path leading to the exchange outpost.
Tip: Use the exchange outpost, exchanging time for 1 unit of wood.
- Clear the path leading to the tool workbench.
- Rebuild the tool workbench.
Tip: Use it right away upon reaching it.
- Clear the path leading to the general shack.
- Rebuild the general shack.
- Upgrade the truck again.
Tip: Once you’ve gained the extra worker, use this worker on the tool workbench and continue to gather as many tools resources as possible.
- Clear the paths leading to the seed shack and the landing pad.
- Rebuild the landing pad.
Tip: Have the helicopter retrieve wood resources.
- Rebuild the seed shack.
Tip: Upgrade the seed shack whenever you can once built.
- Upgrade the truck again.
- Clear the path leading to the switchable workers’ shack.
- Rebuild the switchable workers’ shack.
Tip: Once built, select the security worker.
- Clear the upper paths.
- Rebuild the expert security shack.
Tip: Once built, change the switchable workers’ shack worker from security worker to default worker.
- Switch between ordering wood resources and stone resources from the helicopter.
- Upgrade the tool shack.
- Upgrade the seed shack.
Tip: Once this is done being upgraded, have the helicopter deliver only stone resources.
- Rebuild the exchange outpost.
Tip: Use as needed to cushion your resources.
- Clear all remaining paths.
- Collect the coins.
- Open the golden chest.
Tip: The golden chest is located behind a bush in the upper left corner of the level.
- Plant all flowers in the planters.
- Repair all broken walls.
- Click on the check mark over the truck to complete the level.
Episode 43 – Bait and Switch
Jill and Mike are tasked with renovating an old park, which will feature new and exciting routes for cyclists! Later, preparations begin for the show’s big finale.
Objectives:
- Remove all obstacles from the water (0/9)
- Remove all piles of rubble (0/3)
- Fix the swimming pool
- Plant and water all plants (0/10)
- Bonus Goal: Make planter groups of 2 plants identical and planter groups of 3 plants unique
![Gardens Inc 4 – Blooming Stars Episode 43]()
Gardens Inc 4 – Blooming Stars Episode 43
How to beat the level:
- Pick up the wood and stone resources in the immediate area.
- Use the exchange outpost on the left to exchange wood and stone for tools.
Tip: Use the “Half Price” bonus while doing this.
- Upgrade the truck.
- Clear the path leading to the universal workbench.
Tip: Use the workbench to produce 2 stones, then seeds.
- Clear the paths leading to the demolition shack and the switchable workers’ shack.
- Rebuild the demolition shack.
- Rebuild the switchable workers’ shack.
Tip: Select default worker for now.
- Collect additional tools as needed for upgrades.
Tip: Use the “Half Price” bonus during the next wave of upgrades.
- Upgrade the truck again.
- Upgrade the wood shack.
- Upgrade the rock shack.
- Collect TNT using the demolition worker.
- Clear away the small rubble in front of the altar.
- Rebuild the altar.
Tip: Use the altar to acquire the “Half Price” bonus for use when using the exchange outpost. You do not need to wait and use the bonus on upgrades.
- Open the golden chest.
Tip: The golden chest is hidden behind a bush below the altar.
- Clear the path leading to the divers’ shack.
- Rebuild the divers’ shack.
Tip: Once rebuilt, have the diver start gathering oxygen right away.
- Clear the path leading to the boat shack.
- Rebuild the boat shack.
- Rebuild the exchange outpost.
Tip: Use as needed to cushion your resources.
- Clear the path leading to the seed workbench.
- Rebuild the seed workbench.
Tip: Once repaired, use the seed workbench right away. Continue using the universal workbench to produce wood and stone in alternating shifts.
- Remove the water garbage.
- Remove the oil spills and collect the coin buoys with the diver.
- Plant flowers in the square flower beds first.
- Rebuild the switchable workers’ shack on the right.
Tip: Select gardener as your worker type. Additionally, switch the first switchable workers’ shack worker type to gardener, too.
- Upgrade the truck again.
- Restore the swimming pool.
Tip: Use the “Half Price” bonus here.
- Plant all remaining flowers while the gardeners continue to water flowers in the square beds.
- Click on the check mark over the truck to complete the level.
Episode 44 – Anticipation
Coin Frenzy! It’s the day before the show’s season finale, and the crew have the day off. Jill and Mike are so close to winning the grand prize – ten million dollars for the children in need!
Objective:
- Collect as many coins as you can!
![Gardens Inc 4 – Blooming Stars Episode 44]()
Gardens Inc 4 – Blooming Stars Episode 44
How to beat the level:
- Collect as many coins as possible before time runs out.
- This level is optional. You do not have to complete it to progress.
- Free all the workers in order to reach the silver chest and acquire the highest score.
- The silver chest is located on the upper right, above the truck.
Tip: It’s necessary you rebuild the boat shack in order to reach the animal catcher. You will need 2 workers and 5 tools to clear the garbage pile blocking the path to the chest, and the animal catcher will need to remove 2 snakes.
Episode 45 – Season Finale
It’s time for Jill and Mike to face their final challenge – the Global Broadcasting Network’s garden! Will they win the grand prize of ten million dollars for the needy children? And will the saboteur be unmasked?
Objectives:
- Fix all broken fountains (0/3)
- Plant and water all plants (0/12)
- Remove debris (0/3)
- Fix the icy paths (0/8)
- Bonus Goal: Use every plant at your disposal!
![Gardens Inc 4 – Blooming Stars Episode 45]()
Gardens Inc 4 – Blooming Stars Episode 45
How to beat the level:
- Clear away the sand on the path blocking access to the tool shack.
- Collect tools from the tool shack.
- Upgrade the truck.
- Clear the path leading to the universal workbench.
- Clear the path leading to the switchable shack.
- Produce wood with the universal workbench.
- Open the crates near the tool shack and collect the resources inside.
- Rebuild the switchable shack.
Tip: Select tools as the resource output.
- Use the universal workbench to produce wood and stone alternatively.
- Clear the path leading to the switchable workers’ shack.
- Rebuild the switchable workers’ shack.
Tip: Once built, select animal catcher as your worker type.
- Upgrade the tool shack.
- Upgrade the truck again.
- Rebuild the switchable shack on the lower right.
Tip: Select stone as the resource output.
- Use the universal workbench to only produce wood resources at this point.
- Rebuild the altar.
Tip: Use this for bonuses as needed.
- Rebuild the exchange outpost.
- Clear the paths on the lower right.
- Rebuild the expert animal catcher shack.
- Continue clearing the paths.
Tip: Use the “Half Price” bonus to remove large obstructions from the road whenever encountered.
- Upgrade the truck again.
- Upgrade the tool shack again.
- Pick up the watch at the bottom of the map.
- Rebuild the expert security shack on the upper left.
- Clear the path leading to the supplier shack on the left.
- Rebuild the supplier shack.
Tip: Select seed as the resource output.
- Open the golden chest.
Tip: The golden chest is located on the left, below the supplier shack.
- Melt the icy path leading to the switchable workers’ shack.
- Rebuild the switchable workers’ shack.
Tip: Select the default worker as your worker type. Once all the wolves are gone, switch the worker type to gardener.
- Repair the pumps using the gardener.
- Plant the flowers in the flower beds.
Tip: While working on this, select gardener for your last remaining switchable workers’ shack.
- Rebuild the fountains.
Tip: Use the “Half Price” bonus while working on this task.
- Clear all remaining paths.
- Collect all coins.
- Plant all remaining flowers.
- Rebuild all fountains.
- Click on the check mark over the truck to complete the level.
Special 5 – Postscript
“Jill, Mike, I’ve got one more job for you! My family’s garden could do with a bit of a clean-up. Would you be willing to help?”
Objectives:
- Build expert security shacks (0/3)
- Plant and water all plants (0/15)
- Bonus Goal: Make sure each trio of planters has 2 of the same type of flower and 1 unique variety.
![Gardens Inc 4 – Blooming Stars Special 5]()
Gardens Inc 4 – Blooming Stars Special 5
How to beat the level:
- Clear the branches blocking the path on the right before moving on to clear to clear the stones on the left.
Tip: Use the “Time Halt” bonus as soon as you start doing this.
- Clear the path leading to the altar.
- Rebuild the altar.
Tip: Use the altar for the “Time Halt” bonus. You will need to use this as often as possible to complete this level.
- Clear the path leading down to the large stone blocking the road.
Tip: Use the “Half Price” bonus to remove the large stone.
- Upgrade the truck.
- Rebuild the landing pad.
Tip: Have the helicopter retrieve stone resources.
- Rebuild the expert security shack.
- Clear the path to the left of the truck leading to the second expert security shack.
- Rebuild the second expert security shack.
- Clear the paths leading to the exchange outpost and flower beds.
- Rebuild the switchable workers’ shack.
Tip: Select animal catcher as worker type.
- Rebuild the exchange outpost.
Tip: Begin exchanging resources for seeds here right away. Seeds are an essential part of this level for not only planting, but also buying yourself additional time.
- Rebuild the switchable workers’ shack toward the right.
Tip: Select gardener as your worker type.
- Plant flowers in the flower beds.
Tip: Use gardeners for this task from your switchable shack. Only change worker type to animal catcher when you need to remove a snake.
- Clear all remaining paths as you are able.
- Rebuild the second exchange outpost.
Tip: Use this often!
- Rebuild the general shack.
- Rebuild the expert security shack on the lower left.
- Continue exchanging resources and planting flowers.
Tip: Water flowers and clear any remaining paths as necessary. Don’t forget to use the “Time Halt” bonus, too.
- Select the helicopter and have it occasionally deliver tools.
- Repair the stairs on the lower right.
Tip: Afterward, clear the remaining path leading to the silver chest.
- Open the silver chest.
Tip: The silver chest is located on the lower right.
- Collect all coins.
- Click on the check mark over the truck to complete the level.
Congratulations! You’ve completed the Gardens Inc. 4 – Blooming Stars walkthrough! Be sure to check out our blog for more great tips and tricks!
The Gardens Inc. 4 – Blooming Stars walkthrough is meant as a guide and does not contain cheats, hacks, or serials.
The post Gardens Inc. 4 – Blooming Stars Walkthrough appeared first on GameHouse.